October 20, 2005 archives
you are here [x]: Scarlet Star Studios > the Scarlet Letters > October 20, 2005
<< before
October 19, 2005
after >>
October 21, 2005
October 20, 2005
sculpture experiments
by sven at 9:43 am
I want to sculpt. It's an idea that's been in my head for years. I've got a pretty clear idea about how I want to work -- but I'm still wrestling with how to get the media to do what I want. Here's what I know about the process I want to use:
- I want to start with a core of polystyrene foam. It's lightweight, inexpensive, and you can work very fast with it.
- On top of the polystyrene, I want to be able to smooth out the texture and create details by adding a thin layer (~1/4 inch) of clay, or something very much like clay.
- I want to finish the sculpture with some kind of paint or latex -- or I-don't-know-what -- that will create the impression of skin.
- I'm thinking about these layers basically as "skeleton", "musculature", and "skin" -- with one exception: rather than have the core be made out of stick-like bones, I want to rough out volumes.
In addition to this general vision of process, I have several criteria for what kinds of materials I don't want to be using. Here are some notes I wrote out for myself on Monday:
- no toxic fumes (e.g. resins)
- minimal dust
- no baking / firing / use of flame (e.g. sculpey, ceramics)
- carving doesn't require hammering with chisels, or a significant amount of grinding hard stuff away (e.g. wood)
- doesn't require making molds and casting
- not a battle with drips (e.g. plaster)
- not a race against time, drying-wise (e.g. foam latex)
- less that 24 hours drying time (if possible)
When you go through the list, I think you're pretty much left with clay and papier mache as the main options. [Although it's been disturbing to read about silicosis -- "a chronic and debilitating lung disease resulting from exposure to clay and silica dust (...) a known threat in the ceramic studio." (from The Spirit of Clay: A Classic Guide to Ceramics by Robert Piepenberg).]
...Things have been stuck at this point for a long time. New inspiration came while Gretchin and I were on the Portland Open Studios tour this weekend. Looking at the ceramic figures of Katy McFadden, I suddenly realized three things:
- I've been working too small. The scale appropriate for the level of detail I'm interested in is about two feet tall.
- I've been too focused on smooth -- rough surface textures may be more interesting.
- A body can be implied with very little. A cylinder plus a sphere equals a body. A sphere with two holes reads as a face.
...It sounds like I know exactly what I want -- but the devil's in the details. This week I've dedicated myself to trying to finally nail those details down. How? Experimentation! Here's a photo of what I've done so far:
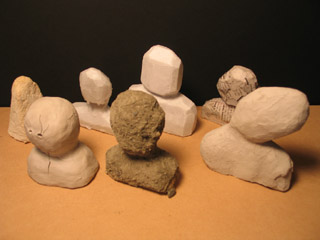
Back row, left to right:
- A snippet of polystyrene foam coated with celluclay. Clumpy and not fun to work with when wet. Took about three days to dry. Seems to be sandable, but with effort.
- A foam bust carved with the sort of flexible razor favored by folks who work with sculpey. I tried dripping parafin over it, using a brulee torch. The parafin is too watery for my tastes, and would have to go on in several layers to be of much use. Dipping might work better.
- A foam bust with a tissue paper veneer, papier mached on using Elmer's glue mixed with water. It provides a pretty fine surface, with only minor crinkling. I'll have to try painting a model like this -- when I tried painting tissue paper that wasn't bonded to something, it started to fall apart pretty quickly.
- A foam bust with newspaper papier mached on one side, craft paper on the other. This basically just confirmed what I already knew -- that both of these two papers are too stiff for fine detail.
Front row, left to right:
- Clay applied directly over a foam bust. Serious cracking.
- Foam bust papier mached with paper towel, then coated with Elmer's glue and dusted with concrete. This isn't the texture I've been imagining -- but it's a great discovery nonetheless. My one mistake here was that I didn't get all the concrete wet, so some areas remain dusty. A spray-bottle works well to make sure everything is moist, and a final coat of glue seems to do a good job of sealing while still keeping the overall look intact.
- Foam bust (more expressive pose) covered in a mix of clay and pulped toilet paper. This one is still drying, and seems to be cracking too -- though perhaps not as severely. I'd read that with paper clay you can apply wet to dry -- and that seems to be true. The texture is impacted by the pulp... I need to see if I can find a finer grained source of paper fiber.
The paper clay seems to be the most promising direction -- although the tissue paper and concrete options deserve further exploration, too.
...In addition to the sculpting experiments, I put in two hours last night experimenting with paints. I tried using sponge application for the first time -- which I'm totally sold on now. I also tried adding things directly into the paint in order to get more texture: concrete, celluclay, and dryer lint. Dryer lint was the most interesting, the most organic. Celluclay particles were a bit too regular for this purpose. Concrete looked best with its natural colors.
So, for the sake of getting my own head clear about this, here's what I've learned this week:
- Polystyrene foam can be cut with a razor rather than shredded with a serated knife, avoiding making that terrible static-clingy dust.
- Flat sheets of clay can be created by using a rolling pin and two rails, which determine its thickness.
- Adding paper fiber to clay helps prevent cracking.
- Paint can be sponged onto a surface, rather than brushed.
- I can use Elmer's glue plus concrete or dryer lint to create interesting textures.
And here are my next steps:
- Find an easier way to mix paper pulp into clay. (And a source for fine-grained fiber.)
- Go to an actual clay store to see what they carry.
- Actually try making a full-on sculpture!
- Figure out how to attach a foam-core sculpture to a base / armature.
- Try juxtaposing a clay-skinned sculpture with other elements. (In general, I like assemblages better than single-media sculptures.)
- Sketch out some sculptural ideas.
- Clean up the damned work area!
Ah -- lists, lists, lists...
posted by sven | permalink | categories: sculpture
hangable shelf
by sven at 9:06 am
Oh, yes, we enjoy the art on the Portland Open Studios tour. (But really it's the storage space ideas that we're after.)
Something we've been talking about for quite some time is the need for small shelves in the studio that we can display sculptures and knickknacks on. One of my personal hang-ups about this has been that I'm loath to commit to installing a shelf permanently in any one place. In a studio, you need to be able to move things around, rotate the art.
I didn't see anything on the tour that was what I wanted -- but the creative stimulation/fertilization did the trick nonetheless. I got it into my head that one could build a hangable shelf. Monday night I dove into the project... Three hours (plus drying time) later, this is what I got:
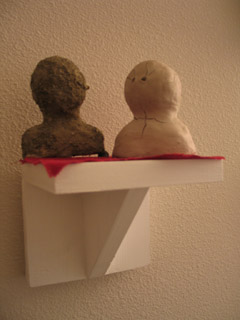
In the initial design I was connecting two eyebolts directly to the picture-hanging hooks on the wall. The problem there was that you have to get your hooks perfectly level with each other, or the shelf will tilt. So I added two more eyebolts and looped a bit of wire through them. Now the shelf hangs from the wire -- since it's a loop, there's a tiny bit of slack and you can adjust. Placing the hooks on the wall can also be done by eye-balling now, rather than having to measure. Here, take a look:
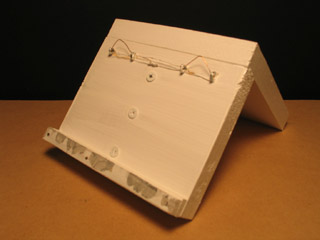
Since the shelf hangs out from the wall, I also needed to add a little lip on the back at the bottom to make it hang even with the wall. That's the other bit you're seeing here.
...Not bad! I didn't want to get too fancy on this first attempt -- but now that I've got proof-of-concept, I can see potentially making a longer shelf to keep around, too. Three feet wide, maybe?
posted by sven | permalink | categories: sculpture, studio space
learning about toxic fumes the hard way
by sven at 6:46 am
This has been a good week for exploring sculpture. But it has been a very bad week with regards to toxic fumes.
Being all inspired after the Portland Open Studios tour, Saturday night I went to the studio to experiment with some new techniques...
One idea was to bend a snippet of acrylic "glass" by heating it with a brulee torch. I figured this was likely to release fumes, so I did it outside, and tried to be careful not to breath anything in. The technique worked very well...
But 15 minutes later something odd happened. I had a shooting burning stitch in my armpit, almost as if a bee had stung me. I tried to disregard it at first, as one of those occasional mysterious body pains that can never be explained. But then I woke up in the middle of the night. I felt faint and a bit nauseous, and the stitch was back. For maybe half an hour it felt as if there was something seriously wrong with the artery -- touching or stretching it would cause shooting fiery pain. I was worried that this was a sign of a heart attack, or something similar, and enlisted Gretchin's help to look up the symptoms online. Fortunately, the symptoms didn't match up; and as they subsided, I decided to wait and watch for the time being.
Sunday afternoon the stitch showed up again, but less intensely. Now it seemed like it was perhaps a ligament, rather than an artery, that was the source of trouble. During the course of the day I noticed mild burning sensations slowly circulate through my body -- showing up in my right leg, then my right arm pit, and finally a little in my neck. My sense was that whatever toxins I'd breathed in were traveling outward from my heart, depositing in artery/ligament areas.
On the one hand, this was a big relief -- to now believe it wasn't my heart that was in trouble. On the other, it's pretty unnerving to think that these acrylic toxins are probably now deposited within me.
On Monday I may have felt a few very mild burning sensations -- but nothing since. Phew!
Ah, but the story doesn't end there... Monday night I built a shelf for displaying sculptures. I painted it with a glossy white latex house paint, outside and trying to be careful not to inhale the fumes. ...Nothing as serious as the acrylic incident happened -- but I did wake up in the middle of the night again, this time with the feeling that my skin was cold and slightly numb. Once again I had the feeling that I had chemicals inside my body.
To what extent was I really feeling these things -- versus imagining them, because I was worried and in a suggestive state? Hard to say. ...That's the thing about this body information: it's often indistinct -- and there's a considerable amount of self-doubt that goes along with trying to focus on it and identify its nature.
And so is that the end of the story? No! ...Last night (Wednesday) I was working in my studio room, trying out a bunch of ways of working with acrylic paints and gel medium. After two hours, I had a headache and was feeling sick. Again, the feeling of having chemicals inside my body.
It cleared up pretty easily... But I'm getting downright paranoid now about chemical fumes. Trying to be proactive, I purchased a book on Tuesday titled "The Artist's Complete Health and Safety Guide" and flipped though it. The emphasis, it appears, is on ventilation... Which, unfortunately, I think is going to be a fairly unwieldy problem in my art room.
...Looking back on 2005, this has been a pretty unhealthy year. I've been sick a lot more frequently than in past years -- and when I think about it, most of my colds followed on the heels of a big art project. To an extent, you can blame it on the stress -- I tend to be somewhat kamikaze. However, I'm increasingly convinced that one or two of those colds were the result of breathing in toxins -- wood dust from glue-based particle boards, in particular. This is, to say the least, a very disturbing revelation.
Not to mention ironic: I think probably most of the food we buy is organic. Granted, that has a lot to do with helping the environment, rather than health-minded reasons... Still, there's a comic contrast between what I seem to be willing to put into my mouth with a fork, versus what goes in via the studio.