sculpture
you are here [x]: Scarlet Star Studios > the Scarlet Letters > sculpture
July 4, 2011
clyde
by sven at 5:00 pm

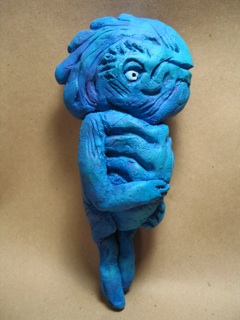
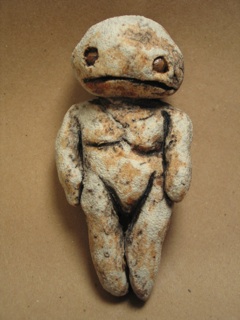
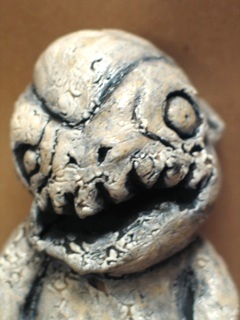
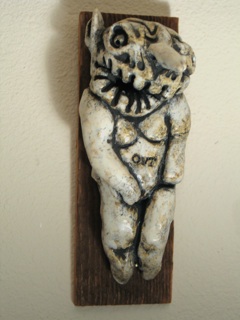
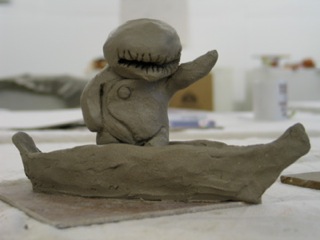
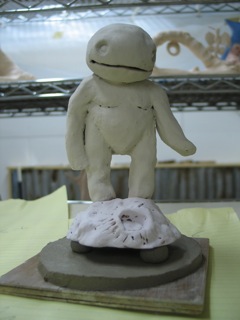
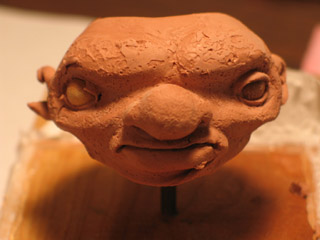
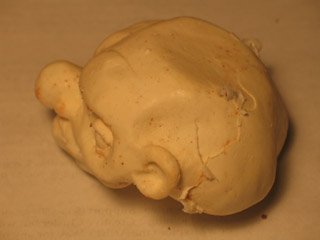
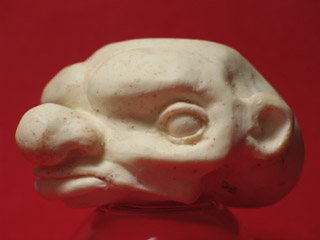
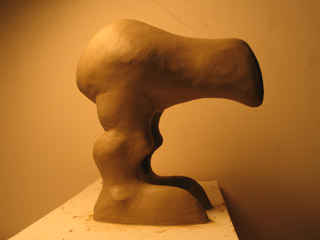
Happy birthday to my brother Shield! As a gift, I created this little goblin fairy, "Clyde."

If you scan back through my work, you'll see that I've been experimenting with wall sculptures for several years. And monsters… Since childhood. This feels like the next evolution for both. Very excited.
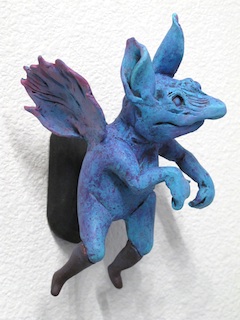
Clyde can be detached from the abstract painted backdrop panel. As an afterthought, I created an additional alternate wall mount, which focuses attention just on Clyde.
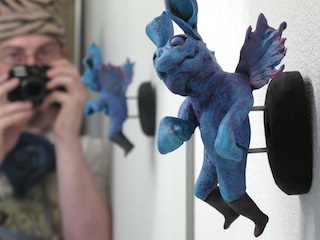
I think I kind of like the simple presentation better… But now Shield has both, and can pick whichever one works best for him.
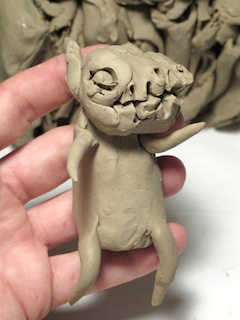
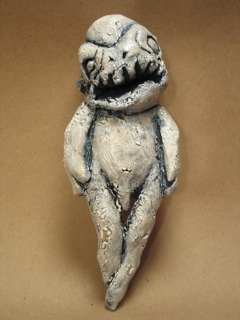
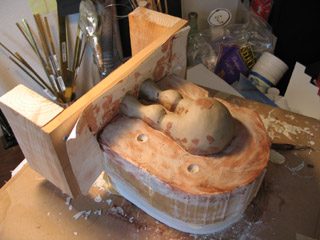
While figuring out what I wanted to do for this piece, I did some sketches in clay. I allow a lot of room for improvisation while sculpting — I thought you'd be interested to see how different the sketch is from the final.
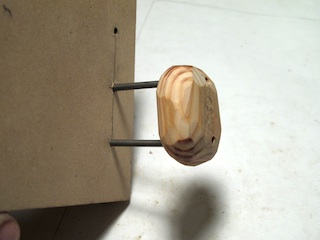
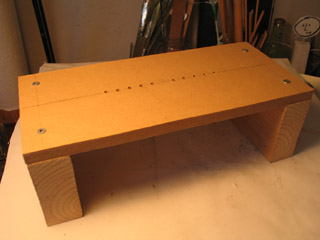
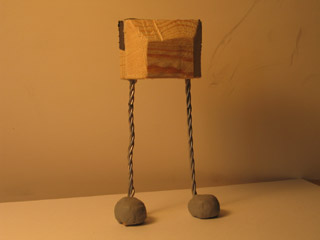
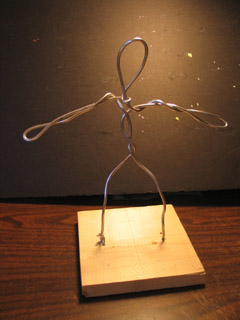
A big discovery on this piece: how to make a good core armature. I'm an armature guy — you'd think I'd already know what I'm doing. But armatures for stop-motion puppets and armatures for static sculptures are two very different things. Realizing that a simple block of wood on two steel posts makes a good core opens up whole worlds.
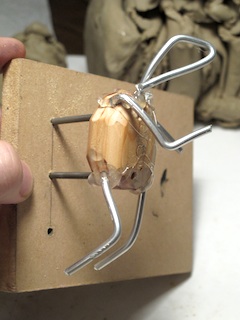
This armature isn't that great, actually. I was improvising, and didn't drill the holes for the rods perfectly straight. And I used hot glue rather than epoxy for attaching limbs. Still, the concept is there.
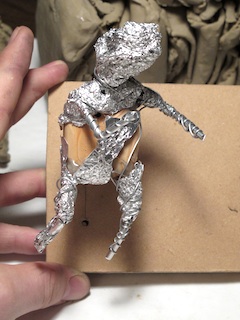
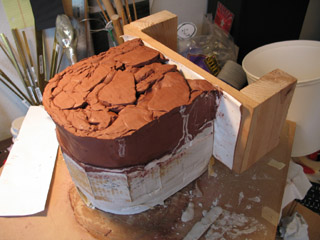
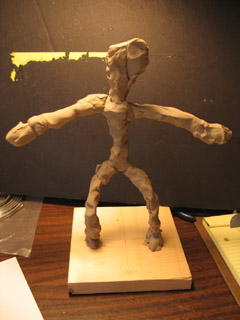
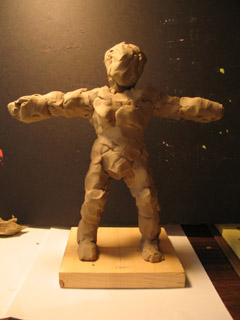
Super Sculpey (a polymer clay) needs to be fairly thin for baking. You bulk out the basic form using aluminum foil.
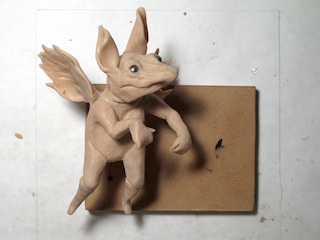
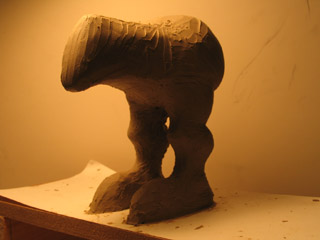
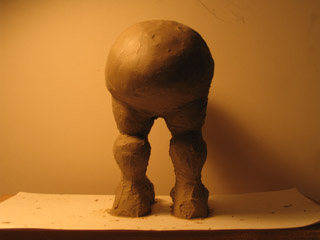
Here's the sculpture before baking or painting. After baking, I did a lot of work with sandpaper to smooth up the form.
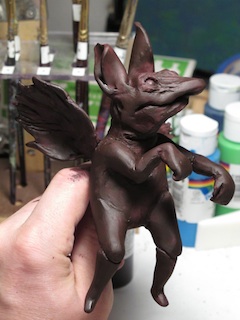
I wound up spending a fair amount of time painting texture, highlights, and subtly different colorings for different parts of the body. Basically, though, the paint job begins with a dark base color, then proceeds to dry-brushing on the blue. It's a good way to make sure that crevasses are dark — instead of trying to paint them in with a tiny brush.
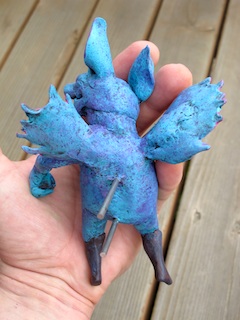
Here's what the back looks like with the two 1/8" dia. steel rods protruding.

I hope that Clyde enjoys his new life with Shield and his family.
And Shield: stock up on sugar cubes. I think this little guy has a high metabolism.
posted by sven | permalink | categories: painting, sculpture
May 25, 2009
new ceramic sculptures
by sven at 7:00 am
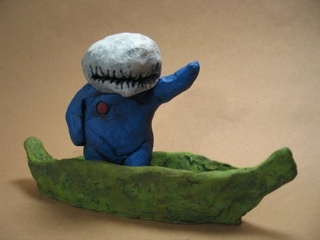
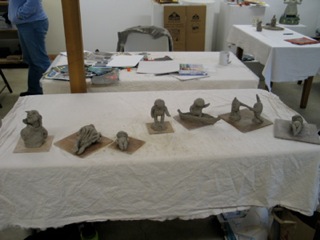
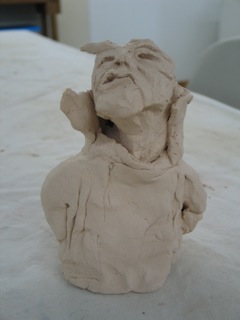
A while back I shared photos of some unfinished sculptures I'd made at Sara Swink's studio… Well, they're finally done! Some are painted, some are glazed. We'll start with the painted ones.
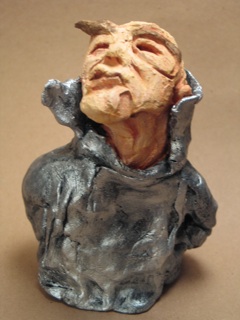
The mad scientist was the first piece I made at Sara's, and the first I tried painting with acrylics. It's based off of a photo of a man at a steel foundry, who was wearing a heavy silver suit to protect him from molten metal.
A lesson I learned here: clay loves watery washes of paint. Using the paint at full-strength kills detail and just looks wrong.
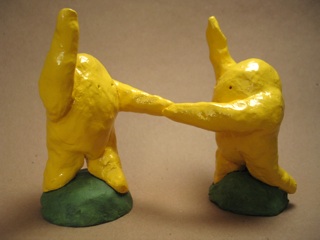
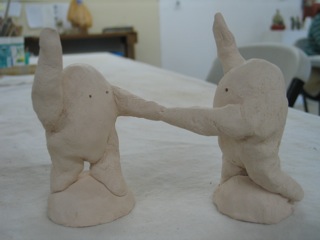
When I took Sara's class, this dancing duo seemed to be everyone's favorite. I mixed yellow with tar gel medium and glopped it on heavily to see if I could get some of the same textures as with the glazed pieces. …Nope.
Maybe encaustics could achieve the effect I was going for?
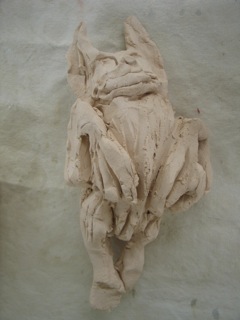
The whale critter was the last piece I made at Sara's. I was playing with wall-mountable characters… Unfortunately, it's weighted badly and doesn't hang right at all.
Next up, pieces that were glazed:
I really like the moon babi -- it feels like he has strong potential for being turned into a stopmo character.
The bat was the first piece I tried glazing, so I chose a simple black/brown. In general, I much prefer matte surface treatments to gloss. Too bad this turned out so shiny.
A little shout out to bat-fan Shu-Ju Wang… I can't look at this sculpture without thinking of you!

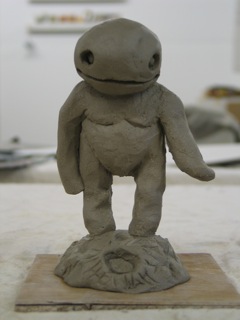
I'm really enamored with these three demon babis, which unexpectedly wound up being a set.
The little one feels fantastic in the hand. It sort of reminds me of the Venus of Willendorf.
In my mind, the series shows the evolution of a single being. The baby passes through this next phase on the way to its final form.
The glaze on the "molting" babi does this incredible crackle thang. I wish I knew how to simulate it using acrylics… I'm vaguely familiar with crackle paint -- but this stuff actually peels up into little platelets!

Whereas the baby has skin that feels like orange peel, and the adolescent is peeling, the adult demon's skin is creamy smooth. In all three cases, I painted on iron oxide, wiped it off, then put an essentially white glaze on top (3 varieties of white).

Exploring conceptart.org, it seems like a lot of sculptors fetishize wrinkles and skin textures… It's not hard to understand why. It's a lot of fun etching crevasses into clay!
Last night I created a wall mount for the adult demon… A perfectly rough and weathered scrap of wood with brass pins to hold the top-heavy beast in place.
I love the inherently gritty texture of clay, and the weight of it in my hand. It feels so real. Yet, even though clay is extremely cheap, the time spent waiting for it to get fired makes it more "expensive" than I initially figured. When I find the time, I'm planning on doing more experiments with home-bake polymer clay.
I really want to replicate the colors and textures of ceramic glazes, though. I've got some faux stone and "orange peel" spray cans to experiment with. I also need to explore a more neutral color palette. My natural tendency is toward vibrant colors… I think ceramics, as a species, gravitates toward earth tones.
posted by sven | permalink | categories: sculpture
February 11, 2009
learning ceramics with sara swink
by sven at 7:00 am

On Jan 17 & 18 I took a class from local ceramic sculptor Sara Swink titled "Two-Day Creative Process Workshop." Highly recommended!
Most of our time on the first day of the workshop was devoted to doing intuitive collages. Being familiar with the exercise, wherein you collect images without trying to figure out why they appeal to you, I decided to try a bold new experiment: collaging outward without boundaries.
I'm pleased with the end result... But not quite sure what to do with it now. Sara demonstrated cutting your collage into pieces and making a book with them. I can't quite bring myself to dismember the thing yet.
The point of collaging is to begin developing a "personal vocabulary" of images. On day two, we started with doodling exercises -- then moved into sculpting ideas from our collages in clay.
At first I was frustrated, because I didn't feel emotionally connected to what I was making. Two thoughts helped: (1) the idea that I could "doodle in clay" rather than trying to translate inherently 2D concepts to 3D; and (2) remembering that cel animators think about their characters in terms of underlying volumes, not just outlines.
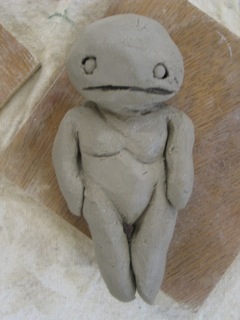
Here's the first character I made that I felt happy with. "Babi" (pronounced "baby") is a reference to a drawing I did way back in high school. I'm not sure how to explain what "babis" are... They're generally blobby child-proportioned critters that live in the realm of dreams and the subconscious, hopping from one person's mind to another without anyone being aware.
The "babi" series that's emerged is very pleasing -- I'd like to see these characters turned into stopmo puppets.
I was attracted to the "creative process" class for a number of reasons...
I've never done much with water-based clay, and wanted to add ceramics to my skill set. Learning about clay with a sculptor rather than a potter seemed like the way to go.
I'm looking at clay as the sculptor's pencil: the fastest, cheapest way to rough out 3D ideas. I want use this medium for stopmo character development. Drawn sketches are useful, but not as illuminating as maquettes; Super Sculpey maquettes are too expensive to make en masse.
Also, as an artist, I'm very interested in process. This class, with its focus on developing one's "personal vocabulary" of images particularly excited me, because I feel like my analytical tendencies sometimes undermine connection to the content I'm developing.
Since the weekend class, I've gone back to Sara's studio for two more work sessions. My original seven sculptures -- plus an additional one from the following weekend -- have now been bisque fired. (That's the initial firing you do to make the clay hard and strong... Glazes are added in a second pass.)
For the sake of getting the full ceramics experience, I'm going to go ahead and glaze most of the pieces. This bust I made, however, is going to be painted with acrylics. If I wind up bisque firing clay character sketches in the future, I imagine I'll opt to just paint them, rather than glazing.
The bust was the very first piece I made, and I don't like it much. My second piece was this bat, which I like a good deal more -- but it still didn't really feel like "me" when it came out. It's going to be a wall-hanging with a black-brown glaze.
(Every time I look at the bat, it makes me think of Shu-Ju Wang -- a local book arts friend who's very into our nocturnal, flying companions.)
Sara has ongoing drop-in classes on Saturdays, where you get individualized attention and can work at your own pace. For a while, it looked like I'd be going directly from my Saturday morning playwriting classes over to Sara's studio....
Unfortunately, I'm feeling very pinched for time now, so ceramics work is going to have to be sporadic for a while. Even so, I'm really glad that I grabbed the opportunity to take the process class when I had it. Very inspiring -- I strongly recommend taking it if you have the opportunity.
posted by sven | permalink | categories: classes & workshops, sculpture
July 6, 2007
"pajama dreamer" at 100th monkey studio
by sven at 9:15 pm

My 3D collage "pajama dreamer" is hanging in a gallery this month... It was selected for inclusion in the 100th Monkey Studio's "First Annual Men's Show."
The show opened tonight, and runs until July 31st. If you want to check it out, 100th Monkey is at 110 SE 16th Ave @ Ankeny.

Huge thanks to Gretchin, who suggested that I submit, and then managed communication with 100th Monkey for me. I am extremely grateful for this help! Consumed as I am with getting Let Sleeping Gods Lie done, I'd never have considered submitting to a show right now -- were it not for Gretchin's generous offer to take care of the details. Thank you!!
posted by sven | permalink | categories: exhibits & events, sculpture
January 15, 2007
casting a resin head
by sven at 8:00 am
Friday was a "stopmo play day"... I put the newly renovated studio to good use, exploring mold-making and casting.
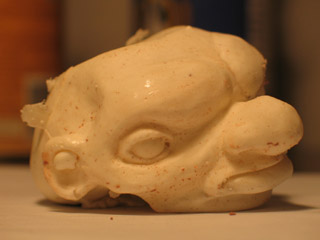
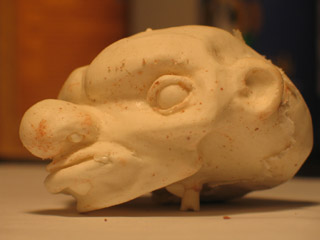
Back in early December, I had a spare hour or two after helping Gretchin with prep for one of her holiday sales. So I pulled out some "Chavant NSP - Medium, Brown" and sculpted this head.
I cleaned it up just a little bit on Friday, smoothing the surface with Brylcreem and a paint brush.
Here's some of what was going through my mind:
Just before Thanksgiving I had a little breakthrough, some insights about character design. Working in my sketchbook, I made rows of circles -- each one a blank face -- and then tried varying the facial features systematically.
Do I like big, medium, or small eyes the best? Do I like the eyes to be close to the nose, centered, or out toward the ears? Do I like the eyes to be high on the head, in the middle, or down around the jaw? ...Pages of variations like this gave me a much better sense of what sorts of characters I want to be creating.
This head was attempt to take some of those sketches into the third dimension.
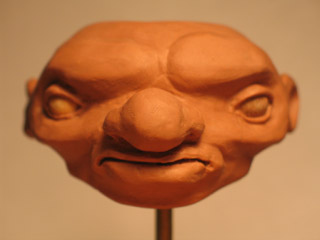
Also, during the past month or so, I've been putting some energy into studying anatomy. I learned a good deal when I was taking that sculpture class with Kim Graham last summer. I've now picked up some anatomy books, and have been making practice sketches of skulls and skeletons. I figure, the more anatomy you can put into a sculpt, the more realistic/plausible-looking your result will be.
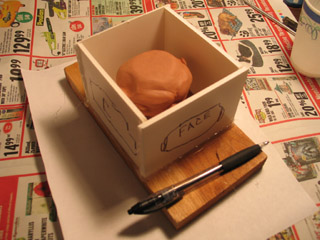
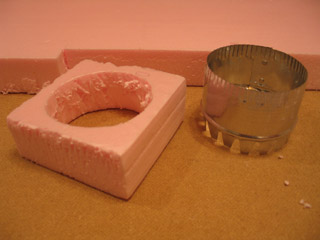
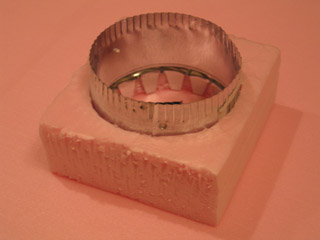
The head was sculpted without an armature. For the sake of making a mold, I put it on a piece of 3/16" brass rod, and fixed that into a piece of wood.
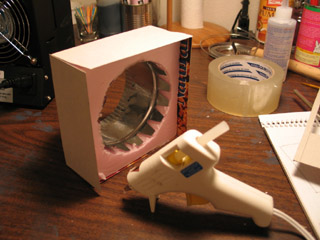
To make a mold box, I cut out pieces of foamcore and used hot glue to seal the edges together.
For this one-day project, I wanted to get my hands dirty -- and not get stuck over-thinking it. I knew at the outset that this might mean some significant screw-ups. But oftentimes getting a feel for mistakes gives you an even better grasp of how to do things right later on. So, I was prepared to see how things would go wrong.
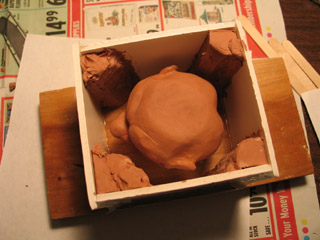
Case in point: When I opened up my container of silicone base, I didn't have as much left as I'd remembered. I hastily put some wedges of clay into the mold box to take up space -- just hoping that I'd have enough silicone for the mold then.
I'm using silicone from TAP Plastics. Why TAP? Because they have a storefront in town where I can browse, instead of having to buy online.
It took two batches of silicone to fill the box. The first was just silicone base plus the quick cure catalyst (6-8 hour demold time). I thought I'd try the trick where you make a hole in a paper cup and drizzle the silicone into your mold -- the idea being that the string of silicone will break up bubbles. The silicone was so viscous, though, it didn't really want to cooperate. It didn't really even want to fall out of the hole.
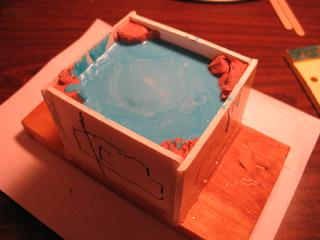
So, for my second batch, I mixed in 10% silicone thinner (which also functions as a filler). This poured a good deal more easily -- but at this point I forgot to try the hole-in-the-cup trick.
The silicone just barely managed to cover the head.
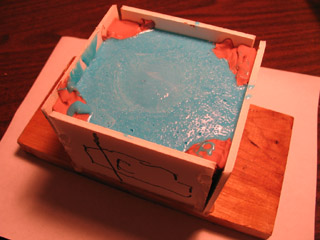
Silicone cures via a chemical reaction between the base and the catalyst. As such, it can be speeded up by adding heat. I've tried this with good results using DragonSkin. I decided to try it with the TAP silicone.
This one of those mistakes I alluded to earlier...
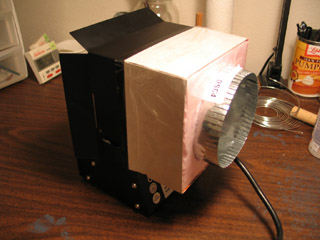
I put the mold in the oven on an old pizza pan. [We've dedicated the oven in the studio kitchen to chemical play.] The oven only goes as down to 170 degrees, so I had to prop open the door to take it lower. You can cure DragonSkin in 30 minutes at 150 degrees. I was indecisive and varied the temperature between 130 and 150 degrees during the baking period.
I left the mold in the oven for 2 hrs 15min -- and probably could have taken it out sooner. When I retrieved it, I discovered that the hot glue had melted and the mold walls had popped open. The clay space-fillers looked nearly liquified. ...And yet, the silicone mold itself seemed pretty OK.
[The top has a slight tackiness to it -- which I attribute to the silicone thinner. The sides are properly dry.]
When you make a puppet body out of DragonSkin silicone, you're baking the silicone inside of a plaster mold. Nothing's going to melt. ...So, while I proved to myself that I could successfully speed up the curing time of a silicone mold by adding heat, I also discovered that this is inappropriate when your original is made out of oil-based clay and your mold box is made of materials that melt at low temperatures.
Surprisingly, the silicone took a pretty good impression -- even with the clay liquifying. However, because the clay head got melty, it left a lot of residue on the interior of the mold. I cleaned it out with an old paint brush and isopropyl alcohol -- but I still couldn't get every fleck.
The original clay head was demolished because I put it into the oven. Next time, I think I'll put it in the refrigerator or freezer before pouring the silicone, and then just let the silicone cure at room temperature overnight.
OK, now that the mold is made, it's time to make a casting.
I used TAP Quik-Cast Polyurethane Casting Resin, and mixed in microspheres to make the casting more lightweight. The pour hole is where the brass rod used to be; I enlarged it into a funnel with an X-Acto blade.
In terms of gooeyness, silicone is like slightly liquified peanut butter. Simply dreadful. Resin, on the other hand, pours very easily. It went through the pour hole without incident.
However, I didn't bother to drill a hole in the mold for air to vent out of -- so I did have to awkardly tip the mold around a lot, trying to get bubbles to come out.
Despite all the mistakes I made, I got a surprisingly good casting out of this mold.
Because the silicone wasn't properly degassed, there were a lot of bubbles in the mold. The resin faithfully reproduced these bubbles in the casting.
When I cut open the cured silicone, I tried to use a jeweler's cut -- making a zig-zag cut with an X-Acto blade. I was a little disappointed with the results. I got quite a bit of flashing along the split-line -- particularly at the top, where the silicone was too thin.
The resin seems to have cleaned out the remnants of clay left inside the mold. So, I've got a half-decent mold to play around with some more now.
I'm thinking that I want to try a hollow casting. I've seen this done in puppet animation to get a very lightweight head.
I'm also considering adding a venting hole in the chin. When I'm pouring resin, the chin is the highest point inside of the mold, and a big air bubble gets trapped there.
I didn't realize it immediately, but the casting actually came out with a hollow chin. As everything cooled off, the chin kinda shrivelled up. Now it looks like the head doesn't have a jaw at all.
Oh well. Plenty learned.
posted by sven | permalink | categories: sculpture, stopmo
June 14, 2006
setting up a small machines shop
by sven at 1:00 am
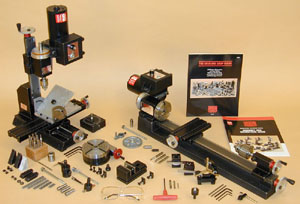
I'm actually doing it: I'm setting up a small machines shop!
I've just ordered three vital tools: a mill, a lathe, and a drill press.
In my initial research on milling machines it looked like I was going to go with a MicroLux. However, that machine's 110 pounds... I just can't accommodate it in my work space. And certainly not if I'm going to have other machines, too. What I need is a group of small machines.
For a long time I kept trying to find a way to avoid purchasing multiple machines. I've finally accepted that the mill, lathe, and drill press all have their own specialized functions. It's like a kitchen: an oven, a stove, and a kitchen mixer all serve different functions... You can get by without them -- but, oh!, the things you can cook up when you are fully equipped with proper tools!

What do these machines do?
A drill press drills perfectly vertical holes; it's quick and easy to plunge the drill bit into your work piece.
A mill allows you to shave metal off of a work piece that is held still. Although it looks a lot like a drill press, the mill is designed to take sideways stress that would break a drill press (and take out your eye in the process!). A mill is designed to do very, very precise work; it's not the best tool for just drilling a quick hole.
A lathe is like the opposite of a mill: instead of holding the work piece still and cutting it with a spinning tool, the work piece is what spins while the cutting device remains still.
...With luck, the machines that I've just purchased will be the only big purchases that I ever need to make for metalworking. And, if I understand the relative sizes of these machines, they should all fit on one table.
There's a lot of learning still to do, about how to properly use these devices -- but it seems to me that 90% of making metalworking projects is just having the appropriate tools available. And now, I'm going to have those tools.
Exciting! Intimidating! Liberating!
posted by sven | permalink | categories: sculpture, stopmo, studio space
June 5, 2006
making my first two-part mold
by sven at 7:54 pm
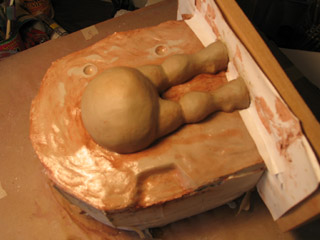
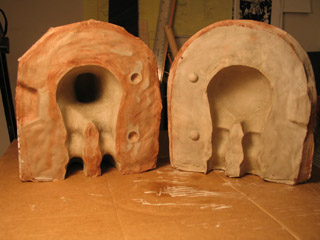
Thursday (June 2) I got back into the studio and made my first two-part mold.
The mold itself is made from ultracal 30 that I bought at Stephenson Pattern Supply. Ultracal is a gypsum product that's about halfway between plaster and concrete; it's designed to capture a lot of detail.
The red clay is "cherry creek red (no grog)" that I bought at Georgies. I needed a soft clay that wouldn't damage my sculpt; an employee recommended that I select any "low fire" clay without grog. I picked a red clay so there'd be good visual contrast with my sculpt while I was working.
This sculpt has a long nose and long feet. It really ought to get a three- or four-part mold. However, I opted to go for a two-part mold.
Why? I decided that I just couldn't leap from only ever having done one-piece molds to doing a complicated four-piece mold. The material I'm going to use for casting is flexible; I'm hoping that with a little effort I'll still be able to get it out of the two-piece. ...I decided that while this is most likely a mistake, it's a mistake that I need to make in order to understand the mold-making process better. I also decided that I've been being too precious with my sculpt; there will be more sculpts -- it's OK to screw this one up.
I think occasionally it's worthwhile to go ahead with a project even when you know at the outset that it's flawed. Mistakes are an important part of how we learn.
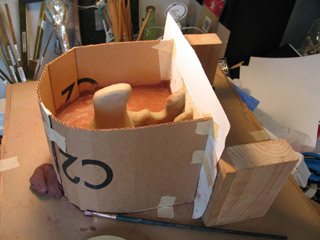
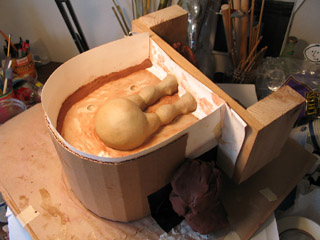
I made a cardboard wall to hold the liquid ultracal in place... I've watched Kathi Zung's video, and she doesn't do this. She slathers the material on by hand, then shapes it with a kidney-shaped pottery tool (sort of like frosting a cake).
It may well be that I wasn't mixing my ultracal thickly enough -- or maybe I should have waited for it to get stiffer before pouring... Nonetheless, the technique I used seems to have worked out alright.
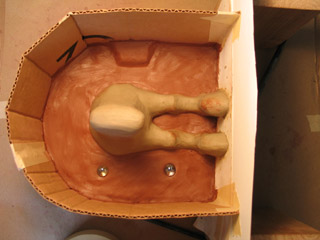
For making "keys" for the mold, I tried two different styles. On one side there's a sort of clay trapezoid with tapered edges. On the other side there are two marbles that I pressed into the clay. Initially, the marbles didn't want to separate from the ultracal 30. A gentle knock with a hammer did the trick, though. ...The two sides of the finished mold seem to fit together very well.
I extended the top of the mold using what was at hand: cardstock. It worked OK when the paper didn't have to hold back too much ultracal.
I figured out when I made my second wall that you really do need the cardboard for strength -- but if you line it with cardstock, then the resulting mold has smoother and nicer sides.
When I mixed the ultracal 30 with water, I did so in these big paper buckets that I found at Ace Hardware. They seem to be meant for house-painters... However, they very quickly became soggy. Near the end of the day, I was carrying one of these paper buckets, full with water, away from the sink -- and it started gushing water out the bottom onto the carpet!
Grrr.... No real harm done -- but on my next plaster-making run, I'll definitely be using plastic buckets instead.
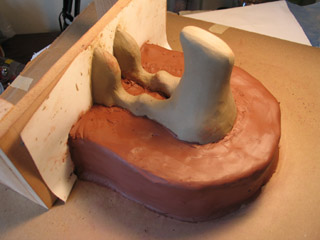
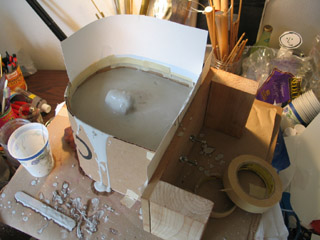
When the ultracal for the first side of the mold was hard, I removed the cardboard walls. Then, I flipped the whole thing over and stripped away the red clay. I had been worried that the clay would damage my sculpt... I was very pleased to discover that it really left no damage at all.
When I was flipping everything over so I could do the other side, I had an absentminded moment where I tried to pick up the work-piece by its wooden base. Oops! While it looks like everything is firmly attached to that piece of wood, really it's just the sculpt that's held in place with tie-downs. My flub created some tiny spaces beneath the feet of the sculpt that I had to fix -- otherwise, ultracal would have flowed into the feet-holes of the mold.
There were some minor smudges of red clay left on the sculpt. It was very easy to clean these off, just using a brush and water.
After I cleaned off all the red clay residue, I used a brush to apply vaseline to the ultracal. In retrospect, I think I probably should have applied vaseline to the sculpt as well. It was a nightmare picking plasticene out of the mold later.

Doing the second pour of ultracal is pretty similar, so I'm just going to let the pictures tell the story here...
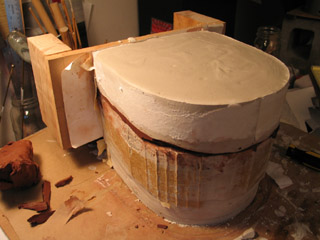
After giving the second side of the mold time to harden, I opened it up... The sculpt didn't survive at all. I had thought that plasticene -- an oil-based clay -- wouldn't stick to the ultracal. I was wrong.
Maybe I opened up the mold too soon. I know that you're supposed to let ultracal set for at least two hours -- and I only gave it one. When I opened it up, it was pretty warm inside... The plasticene had the consistency of peanut butter. Maybe if I hadn't been in such a hurry -- if I had let everything cool down -- maybe then the plasticene would have come out more easily.
Or maybe I just needed to apply a release to the sculpt itself. Vaseline would probably work. I've also heard that a clear acrylic spray can do the trick.
(Here you see those terrible buckets that I mentioned earlier.)
Even after I'd scraped all the plasticene out of the mold using my trusty loop tool, there was still an oily residue. To get this out, I needed a solvent. What I had at hand was turpenoid. Scrubbing turpenoid around with a brush, the residue came out quite easily (although scrubbing ultimately ruined the brush).
...I'm a bit worried, though. Turpenoid is a petroleum distillate. Will it leave any sort of oily residue? When you cast liquid latex in a plaster mold, it cures because the ammonia content is absorbed into the gypsum. Will a petroleum residue prevent the ultracal from absorbing the ammonia? Or will the turpenoid, since it's a solvent, evaporate from the mold -- leaving it OK for use with latex?
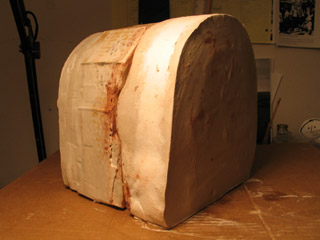
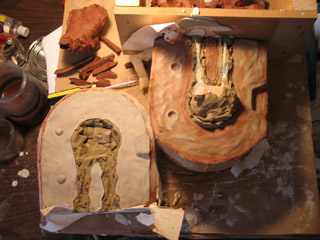
And here's the finished mold! I took me a bit over eight hours to make -- kinda a long time, but not over my patience threshold.
Boy is this thing massive, though! Lesson learned: Another advantage of doing a three- or four-part mold would be that you wouldn't need nearly as much ultracal.
THE SURPRISING EPILOGUE
The mold is done; I'm ready to make castings. However, just this morning I had surgery on my back to remove a lipoma (a large, non-cancerous fatty deposit). Consequently, I'm not supposed to lift anything as heavy as a gallon of milk for 4-6 weeks. How am I going to work with my monster-sized mold?
Gretchin has generously offered to help... Still, I'm having a moment of discouragement.
posted by sven | permalink | categories: sculpture, stopmo
May 24, 2006
if i buy a milling machine...
by sven at 8:00 am
I very much want to build metal-jointed armatures for my puppets. I've come up with a relatively simple brass design that can be made with handheld power tools. However, I'm interested in graduating up to making steel and/or aluminum armatures. Ones with joints that make sense for the anatomy: e.g. knees that only bend on one axis of rotation.
That probably means: buying a milling machine.

I've been doing a lot of research. At this point in time, I think that I would choose to buy a MicroLux Mini Milling Machine from Micro-Mark for $590 (that's including shipping). However, I haven't fully committed to buying any machine -- not just yet.
For my own sake, I need to summarize what I've learned so far...
1. CROSS SLIDING VISE?
A while back, I bought a drill press at Home Depot -- which I returned a few days later. ...Immediately after leaving that Home Depot, I stopped at a hardware store that I'd never been in before: The Tool Peddler (9907 SE 82nd Ave). Inside, I discovered this tool I'd never seen before: a cross sliding vise. The cross sliding vise looked very much like the X/Y table on a milling machine. It made me wonder: can you use a cross sliding vise to turn a drill press into a milling machine?
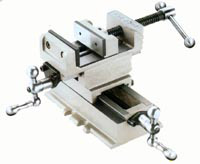
I posted my question on SMA. The answer I got back was that a drill press isn't really built to deal with the sideways stress. Mike said that the machine will vibrate and give you sloppy cuts. Nick said that he's tried using a drill press to mill aluminum (which is soft) and failed. Jon Frier warned me that he had tried milling with a drill press -- and has scars from the attempt!
I went back into the store to have a second look at the vise, and was told similar things by an employee: the cross sliding vise is really just for precision-positioning. You might be able to use it for milling wood -- but trying it on metal would be a Bad Idea.
2. PRICES
For making armatures, you don't need a full-sized milling machine. There are "micro" mills and "mini" mills -- and either of these sizes will suffice. In general, it seems that micros cost more than minis -- you're paying for miniaturization.
From what I've read, it looks like a good mini is going to cost at least $500, and a good micro is going to cost at least $650. The price range for minis I've looked at runs from $399 to $525. The micros fall into two groups: $240 to $260, and $650 to $995. All of these prices are without shipping. Also, these are prices for the machines only -- milling bits, clamps, or other accessories all have to be purchased separately.
Micro mills I've looked at:
- Procon = $240 ($375 with milling table?)
- Harbor Freight = $259.99
- Sherline = $650 / $775 / $995
- Taig = $680
Mini mills I've looked at:
- Cummins = $399
- Procon = $405
- Harbor Freight = $459.99
- Micro-Mark MicroLux = $524.95
- Grizzly = $525

The Harbor Freight micro milling machine seems to be the cheapest milling option available. Unlike the Procon (whose price is unclear), I can buy it locally and avoid shipping costs. However, it's remarkably heavy for a micro; its X/Y table is quite small; and it only has two speeds. The cheapest option is worth mentioning -- but I think I would have more confidence purchasing one of the fancier machines. We're going for precision metalworking here. (And "you get what you pay for.")
3. WEIGHT AND SIZE
For me, weight and size have probably been the most significant consideration after cost. My studio space is a spare bedroom. I don't have a proper metalworking shop -- and I don't have a lot of free space. This would seem to indicate that I should get a micro mill.
Comparing height, width, and depth is cumbersome (even for me!); a comparison of weight should give an adequate sense of how big these things are...
Micro mills I've looked at:
- Procon = 15Kg without table (33 lbs.)
- Harbor Freight = 103 lbs.
- Sherline = 33 lbs. / 36 lbs. / 38 lbs.
- Taig = 65 lbs.
Mini mills I've looked at:
- Cummins = over 150 lbs.
- Procon = 40Kg (88 lbs.)
- Harbor Freight = 150 lbs.
- Micro-Mark MicroLux = 110 lbs.
- Grizzly = 153 lbs.
If weight and size are the primary considerations, then Sherline is the clear winner. Reading through the setup instructions, I see that you do need to attach the Sherline mill to a board, to create stability -- but you don't need to (and shouldn't) secure it to a workbench. It appears that all other mills (including the Taig) need to be bolted to a heavy table.
4. STRENGTH
The strength (or "beefiness") of a mill seems to be a matter of two factors: (1) what kind of metals it's able to cut, and (2) how rigid the milling column is.
On two threads over at SMA, professional armature fabricator Lionel Ivan Orozco ("LIO") advises that the extra mass and power of a mini mill (vs. a micro) can be advantageous.
LIO uses a Grizzly mini mill (as well as a 400+ Lb. Enco!) -- however, he's quick to point out that with intelligent design, there's still a lot that one can do with a micro.
Tom Brierton, another professional armature fabricator, gets good results with a Sherline. In his book Stop-Motion Armature Machining: A Construction Manual, Tom says
"Sherline miniature mills and lathes can cut the following metals quite easily: all grades of aircraft aluminum, brass, and mild to semi-hardened steel, such as the 303 and 404 series steels. Anything beyond the hardness of 440 will require very specialized cutting tools and jobber drill bits, which are very expensive. It has been the experience of the author that rarely is there a need to go beyond the 440 hardness when building stop-motion puppet armatures, as these metals are quite sufficient for armature purposes." (p.21)
...So, it appears that the Sherline is limited in terms of what materials it can deal with -- although it's unlikely that you'll need metals that it can't cut -- not within the realm of stopmo. Still, it's worthwhile to realize that size does limit the versatility of the Sherline.
[As I'm reviewing this portion of Tom's book, I now see that he says "Sherline machines must be securely mounted on a table, preferably with screws and bolts." This seems to contradict what Sherline says on its website.]
With regards to rigidity, the difference between a Sherline and a Taig is visible in their photographs.

Look at the milling column of the Sherline...

Now look at the milling column of the Taig. You can see that it's much more solid. ...The Taig website boasts about their micro mill's strength:
"This is the machine you don't have to baby. The Micro Mill is a rugged precision instrument that has plenty of rigidity. Its machined, ground and stabilized steel bed has a life-time ball bearing spindle, coupled with a six speed positive vee belt drive. Spindle speeds in geometric progression from 525-5200 RPM (CR version 1000 - 10000 rpm) provide the power to "HOG" 1/8 inch cuts in mild steel or the speed and precision to "dust" a few tenths (compare that to other mills of similar size on the market, you can't!)."
It appears that if strength is the primary concern in choosing a mill, then the Taig wins out over the Sherline. However, a Taig pretty definitely has to be screwed down onto a workbench -- so at that point, you might as well go for a mini like the MicroLux.
5. MINIS VS. MICROS
There a few differences between the minis and the micros worth mentioning...
(1) The milling heads on the micros can turn 90 degrees in either direction; the milling heads on the minis can't turn -- but their milling columns can turn 45 degrees in either direction. It sounds like this is a point in favor of micros -- however, after asking folks on SMA and looking in Tom's book at how specific armature joints are made, I find that you probably want to avoid tilting the milling column entirely. It's unnecessary -- and "tramming" the column to make sure it's perfectly vertical sounds like a very tedious process.
(2) The minis can double as drill presses -- the micros can't. The minis all have a wheel on the side that allow you to easily plunge a drill bit into a work piece; the micros can only lower their drill bit slowly, using very small increments of movement. Getting two machines for the price of one -- both a milling machine and a drill press -- seems like a significant benefit to me. [Correction: It appears that the Procon and Harbor Freight micro mills can double as small drill presses.]
6. COMPARING THE MINI MILLS
An interesting fact about the minis is that at least five brands are all made at the same Chinese factory: Grizzly, Harbor Freight, Micro-Mark, Homier, and Cummins. LittleMachineShop.com has a very useful comparison chart for these five brands. [I have been unable to find any info for Homier Mobile Merchants' "Speedway" model, and have thus excluded it from consideration.] Procon appears similar to these brands, but seems to be produced in a different factory.
Now, on to comparing the various brands of mini mills with one another...
The Procon website is confusing -- and as I am looking at it today, the link to its page about mills seems to be broken. The Procon also appears to be a metric machine. I'm disqualifying it from my considerations.
The Cummins ($399) and Harbor Freight ($459.99) both seem to be somewhat less expensive because they have only two speeds. From what I read, being able to control the speed at which you mill each particular kind of metal is very important. Having only two speeds is a significant deficit. However: There are at least two Harbor Freight stores here in Multnomah county; all of the other brands seem to only be able via mail order. Thus, Harbor Freight gets some extra points... With their brand, I wouldn't have to pay shipping costs.
The Grizzly ($525) and the Micro-Mark MicroLux ($524.95) are essentially identical in price -- and even when shipping is considered, they only differ by $5. The Grizzly is heavier: 153 lbs. versus 110 lbs. The MicroLux's lighter weight should probably be considered as a point in its favor.
The tipping point in favor of the MicroLux may be that it has "true-inch" feed screws and dials. As the LittleMachineShop.com comparison chart explains,
"The MicroLux mini mill has one unique feature; the table feed dials both advance 0.050 inch per revolution. On all the other mini mills the dials advance 1/16 inch per revolution. The 0.050-inch per turn is easier to use than the 0.0625-inch per turn of the other mini mills. Micro-Mark will have you believe that the other mini mills have metric dials, but they do not."
I've looked at the Harbor Freights dials in person and can attest: .0625-inch per turn is really strange-looking and counter-intuitive. It's difficult to explain; suffice it to say that I walked away from the store not understanding how one would actually work that dial.
So, when it comes down to it, it looks like both the Grizzly and the Microlux are very good machines. LIO has a Grizzly. And, I feel it's worth mentioning, Kevin Kelly's "Cool Tools" website advocated for the Grizzly (though not in comparison to anything else). On the other hand, both Yuji and Eric Scott over on SMA have opted for the MicroLux, and seem very happy with the machine. ...For someone who's not a pro like LIO, it sounds like the "true-inch" dials make the MicroLux slightly easier to work with -- giving it a slight edge.
7. PICKING THE MACHINE FOR ME
It seems that my first choice for a milling machine would be the MicroLux ($524.95). It's strong: having both rigidity, and the power to cut different metals with ease. It's versatile: being able to serve both as a milling machine and a drill press. It's somewhat easier to use than other mini mills: having both a variable speed control, and "true-inch" dials. It's less expensive than the micro-mills. And at 110 pounds, it's not light -- but it's also not completely unmanageable.
The "big" problem with the MicroLux is that it commits me to also buying/making a sturdy workbench that it can be screwed onto. So, my second choice for a milling machine would have to be the Sherline Model 5400 Deluxe Mill ($775).
...The basic Sherline mill (Model 5000, $650) is a bit smaller than the Deluxe -- but also lacks the "laser engraved scales on the table and base" -- which seems a little unreasonable. Having an incremented ruler built into the X/Y table feels essential; the Model 5000 seems inadequate. The high-end Model 2000 ($995), on the other hand, seems like over-kill. The "Deluxe" seems to be Goldilock's "just right" compromise.
[Note: As I double-check info now, it appears that the Model 2000 may be the only Sherline with a milling head that can turn 90 degrees -- the others seem to be fixed in place.]
A Sherline is the most lightweight option. There is conflicting info, but it appears that one can merely attach it to a wooden tray -- which then allows one to put it away when it's not being used. It has variable speed -- whereas the Taig has only six speed settings, and the Procon and Harbor Freight micro mills only have two. Sherlines are the best documented of all mills (micros and minis) that I've seen, and there's a vibrant online community of users.
Really, I think the only sticking point that's really preventing me from buying a MicroLux right now is: "Where am I going to put it?" ...I'm having trouble imagining where I want to put a heavy workbench.
That makes me begin to wonder if the Sherline might be the better option after all. BUT... It's more expensive -- by $250 -- and I have to remember that there's bits, clamps, and accessories to buy, as well as the machine itself. And it's also helpful at this point to recall what Yuji said while discussing his purchase:
"I chose the mini mill and lathe because I wanted something beefier than the Sherline. I got to use Sherline equipment with Tom Brierton last year when he gave a workshop here in Los Angeles. I thought they were good little machines but there were too many little things I didn't like about them too. Now that I have been working on my Micro Mark machines for a few months, I am very happy. And the fact they are cheaper, well that's just icing on the cake."
Yuji's kind of vague -- but his comment does help me feel more confident about going for the MicroLux.
SO! I guess the question I'm left with is: what am I going to do for a workbench?
8. THE WINNERS
This post is long and rambling, so let me summarize in another way. In the "small affordable milling machines" competition, I'd like to announce awards in three categories:
- cheapest machine: the Harbor Freight micro mill ($259.99, if bought locally)
- strong and versatile: the Micro-Mark MicroLux mini mill ($589.95, shipping included)
- small and portable: Sherline Model 5400 Deluxe micro mill ($775, shipping not included)
...And the winner for best overall value: the Micro-Mark MicroLux mini mill ($589.95, shipping included)
posted by sven | permalink | categories: miscellany, sculpture, stopmo
May 23, 2006
the drill press mistake
by sven at 8:00 am
It seems like there's a progression of complexity for puppet armature designs:
- Mike Brent: aluminum armature wire, epoxy putty bones, nuts for tie-downs
- Nick Hilligoss: aluminum armature wire, wooden body block, T-style tie-downs
- Susannah Shaw: aluminum armature wire, K&S plug-in limbs
- Lionel Ivan Orozco ("LIO"): "open-hole double-ball" joints made from steel strips, bearings, and rods.
- Tom Brierton: multiple types of joints, milled from aircraft aluminum stock
I've gotten to the point where I can make a Susannah Shaw design pretty comfortably. For a while, I thought it was reasonable to just take the next step up -- getting only what I would need in order to make a LIO armature... That meant: a drill press, and some special-order metal stock.

About two months ago, I actually went ahead and bought a drill press. I was reading and re-reading LIO's tutorial on how to drill type 302 stainless steel balls. In the photos, he uses a 10" Ryobi drill press. I could see in Nick Hilligoss' tie-down tutorial video that he uses a Ryobi bandsaw. Ryobi seemed like a trustworthy brand. Affordable, too: the 10" drill press only costs $99 at Home Depot. After coveting it for weeks, I finally decided that my ultimate purchase was a foregone conclusion, and that I might as well quit putting it off.
However, I wound up taking the drill press back just a few days later -- never even having taken it out of the back of the Svan.
Reason #1
At the point of purchasing a drill press, you enter into the world of tabletop machines -- which take up quite a bit of space. If a milling machine were able to both mill and drill, then perhaps for the sake of space I ought to just save up and get the more versatile machine.
LIO ranted a little at me that a drill-press is an essential tool in any shop. That helped goad me into purchasing the drill press. He's an authority that I respect... But did I feel like I truly understood why I need both tools? No. So I decided I should take the drill press back. I can always re-purchase it later, if I finally understand why both are necessary.
Reason #2
I realized that I just didn't know enough about machining metal yet. I was depending entirely upon other people's tutorials and advice. When I'd ask a question on SMA, I could see my own ignorance reflected back in what I wrote, and it just seemed ridiculous.
My new resolve: I'm a smart boy -- I can own the knowledge of metalworking for myself -- no more dumb questions -- go forth and read up on the subject! So, I drove to Powell's Technical Books and purchased The Home Machinist's Handbook by Doug Briney and Tabletop Machining by Joe Martin (owner of Sherline).
Research research research....
posted by sven | permalink | categories: sculpture, stopmo
May 22, 2006
learning metalworking
by sven at 8:00 am
[Last week I wrote a comment over at Shelley Noble's "Notes from Halfland" blog that seemed worth re-posting here. I have thoughts about fleshing it out into an illustrated tutorial -- but best to share it as-is for now.]
Prior to February, I had never done any metal working. Period. In fact, I clearly remember the message I wrote to Mike saying how the thought of metalworking scared the bejeezus out of me. His encouraging words got me over the hump, to the point where I decided that I'm probably a smart-enough sort of person to be able to get the job done. [THANK YOU MIKE!!]
There were several distinct steps for me in learning what I know so far.
#1. Cutting a strip of aluminum. I started with a hacksaw and trying to hold the metal down by hand. Couldn't do it. I got a drillpress vise -- wrong kind of vise. I got a small clamp-to-the-table vise and wax for the hacksaw blade. That worked, but my cuts were sort of crooked. I tried using a dremel cut-off wheel, and suddenly cutting metal was like slicing butter.
#2. Drilling and tapping a brass strip. Drilling was pretty easy right off the bat. What I didn't realize at first was that normal drill bits work fine. If they're labeled HSS, that means "High Speed Steel", which can easily cut the softer metals (brass, aluminum, copper). HSS bits are probably what you have by default; you can get carbide bits at a hardware store, which are even more durable. ...Tapping just requires buying a little specialized tool so you can screw threads into a hole. I was so proud when I showed Gretchin a simple hole with a screw in it -- and I had made the threaded hole myself!
#3. Soldering. I needed to learn soldering so I could attach little brass nuts onto square K&S tubing, so I could make plug-in armatures like Susannah Shaw describes. (Neither super glue nor epoxy putty made adequate bonds.) My first frustration was learning that a zinc nut wasn't going to attach to the brass K&S -- it had to be brass-to-brass. I discovered that I had to sand the parts a little to make sure that they were clean. Then it took a little bit of fiddling to figure out where to press the soldering iron and how to hold the soldering wire effectively. ...But then, poof! I knew how to solder!
#4. Safe ventilation. Reading online, I found out that the fumes from soldering -- both from the lead and from the rosin core -- are hazardous. (My other main worry had been the fumes from epoxy glue.) My desk isn't in front of a window, so I needed a way to suck the fumes through dryer ducting that I bought at Home Depot. I tried an air brush spray booth -- it was way too big for my desk! I found some tiny desk fans made specifically for soldering and ordered one from Amazon.com. I figured out a way to modify it so it could vent through the ducting. The write-up on my solution is available over at Scarlet Letters.
#5. Using a torch. When it came time to attach balls onto rods, the soldering iron couldn't get the metals hot enough. I wound up using a butane micro-torch -- actually the kitchen brulee torch that I got two Christmases back! Flame scares me, and it took a little time even when I was in the kitchen to get comfortable with using something that's 1200 degrees hot. Using it for metal working, it wasn't bad at all -- as soon as I figured out that I ought to work on top of a cinder block, and that a small "helping hands" clamping device from Radio Shack was necessary to hold things for me while I heated them.
...And that's actually everything I know!! Each step was a big deal to me -- but once learned, it's just like adding a new media to the art pantry: pastels, acrylics, clay...
Oh -- one other step that was a meaningful hurdle: ordering materials online. It was really weird to be buying something that I'd never touched in person before. Buying "self-skinning flexible expanding urethane foam" from MonsterMakers was where I got over that. I'm going to need to order type 302 stainless steel balls from smallparts.com soon -- I wouldn't be able to if I hadn't already broken the online-buying barrier.
(Not a barrier, but another little bit of learning: Walking around the hardware store looking at nuts and bolts and screws long enough to know the difference between 4-40, 6-32, and 10-24; the difference between a socket cap screw and a machine screw; the difference between brass, zinc, and stainless steel screws... It's been really useful to be able to recognize these things by sight.)
posted by sven | permalink | categories: sculpture, stopmo
May 20, 2006
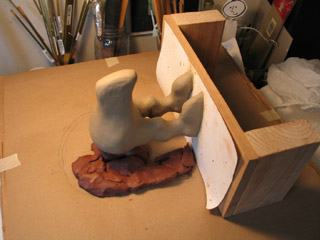
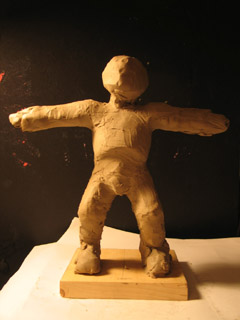
sculpting: a wingless bird creature
by sven at 12:00 pm
Two weeks ago I started doing a sculpt for a humanoid puppet. I was going to use this sculpt to make my first-ever two-piece mold... However, I've put that project on hold. The mold-making experiment could go horribly wrong -- it'd be foolish to put a huge investment of time into a sculpt that might just get wasted.
Instead of the humanoid, I've gone ahead and made a simpler beastie -- a sort of wingless bird-creature. I think I'm going to name it "buttons", after a raven-critter from Amy Winfrey's wonderful online cartoon series, Making Fiends. (A little homage, y'know?) ...Just one problem: I put too much effort into this sculpt to use it as a first test, either!
Oh well. I'm thinking now that I'll do something ridiculously simple for my two-piece mold test. Like, say, a severed arm. If that goes OK, then I'll go forward with casting "Buttons" in flexible expanding urethane foam.
New invention: A puppetmaking table. Puppets have tie-downs -- screws that come up from underneath the table, fitting into nuts in the feet. This little table has holes in it for tie-downs, so I can easily work with the puppet in a standing position -- but still be able to lift it up or rotate it when necessary. I made a whole series of holes, all 1/2" apart, so the table can accommodate puppets with different gaits.
I think I've come up with a pretty useful tool here... My only complaint: the table's just a little too wide. It's 12" across; 8" probably would have been plenty.
As I understand it, when you're making a puppet from casting materials, you usually create two armatures. A rough one that just holds the clay up while you sculpt. And the good armature, which goes inside the final puppet. I thought I'd be clever and make just one armature...
The one you see above has three twisted strands of 1/16" aluminum armature wire in each leg. The legs are glued into a block of pine with epoxy glue. The feet are metal nuts attached to the wires with plumber's epoxy putty. The nuts are set on top of thin pieces of wood (with holes, so the screws can pass through) -- just to make the soles a bit flatter.
It's a well-constructed armature. But it's not going to work for the final puppet. I can already tell that the leg wires aren't going to be nearly strong enough to pose the puppet's legs. The sculpt wound up being a lot beefier than I expected.
It took three hours to build the armature and puppetmaking table; it took another four to do the actual sculpt. Before adding plastilene, I covered the armature with plastic wrap so it would be protected.
I had a lot of fun... There's something really appealing about working with actual 3D volumes, rather than just 2D representations. I specifically wanted to share the photo above because I was really pleased with how the backs of the legs turned out. Neat shapes.
...And here's the finished sculpt! I used turpenoid with a brush to smooth it out. It's pretty close to what I had in mind. I think I'm beginning to get the knack for this "sculpting" business. ;-)
posted by sven | permalink | categories: sculpture, stopmo
May 12, 2006
kim graham sculpting class
by sven at 12:32 am

I just tonight discovered that Kim Graham is running a "Sculpting the Human Body" class Saturdays 10-2pm, June 3-24. In a heartbeat, I knew: I must be in that class!
Kim's studio is up in Georgetown, WA -- a three hour drive from where I live. But this is a person I'd eagerly travel great distances to learn from.
I met Kim last November at the art marketing workshop by Marty Rudolph. Kim's work is magnificent, gorgeous, astonishing. Her personality is electric.
I am so thrilled to have this opportunity!!
posted by sven | permalink | categories: classes & workshops, sculpture
May 3, 2006
new project: cold foam puppet
by sven at 10:21 pm
After what seems like forever, I finally got back into the studio tonight. I'm starting a new project: making a stopmo puppet with "flexible expanding urethane foam" (cold foam) and a latex skin.
The first step is to make a sculpt out of oil-based clay. Then I'll make a mold out of ultracal 30. Then I'll paint in liquid latex and let it dry. Then I'll put the puppet's armature into the mold, and fill it with the expanding foam.
In making the sculpt, you need an armature to help support the clay. This is NOT the same armature that will be inside the finished puppet. For supporting the sculpt, I used 1/8" thick aluminum armature wire. The base is a piece of wood that I've drilled several holes in, so I can weave the wire through.
I've been experimenting with different types of oil-based clay. From what I've read, the two most popular brands are Roma Plastilina Clay and Chavant Plastiline. Plastilina often has sulfur in it, which interacts badly with latex. Chavant produces an oil-clay called "NSP" (Non Sulphurated Plastine) that's safe; I don't think Roma has a similar product.
According to the Chavant website, there are only two distributors of NSP in Portland: Stephenson Pattern Supply and Lash Quality Molds. These aren't your typical art supply stores; you're only going to know that they exist if you're doing pretty specialized work...
Stephenson Pattern Supply is a wholesaler in the industrial district that has a sign saying they don't accept orders for less than $150 of materials... They mean to scare off browsers; I was fortunate, and they deigned to sell me four pounds of NSP and a bag of ultracal 30 -- despite what the sign said. They're the only place in Portland that sells ultracal 30. [Interesting note to those in the know: This must be where Ralph Cordero shops -- there was a Toxic Mom's Studio sculpture in the lobby!]
Lash Quality Molds is a one-woman operation in an unmarked building way out by the airport. You have to call for an appointment. The owner (whose name I forget at the moment) was a neat person; she gave myself and another fellow a tour of the premises. I saw silicone molds being assembled -- and a monumental sculpture in the back room that was being prepped for casting. The owner recommended that I try J-MAC Classic Clay. It's non-sulphur, and she says the "brown firm" outsells everything else she carries by 80%. Well... I had to give it a try!
Comparing the NSP to the J-MAC, the NSP is more oily. The J-MAC feels more like water-based clay. ...I think I like the J-MAC a lot!!
In all honesy, I've hardly worked with clay at all previously. This is very new to me -- but it's feeling really right.
I do know that I generally like to work reductively -- so I began the sculpt by building up way more clay than I'm going to need. I don't have a drawing that I'm working from; I'm improvising... Happily shaving the lumpy mass into smooth volumes with my one trusty loop tool. I find myself starting with the ribcage, and then everything else evolves from there. The front of the ribcage arcs around to the small of the back; the spine is S-shaped; there's a line that swoops around from the butt to the knee... And so on.
I'm charmed. It's like learning constellations: From the Big Dipper, you arc to Arcturus -- and from Arcturus, spy Spica. :-)
posted by sven | permalink | categories: sculpture, stopmo
April 18, 2006
buying a lab scale
by sven at 12:00 pm
It's taken me a long time to get to the point where I can begin experimenting with toxics like resin and urethane foam.
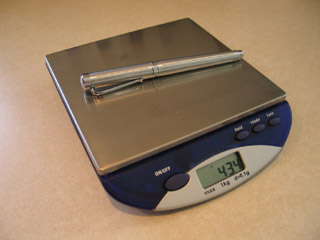
Part of what's held me up is that I've lacked a precision lab scale. I did a bunch of shopping around on Amazon.com and finally found one that is both inexpensive and meets an animator's needs. To all you stopmoes out there, I recommend the 1000 x .1g Precision Lab Table Scale from US Balance.
The standard scale that you'd use for weighing chemicals is the Ohaus 750-SO Triple Beam Scale. This is what I remember using in high school, and (I believe) what Kathi Zung uses in her "Do It Yourself! Foam Latex Puppetmaking 101" DVD. Amazon currently sells the triple beam for $99. I've seen it sold for $150 at other places -- Amazon is offering a good deal. ...But I really wanted a digital scale if at all possible.
So: how to decide what scale to buy? I think there are three factors to consider: How accurate is the scale? How much weight can it accommodate? And what is the cost?
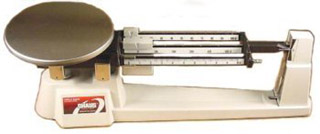
The standard triple beam model is accurate down to .1 grams -- so I decided that whatever digital scale I chose should also be able to measure in .1 gram increments. As for price range, I was hoping to find an option that was no more expensive than the triple beam's normal cost, $150. I decided that if all the digital scales were more expensive than that, then I'd sacrifice convenience and just buy the triple beam.
Fortunately, after a thorough search I found three decent candidates.

The Ohaus SP-401 Scout Pro Digital Scale costs $114.95 -- but can only accommodate 400 grams. One pound equals 453 grams; so the SP-401 can't even deal with four sticks of butter!

The HL2000 HI Digital Scale from A&D Engineering costs $130.23, and can accommodate 2000 grams (four pounds). A bit more expensive -- but much more useful, being able to deal with larger batches of chemicals.
The Precision Lab Table Scale from US Balance can deal with 1000 grams -- but only costs $40!! It's a reasonable compromise in terms of how much weight it can measure (2.2 pounds)... And for $40, I decided I could afford to make a mistake, if this turned out to be a bad purchase.
Luckily, it's turned out to be a very good purchase. So far -- (knock on wood) -- no complaints whatsoever!
posted by sven | permalink | categories: sculpture, stopmo
April 17, 2006
toxic cupcakes
by sven at 9:25 pm
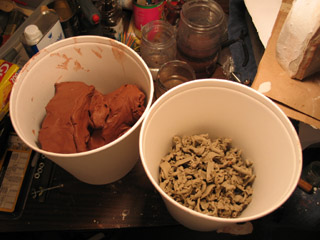
During the past two months I've purchased several new-to-me art materials: ultra-cal 30, RTV silicone, polyurethane casting resin, glass microspheres, and "self-skinning flexible expanding urethane foam". On Saturday I finally had the opportunity to play with all this stuff. Doing small experiments in paper drinking cups, I now have a bunch of odd castings that look like... toxic cupcakes.

What do I plan to do with all these materials? Well, they'll allow me to make molds and castings with a precision that I've never achieved before. So as an artist, I'm interested in them just for the sake of having more techniques at my disposal. However, there are two projects that they may apply to immediately:
Project #1: I want to try making a stopmo puppet with a body cast in foam. Foam latex is the standard for this application. However, foam latex has several problems: it involves 4 chemical components; it requires a dedicated kitchen mixer and oven; it is very vulnerable to temperature/humidity/barometric pressure; and it starts to rot after a few years. ...Contrast this with urethane foam: it only has two components, cures at room temperature, and doesn't rot. --Worth a shot, don'tcha think?
Project #2: I like puppets with heads that are very large in proportion to their bodies. How do I make heads that are light enough so that the puppet won't tip over? Mike Brent suggested that I should try casting my puppet heads in resin. You can get a filler material (such as glass micro-spheres) that will lighten the casting significantly... And as an additional benefit: If you're doing castings, when a puppet breaks you can just cast another!
These materials give off toxic fumes, so I have to work with them outside. However, this is Oregon... It was rainy and windy on Saturday -- so I wound up working on the front porch, manipulating the chemicals inside of cardboard boxes that served as wind-breaks. It worked adequately; but boy do I wish we had a covered driveway!
Please refer to the photo above...
FRONT LEFT: RESIN
The front two "cupcakes" are polyurethane resin. This resin has you mixing part A and part B in a 1:1 ratio by volume, but allows for 5-10% error. For the cupcake on the left, I measured out part A and part B by weight (oops) on my new lab scale. It cured in roughly 20 minutes... It looked sort of like liquid lard congealing, a white clot appearing in the clear fluid. I was disappointed to see tiny bubbles over much of the casting's surface.
FRONT RIGHT: RESIN WITH MICROSPHERES
For the resin cupcake on the right, I tried eyeballing the measurements, and added in the glass microspheres as filler. The bottom-most part of the casting didn't seem as if it was going to cure -- which I attribute to the poor measurements... But the next day, I was surprised to find that the remaining material did finally harden. Conclusion: I prefer not to eyeball measurements. ...The microspheres definitely lightened the material -- and they also smoothed out the surface a great deal. Yay microspheres!
Next steps for exploring resin: The bottles "glug" when I pour them -- I need to see if I can find some screw-on spigots for more precise pouring. I tried painting the resin with acrylic -- but even dry, it wiped off easily. I suspect that resin requires enamel based paints. However, I may be able to use an enamel-based spray primer, over which I could paint acrylics. That, I believe, is how wargamers paint their plastic and metal miniatures -- so I'll have to pick some up at Bridgetown Hobby. ...I'm also interested in trying out some black pigment that gets mixed directly into the resin.
BACK FAR-LEFT: URETHANE FOAM
In the back row on the left is my first experiment with the expanding urethane foam. I was really surprised to discover that it cures in only about six minutes. There were gooey uncured areas at the bottom of the cup, however; I don't know what to make of that. The material feels like a Nerf football -- only a bit stiffer.
BACK MIDDLE-LEFT: URETHANE FOAM ON ULTRA-CAL
The next cupcake is an experiment I did to see if the urethane would stick to ultra-cal 30. I knew that urethane foam has a reputation for adhering to anything -- but I hoped against hope that the self-skinning variety would be different. No luck. This was my first batch of ultra-cal... I eyeballed how much water to add, and it turned out fine. It took a good deal longer to set-up than I expected, though -- around half an hour.
I checked The Prop Builder's Molding & Casting Handbook to see what mold-release it recommended for making urethane foam casts in a plaster mold. It said that PVA (white glue?) could work, but is not recommended. Instead, urethane foam should be cast in silicone molds. This leads us to the pretty blue cupcake...
BACK MIDDLE-RIGHT: SILICONE MOLD, PAINTED FOAM CASTING
The blue cupcake is made of silicone. Silicone is the gooiest stuff I've ever encountered: like wet peanut butter mixed with caulking. I wanted to actually try making a mold with this stuff, so I dangled a wooden sphere from a wire into the paper cup, and then poured in the silicone around it. I was worried that the cold would interfere with curing -- but it seemed to be cured after only six hours, which was listed as the minimum set time. I cut open the silicone with a razor, and bundled it back together with a rubber band. I used the hole where the wire had been as a pour hole, and made an impromptu paper funnel to help channel in the urethane...
The casting was OK, but not great. Air got trapped in the mold, so my casting wasn't perfectly spherical. I guess I need a second hole, so air can escape. The expanding foam was under pressure inside the mold, so it wound up being a good deal denser than I'd like. The surface is relatively smooth, but has pitting that looks like the pores in the skin of your nose. That pretty much terminates my fantasy of doing urethane foam puppets without latex skins. Drat.
One nice thing I'll say about the urethane though: It's really easy to paint. The sphere looks like a cherry because I painted it with red acrylic. The paint doesn't rub or peel off; and it's so flexible, I question whether you'd even need PAX paint if you were doing an all-urethane puppet.
BACK FAR-RIGHT: LIQUID LATEX ON UNTRA-CAL
The cupcake on the far right is another ultra-cal test. I did a quick google on the material, and discovered that 38 parts water for every 100 parts ultra-cal is recommended. This batch seemed to have a little water left over; now that I think about it, I wonder if it's because I measured by weight instead of volume? ...Even so, it set up. I tried painting some liquid latex on top; latex (unlike the urethane) comes off easily.
Conclusion: It looks like my next puppet will be made from flexible urethane foam with a latex skin, all cast in an ultra-cal 30 mold. The foam seems to be fluffiest when it has ample room to escape -- so I'll need to make vent holes in the puppet's feet. I have some Pro Adhesive (a Prosaide knock-off) for making PAX paint...
So I guess at this point I have everything I need to get started!!
posted by sven | permalink | categories: sculpture, stopmo
April 6, 2006
building sets with insulation foam
by sven at 6:00 pm
Back on March 15 I made my first foray into set-building. (I've been meaning to write about this for a while!)

From what I've read online, it seems that one of the most versatile materials for making stopmo sets is insulation foam -- so I started there. I used 1" thick pink Dow insulation foam-board to create a 24"x15" stone wall.
I hacked into the foam with a steak knife to create an irregular surface. Then, I painted the entire thing with black (acrylic) gesso. On top of this basecoat I dry-brushed three layers of acrylic: burnt umber, a gray, and finally a very pale gray. I was originally trying to create the look of a cave wall. I don't think I got that. Maybe a cliff face, maybe granite that's been roughly mined...
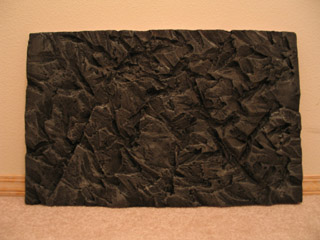
Even so -- for a first try, I'm very pleased with the results. Here's what I'll need to explore next...
- While the surface texture is good, it's still just a flat wall. I want much more depth in my sets -- hallways and landscapes, etc., where there can be a foreground, midground, and background. ...I always think of Peter Greenaway's cinematographer Sacha Vierny as someone I'd like to emulate in this regard.
- The lighting is flat and lifeless. I've ordered some par cans and gels, so I can start experimenting with more dynamic lighting set-ups. A cave environment, I think, needs some blues and reds.
- I'm increasingly curious to try a hot-wire foam cutter. There's a local hobby store that carries them -- but I'll want to do some further online research before I purchase.
posted by sven | permalink | categories: sculpture, stopmo
March 22, 2006
tutorial: desktop ventilation
by sven at 4:55 pm
Many of us who are working on stopmo puppets labor in dungeon-like basements. Although we know that we should have "good ventilation" while working with toxics, it just doesn't seem possible -- so we play dumb. This is not OK!
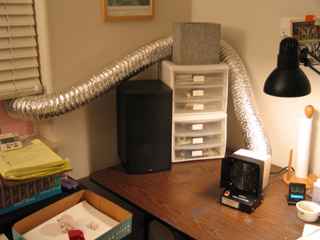
desktop ventilation system In this post I'll show you how to build your own desktop ventilation system. Please -- if you work with materials such as super glue, epoxy glue, epoxy putty, barge cement, turpenoid, acetone, or soldering wire while making your puppets -- strongly consider making a ventilation system siimilar to this one for yourself!
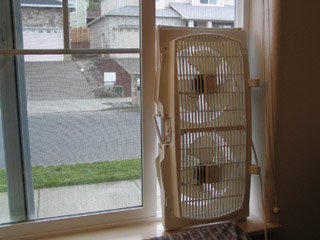
a temporary solution It takes a while to get new a ventilation system set up. In the meantime, at least put a fan in your window.
[Addendum: And be sure that the fan is sucking air out of the room, rather than blowing air in.]
When you're working on something toxic at a desk, you usually have your face right over the nasty stuff. Opening a window will help keep the fumes from building up in the room -- and using a fan to suck the fumes out will help even more. If you're just using a fan, though, you're still breathing in the fumes as they rise up from your work.
What you want is for the fumes to be actively sucked away from you, in a way where they don't go past your face as they escape.
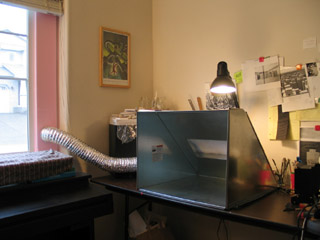
Paasche spray paint booth My first strategy for good ventilation was to purchase a Paasche hobby shop spray paint booth ($269 before shipping). But unfortunately... I HATED it!
The spraybooth takes up my entire desk. And although it's collapsable, it is not nearly as easy to set up as I had initially hoped.
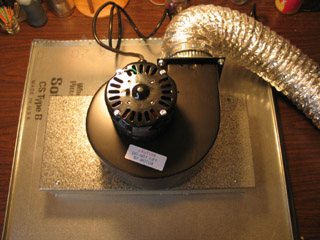
the huge motor Storing this thing is another problem. Look at how huge that motor is! ...Much discouraged, I wound up returning the spray booth to the store where I had purchased it.
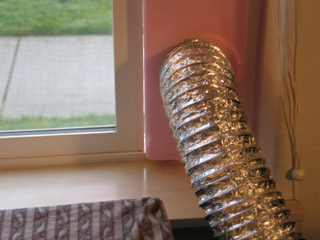
venting fumes outside One thing about the spraybooth solution that did work well was the way that I vented it out the window. The insulation foam doesn't have to live there forever; I just pop it out of the window between work sessions. [In this picture it looks like there's a crack of light between the foam and the sliding window -- but I realized later on that the foam could fit even more snugly if I just pushed it into the window frame a little farther.]
...After finally admitting to myself that the spraybooth wasn't going to work out, I resumed research. Luckily, right around this time I was exploring soldering. I stumbled upon this useful quote on the Art Glass Association's website:
"Most fluxes contain zinc chloride that is harmful to the skin and eyes, and toxic if ingested. Read the labels on all chemicals you use for safety precautions. Flux also produces fumes when it is heated (as in soldering) and you need to work in a well-ventilated area.
Well-ventilated means MOVE THE AIR - DON'T JUST OPEN A WINDOW. There are small, portable fume removers made specifically for eliminating flux fumes, available through your local stained glass retailer. If you find that you are getting frequent headaches or sinus problems, you may be breathing fumes. One rule of thumb - if you can smell what you're working on, you probably need to move the air a bit more, or invest in a fume remover."

the Edsyn "Fuminator" 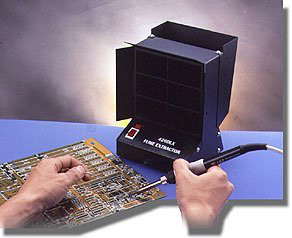
the Xytronic 426DLX This site on soldering safety recommended the Edsyn Fuminator for soldering fume extraction. That was the most explicit product recommendation I could find. Hunting around on Amazon.com and elsewhere, I found that the Fuminator's main competition seems to be the Xytronic 426DLX fume extractor. ...So the problem became how to choose between the two.
What's important here? First of all, we need something small that won't take up a lot of desk space. Folks doing soldering (unlike folks doing airbrushing) have this same need -- which is why fume extractors are also a good option for puppet-makers. Second, we need something that has powerful sucking capabilities.
Airflow is measured in CFM (Cubic Feet of air per Minute). According to this Fuminator product info sheet, "the maximum air flow with both filters installed is 21 cfm." According to this Xytronic product info sheet, the 426DLX's "max. air volume" is "95/115 CFM". So, although the Fuminator has a sexier design and is more expensive ($79.95 at Amazon.com), it appears that the Xytronic 426DLX is really the better purchase for our purposes.
[This write-up on the Paasch spray booth says that it "provides approximately 80 to 100 LFM air movement." That's Linear Feet of air per Minute... These companies certainly don't make comparison-shopping easy!]
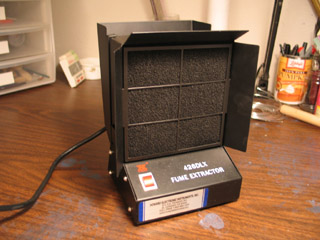
Xytronic 426DLX - front At present, the Xytronic is being sold for $59.95 at Amazon.com. With shipping and handling, it cost about $64, and took about a week to arrive.
One thing that I did not 100% understand when I ordered the Xytronic is that tabletop fume extractors aren't intended to be attached to a hose for venting. The fan sucks air through a carbon filter, and simply vents out the back. This raises a question: Would it make more sense just to buy a simple fan? I don't think so. What we need is a very small, very powerful fan -- which is what the fume extractors have. It's hard to find plain fan with these qualities.
...And, even though the fume extractors weren't built to attach to ducting, I feel it's easier to attach ducting to these than it would be to a fan. So I'm sticking with the Xytronic.
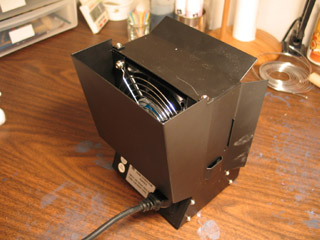
Xytronic 426DLX - back As you can see here, the Xytronic has a plate on its back that directs air upward and out of a slot on top of the device.
removing the back Removing the back plate was a simple matter of taking out a few screws. In order to maximize air flow, I also chose to remove the filter. The filter is supposed to be replaced every month, so the device is built to make removal of this part easy.
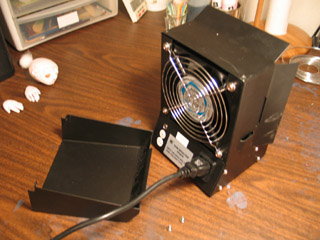
cutting the insulation foam What we need now is an adaptor, so we can attach ducting. I started by measuring the back of the Xytronic, and then cutting out a square of insulation foam that matched its dimensions.
inserting duct adaptor If you go to Home Depot and look in the aisle where they carry air ducting supplies, you should be able to find an adaptor that looks like the one above. Trace the adaptor's outline onto the foam, and then cut this circle out with a steak knife. Trim as needed so you can fit the adaptor snugly into the hole.
attaching cardboard This next step is mostly just to disguise the ugly pink foam. I measured the sides of the foam square, and cut out rectangles of cereal box cardboard to cover them. The cardboard is wider than the foam on three of the sides so we can easily fit it around the Xytronic.
assembly Press the pink foam square against the back of the Xytronic. The cardboard lips should wrap around the top and sides of the device. Now attach this adaptor that you've made onto the fan using clear packing tape. Seal up any cracks you notice where fumes might escape.
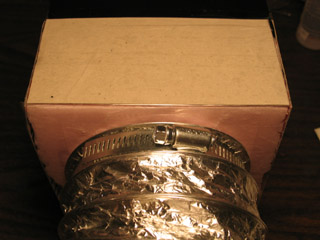
duct and hose clamp The ducting is the same kind that comes out the back of a clothes dryer. Attach it to the tin ducting adaptor using a hose clamp. The foam that sits in the window frame also has a tin adaptor in it, and the ducting is attached with a hose clamp there, too.
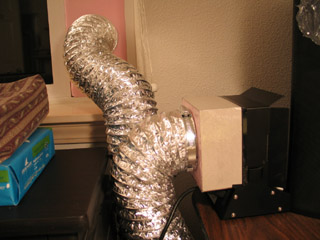
completed ventilation system tucked away Here's the completed desktop ventilation system, tucked away at the side of my desk. The ducting is still a bit awkward -- but it's a far better solution than the spraybooth.
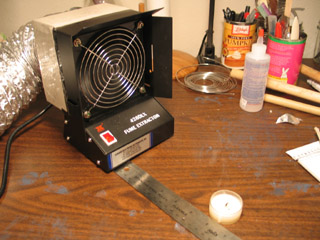
smoke test But wait! There's one more thing that you need to do. You need to understand the range at which the ventilation system is effective.
Turn on the Xytronic. Light a candle, and then blow it out. If everything is working properly, the smoke will be sucked into the ventilation system. OK -- now lay down a ruler. How far away can you pull the candle before the smoke just wafts up into the room?
I found that the suction is only effective when the candle is within 6 inches of the fan. That's not really very far -- but remember, this system is designed to deal with small jobs, like when you're using epoxy glue or soldering. Be mindful of the range when you work -- and even when the Xytronic is turned on, be sure to wear a respirator rated for organic solvents for additional protection.
Good luck, and play safe!
posted by sven | permalink | categories: sculpture, stopmo
January 30, 2006
sculpting: new test snippets
by sven at 12:30 am
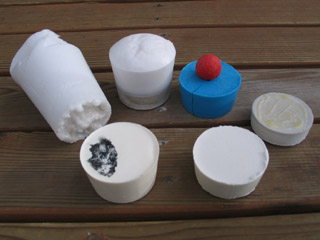
I've done a bunch of little test snippets with different sculpting materials this past week. Lots of things to show you!
papier mache mash The papier mache mash I wrote about on Jan. 23 has finally dried. I think it took about five (maybe six) days. The stuff that I baked turned dark and tough; it reminds me of a chew toy you'd give to a pet dog... I'll never try that again. The unbaked stuff turned a pale gray; it has potential. I'm thinking about how I could use it for stopmo animation sets.
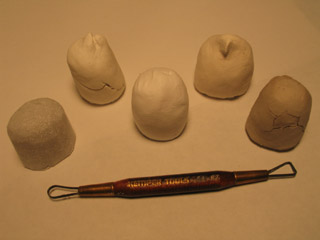
insulation foam; "Sculpt It!"; Foam Putty; Creative Paperclay; clay and wood flour mix Here are several test "fingers" I made using different materials. From left to right:
- insulation foam
This is a bit of carved insulation foam without anything on it. The rest of the tests involve spreading different substances on top of one of these. - "Sculpt It!"
This feels like a high-grade Play-Doh; sort of soapy, very slightly springy. When I try to put it through the pasta machine, it becomes flakey. Loop tools work poorly. It smooths easily with fingers. It starts feeling dry to the touch after 10-15 minutes, but remains workable longer. It shrinks while drying; since it was applied over a foam core, this made it crack. - Foam Putty
I found this at a model train store. It has a very fine powdery grain, like spackle. It has the consistency of very light frosting. It can be spread, but is impossible to sculpt; it's only good for filling in cracks in pieces of foam, I think. It didn't crack while drying. - Creative Paperclay
The fiber content is very fine. Smoothing with fingers works OK; water helps. Loop tools work pretty well, but leave a rough grain that needs smoothing; sometimes using the loop tool leads to crumbling. Doesn't go through the pasta maker well. Doesn't adhere to the foam core easily. Cracked while drying. - air-drying clay mixed with wood flour
Wood flour is sawdust that's been ground into a fine powder. Here I was trying to reproduce the Noah's Doll technique. It was difficult to mix the clay and wood flour -- very crumbly. When I added water, it became very messy. I think perhaps I'm missing an ingredient: maybe wheat paste. Once I got this stuff mixed, it was indistinguishable from regular clay. Cracked while drying
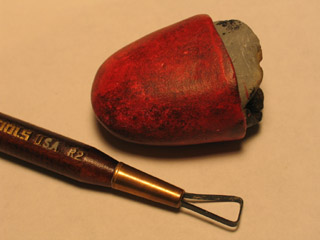
Super Sculpey on top of epoxy putty (painted) I wasn't very happy with any of the preceding materials. Then I had an epiphany... Try sculpting in three layers: a core of foam, covered with a hard shell of epoxy putty, and a "beauty layer" of Super Sculpey on the outermost surface. I tried it -- and was thrilled! This is technique I've been searching for, like, forever. Now it's just a matter of refining it.
I particularly need this technique for making stopmo puppets... Last weekend I was brainstorming, doing sketches of characters that I could turn into new puppets. In the process, I discovered that most of my characters have over-sized heads. This is a big problem for two reasons. One: the weight of these heads -- if they're solid -- is going to bend my puppets in half; they won't be able to stand up. And two: Super Sculpey doesn't bake well if it's more than about half an inch thick -- solid heads would either crack, or not cure at all. Solution: make hollow heads!
[Added benefit: Super Sculpey for the top layer can be put through the pasta machine. When you lay Sculpey sheets over the epoxy putty shell, you know exactly how thick they are. That means that it should be really easy to guess how long the head needs to bake. ...With the Moon Baby puppet, I had a terrible time trying to figure out what my baking time should be.]
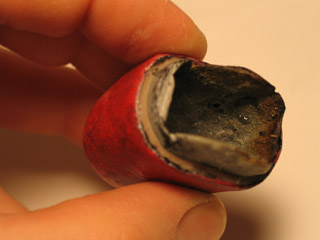
notice the yellowish layer of Sculpey over the hollow gray epoxy shell If I make a hard shell of epoxy over a soft base form, it should be easy to hollow it out to make a hollow puppet head. How should I do this? I've come up with a five possible options so far, and am still exploring...
- Work on a base of foam, dissolve it out using acetone.
- Work on a base of foam, melt it out with a heat gun.
- Work on a base of foam, use a rasp to rake it out of the shell.
- Work on a base of plastilene, use loop tools to dig it out.
- Work on a base of plastilene covered with cling-wrap, dig and pull it out.
On the snippet above, I tried the acetone trick -- using nail polish remover, actually -- but it didn't work for me.
Then I tried a heat gun; that worked very well -- but it releases toxic fumes, so this isn't a very good option.
I have only just purchased a suitable rasp -- I still need to try using it. (It's what's recommended in the Noah's Doll tutorial.)
Plastilene: that's probably the way to go. It's what I try out in this next experiment...
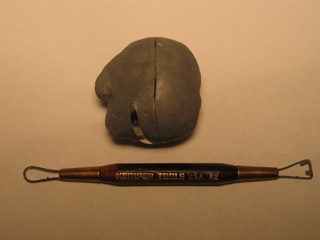
shell of hard epoxy putty over Roma Plastilene I didn't really get the photos I'd like to have for explaining this next thing... What you see above is a piece of Roma Plastilene that I've already covered with plumber's epoxy putty. I only wanted a very crude form; detail work would go on top of this, using Super Sculpey. I roughed out a nose and a chin...
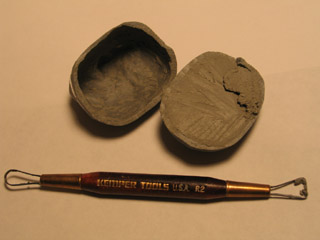
head cut in half with hobby saw I cut the epoxy putty shell in half with a hobby saw. In this picture I've already scooped the plastilene out of half of the shell -- but you can see that the other half is still filled.
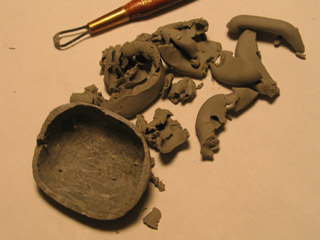
scooping out the plastilene This picture maybe gives you a better sense of what it's like to dig out the plastilene. It comes out fairly easily -- but leaves a waxy residue. On my next try, I'm planning on covering the plastilene form with cling-wrap; that ought to make it easier to get out cleanly.
When I dug out the plastilene from the first half, I was dismayed to discover that the shell wasn't entirely solid yet. It was definitely firm -- but bendable. I was worried that the plastilene had reacted with the epoxy chemically, preventing it from curing. Since I'd been working outside on the porch, to give myself good ventilation, I also wondered if cold weather was impeding the cure...
To my great relief, the epoxy was rock hard the next day. Lesson learned: 20-minute epoxy is workable for five minutes, and hard to the touch in twenty -- but it may be a few hours before it's fully cured.
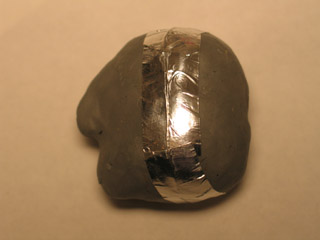
head put back together with metal tape Here I've taped the two halves of the head back together using metal tape. I found it at G.I. Joe's -- a NorthWest automotive and sporting goods store -- in the auto section. I've been told you can also find metal tape in with the plumbing supplies at a hardware store or at Home Depot. My thinking here: since the Super Sculpey layer is going to be baked, I want an adhesive that's going to hold up under heat. Metal tape seemed right for the job.
I haven't gotten around to putting Super Sculpey on this snippet yet -- but I'm very pleased at how firm and lightweight it turned out to be. Yay!!
Oh... I should mention that the previous snippet -- the red tongue-like one -- was painted with acrylics. I tried "tonal underpainting" for the first time. It's a technique that was used by the old masters, where they would do their painting in black and white, and then "colorize" it with glazes. For the "tongue", I sponged on a black undercoat, sponged on a speckling of white, and then used a large soft brush to apply thin coats of red. I'm simply in love with the results. It's got such depth of color... I'm eagerly looking forward to exploring this painting technique further.
posted by sven | permalink | categories: sculpture, stopmo
January 27, 2006
safer - but still not safe enough
by sven at 8:03 am
Epoxy putty is an amazing sculpting material... But it gives me the willies.
So far, I've discovered several types of putty: plumber's epoxy putty, Magic Sculpt, Apoxie Sculpt, milliput, and Green Stuff. All of these brands come in two parts -- a resin, and a hardening agent -- which you knead together to activate. Working time varies from about 5 minutes to 3 hours, depending on which product you use. When the putty dries, it's extremely sturdy -- but can easily be sawed, drilled, or sanded.
However, epoxy resins are extremely toxic. This fact seems to frequently be downplayed or ignored by manufacturers and hobbyists. This fellow, for instance, in demonstrating how to mix resin and hardener, doesn't wear any gloves. Elsewhere on his site, he talks about using his saliva (!!) to smooth the putty. ...That's a great way to ingest toxins -- don't do it!
I've been trying to research how to approach toxins in the art studio intelligently. My best plan at present is to wear vinyl safety gloves, a respirator rated for organic solvents, and set up a desktop airbrush spray paint booth to vent fumes to the outside. At present, I have the respirator, and am using latex gloves. I still need to get a spray booth, and the gloves should be upgraded.
To check if my plan makes sense, I consulted Kim Graham -- a truly amazing sculptor whom I met at the art marketing workshop in November. Kim recently left working in the special effects / fantasy sculpting industry -- largely because she was beginning to develop sensitivities to some of the sculpting media. (She's moving into fine art ceramic figures and Art Nouveau fireplace facades -- please, look at her stunning website!) ...She's known people who've died from misuse of art materials -- so I asked about that, too. Here's what she wrote me:
"You have taken all the necessary safety precautions. The vinyl gloves are your best protection. Magic Sculpt, Apoxie and Plumbers putty are all Epoxy that has been loaded with some powders like talc. The resins can seep into your skin, and over time cause nerve death in your fingertips. If you are only using this stuff once or twice a week you will be fine with just gloves, but if you are using it constantly, all the precautions are a good idea. A good rule of thumb is if you can smell it, you are sucking it into your lungs.
It is the liquid form of Epoxy that will give you some real trouble. That and the volatiles used to thin it, like paint thinner, Lacquer thinner and Acetone. These are the most deadly and the ones that lead directly to the deaths of those people. These substances shred cells and do it quickly. All of the precautions should be in place every time you use them! Lacquer Thinner and Acetone are the most dangerous. Their purpose is to breakdown molecular bonds aggressively. The two people that I knew, and I hesitate to call them friends, did some downright stupid things. I watched in horror when one of them used acetone to wash his face and hands like it was water! The other was a professional fiberglasser and refused to wear a respirator, even when I bought him one, because it was uncomfortable. His job was to spray epoxy gel coats onto furniture. In order for epoxy to be put through an air gun it has to be cut 30 to 50% with acetone. Essentially he was atomizing this toxic brew and breathing it wholesale into his lungs. True, you will not be handling epoxy in quantities that will hurt you immediately, just be warned that this stuff resides in fat cells and can stay in the body for years. It is the accumulated damage that can get you."
Sobering words of caution. Stopmo folk using epoxy putty for puppet construction, heed the warning... "nerve death in your fingertips!"
Last night I tried working with plumber's epoxy putty outside while wearing the respirator and latex gloves. It's better than what most people would do -- but I'm still uncomfortable. I have the sense that resin fumes are probably passing through the latex. My hands feel dry, and I'm just really hoping that it's due to the plastiline and other materials I handled during the evening, not the epoxy.
Also, I could occasionally smell the epoxy through the respirator. That's not too surprising -- a respirator cuts down on how much vapor gets through, but it's not 100% effective. Even so, I'm getting increasingly antsy to get that spray booth. It'll make me feel better when I have the means to forcably suck the fumes away from myself and vent them outside.
posted by sven | permalink | categories: sculpture, stopmo
January 23, 2006
experiment: papier mache mash
by sven at 12:00 pm
There's a papier mache technique where you grind your paper into pulp, rather than cutting it into strips. It's called "papier mache mash". You might be familiar with Celluclay... This is the same idea. Mash isn't new, though; from what I've read, it's about as old as papier mache itself.
For years I've wanted to try making mash. Friday night I finally gave it a whirl.
boiling newspaper I looked at a few recipes online, but didn't really abide by them. I started by chopping a copy of The Oregonian into 1"x1" squares with a swing-arm cutter. (Once a week, though we never asked for it, someone tosses a copy of this newspaper at our house... At last: a good use for the damned thing!)
I threw about half of the paper bits into a pot of boiling water and cooked it for 20 minutes. Note that I'm using a pot that's only for art projects -- don't eat out of it! The newspaper ink forms a black ring around the rim that's never going to come off.
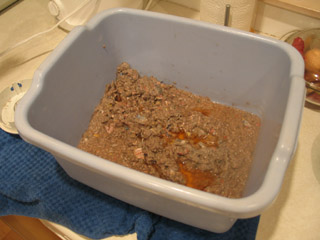
boiled newspaper in a tub I dumped the boiled newspaper in a tub to cool. Looks nasty. I read somewhere that you should only use the black and white portions of the paper, not color supplements. Sure enough, the glossy color pages didn't really break down into pulp very well. I think they're also responsible for the water turning reddish.
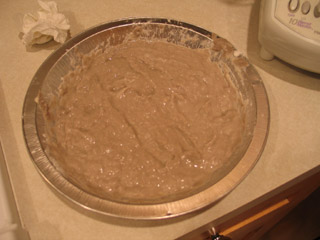
blendered pulp mixed with flour Wearing disposable latex gloves, I put a few handfuls of pulp into a blender with some more water. Again, this is a not a food-safe blender -- it's only for art. (I picked it up for under $10 at Goodwill.) After pureeing the pulp into a sort of paste, I poured it into a tin pie pan, and mixed it with flour.
From what I read online, it looked like an acceptable option to use flour paste as a binder. It may be, however, that this only works if you boil the flour first. I was curious to see what would happen if I didn't boil it -- so I'm not going to be surprised if this experiment is a total flop.
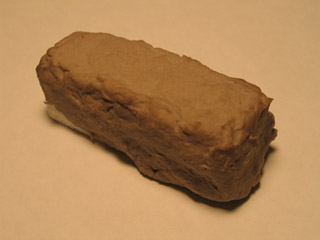
mash spread over a styrofoam snippet The mash seemed too wet to me, so I endeavored to squeeze out some of the water. I put a handful in a piece of cloth and twisted. This didn't work very well. Mash that was directly against the cloth dehydrated -- but the mash in the center of the ball stayed wet. When I tried to mix the dryer and wetter pulp together, the mash turned frustratingly lumpy.
Nonetheless, I took about half of the mash and spread it onto a snippet of styrofoam. It's not very easy to work with... If the mash doesn't have enough water content, it wants to be clumpy. If you wet it, you can get a farily smooth surface -- but then it's slick mush that's difficult to form.
Forty-eight hours later, there are thinner patches on the "brick" that have dried -- but I don't expect the thing to be fully dry for another two to three days.
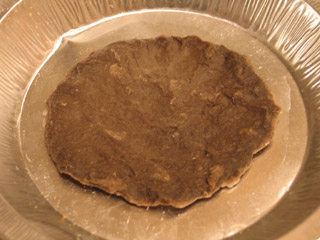
mash after being baked I decided to take the remaining mash and bake it in the oven. I wanted to see if I could dry it out faster that way.
The results were... disturbing. I got a waxy, glutinous, fleshy gray pancake. I think this is largely a result of the flour content. Really, it's kinda vile.
Forty-eight hours later, the pancake's edges have started curling... But it hasn't lost that fleshy texture. I don't think it's ever going to dry out right. Ew.
CONCLUSIONS:
When I've tried Celluclay, I was fairly frustrated with it. It's either clumpy, or a slick mush that's difficult to form -- and it takes days to dry out. The same is true with the mash that I made.
Good: Newspaper and flour are about as cheap as it gets. If a large area needs to be covered with something vaguely clay-like, this could be acceptable. It looks like the mash will dry pretty hard; it should be possible to sand and drill it. It's pretty good for making seamless, organic surfaces. Leftover pulp can be safely thrown into the compost heap.
Bad: It's labor intensive to create: plan on at least an hour to prep. You need a big pot (with a lid), a stirring device, a tub, and a blender -- none of which can ever touch food again. It's messy. The boiling pulp wants to spit, and it's hard not to drop little splatters on the counter occasionally. And when the tarry ink separates from the paper, it will adhere to whatever it next comes in contact with. It's difficult to shape the pulp. And it takes forever to dry.
Next steps: Despite all this, I haven't given up on mash yet. For my next go, I want to try using toilet paper for pulp. It's relatively cheap, fine-grained, and inkless. I think I'm also going to try mixing the pulp with white glue, rather than flour paste. I suspect that Elmer's glue, even if it's watered down, will probably help the stuff dry faster.
posted by sven | permalink | categories: sculpture
December 23, 2005
new stopmo puppet - in progress
by sven at 9:29 pm
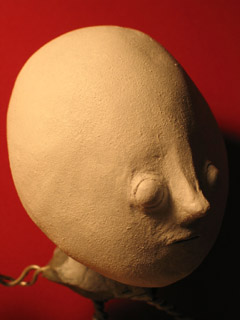
For several weeks I've been obsessed with learning how to make puppets for stop-motion animation. I studied and studied -- and now I'm making one of my own...
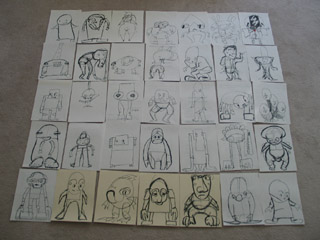
How I came up with the design is interesting... I was experimenting with different ways to generate stories for my Super8 final project. I tried:
- photographing improvised dioramas
- quickly brainstorming story elements, drawing each one on a separate piece paper
- writing ten one-paragraph-long story ideas as quickly as I could
- beginning from the characters: sketching pictures of possible puppets
[So far, working with dioramas has worked the best. I found that when I drew story elements, I tended to only draw solitary characters -- working with "dolls", on the other hand, immediately implied relationships. Writing story ideas, I tended to come up with poetry -- neat, but it felt too abstract.]
...When I tried doing character designs, I managed to spit out 35 sketches in about an hour and a half. I used fat crayola markers on the backs of junk typing paper -- it was nice not to be inhaling toxic fumes! The sketches were rough, but conveyed emotion... From this, I just had to leap into constructing them in 3D!

I'm surprised myself that I chose this picture to start with. But for some reason, the little "baby" on the far left really spoke to me. In my imagination, I see this shy family of what's-its cowering in a cave somewhere, eyes almost blind from disuse, whispering unintelligible things to the moon when they occasionally creep up to the outside world at night.

I started puppet construction by drawing a quick outline of the character on another piece of paper, marking out where I thought the bones should be. I took some sculptor's aluminum armature wire (1/16", I think), folded it in half, and used a hand-held drill to twist the two strands together. Interesting: the wire becomes a straight and stiff rod in the process... It's easily bent -- but this first transformation fascinates me.
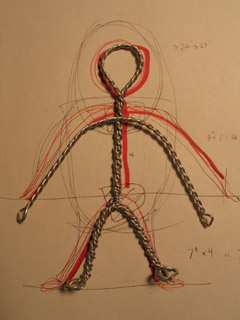
I created three lengths of twisted wire: one for the legs, one for the arms, and one for the spine and head. The lengths for the legs and head I folded and twisted a second time, so they'd be four-strands-strong. These bits turned out smaller than I expected -- when you twist the wire, it shortens noticably.
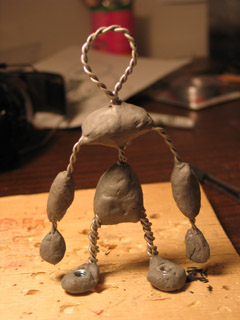
Next I created some "bones" out of plumber's epoxy putty. The armature here is about 5" tall -- which is overly small -- so I couldn't make all the bones I'd imagined. Nothing in the legs, and bones only in the forearms.
This is my first time working with epoxy putty... Overall I liked it. It starts setting up in about 5 minutes, and is steel-hard in 20. Since I wasn't creating any details, that was plenty of time. (Glad I wore latex gloves, though.)
Notice that I epoxied some bolts onto the feet loops. The armature is able to stand up because there's a bolt coming up through a hole in that piece of wood, screwing into the foot.
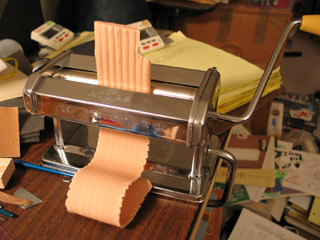
For my first puppet I figured I'd just have a single-expression face -- expressiveness would have to come from body language. I got out some Super Sculpey and "conditioned" it by putting it through a pasta maker several times. ...I got the stuff to begin working with Sculpey quite a while back (last year?), and I tried a few tests then -- but this is really my first time doing a serious project with the material.
I used Super Sculpey to put on a head, hands, and feet. I smoothed the head by using a loop tool and then brushing with isopropyl alcohol. The rubbing alcohol is supposed to act as a solvent, softening the sculpey; it did somewhat, but I was disappointed. Turpenoid is stronger; I'll be trying that next time. ...Even so, I got a pretty darned smooth head. I wasn't as concerned with the hands and feet this time around, and didn't work them too hard.
You're suppossed to bake Sculpey at 275 degrees for every quarter inch of thickness. I guessed that there were places on the head a full inch thick, so I chose to bake it for an hour. That was a mistake. I got severe cracks in the head, a pinky fell off the hand, and one of the feet broke. Meh.

According to Smellybug's insanely cool tutorial on maquettes, the way to fix cracks is by putting superglue in, smearing on Super Sculpey, smoothing it with turpenoid, and then hitting the spot with a heat gun. I tried this and only wound up adding some scorch marks to the puppet. However, I found that I could just smear Sculpey into the cracks like you'd use wood putty on a nicked chair; it was fine even without baking.
After making repairs, I sanded the head even smoother, and then painted all the Sculpey bits with four coats of white acrylic. I used a bit of kitchen sponge to do the application, which gives the whole piece a really neat stone-like texture. I think I like it better than brush-work -- but in the future I might try using an airbrush to get an even finer surface.
That's where things stand at present!
Notes on what could be improved:
- 5" is too small a scale -- puppets should probably be between 8" and 14" tall
- bake Super Sculpey at a lower temperature for a longer time (200 degrees?)
- a basecoat of black paint, with white sponged on top of that, and then color stains, would probably give me a better look
- try using an airbrush next time?
- I shouldn't have used tin foil to bulk up the head; it's a little loose on the wire
- there should be a more distinct neck; the head almost rests on the shoulders
- the shoulders could have been wider
- truly flat feet would work better; bolts on top of wire loops = uneven footing
- I think Nick Hilligoss' T-style tie-downs would be easier to work with on set
(Still, I'm very enthusiastic about what I've accomplished so far.)
posted by sven | permalink | categories: movies, sculpture, stopmo
November 4, 2005
Elder Hat
by sven at 9:25 pm
On Thursday Oct 27, I got a crazy idea for a Halloween costume: I should dress up as one of the "Elder Things" from Let Sleeping Gods Lie!
I started with an old bicycle helmet. In the garage I found some squares of styrofoam that I've been hanging onto for years -- possibly from the dining room chairs' packaging? I cut holes in the styrofoam and then layered it around / on top of the helmet. I adhered everything together with sprayment.

Luckily, I didn't run out of sprayment until just as I was adding the final bit of foam. To sculpt the Elder Thing, I used a flexible blade -- the sort that folks who work with polymer clay use. Cutting, rather than scraping, minimized foam dust -- but foam dust is innevitable, and it got everywhere. The glue was slow to dry, and badly gummed up my blade. But hooray for latex gloves! It would have been much worse if the glue was all over me. Still, I got a blister from using the naked blade.
This is where I made a mistake. I've been so obsessed with sculpting techniques that layer stuff over foam, I moved on to the next step without thinking. What I should have done, was just use papier mache at this point. That would have been light-weight. Instead, I applied a thin layer of clay to the entire exterior. I'd scrape a bit of clay onto a wooden sculpting knife, then press it onto the foam like a small bandage. The thickness of this layer was only about 1/8"... Even so, I estimate that I used at least 10 pounds out of a 25 pound bag of clay. D'oh!
For this project I used a paper clay that I recently bought at Georgies. I anticipated cracking: clay shrinks as its water evaporates, and I was applying it to a solid core. My hope was that paper clay would shrink less and be stronger than typical clay... Even if it did help, though, the cracks were severe -- between 1/16" and 1/8" wide in some places.
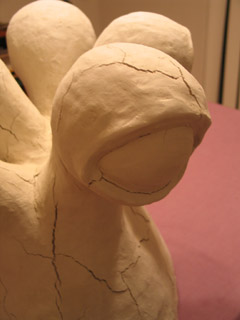
I waited about 48 hours for the clay to dry completely, anxiously watching cracks develop. The clay visibly turned a lighter shade of gray when it was done drying, and it no longer felt cool to the touch. ...Curiously, three of the eye-stalks didn't crack. I'm wondering if I put the clay on thicker on these -- like 3/16" or 1/4" thick?
To help bind the whole thing together, I decoupaged tissue paper over its surface. [This had been part of the plan even before the cracks appeared.] I applied pieces that were approximately 6" square with watered down Elmer's glue, using a 1" wide brush. The tissue paper innevitably has some small wrinkles in it. It's acceptable -- but to an extent, defeats the intent of the clay, which was mainly to create a smooth surface. Still, the clay gives the tissue paper something really firm and well-shaped to cling to...
I painted on a layer of gesso. I mixed acrylic red with clear tar gel medium to make the eyes glossy. [The eyes were the one part of the critter that I didn't cover with tissue paper.] I gave the rest of the skin a wash of acrylic phthalo green. I started to sponge on a mottled layer of black... And then I ran out of time! Ack!
I worked right up to 5:30 on Halloween night. Then I admitted defeat. I brought the Elder Hat over from the studio, to display it as a work-in-progress. --And frantically looked around for something else to wear in its place...
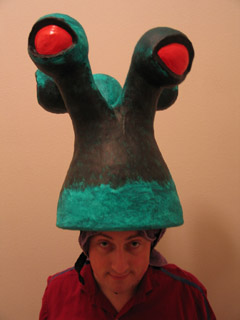
Here's a photo of me modeling the unfinished Elder Hat on Halloween night. Mysteriously, all of the bicycle helmet's padding fell out while I was working on it -- so in this shot you can see that I've got a towel between my scalp and helmet. With the clay, this thing was very top-heavy. It wasn't bad on my neck -- but I had to strap the helmet on tightly so the thing wouldn't start leaning -- and that was no fun.
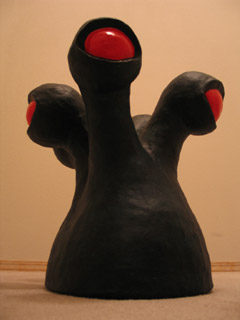
I finally got around to completing the piece this afternoon. I finished sponging on black acrylic, and gave the whole thing another glaze of phthalo green, to help mute the black. ...I'm kinda disappointed, though. It turned out much darker than I expected. Up close you can see that there's real depth to the color; but in anything less than bright light it just looks black.
Despite my mistake in using clay, and my disappointment with the color, I'm actually quite pleased with this project. It turns out that it's really going to be a sculpture, and not a costume... But as a sculpture, I finally got to do a completed piece using some of the techniques I've been exploring with little tests during the past few weeks. And it feels solid.
Total time spent on project (not including checking to see if it was dry, cleaning up, or blogging about it): 20 hours 15 minutes.
posted by sven | permalink | categories: let sleeping gods lie, sculpture
October 21, 2005
trip to georgie's & to w.c. winks
by sven at 8:31 pm
Today I squeezed in a visit to Georgie's Ceramic and Clay Co (756 N. Lombard). Within five minutes of walking through the door, the thought that went through my mind was "I'm in heaven." ...After a longer browse, I think I'd downgrade that sentiment -- but still, it was really thrilling.
See, I've only ever been to general art supply stores, such as Art Media. I haven't been to a store that specifically deals with clay and sculpture. Until now. There were potters' wheels, and a billion glazes, and wax in bulk, and sculpting tools, and wiring for electric lights, and books... I can hardly wait to go back and take another look around.
Perhaps the best discovery: I'm not crazy! I found a book about sculpting styrofoam and then smearing paperclay over it! The book is Easy Sculpted Foam for Your Home: 25 Fantastic and Fun Accent Pieces by Koren Russel. ...The projects aren't very appealing to me -- but the technique is exactly what I've been trying to invent by myself. It even talks about something I just figured out last night: that you can fix cracks in your clay with spackle -- since spackle (unlike clay or plaster) doesn't shrink.
The book passed the "Will I regret not buying this if I never see it again?" test, so I bought it. I also purchased a copy of 500 Figures in Clay: Ceramic Artists Celebrate the Human Form, edited by Veronika Alice Gunter. I've come to realize that I'm most interested in art that has a human form of some sort in it. This book is just up my alley -- it's going to be great for inspiration.
On a separate errand, trying to get some specific metric screws with which to fix our couch, I found my way to WC Winks Hardware (200 SE Stark). Wow -- this is a really interesting and extensive hardware store! I came right as they were about to close, so I didn't get to look around much -- but the staff were extremely helpful, and I saw things that I wanted to spend more time exploring. Like a very small hand-held rotary saw (yum). ...I did, however, manage to pick up a little tub of spackle before checking out.
Wow! How often do you discover two great new stores in one day?
posted by sven | permalink | categories: sculpture
October 20, 2005
sculpture experiments
by sven at 9:43 am
I want to sculpt. It's an idea that's been in my head for years. I've got a pretty clear idea about how I want to work -- but I'm still wrestling with how to get the media to do what I want. Here's what I know about the process I want to use:
- I want to start with a core of polystyrene foam. It's lightweight, inexpensive, and you can work very fast with it.
- On top of the polystyrene, I want to be able to smooth out the texture and create details by adding a thin layer (~1/4 inch) of clay, or something very much like clay.
- I want to finish the sculpture with some kind of paint or latex -- or I-don't-know-what -- that will create the impression of skin.
- I'm thinking about these layers basically as "skeleton", "musculature", and "skin" -- with one exception: rather than have the core be made out of stick-like bones, I want to rough out volumes.
In addition to this general vision of process, I have several criteria for what kinds of materials I don't want to be using. Here are some notes I wrote out for myself on Monday:
- no toxic fumes (e.g. resins)
- minimal dust
- no baking / firing / use of flame (e.g. sculpey, ceramics)
- carving doesn't require hammering with chisels, or a significant amount of grinding hard stuff away (e.g. wood)
- doesn't require making molds and casting
- not a battle with drips (e.g. plaster)
- not a race against time, drying-wise (e.g. foam latex)
- less that 24 hours drying time (if possible)
When you go through the list, I think you're pretty much left with clay and papier mache as the main options. [Although it's been disturbing to read about silicosis -- "a chronic and debilitating lung disease resulting from exposure to clay and silica dust (...) a known threat in the ceramic studio." (from The Spirit of Clay: A Classic Guide to Ceramics by Robert Piepenberg).]
...Things have been stuck at this point for a long time. New inspiration came while Gretchin and I were on the Portland Open Studios tour this weekend. Looking at the ceramic figures of Katy McFadden, I suddenly realized three things:
- I've been working too small. The scale appropriate for the level of detail I'm interested in is about two feet tall.
- I've been too focused on smooth -- rough surface textures may be more interesting.
- A body can be implied with very little. A cylinder plus a sphere equals a body. A sphere with two holes reads as a face.
...It sounds like I know exactly what I want -- but the devil's in the details. This week I've dedicated myself to trying to finally nail those details down. How? Experimentation! Here's a photo of what I've done so far:
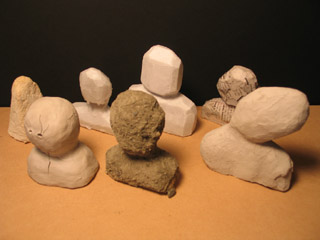
Back row, left to right:
- A snippet of polystyrene foam coated with celluclay. Clumpy and not fun to work with when wet. Took about three days to dry. Seems to be sandable, but with effort.
- A foam bust carved with the sort of flexible razor favored by folks who work with sculpey. I tried dripping parafin over it, using a brulee torch. The parafin is too watery for my tastes, and would have to go on in several layers to be of much use. Dipping might work better.
- A foam bust with a tissue paper veneer, papier mached on using Elmer's glue mixed with water. It provides a pretty fine surface, with only minor crinkling. I'll have to try painting a model like this -- when I tried painting tissue paper that wasn't bonded to something, it started to fall apart pretty quickly.
- A foam bust with newspaper papier mached on one side, craft paper on the other. This basically just confirmed what I already knew -- that both of these two papers are too stiff for fine detail.
Front row, left to right:
- Clay applied directly over a foam bust. Serious cracking.
- Foam bust papier mached with paper towel, then coated with Elmer's glue and dusted with concrete. This isn't the texture I've been imagining -- but it's a great discovery nonetheless. My one mistake here was that I didn't get all the concrete wet, so some areas remain dusty. A spray-bottle works well to make sure everything is moist, and a final coat of glue seems to do a good job of sealing while still keeping the overall look intact.
- Foam bust (more expressive pose) covered in a mix of clay and pulped toilet paper. This one is still drying, and seems to be cracking too -- though perhaps not as severely. I'd read that with paper clay you can apply wet to dry -- and that seems to be true. The texture is impacted by the pulp... I need to see if I can find a finer grained source of paper fiber.
The paper clay seems to be the most promising direction -- although the tissue paper and concrete options deserve further exploration, too.
...In addition to the sculpting experiments, I put in two hours last night experimenting with paints. I tried using sponge application for the first time -- which I'm totally sold on now. I also tried adding things directly into the paint in order to get more texture: concrete, celluclay, and dryer lint. Dryer lint was the most interesting, the most organic. Celluclay particles were a bit too regular for this purpose. Concrete looked best with its natural colors.
So, for the sake of getting my own head clear about this, here's what I've learned this week:
- Polystyrene foam can be cut with a razor rather than shredded with a serated knife, avoiding making that terrible static-clingy dust.
- Flat sheets of clay can be created by using a rolling pin and two rails, which determine its thickness.
- Adding paper fiber to clay helps prevent cracking.
- Paint can be sponged onto a surface, rather than brushed.
- I can use Elmer's glue plus concrete or dryer lint to create interesting textures.
And here are my next steps:
- Find an easier way to mix paper pulp into clay. (And a source for fine-grained fiber.)
- Go to an actual clay store to see what they carry.
- Actually try making a full-on sculpture!
- Figure out how to attach a foam-core sculpture to a base / armature.
- Try juxtaposing a clay-skinned sculpture with other elements. (In general, I like assemblages better than single-media sculptures.)
- Sketch out some sculptural ideas.
- Clean up the damned work area!
Ah -- lists, lists, lists...
posted by sven | permalink | categories: sculpture
hangable shelf
by sven at 9:06 am
Oh, yes, we enjoy the art on the Portland Open Studios tour. (But really it's the storage space ideas that we're after.)
Something we've been talking about for quite some time is the need for small shelves in the studio that we can display sculptures and knickknacks on. One of my personal hang-ups about this has been that I'm loath to commit to installing a shelf permanently in any one place. In a studio, you need to be able to move things around, rotate the art.
I didn't see anything on the tour that was what I wanted -- but the creative stimulation/fertilization did the trick nonetheless. I got it into my head that one could build a hangable shelf. Monday night I dove into the project... Three hours (plus drying time) later, this is what I got:
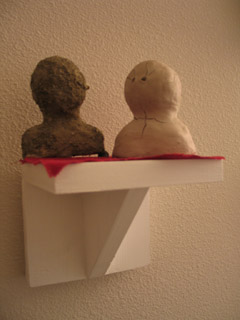
In the initial design I was connecting two eyebolts directly to the picture-hanging hooks on the wall. The problem there was that you have to get your hooks perfectly level with each other, or the shelf will tilt. So I added two more eyebolts and looped a bit of wire through them. Now the shelf hangs from the wire -- since it's a loop, there's a tiny bit of slack and you can adjust. Placing the hooks on the wall can also be done by eye-balling now, rather than having to measure. Here, take a look:
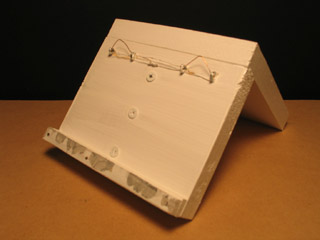
Since the shelf hangs out from the wall, I also needed to add a little lip on the back at the bottom to make it hang even with the wall. That's the other bit you're seeing here.
...Not bad! I didn't want to get too fancy on this first attempt -- but now that I've got proof-of-concept, I can see potentially making a longer shelf to keep around, too. Three feet wide, maybe?
posted by sven | permalink | categories: sculpture, studio space
learning about toxic fumes the hard way
by sven at 6:46 am
This has been a good week for exploring sculpture. But it has been a very bad week with regards to toxic fumes.
Being all inspired after the Portland Open Studios tour, Saturday night I went to the studio to experiment with some new techniques...
One idea was to bend a snippet of acrylic "glass" by heating it with a brulee torch. I figured this was likely to release fumes, so I did it outside, and tried to be careful not to breath anything in. The technique worked very well...
But 15 minutes later something odd happened. I had a shooting burning stitch in my armpit, almost as if a bee had stung me. I tried to disregard it at first, as one of those occasional mysterious body pains that can never be explained. But then I woke up in the middle of the night. I felt faint and a bit nauseous, and the stitch was back. For maybe half an hour it felt as if there was something seriously wrong with the artery -- touching or stretching it would cause shooting fiery pain. I was worried that this was a sign of a heart attack, or something similar, and enlisted Gretchin's help to look up the symptoms online. Fortunately, the symptoms didn't match up; and as they subsided, I decided to wait and watch for the time being.
Sunday afternoon the stitch showed up again, but less intensely. Now it seemed like it was perhaps a ligament, rather than an artery, that was the source of trouble. During the course of the day I noticed mild burning sensations slowly circulate through my body -- showing up in my right leg, then my right arm pit, and finally a little in my neck. My sense was that whatever toxins I'd breathed in were traveling outward from my heart, depositing in artery/ligament areas.
On the one hand, this was a big relief -- to now believe it wasn't my heart that was in trouble. On the other, it's pretty unnerving to think that these acrylic toxins are probably now deposited within me.
On Monday I may have felt a few very mild burning sensations -- but nothing since. Phew!
Ah, but the story doesn't end there... Monday night I built a shelf for displaying sculptures. I painted it with a glossy white latex house paint, outside and trying to be careful not to inhale the fumes. ...Nothing as serious as the acrylic incident happened -- but I did wake up in the middle of the night again, this time with the feeling that my skin was cold and slightly numb. Once again I had the feeling that I had chemicals inside my body.
To what extent was I really feeling these things -- versus imagining them, because I was worried and in a suggestive state? Hard to say. ...That's the thing about this body information: it's often indistinct -- and there's a considerable amount of self-doubt that goes along with trying to focus on it and identify its nature.
And so is that the end of the story? No! ...Last night (Wednesday) I was working in my studio room, trying out a bunch of ways of working with acrylic paints and gel medium. After two hours, I had a headache and was feeling sick. Again, the feeling of having chemicals inside my body.
It cleared up pretty easily... But I'm getting downright paranoid now about chemical fumes. Trying to be proactive, I purchased a book on Tuesday titled "The Artist's Complete Health and Safety Guide" and flipped though it. The emphasis, it appears, is on ventilation... Which, unfortunately, I think is going to be a fairly unwieldy problem in my art room.
...Looking back on 2005, this has been a pretty unhealthy year. I've been sick a lot more frequently than in past years -- and when I think about it, most of my colds followed on the heels of a big art project. To an extent, you can blame it on the stress -- I tend to be somewhat kamikaze. However, I'm increasingly convinced that one or two of those colds were the result of breathing in toxins -- wood dust from glue-based particle boards, in particular. This is, to say the least, a very disturbing revelation.
Not to mention ironic: I think probably most of the food we buy is organic. Granted, that has a lot to do with helping the environment, rather than health-minded reasons... Still, there's a comic contrast between what I seem to be willing to put into my mouth with a fork, versus what goes in via the studio.
posted by sven | permalink | categories: sculpture
October 18, 2005
customizing clay?
by sven at 2:19 pm
I've been doing a lot of experimenting with sculpture techniques lately. I've been creating roughed-out figures using polystyrene insulation foam -- and am very happy with the results. Now what I want is an air-dry, non-toxic clay-like substance for fine work on the surface... Ideally, y'know, clay -- but I've had problems with cracking.
So far I've tried surfacing with air-dry clay, parafin, concrete, and paper mache (craft paper, newspaper, paper towels, toilet paper, and tissue paper). The concrete created an exciting surface that I'll be experimenting with more. I'm also going to be trying encaustic-style wax. ...But really, these options are more about creating an interesting "skin" than the "muscle"-level sculpting.
I re-read the How to make a Noah's Doll website, and got really curious about why these folks mix sawdust with their clay. As I Googled further, I think I've figured it out. This site on paperclay explains that paper fiber creates microscopic straws that allow clay to dry without cracking -- and that also allow you to adhere new wet bits to dry. Wow!
This fellow, Ian Gregory, claims to be one of three folks who invented paperclay... He recommends not exceding 25% paper pulp in your clay. ...I'm guessing sawdust serves the same function -- though Noah's Dolls mix 50% clay and 50% sawdust.
Ah, now what else could we mix into clay? There are several websites out there that give formulas for making "sawdust clay" (2 parts sawdust, 1 part flour, add water). These sites tend to be geared toward schoolroom settings, rather than fine arts... I'm also finding a bunch of interesting customized clays at the level of housebuilding: cob, papercrete, paper adobe. Whether we're looking at sculpture or housebuilding, though, the principle seems to be the same: add fiber to clay, and you get something that's more lightweight, less brittle, and dries more easily.
So: What should I start mixing into clay? Toilet paper? Straw? ...And what products exist already? I know that there's a product marketed as "Paperclay" -- I should try that, for sure. There's also a good clay shop in town, Georgie's Ceramic and Clay Co. (756 N. Lombard), that I'll have to visit. I doubt they'll have much with fiber mixed in -- but I should get a sense of what a real clay shop looks like.
posted by sven | permalink | categories: sculpture
October 14, 2005
"pajama dreamer" sculpture
by sven at 11:50 pm
Just finished a new sculpture this afternoon: "pajama dreamer". Here's a photo...

The darn thing took me more than a month to complete... Been busy with other things, had to keep setting it aside. But I'm pretty happy with the results.
I'm building upon the style I used with the "witch" sculpture and "nature god" collage. Improvements: the backdrop is masonite, rather than foamcore; the stars are more irregularly shaped; everything is set at angles to the backdrop; the figures are also attached to masonite, rather than museum board. Why? Angles are artsy. And masonite is more durable. ...Though in future pieces, I think I'll use a thinner masonite (like 1/8 inch).
The backdrop was a real evolution for me. I painted it flat black, and it looked awful. So I wire-brushed a bunch of paint away -- giving it a very tortured look -- and then layered on some purple and blue. It's not as visible as I'd like in the photo, but there's a lot of depth to the backdrop now. ...I feel like I just grew a notch, as an artist!
Here's another photo, so you can get a better look at how things jut out:
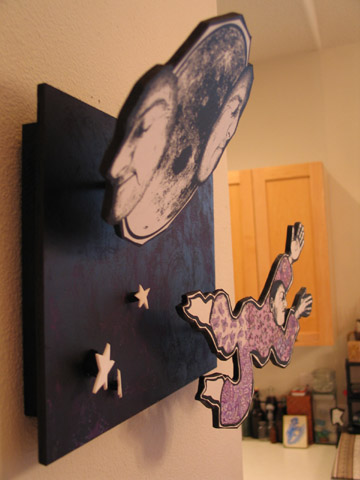
...I fussed and fretted for a long time about whether or not I should put hair on the figure. I decided not -- but did a test head with yarn hair that is looking mighty fine fixed to a flea's body right now. [Look for that in a future piece!] ...I'm going to need to set sculpture aside for a while, to be working on other projects -- but when I return to this, I think I'm going to work on making new heads and bodies and backdrops all separately and in parallel -- so I can mix and match "dolls" and their "worlds", and not be as linearly start-to-finish as I was on this piece. Working within a recognizable style allows this.
An interesting observation: All you need to make a plausible doll is a head. Or a head and hands, if you really want to go wild. Give the audience that much, and any kind of blobby body is passable.
posted by sven | permalink | categories: sculpture
September 27, 2005
urban vinyl / designer toys
by sven at 10:50 pm
Stuck on the couch with a cold today, google exploration led me to discover urban vinyl -- a.k.a. the designer toy movement.
I'm fascinated! The concept is that artists are doing limited edition vinyl toys -- not based on TV shows, but rather on original pop art concepts of their own. See the link above for a more in-depth history.

from sweatyfrog.com posted by sven | permalink | categories: links, sculpture
September 23, 2005
"witch" sculpture
by sven at 8:53 pm
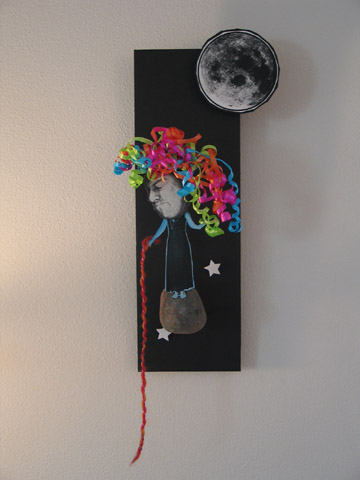
I started this sculpture on Friday Sept 2; finally finished it last Saturday -- Sept. 17. The backdrop is black foamcore, hot-glued to a piece of wood. The stone juts out an inch or two on a dowel... I actually used a masonry bit to drill a hole into the rock. The body is photocopied from a magazine, then tinted blue with acrylics. Gretchin informed me later that it had been a photo of singer Amy Grant. The hair is a bit of frilly gift ribbon that I found in our "3D items" collaging bin. The stars are made out of sheets of foam that you can get at a craft store. I found the image of the moon online. The moon and stars also pop out from the background.

I'm really excited about this piece. As an assemblage, it reminds me a little of Dave McKean's work. Also of Maurice Sendak and Winsor McCay, both of whom I admire greatly. A sense of whimsy. ...I like taking photocopies of my own face -- a very low-brow sort of art -- and elevating them to a more uppity artform. I like the photographic element sort of being kept behind a pane of glass, because it's black and white. I like the notion of populating a universe with characters that all have my face, even though they'll all have their own identities (Malkovich Malkovich... Malkovich?)
It implies a story -- even though I haven't thought of one myself. The yarn was a last-minute addition that really worked out. I see this character as being angry/in pain, yet oddly beautiful -- offering a rope to anyone who wants to climb up. I showed it to the "Church of Art" folk last Sunday; one of them saw the stone as our badly damaged earth. Neat! Me, I'd seen it as another world, a tiny little asteroid like the one in "The Little Prince".
I've got another sculpture in the same style half-done. Very much looking forward to posting about it when it's done...
posted by sven | permalink | categories: sculpture
April 7, 2005
"Dollhouse Noah" Sculpture Technique
by sven at 3:53 pm
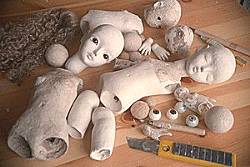
I've been frustrated for a long time with regards to sculpting. I feel like I just haven't found my medium yet -- but nonetheless have a strong tactile sense of what I'm looking for.
Stuck on the couch with a cold today, I spent a good while surfing the net looking up artists I'm fond of. In the process, I discovered that there's some really exciting work going on in Japan right now with regards to art dolls. Better yet, the process for making some of these things looks very much like what I want to be doing: How to Make Noah's Doll.
A foam core, with a clay-sawdust skin, lacquered with modeling paste... The results are really astonishing! Some of the dolls are unsettling to say the least -- but I'm compelled to share a few of the "Dollhouse Noah" images, simply because I was so aghast (yes, "aghast") at how haunting they are..


- insulation foam