you are here [x]: Scarlet Star Studios > the Scarlet Letters > brass "open hole double ball" joint
<< before artist's way open studio review (march)
after >> art updates

March 18, 2006

brass "open hole double ball" joint

by sven at 10:43 pm

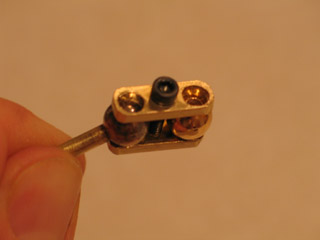
Very exciting! I just this afternoon created my first really successful "open hole double ball" joint!

side view

This design was inspired by Lionel Ivan Orozco's tutorial on how to make an open hole double ball joint and by a link off LIO's site that describes a similar design made of brass. It's a lot like a "ball and socket" joint -- but the balls just sit on top of the holes, rather than being recessed into sockets.

I'm scheming to make a full puppet armature out of these joints. Expect to be hearing more about them... ;-)

top view

If all goes well with these joints, I'll probably do a full write up about how to make them. In the meantime, here are a few details...

The balls are 8mm hollow brass beads that I found at a bead store. The brass rod and the brass bar (for the sandwich plates) are K&S brand materials. The rod is 1/8" diameter. The bar is 1/4" wide and .064" thick; I cut it to be 18mm long using a Dremel cut-off wheel. Beads are measured in millimeters -- which led to this weird combination of metric and English units.

The trick to making the sandwich plates was to screw them together before drilling the holes that seat the beads. The screw is 4-40 and 1/2" long; it has a cap that can be turned with a hex key. I threaded the middle hole myself, using a tap. To allow the plates to move correctly, only one side of the sandwich gets tapped. After all the holes were drilled, I rounded off the bar's corners using the Dremel again.

I used a power drill to enlarge the hole through the bead. Because the bead is hollow, I was able to snip off a little bit of solder and actually put it inside the bead with the rod. I heated the bead with a butane micro torch (actually my brulee torch!) to melt the solder and seal the bead in place. I didn't round the end of the rod that pokes out of the hole -- but the joint seems to work very well, nonetheless.

posted by sven | March 18, 2006 10:43 PM | comments (7) | categories: stopmo

Comments

...COOL...can't wait to see that thing put to use :)...my next goal for the jenny project is to re-vamp the little girl puppet (she REALLY needs a name) so i'll be exploring tie-downs and ball-n-socket joints for the first time...cant wait to compare notes!...

Posted by: Ubatuber at March 19, 2006 9:47 AM

Thanks, Uba! One of the big benefits with this design is that I seem to be getting acceptable results without having to buy a big drill press yet (although having one sure would be nice).

A Dremel, a power drill, a hammer, a tap, some small files, a vise, a butane micro torch, a cinder block... That's pretty much all you need.

...And the metal is readily available with just a stop at Ace Hardware and a bead shop. The other two designs I mention either require ordering materials online or searching lighting stores.

Posted by: sven at March 19, 2006 11:02 AM

Hey! That's looking awesome! The only bad thing I suppose is that you got limited movement. What made you get away from wire puppets? I got no idea what I'll be using on my next project, but wire is SO easy to use! and I only got one problem with it: the rebound (I think I heard it's called memory effect). See ya'

Ale Stop Motion

Posted by: Ale at March 19, 2006 12:58 PM

Why am I getting away from wire puppets? Several reasons:

1: Metal-jointed armatures don't break. (Although they can get loose, which is another form of trouble.)

2: When you're making a wire armature, in order to avoid putting too much stress on one point you have to make joints wider than they would be on an actual skeleton. I want elbows and knees that pivot at a single point. ("Limited movement" can be a good thing!)

3: With metal-jointed armatures you don't have to fight the springiness of the wire. When you pose a limb, it stays posed.

4: I'm attracted to the precision required for making a metal-jointed armature. It's so easy to make a lop-sided wire armature...

5: It feels like a step in the direction of professionalism. Most pro-level puppets seem to have ball and socket armatures -- I want to have that skill at my disposal.

...Which is not to say that I'm giving up on wire armatures! I expect I'll use wire armatures for puppets that aren't going to get a lot of screen time... And there will probably be parts of metal-jointed armatures that still use wire -- possibly where the foot bends so a puppet can stand on its toes, for instance.

(And y'know, before there's talk about swearing off wire, it might be nice to get a metal-jointed puppet actually up and running!)

Posted by: sven at March 19, 2006 6:15 PM

That looks really good! Does it move smoothly through its entire range, with no rough spots and no sudden "moves too easily" areas? What worries me about using hollow brass beads is that the heat might distort them pretty easily, and also that being hollow, there's no straight-sided "tunnel" through the center of it to hold the rod perfectly straight... when you're soldering, it seems like it can go a little lopsided. But i hope it works well! Keep in mind you ought to move up to steel and/or aluminum at some point.

Posted by: Darkstrider at March 20, 2006 12:53 AM

Ok you convinced me :P But yeah, you're right, we should wait till you see how your armature works before smashing wire puppets... Plus, there's gotta be something good about them, 'cause Marc Spess is using them, and I consider him a Pro guy Bye!

Ale Stop Motion

Posted by: Ale at March 20, 2006 10:15 AM

Surprisingly, the joint does seem to move smoothly throughout its entire range. Visually you can see a faint seam where the two halves of the bead were put together during its making; but I haven't been able to feel it while turning the joint -- and I've been fiddling with it non-stop for days.

The bead doesn't seem to be developing any scratches or grooves in its surface, either, which was another concern... I guess because it's brass on brass, neither the plate nor the bead is harder than the other, which helps.

The heat doesn't appear to distort the bead. Solder melts around 400 degrees, and brass melts up around 1750 -- so as long as I don't fry the bead, it seems to be OK. The one tricky bit is that because the solder is inside the bead, you can't actually see it melt. Before I figured out that I could put it inside, I was trying to put solder on the end of the joint; it didn't work -- but I learned that a butane torch melts the solder waaaay faster than a soldering iron.

The bead is hollow, but it has the usual holes on either side -- and these serve as really helpful pilot holes when I expand them with the drill. The rod is held in place at each end of the sphere, so it's actually locked in place very well -- it can't wiggle from side to side, and it's oriented the same way that the original holes were.

I expected that the place where the rod ends would impede motion -- but the edges of the sandwich plates actually stop the rod before the end of the rod can cause trouble. ...When I was putting the ball on the rod, I had a trick where the rod stands vertically, with the ball slid down to the bottom -- so the rod doesn't stick out at all... it's almost as if it's just a flat spot on the far side of the ball.

I'm pretty intent on trying a steel / aluminum armature eventually. Right now I seem to be experimenting with intermediate-level materials (brass armature, cold foam) -- I need a midway point before leaping to pro-level stuff.

I don't want to share this with SMA until it's been play tested on a real armature... But I'm hopeful that it will provide folks with another good alternative for metal-jointed armatures -- an "open hole double ball" design where you don't have to special-order the metal stock, and you don't have to own a table-hogging drill press. (I've been following that thread where I-forget-now-who has been building an armature out of "helping hands" bits; I don't understand how this can possibly work -- the joints on mine are terrible!)

Posted by: sven at March 20, 2006 10:47 AM

Post a comment


Remember Me?


You may use HTML tags or Markdown syntax in your comments:
*emphasized*, **strong**, & [link](http://www.foo.com).

No need for <p> or <br> tags.