stopmo
you are here [x]: Scarlet Star Studios > the Scarlet Letters > stopmo
September 5, 2012
adobe premiere & animation frame rates
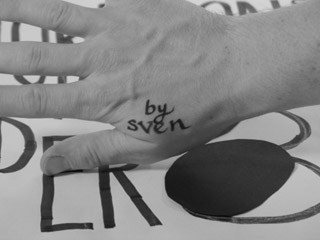
by sven at 1:12 am

Earlier this year I finally broke down and purchased Adobe Creative Suite 5.5 - Production Bundle. ...Only a week or so before CS6 was released — sigh. Happily, though, I did a lot of shopping around and managed to get a very good deal from SoftwareMedia.com.
The critical application for me was Adobe Encore, which seems to be the only good option for authoring Blu-ray discs from a Mac. Going into this, I didn't know that Adobe Premiere is the hub of the production experience in CS5.5. It's been interesting getting familiar with the software.
The only film editing software I'd worked with previously was iMovie — and I kind of hated it. Premiere, on the other hand, is a pleasure. I particularly enjoy editing to music: looking for the best moments in my library of film clips, and finding ways for the visual beats to coincide with audio dynamics.
I've spent a lot of time watching instructional videos in order to get up to speed. (Google "Adobe TV" for the best starting place.) But now that I've begun to get my legs under me, I really appreciate some of the professional magic tricks I can work. The most crucial of these is converting frame rates.
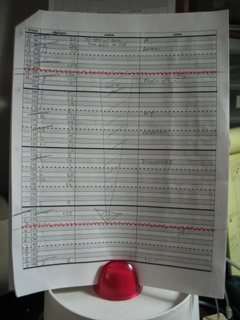
Converting framerates for the NW Animation Festival
I'm going to oversimplify: video in Europe is 25fps, film in the USA is 24fps, and TV/DVD video in the USA is 30fps. If you tell a computer to convert one frame rate to another, it's just going to insert or delete frames — which creates a very noticeable stutter. (Unless you interlace — which is a whole 'nother nightmare.) ...What to do?
Well, first off, I've got a big advantage because I'm dealing with animation. Live action filmmakers often shoot footage in 30fps. Only a very tiny minority of animators originate films in 30fps. We work and think in 24fps. When our films get transferred to 30fps for TV/DVD use, they get degraded in the process. In the world of animation, we want to avoid 30fps if at possible.
Happily, we've finally entered an age where we can avoid 30fps. Blu-rays and broadcast HDTV can accommodate 24fps. 30fps is still in usage — but there's real movement toward 24fps becoming a universal standard for film and TV.
So, based on what's native to animators, and in hopes of a universal standard, I've settled on 24fps as the master frame rate for the NW Animation Festival. In the upcoming year, I'll be encouraging animators to send me their original source files — which are most likely 24fps — and strongly discouraging them from burning playable DVDs.
This still leaves the issue of how to work with 25fps. (Q: Where did that number 25 come from? A: It's an artifact of European electrical current being 50hz, whereas ours is 60hz.) After a lot of research and a good tip from the Steve Herring at Proludio, I've settled on this strategy: slow the films down by approx. 4%, and pitch shift the audio up by +.75dB. The change in speed is imperceptible, and no frames are lost.
In the context of Adobe Premiere, one uses the "interpret footage" menu to play back individual frames at a different rate. Audio needs to be adjusted in Adobe Audition. Once you find the settings and grasp the underpinnings, the conversion is fast and easy. Getting to the point of understanding why this is the right solution, and how to accomplish it — that was decidedly not easy.
posted by sven | permalink | categories: nw animation festival, stopmo
June 9, 2012
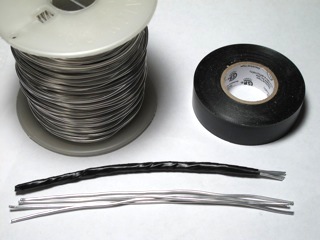
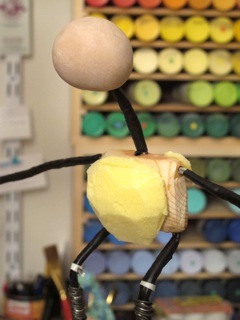
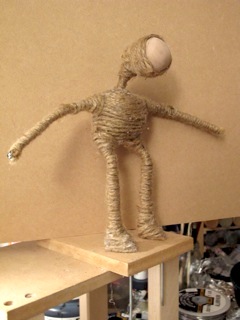
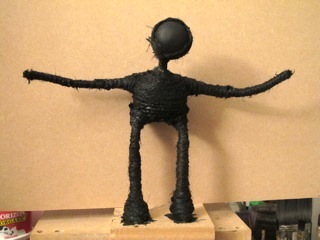
armatures 101 - part 2: how to make a wire armature
by sven at 9:42 pm
Here are videos from three well-respected StopMotionAnimation.com members, each describing how to build a basic wire armature.
(Click on name to go to their website.)
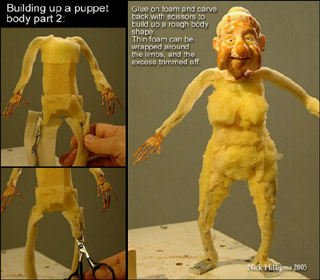
Nick's puppet-making series:
• Make a Buildup Puppet
• Tie-downs Tutorial
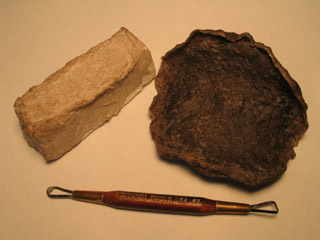
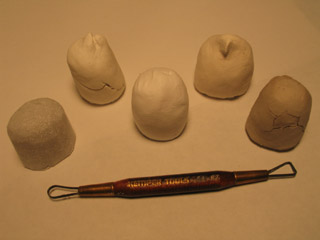
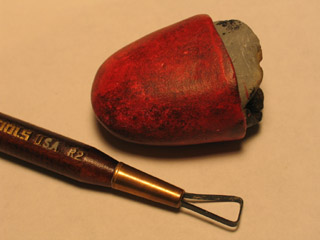
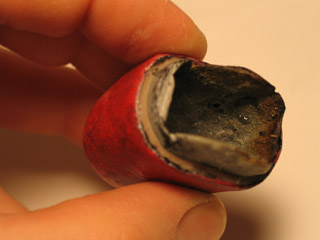
• Stop Motion Puppet Heads Part 1: Latex Build-up
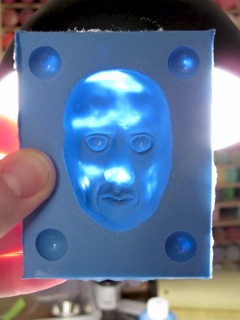
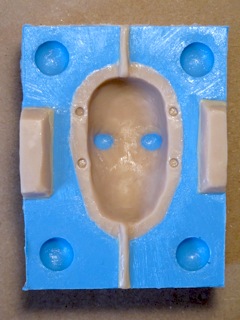
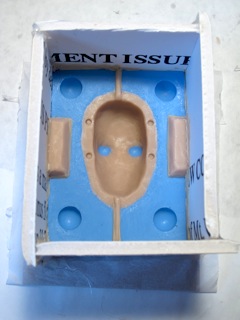
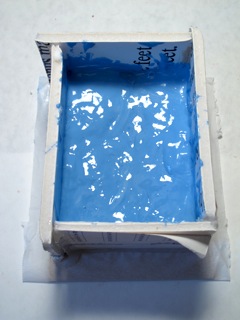
• Stop Motion Puppet Heads Part 2: Mouldmaking and Casting in Silicone Rubber
.
.
MARC SPESS
Marc's puppet-making series:
• How to Make Wire Armatures for Stop Motion
• Stop Motion Puppet Construction 1st Edition
.
.
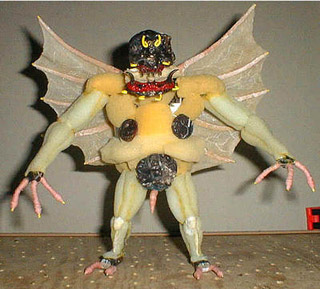
RICHARD SVENSSON
Richard's puppet-making series:
• Building a Stop Motion Monster: Making an Aluminum Wire Armature (1 of 4)
• Building a Stop Motion Monster: Making the Latex Skin (2 of 4)
• Building a Stop Motion Monster: Padding the Body (3 of 4)
• Building a Stop Motion Monster: Finishing the Puppet (4 of 4)
posted by sven | permalink | categories: stopmo
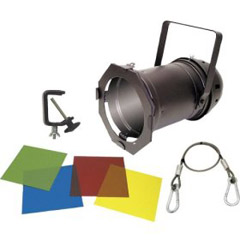
armatures 101 - part 1: wire vs. ball & socket
by sven at 5:06 pm
[Today StopMotionAnimation.com got a major overhaul and years of archives disappeared. I'm doing some writing to help repopulate the site with info useful to newcomers.]
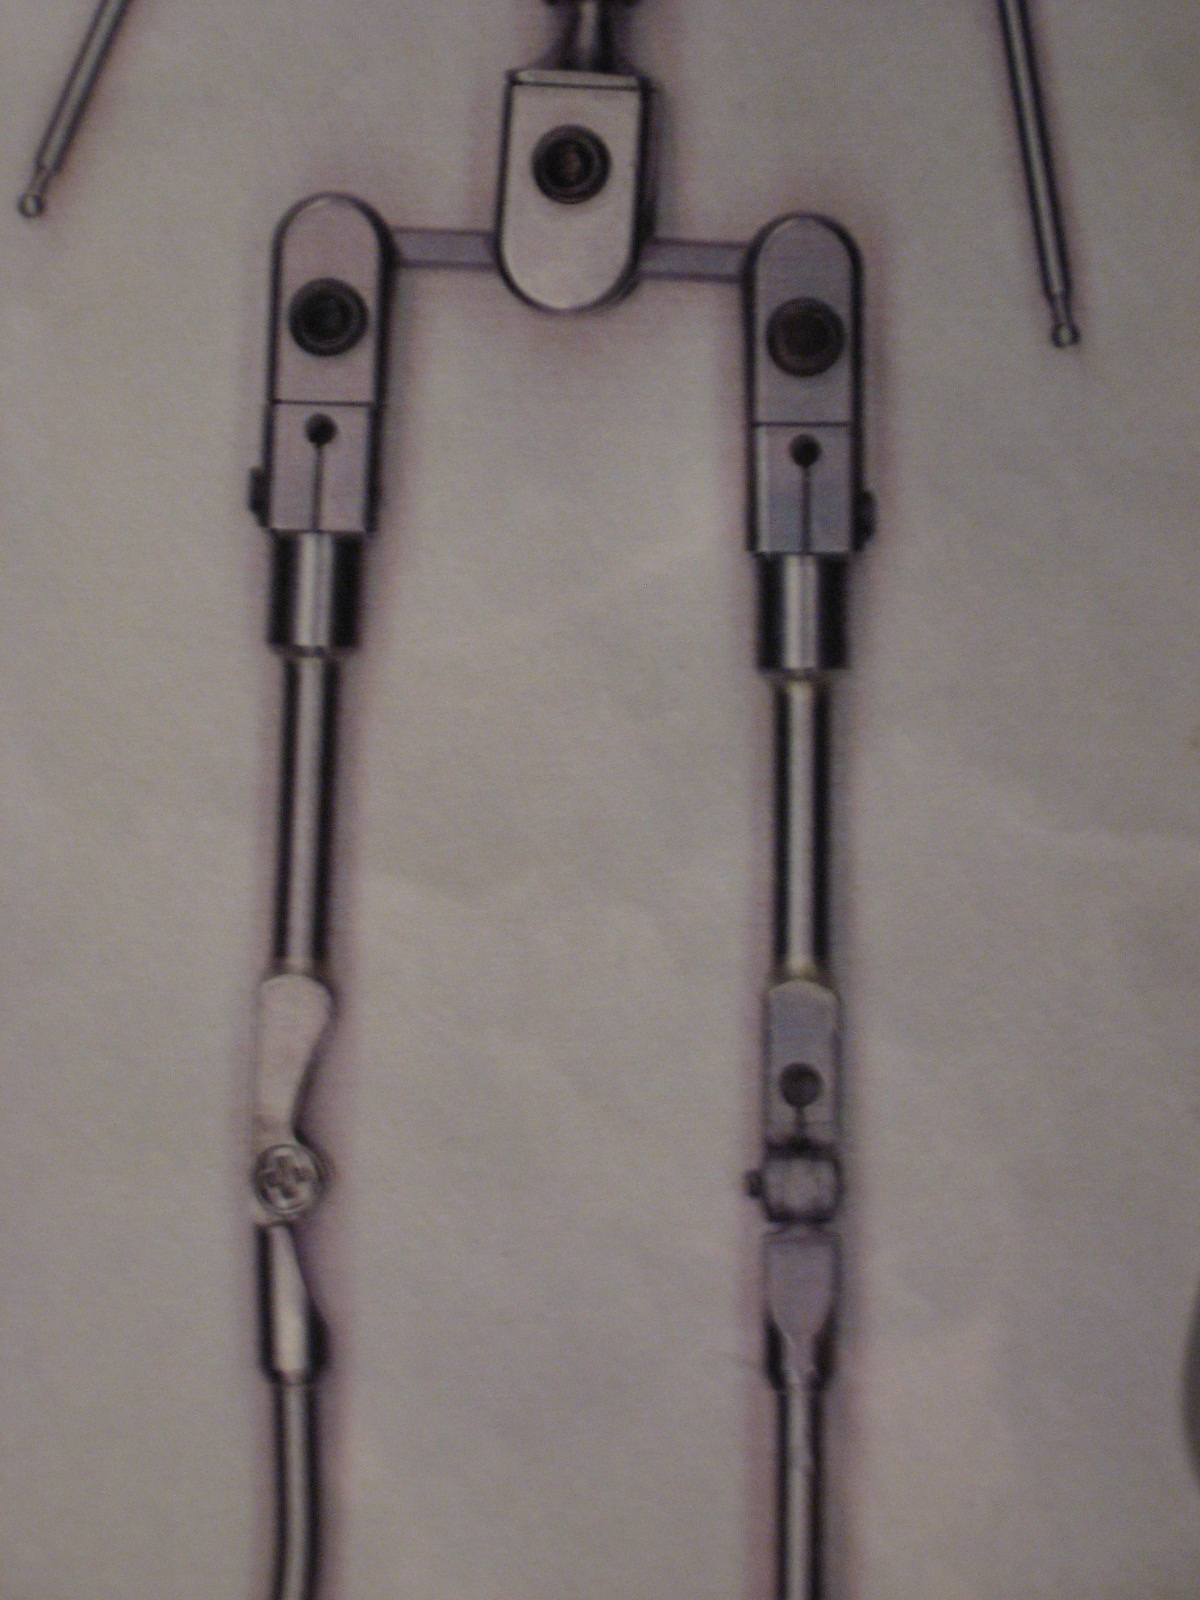
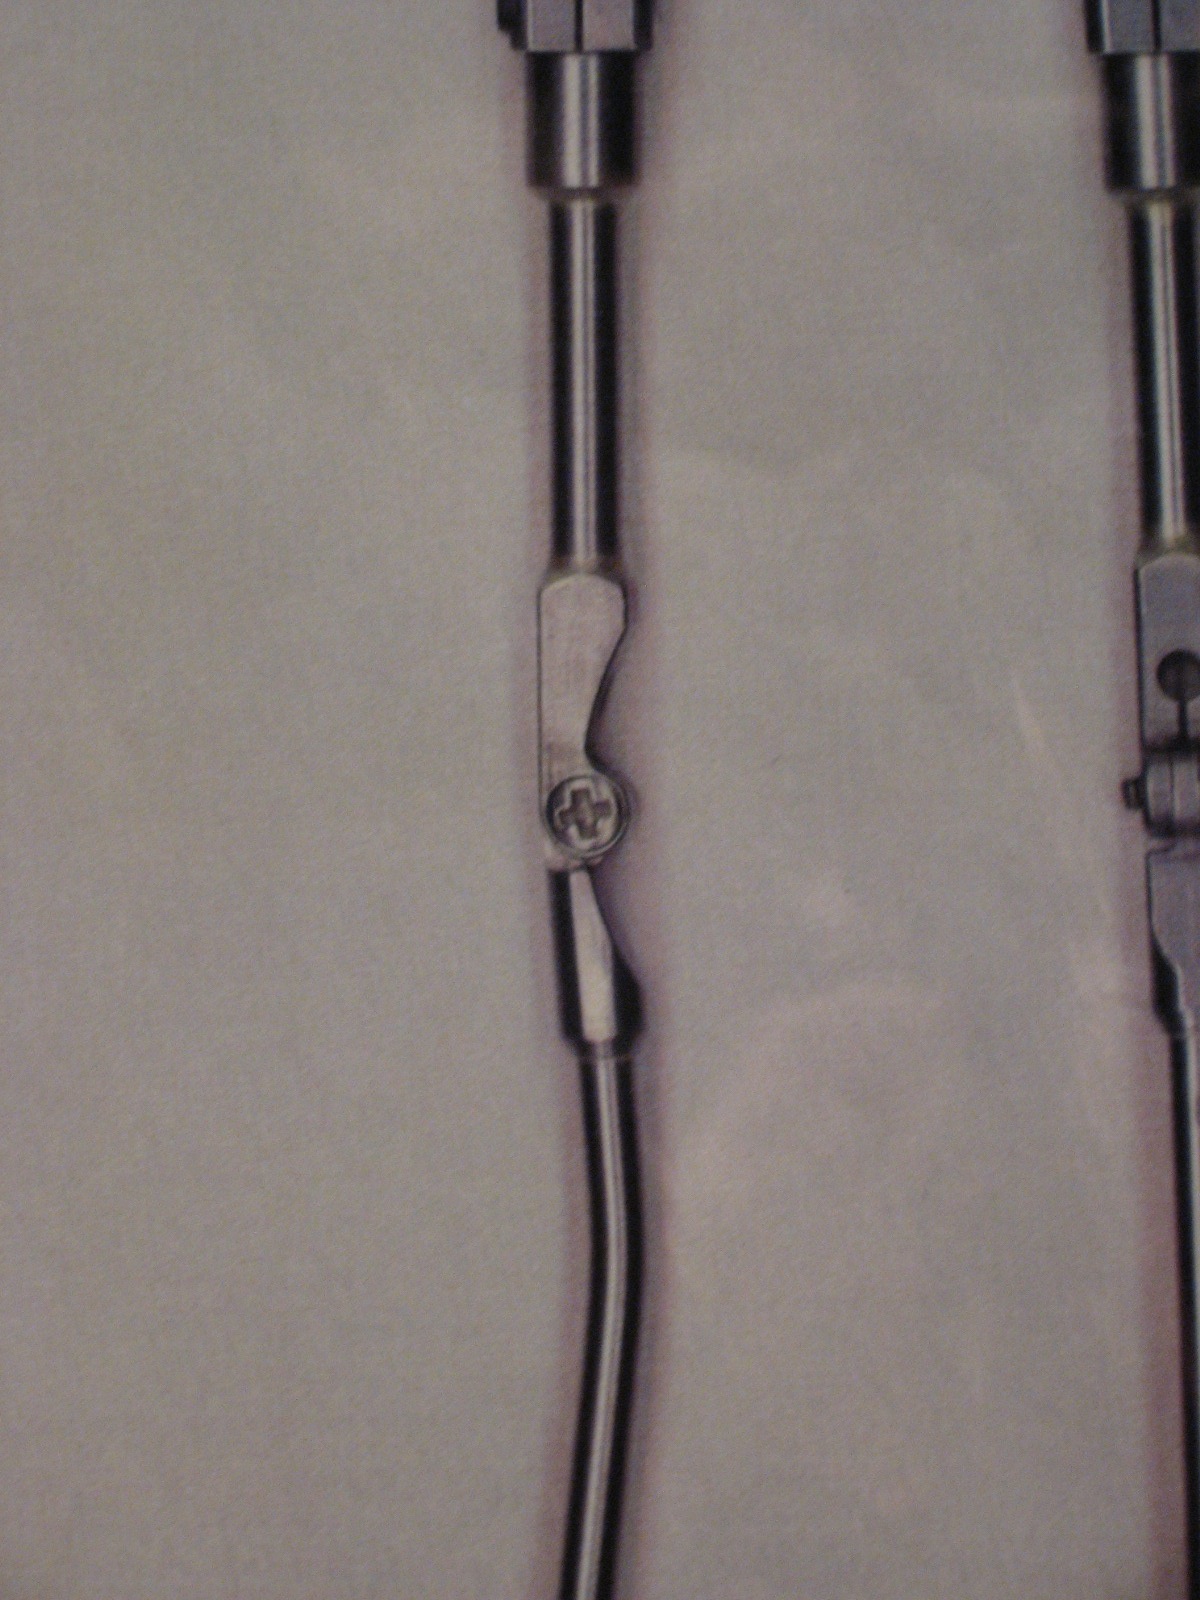
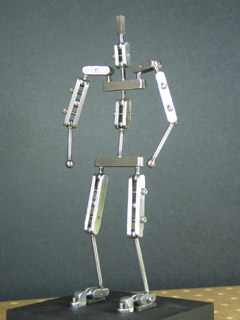
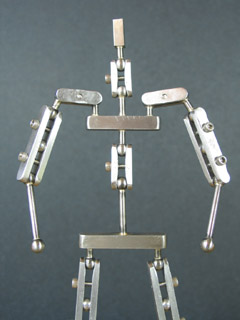
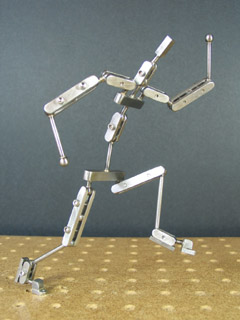
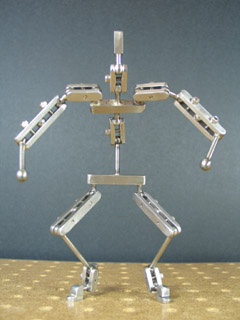
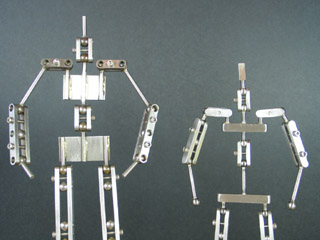
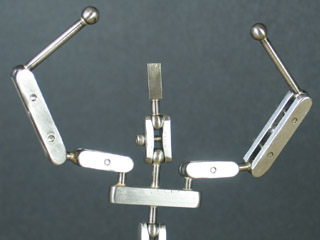
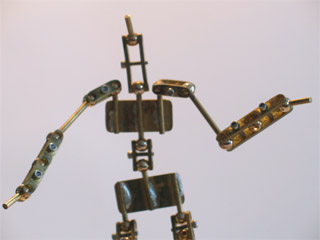
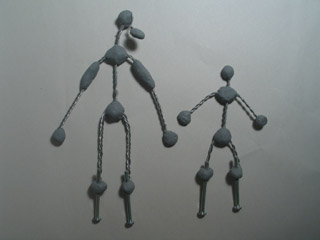
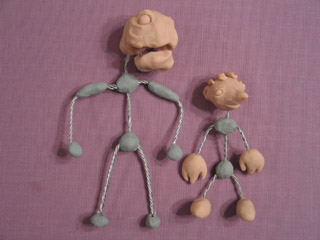
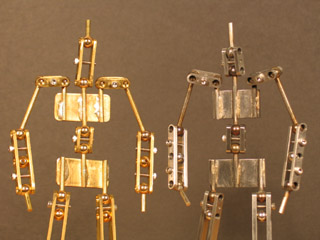
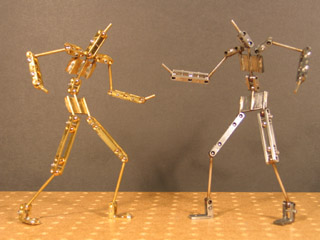
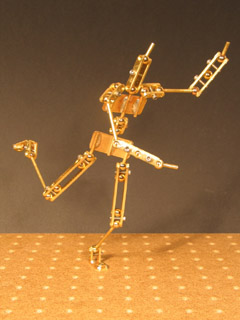
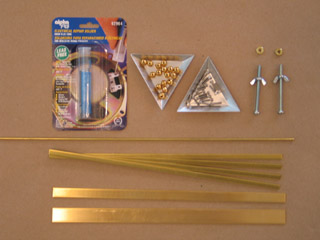
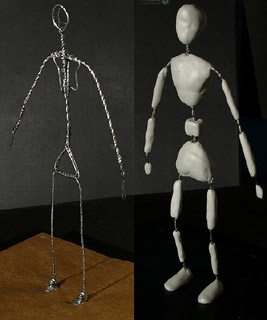
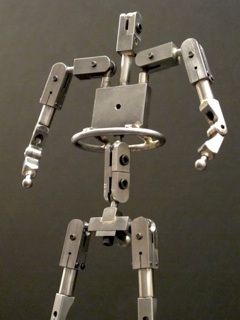
There are two main varieties of armature: wire and ball & socket. Here are the pros and cons.
1. Price
Wire armatures are inexpensive: ~$20 for materials. Ball & socket armatures are expensive: ~$150 for a humanoid kit, ~$500+ for something custom-built.
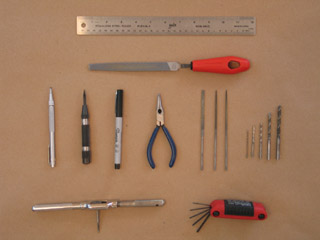
2. Time Spent Building
Wire armatures are fast to make (1-2hrs). Ball & socket armatures take a long time (30hrs+).
3. Durability
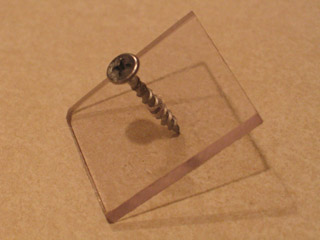
Wire armatures break. It's not a question of if—it's a question of when. A well-built wire armature can hopefully last for 5-minute film. A well-built ball & socket armature will never break; however, screws that keep the joints tight can become loose and need re-tightening.
4. Spring Back
When you bend a wire armature into position, it will "spring back" a little. A ball & socket armature won't spring back, and thus allows you to put a puppet into a pose more precisely. If you use framegrabber software, you can compare frames and compensate for spring back—so it's not such a big problem nowadays.
5. Hinge Motion
When you make an elbow using wire, the joint bows rather than hinging on a precise point. If you try to narrow the length of wire at the elbow joint, risk of breakage increases. With a ball & socket armature, you can make a joint that bends at a single, precise point.
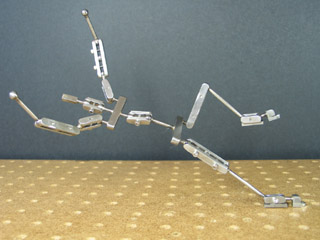
6. Flexibility
It's a simple matter to make a tentacle using wire. It's very difficult to create enough ball & socket joints to simulate the same thing.
7. Limited Range of Motion
In ball & socket armatures, range of motion is often limited—especially at the shoulders. It may be difficult to transition a puppet between certain poses. For example, many puppets will lock up if you try to move from arms down at sides to arms up at sides to arms outstretched in front. Wire armatures, by contrast, can give you an unlimited range of motion. Constrained motion can sometimes make your job easier while animating... However, extra range of motion can also be very valuable. It might allow you to cheat your way out of a problematic pose on set.
8. Professionalism
There's a misconception that professionals only use ball & socket armatures. Not true. Most puppets made for TV use wire armatures. The expense of creating ball & socket armatures is usually only justified for feature films.
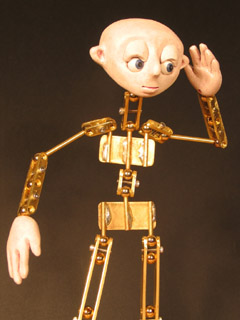
Bottom Line
Animating a well-made ball & socket armature is like driving a Porsche. It's a pleasure to work with, and you get the very best results. Expect to spend extraordinary amounts of time and money for that experience, though. A bad ball & socket armature is miserable to work with, and worse than a typical wire armature. You'd be wise to start off your animation career by learning to do good work with wire.
posted by sven | permalink | categories: stopmo
April 27, 2012
stopmo interview with elizabeth carmona
by sven at 2:40 am

Elizabeth Carmona, a graphic design student in El Salvador, is doing her graduation thesis research on stop-motion. She found my work via StopMotionAnimation.com and asked for an interview. I have a hard time saying no to pontificating about the subject — particularly if it might help an emerging artist — so here's what came of it...
Eliza: Thanks a lot for your answer and for agreeing to help me!
I'm doing a guide about "How to do stopmotion animation", and I was reading your site and it has such a wonderful information about the technique (I specially find really useful and interesting the essay about pros and contras of cg, and the aesthetics of stopmotion) and the way you've been experimentating with armatures.
So for the interview I wanted to ask you:
Why did you choose stop-motion?
Sven: Stop-motion is something that I've wanted to do since I was maybe 6 years old. I read books about animation and special effects because I was in love with Star Wars and films like it. But animation seemed impossible then. I just couldn't see myself shooting on film and then having to send it off for developing. In 2002, one of the books I'd read as a child — The Animation Book, by Kit Laybourne — was republished with new material about computers. Suddenly it dawned on me: all you need now to do animation is a computer — and I've already got one of those. So I started doing motion graphics and kinestasis using AfterEffects. But it still felt like something was missing. I enrolled for a hands-on class about shooting Super8, so I could say I'd at least tried using celluloid. In the process of doing that, I finally got my chance to try stop-motion. And when I did, I was hooked. It was like a fever. For at least a year, it seemed like I did nothing but study stop-motion and experiment with puppet-making materials. I could talk about the various things I love about stop-motion — how you're making real, tangible objects come to life (magic!) — but the attraction goes beyond reason. I bonded with stop-motion at a young age, and late in life am unable to shake its gravitational pull.

Who have been your influences?
I fell in love with Star Wars, King Kong, all of Ray Harryhausen's films... There's a lineage there, that goes from Willis O'Brien to Uncle Ray to Phil Tippett. But while the sci fi / fantasy stuff is ingrained in my bones, it's actually the more stylized, artsy puppet animation that I'm interested in making myself. There's another lineage: which goes from Vladislav Starevich's The Cameraman's Revenge to George Pal's Puppetoons to Henry Selick's The Nightmare Before Christmas. In the current scene, I'm most inspired by folks like Jeff Riley (Operation: Fish), Neil Burns (The Nose), Nick Hilligoss (L'Animateur), and Barry Purves (Tchaikovsky - an elegy).

From where do you take inspiration for a new story or character? what comes first for you?
I'm very interested in process. Story and character are important, but pretty much everything I've done so far has begun from wanting to tackle a specific technical challenge: such as lipsync or replacement faces. Time has also often been a consideration — challenging myself to make a film in a set number of days or weeks. I find that by starting with the limitations I want to obey, I'm less likely to get sucked into attempting a project that's too big to be completed in a tolerable amount of time.

While making the puppet, what are the most important things you consider?
A puppet is only as good as its armature. To get really nuanced movement, you want to have a ball and socket armature. So I've spent a lot of time learning how to create professional-level steel armatures using a milling machine and lathe. Armatures are interesting to me as an art form unto themselves, though. Most puppets I've actually animated — and truth-be-told, the majority of puppets in professional studios — have wire armatures. Frankly, the benefit of being able to create a puppet quickly is usually more important than having one that's perfect.
Besides the armature, I also want puppets that have a very sculpted look. With build-up puppets, you can do a lot with hard body parts made from Super Sculpey or epoxy clays (such as Magic Sculpt, Milliput, or Apoxie). Given the look I want, though, I'm naturally drawn to mold-making and casting puppets in foam latex or silicone. I've had some successful experiments, but am still in working on really learning the skills.
What materials you prefer to use and why?
Every material has a place in the puppet-maker's toolkit. A puppet's head might be made from polymer clay in order to gain more working time while sculpting — whereas the hands and feet might be made of quick-curing epoxy (much stronger) to avoid being broken, since they're so close to high-stress joints. For humanoid puppets I like to use hard parts whenever possible, so that I don't have to fuss with re-sculpting soft clay mid-shot. But, on the other hand, I also like working with clay on its own terms. I think that animating with clay can be like having a 3-dimensional sketchbook... It allows you to improvise and explore ideas in ways that build-up and cast puppets don't. For any kind of artist, I think it's important to make improvisation a regular practice. Make elegant puppets — but also play with shapeless blobs. Ultimately, I think it's good to avoid getting stuck in one set of materials; you should strive to have all of them at your disposal, and know which is right for a particular job.

In your point of view, how does social media and technology influence modern stop-motion animation?
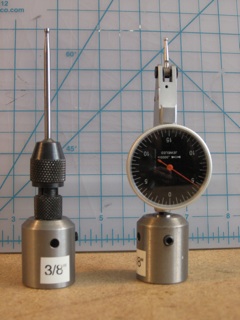
Stop-motion has undergone a technological revolution in the past 15 years. With the advent of frame-grabbing software, animators have the ability to toggle back and forth between frames, making sure that they're getting the shot they want. Before this, animators used tools like surface gages (many still do) — but mostly had to rely on sheer mental focus to keep track of what bits were changing between shots. Subtle stop-motion is still challenging — but far easier now that you can check your work before committing.
The internet and forums such as StopMotionAnimation.com and AnimateClay.com have also played a huge role in stop-motion's renaissance. It used to be extremely difficult to find good information about how to make our specialized puppets. Now there's an active online community where masters and amateurs co-mingle, solving problems and learning from one another. Some of the magic may have been lost in the process of revealing the art form's secrets — but as a result, an art that once seemed on the brink of extinction is prospering again.
I think stop-motion is particularly suited to communal discussion, too. With computer animation, it can be challenging to explain what's going wrong with your software. Stop-motion, by contrast, is all about craft projects. "Show and tell" is much more intuitive when you're working with real, tangible materials like clay and wire and foam.
The web is a godsend for stop-motion animators as people. It's difficult enough to find in-the-flesh communities of animators. When you do, stopmoes are usually a minority. Being able to Google "stop motion" and find a bunch of people doing the same sort of work breaks the isolation — and then allows friendships to form. My most valued circle of stopmo friends is made up of individuals living in Los Angeles, San Diego, New Orleans, Atlanta... While I'm all the way up here in Portland. We keep up with each other via show-and-tell on our blogs, through "hey, have you seen this?" emails, and the background noise of Twitter. We've kept tabs on one another during hurricanes and earthquakes, when there's a medical crisis, or when someone just goes missing for a while. ...But of course, that story of "internet relationships extending into the real world" has been true for many types of online affinity groups, not just our own.
Technologically, the most curious thing to me is seeing stop-motion beginning to become indistinguishable from computer animation. The advent of rapid-prototyping 3D printers means that objects for stop-motion are being created first in the computer, then translated into real sapce. Motion control cameras allow dizzying moves that were the sole purview of CG not long ago. When Coraline came out, the stop-motion community seemed torn about how to feel... On the one hand, the technological accomplishment was unprecedented. On the other, the quirky jerky movement usually associated with our hand-made films seemed to be disappearing.
Since Coraline, rapid prototyping technology has spread rapidly among professional stop-motion studios... And it looks like LAIKA's follow-up to Coraline — titled ParaNorman — will push the limits of technology even further. I have no crystal ball — but it seems like in the near future, most of what CG can do (with the exception of large crowd scenes) will be able to be accomplished in stop-motion with nearly identical results. Then what? ...Frame-by-frame hand-drawn animation has been on the wane for a while — perhaps it will have a resurgence. We crave uniqueness. Just as with stop-motion, what's currently being ignored will soon start to look fresh and new.
posted by sven | permalink | categories: stopmo, writing
July 20, 2011
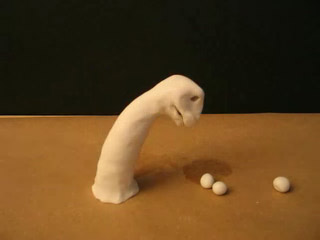
animation walk
by sven at 5:30 pm

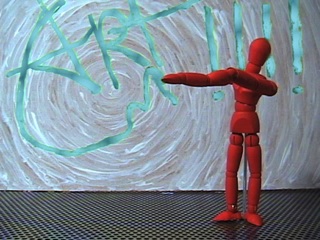
Experimental stop-motion animation driven by six principles:
- An animator animates.
- You can animate anywhere.
- Get out and walk.
- Every artist needs a sketchbook.
- Clay is your pencil — the photo is your page.
- Watch your mind evolve one frame at a time.
...It's been such a busy year, I had to find some way to squeeze in actual filmmaking!
P.S. As usual, the soundtrack won't be much good unless you've got decent woofers in your audio system.
posted by sven | permalink | categories: movies, stopmo
July 13, 2011
"mutate" in da vinci days film fest - july 16, 17
by sven at 1:46 pm

My short film Mutate will playing at the da Vinci Days Film Festival this weekend in Corvallis.
It's playing twice, so Gretchin and I will be taking a little vacation to check out the whole affair. It's part of the Animation Block, which will show on Saturday (July 16) at 3:45pm at the Darkside Cinema and Sunday (July 17) at 2:30pm at the Majestic Theatre.
I'm often amused by how festivals re-write my film description. Here's the da Vinci version:
Like an Animal Planet documentary from another dimension, MUTATE reveals the bizarre life-cycles of various alien creatures as they meld, merge, dissolve and evolve in surprising and frequently hilarious fashion.
Not bad. :)

posted by sven | permalink | categories: exhibits & events, movies, stopmo
July 3, 2011
ken sipel visit
by sven at 4:00 pm

Ken Sipel is a fellow stopmoe and blogger. Last month I had the pleasure of meeting him in-the-flesh.
Ken was coming through town and contacted me to see if we might meet up. Absolutely! I love it when stopmo bloggers bridge the cyber divide — and encourage other readers to also come visit if they're near Portland.
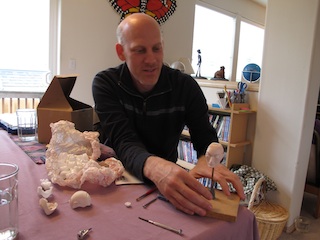
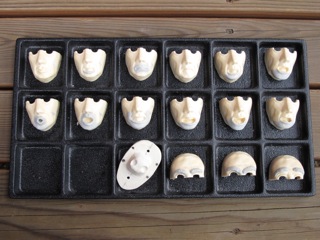
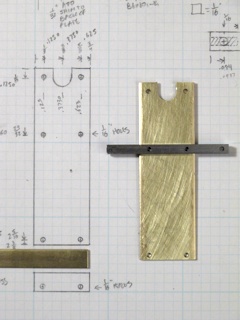
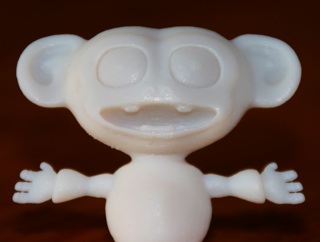
We talked about the NW Animation Festival and about my armature work. Then Ken gave me real treat, and let me see the work he's been doing on 3D-printed replacement faces for his puppet "Christian."
Since Coraline, a number of us have been speculating that indie animators might print puppet faces in resin using shapeways.com. To the best of my knowledge, Ken is the first to actually try it.
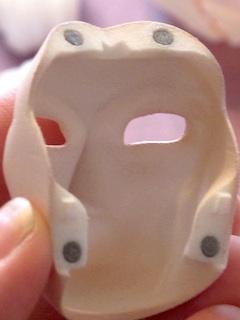
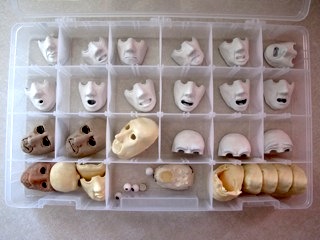
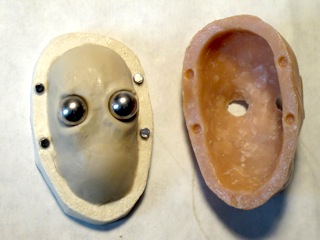
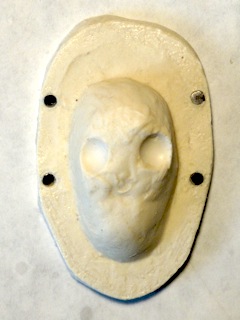
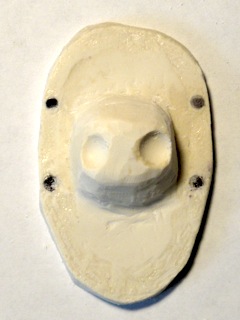
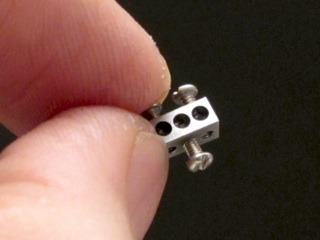
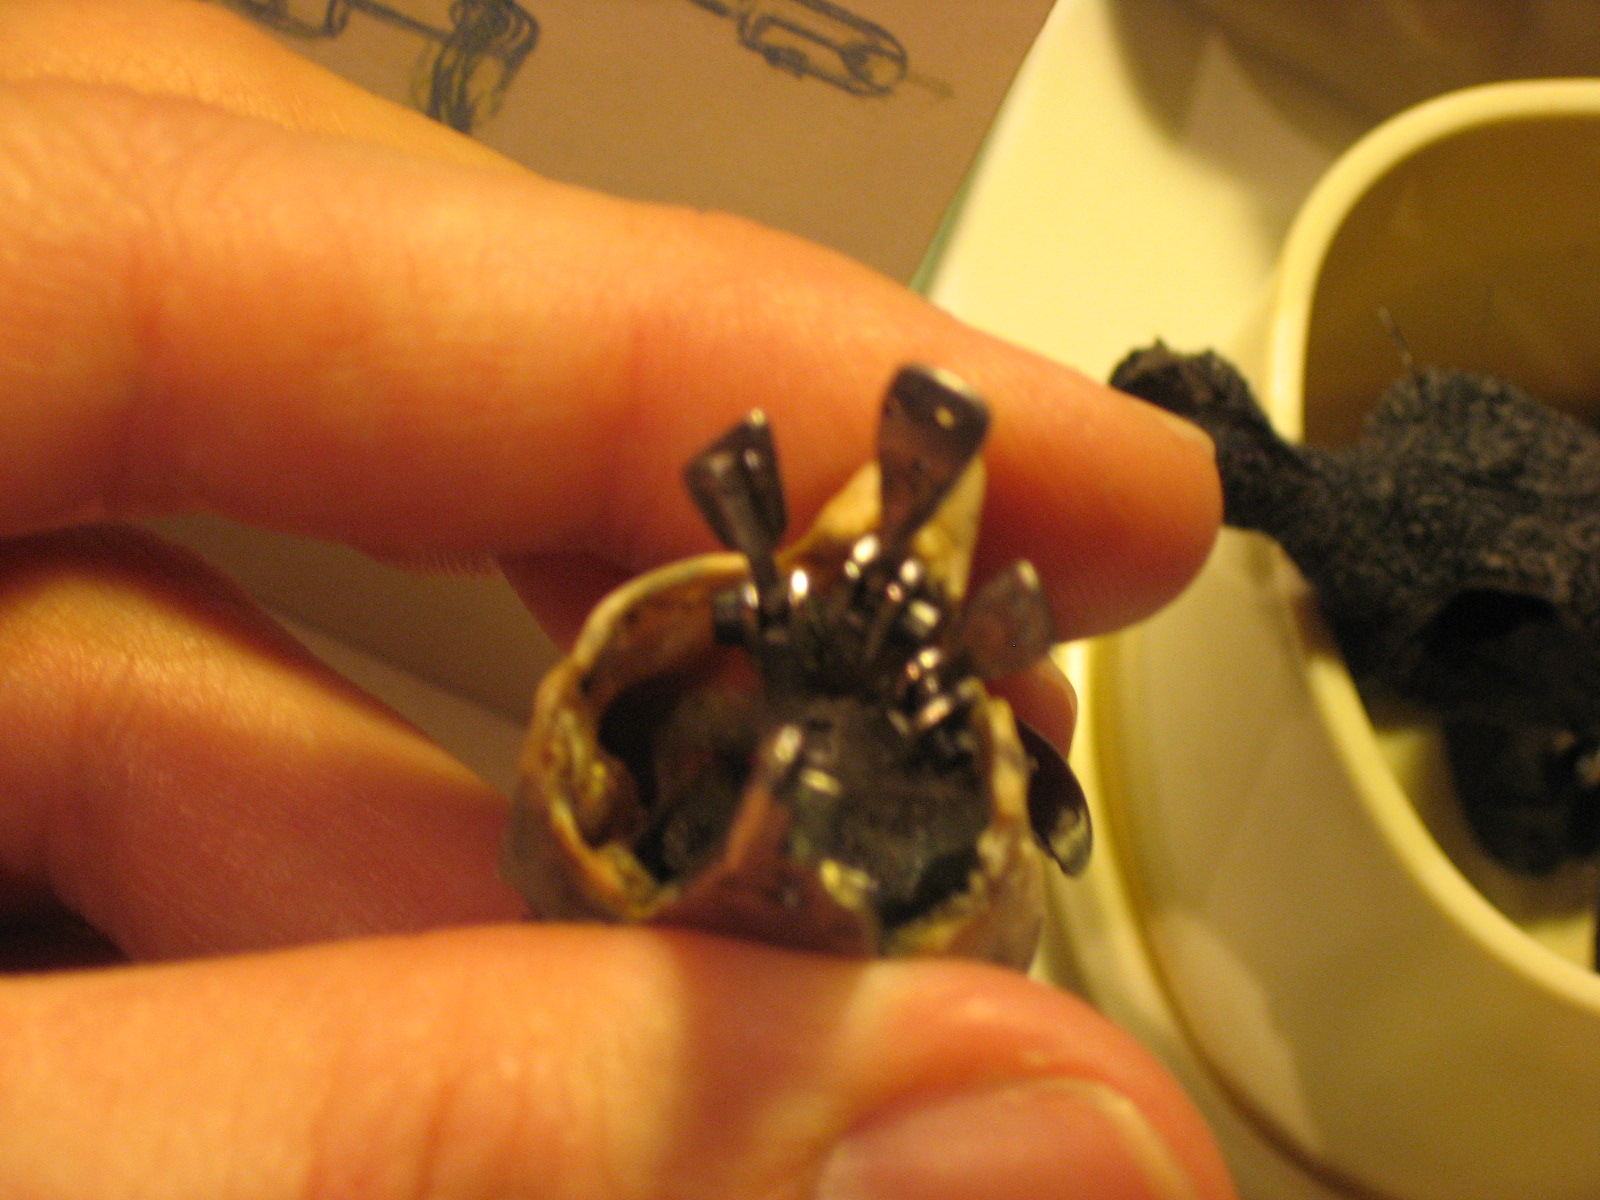
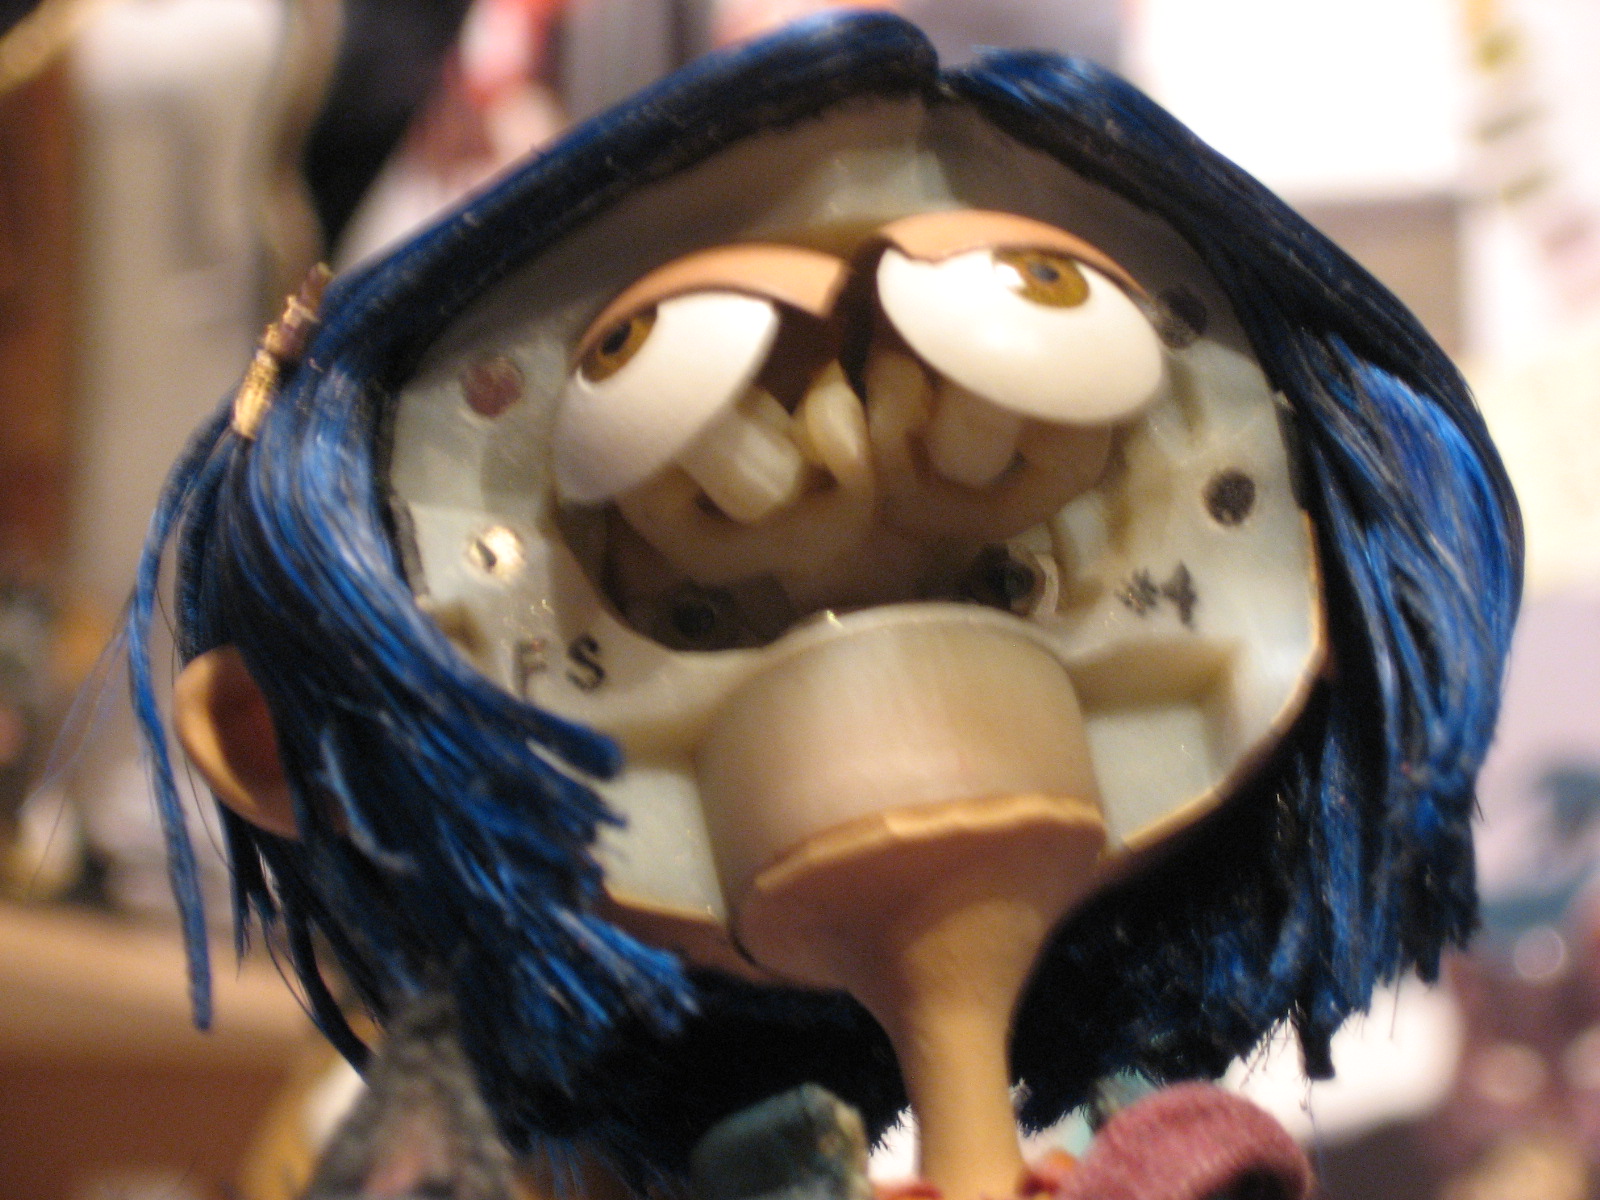
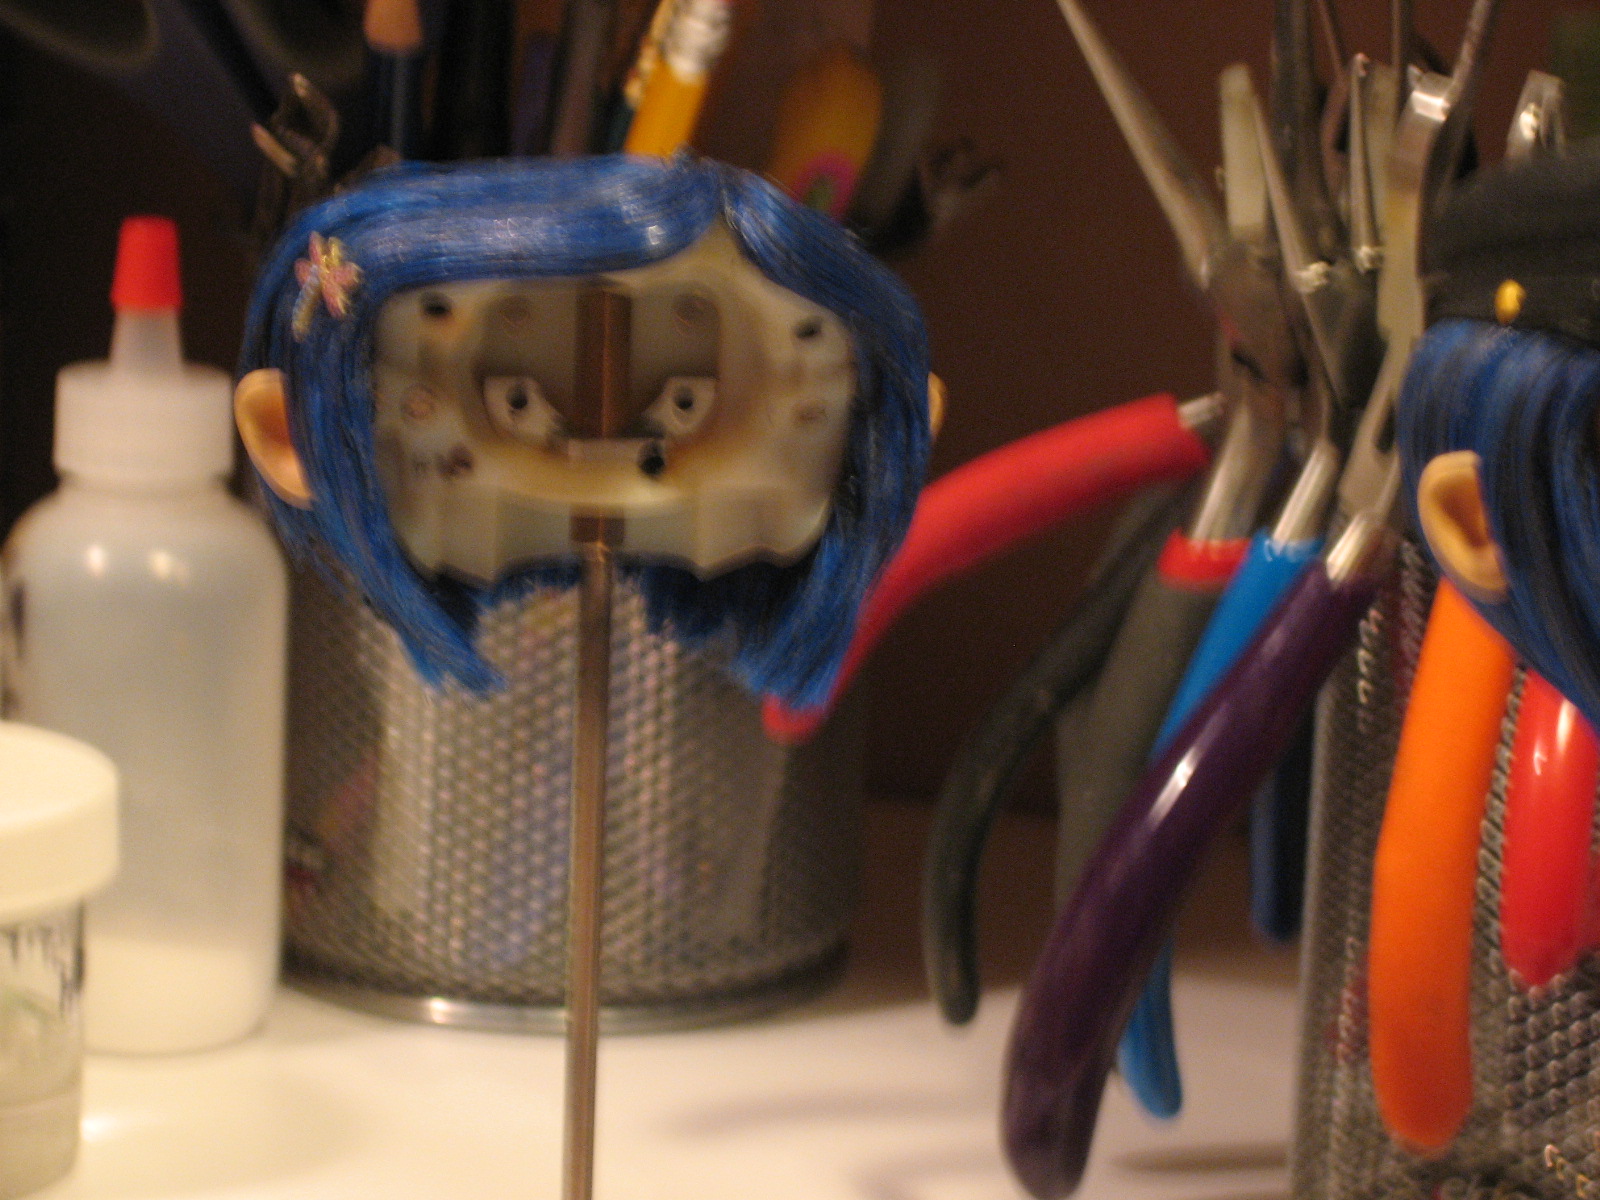
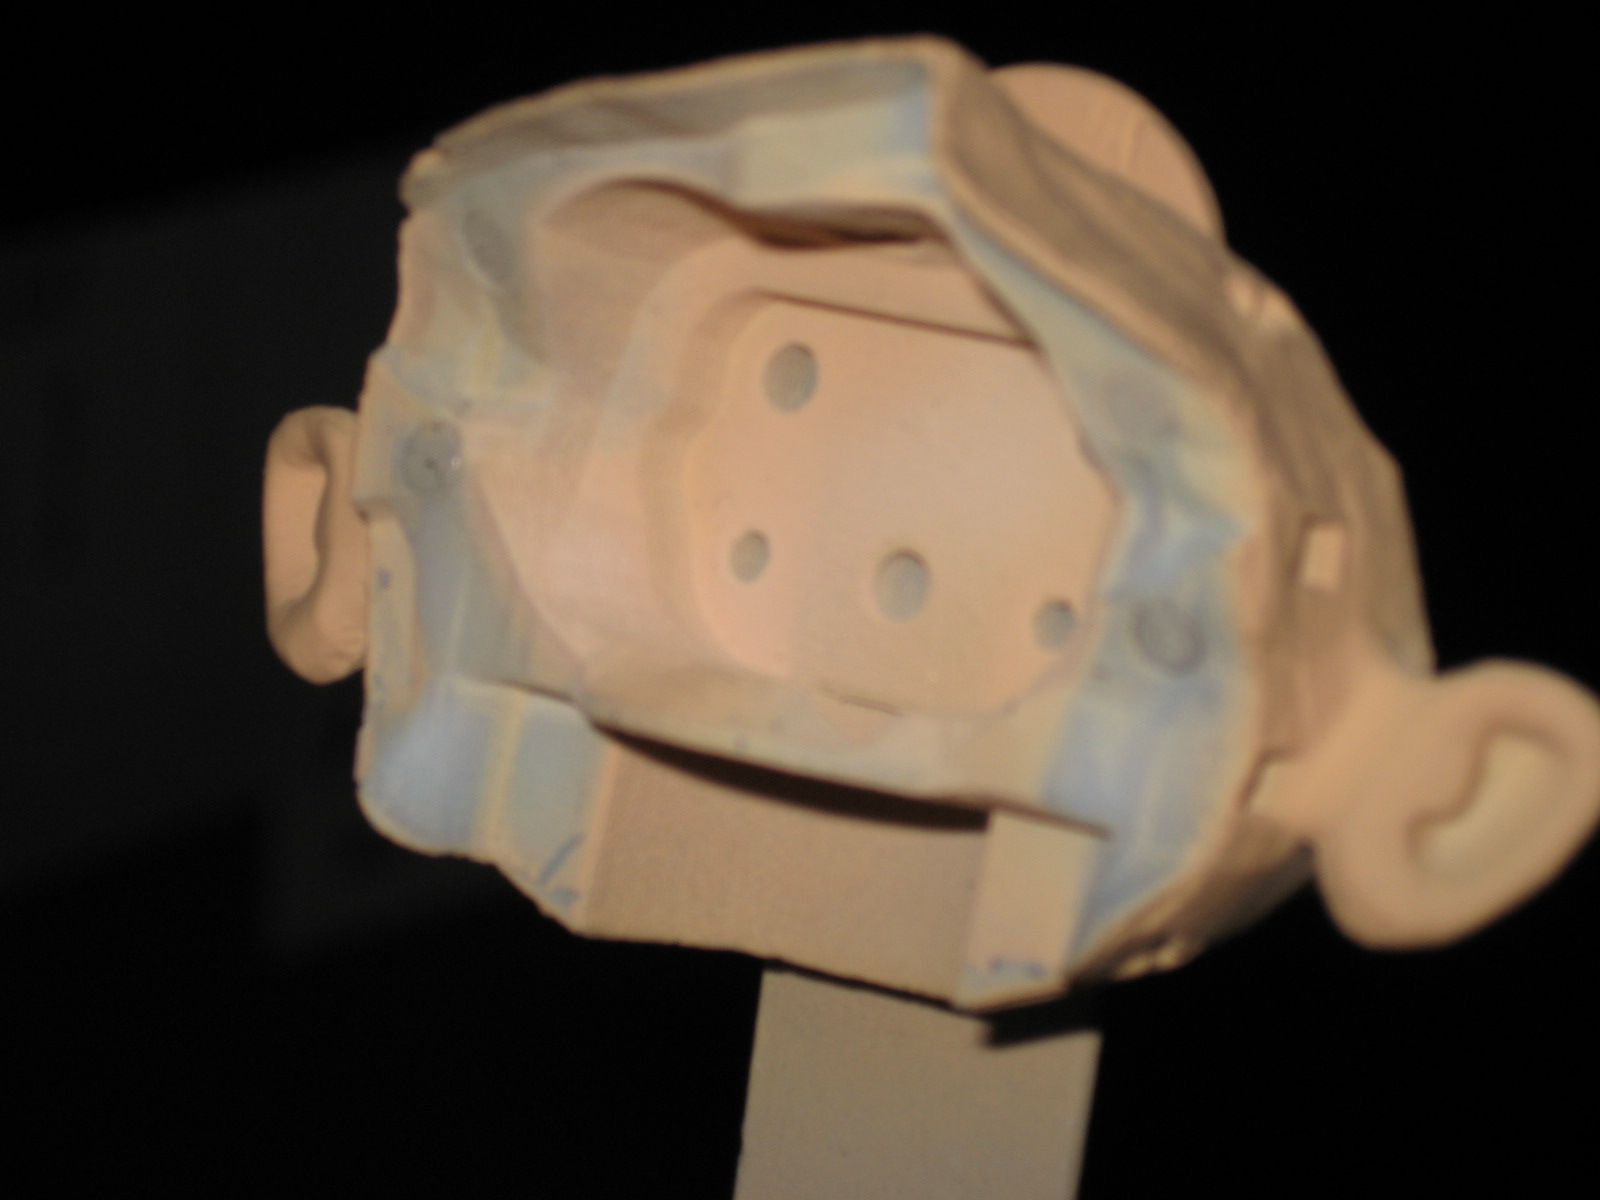
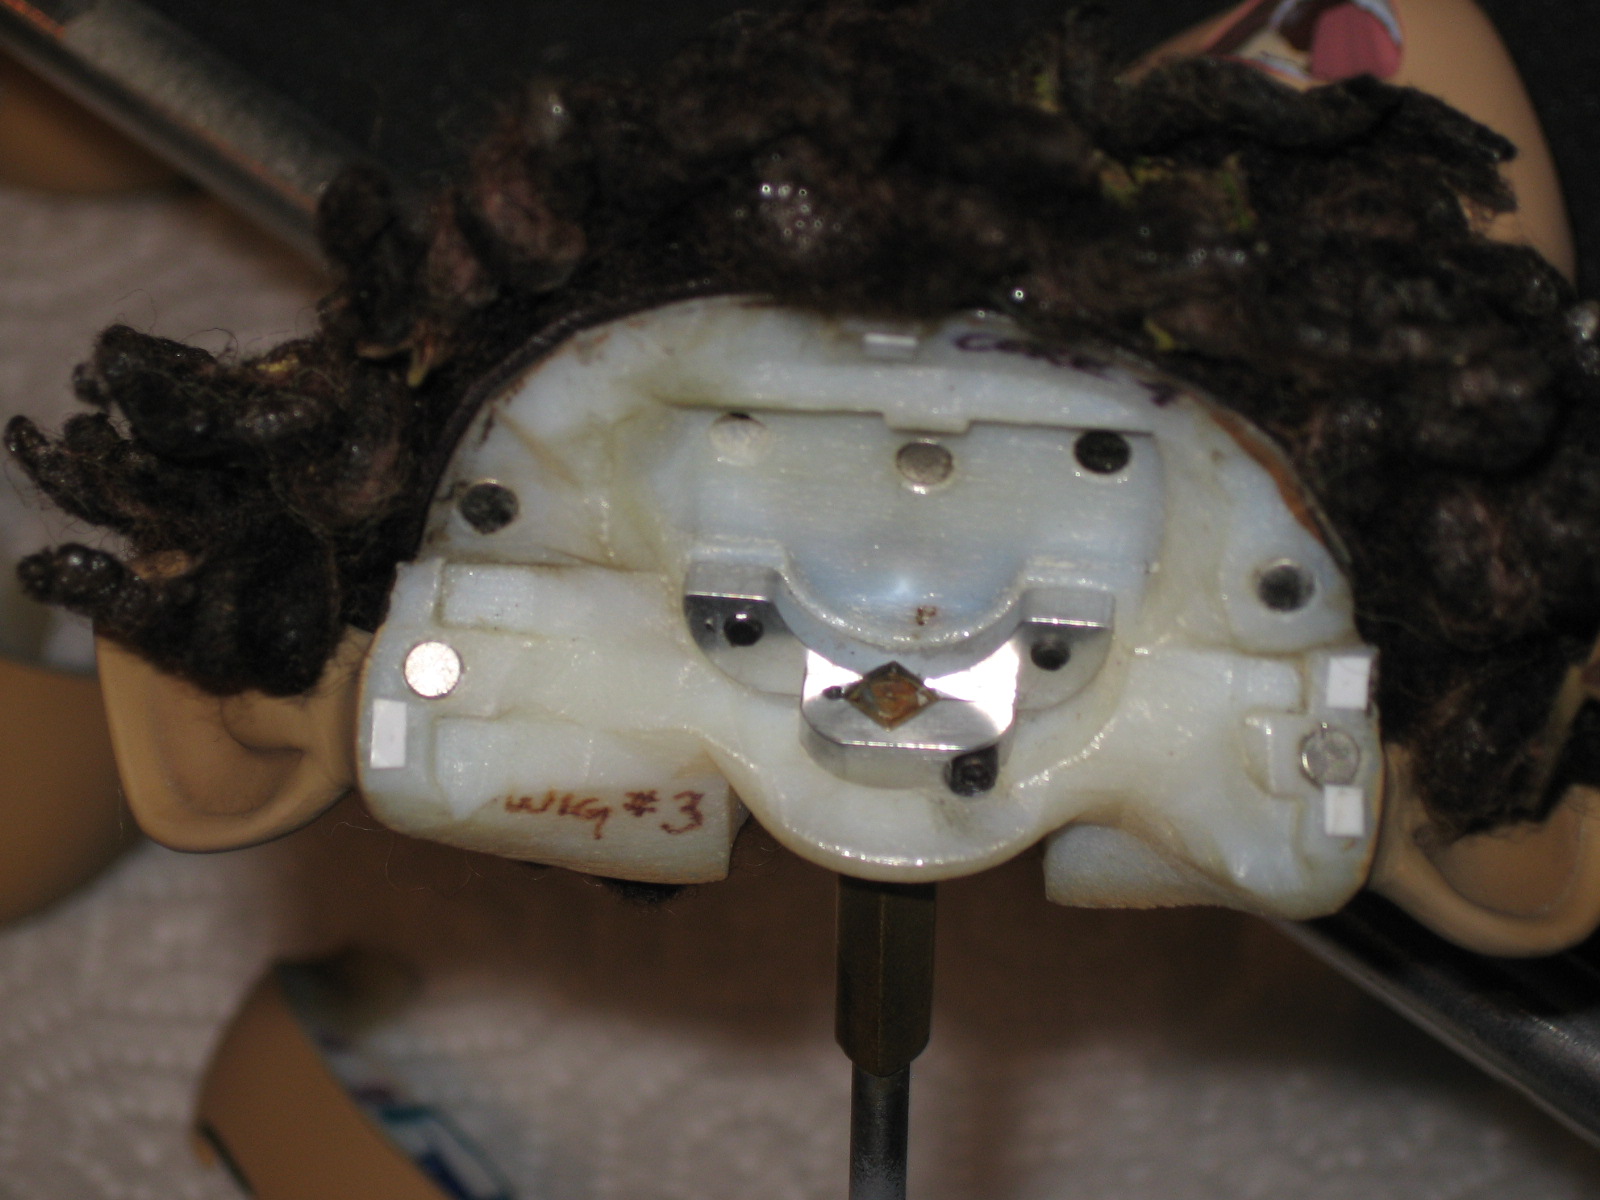
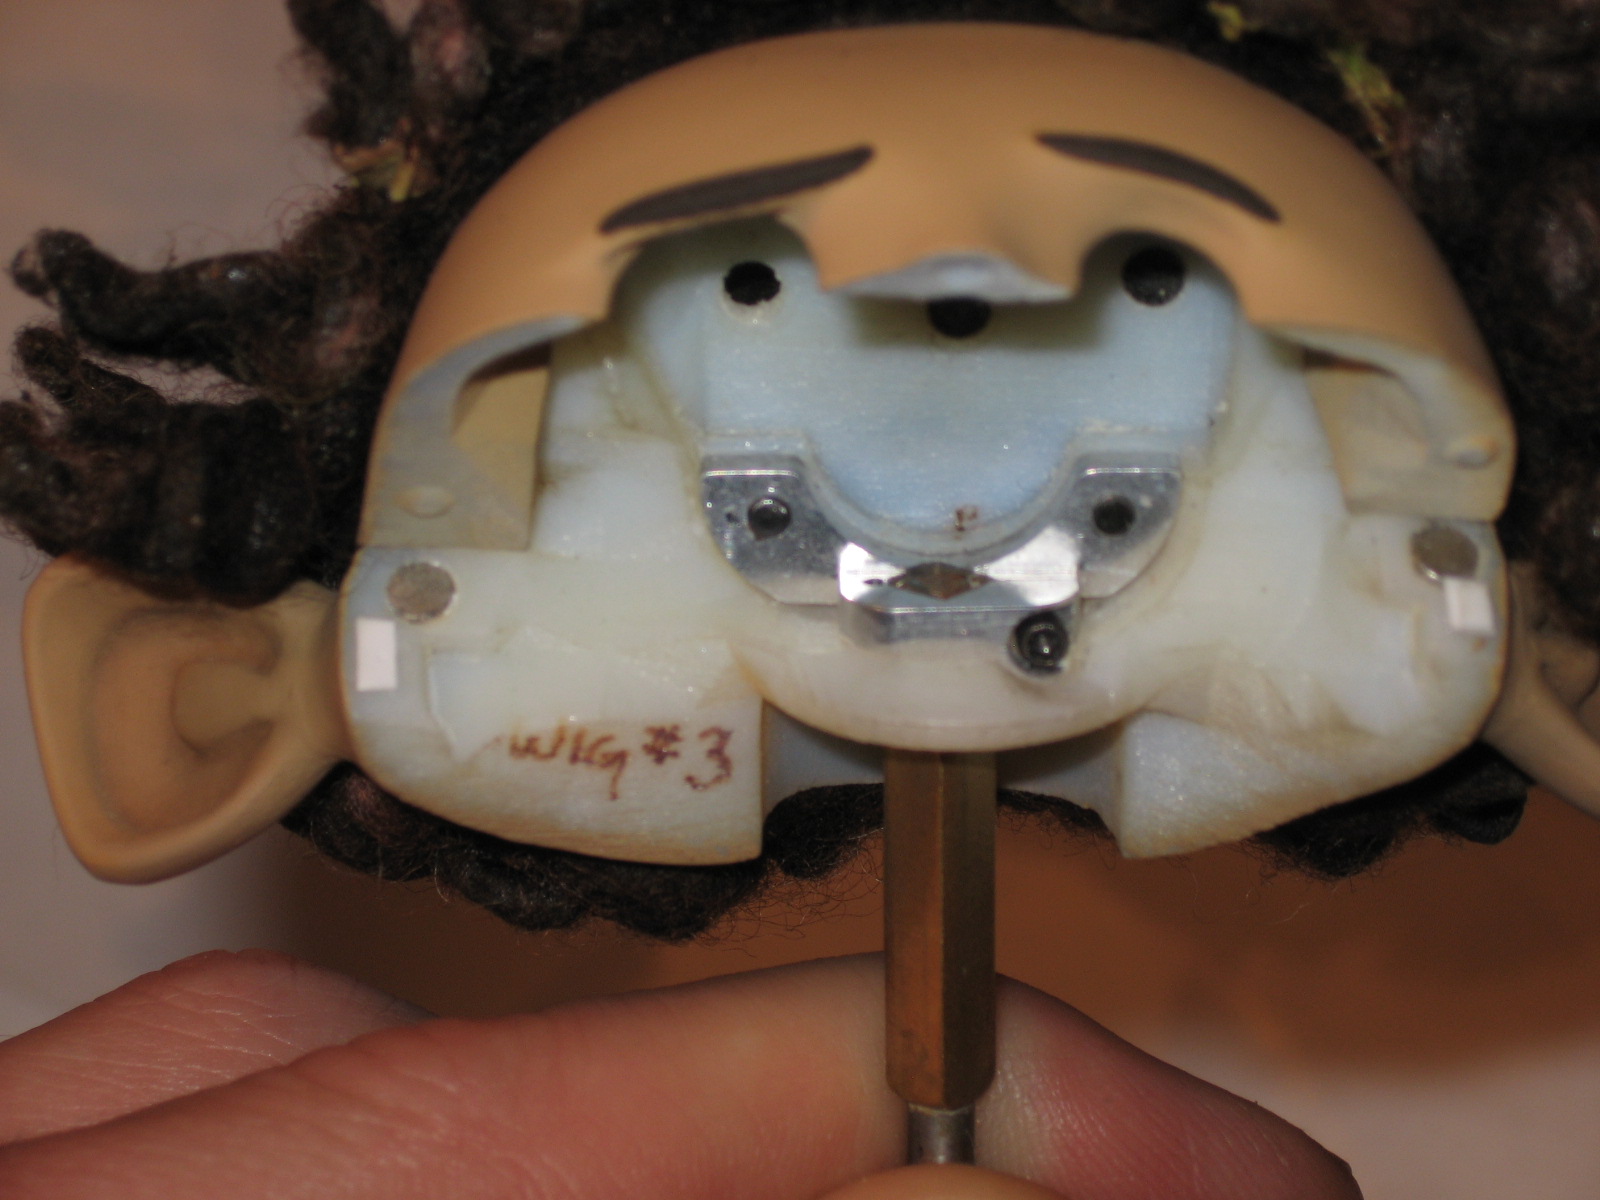
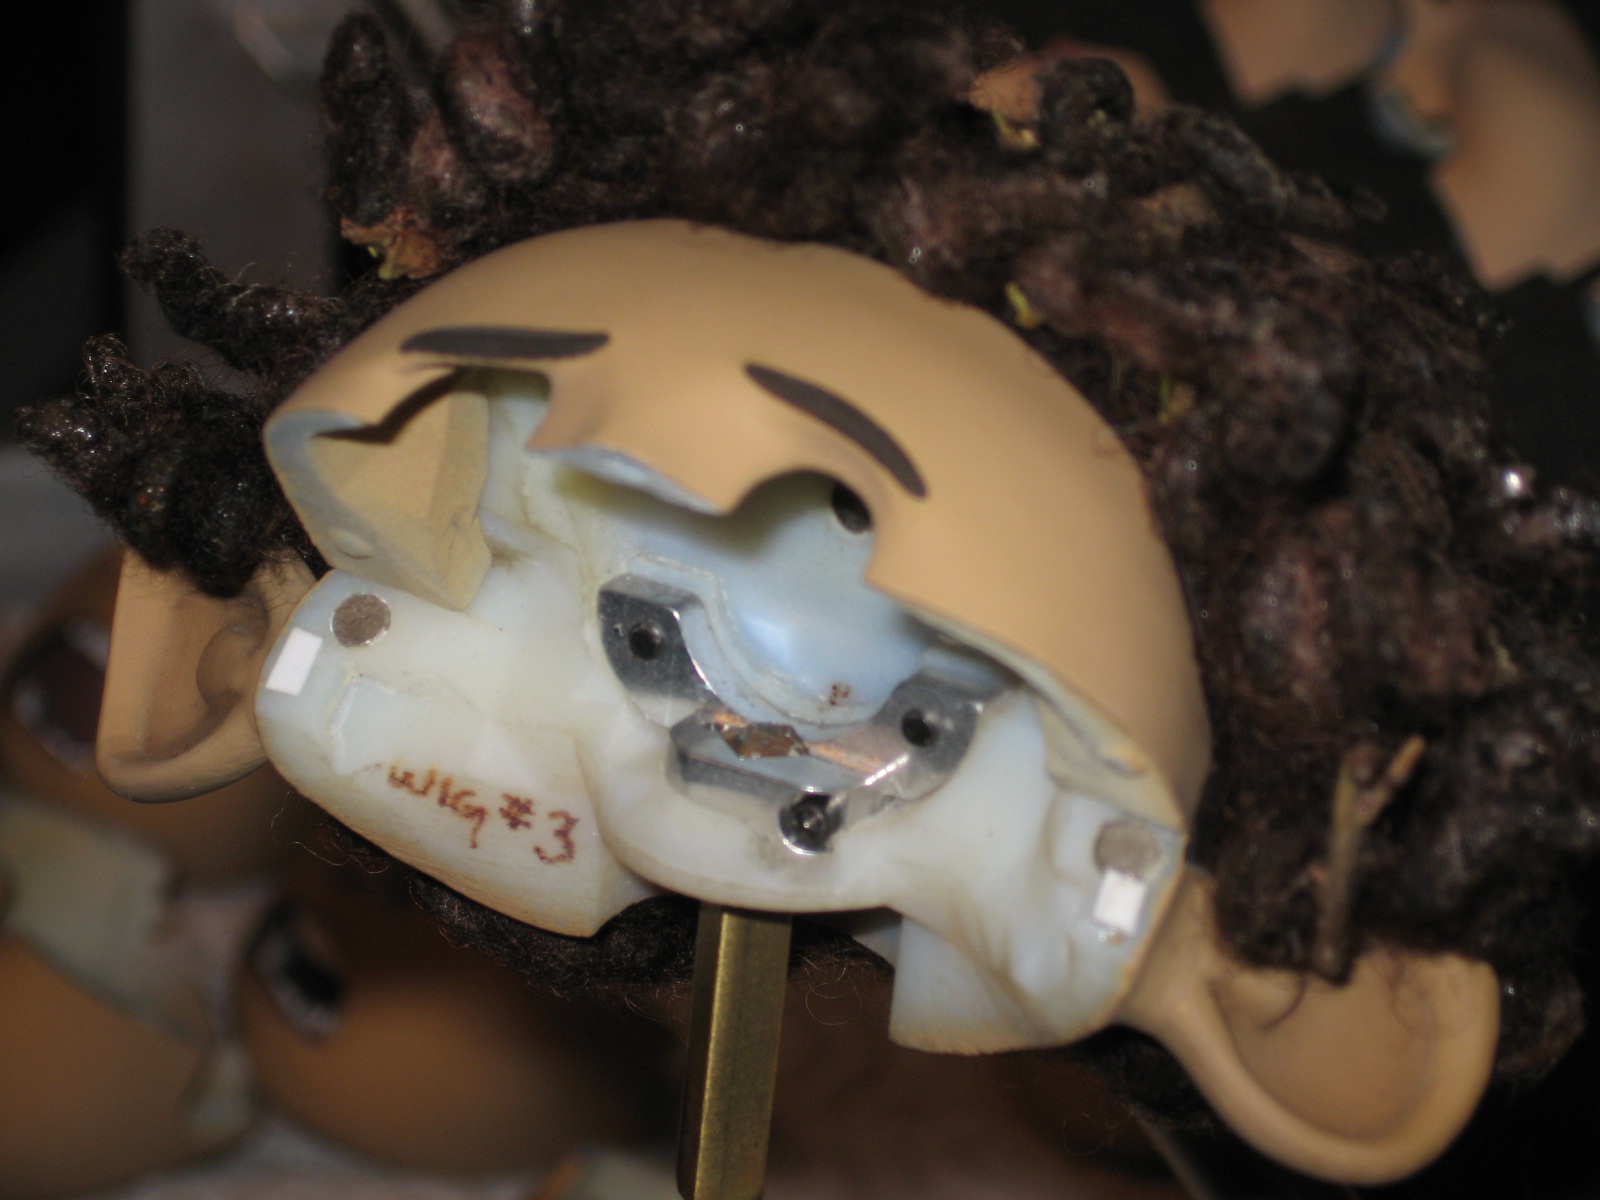
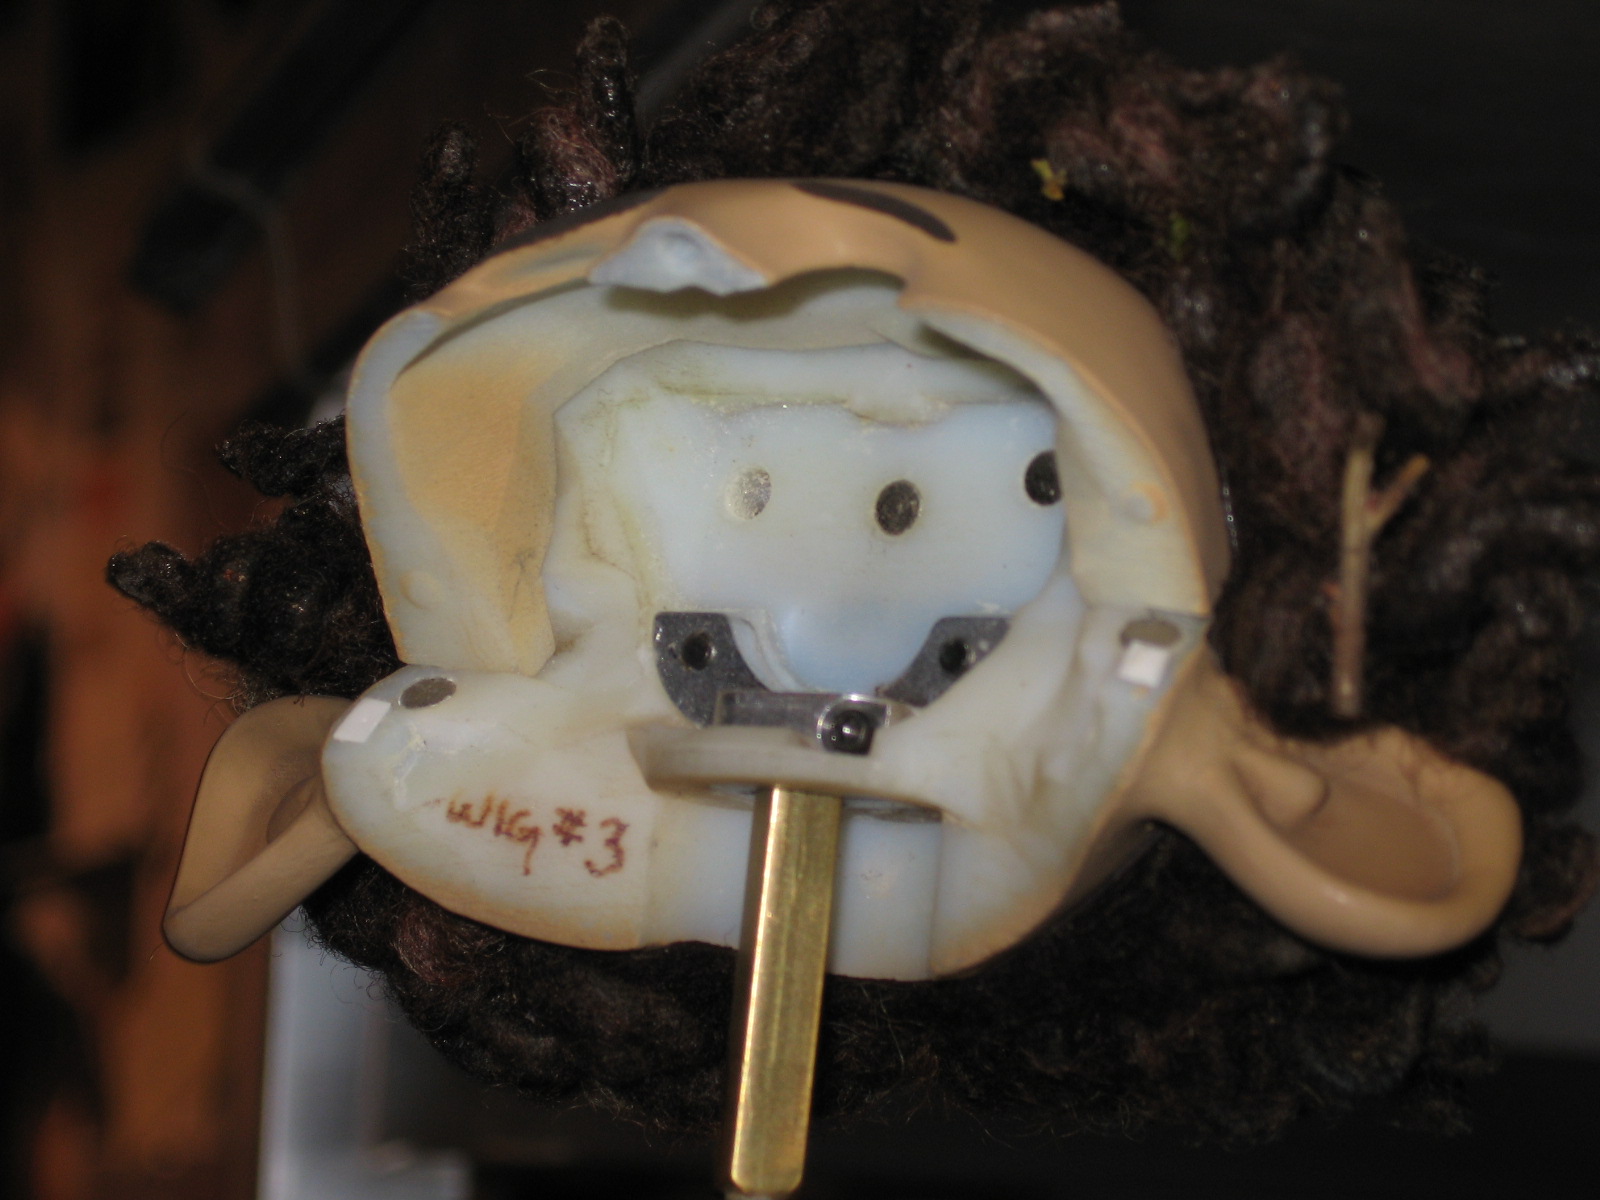
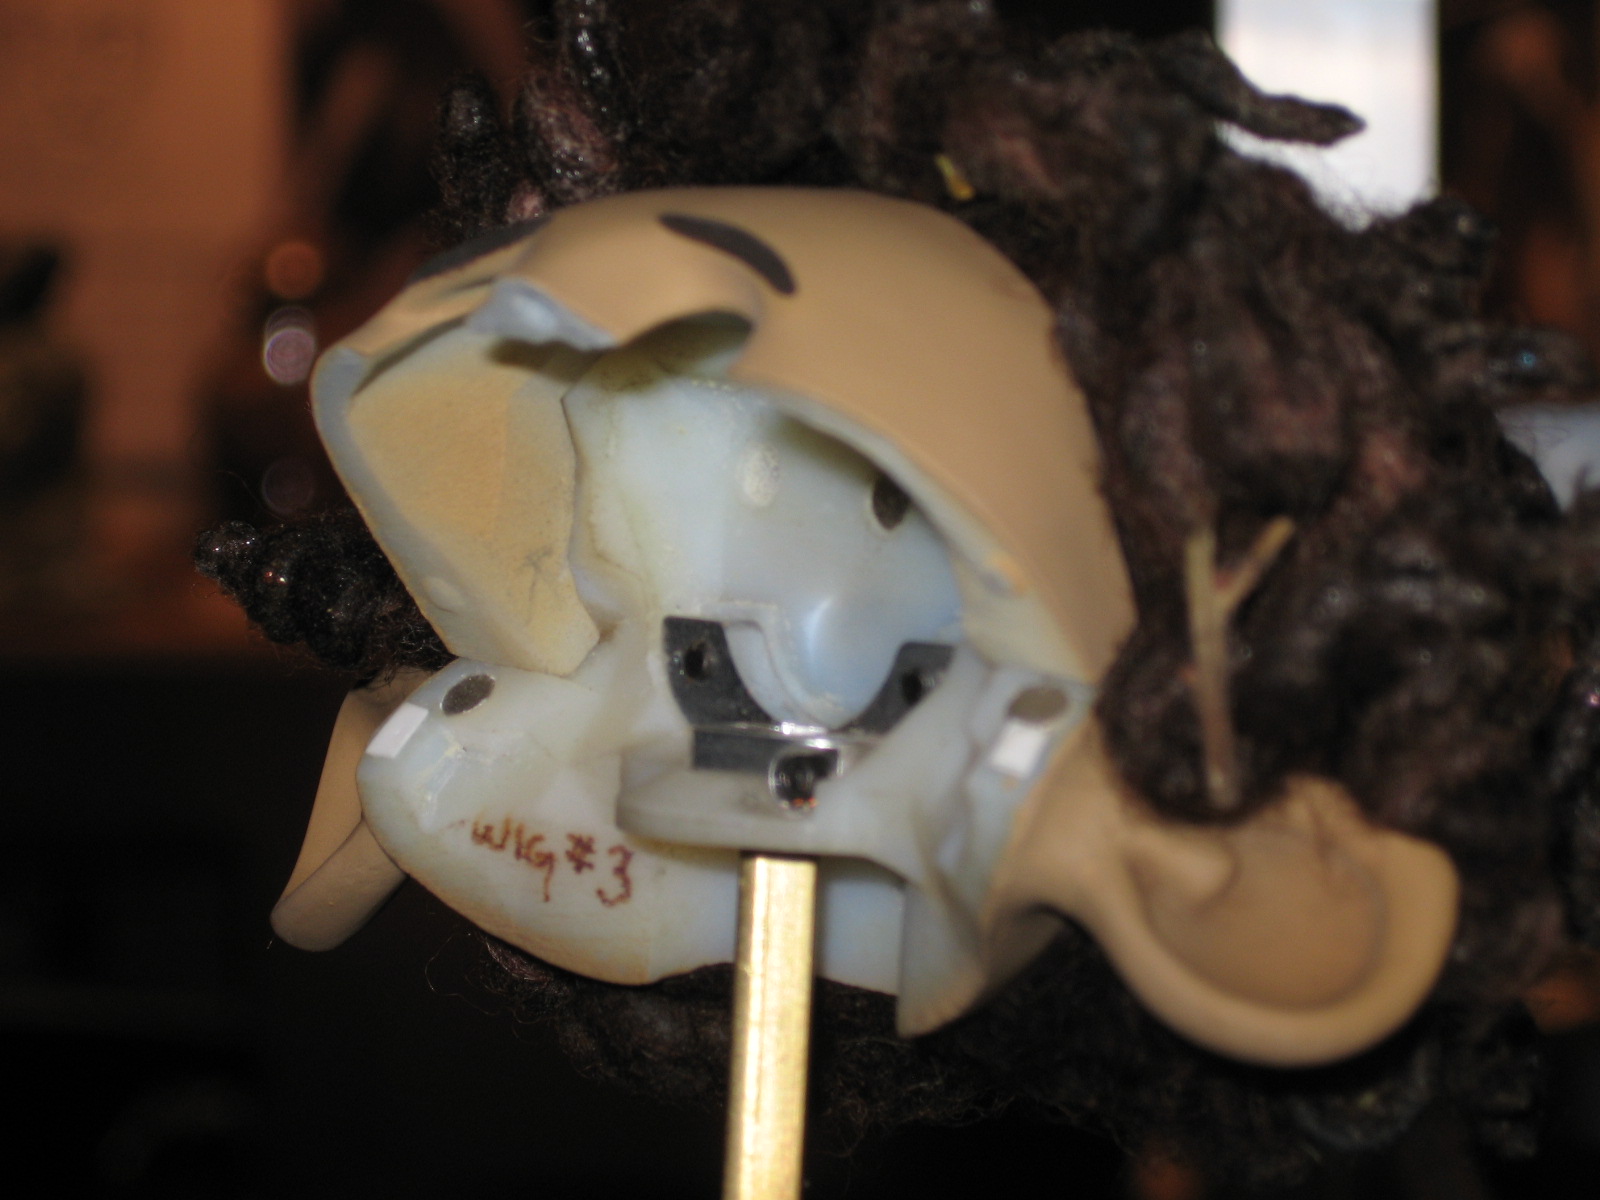
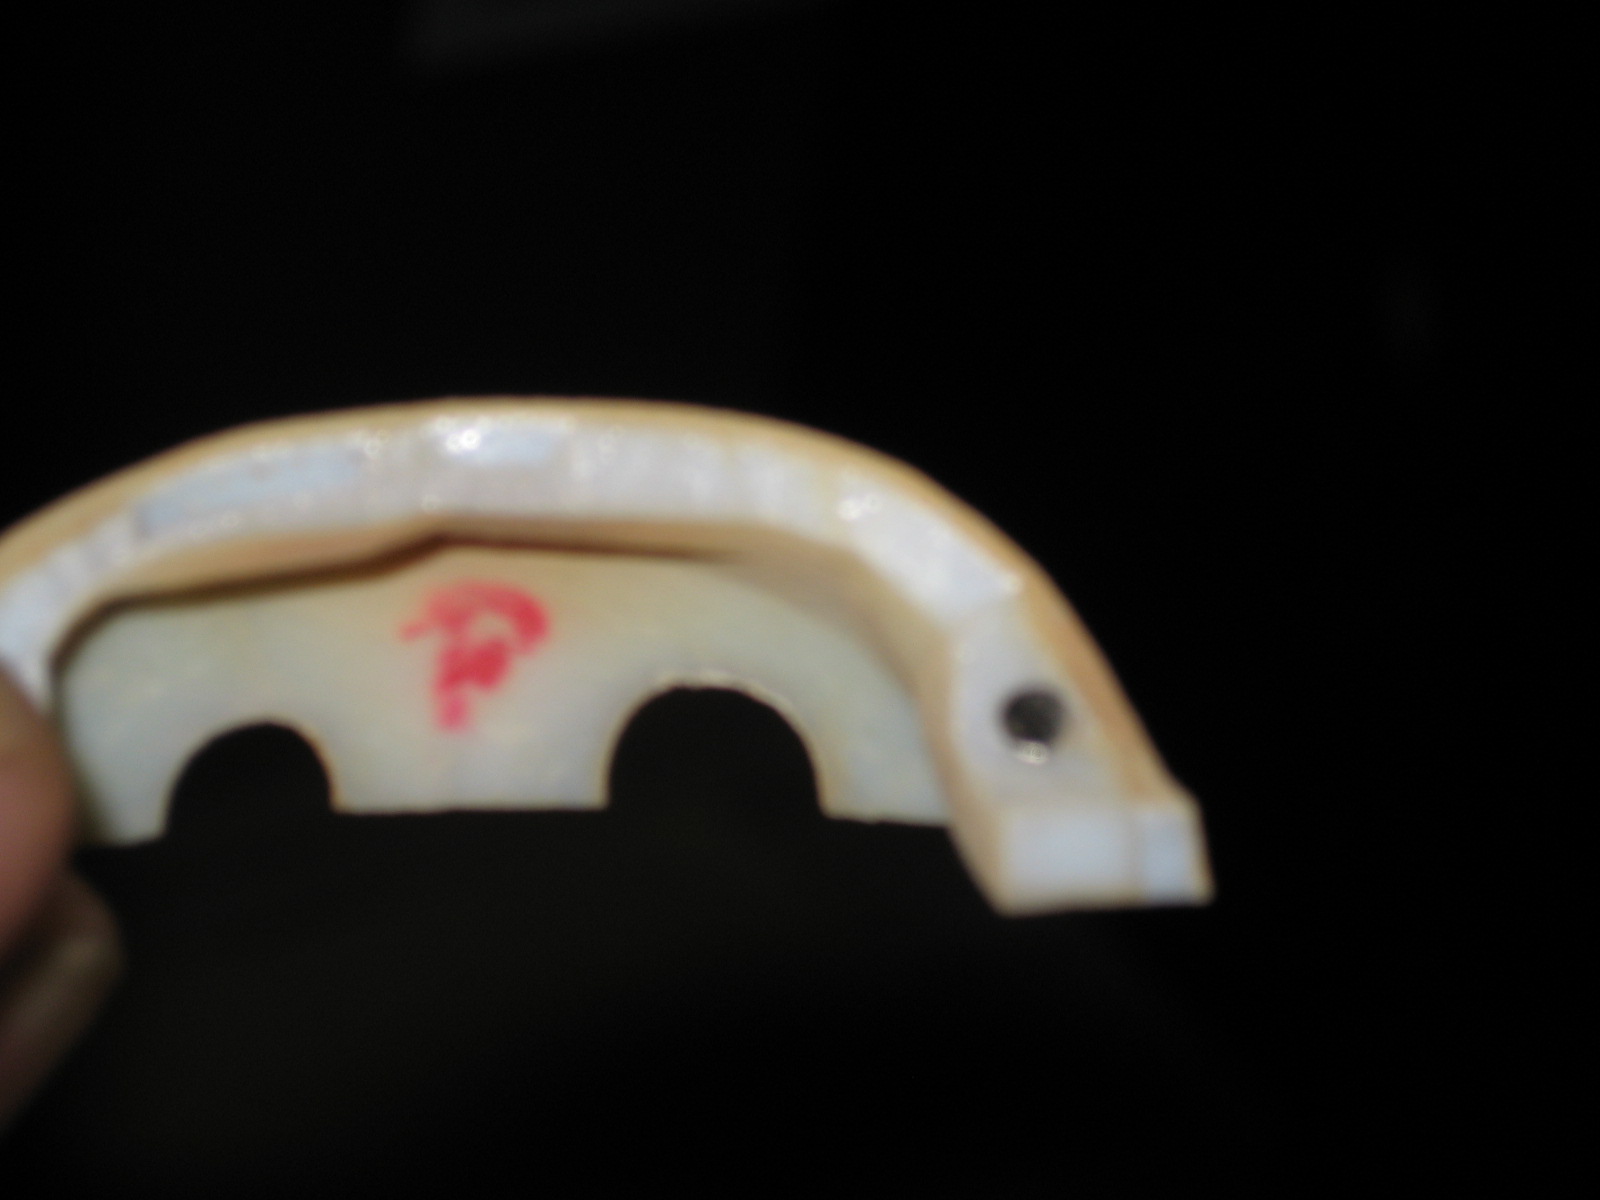
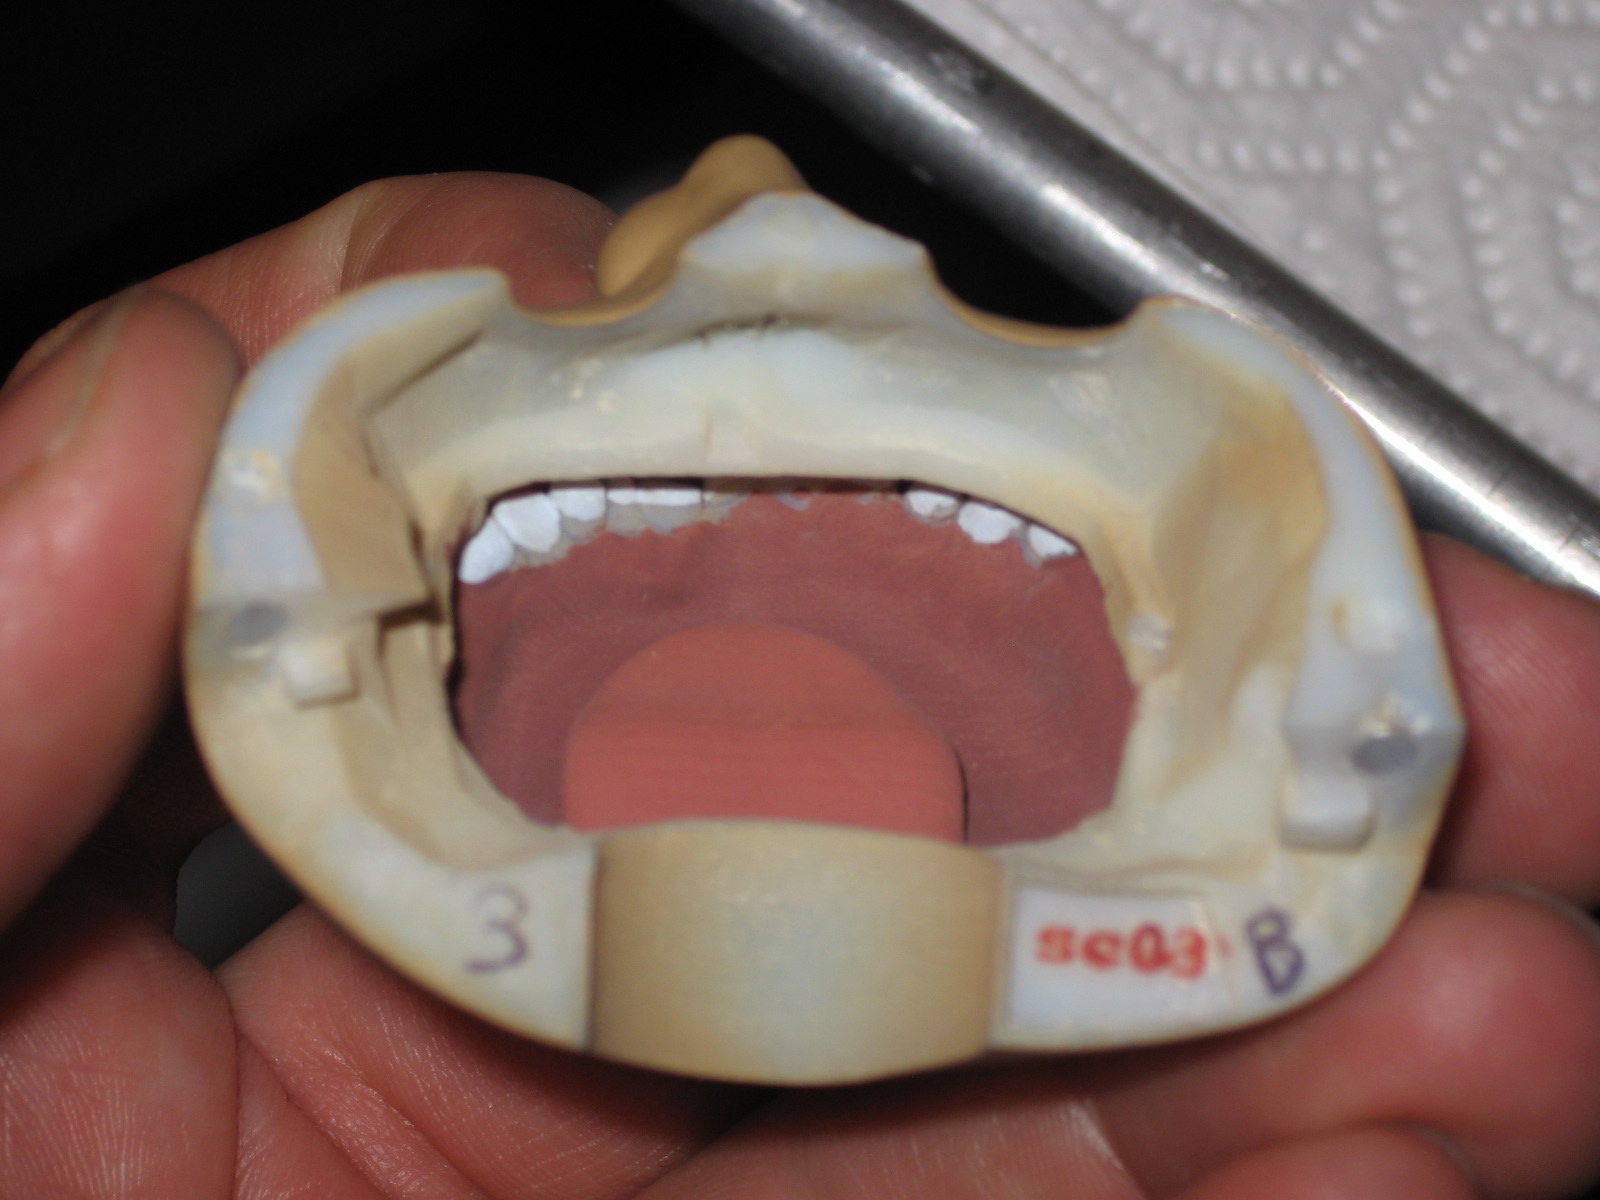
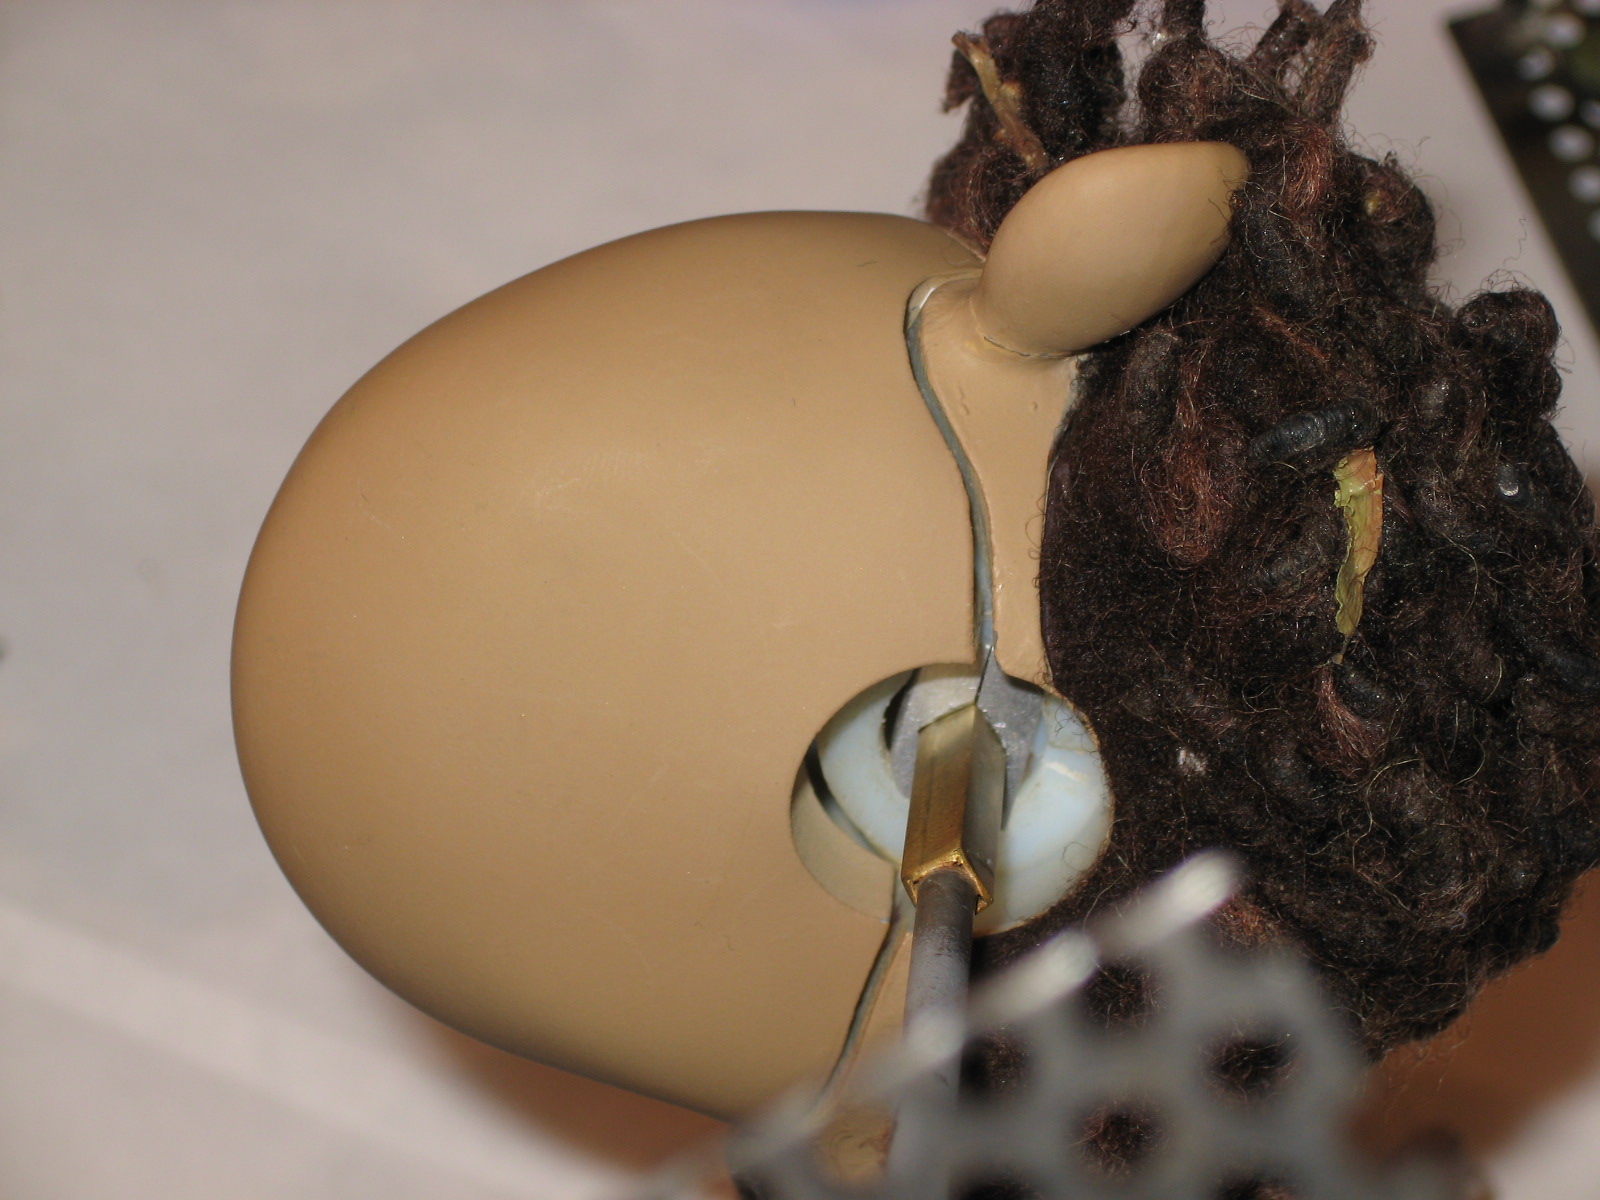
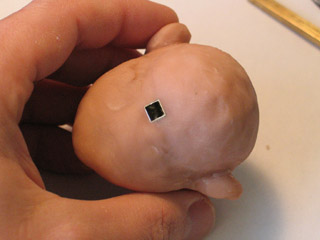
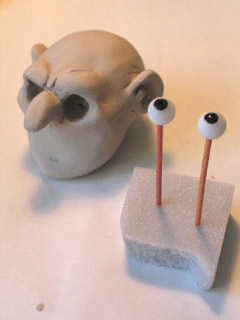
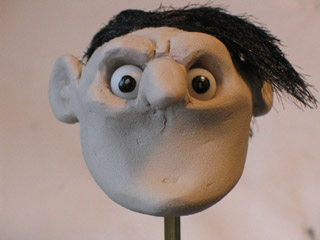
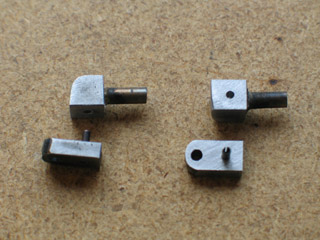
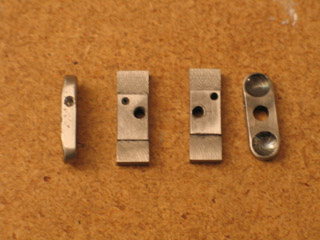
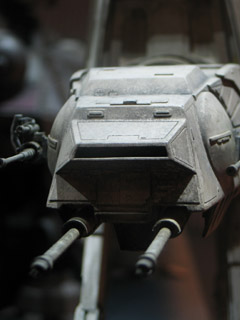
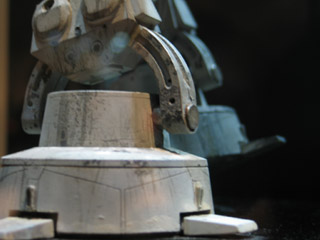
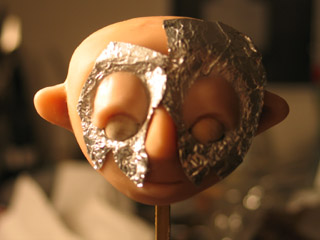
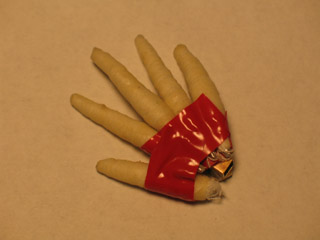
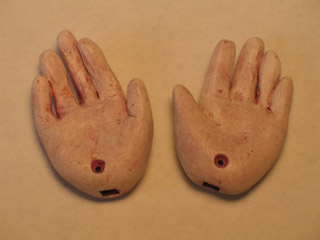
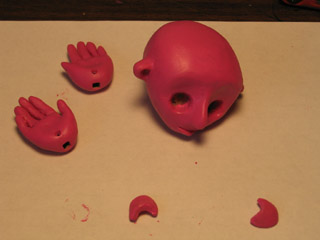
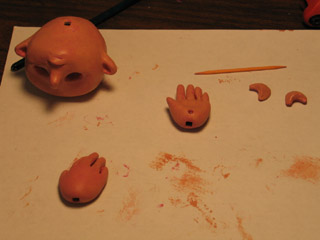
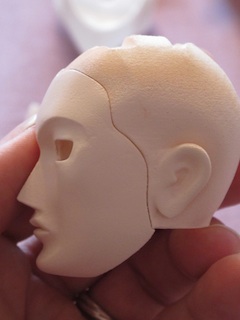
The photos that I took at the Coraline premiere party were apparently quite helpful in the design process. In the photos here, you can see that the puppet head is built from four main parts: the back of the head, the face mask, a core, and the eyes assembly.
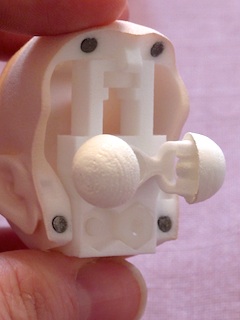
The back of the head attaches to the core with a screw at the top, which will later be covered by hair. The contours of the core could theoretically be rectangular, but become narrow at the jaw to allow a tight fit with the back of the head. The face snaps into place with tiny magnets.
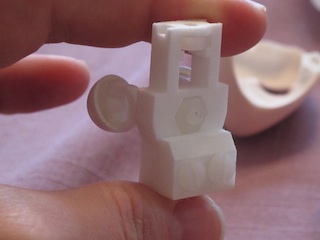
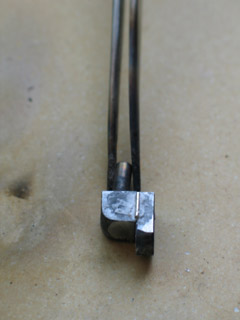
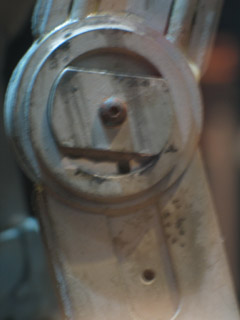
The core has a detachable part at the bottom that clamps around an armature's neck post. The eyes are half-spheres with tiny ball joints held in place by the pressure of the semi-flexible plastic sockets. The whole eye assembly can be detached from the core.
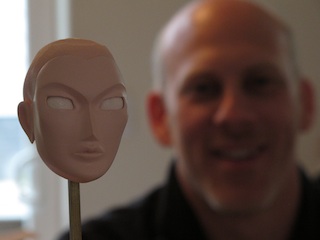
Congratulations to Ken on this ingenious puppet construction! I am thoroughly impressed with how his project CRS Glimmer is coming along, and can hardly wait to see further developments. Outside of feature films and big budget TV commercials, this is pioneering work!
posted by sven | permalink | categories: stopmo
July 1, 2011
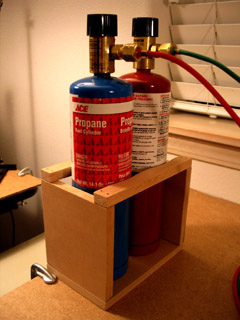
notes on brazing
by sven at 7:00 am
I'm still not as proficient at brazing as I'd like to be. So I want to capture some notes, while this last project is still fresh in my mind.
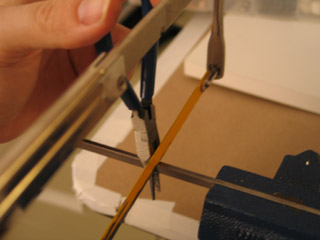
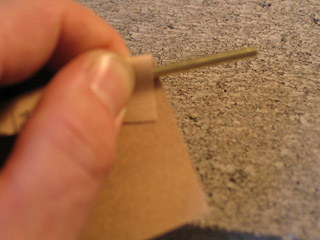
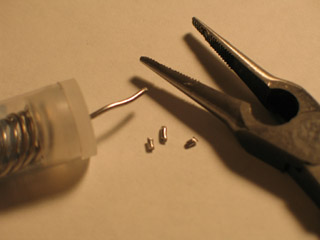
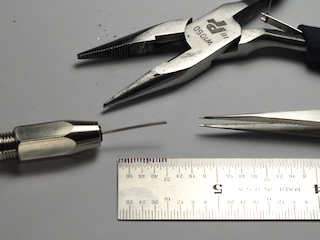
1. CUTTING SOLDER
When cutting solder, you want five tools on hand:
- pin vise for holding the solder
- ruler for measuring
- fine-tipped sharpie for marking
- pliers for cutting
- needle-nosed electronics tweezers for picking up bits
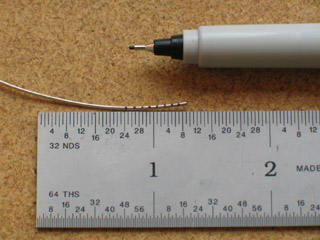
I'm using 1/32" diameter Safety-Silv 56 cadmium-free silver solder. Smallparts.com is supposed to carry it, but right now they're out and don't know if or when it'll be back in stock. It's hard to find, so I'm wondering where I'm going to get some more.
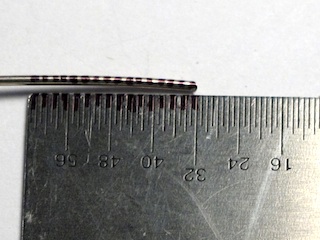
When cutting the solder, I try to look at the wire in terms of 1/64" increments. I have to wear optivisors (magnifying glasses) just to be able to see these measurements clearly. Blackening every other increment on the ruler helps. I can basically draw a line straight from these marks onto the soldering wire.
The pin vise is a new discovery. It makes holding wire while cutting very much easier. It also allows me to make cuts a good deal closer to the tail-end stub of the wire segment.
I've used the electronics tweezers before, but they really proved their worth on this project. I originally bought them for removing microscopic splinters from my fingers. I really ought to get a second pair now, to be dedicated to general shop work.
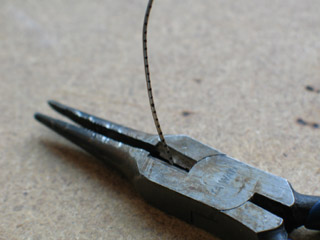
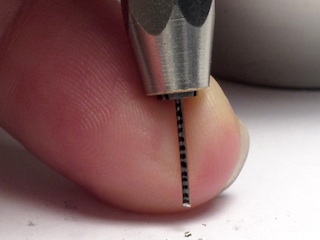
When cutting the wire, keep the pliers flat against the table. That way, the wire will get trapped underneath, rather than flying across the room. The cutting edge isn't in the middle of the tool — it's closer to one side. If you take advantage of this, you can easily cut 1/16" bits of solder, which are sometimes useful. Note, though, that the cutting action will cause the wire to be pressed down and gouge the table. Be sure to put down a self-healing mat.
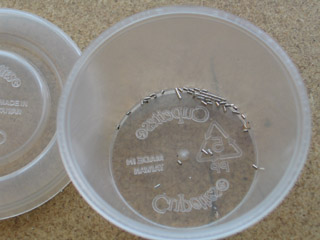
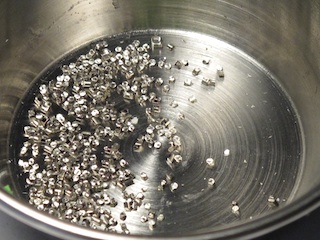
When solder bits have been cut, don't presume they're all equal. Use your eyes. A 1/32" bit of solder will look roughly square. Visually gauge whether the piece of solder you're picking up is 1/64", 1/32", 3/64", or 1/16".
For 1/8" balls, I've found that 3/64" of solder works quite well. I've been putting 3/64" lengths into the ball holes… It might be wiser to put in three bits of 1/64" solder, so they can pack down into the hole. In a 5/64" deep hole, a longer piece of solder will prevent the rod from getting in — whereas bits can be stuffed in more compactly.
It would probably be wise to scientifically figure out exactly how much solder is required for any particular size of hole, so I stop guessing and thinking about it while doing work.
2. FLUX SAFETY
Safety first! Silver-Silv 56 is better than a lot of other solders which contain lead, cadmium, or antimony — but you still have to be thinking about the flux.
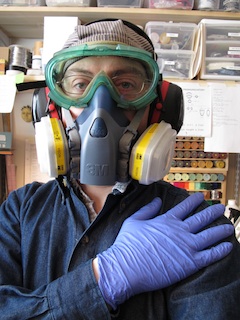
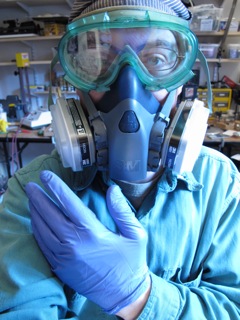
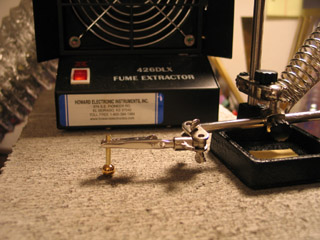
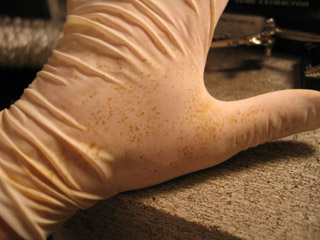
Harris brand flux contains fluorides, which can damage your lungs, and are absorbed through the skin. You might not know at first that it's gotten into you; this stuff causes subcutaneous chemical burns. So get used to wearing nitrile gloves. Don't go with latex; remember that it originally comes from rubber trees, which as an organic material is nearly as vulnerable as you are.
For flux fumes, go with the 3M 6003 respirator cartridges, which handle organic vapors and acid gas. These cartridges specifically mention fluorides as one of the chemicals shielded against, whereas simple organic vapors cartridges (6001) do not.
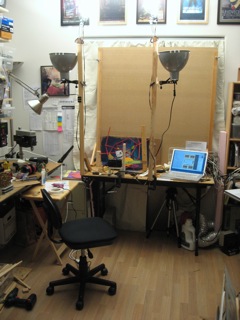
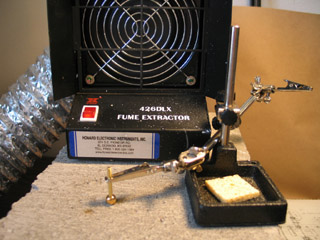
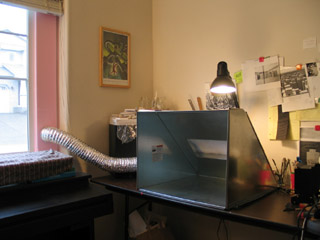
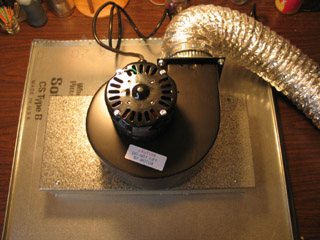
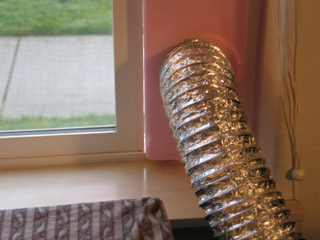
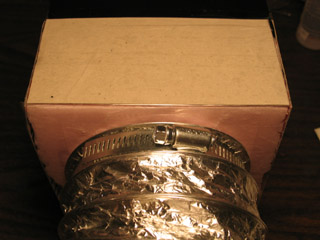
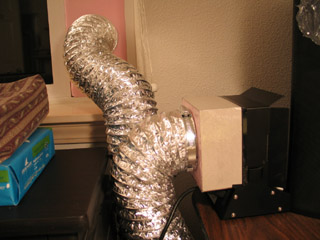
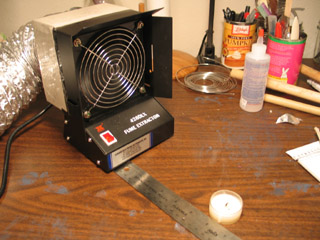
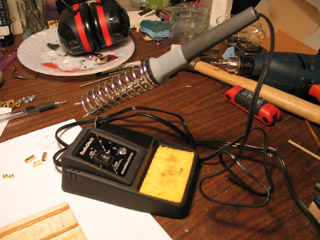
Even while wearing the respirator, be actively moving fumes out of the room. I've moved to a two fan set-up. One fan is set up at the window to pull fumes out. The other is set on the other side of my work table to push air towards the window. It gets a bit loud, which is why I wear the protective headphones.
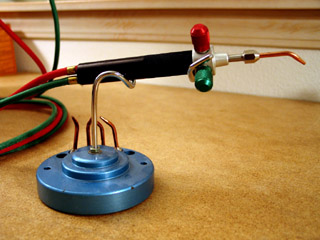
3. BRAZING ON FLAT SURFACES
On this past project, I needed to braze rods to rings. It seems like most brazing set-ups are either vertical or horizontal: either laying flat on a table, or held upright in a vise.
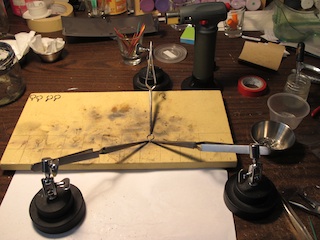
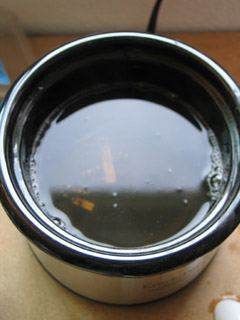
I'm using a ceramic tile bought from a jewelry supply store which is specifically designed to withstand open flames. Several years back I simply used a cinder block. I don't know if that was a good idea, or if I just got lucky with the stone not exploding. Either way, this is a much more elegant solution.
I think these posable tweezers are called "helping hands" — though there's another tool that possibly also goes by that name. It's good to keep at least four of them on hand for putting things in position. A brass rod turned out to be useful for poking at things if they started moving while under the flame.
I still have to remind myself each time I do a new project: solder will only flow where there's flux. I'm beginning to think that you can't over-flux a part. For a while I was skimping on flux, because it seemed to leave bad black residue on parts. I think now, though, that the problem was that I overheated the parts, actually burning the metal. I probably wasn't using the right pickling compound back then, either. You need Sparex #2 to effectively remove flux residue from ferrous metals.
I did a bunch of shopping around to find appropriate jump rings. Ones with brass or steel cores worked fine, regardless of whether they were plated. Ones with "base metal" cores melted into a mess. It turns out that "base metal," used commonly in the jewelry industry, is composed largely of tin and zinc… The very same things you find in low-grade solder!
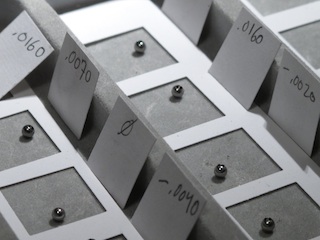
I've had a bad habit for a long time of quenching parts in water after they've been brazed. I'm making a concerted effort now to do the right thing and let them cool slowly. I think I just need to have a second ceramic tile for cooling. That way, valuable work space isn't being eaten up while I wait. Drawing a grid on the tile to help me keep small parts lined up also made the process feel better organized.
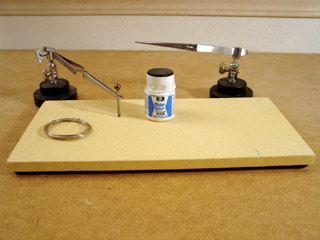
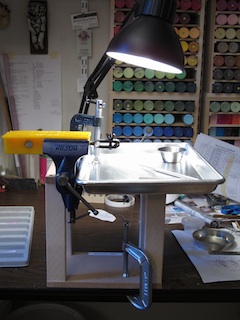
4. ERGONOMICS
The horizontal brazing work had me looking down at the table for hours on end. My neck is still in a lot of pain days later. I'm interested in re-working my ergonomics.
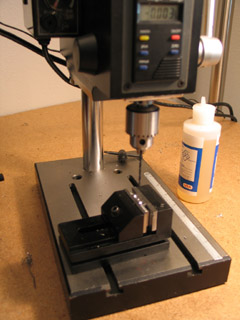
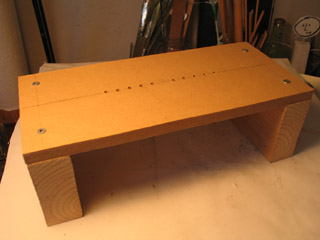
Regular tables are about 30" tall. Jewelers, who have to work with very small parts all day have special benches that are ~36"-39" tall. Back when I was working on the tiny Mi-Go maxillipeds for The Whisperer in Darkness I built myself a small jeweler's riser that clamps onto a normal work table. It's been absolutely great so far — and I think I can still do more to optimize the design.
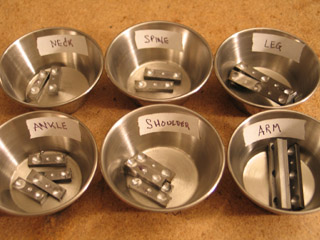
The riser gets more useful when combined with other things. I got a number of steel trays from a restaurant supply store; clamping one onto the riser gives me a nice rim to keep little parts from rolling off. Clamping a vise onto the riser also helps bring my work up to a comfortable height.
For the Mi-Go armature, I was doing crazy-small work with 000-120 screws. I had to come up with complicated strategies just for holding these things… For instance, putting a pin-vise into the larger vise, held between rubber jaws.
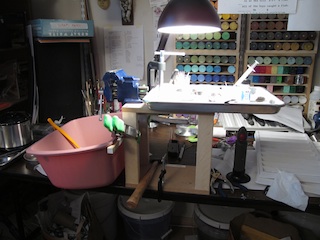
I re-configured the riser slightly on this last project. Besides having the vise on a different side of the riser, the main addition is a small bin located just beneath it, to catch tiny parts if they should fall.
This set up is good for vertical brazing, but it's not wide enough for the ceramic tiles if I want to do horizontal brazing. I'm considering making a wider jeweler's riser for that. (My neck may thank me.)
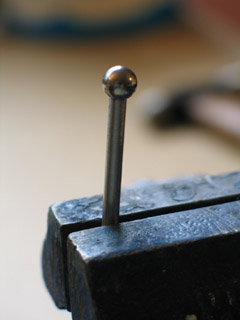
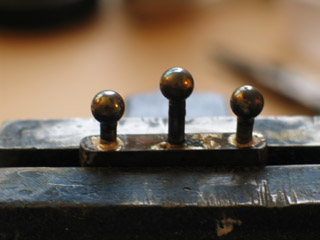
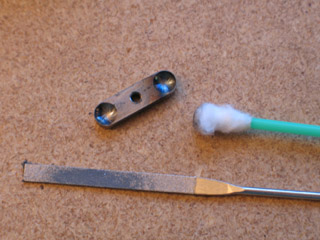
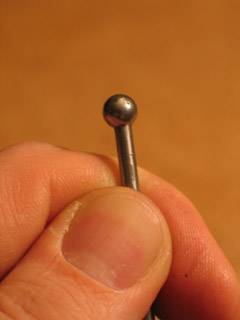
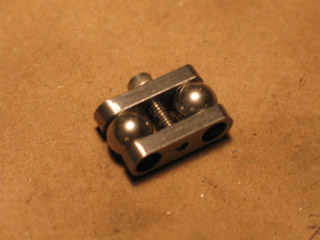
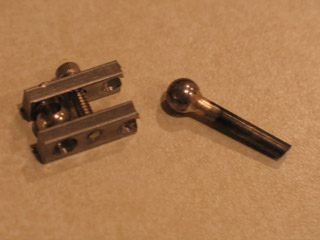
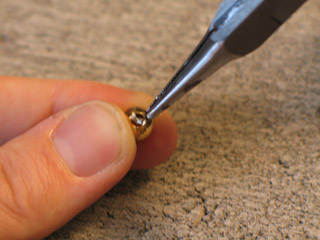
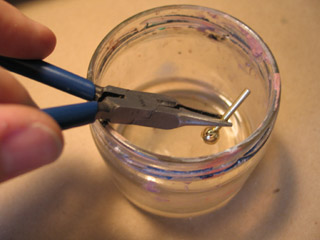
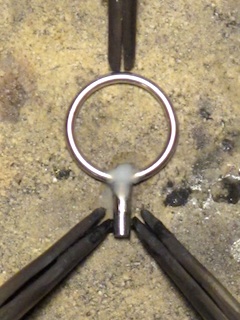
5. BRAZING BALLS
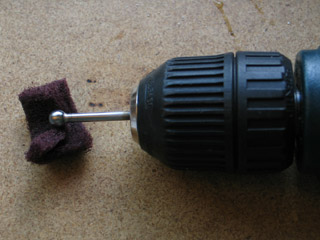
My method for brazing balls hasn't changed much — but I'm really thrilled to have found some better tools for moving solder bits and flux.
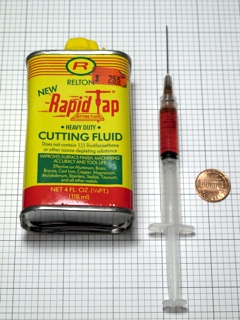
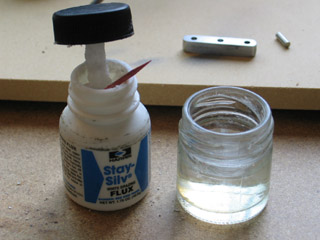
I've already said it: electronics tweezers, FTW. The other discovery is that I can make flux paste a bit more fluid with water, then deliver it where it needs to go using a syringe. Before, I was using tooth picks, which was clumsy and miserable. What's more, I'd need to leave the jar of flux open; the paste dries out quickly. Keeping the flux in a syringe keeps it good and wet.

Flux paste seems to be water-based. Just use an eye-dropper to mix it with a little extra water in a small jar. Then it sucks up into the syringe easy as pie. (I should mention: I grind off the pointed tip of the syringe with a belt sander before doing this.)

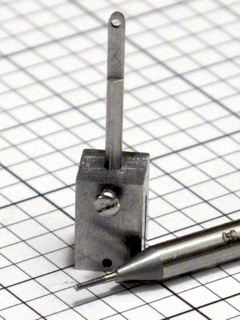
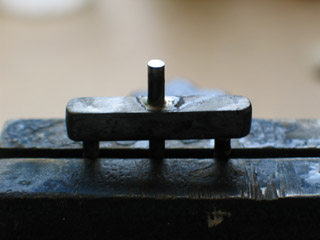
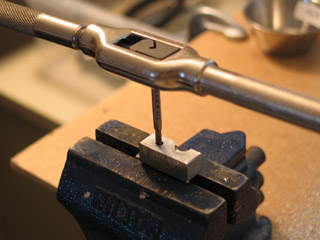
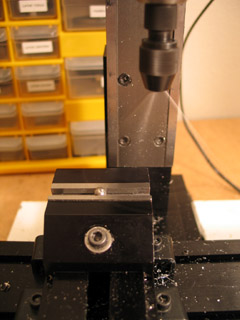
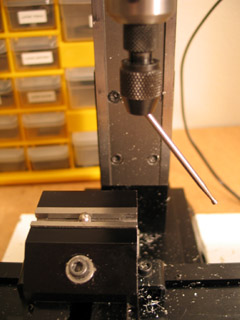
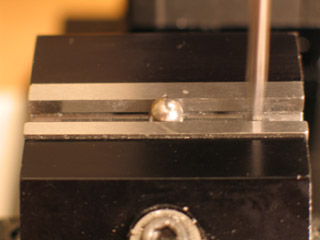
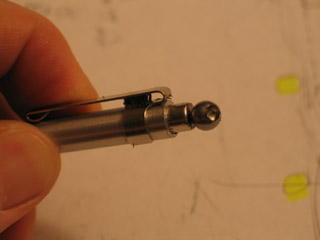
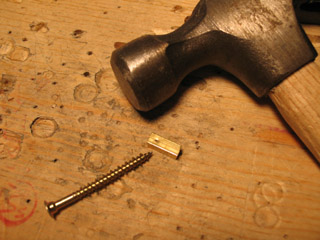
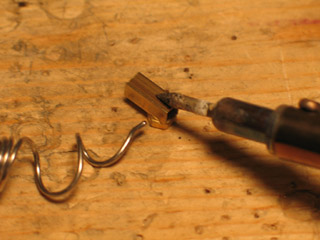
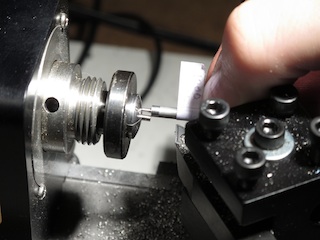
As always, I've got the rod clamped into a vise, and am holding the ball down with a hammer while it's heated. (Hot gas will make the ball want to pop off.) The hammer isn't an ideal solution, because it's also a heat sink cooling off the area that you want hot. I need to look into other tools for this job.
There's a temptation to loosen the downward pressure on the ball, in order to let it heat up more quickly. Bad idea. The ball starts to rise, and then when you press it back down, molten solder squirts out in blobs. Keep downward pressure constant.
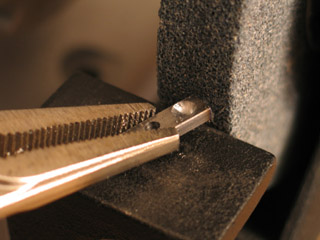
Lionel Orozco says that the ball should be heated to a cherry red. Jeremy Spake tells me that this may actually be too hot — that you should specifically avoid getting to the cherry red stage. This matches my experience. I've seen in welding books that there are names for all the various colors that steel turns while being heated, and they are indicative of specific temperatures. I'd like to do deeper research at some point to truly understand how the color of the ball and the melting point of the solder match up.
Jeremy also suggests that the entire ball can be covered in flux. Very interesting! If I'm not overheating my metal, this might work out really well. Must experiment.
I've moved my pickling station closer to the window. Duh. And I've put it on one of those metal pans, to protect the work table. Incremental progress.
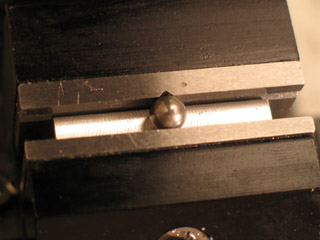
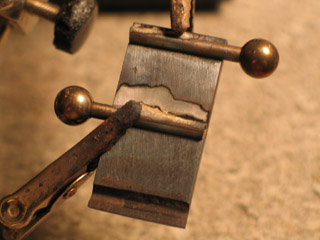
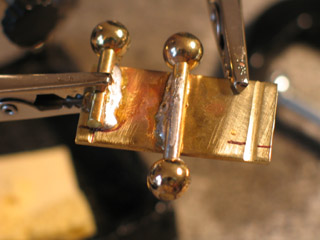
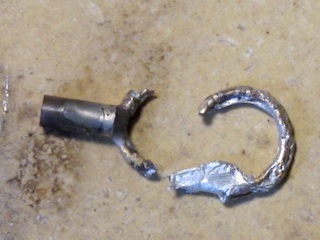
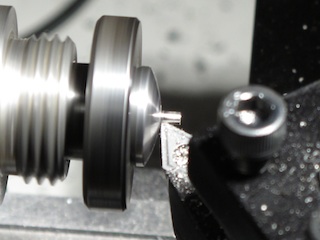
On this last project, I was having trouble getting a nice clean seam of solder where the ball and rod connect. It was turning out too blobby, which would have impaired range of motion. So I decided to use less solder — to the extent of not having a visible seam.
The problem with this strategy is that without the visible seam, there's no way to know for certain that you got a good bond. It's a big no-no in armatures… And let me tell you: the very last thing you want as an armature maker is for a ball to break off mid-scene while an animator's working!
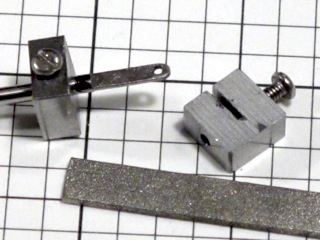
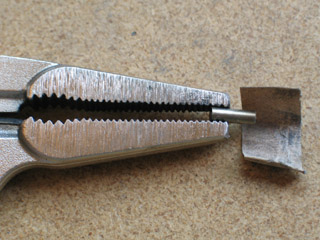
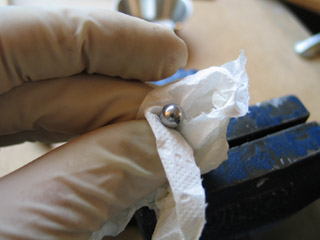
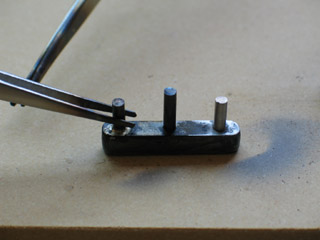
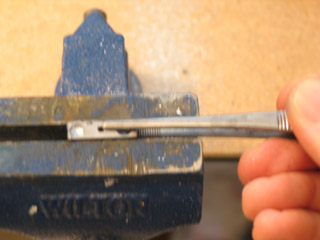
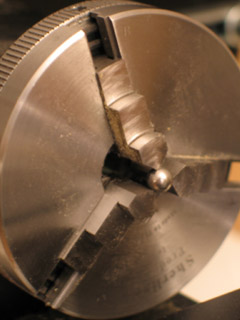
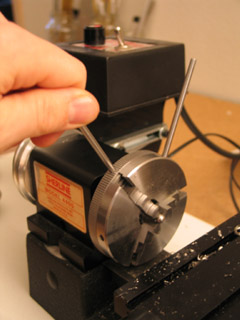
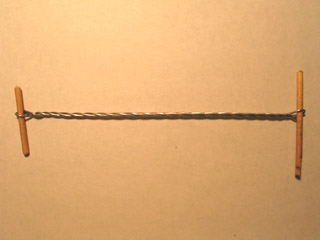
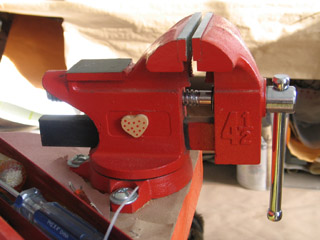
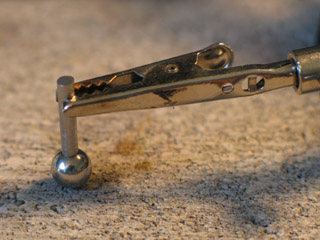
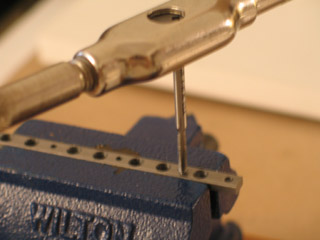
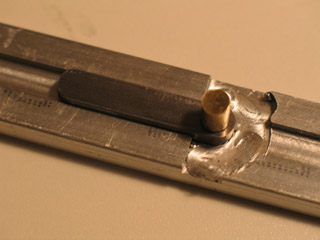
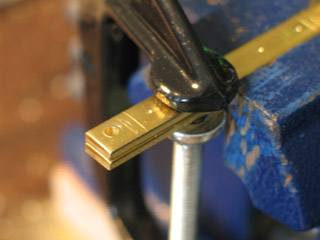
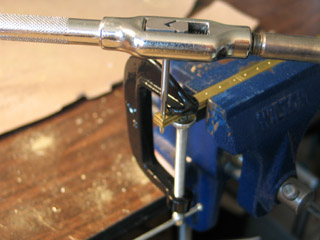
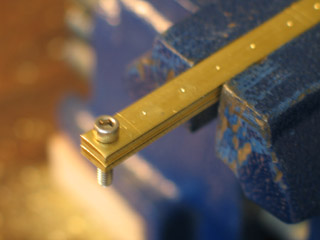
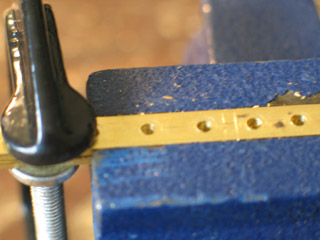
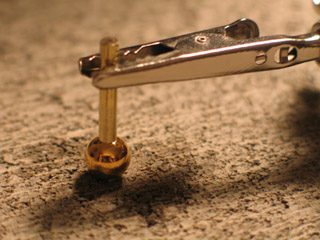
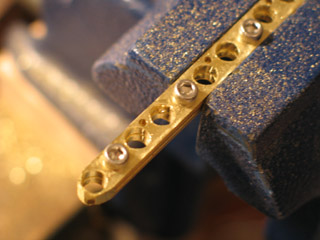
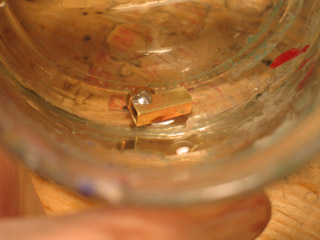
So I came up with a stress test. I put rubber jaws onto my vise, and clamped the ball tight. I twisted the rod using parallel pliers. If the bond is weak, the ball breaks off; if the bond is strong, the rubber will tear first.
I think it's a good test. The pressure of the vise — even with rubber jaws — is greater than what the part will likely experience when it's in a step-block joint. It's definitely greater stress than human hands can exert (a poor test). And the stress test is based on twisting, which is the only way balls are really likely break off. I broke enough bad joins, I feel reasonably confident that the survivors will hold up.
Even so… It's kind of a miserable process. I really want a better strategy for clean, small ball seams the next time I do this.
posted by sven | permalink | categories: stopmo
June 30, 2011
cutting rods to size
by sven at 7:00 am
In making armatures, the smaller you work, the more you have to focus on precision. By the same token, when you start doing batches of more than 100 parts at a time, you start looking really carefully at each step of your process.
Rods are the simplest part of an armature. But during the past year, I've come to realize that they're as deserving of attention as any other component. Today I'm going to walk you through the process I've developed for making good rods… In excruciating detail.
Here are five guiding principles:
- Don't assume your rod is actually round.
Like in cooking, start with the best ingredients possible. I've moved to using type 303 precision ground rods, which are pretty close — but even then, while lathing you might discover a rod is .0005"-.0010" off on one side. - You can't get an accurate measure of length if the ends aren't flat.
Which means that before you can even check the length of a rod, both ends need to be lathed. - Protect your lathe's collet by chamfering rod ends.
You may not be able to see burrs on the end of your rod, but you'll feel them scraping the inside of the collet when you try to shove it in. Collets are precise tools; take care of them. - You can't put a rod in a hole of the same diameter.
If your rod is precisely 1/16" wide, and the hole it's supposed to go into is precisely 1/16" wide, the rod won't go in. You have to narrow the rod just slightly, so there'll be a little bit of play. - Don't keep numbers in your head.
When machining big tedious batches of things, trying to remember numbers will inevitably lead to error. Write things down instead.
OK… On to the step-by-step instructions. When you get good at it, this should take about 7-9 minutes per part.
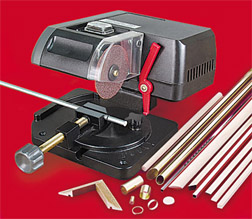
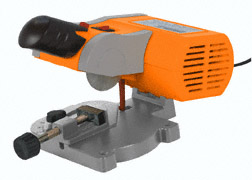
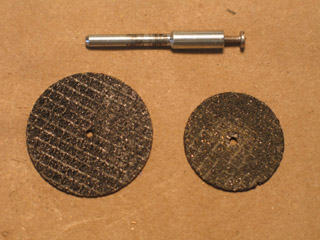
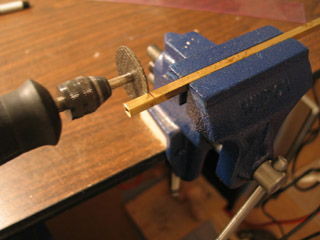
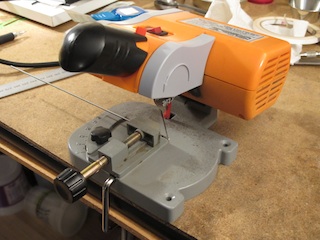
Step 1: Rough cut your rod into segments
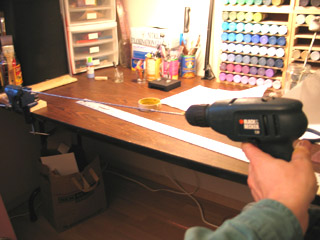
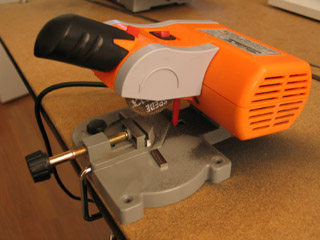
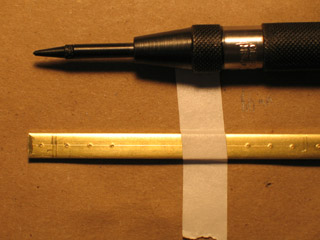
Start by marking the rod you're going to cut with a fine-point sharpie marker. Cut it into segments using a 1/16"-thick abrasive wheel on a mini cut-off saw. These things only cost ~$25 at Harbor Freight, as opposed to ~$60 at Micro-Mark. Great tool. Wear a tight-fitting face mask — you definitely don't want stainless steel dust in your lungs.
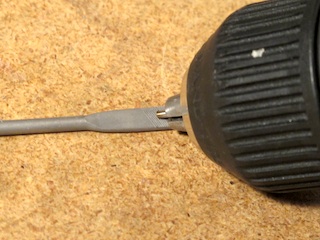
Step 2: Chamfer one end of the rod
One end of your rod segment will be fairly smooth, the other will have a big burr hanging off it. Prep the smooth side to go into the lathe by filing the edges. I find it useful to put the rod into the chuck of hand-held electric drill, and simply run it across a stationary file.
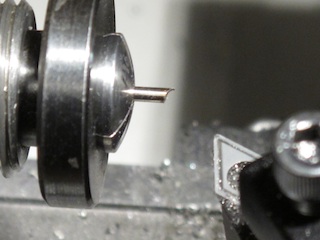
Step 3: Flatten one end of the rod
With one end of the rod chamfered, insert it into the lathe collet. If you're trying to work precisely, don't use a jawed chuck — it's just not as accurate. Lathe that big ugly burr right off.
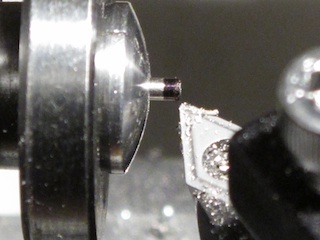
Step 4: Chamfer and mark the flattened end
The end of the rod is flat, but there are still microscopic burrs on the edges. While the segment is still in the lathe, use a tiny diamond file to very slightly soften that edge. While you're at it, use a normal-sized sharpie marker to blacken this end of the part. It's helpful as you go through the process to be able to tell one end of the part from the other.
Step 5: Flatten the other end
Take the segment out of the collet and turn it around. Repeat step 3 and flatten the other end of the rod.
Since you've blackened one end of the rod, you don't have to bother chamfering this side. Just make sure that when you do further work on the rod, it's always this side that you're cutting.
Step 6: Measure the part
Using digital calipers, measure your part to see how long it is. Hopefully you've left yourself ~.0100"-.0800" of extra length, since we're still going to need to lathe the part to its final size.

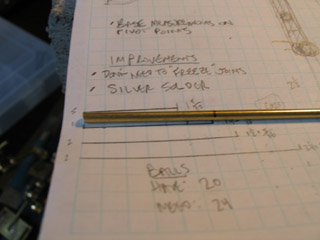
Step 7: Write down the measurement
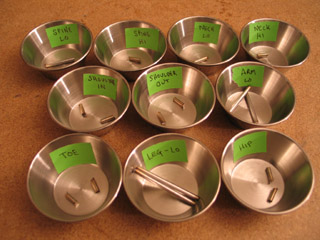
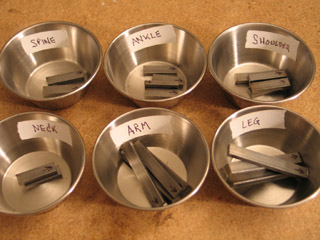
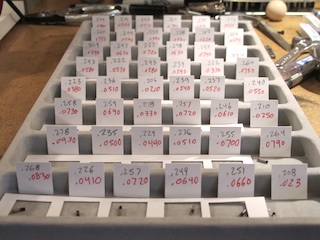
However long the part is, write that number down on a little scrap of paper. If you're doing a big batch of parts, I recommend getting yourself a cheap jewelry organizer (~$3) to use as a palette.

I've got a 3/4" square paper punch that came from a craft supply store — very useful for making the tiny bits of paper. Card stock works a bit better than typing paper, because the paper doesn't bend when you lean it against the walls of the jewelry organizer.

Step 8: Calculate how much to shorten the rod
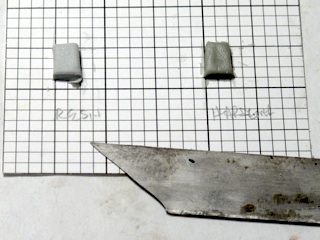
For the rod we're looking at below, I wanted the final length to be .1880". Since the rod at this stage was .2300" long, I just needed to subtract to figure out that I needed to remove .0420".
Step 9: Write down how much the rod needs to be shortened
On the same tiny square of paper, write down how much the rod needs to be shortened. I find using a red pen here helps keep the new number visually distinct. Anything that helps prevent errors is good!
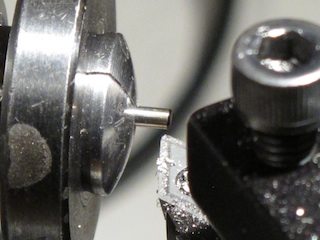
Step 10: Locate the end of the rod
Put the chamfered end of the rod segment back into the lathe. Blacken the flat end of the protruding side with a normal sized sharpie marker. Bring your cutting tool in until it just touches the end. If you're careful, you should be able to remove less than .0005" of material while doing this. Listen for a change of sound when the tool touches the spinning rod, and look for whether or not the sharpie ink is being rubbed away.
Step 11: Cut the rod to its final length
Zero out the DRO (Digital Read Out). Use the lathe to cut off the amount of material that you wrote down in red. For 1/16" rods, I found that .0050" cuts worked well. You can take off more at a time safely — but the stress is more likely to cause the rod to move in the collet.
Step 12: Check that you hit the correct length
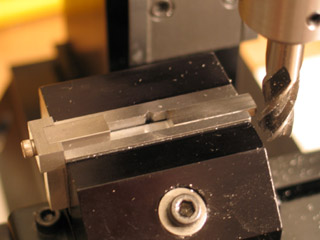
Sometimes things go wrong. Like when a rod moves in the collet, and you don't actually cut off as much material as you thought. Check your work with the digital calipers. In the photo below I was off by .0005" from my desired length of .1880". That was a perfectly acceptable level of error for this project.
The part is now at it's correct length.

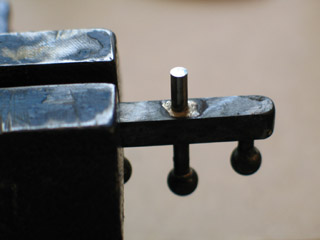
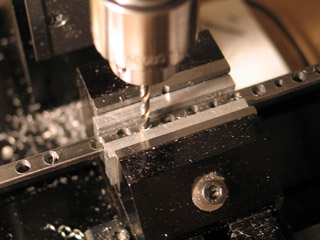
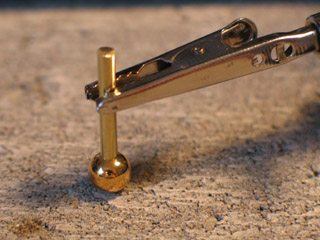
Step 13: Position the rod for trimming its diameter
If this end of the rod is going to go into a ball, then you're going to need to trim its diameter. I find lathing about .0010" off all around gives just enough play to get the rod into the ball's hole while still keeping a close fit.
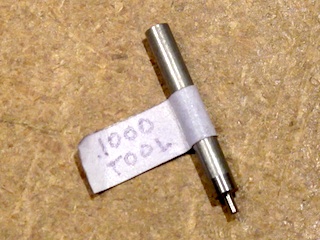
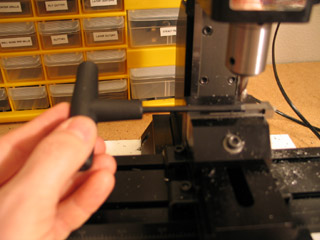
For this project, the ball holes were 5/64" deep (.0780"). I decided the diameter trim should be .0850" long. I wanted the rod to stick out .1000" from the surface of the lathe collet, so there'd be a margin of safety between the cutting tool and the collet. To accomplish this, I created a little tool that allows me to push the rod into the collet to a (reasonably) precise depth. Using the .1000" tool, position the rod in the collet.
Step 14: Zero out the DRO where you want the diameter trim to end
As in step 10, blacken the end of the rod, and carefully bring the cutter in until it just touches. Zero out the DRO. Without performing a cut, move the cutter along the Z-axis to .0850". Zero out the DRO again.
Now, when you're trimming the rod ends, all you have to do is travel to zero each time. It saves a lot of brain power. (If you're doing a big batch of parts, you're only going to have to do this step once.)

Step 15: Locate the side of the rod
Blacken the side of the rod. Move the cutter on the X-axis and watch for when it makes a mark in the ink. Figure out where the edge of the rod is and zero the DRO. Move the cutter in to X=-.0010. You're now ready to make cuts. (For a batch, you're only going to have to do this once.)
Step 16: Trim the end of the rod
With the cutter set at X=-.0010, move it to Z=0, and then back off from the part on the Z axis. Leave the X alone. Test the trim by placing a ball on the end of the rod. If it fits nicely, then you're done — or ready to trim the other end of the rod.
There, that wasn't so hard, was it?
Oh… I guess it was. Well, at least you've got a really great part to work with now. ;-)
posted by sven | permalink | categories: stopmo
June 29, 2011
evolution of the ball-drilling jig
by sven at 7:00 am
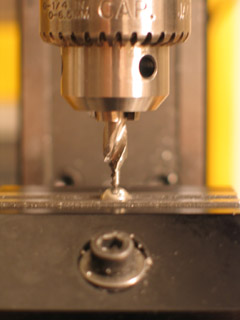
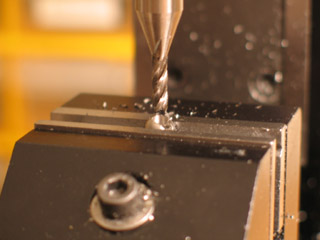
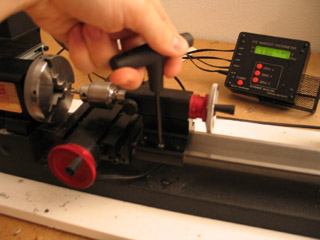
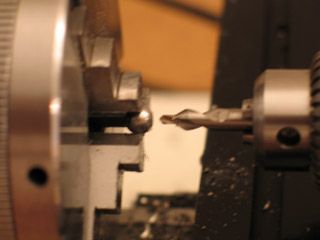
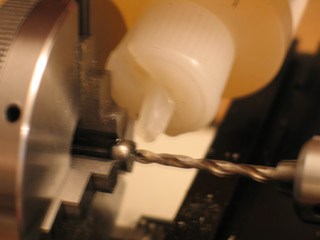
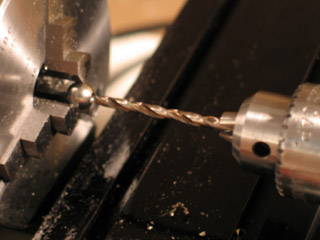
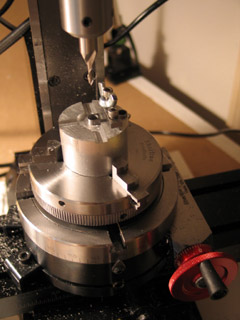
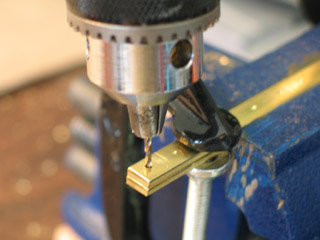
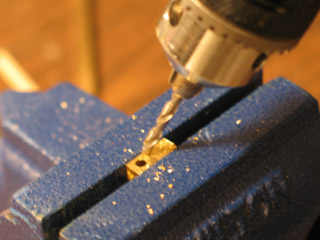
Drilling balls is a fundamental of armature building. It's a tougher problem than you'd think. At this point, I believe I've gone through seven methods of drilling balls — and I'm still not entirely satisfied.
Today I'd like to do a retrospective of the methods I've tried and discuss their various shortcomings.
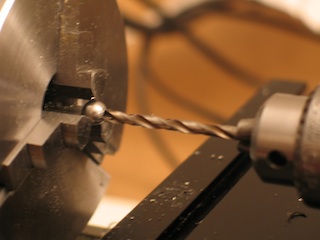
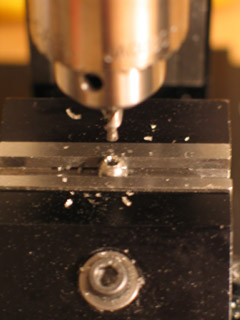
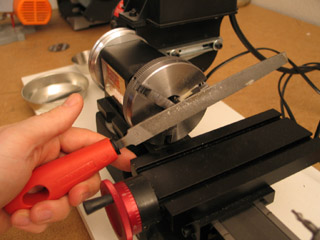
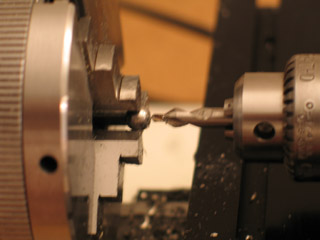
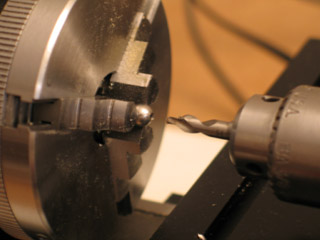
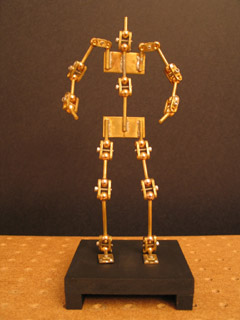
Fig.1: The classic method for drilling holes in balls is to put the ball in a lathe chuck. This is what I did for the Man of Steel back in 2006.
The advantage is that your hole should be perfectly centered. The big problem is that the drill bit wants to push the ball back into the chuck, ruining your control of hole depth. You can try to crank down on the chuck and make it really tight — but the stainless steel ball is harder than the jaws of the chuck and will leave a ball-shaped deformation. Oops.
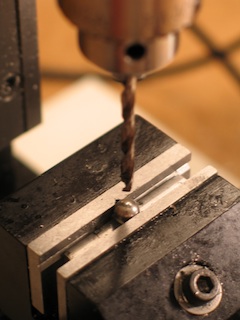
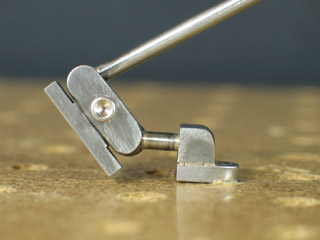
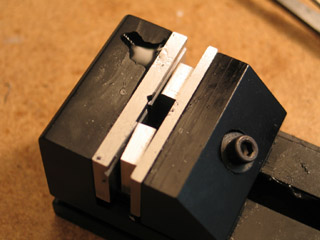
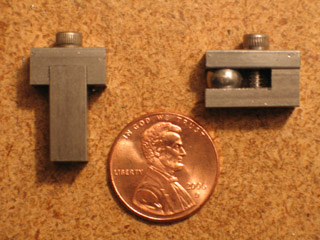
Fig.2: If you put the ball into a milling vise, supported by a riser, you can be sure that your depth will be accurate. However, now you're going to have to worry about getting the hole perfectly centered.
My milling vise has a nice built-in groove for holding the ball in place. But if you use it, where do you measure from to find the center of the ball? You can't use the fixed jaw because you don't know how deep the ball sits in the groove*. You can't use the moving jaw because milling vises pull that jaw down at an angle. If the jaw isn't vertical, there's no way to tell exactly where the ball is making contact.
(*Technically, you could figure it out with geometry — if there was a way to get really precise measurement of the groove's dimensions.)
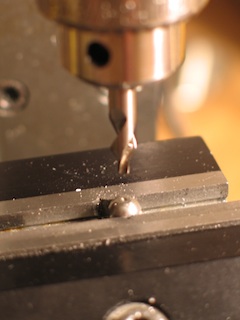
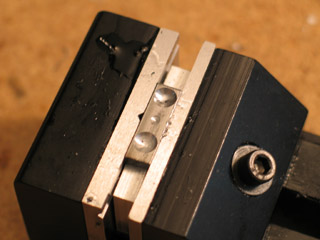
Fig.3: I tried moving the ball over in the vise, so I could use the fixed jaw as a vertical surface to measure from. But with only two points of contact, the ball wants to spin on the Y-axis when the drill makes contact.
To give the vise a better grip, I tried making a grooved insert that attaches to the moving jaw. As I recall, it did an OK job of holding the ball in place… But then I discovered that the ball was deforming the vise jaws. Again, the stainless steel ball is harder than the things holding it. No good.
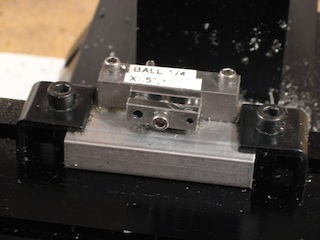
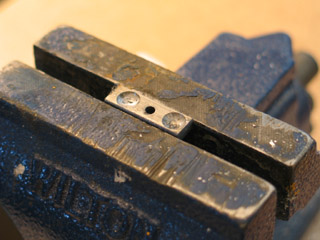
Fig.4: Thinking about sandwich plate joints, I created this jig that would hold two balls from the sides. Several problems… It's fussy to get balls in and out. You have to take the versatile milling vise off the XY table and put a bunch of effort into getting the jig parallel with the milling column. There's a lot of room for compounding errors if the jig itself wasn't milled perfectly straight. It's an overly complicated and irritating solution.

Fig.5: This jig was inspired by step-block joints, and worked pretty well most of the time. It involved a few superfluous steps, though. After clamping a ball in place, I'd fill the hole above it with oil. (The hole held the oil in place quite nicely.) I'd use a cylindrical diamond burr to grind a flat spot on top of the ball. I'd use a center drill to start a hole. Then I'd use a drill to make the actual hole. I've since found a method that doesn't require flattening the ball or using a center drill.
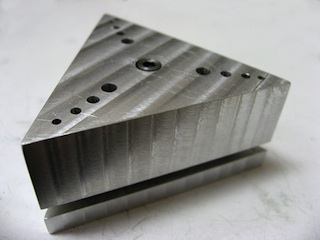
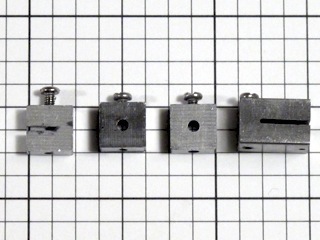
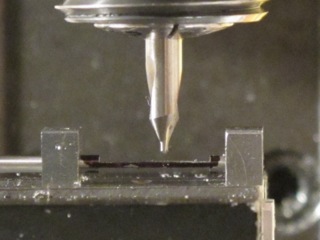
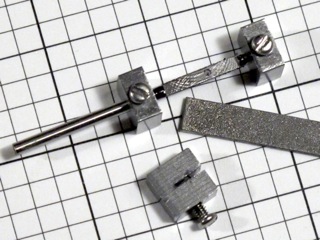
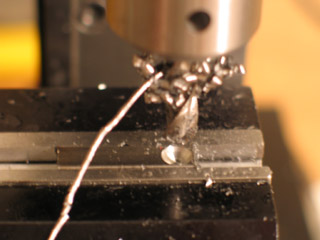
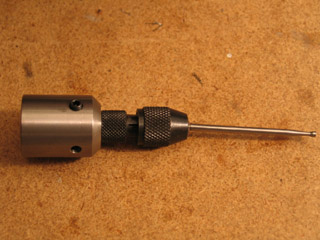
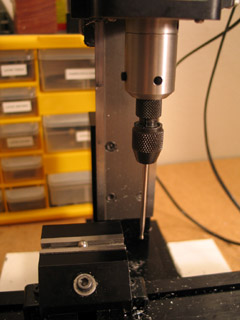
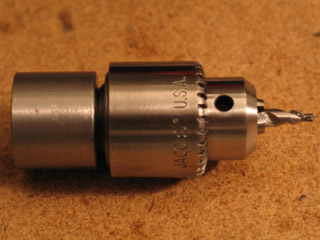
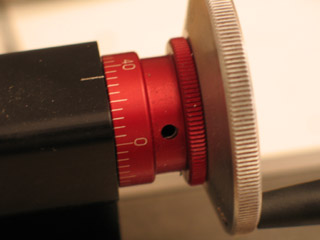
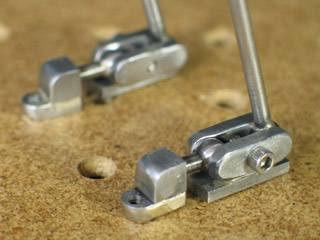
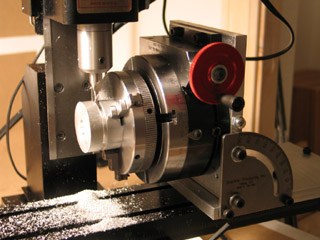
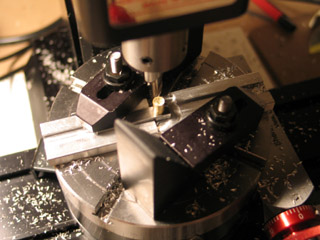
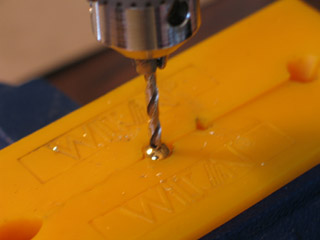
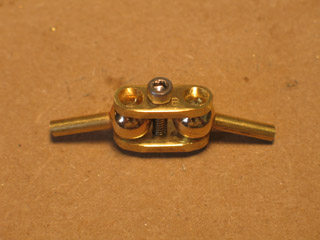
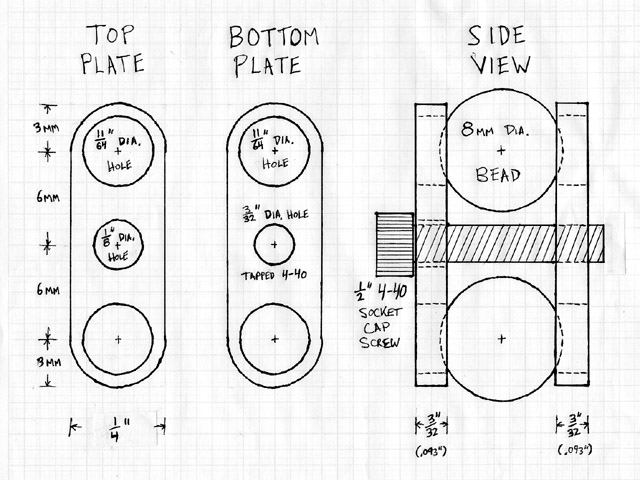
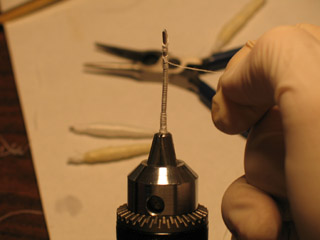
Fig.6: My most recent attempts take their inspiration from this jig by Jeremy Spake. The top holes guide the drill directly to the balls' centers, making center drilling unnecessary. This design is intended for use with a drill press. Unfortunately, I don't have a drill press with depth control that I really trust, so I've had to adapt it for the mill.
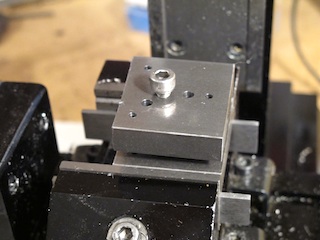
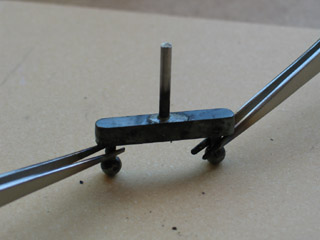
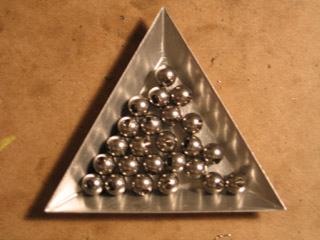
Fig.7: Using three balls guarantees that the top plate will be parallel with the bottom. The hole you make in the ball will be centered, the drill bit won't go into the ball at a funny angle, and you've got good depth control. Excellent!
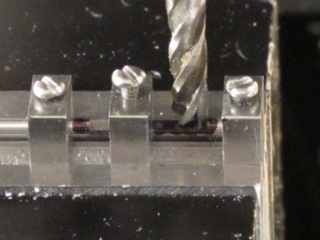
My version for the milling machine theoretically gives me depth control down to .0005" accuracy. You do have to pull the drill out promptly, though, or else Z-axis backlash might allow the drill to keep going down after you've stopped turning the handwheel.
With Jeremy's design you can do a couple of balls per minute. With mine, you have to re-load the jig every time you want to drill a new ball. Slower… But I'm willing to give up some time for the sake of getting accuracy.
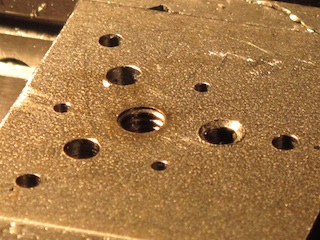
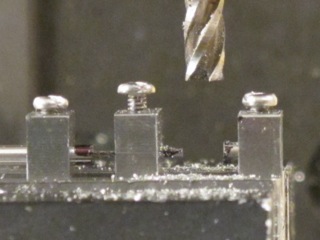
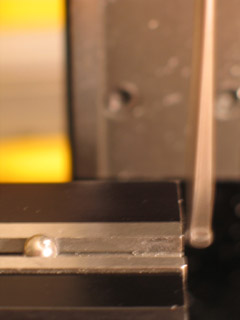
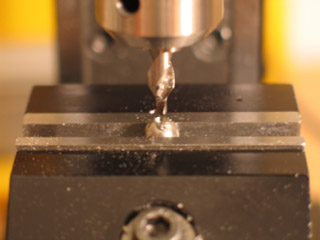
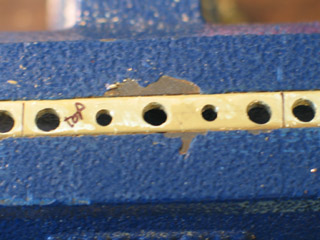
Fig.8: Much to my frustration, I've run into problems with this jig design becoming deformed. If your speed and feed for the drill aren't right, the ball will work harden and the bit can't cut into it anymore. After that point, the drill is simply smashing the ball downward into its seat.
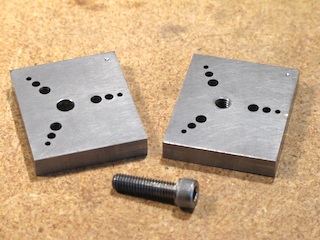
Fig.9: The previous jig was made out of 1018 steel — just about the softest steel you can buy. For my most recent jig I switched to type O1 tool steel, which is harder than 302 stainless. It too has deformed with use, but it survived a much longer time. Progress.
I think the next improvement would be to mill ball cups into the jig… And to really control speed and feed. Unfortunately, I think the only way to achieve that is to purchase a CNC machine. A computer would stepper motors to precisely control the descent of the drill bit.
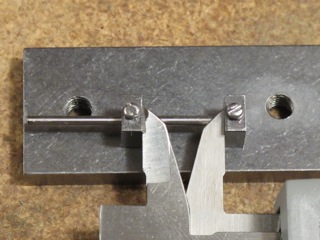
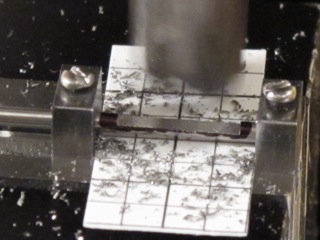
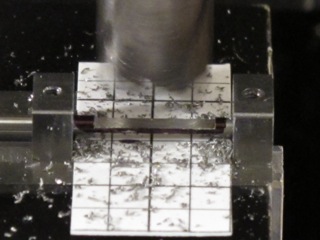
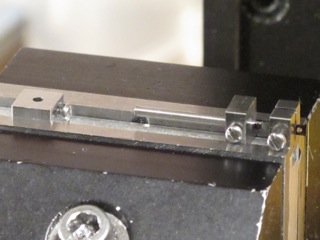
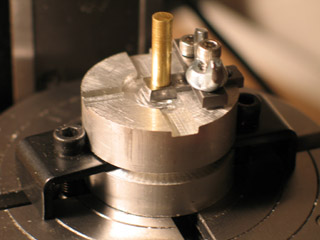
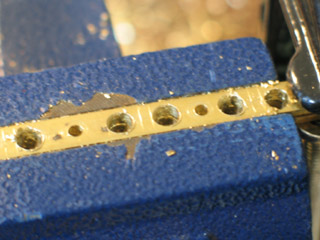
In the meantime, let's take a closer look at using the current jig design.
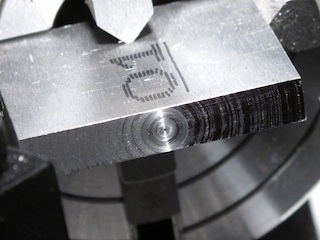
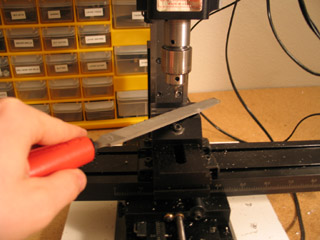
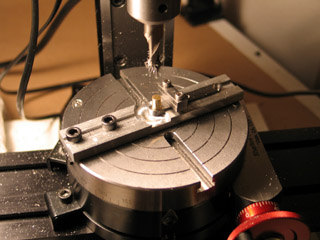
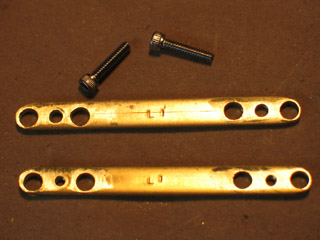
Fig.10: A blog post for another day would discuss the ordeals I've gone through trying to learn how to make the ends of rectangular stock truly flat. Recently I discovered a very simple solution to my woes: four-jawed lathe chucks.
I've been prejudiced against the lathe ever since I couldn't get it to drill balls correctly. Now I discover it's the solution to a problem that's given me countless headaches. Ironic? Anyway, this jig is my first time using the independent-jaws version of the four-jawed chuck.
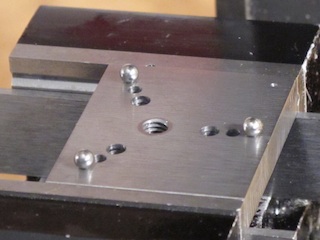
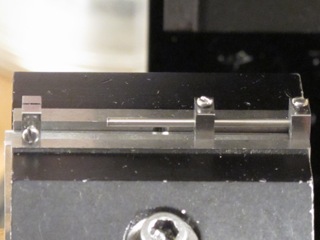
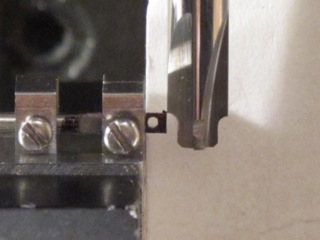
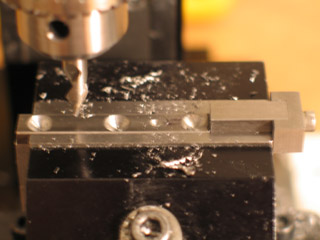
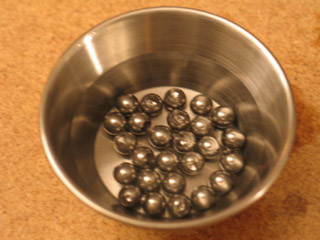
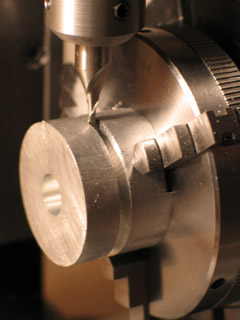
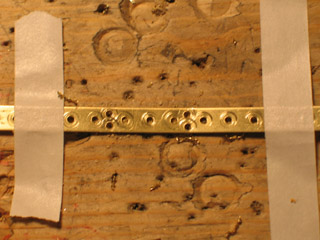
Fig.11: When you put the smallest balls into this jig, they can fall through the larger holes if you accidentally knock them. It's a good idea to put tape or stickers over the larger holes while you work.
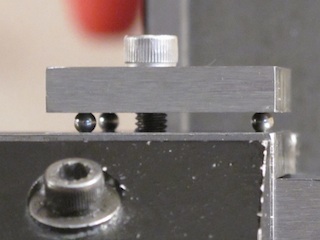
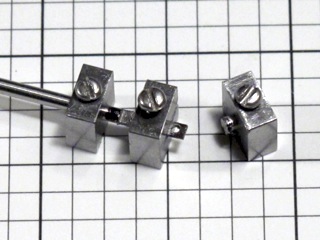
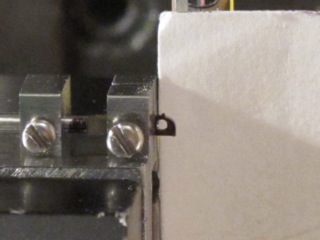
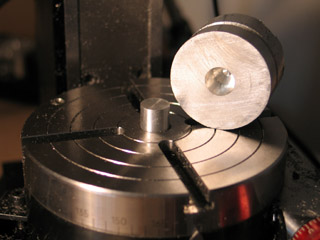
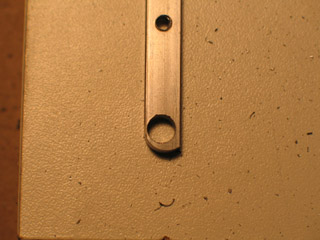
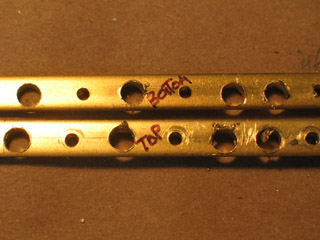
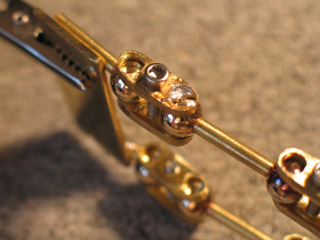
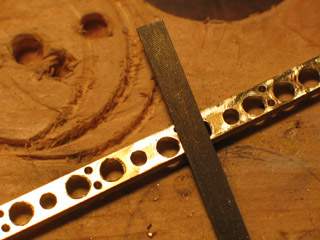
Fig.12: You can see here how parallel the jig's top and bottom plates are. When one of the holes starts deforming, the plates become less parallel. To my surprise, the drilled balls coming out of the damaged jig are useable until the parallelism is strongly compromised.
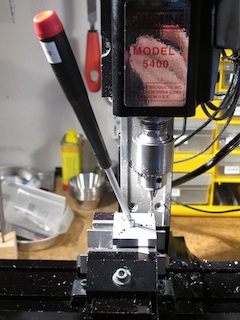
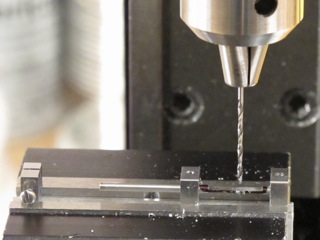
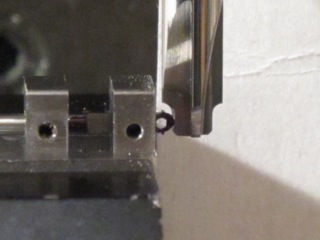
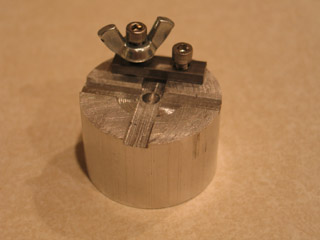
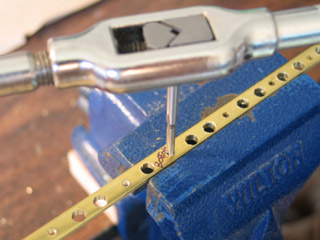
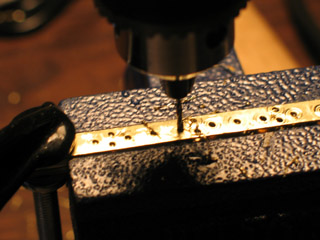
Fig.13: It's very useful to use a ball-nosed hex screwdriver when initially tightening the jig. It allows you to get in at an angle.
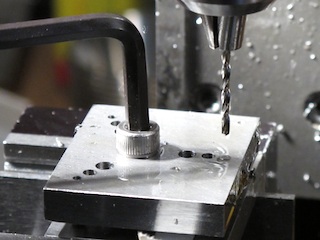
Fig.14: The screwdriver doesn't have enough torque to get the jig really tight. For the final quarter turn, you need to use a regular hex key.
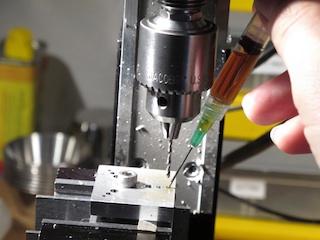
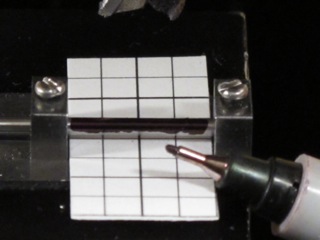
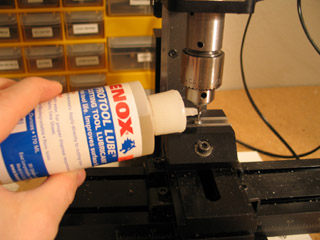
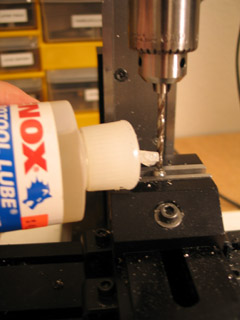
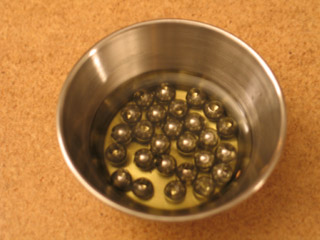
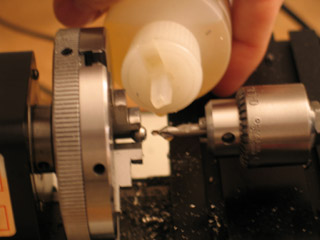
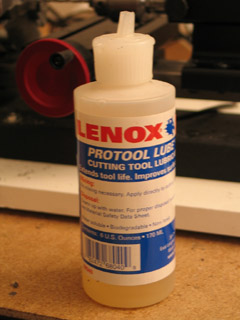
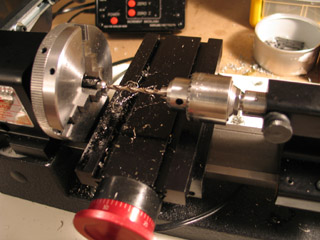
Fig.15: One of my best discoveries for milling has been that you can use a syringe to apply cutting fluid where you need it very precisely. Trying to put oil where you want it with the short spigot of the tin can is messy if not impossible here.
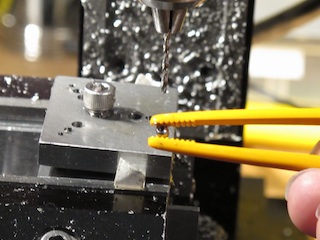
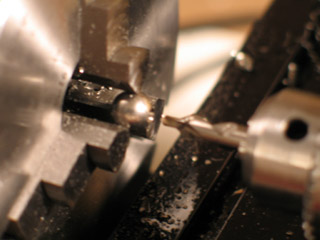
Fig.16: Especially with 1/8" balls, it's difficult to use your big meaty fingers. Tweezers are necessary. Metal tweezers tend to become slightly magnetic, which causes lots of trouble. Using a pair of plastic tweezers works better. Normally I use these for cleaning parts in acid baths… Yet another small detail that saves grief.
posted by sven | permalink | categories: stopmo
June 27, 2011
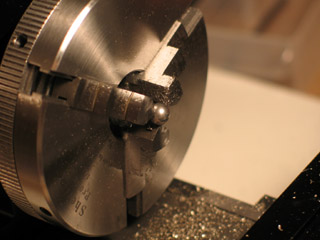
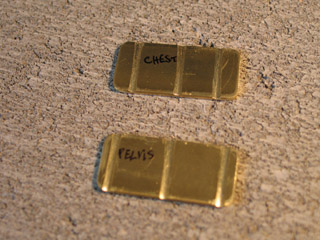
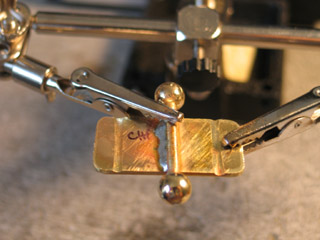
hand paddles
by sven at 11:55 pm
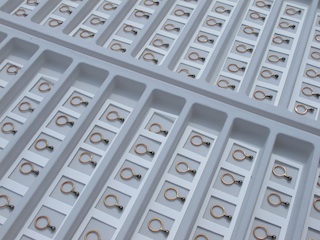
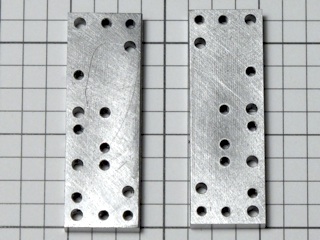
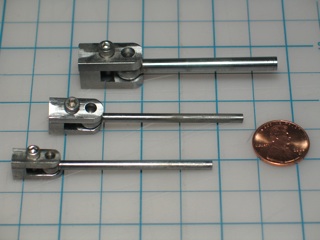
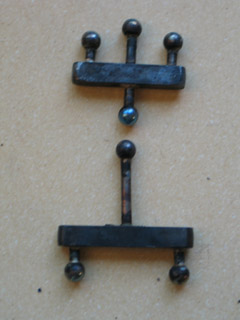
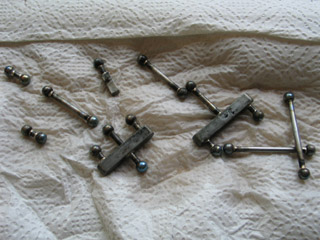
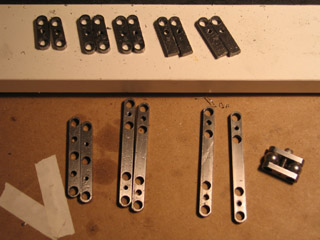
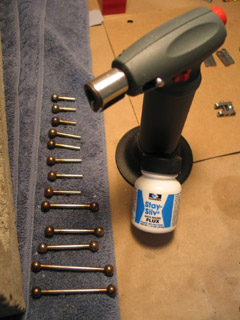
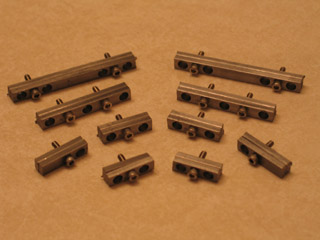
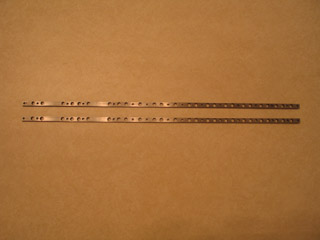
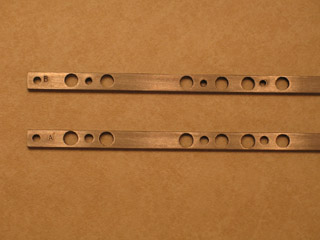
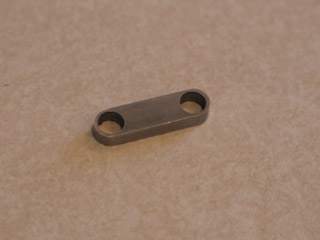
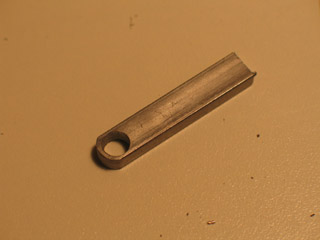
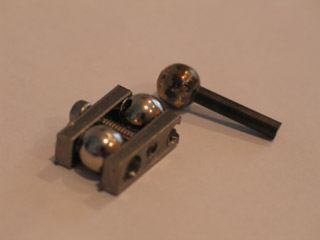
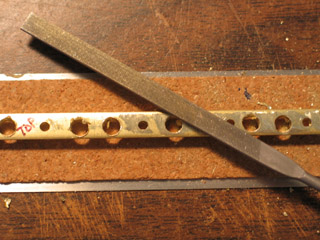
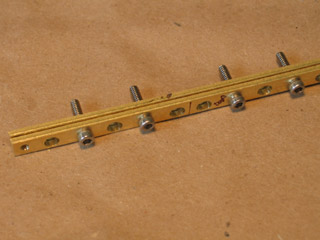
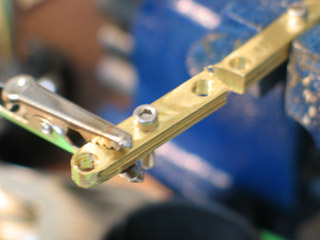
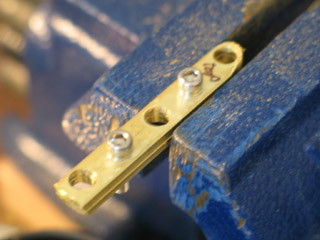
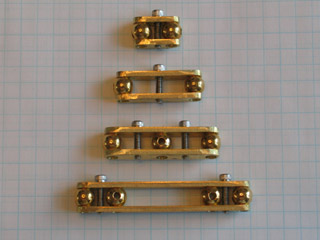
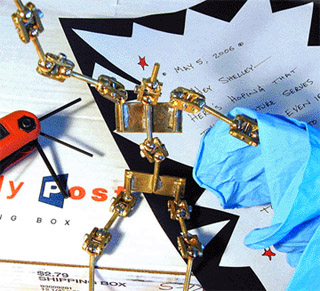
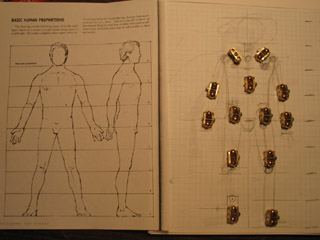
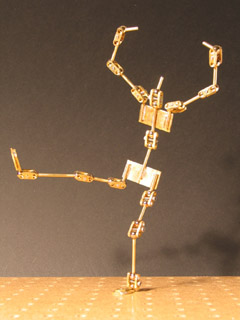
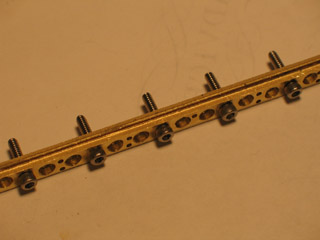
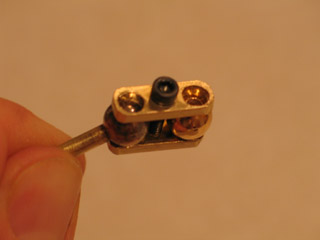
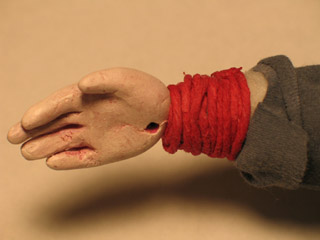
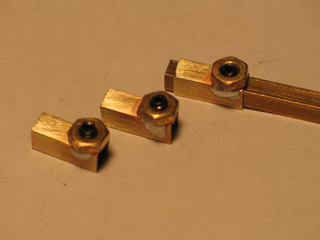
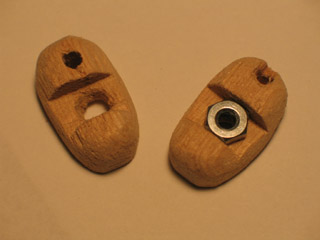
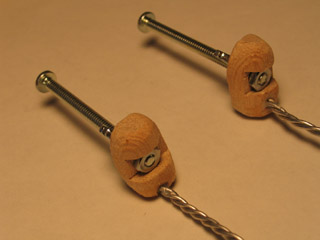
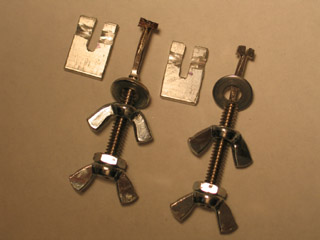
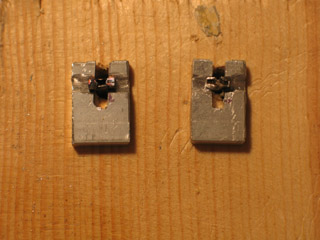
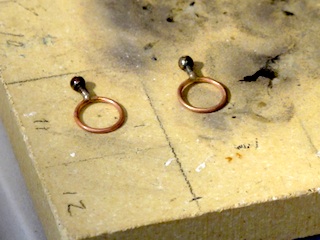
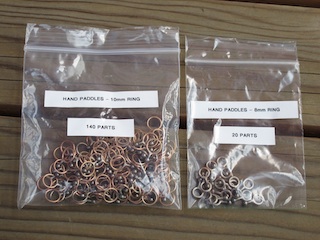
Immediately after the Northwest Animation Festival ended, I got hired to do some armature work for a feature film. I was asked to fabricate 160 puppet hand paddles.
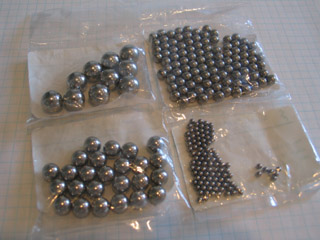
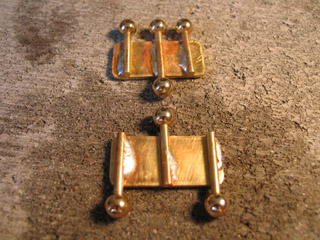
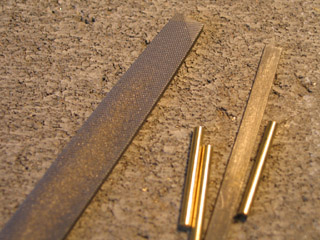
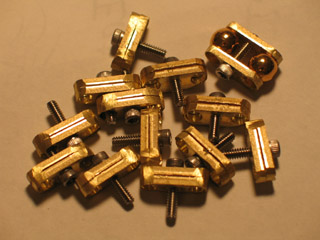
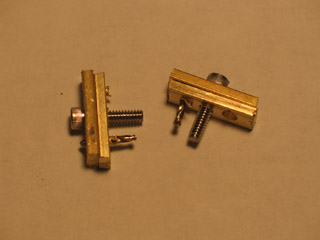
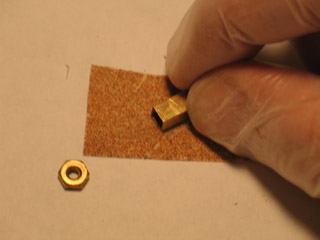
I made parts in two sizes, using 10mm and 8mm jump rings.
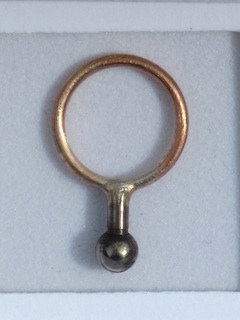
The 10mm rings are solid brass. The brazing process draws copper to the surface of the metal, making it reddish in color.
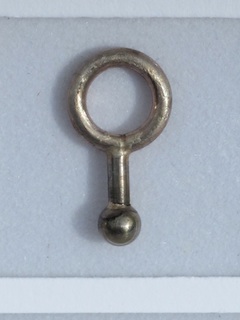
The 8mm ring appeared to be made of brass — but that burned away during brazing, revealing a steel core. I was initially worried that plating would interfere with getting a good bond. It didn't turn out to be a problem.
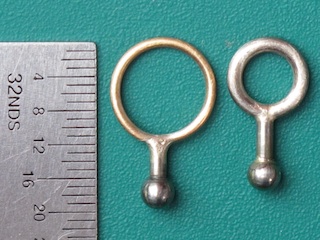
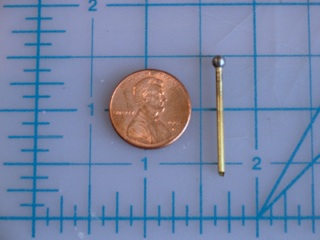
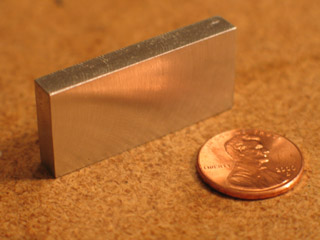
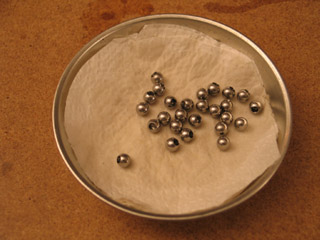
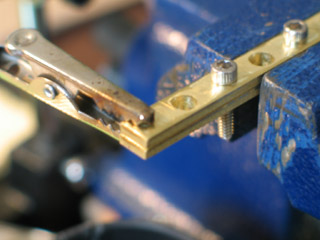
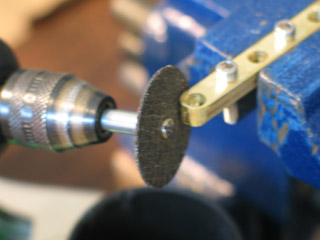
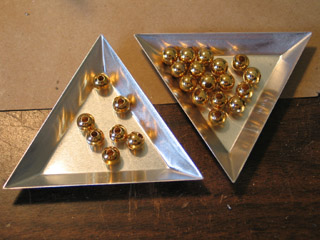
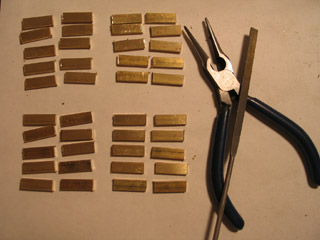
The balls are 1/8" diameter, the rods 1/16". We're talking SMALL. I constantly had to use needle-nosed electronics tweezers to pick things up.
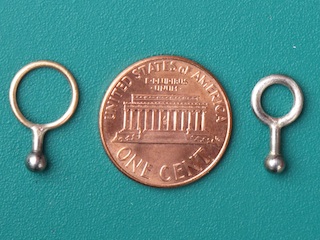
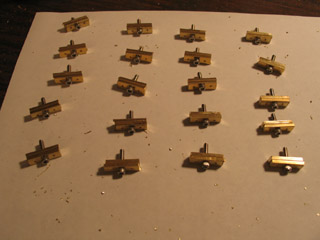
Doing just about anything 160 times gets tedious. At least the tedium gets punctuated with panic when things go wrong!
Armatures are a love/hate thing. There's a very special misery when things aren't working out in the machine shop… But when things do work, perfect shiny metal is all kinds of sexy.
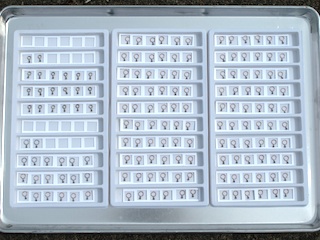
A couple weeks of living night and day with this project. Then? All those neatly laid out parts get dumped higglety pigglety into bags and I take them off to FedEx, never to be seen again. Good luck in your new life little hand paddles!
posted by sven | permalink | categories: stopmo
February 6, 2011
lipton brisk eminem superbowl commercial
by sven at 10:30 pm

I helped out on a SuperBowl commercial: an ad for Lipton Brisk Tea, featuring Eminem. Big time!
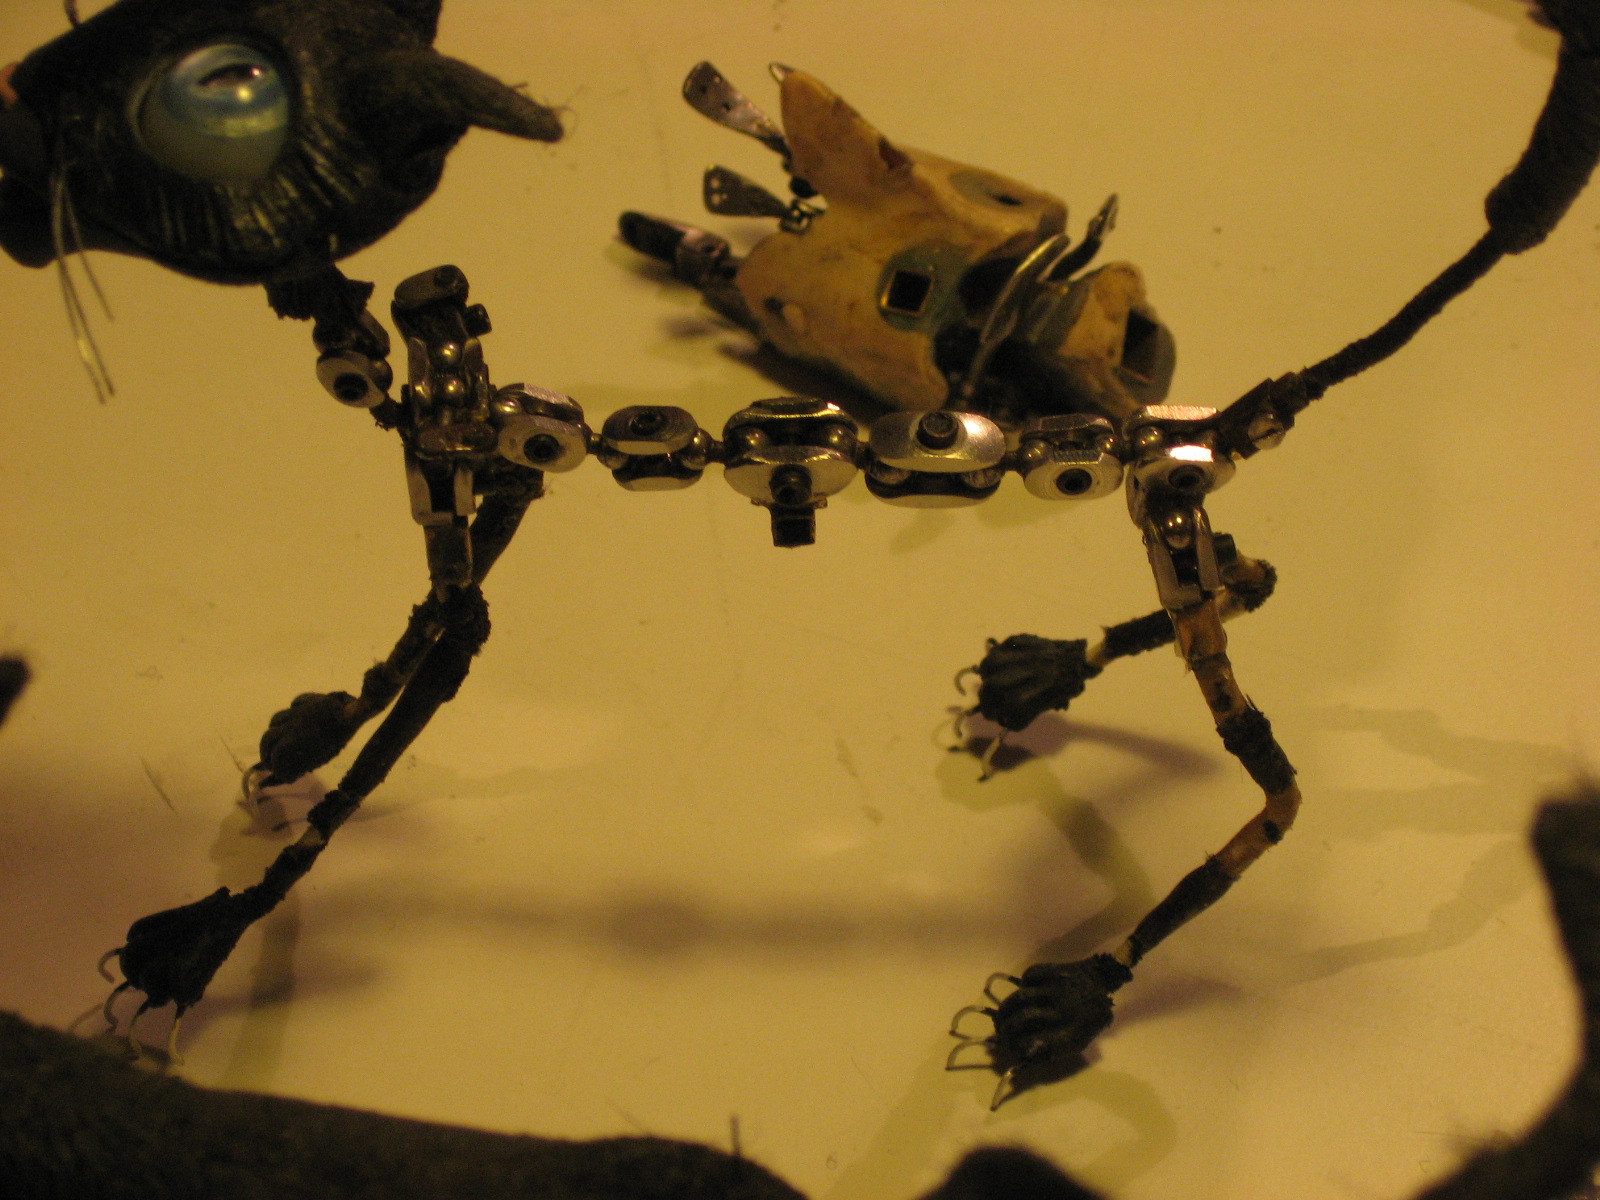
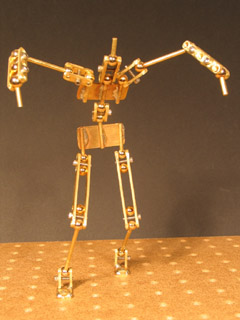
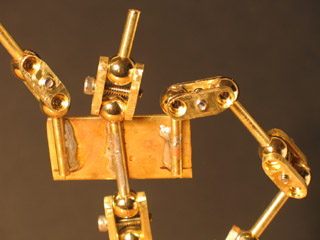
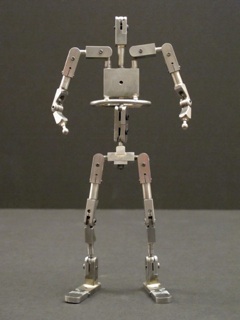
I built the 8" tall armature for one of two Eminem puppets.
This ad was produced by the San Francisco-based company, Mekanism. Misha Klein directed animation, and Tirsh Hunter was in charge of puppet fab. One puppet was already in progress; my job was to duplicate the original armature, designed by Merrick Cheney.
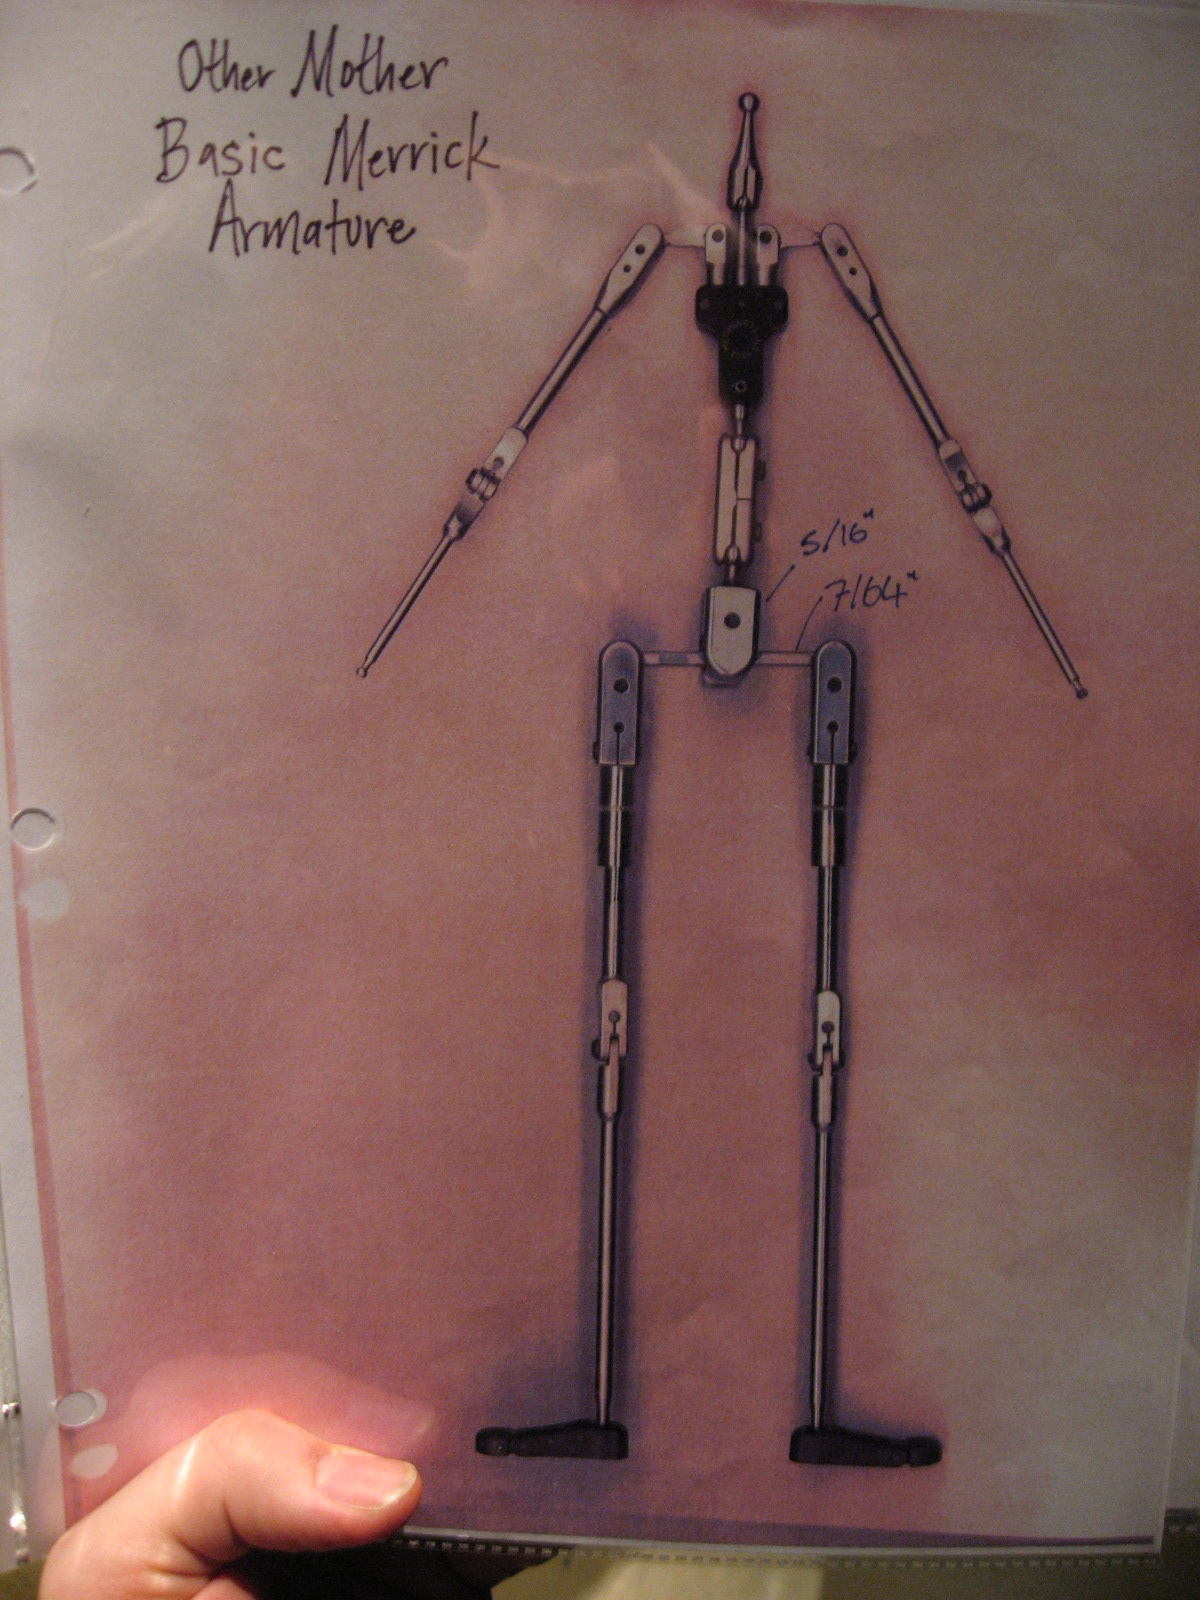
Understand, Merrick is the living GOD of armature makers. Films like The Nightmare Before Christmas and Coraline... If you need impossibly small, strong, and precise armatures, he's the gold standard. I was thrilled and terrified to try working in his footsteps.

Merrick was able to supply the hinges, which was an enormous help. Due to time constraints, Lionel Ivan Orozco made hands (lots of hands). I understand that Ron Cole did the inner workings of the head. Stepblock joints, swivels, body blocks, assembly... That's all me.
The project took me 16 very sleepless days/nights. My speed, accuracy, and design work all just took enormous strides forward.
But during that time, everything else ceased to exist. I got the armature sent off on December 24... Huge thanks to Gretchin, without whom Christmas would hardly have happened at all!
posted by sven | permalink | categories: exhibits & events, stopmo
January 26, 2011
"mutate" in openlens festival - jan 29
by sven at 11:39 am

My stopmo short Mutate will be showing this weekend in Eugene, Oregon, at the OpenLens Festival.
The date of my film's screening falls between two days when I'm emceeing for PDX Playwrights shows at the Fertile Ground fest. Playwright and animator... It's kinda mind-bending to switch between these identities in such quick succession!
Screening: OpenLens Short Film and Video Competition
Time: 8:00 PM
Location: UO Baker Downtown Center at 325 E. 10th
Admission: $8. Includes screening, awards ceremony, and reception with filmmakers and audience. Refreshments provided by DAVIS Restaurant.A screening of jury selected films for DIVA's OpenLens Festival Short Film and Video Competition will be followed by an awards ceremony and reception at which you can join filmmakers and others in celebrating the evening's showcase of exciting short films. Awards: $500 - Best Of Festival Jury Award. $200 - Honorable Mention Jury Award, and a $100 - Audience Choice Award. A membership in the Mid-Oregon Production Arts Network (MOPAN) organization will be awarded the Best Of The Festival film director.
OpenLens 2011 is a statewide event that provides an opportunity for Oregon short film artists to showcase their work in a competitive event. It is a small festival dedicated to the showcasing of new work while providing the opportunity for artists and audiences to meet and network.
This year’s festival features work from around the state as well as that of local artists. Of the 36 entries submitted, the festival Jury has picked a number of excellent films for the evening program. This year's juried films, trailers, and descriptions are available online.
Update: "Mutate" won Honorable Mention!
posted by sven | permalink | categories: exhibits & events, movies, stopmo
November 13, 2010
birthday party: still 30 something
by sven at 7:00 am
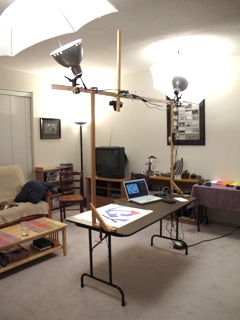
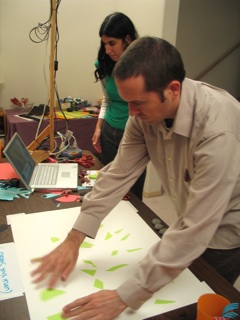
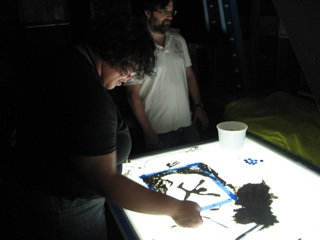
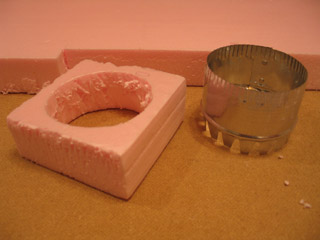
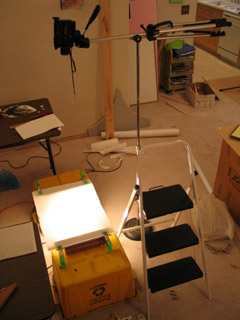
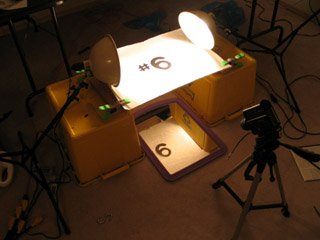
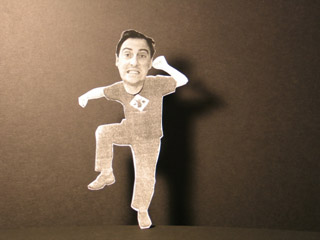
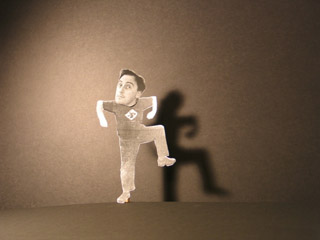
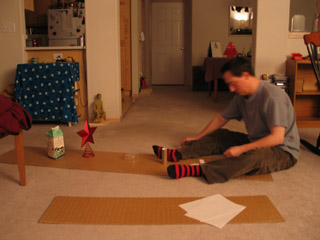
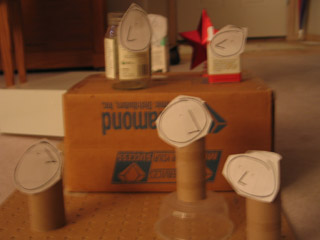
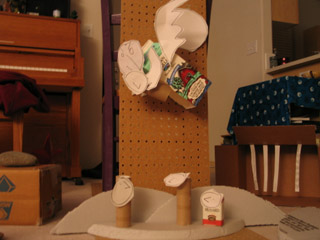
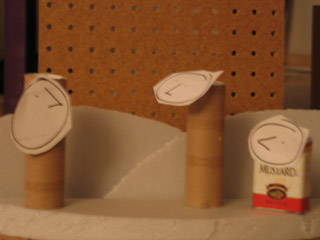
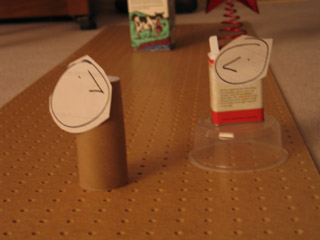
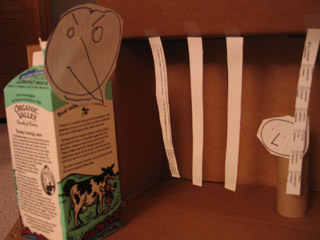
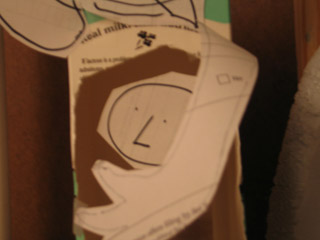
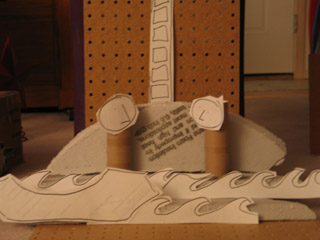
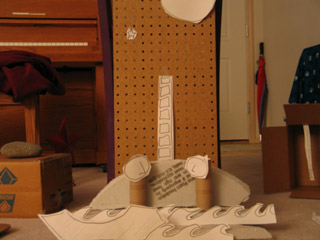
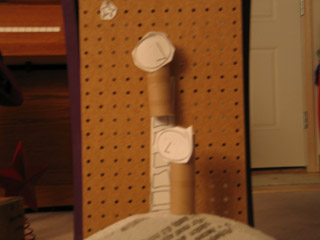
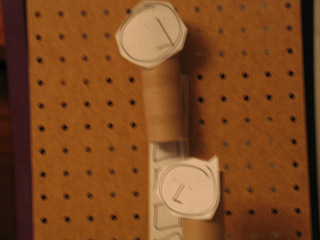
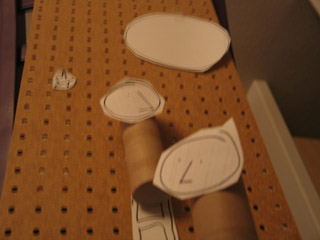
click on image to play film (39sec - 1.9 MB) or view on YouTube Last year I set up a downshooter animation table at my birthday party -- to introduce my friends to this artform that I love. It went so well, I decided to do the same thing again this year!
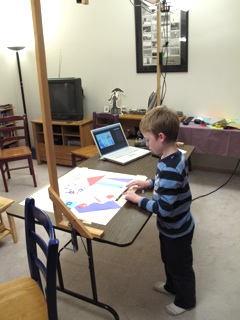
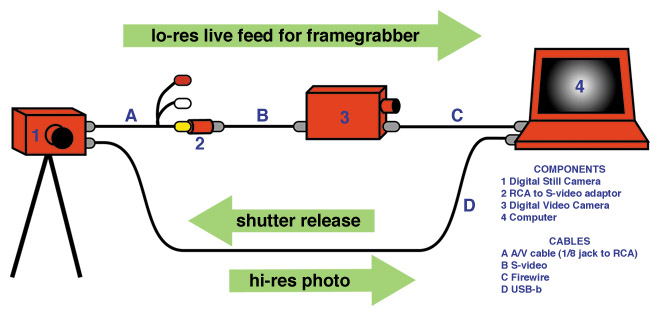
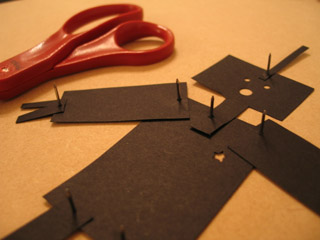
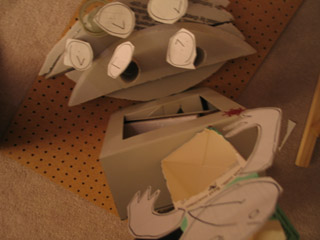
downshooter I provided colored paper so people could cut out whatever shapes they wanted. A downshooter is very user friendly: just move the shapes around on the table, and hit the computer's "enter" button to shoot a frame.
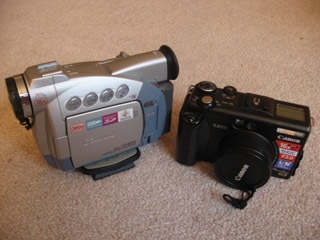
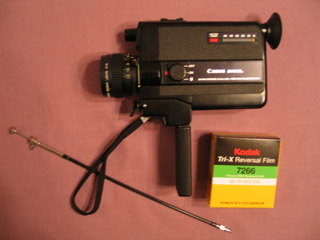
(My one mistake was that I should have used the DV cam rather than a digital still camera. Though picture quality is lower, it can capture frames faster, which makes the process more fun for everyone.)
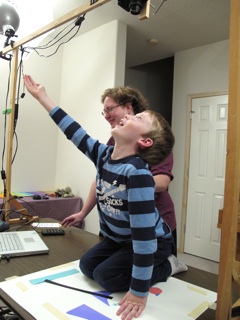
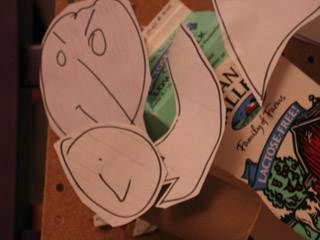
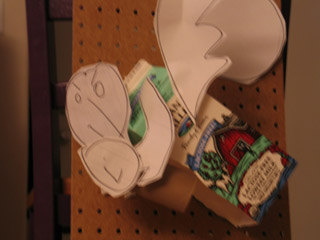
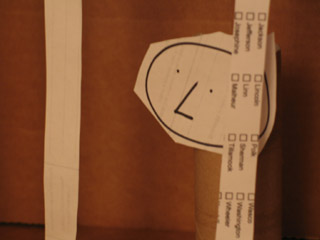
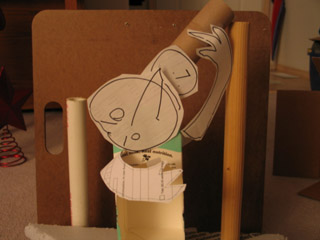
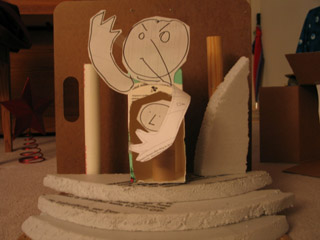
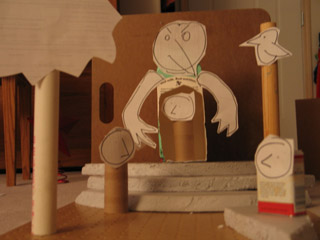
Ben gets animated Most of the animation was done by our friend Ben H. From the very start, he saw the exciting possibilities about what you can put beneath the camera...
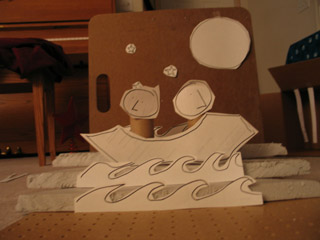
Ben tells a story It was remarkable to watch Ben's approach evolve over the course of the evening. If you pay attention, after the cake portion of the film, the images become less random. ...We're watching a story about a wizard who casts a spell!
posted by sven | permalink | categories: exhibits & events, stopmo
November 11, 2010
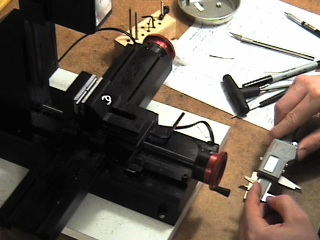
thirty-nine dance: behind the scenes
by sven at 5:30 pm
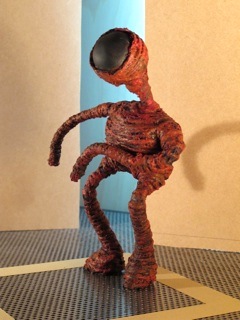
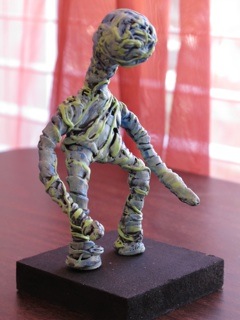
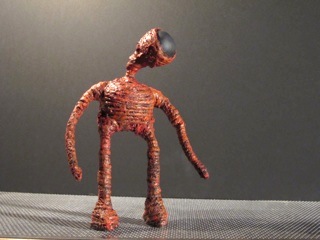
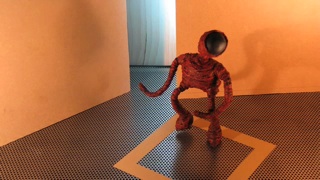
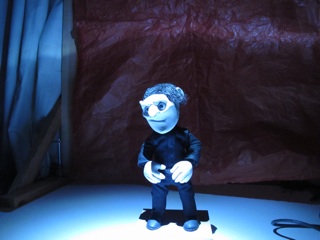
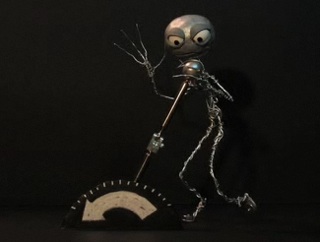
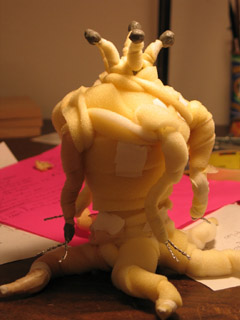
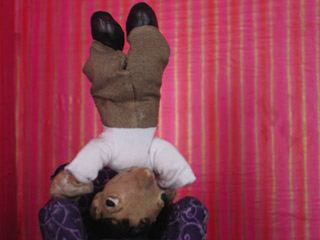
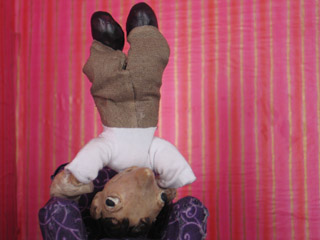
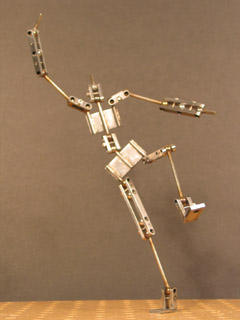
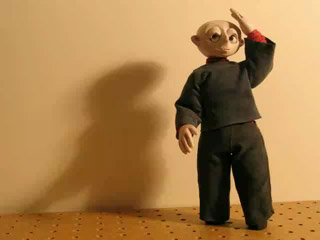
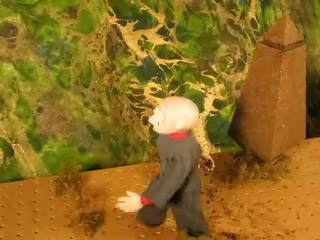
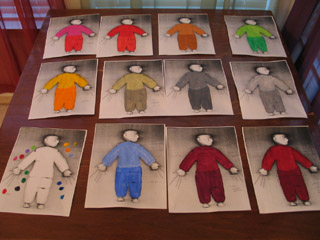
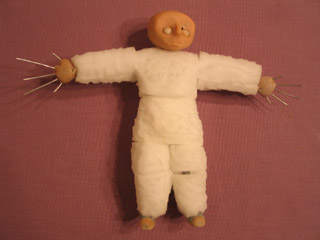
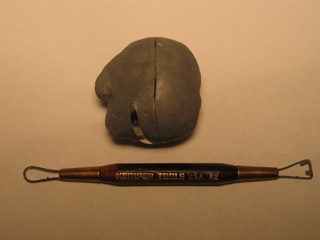
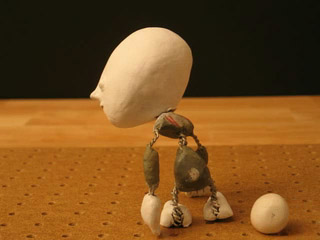
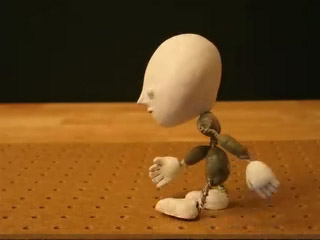
dancing puppet I want to share some "behind the scenes" photos from my most recent stopmo clip, The Thirty-Nine Dance.
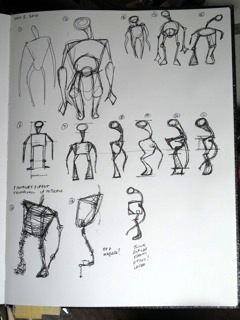
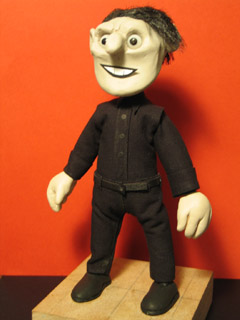
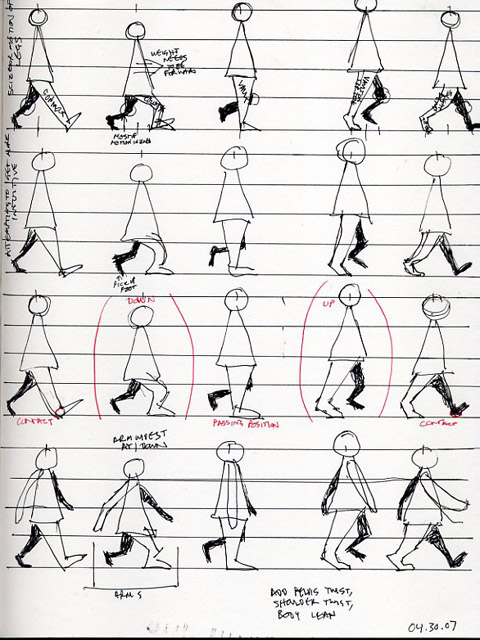
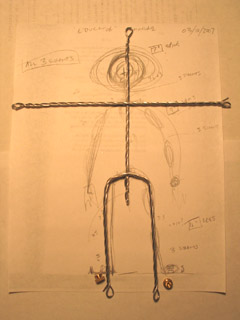
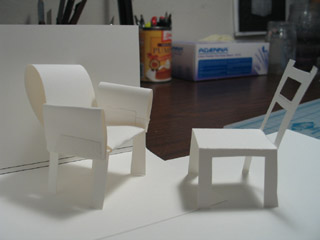
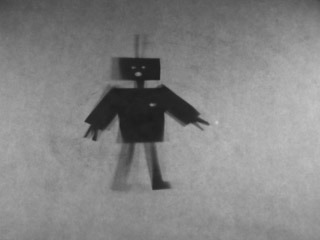
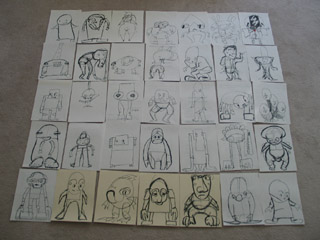
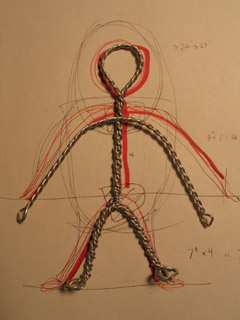
fig.1 sketches Fig.1: For the puppet design, I didn't just want a generic humanoid. I wanted something stylized.
In 2D hand-drawn animation, there's an emphasis on finding the underlying forms of a character. If you're going to draw Donald Duck or Homer Simpson thousands of times, you need to know that the head is built upon a circle, the belly is constructed from a bean, the character is four head-circles tall... Etc.
Using this sort of thinking, I decided to base the body on a squashed square shape, and made the legs almost twice as long as the torso.
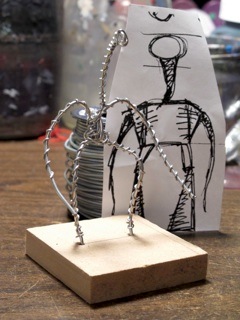
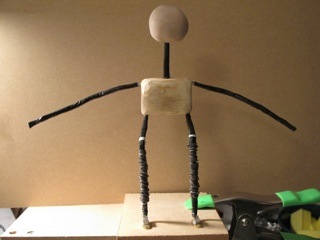
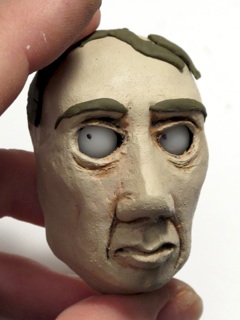
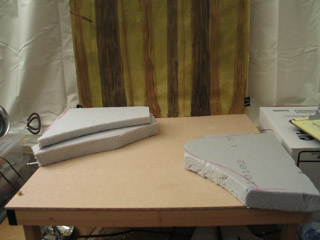
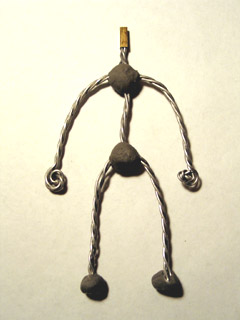
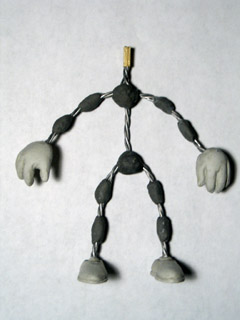
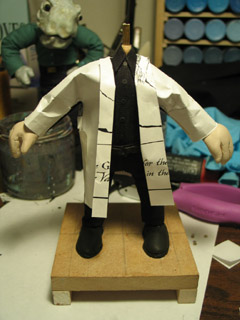
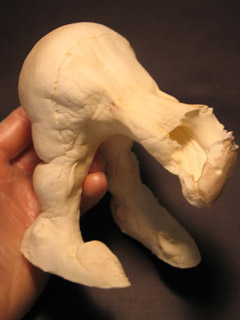
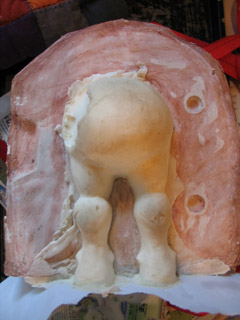
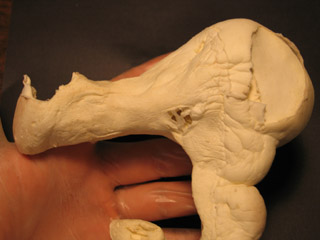
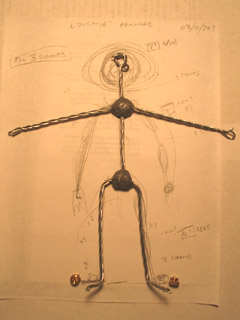
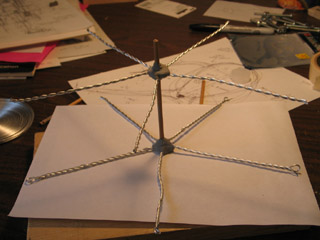
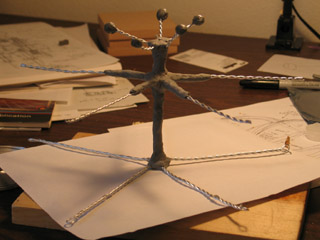
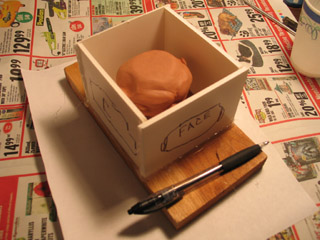
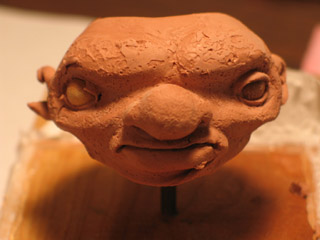
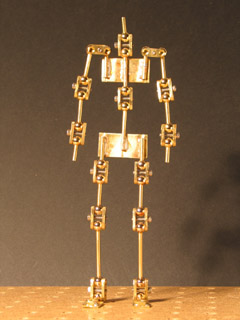
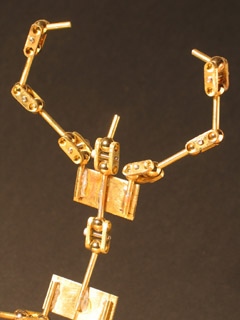
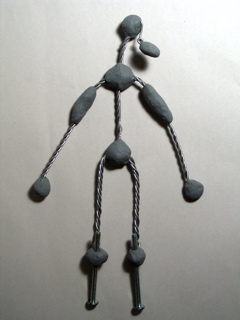
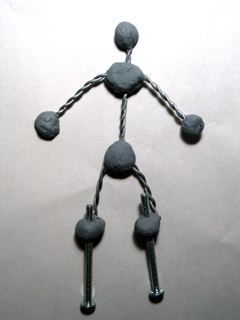
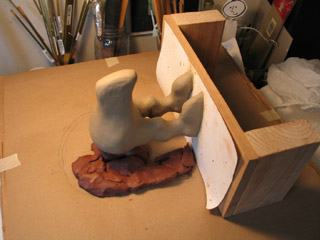
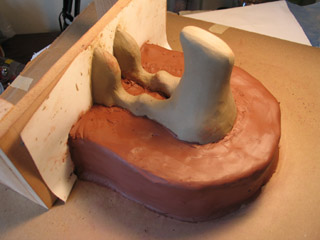
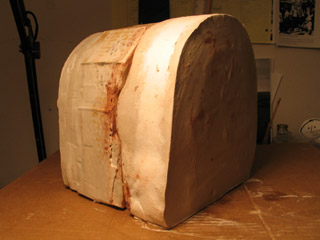
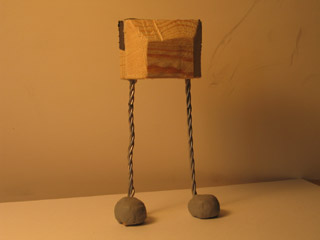
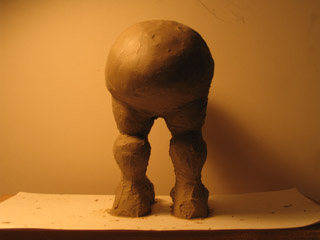
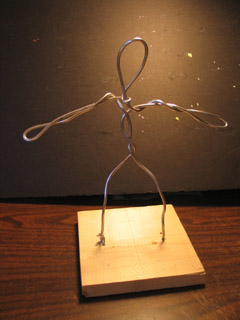
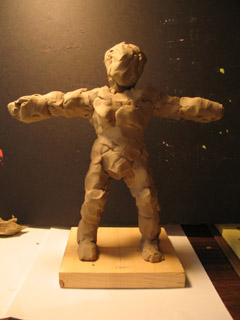
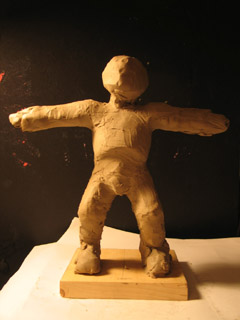
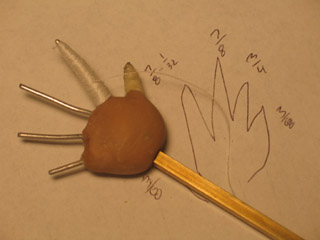
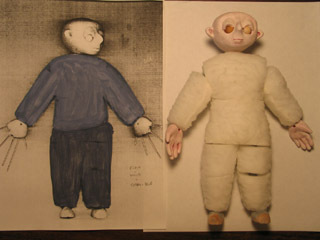
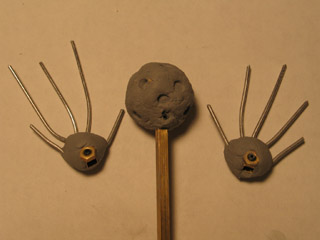
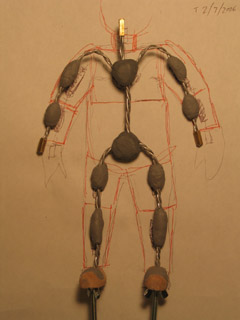
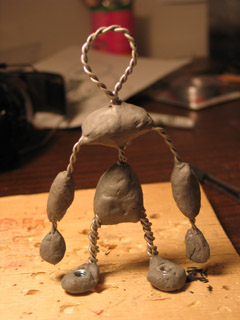
fig.2 maquette armature Fig.2: I want puppets that have a highly sculpted look. So, for the first time, I went ahead and tried making a maquette before creating my final puppet. Seeing a rough sketch in 3D allowed me to identify some changes that I wanted to make in the final design.
Some thoughts about the armature you do your sculpt on...
If you're going to cast a puppet in foam latex or silicone, you can either:
- make an animatable armature, do your sculpting on top of it, and then make a mold, or
- do your sculpt on a rough armature, make a mold, and then make an animatable armature to fit inside it.
While I'm not doing cast puppets yet, I do want to work in the direction of option B. It makes the life of the armature builder more difficult -- but prioritizes creating a dynamic sculpt... Which is, after all, what the audience is going to see.
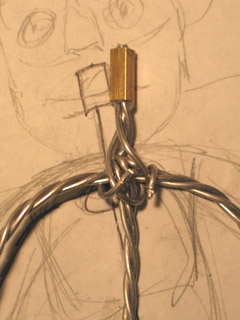
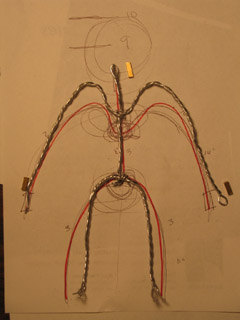
The armature that you build a sculpt on is different from an armature suited for animation. The maquette armature you see above starts with two equal lengths of wire for the left and right sides of the body, which then get bound together at the spine. This construction helps make sure that both sides of the puppet are symmetrical. The entire thing is then wrapped in a smaller gauge wire, which gives your sculpting material something to grip onto.
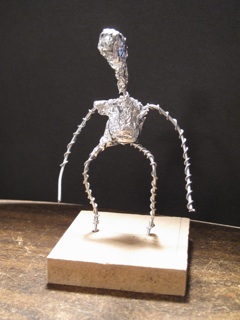
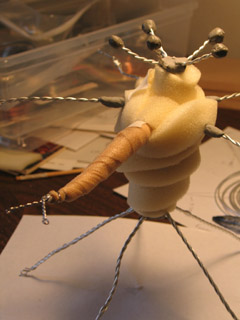
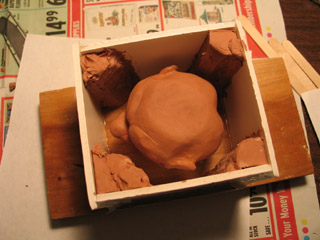
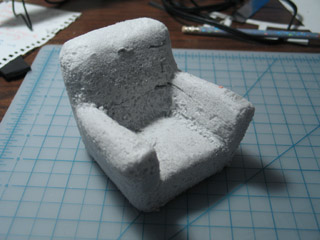
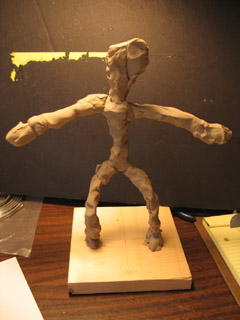
fig.3 bulking out with aluminum foil Fig.3: If you look at photos from the making of Return of the Jedi, all the monster maquettes from Jabba's palace appear to be made from water-based clay. If you look at photos from Star Wars Episodes I-III, you can see that maquettes are now made from Super Sculpey brand polymer clay. From what I've read online, Super Sculpey seems to have become Hollywood's default medium for maquettes.
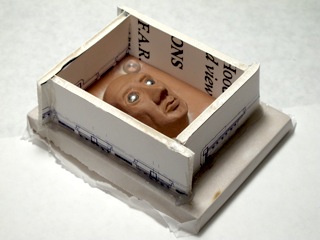
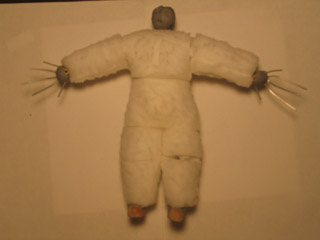
With polymer clay, you want the material be of similar thickness everywhere on the maquette's body so that it will bake evenly. Thick parts of the body (like the torso) get bulked out with aluminum foil. Tip to the thrifty: the Dollar Store is a great place to pick up cheap rolls of foil!
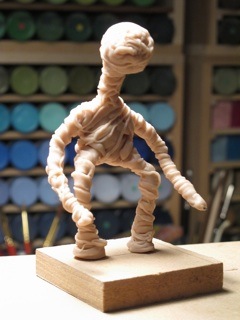
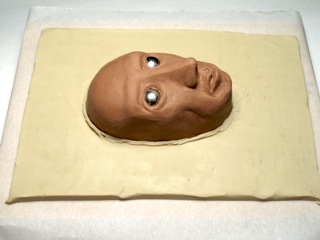
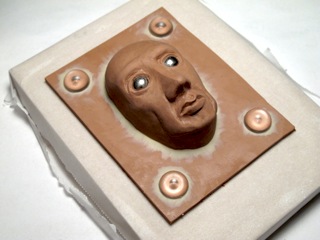
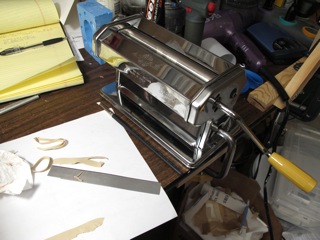
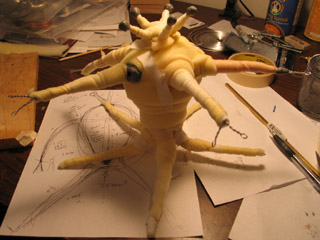
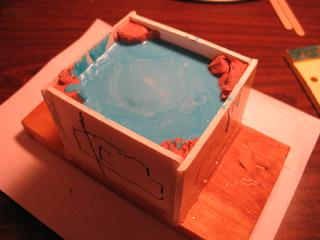
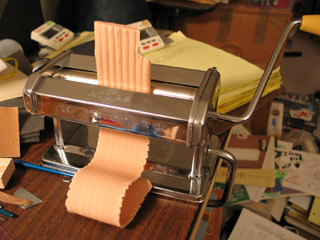
fig.4 Super Sculpey Fig.4: I was imagining that the puppet would be wrapped in sisal twine, burlap, thread, and possibly plant materials. To simulate this texture, I ran the Super Sculpey through a pasta roller, sliced it into fettuccine-like strips, and then wrapped the strips around the armature. For even thinner strands, I used a small clay extruder.
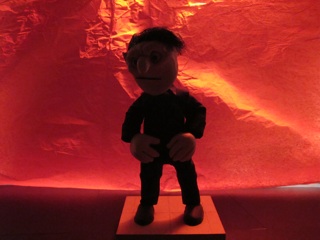
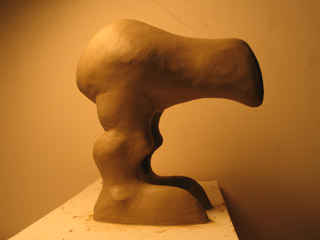
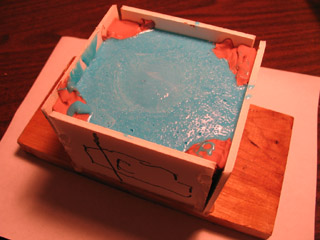
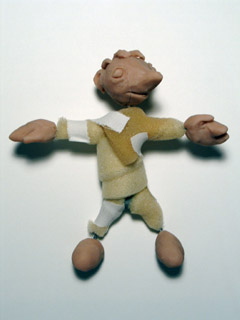
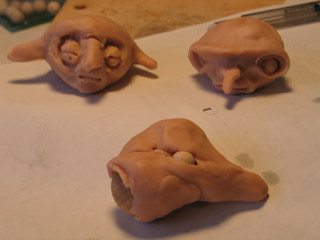
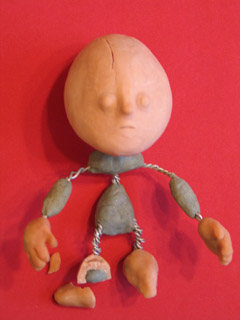
fig.5 finished maquette Fig.5: Paint really transforms a maquette and brings it to life. I gave the maquette a base of black acrylic paint, then dry-brushed highlights with pale blues and greens. (Painting the wooden base black goes a long way toward creating a professional presentation.)
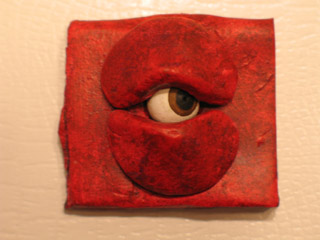
Studying this maquette, it seemed as if I'd lost some of the angularity that I liked so much in the original sketch. Also, I felt that there needed to be some area on the puppet that was smooth, to contrast with the chaotic fibrous areas. I changed my mind about colors, and decided to go with a red palette.
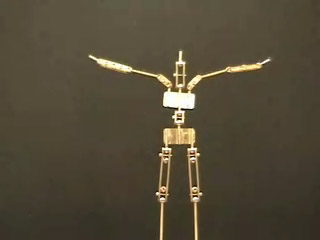
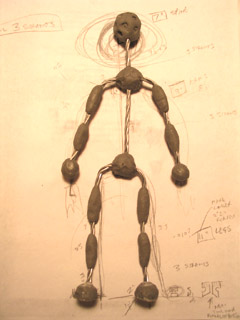
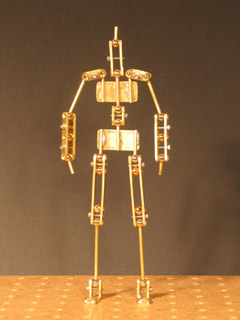
fig.6 puppet armature Fig.6: My original thumbnail sketch was about 2" tall. For the maquette, I blew the sketch up 200% on our photocopier, and made the thing 4" tall. For the final puppet, I went up 200% again, and created an 8" tall puppet. I could have just drawn a new reference sketch that was 8" -- but there tends to be a special vitality in thumbnail sketches, which I wanted to preserve as long as possible in the construction process.
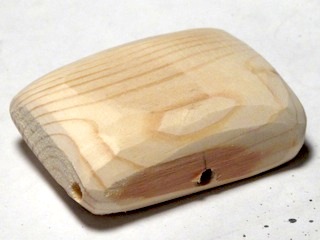
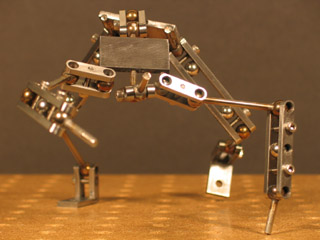
fig.7 wood torso block Fig.7: The torso is made from a scrap of pine wood. I drilled 1/8" diameter holes where the arms, legs, and neck would attach. Then I ground off the edges using both a Dremel moto-tool and a belt sander.
My use of wood here is inspired by the puppets of Nick Hilligoss. One difference is that he sometimes has multiple strands of wire glued into multiple holes -- rather than all being glued into a single hole as a bundle. I can see, at least in theory, that this should have benefits for preventing wire breakage. Wires tend to break where they interface with something hard. Multiple attachment points would give you more safeties.
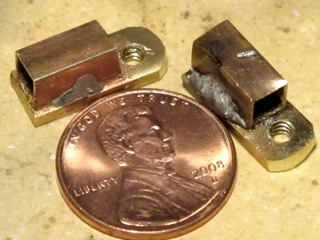
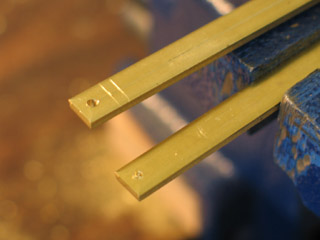
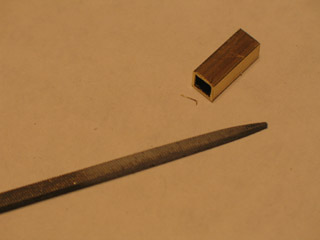
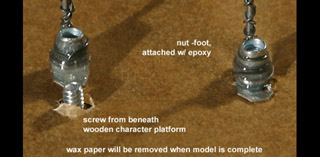
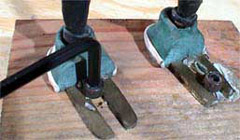
fig.8 brass feet Fig.8: The feet are made from K&S brand brass, which you can find at most hardware and hobby stores. The feet are 1/4" wide and about 5/8" long. I tapped the tie-down holes to receive 4-40 threaded rods. Rather than have the square tubing point upward, I have it come out the back of the foot. I think that this better simulates an ankle joint, putting it close to the ground, rather than a ways up the leg. (Again, this approach to ankles was inspired by Nick Hilligoss.)
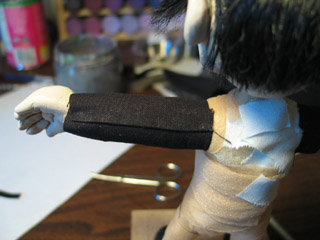
fig.9 untwisted aluminum wire limbs Fig.9: Most amateur stopmo puppet makers twist strands of wire to make a sort of cable. In recent years, the default approach in some Hollywood-based stopmo houses is to leave wires untwisted -- instead binding them together with thread and a coat of Barge brand flexible cement.
An advantage of leaving wires untwisted is that it avoids putting tension into the wires, which could cause breakage. Also, for an area like the puppet's neck, where you rotate left and right, you can feel twisted wire tightening or loosening depending on which way you rotate... That doesn't happen with untwisted wire.
A disadvantage of leaving wires untwisted is that you can sometimes hear the wires sliding past each other, when they bend at the hip or elbow.
Based on personal study, I think that different wire strategies may be better suited to different parts of a puppet body -- depending on whether a bend or a twist motion is most common...
See, there are actually three options for working with strands of wire: (a) untwisted, (b) twisted, and (c) coiled. For coiled wire, you wrap your wires horizontally around a vertical core wire. Think about what happens when you bend a spring or slinky at a 90 degree angle -- very little stress is put on the wire.
In theory, it could be smart to put a coiled strand or two in at the puppet's knees -- as safeties, in case the core untwisted wires break. In practice, however, it seems like a lot of trouble to try to come up with a perfect solution for what is, after all, only a wire puppet.
For the dancer puppet, I decided to go with four untwisted strands of 1/16" dia. annealed aluminum wire for all limbs. Barge is very toxic, and working with thread is awkward... So I bound the strands together using flexible vinyl electrical tape. It seems to have worked quite well for this build-up puppet -- but I recognize that there might be adverse chemical reactions if I were to bake these bundles inside of foam latex.
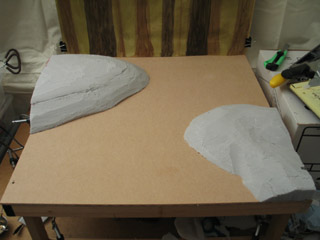
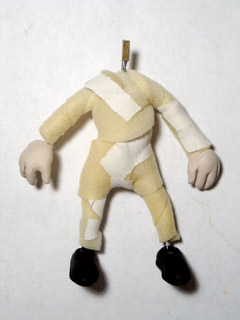
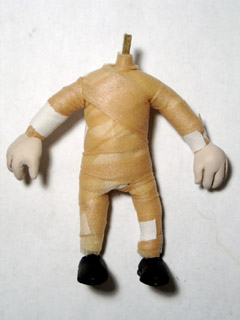
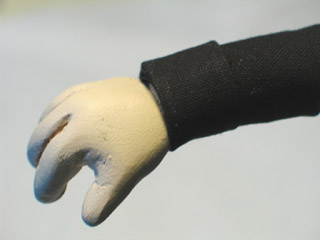
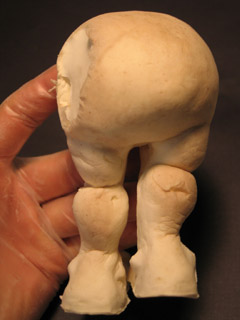
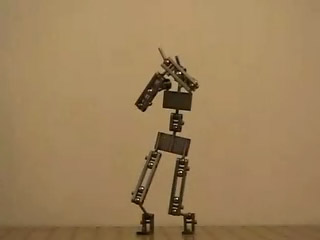
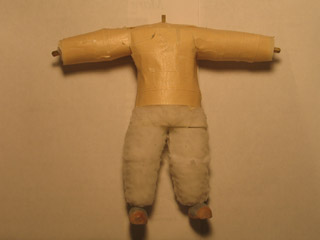
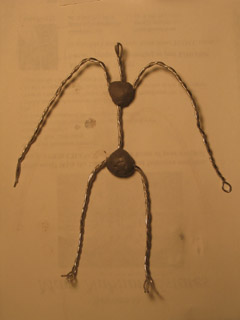
fig.10 bulking out with rigid foam Fig.10: The initial armature looked a bit too much like a bar of soap with legs. So, I bulked out the torso with rigid insulation foam, to give it some additional form. Insulation foam is wonderfully easy to carve, and is easily adhered using hot glue.
I should also mention that I wanted to give the lower legs some "bones"... Rather than use plumber's epoxy putty (as I have in the past), I stiffened the lower legs by wrapping them in a thin gauge steel wire. The difference in flexibility between the top and bottom of the leg was plenty enough to help me animate the illusion of there being stiff bones there.
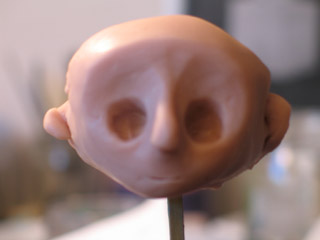
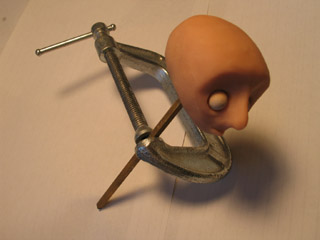
The head has a wooden core, bulked out with aluminum foil, and a thin Super Sculpey skin, which I sanded down for maximum smoothness.
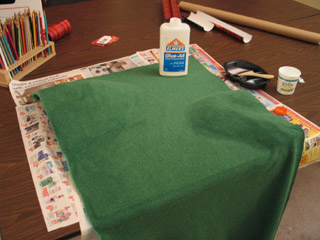
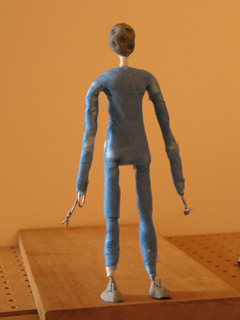
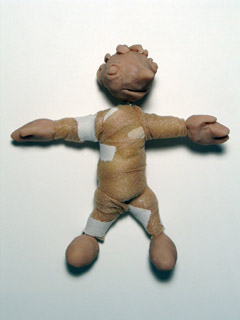
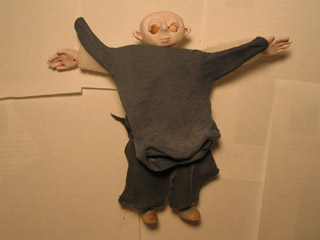
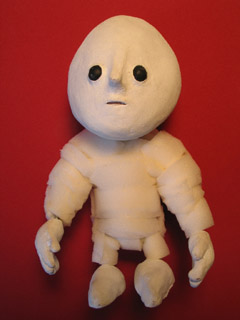
fig.11 wrapping with twine Fig.11: For skin-level texture, I wrapped the puppet in sisal twine, periodically laying down a dab of hot glue to keep it in place. At the maquette stage, I thought that I'd have organic textures going in all directions... But the look of the methodical wrapping was so striking, I decided to just stick with that.
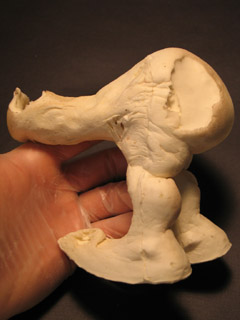
fig.12 wrapping complete Fig.12: I'm very pleased with the look of the wrapped sisal. However, at this point I discovered a down side. The twine greatly reduced flexibility -- particularly at the shoulders and hips, where the wrapping is thickest.
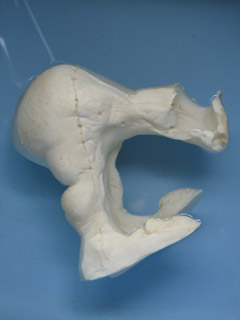
I also discovered a big flaw in the armature's design. In a human skeleton, the base of the pelvis is significantly lower than the points where the femurs connect. The head of a femur really connects to the side of the pelvis, not the bottom...
In my armature, I have the leg wires shooting straight out the bottom of the torso block. Consequently, it seems like the bend is part way down the leg -- not up at the hip. In future designs, I intend to have the leg wires come out the sides of the pelvis... And I'll look at carving the pelvis to be shaped more like a triangle, rather than a box.
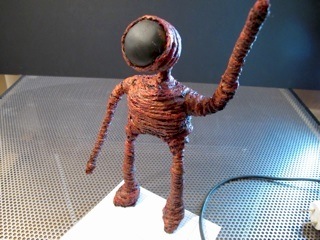
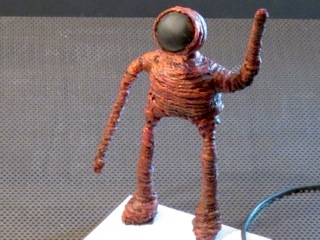
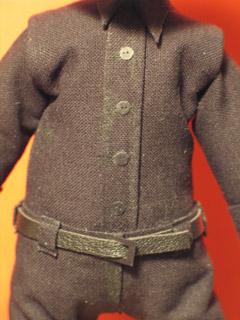
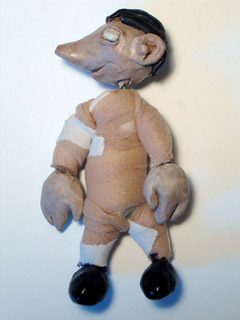
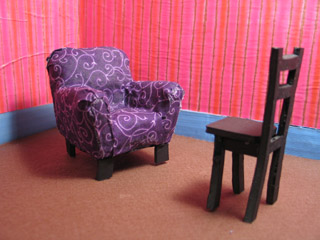
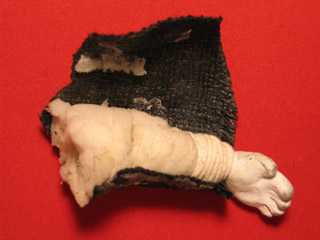
fig.13 base of black acrylic paint Fig.13: As with the maquette, I started painting the puppet by laying down a base coat of black acrylic paint. Sisal is absorbent, so I watered the paint down a lot, to help it soak in.
fig.14 finished puppet Fig.14: Even after applying the base of black acrylic, the puppet had a lot of loose fibers sticking off of it. I used an electric razor to trim them down some. Then, I coated the puppet in a 50-50 mix of balloon rubber and black acrylic to hold the whole thing together. Painting was finished off with a dry-brushed layer of red acrylic, and another thin layer of orange (no balloon rubber this time).
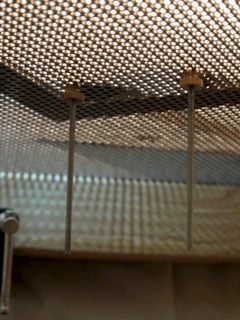
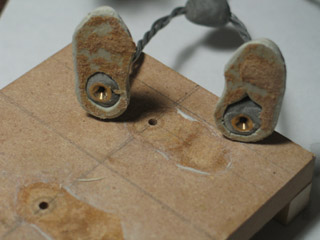
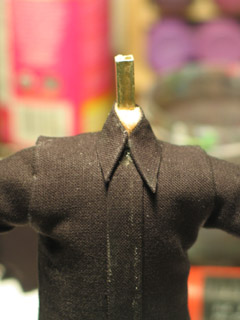
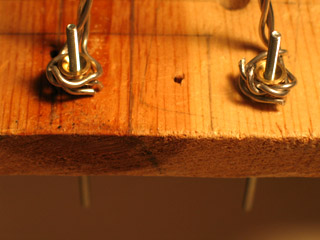
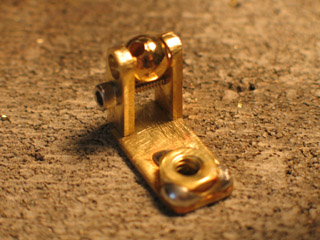
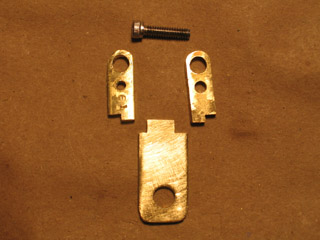
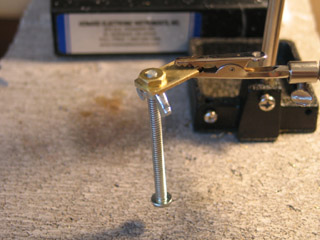
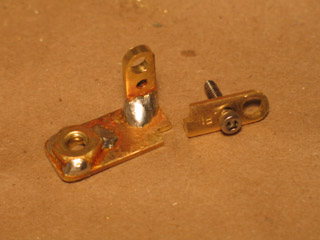
fig.15 tie-downs Fig.15: For tie-downs, I used what I always use: 3" long 4-40 threaded rods, purchased at Ace Hardware. The feet are tightened into place using brass thumb screws. Tightening these is actually really hard on my fingers... I'm interested in replacing them with something more friendly, like wing nuts.
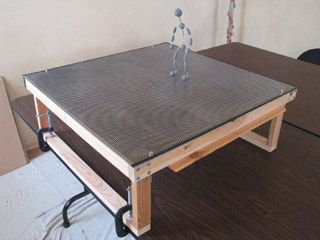
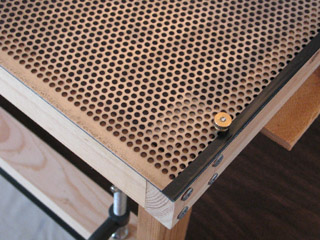
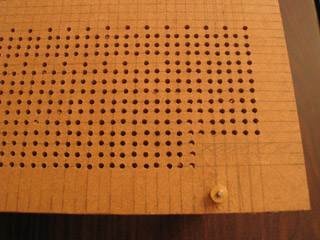
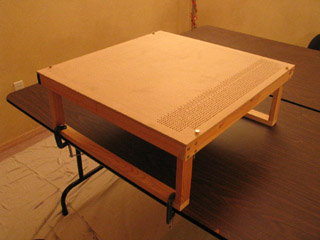
The stage for this project is a sheet of perforated steel that I bought a few years ago from onlinemetals.com. The convenience of having all those holes pre-drilled can't be beat. I know a number of stopmoes have imitated Justin Rasch, who drilled hundreds of holes by hand in the floor of the set for his film Gerald's Last Day... I tried that myself once -- but for the size of the stage floor I wanted, the monotony was unbearable. I think I paid about $50 for the perforated steel. It was money well spent.
One down-side of a steel floor, though: Unlike MDF, it has no give to it. To fix a puppet foot in place, you actually have to tighten the tie-down nut really hard. To make it easier on myself, I added rubber washers to the tie-downs, underneath the set. That helped some -- though not as much as I'd like.
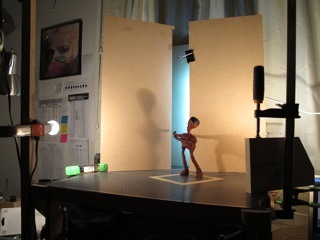
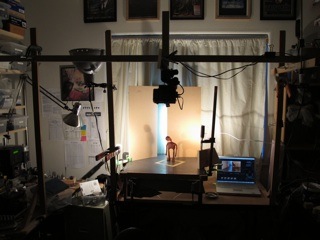
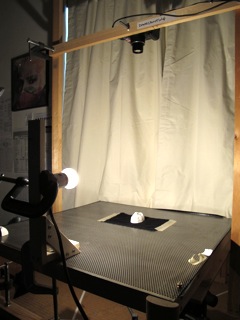
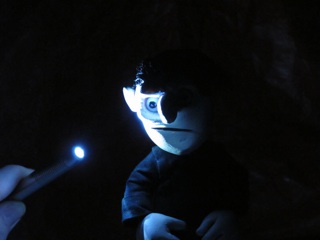
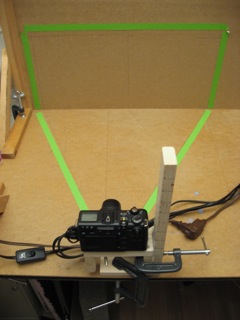
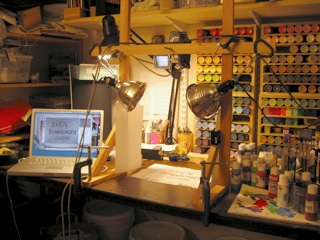
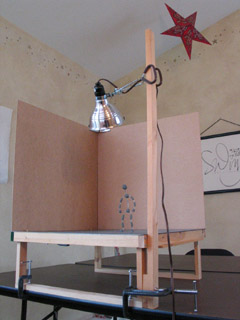
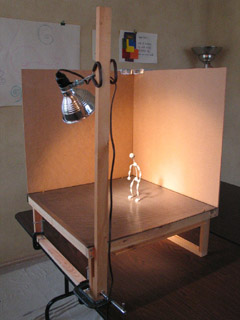
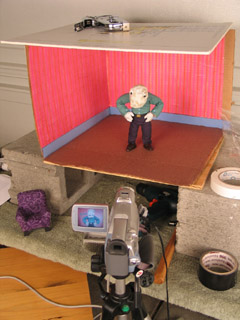
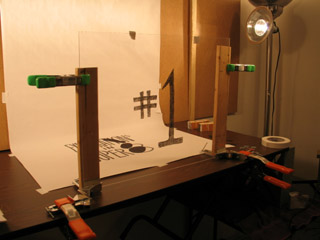
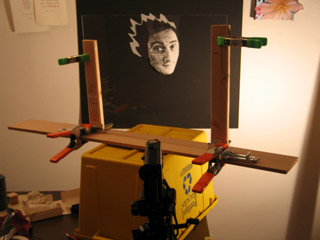
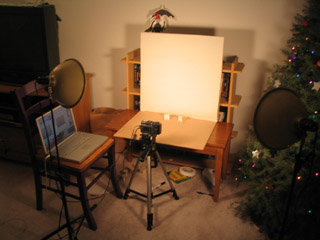
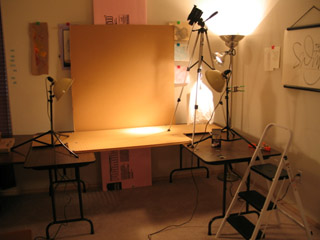
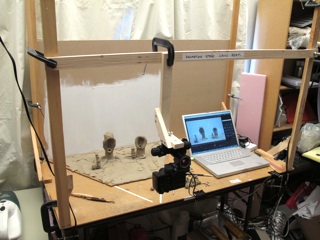
fig.16 lighting - view 1 Fig.16: I always forget how painful it is trying to find a lighting set-up that works. For this project, I wanted to imitate lighting at dance performances -- which often comes in from the sides, helping to define the dancers' muscles.
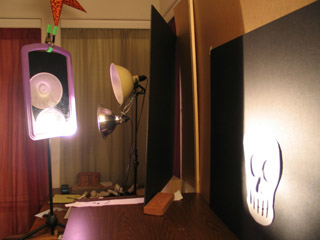
fig.17 lighting - view 2 Fig.17: For my stopmo films so far, I've generally flooded the stage with as much diffused light as possible, bouncing beams off of the ceiling and white photographers' umbrellas. I'm trying to get away from that approach; instead, setting up just a few lights that perform precise jobs.
I've discovered that Home Depot sells light sockets for $2 that are just a socket and a plug with no cord. Very useful for trying out different lights! I'm using (if I recall) two little 40 watt bulbs at the front of the stage: one at the puppet's eye level that comes from the front, and one that's more at hip level, that comes strongly from the side (and casts a nice shadow on the wall).
I would have been blinded by the side lamp, so I clamped a piece of wood between me and it to protect my eyes. In the future, I'm interested in seeing if I can modify tin cans to narrow the beams of light.
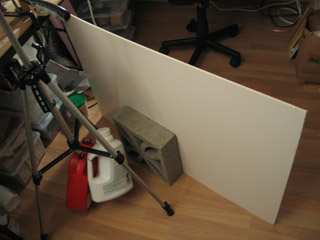
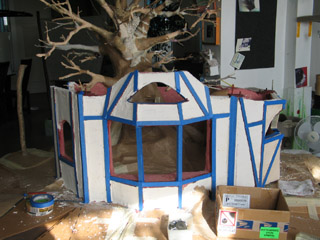
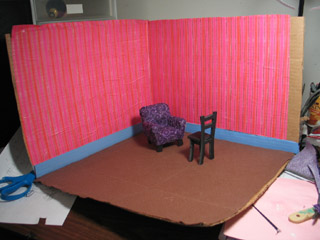
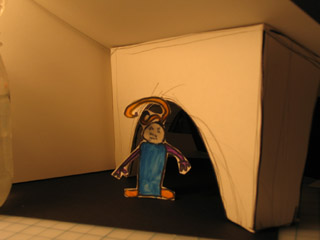
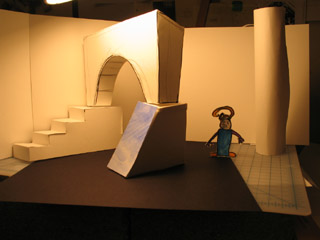
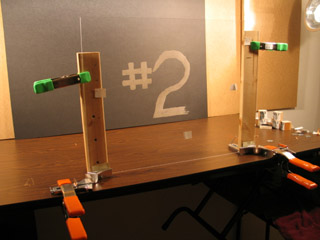
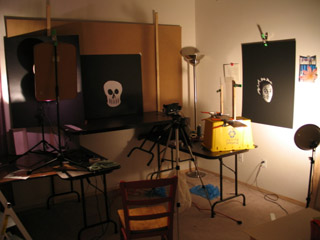
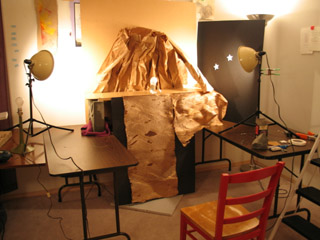
fig.18 lighting - view 3 Fig.18: I was very pleased with the idea of having two unconnected flats that let you see another wall beyond them. So much amateur stopmo work just sticks the puppet in the corner of a cubical room -- or worse yet, against a flat wall. I really want to create some sense of depth in my sets.
The rear plane was lit with a strip of LED lights. I'm excited about LEDS -- they don't get hot, they're energy efficient... I've tinkered with wiring LEDs purchased at Radio Shack -- but haven't got the hang of it yet... And I'm uncertain about how to give them a stable power supply.
One happy accident was that the LEDs are more blue than the incandescent lights. The variation in color added interest to the set.
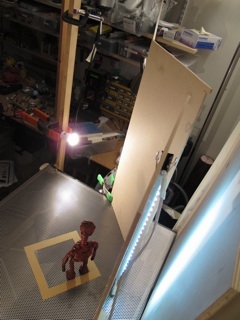
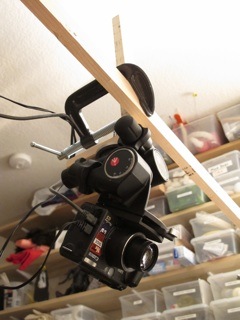
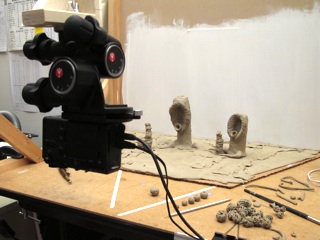
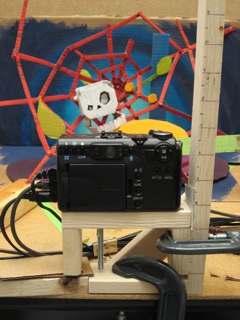
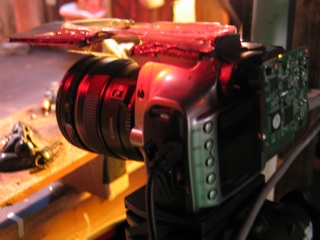
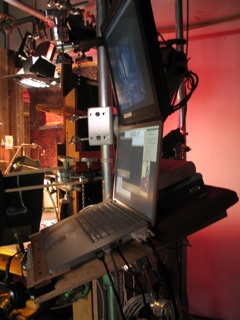
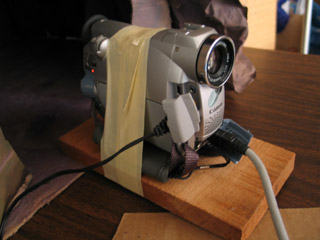
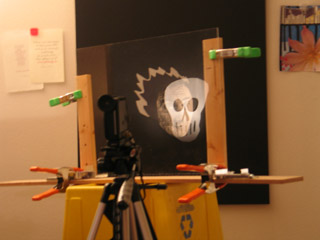
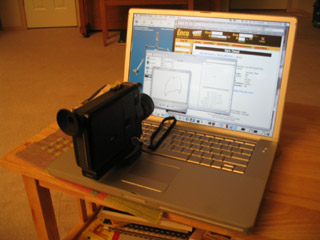
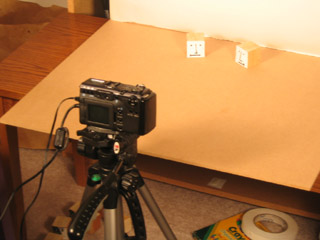
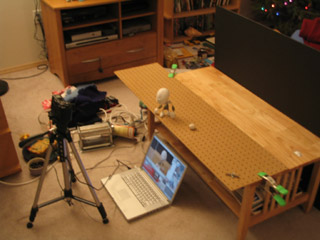
fig.19 hanging camera Fig.19: The camera is a PowerShot G5, attached to a manfrotto geared head. Tripods are a nightmare; if you accidentally kick them, your shot is ruined. So I hung the camera upside-down from overhead. My framegrabber software, Dragon Stop Motion, makes it incredibly easy to flip the image right-side-up again.
fig.20 camera close to subject Fig.20: I've spent a lot of time during the past two years trying to better understand how a camera's "angle of view" impacts stopmo work.
When the camera is not zoomed in at all, you have the widest angle of view. You can get the camera close in to the set -- which can be important if you don't have much floor space in your studio for a camera tripods and such.
Having the camera so close to the puppet can also create some "perspective distortion"... Increased foreshortening and some slight fisheye-like curvature around the edges of the frame. This helps create some sense of depth.
fig.21 camera far from subject Fig.21: In the previous photo, the camera was about 12" from the puppet. In this photo, the camera is maybe 72" back. The foreshortening is gone, and the image looks fairly flat.
However, I also don't need as much backdrop... When the angle of vision is narrower, the rear wall or sky cyclorama doesn't need to be as wide.
So there's a trade-off to be made:
- When the camera is very close to the puppet, you're going to need a wide backdrop. (big X-axis)
- When the camera is farther back, you can have a narrow backdrop -- but you'll simultaneously need more space for pulling the camera back. (big Z-axis)
My compromise was to put the camera about 24" back from the puppet. I don't get as much foreshortening as I'd like -- but both the width of the backdrop and the placement of the camera were manageable, given the size of my work room.
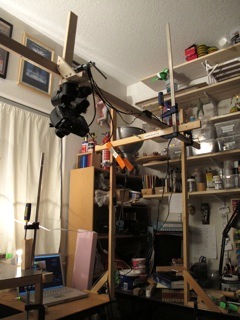
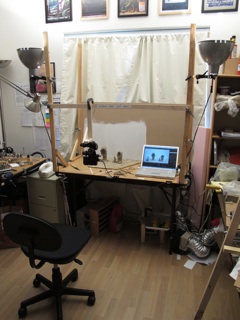
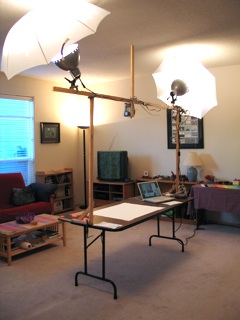
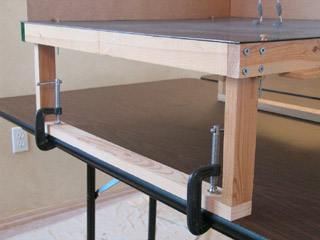
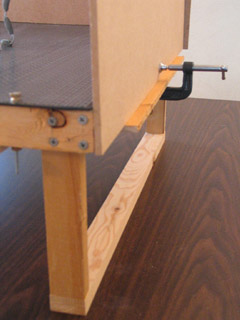
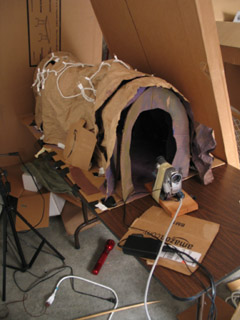
fig.22 camera support frame Fig.22: I've built several wooden pylons that I can move around at will, clamping them to the edge of tables. For my film Mutate, the camera was clamped to a cross strut that was attached to the animation table itself. For this project, I created an 8-foot-wide arch that was attached to two separate tables on either side of the room.
I am totally enamored with this modular approach. It's great to be able to quickly set up different arrangements as need arises. Which leads to Sven's rule: YOU CAN NEVER HAVE TOO MANY C-CLAMPS!
One downside of the big arch concept, though, was that if the animation table moved even slightly, it's the same as kicking a tripod. If you watch closely, in the film you can see that the entire set moves about a millimeter backwards.
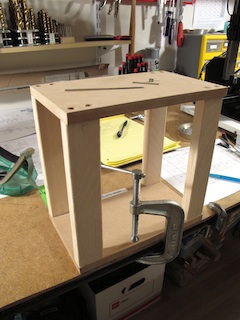
For my next film, I think I'm going to try creating a stable wooden cage around the set, and then have the camera extend outward on some sort of pole -- so that if the animation table moves, the camera will have to move with it.
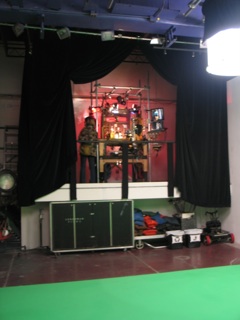
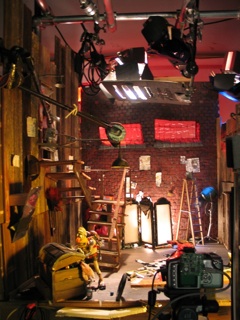
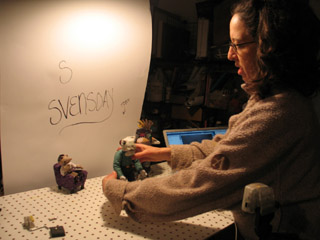
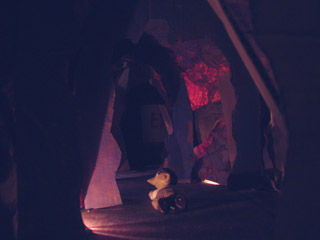
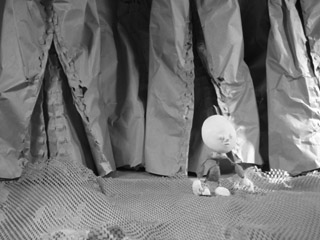
fig.23 hot set! Fig.23: It's a different feeling animating when you're using a few well-positioned point lights, rather than flooding the whole room with diffused light. Most of the room is in darkness. I've seen that professional stopmo sets tend to have black curtains surrounding the animation area... It's a pleasing feeling to begin reproducing that environment at home.
posted by sven | permalink | categories: stopmo
November 7, 2010
thirty-nine dance
by sven at 11:21 am
click on image to play film (5sec - 1.7 MB) or view on YouTube For my birthday, I took a "staycation" in the studio. For a few days, I got to eat, breath, and sleep stopmo.
I've been wanting to try choreographing a puppet dance. I managed to build a new puppet, compose a song, and work out some steps. Time ran short, though, so I only got five seconds on film.
If you want to hear the complete "thirty-nine" song, you can listen to the mp3 here.
(Note: The song has a very low bass line, which might not be audible on some computer speakers.)
posted by sven | permalink | categories: music, stopmo
October 12, 2010
"mutate" in film festivals
by sven at 5:16 pm
In the next few days, my film Mutate will be playing at three different film festivals...
Astoria International Film Festival
Saturday, Oct 16
1:00pm
Liberty Theater
1203 Commercial Street
Astoria, OR 97103
(503) 325-5922"In this brief but highly creative abstract clay animation, we witness the whimsical and even sometimes intriguingly edgy musings of a sculptor/animator with a sense of humor. The zany sound track mirrors the outré visuals. Like most art, Mutate defies concrete analysis; just relax and enjoy the quirky fun!"
-- Michael Fendel, Astoria International Film Festival
Salem Film Festival
Saturday, Oct 16
3:00pm - Northwest Emerging Artists Shorts Package
The Grand Theater
191 High Street NE
Salem, OR 97301
(503) 990-0150"Strange clay creatures revolve, dissolve and evolve in this delightfully quirky stop-motion animation."
-- SFF website
Video Gong Show - Final Round
Thursday, Oct 21
8:00pm ???
4122 N.E. Sandy Blvd
Portland, OR 97212
(503) 281-4215"3 competitive rounds of screenings have been scheduled & each is to take place in a different Portland quadrant throughout the summer. Top 5 films from each round will advance to the Finals at the Hollywood Theatre in October. Contestants compete for a $100 cash prize and a grand prize package from Picture This worth $1000. Just as with the classic show, the film's run time could be cut short by the sound of a GONG! The competition is meant to be fun (not cruel). Come support Portland's Indie filmmakers, while sipping a beer and having a laugh."
-- Film Action Oregon website
Why, yes -- AIFF and SFF do happen on the exact same day. Sigh. I'll be at the Salem screening if you want to see me in person.
Slim hopes of winning the Video Gong Show... In round 1, I was a runner up. I only moved on to the finals after someone else's film got disqualified.
Even so: Very exciting to be taking my filmmaking to the next level -- getting out there, getting seen!
posted by sven | permalink | categories: exhibits & events, movies, stopmo
July 13, 2010
making a replacement face kit
by sven at 3:45 am
I've discussed mold design for my film, The Beginning. In this post I'll document how you take resin castings and turn them into a full replacement face kit.
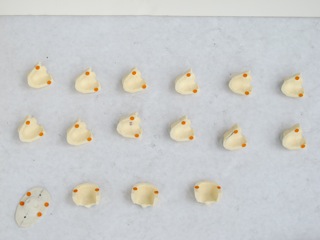
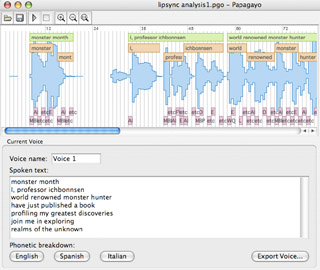
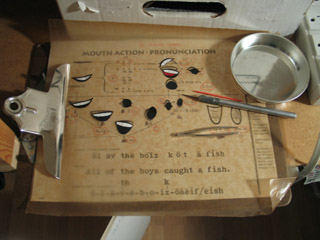
fig.1 replacement face kit Fig.1: The mouths in my face kit are based on the visemes described in Preston Blair's classic book, Cartoon Animation. Every other set of mouth shapes I've encountered in books and online is derivative of Blair's seminal work. Many authors simplify Blair's shapes in ways that I consider mistakes; for instance, identifying vowels by alphabet letter rather than phonetic sound. For my purposes, I decided I could simplify the set very slightly and get away with 12 mouth shapes.
Problem: How do you name these mouth shapes? —Particularly the vowels? I decided for this project to do some in-depth research on how dictionary pronunciation guides spell out phonemes. The wikipedia entry on Pronunciation respelling for English proved extremely helpful… To my surprise, it turned out that there is no universal system! One system may define "ay" as sounding like pay — whereas another defines it as sounding like pie.
For my purposes, I decided that a simple and elegant approach would be to denote long vowels with capital letters, and short vowels with lower case letters. One additional vowel is required, though: OO/oo. Here's my pronunciation guide:
I also found it useful to reorganize the various phonetic sounds into four categories… Consonants, vowels, consonants that use vowel mouth shapes, and vowel sounds that are actually made by combining two other letters' sounds. Here's my cheat sheet:
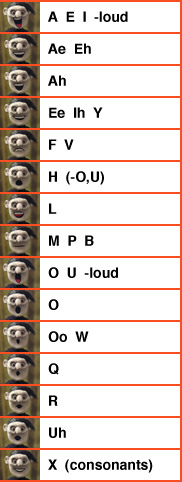
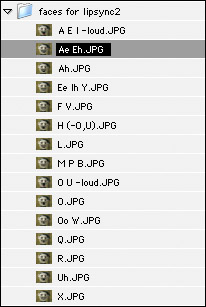
Now that you understand how I've chosen to notate and organize phonemes, here's the list of the 12 mouth shapes I finally settled on:
- A e
- a
- BMP
- E i Y
- FV
- H(-o,u)
- L
- neutral
- O o
- OO oo QW
- u R
- X
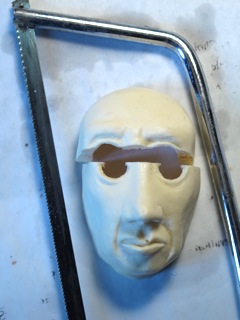
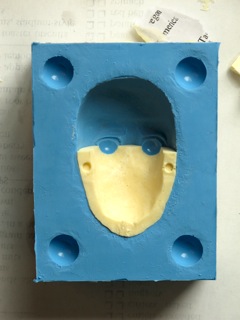
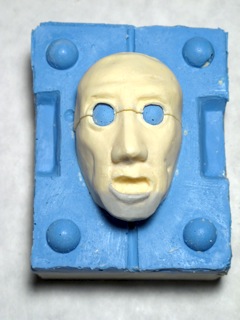
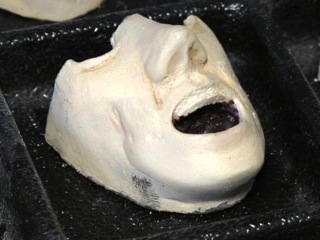
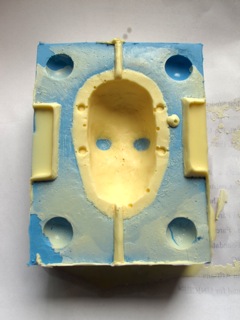
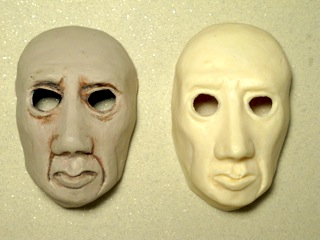
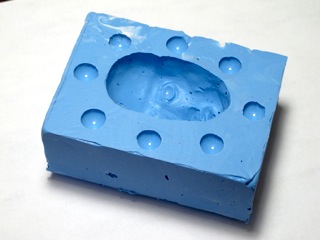
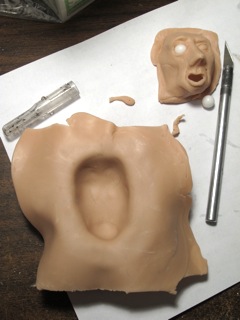
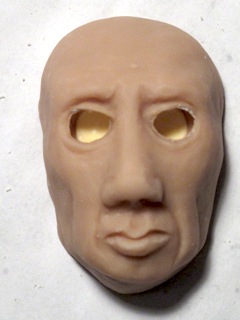
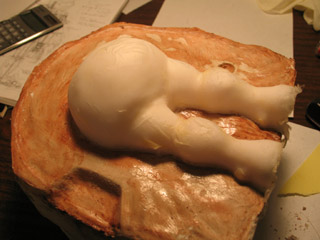
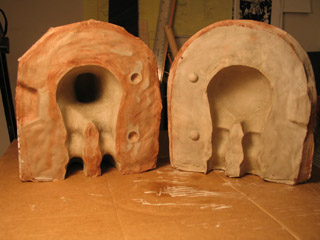
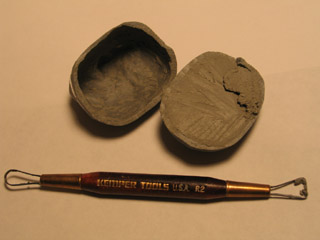
fig.2 casting cut in two Fig.2: I had originally planned to do the replacement faces as single-piece masks. The problem with that plan, though, is that eyebrows would have to be re-applied every time the mouth moves. No good! So I decided to try the method used in Coraline: doing the forehead and lower face as two separate pieces.
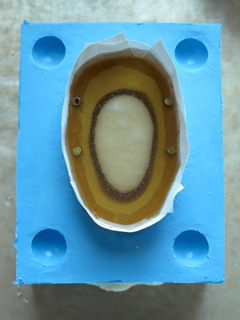
I took a casting and cut it in half with a craft saw. The forehead gets discarded. I used a belt sander to smooth the rough edges of the lower face and make them perfectly flat.
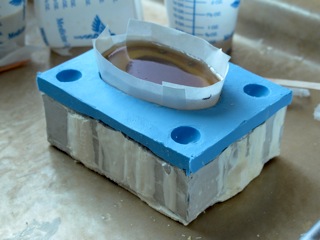
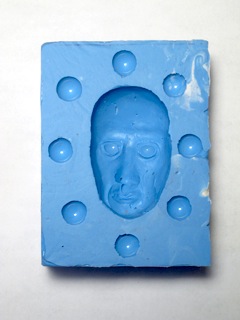
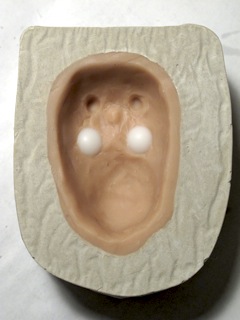
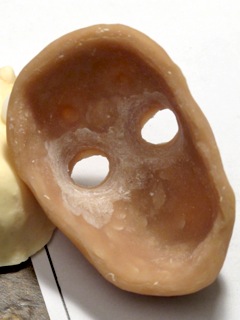
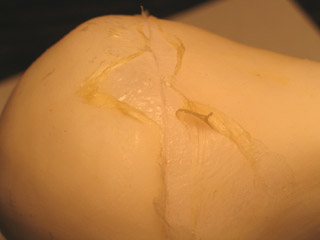
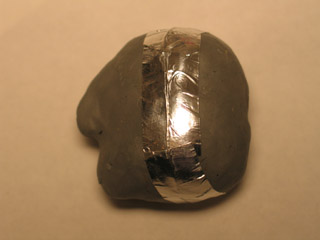
fig.3 placeholder in mold Fig.3: The half-face part I just made goes into the mold as a placeholder. I use a brush to thoroughly paint the part with vaseline, then do a casting of just the forehead, which will be a second placeholder. The two parts match up exactly now. Had I used the forehead piece that was cut off in fig.1, seams would have been much wider.
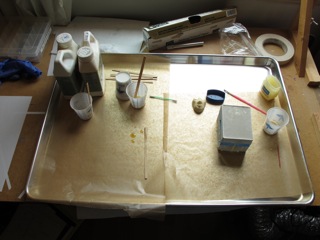
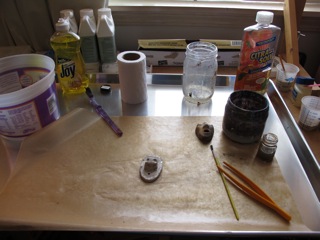
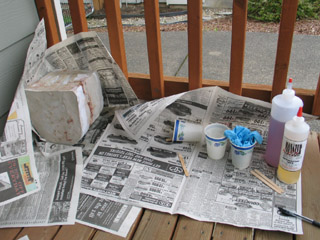
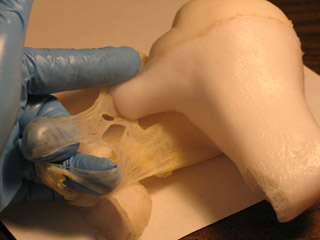
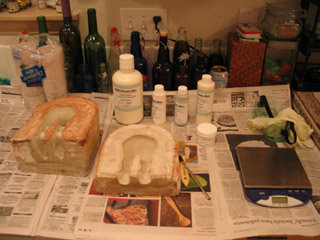
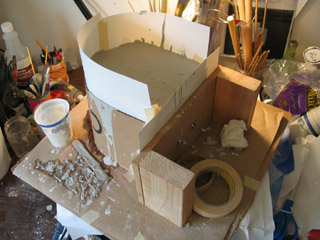
fig.4 tray for chemical work Fig.4: Working with silicone, polyester resin, and solvents is nasty, messy, and toxic. In addition to wearing my usual safety gear, I purchased a large metal tray from a restaurant supply store, on which to do all my chem work.
To make cleanup easier, I tried lining the pan with wax paper. Unfortunately, chemicals go right through it. In the future, I may try laying down Saran wrap or something similar instead.
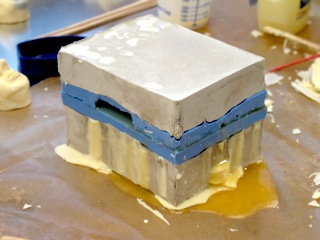
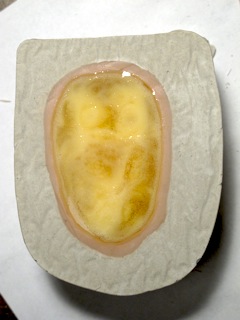
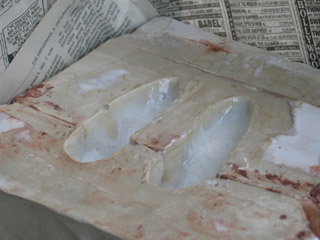
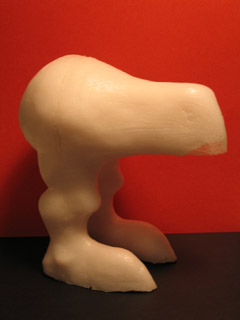
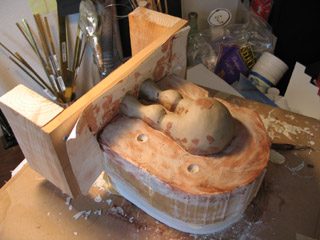
fig.5 casting with polyester resin Fig.5: For casting the mouth and forehead pieces, I found that 10ml of part A combined with 10ml of part B gave me about the right volume. You need to have some overflow that will exit though the sprue holes in order to get a good casting. The area around the mold gets progressively messier with each casting.
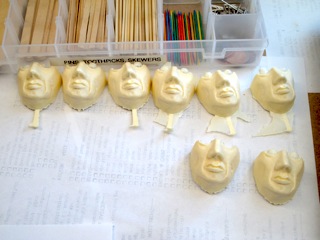
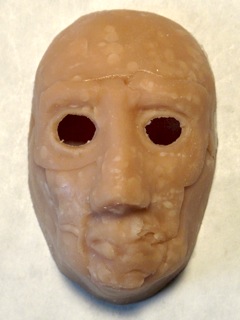
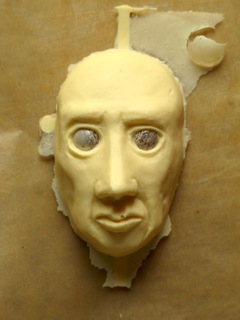
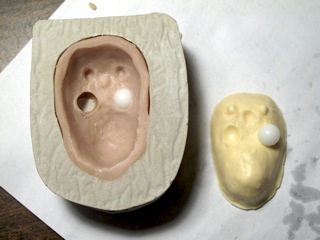
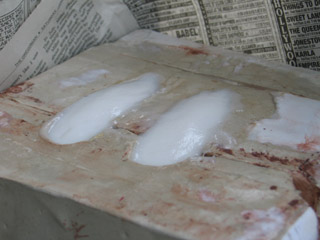
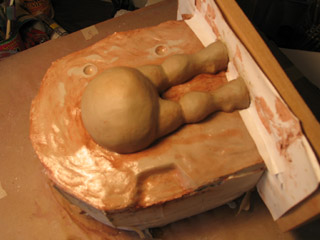
fig.6 castings Fig.6: It takes at least an hour for the resin to fully cure. I found that the pieces were firm enough to demold at 30 minutes. Do not trim off flashing at that point, however — the curved casting is likely to get deformed by your grip while you work on it.
It took 15-20 minutes to release each casting, clean the mold, and pour in another batch of resin. So turn-around time for each part was about 50 minutes. Needing to make 12 mouths, 3 foreheads, and some spare parts to have on hand, this was more than 2 solid days of work.
It was a fairly frustrating part of the fabrication process… Not because I had to wait, per se — but because I had to repeatedly take off the gloves to work on a B project, then interrupt myself to put the gloves back on when the each new casting was ready. No sense of flow was possible. It would be preferable to be working on two casting processes simultaneously, to avoid switching gears so much.
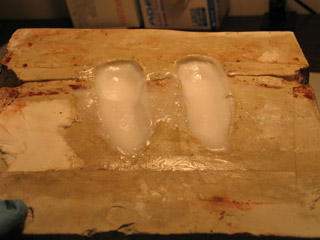
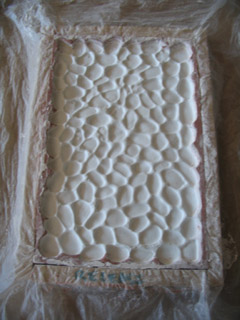
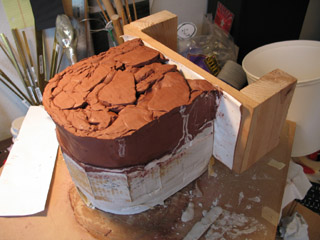
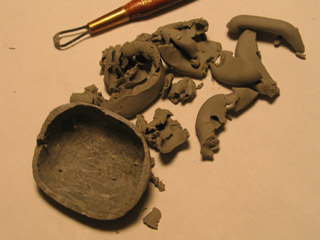
fig.7 wear and tear Fig.7: In all, I got 24 good castings out of the mold before wear and tear got too bad. Studying the mold interior, I think I see what went wrong. When I made the mold, I painted a thin detail layer of silicone onto the sculpt, then covered that with a thicker layer. Bubbles were trapped between the thin skin and the thicker one… So most damage was from the thin skin tearing away to reveal the air bubble trapped behind it. Use of silicone thinner probably also helped weaken the material.
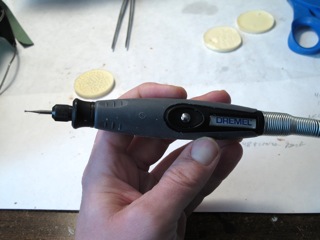
fig.8 flexible shaft Dremel Fig.8: We don't need a set of identical faces — we need them resculpted with different mouth shapes and eyebrow positions. For this job, I tried a flexible shaft attachment with my Dremel roto tool for the first time. I was pleased — it was much easier to wield the tool while carving.
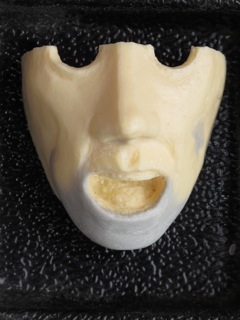
fig.9 carving resin Fig.9: Resculpting a face involves carving away excess material…
fig.10 epoxy clay added - mouth Fig.10: After excess material's been removed, new bits can be built up by adding epoxy clay. I used Magic Sculp, which has about a 4 hour cure time. Apoxie and Milliput are roughly equivalent leading brands.
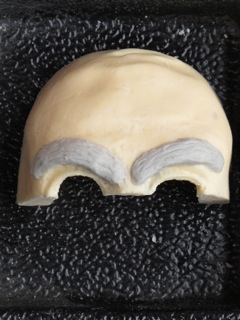
fig.11 epoxy clay added - brow Fig.11: Eyebrows didn't require any carving. They just sit on the forehead.
fig.12 measuring out epoxy clay Fig.12: Using such tiny quantities of epoxy while sculpting, getting equal proportions of part A and part B can be tricky. I found it useful to flatten out dabs of epoxy on a piece of gridded paper and then use the guide lines to help me cut them to size. (Good free graph paper PDFs are available from incompetech.com.)
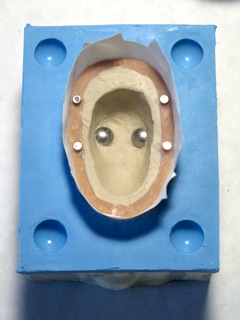
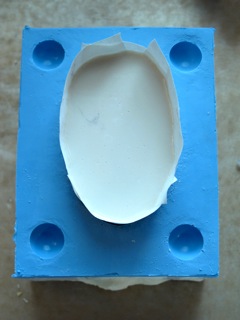
fig.13 registration test Fig.13: Are the face kit pieces working out? As an initial test, put the pieces back onto the interior mold face. I was pleased at this point to see that registration's pretty accurate.
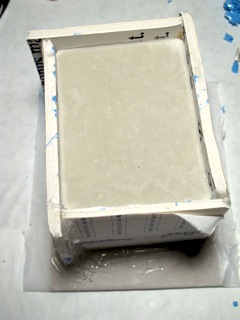
Now we can proceed to making a base for the faces.
fig.14 Super Sculpey pressed into mold Fig.14: During the mold-making process, I made a Super Sculpey placeholder to establish the thickness of the faces. When it comes time to make a base for the faces, the Sculpey piece becomes useful again.
fig.15 mold for the face's base Fig.15: The base for the faces merely needs to support the eyeballs, so I put some Klean Klay into the mold, atop the Sculpey placeholder, to create some extra space. To set up walls around the edge of the face, I just used some tape. Tiny magnets were placed in their sockets in the Sculpey, and additional magnets were placed atop each of them. The second layer of magnets create sockets in the base.
fig.16 dental tool for placing magnets Fig.16: These magnets are so powerful, if they come too close to each other they leap out of their sockets and go flying across the room. Putting them in place was a bit tricky! Ultimately what worked best was to use a dental tool to maneuver them into place. I'd then pull the dental tool away while holding the magnet down with a toothpick.
fig.17 liquid resin in mold Fig.17: Pour part A and part B of the resin into two separate cups, then mix them in a third. Fill the mold.
Just before making the base, I discovered that all my resin hardener had dried up, and I had to go out to buy a new batch. The resin and hardener (part A & B) are sold as a set. I thought I'd use up the old resin before breaking in to the new… But when I mixed what I thought was part A with part B, I discovered — much to my chagrin — that I'd only mixed two cups of resin base together without any hardener. TAP plastics has switched which material they label as A and which they label as B!
Cautionary tale: double-check that you know which material is A and which is B before combining new and old materials!
fig.18 resin beginning to cure Fig.18: It's interesting to watch the resin cure. I would have expected it to start congealing at the edges of the mold… But actually it turns white in the center first.
fig.19 resin fully cured Fig.19: Here's the resin after it's fully cured. It's noticeably whiter than castings I did with the older materials. That clue turned out to be pretty important later on when things started to go seriously wrong…
fig.20 pulling out the casting Fig.20: Here I've separated the base and Klean Klay from the Super Sculpey placeholder.
fig.21 face's base Fig.21: Here's the face's base after it's been cleaned up. Studying it, I realized that the bulge in the middle is unnecessarily large. With more flat area, there'd be more room for drilling tie-down holes.
fig.22 modification to face's base Fig.22: I used the Dremel roto tool to carve away more material. If/when I do this again, I'll try to remember that the only thing needing to go in the hollow space behind the mask is a support for the eyes.
fig.23 full kit - unpainted Fig.23: Here's the whole kit ready to be painted: 12 mouths, 3 brows, and a base. That useful organizer that they're in was less than $2 at a jewelry supply store. If you look closely, you can see that I've drilled two holes in the base for tie-downs.
fig.24 preparation for primer Fig.24: Before painting these faces with acrylics, it's a good idea to spray them with a layer of primer. To protect the magnets, I covered them with little sticker dots.
fig.25 primer applied Fig.25: I sprayed the backs of the pieces with black primer and the fronts with white primer (Games Workshop brand). I was thinking about how theatrical masks tend to have their interior painted black. However, almost immediately after priming, I realized that replacement faces are different. You want everything to be flesh-toned — to camouflage the interior, in case the camera accidentally glimpses it through a gap between the eye and the eyelid. Black was a mistake.
fig.26 fingerprint Fig.26: The day after priming the parts, I made a horrifying discovery. The primer was wet — completely uncured, it seemed. As I was applying acrylics, black fingerprints kept showing up. What a mess… I had no option but to strip off all the paint and primer and start over.
fig.27 new resin (left) and old resin (right) Fig.27: At first I thought that the problem was the primer. Did I not shake it long enough? Was it too hot on the day I sprayed? Too humid? Should I have washed the parts with soap before spraying? Research told me that primer can be fussy, and any of these mistakes might cause problems.
But then I noticed that the pieces were leaving oily marks on a piece of paper. Now I'm pretty sure that the primer wasn't the main problem. What's going on is that the resin chemistry was off — something is leaching out of the resin that either prevented the primer from adhering, or dissolved it overnight.
Remember that my old batch of resin hardener had dried out? The whole story is that some time ago, I was unable to open its container. So I cut a hole in the jug, and then later resealed it with tape. But the tape didn't adequately prevent evaporation. As the hardener reduced down, I was no longer creating the proper mix by combining equal parts of A and B. Comparing leftovers from an old batch with leftovers from the new batch, it's painfully obvious that the old batch is yellow — a sign of bad chemistry.
Lesson learned: Make sure your materials aren't past their expiration date! And make sure to keep them tightly sealed between uses!
fig.28 using solvent to strip primer Fig.28: With so much time invested in this project, I couldn't just give up. I had to try to salvage the parts. It took five hours scrubbing with CitriSolv and an old kitchen sponge to strip off all the ruined paint and primer.
fig.29 "cleaned" part Fig.29: Even after the parts had been cleaned, there was a good deal of staining that's impossible to remove. It was pretty demoralizing to see my shiny new parts looking so grubby.
fig.30 second priming Fig.30: For my second attempt at priming, I was extra careful about shaking the can, heat, humidity, and cleaning. I washed all the parts with dish soap and dried them thoroughly with a hair dryer. The heat of the dryer seems to make more oils sweat out of the resin, so I tried to use it sparingly.
This time I went with Krylon white primer, feeling that it might be a more trustworthy brand… Even though it probably wasn't Games Workshop's fault that the first priming failed.
fig.31 pitting Fig.31: While re-priming the parts, I noticed that there was pitting on some of the surfaces. I think this must have occurred when I was scrubbing with solvent. In trying to solve one problem, I created another. If I wanted, I could fill all those tiny holes with epoxy… But by this point, I just needed to get the project done, and couldn't afford to be a perfectionist anymore.
As a final step, I used epoxy glue to fix tiny magnets into the backs of the face pieces — taking care to make sure that all the polarities were pointed in the same direction.
fig.32 primer beginning to melt Fig.32: The white primer has survived better than the black did… But I'm seeing signs that it's also beginning to "sweat" a bit. Further proof that my main problem is bad resin chemistry.
fig.33 wooden balls and enamel paint Fig.33: My original plan was to give the puppet eyes, hair, and a naturalistic paint job. However, I only allotted myself a month for this experiment, so plans changed. The faces are striking when they're all white; I determined to do a lipsync proof using that look.
I figured I should at least finish off the eyes, though. The plan was to paint 3/8" wooden balls with enamel paint. Pupils would be made from black dots of paper, which could float on a thin coat of vaseline.
fig.34 painted eyes curing Fig.34: I drilled holes in the back of the eyes, planning to fill them with magnets. I temporarily hot glued toothpicks in those holes, so I could easily dip the balls into the paint. I dipped each ball three times, which created a gorgeous glassy look. However, it took days for the paint to really cure — and even then, the paint was more vulnerable to marks than I'd expected.
fig.35 oops! eyes are too big! Fig.35: It turns out that with those extra layers of paint, the eyes became too big to fit in their sockets. Next time, I could either start with smaller balls, anticipating the size change — or I could just use delrin/acetal plastic balls and skip this issue altogether.
fig.36 shooting still photos Fig.36: Onward to photography! For this project, I wanted to create a set of 36 face photographs for animation. That's 3 brows times 12 mouths.
I set up the camera as a downshooter and used Dragon Stop Motion as a video assist. Technically I didn't really need to use a framegrabber — but it made aligning the faces between shots a good deal easier.
The magnets work perfectly for fixing the face parts to the base. However, due to one of the base's magnets being a slightly tilted, the lower face can slide a little to the left or right. I think an important addition to the design would to add hemispheres (or something similar) to the edges of the face pieces, to help them physically key into the base.
The light, incidentally, is set into a handy little fixture that is nothing more than a socket and a plug. Very cheap — less than $2 — and available off the shelf at Home Depot.
The stage is a piece of perforated steel that I got from onlinemetals.com a few years ago. The tie-downs are what I always use: 3" 4-40 threaded rods and brass thumb nuts.
fig.37 face's base with black velvet Fig.37: I wanted the face to be floating in a black void, so I taped down a piece of black velvet. I put a little bit of black velvet behind the face's eye holes, too, to hide the eye sockets. While the black looked inky in Dragon, when I rendered the final animation out of AfterEffects, I discovered a lot of color inconsistencies… Velvet was a good start, but I needed color keying to get a true black nothingness.
fig.38 still from "The Beginning" Fig.38: So finally the big question: How do you get rid of the seams in the mask?
I know, having attended a Laika presentation, that on Coraline they used Inferno as their software for seam removal. That software's alien to me, though.
Doing my own research, it looks like the magic bullet for this problem ought to be Adobe PhotoShop CS5's new tool "content aware fill," which the net has been buzzing about since its release in April. However, CS5 is incredibly expensive. Further research turned up that a FREE software called GIMP has a tool called "resynthesizer" that's supposed to do the very same trick. (Here's a useful comparison of "content aware fill" and "resythesizer.")
GIMP was originally written for Linux, but is available for Macs and Windows machines as well. Admittedly I'm not very proficient with the software yet, but still I was somewhat disappointed. Fixing each frame was laborious — and while better than the "smudge" tool alone, nonetheless created areas that stand out as blotchy when animated. (Out of curiosity, I'd like to try a demo version of CS5 at some point to see if it can do a better job.)
If these replacement faces were on a puppet that moves its head around a lot, maybe the smeared patches where seams have been removed would be less obvious. I don't know. On this project, though, I was able to employ a different method entirely, which worked quite well: I retouched just one face, and then used it as a clean plate — treating seam removal exactly like rig removal. This process still involves fixing frames one at a time… But simply erasing seams on the top layer in an image manipulation program is much, much simpler than having to blend, blur, and create pixels that additively cover up the unwanted lines.
So, conclusion? The replacement faces are a qualified success. They can look great when viewed from the front. Whether they can look good on a moving puppet, too, is unknown. The fabrication process is extremely laborious — easily eating up 100+ hours in the making. But once you have them, they're a great asset to have on hand. Right now, I'd say I'm 75% in favor of doing future puppet faces using the same method.
posted by sven | permalink | categories: stopmo
July 10, 2010
the beginning
by sven at 11:25 am
click on image to play film (40sec - 1.9 MB) A new film!
The point of this was to do proof-of-concept for the new replacement face kit. It could have just been a test clip — but adding title/credits material let me do more with the idea and atmosphere.
I'm considering doing some longer films like this using the same face... So please let me know what you think of the look, eh?
(I'd also love to hear some feedback from folks with lipsync experience.)
posted by sven | permalink | categories: movies, stopmo
June 11, 2010
mold design (part 2)
by sven at 7:00 am
"Howard" sculpt & three molds I want to do lipsynch using replacement faces. The idea is to have a set of ~12 masks that fit over a skull, which seats the puppet's eyes. Generic masks will be cast from resin, and then the mouths will be resculpted using either Super Sculpey or Magic Sculpt.
The resin will be cast from a 2-part silicone mold. The current iteration has several improvements over my last attempt:
- sculpt has better seal on mold bed
- to avoid entrapping bubbles, a "detail layer" of silicone is brushed onto the sculpt
- to conserve silicone, I've made a plaster "mother mold"
fig.1 Kleen Klay mold bed Fig.1: For my last mold-making attempt, the sculpt and mold keys were seated on a piece of wax paper. This go around, I decided to seat the sculpt on a bed of clay, to get a better seal.
I tried using Kleen Klay. However, I felt this material was much too soft.
fig.2 Chavant mold bed Fig.2: For my next try, I lay down a bed of Chavant NSP medium, which is much firmer. I could then use Kleen Klay as a sealant without marring either the sculpt or the bed.
An incidental note about nomenclature… Both Kleen Klay and Chavant are types of oil-based modeling clay. I've been wondering for a while what the general term is for this stuff: "plasticene" or "plastilina"? Turns out the answer is neither. Both those words are genericized brand names — like how "Kleenex" is often used to refer to facial tissue in general. (reference)
fig.3 pasta roller Fig.3: How did I get the Chavant to be so nice and flat? I sent it through a pasta roller.
Polymer clay hardly sticks at all; Chavant leaves a bit of a film on the roller, which causes it to begin sticking to itself. I fixed a few minor defects in the surface by using a brayer.
(I also tried using a butane micro-torch to melt the surface of the clay… But then I had to wait a long while for it to cool again. More trouble than it's worth — wouldn't do that again.)
fig.4 building the mold walls Fig.4: As with my last mold, the walls are made of 1.5" wide strips of repurposed foam core. I didn't cut the walls as long as before, though. Sealing the walls with hot glue was easier if the walls didn't hang out over the edges of the wooden base.
A note on cutting foamcore: box cutters work better than X-acto blades. Because the box cutter has a wider blade, it's more inclined to travel in a straight line.
fig.5 silicone detail layer Fig.5: I mixed up a small batch of silicone base, catalyst, and thinner. I applied the silicone mix to the sculpt using a disposable "acid brush." After watching a few videos online, I picked up that the trick to doing a "detail layer" like this is that you dab with the ends of the bristles, rather than painting with strokes.
I baked the silicone at 170 F for about 90 minutes to cure the silicone extra fast — then I put it in the freezer to re-congeal the clay. The oven temperature was low enough that neither the hot glue nor the foamcore seem to have melted. Happily, the silicone also seems to cure faster than the clay can liquify.
Even so, I kept the kitchen door wide open and stayed out of the room during this part of the process. I want to minimize the number of things that can possibly release fumes when warmed. I was surprised to discover that MDF gets smelly when heated. For the second half of the mold, I made a cardboard tray, which was better.
I believe I have a better alternative to using foam core for mold walls, too… The next time I make a mold, the walls will be made out of Legos!
fig.6 pouring plaster to make the "mother mold" Fig.6: The cured silicone "detail layer" is fairly floppy. To give it some support, I created a "mother mold" by pouring UltraCal 30 plaster into the box.
fig.7 removing the mold walls Fig.7: Here's the mold-in-progress after I've removed the foamcore walls. I really dig the layers of different colors!
fig.8 mother mold and detail layer Fig.8: The silicone pulls away from the plaster effortlessly. The mother mold bears the lumpy impression of the silicone. The lumpiness is enough to register the two parts together.
fig.9 removing the sculpt Fig.9: The sculpt came away from the silicone cleanly, and the detail layer has no bubbles. Awesome!
fig.10 brush marks on the sculpt Fig.10: It's not a major flaw, but I was dismayed to discover that the acid brush left stippling in the sculpt. Apparently it's important to use a brush with really soft bristles. (Freezing the sculpt could also help protect it against brush marks.)
fig.11 thin spots in the silicone mold Fig.11: When I held the silicone up to a light, I discovered that there were several thin spots. The mold is useable — but I would have been smart to go in and apply a second layer of silicone on high areas of the sculpt to ensure adequate thickness.
[Now that I've done some castings in this mold, I'm noticing that the mold buckles a little at the thin spots… Acceptable but avoidable imperfections.]
fig.12 sculpting mold keys, sprues, and the interior of the mask Fig.12: This is 2-part mold. Side A is done — now to make side B.
I sculpted what will be the interior side of the puppet mask using Super Sculpey. I chose it largely for where it falls on the soft/firm continuum… But I'm not so sure it was the best choice. When I put it in the oven, it didn't get fully hard — but it did cure enough so that I won't be able to re-use the material.
The vertical rods at the top and bottom are to be sprues, where excess resin can escape. If this were a simple mask, just one sprue would be necessary… But I'm actually going to wind up doing the forehead and lower face as separate pieces. More about that later!
The trapezoidal blocks on either side will create open spaces that make it easier to pry the two mold halves apart. The four little dots will hold 1/8"x1/16" magnets, that allow me to attach the mask to the back of the puppet's head.
fig.13 building another mold box Fig.13: Once again I build a mold box. This time the walls are 3" tall. Cracks are sealed up with that ultra-soft Kleen Klay.
fig.14 brushing in the second layer of silicone Fig.14: Again, brushing in a layer of silicone, using a dabbing motion to avoid creating bubbles. This time I used a soft-bristled art brush. Silicone destroys the brush — but I found ones being sold for 25¢ apiece at I've Been Framed (4950 SE Foster Rd), so not too big a loss.
fig.15 second pour of plaster Fig.15: This second layer of silicone also needs a plaster mother mold.
fig.16 opening the completed mold Fig.16: Opening the completed mold, I found that the Super Sculpey got partially cured in the oven. No big loss… But it wouldn't have been an issue if I were more patient and let the silicone cure at room temp for 6 hours.
Hypothetically, you could press Sculpey into the silicone mold and then bake it. Silicone tends to be quite heat resistant, so I'm pretty sure it could keep its integrity at the 275 F required for a full polymer clay cure… But I see no advantage at present. (Perhaps a less toxic solution than resin?)
fig.17 completed mold after cleaning Fig.17: OK! Here's the completed mold all cleaned up. Time to pour some resin!
fig.18 resin Fig.18: The resin I'm using has a 1:1 ratio of part A & part B, measured by volume. I got these paper measuring cups at the same store where I bought the resin — TAP Plastics. Using 15 ml of each component is about enough to make a full mask with minimal overflow.
fig.19 two by two, hands of blue* Fig.19: Safety first! When working with resin, you want impermeable gloves. I've got nitrile — I'm looking into butyl, which may have reusable options. Latex will not do — resin penetrates it.
Splash goggles. Long-sleeved shirt. And a respirator that has cartridges rated for organic vapors. I recommend 3M brand respirators. They're comfortable for day-long use — and these things only protect you if you actually wear them. If you go with 3M, the model no. 6001 cartridges are what you want.
* (Firefly reference. Shiny, eh?)
fig.20 making a casting Fig.20: To get a good casting, there needs to be a little bit of overflow, which exits the mold through the sprues. For my first few castings, I laid down scrap paper on my desk to catch the overflow. Later on I refined my work area, covering a steel tray with sheets of wax paper.
Giving the resin 60 minutes to cure is ideal — but I found I could get away with demolding at 30 minutes. With about 15 minutes to clean up the mold and make another batch of resin, it looks like I can make one part approximately every 45 minutes.
fig.21 resin flashing Fig.21: Having thin layers of silicone that fit inside plaster mother molds makes it very easy to remove the resin castings. They just pop out. The flashing can be snapped off, or cleaned off more carefully with an X-acto knife.
However, I do recommend waiting a while before carving the resin. When you first de-mold, the resin is still soft, and it will likely distort from the pressure of your grip.
fig.22 puppet mask after being removed from the mold Fig.22: After doing a few pours, I've begun to recognize the areas that are most likely to capture air bubbles… The lips, the nose. So long as I pour carefully, it's not an issue. And if I'm nervous, I can just gently poke around in the area with a toothpick to break any hidden bubbles.
fig.23 comparison of Sculpey and resin masks Fig.23: Comparing the Sculpey and Resin masks, you have to remember that the sculpt had to be modified before making the new mold… And the Sculpey's been painted, with makes it look better at this point.
The process of making a 2-part silicone mold is a great deal more time consuming than a simple plaster press mold. However, I feel much more confident that the masks I make will be identical in shape, and the mold is surviving the wear and tear of castings much better. So, in terms of my goals, I'd say the project was a success.
Next: Making a batch of generic masks and modifying them with different mouth shapes. Sorry folks, this may take a while…
posted by sven | permalink | categories: stopmo
June 10, 2010
mold design (part 1)
by sven at 4:14 pm
silicone mold I'm back at work on creating replacement faces for the "Howard" puppet.
I've abandoned pressing Super Sculpey into an UltraCal 30 plaster mold. Getting the Sculpey out of the mold without distortion wasn't working out so well. And the plaster mold was beginning to lose fine detail.
Oh well. The press mold idea was always intended as a stepping stone on my way to something better: making resin castings from a silicone mold.
fig.1 Super Sculpey "Howard" face Fig.1: Here's a reminder of what Howard looked like when the Sculpey casting was fully painted. Doing resin castings from a silicone mold should allow me to replicate the original sculpt even more precisely.
fig.2 sculpt after being removed from plaster mold Fig.2: The original Howard sculpt was made from Chavant NSP medium. It cracked when coming out of the plaster mold, but was otherwise in pretty good condition. Before making a new silicone mold, some repair and resculpting is called for.
fig.3 repaired and resculpted Fig.3: The newly repaired sculpt isn't exactly the same as the original, but it's very close. There were a few areas that I reworked... And I also made the surface much more smooth.
I tried a trick I read about on pro sculptor Dave Pressler's blog, where you use a butane torch to melt the surface of the clay. Jury's still out on that one. [Note: I switched out the acetal plastic eyes for 3/8" stainless steel balls to fire-proof the sculpt.]
I also tried a trick I learned from a sculptor at Bent, where you use Brylcreem as a solvent. I like this one — it's nice that the solvent is a paste, rather than a fluid like alcohol or citrisolve. It's easier to control, and gives off less fumes.
fig.4 mold box Fig.4: The mold box was made from pieces of foam core that I got cheap from Scrap. Notice the way that the walls overlap one another — that makes it easy to get the things to line up well.
The sculpt is sitting on a piece of MDF (a type of particleboard) that's been wrapped in wax paper. The mold walls are set in place using hot glue. If the walls hang over the edges of the base, be sure to hot glue their undersides too, to avoid leaks there.
Acrylic hemispheres where taped into the mold to a act as mold keys.
fig.5 bad batch of silicone Fig.5: I was dismayed to discover that my silicone is labeled as having a 6 month shelf life. I've had this current supply sitting around for 2 or 3 years.
The silicone base seemed even thicker than usual, and I think the working time was reduced. My first batch clotted up before I could do anything with it. A shame! Silicone is one of the more expensive materials in my workshop. :(
fig.6 getting silicone into the mold Fig.6: I ran a second batch of silicone, this time mixing it with silicone thinner. I was able to get a useable material this way — but it still wasn't thin enough to pour.
A big problem with silicone is that it traps bubbles. The pro solution is to put the material into a degasser (a vacuum chamber), which causes the bubbles to explode. Unfortunately, degassers begin at about $300.
However, there's a poor man's solution that I learned about from this excellent TAP Plastics video, where you cut a hole in your mixing cup… If you let the silicone pour from 3 feet up, it turns into a string on the way down, which breaks the bubbles. Pretty cool.
But, since my silicone was still too thick to pour, I just had to glop it into the mold as best as a could… Knowing full well It probably wouldn't result in a useable mold.
fig.7 removing the sculpt from the mold Fig.7: There are two kinds of catalyst you can use with this silicone: fast cure and regular cure. Fast cure takes 6 hours, regular takes 16. I HATE waiting between steps — so I went with fast cure.
Here's another really excellent trick. Stick your silicone in the oven at its lowest setting. (On mine, that's 170 F.) Curing is a chemical reaction, and chemical reactions can almost always be speeded up or slowed down by heating/cooling. By using the oven, I was able to get the silicone adequately cured in only 90 minutes.
But wait! As I learned the hard way on my last silicone mold, if you de-mold at this point, the Chavant will still be in a melted state. Take it out, and the sculpt is ruined — and it leaves a clay residue in the mold.
This time I was smart and put the mold in the freezer for a while before taking out the sculpt. Worked like a charm! The sculpt came out clean and undamaged!
fig.8 bubbles in the mold Fig.8: As I feared, the silicone trapped lots of little bubbles. It looks like swiss cheese in there. Silicone also seeped underneath the mold keys an sculpt a little, creating a slight undercut, which is no good.
The mold is unusable. However, during the process of making this mold I had a little revelation.
I've always thought of mold-making as a matter of selecting one of the standard mold-making methods, and following it to the T. Now I realize that mold-making is actually a matter of design. Each mold you make is going to be somewhat unique, and requires an active application of intelligence and creativity.
With that insight in mind, I've decided to get good at making molds… Viewing mold-making as an artform unto itself.
This failure helped me come up with lots of improvements to build into the next mold design… Which is the subject of my next post.
posted by sven | permalink | categories: stopmo
June 2, 2010
mutate
by sven at 12:15 pm
click on image to play film (3:46min - 11.7 MB) Here's the new film: Mutate.
It was intended to be improv... But then the shape of a story emerged and I just had to see it out.
The project took about 75 hours to finish, over two non-consecutive weeks. Roughly:
- 38 hrs animating
- 26 hrs sound + editing
- 11 hrs set-up + clean up + learning Dragon
I prefer the look of puppets to clay — but clay does have its virtues. I had a blast sculpting those tongue and tentacle shapes. :)
posted by sven | permalink | categories: stopmo
June 1, 2010
stopmo in progress: mutate
by sven at 10:38 am
set for "mutate" I'm almost done with a new stopmo film, "mutate." Just finishing up adding sound cues.
It can take months to to fabricate armatures, puppets, and sets for a polished stopmo film. I think it's important to keep your animator muscles warm in the meantime. So this project was a "quick" improv. Like going out for a jog around the block while in training for the marathon.
Canon Powershot G5 on Manfrotto 410 geared head Short jogs are a good way to try out new methods. During this project, a number of tech issues have taken the next evolutionary step forward:
Framegrabber: Dragon
I've finally purchased Dragon Stop Motion — and it's been a joy to work with. Head and toes above FrameThief, iStopMotion, and AnimAideXT.Hi Def
I'm shooting Blu-Ray standard Hi Def (1920x1080 pixels) using my old Canon PowerShot G5 digital still camera. This is my first time using the 16:9 aspect ratio, which has (finally) emerged as the unified standard for both film and TV. None of the computers at our house can play HD files — but you can always shrink the master file down. What I'm doing is future-proofing my films so that they still have some value 5 years from now.Camera mount: Manfrotto
This is my first time using a Manfrotto 410 geared head to mount the camera. I'm a little troubled that you can't lock it into position... But its precision has allowed perfect recovery from a significant camera bump.Shooting upside down
While shooting her film "Little Theatres," Stephanie Dudley has hung her camera upside down to get some tricky shots. An epiphany! There's no camera tripod to kick when the camera hangs from above! So much elbow room is freed up, I'm only ever going to use a tripod again if I absolutely must. [Incidentally, Dragon, makes flipping frames a breeze.]GE Crystal Clear 200 watt bulbs pointed at ceiling I should comment on a few of the tricks I'm repeating from previous projects...
Modular stage design
Pros build their animation tables from the ground up. For my home set-up, it's worked well to build up from a 2'x4' folding table. I've got several reusable lighting pylons that attach to the table with C-clamps. (You can never have too many C-clamps!) For this project, there were no tie-downs — so I didn't need a raised stage — I could work directly on the table top. But for future projects, I can quickly set up a raised stage by clamping horizontal struts onto the pylons, which then support the stage floor. I'm really happy with this fast, versatile approach.Field of vision
After locking the camera in place, I find it very useful to tape off the boundaries of what the lens can see. This avoids wasting fabrication time on stuff that won't be in frame.[I've gone a step farther, too. I know that the G5's maximum angle of view is 54.4º. After doing some basic trig, I realized this means the distance of the camera from the backdrop is very nearly equal to the width of the backdrop. This 1:1 ratio is extremely useful for estimating how much studio space I need for different set designs. Anyone interested in learning more about that math?]
Lighting
I've got two GE Crystal Clear 200 watt bulbs pointed at the ceiling. Each puts out 3980 lumens — which is massive. The bulbs are commonly available at department stores and Home Depot. Bouncing the light off the ceiling approximates noontime on a slightly overcast day. Bouncing diffuses the light, to avoid any hard shadows. Not very dramatic — but handy if you just need a flat, cartoony look.OK, that's enough for now. I hope to have the finished film posted sometime this week.
posted by sven | permalink | categories: stopmo
April 15, 2010
the whisperer in darkness - big news!
by sven at 10:55 pm
Two big news items. First, there's a new trailer for The Whisperer in Darkness:
click on image to play film (3:15min - 18.8 MB) more viewing options at the official site Second: I've just finished a top secret project for the H.P. Lovecraft Historical Society!
I've got some beautiful photos — but can't share them yet. For now, all I can do is tease you with process pics, impressions and interesting numbers…
So small! The HPLHS contacted me on May 5, 2009 about making armatures for Whisperer. On Apr 5 — eleven months later to the day — they opened a box I'd sent them.
Between those dates, I put in 675 hours of hardcore research, development, and fabrication.
So complex! The first email described what they needed as "fiendishly complex." The message upon receipt of my package described the contents as "a thing of terrifying beauty."
So many blueprints! I compiled some statistics before sending off this armature. It's assembled from 239 parts:
- 101 screws
- 132 hand-crafted parts
- 6 wire segments
And it has a total of 63 joints:
- 41 hinges
- 16 ball joints
- 6 swivels
The strangest part for me, experientially, was seeing that galaxy of atoms finally condense down into a single object.
A syringe for applying oil?!? It was unnerving putting 11 months of my life into a box and entrusting it to the US Postal Service. In the first day or so after letting go of it, my thoughts were mostly consumed with how I could make the joints better, worrying that they could somehow not be up to snuff. But after the glowing receipt — and catching some sleep — I hit a state of giddy elation. …Kind of like I've won.
And now? Doing laundry or dishes — doing anything other than machining — it just seems like the most wonderful treat!
posted by sven | permalink | categories: stopmo
March 10, 2010
stopmo experiment: replacement faces
by sven at 7:00 am
meet "Howard" Lena Podesta has started up an animation study group for members of ASIFA Portland. A few weeks back I had a cold and was too fuzzy-headed to machine armatures… So I started work on something for the study group: a set of replacement faces.
fig.1 sculpt Fig.1: The sculpt was done using Chavant medium plastilene on top of a piece of wood wrapped in wax paper. The eyes are acetal plastic balls, which can be purchased either through animateclay.com or smallparts.com (which now offers its catalog via amazon.com). I studied sculptures of Roman emperors as reference while doing the sculpt, which helped me bring in a few nice details.
fig.2 mold wall Fig.2: The mold wall is made from Klean Klay, which Ron Cole recommends in his fantastic mold-making tutorial.
fig.3 pouring ultracal Fig.3: I used Ultracal 30 to make the mold. There is only one place in Portland that carries it… Stephenson Pattern Supply.
fig.4 negative image Fig.4: The negative image inside the mold is always creepy and fascinating to see. A number of tricks in the DisneyLand haunted house ride are based on this optical illusion…
fig.5 sheet of Super Sculpey Fig.5: I put some Super Sculpey through a pasta roller. (The pasta roller is dedicated to polymer clay only.) This is intended to be a press mold, so I simply laid the sheet of Sculpey in and firmly pressed it into the details.
fig.6 Sculpey trimmed Fig.6: I trimmed the edges of the Sculpey sheet, pressed two more acetal balls into the eyes, and then laid in another sheet of Sculpey.
fig.7 pouring resin Fig.7: To create a "skull" that this "mask" can rest on, I poured resin into the negative space.
fig.8 resin pulled out Fig.8: Here's the skull. Notice that I've given it two bumps on the forehead as keys for registration.
fig.9 Sculpey pulled out Fig.9: When I pull out the Sculpey, it's pretty easy to distort the edges. The skull helps put the face back in shape — but it's not going to be perfect. A little bit of detail's been lost, but overall I'm pretty pleased with how the pull turned out.
fig.10 Dremeling eye sockets Fig.10: One problem I quickly discovered was that I wasn't doing enough to dig out the eye sockets. On this mask, I wound up Dremeling the interior. There are still problems… On some pulls, the eyeballs are right up against the eyelids — on others, the eyes are a little recessed.
fig.11 first two masks Fig.11: The first pull was a "neutral" face. For the second pull, I re-sculpted the mouth shape to represent the letter "M." I intend to do twelve faces in all, so I can have a full set of mouth shapes for lip sync.
The paint is several layers of Delta Ceramcoat acrylics. These are cheap crafter's paints — but it's invaluable to be able to use paint colors straight out of the bottle, rather than trying to re-mix the right tint every time. The top color here is called "bamboo."
One obvious problem I'm going to run into is eyebrows. How am I going to keep them in the same place each time I change masks? I'm really seeing the wisdom of having the forehead and lower face be separate pieces, which was a big innovation for the movie "Coraline."
Still, even if this experiment is flawed from the start, I think it's worth seeing through — just to find out how these replacement faces work in practice.
posted by sven | permalink | categories: stopmo
March 8, 2010
armatures: making a hinge joint's tongue
by sven at 8:54 pm
a hinge segment I've been making hinges out of 1/16" stainless steel rod… I want to document the gist of the process while it's still fresh in my mind.
A hinge joint consists of a tongue that fits into a groove. Today I'm just going over how to make the tongue.
fig.1 jigs Fig.1: These are the jigs needed to make the part, each made from .25x.25" 1018 steel. You need two rod-holding jigs and a tongue-holding jig. The long jig on the right will be used later, for making the groove end of the joint.
fig.2 calipers Fig.2: Put your piece of rod through the two rod-holding jigs. One end must be flush with the outside face of one of the jigs. Use calipers to make a space .5" wide between the jigs.
fig.3 putting jigs in vise Fig.3: Put the rod, clamped in the jigs, into the vise. Make sure that one end is flush with the fixed jaw of the vise. Don't forget to put a spacer in the left-hand side of the vise, or it will be damaged.
fig.4 sharpie marker Fig.4: Use a fine-point sharpie marker to blacken the top of the rod.
fig.5 milling top face Fig. 5: Using a 3/8" dia. end mill, mill downward in .0005" passes just until the sharpie ink is marked. Set the DRO (digital read out) to zero. Proceed to mill downward to Z=.215 at 400rpm using .0025" passes.
fig.6 milling bottom face Fig.6: Flip the part over, still keeping it clamped in the jigs. Repeat the process to mill the bottom face.
fig.7 center drill Fig.7: Put a #00 center drill, held in a collet, into the mill's spindle. Start a hole at X=.3735, Y=.124, rpm=3500. (My .25" stock measured .248" in actuality, so Y=.124 is the center.)
fig.8 drill Fig.8: Keeping the spindle in the same position, replace the center drill with a #64 drill bit. The bit should be held in a drill chuck, which is attached using an arbor. Enlarge the hole, spinning the drill at 2550rpm.
fig.9 filing edges Fig.9: Remove the part from the vise. Use a diamond file to de-burr the edges and the hole. Make sure the the part can pass through the tongue-holding jig at this point. If not, file it to size.
fig.10 severing end of rod Fig.10: The part should still be clamped into the rod-holding jigs. Now put the tongue-holding jig on, loosely, just behind the hole. Put this assembly into the vise and tighten it. Now tighten the tongue-holding jig.
fig.11 waste severed Fig.11: Using a .125" dia. end mill at 1200rpm, we're going to part the waste material at the end. Move the end mill to X=.3435. Any slop in the set-up should favor protecting the hole we've drilled, so move the end mill to the right until it physically bumps the ledge that's been milled. Mill through the flattened area of the part using .0025" passes.
fig.12 blackening end Fig.12: In preparation for rounding the corners of the tongue, blacken it with a sharpie.
fig.13 into the vise again Fig.13: Put the part into the vise, still clamped in the tongue-holding jig and one rod-holding jig. Put a 1/32" radius corner-rounding end mill into a collet in the spindle.
fig.14 aligning the cutter Fig.14: I've found it works best to align the corner-rounding end mill by eye. Spinning the cutter at 1200rpm, move it to the left .0005" at a time until it just marks the end of the part. Be sure not to use climb-cutting, or the part will be damaged (though it can likely be bent back into shape, if necessary).
fig.15 rounding the top Fig.15: Once you've got the cutter in place on the X-axis, bring it downward in .0025" passes, until the corner looks about right. Perfect roundness is not crucial here.
fig.16 rounding the bottom Fig.16: Flip the part in the vise and repeat the previous two steps.
fig.17 finishing the tongue Fig.17: Remove the part from the vise and from the jigs. Use the diamond file to remove burrs. To check that the part is good, make sure that the tongue can pass smoothly through the slit in the tongue-holding jig.
(Yep, all the XY coordinates and rpms are memorized at this point…)
posted by sven | permalink | categories: stopmo
March 3, 2010
the tiniest epic fail
by sven at 10:58 pm
costly junk You use a tap to thread holes. A tiny-tiny 000-120 tap costs $50…
Today, while making the groove end of a hinge, my one and only 000-120 tap broke…
Locking the part I was working on in my homemade jig…
Thus also ruining both the hinge and the jig.
Ouch.
posted by sven | permalink | categories: stopmo
February 23, 2010
take your blog to work day: time-lapse footage!
by sven at 12:00 pm
machining 1/16" dia. rod I tell people I make puppet armatures. I show them photos and then they understand what I'm talking about.
But it's probably impossible for most to visualize the actual process of machining. So last week I decided to take some time-lapse footage of myself at work.
before & after machining I was working on making pieces of 1/16" dia. rod into tiny hinge joints. Above you can see the raw stock I start with next to one of the finished parts.
The process for this particular part takes me 80 minutes to complete. For you, I've condensed that down to one minute.
click on image to play clip (1min - 4.8 MB) Here's the process with the camera set up on the table beside me.
click on image to play clip (1min - 4.5 MB) Since I was making several identical parts, I set the camera up again so it could give you an over the shoulder view, too.
(Some of you might recognize the music… Two compositions I did a few years ago: hatching and suave squirty.)
posted by sven | permalink | categories: stopmo
January 18, 2010
animation: what I did in 2009
by sven at 7:00 am
show reel of my animation from 2009 click on image to play clip (10:41min - 21 MB) On Dec 12 ASIFA Portland hosted a "Show & Tell" social for the local animators.
I love that kind of thing! I put together an 11-minute DVD showcasing my animation work from 2009… Which you too can now see, simply by clicking the link above.
posted by sven | permalink | categories: exhibits & events, stopmo
January 4, 2010
toby's christmas miracle!
by sven at 12:40 am
watch "Toby's Christmas Miracle!" click on image to play film (3:35min - 12.4 MB) Toby, our mischievous softie, had an astonishing adventure this Christmas…
It's a comedy.
It's animated.
It's a MUSICAL.
Watch!
(Update: Now also available on YouTube.)posted by sven | permalink | categories: stopmo, toby
November 24, 2009
exploring light
by sven at 12:33 pm
ichbonnsen in blue In stolen moments I've been exploring strategies for lighting my stopmo stage. I'm particularly inspired right now by the lighting designs of contemporary operas.
LED pen light In previous work I've simply tried to flood the stage with as much light as possible. Now I'm taking the approach of starting from blackness and adding just a little bit of light at a time.
I think LED lights are very promising. They're bright, they're small, they're cheap… Perhaps most importantly, they don't get HOT!
I just bought a few at Radio Shack, and have started researching how one goes about wiring them. Looks like there are going to be resistors and circuit boards and whatnot.
spotlight stage center I'm interested in doing some film experiments that mimic black box theater. Let the puppets act -- leave most of the world they live in to the imagination. The theater has embraced anti-naturalism; stopmo often delves into fantasy -- yet typically in a naturalistic way. It seems there's a niche yet to be scratched…
So, I wanted to start out by simulating a single spotlight trained on the stage.
stepping into light I fiddled with camera settings until I figured out how to have Ichbonnsen step from darkness into the light. Very dramatic.
silhouette Modern operas often have the backdrop be a giant swath of luminous color. You can do so much to change the environment simply by manipulating light…
Here I have a piece of crumpled red tissue paper being backlit by a GE 40 watt soft white bulb. I like the dramatic possibilities suggested by having the puppet just be a silhouette.
separation of planes A big part of what I love about opera set designs is the sense of grandeur. Some of that is just the scale -- acting on an enormous set. Some of it is the bold use of color -- luminosity and saturation. Another part of it is depth of space…
One way to accomplish depth of space is by separating visual planes. Make the foreground pop out from the background… If possible, use light and form to establish several midground planes, too.
Here I'm hand-holding a LED penlight covered with a blue gel, so I can separate Ichbonnsen from his background.
obscured by burnished acrylic Lighting is mostly about how you're projecting rays and using the contours of objects to cast shadows… But I'm also going to mention here that I'm interested in obscuring images.
In live theater, scrims can be used to put actors behind a haze, or they can be used to catch projections, or catch shadows. The burnished sheet of acrylic I used here probably wouldn't count as a proper scrim… But it illustrates a direction I'm moving in.
posted by sven | permalink | categories: stopmo
November 13, 2009
birthday animacation
by sven at 7:00 am
click on image to play clip (30sec - 2.6 MB) For the past few years I've been going on a personal retreat for my birthday… This year, however, I wanted nothing more than an animation "staycation" vacation. An animacation!
Gretchin granted my wish, setting up the studio with all the accoutrements of home and bringing me hot meals on a tray. For two glorious days I got to spend every waking moment in animation land. YAY! THANK YOU, GL!
replacement bits Day 1 was spent on stage design and revisiting the process for shooting RAW. Day 2 was spent in the flow of creation.
I decided early on that rather than use up my time fabricating props, I should work in a medium that allows improvisation. It could have been clay or wire… But cardboard felt like the right choice this go around. It's plentiful, it's essentially free -- and it plays friendly with paint.
(Doing series of replacement bits totally had me thinking about Bruce Bickford.)
self-contained animation station After doing the Ichbonnsen on Muglorp clip back in July, I was feeling really discouraged… Putting the camera and lights on tripods eats up so much floorspace, I lose my entire studio during the shoot. And clean up can take days.
I've found a way to fit everything inside a 2'x4' footprint now. It means sacrificing images with really deep depth of field (which I love so)… But for the time being, I just can't afford big productions, space-wise. Going small is a self-imposed limitation for the sake of maintaining momentum.
tabletop: half for stage, half for computer I'm using a 2'x4' folding table. Lights are clamped to 4' tall wooden struts attached to the table with C-clamps. Half the tabletop is is for the stage, half is for the computer. Ergonomically, I'm finding it's really valuable to have the computer immediately next to the set, and at the same vertical level.
The lights are four 200 watt GE lightbulbs, pumping out a total of 15,780 lumens. By bouncing the rays off the ceiling, what I'm doing is approximating high noon lighting on a slightly overcast day.
(I've also got two tiny little 40 watt bulbs on hand, which I'm looking forward to trying for a moody noir look at some point.)
taping off the field of vision There's a crucial difference between set design and stage design. Stage design begins with available studio space, takes account of room required for cameras, lights, tie-downs, etc. Once you've carved out a volume of space that the camera can photograph, then you can work at decorating it -- which is where set design begins.
I've discovered that one of the most valuable things a stopmo stage designer can do is measure the field of vision (FOV) of their camera. It turns out my DV cam has a FOV of ~38° -- whereas my digital still camera has a FOV of ~55° -- which is better suited to a small stage.
Knowing the FOV, I've calculated that the ratio between my visible backdrop's width and the distance from the backdrop to the camera is essentially 1:1…
That's a mouthful… What it means is that if my camera is 2 feet back, then I need a backdrop that's at least 2 feet wide. And since I'm shooting with a 4:3 aspect ratio, I immediately know that my backdrop should be at least 18" tall. Cool!
space for stuff outside the FOV By calculating the size of my FOV, I don't waste time fabricating stuff that won't be in shot. Granted, if the camera is going to move, I'm going to need more space -- but I still think knowing the exact dimensions of your FOV gives you POWER.
To help me further visualize how much room I had to work with, I taped off my work area. The table space that falls outside of the FOV can then be used for setting down animation tools or erecting out-of-shot support structures.
camera fixture I hate camera tripods. I bet most stopmoes do. If you accidentally kick a tripod leg -- which happens all the time -- your shot's ruined. What an absolute JOY, then, to figure out that I could fix the camera directly to the stage.
The fixture I built isn't ideal. If the camera tilts even slightly left or right, it's really obvious in your film. I used cardboard shims to take care of the problem… But I think I've finally reached the point where I'm ready to purchase the much coveted Manfrotto geared head (sold separately from the tripod).
my Day Of The Dead sugar skull Like I said, this clip was improvisation. Beforehand, I wrote out a long list of things that one might try with cardboard… But in terms of content, I had no idea that I'd wind doing flowers or a spiderweb or a skull.
The mind's well of creativity is a funny thing. I can't help but think I was influenced by the sugar skulls that we decorated at Bridget Benton's Day Of The Dead party back on Nov. 1.
[Am I squeezing this in here just to avoid having to do another post? Maybe.]
posted by sven | permalink | categories: stopmo
November 11, 2009
birthday party: 3anim8
by sven at 7:00 am
click on image to play clip (1min 54sec - 4.6 MB) This year for my birthday party I wanted to have all my friends make an animated film for me.
We set up an animation table in the middle of the living room, and over the course of the evening folks jammed using paper cut-outs and found objects. Oh, man… It was AWESOME!
downshooter We used a consumer-grade DV cam for image capture. For software, we used FrameThief. For non-animators: There are a variety of softwares you can use -- a few free ones, but typically $40 for the basics.
The frame for the downshooter is made from a couple of simple wooden lighting stands I built a while back, an 8' long cross-strut, and C-clamps. The light fixtures and umbrellas are from a local pro camera supplier -- but I'm just using 200 watt (3980 lumens) incandescent bulbs in them, which came from a department store.
Todd & Kristen animating It was really wonderful getting to share my love for stop-motion animation with a bunch of friends. After years of hearing me talk about this crazy art form, they finally got try out the mysterious thing for themselves.
Folks were a little surprised at just how much fun it is to bring little inanimate bits and bobs to life. I think I may have made a few converts that night… ;)
So: THANK YOU everyone for coming! I had a wonderful time… Best birthday party ever!!
posted by sven | permalink | categories: exhibits & events, stopmo
October 27, 2009
armatures: the step-block joint
by sven at 4:26 pm
step-block joint The step-block joint is the foundation of professional armature making.
When someone decides to try making armatures, usually the first joints they make are open-hole sandwich plates. You can do a lot with sandwich plates -- but by their nature, each set of plates captures two balls and gives you two pivot points. To avoid double-jointed knees and elbows, often you have to freeze one ball in place. A step-block joint, by having just one pivot point, gives you more control and precision as you design an armature.
Another virtue: Whereas a hinge or swivel joint only offers one axis of rotation, step-blocks offer two… And by adding a swivel in the step-block's butt, you approximate three. (That is, so long as the incoming rods are at roughly 90 degree angles. When the rods straighten out, you're left with just two axes again.)
Step-blocks are very modular, and lend themselves to being produced in batches. Stopmo studios tend to outsource the making of these parts to machine shops that employ CNC machines the size of a small trucks. Inside the studio, then, armature-building revolves around using these pre-made bits.
So, given how central step-blocks are to the life of an armaturist, I've been spending a great deal of time during the past few months refining my own designs.
sizes L, XL, & XXL I'm aiming at being able to produce six sizes of step-block joints in my home studio. For simplicity's sake, I'm labeling them like T-shirts: XS, S, M, L, XL, XXL. These sizes are, respectively, 1/8", 5/32", 3/16", 1/4", 5/16", and 3/8" -- where the joints are defined by the diameter of the ball they use.
I've drawn up blueprints for all six sizes, but have only manufactured L, XL, and XXL joints so far. While step-block joints are generally very forgiving of slop in their manufacture, making the XS, S, and M sizes still requires being able to keep tolerances around the .0020" range (the thickness of a piece of paper) -- a skill I'm still developing.
For my own sake, I've also typed up a 10+ page document that lays out the logic of why certain ratios need to be so, which matches up available sizes of raw metal to parts, selects screw sizes, and so on.
I've written previously about why 1/8" balls represent a certain lower limit for miniaturization. As for upper limits, my Sherline mill can only accommodate cutters with shanks up to 3/8". I have 1/2" balls on hand -- but no means at present for milling ball cups for them to sit in.
ball-rod tester set While working on step-blocks, it became apparent that I should have a set of balls brazed to rods on hand, for testing completed joints. I went ahead and made such a set, and then made a nice little wooden holder for it. I'm really pleased with it aesthetically, and it's proven to be extremely useful.
spacers for the milling vise In order to take raw metal stock and machine it into a step-block joint, you need to be able to precisely position your work in a milling vise. Above you see the set of spacers I created for the job of making 1/4" joints.
Each size of joint requires different sizes of spacers. I've been adding to my collection of spacers haphazardly with each new size of joint that I work on. However, I've drawn up plans for a master set of spacers that can be adjusted to accommodate many different projects. It's sort of like the spacers that letterpress printers use, which they call "furniture." I'm looking forward to reporting more about that project in a future post.
(Oh -- in case you think all this research and development is purely academic… Let me remind you what you're not seeing in the photos: armatures that I'm constructing for the H.P.Lovecraft Historical Society's production of The Whisperer in Darkness! …Check out their blog!)
posted by sven | permalink | categories: stopmo
August 25, 2009
tutorial: how to drill a 1/8” ball
by sven at 2:22 pm
drilled 1/8” dia. ball on rod It can be very tricky to drill tiny 1/8” diameter balls on center using a mill. Here’s the method I’ve developed.
THE BALL-CLAMPING JIG
The ball-clamping jig I designed is essentially a step-block joint. It’s made from two pieces of 1018 steel whose dimensions are 1/8” x 1/2” x 1.8”. At the far left there’s a 10-32 allen head set screw that acts as the step. Next to it, there’s a 10-32 socket head cap screw to tighten the two plates. There are three open holes to seat balls, whose diameters are 19/64”, 11/64”, and 7/64”.ball-clamping jig, closed For practical reasons, I’ve limited myself to working with a set of six ball sizes: 1/8”, 5/32”, 3/16”, 1/4”, 5/16”, and 3/8”. For simplicity’s sake, I’ve taken to labeling them XS, S, M, L, XL, and XLL, respectively. The jig’s smallest hole accommodates XS & S, the middle hole M & L, and the largest hole XL and XXL.
ball-clamping jig, open The jig sits atop 3/4” tall parallels in the Sherline milling vise.
CENTERING THE SPINDLE
It is absolutely essential that the vise be parallel with the X-Y table. For some time I made the mistake of using nothing but a machinist’s square for this job. I’ve come to realize that while a square is a useful start, a lever-style test indicator is indispensable. I recently purchased a serviceable indicator on Amazon.com for about $30.wiggler and test indicator After the vise is correctly aligned, I use a wiggler to locate the right-hand edge of the jig and the edge of the vise’s fixed jaw. These are the same edges I used to locate the jig’s holes when I drilled them.
While doing edge location, I spin the top plate of the jig out of the way, so that it won’t interfere with the wiggler.
DRILLING OPERATIONS
Step 1: Locate the top of the ball.I put the drill I’m going to use in a chuck which then goes onto a drill chuck tool holder, which makes tool changes quick and easy. I screw the tool onto the mill, then lower it down to the point where the tip of the drill just touches the ball. I zero-out the DRO (Digital Read Out).
drill chucks and milling collets Because stainless steel is harder than the metal of the drill bit (I believe), the drill is unlikely to dent the ball, and you’re likely to get a pretty good reading. Note that I’m going for accurate depth -- but getting the depth right is less important than getting the hole centered.
I’ve tried to make sure that this process doesn’t depend on the Z-axis for any crucial measurements. In my experience, Z tends to be the sloppiest of the axes.
Step 2: Make a flat spot on top of the ball.
With this jig, it’s impossible to use a file for making a flat spot on top of the ball. The flat spot is quite necessary -- I’ve broken center drills while testing to see if I could get by without one.
diamond bit, 1/8" spotting drill, #2 combination drill, 1/16" twist drill What I’ve come up with is using a diamond bit that has a 3/32” shaft and a cylindrical grinding body that is approximately 1/16” in diameter. A set of 20 various diamond bits cost about $15 at my local jewelry making supply store.
I put the tool in a drill chuck and bring it down into the jig’s open hole. The diamond bit needs to be used with lubricant… One of the things I love about this jig design is that when it’s clamped tight, it creates a perfect cup for holding cutting oil.
[I’ve read about similar abrasive bits that are made from ruby dust. They may be superior -- they have abrasive all the way through rather than just on the surface. The ruby bits haven’t been in stock at my supplier; I may wind up special-ordering some.]
Step 3: Center drill the ball.
Whereas the twist drill and the diamond bit can just go into drill chucks, it is absolutely essential that the center drill goes into a milling collet. If you don’t use a collet, you won’t have a centered hole in the ball -- and if you’re drilling a 1/8” ball, it will probably be unusable.
There are two types of center drills: combination drills and spotting drills. I use them both. For the XS and S balls, I use a #2 combination drill to reach through the jig’s seating holes. For the larger sizes of ball, I use a 1/8” cobalt spotting drill. McMaster-Carr (the machinist’s ultimate mail order catalog) doesn’t sell spotting drills smaller than 1/4” in diameter -- this one is something special I was able to find on Amazon.com.
Step 4: Drill the ball.
The standard drill has a 118 degree tip. The spotting drill makes a conical dimple with a 120 degree angle, which helps guide the twist drill’s tip to true center. With that help, it doesn’t matter that the drill, seated in its chuck, isn’t perfectly centered.
[Note that drilling a hole in metal is different from drilling a hole in wood. With wood, you might want a pilot hole. With metal, the pilot hole would be counterproductive -- the drill would catch on the edges of the hole and go astray.]
Drill the hole down to your chosen depth… And you’re done!
ROD & HOLE WIDTH CONSIDERATIONS
Usually I use rods that are 1/2 the ball diameter. However, this isn’t possible for all balls. The smallest diameters of rod I can buy are 1/16”, 3/32”, and 1/8”. So, for something like a 5/32” ball, I’m likely to lathe the end of a 3/32” rod down to size.Sometimes rods are slightly too large for their holes. One could use numbered drill bits (AKA “wire gauge” bits) to make larger holes that allow leeway -- but after trying this route, I’ve decided it’s better policy to just sand the rods down slightly. Precise rod diameter is seldom critical… And numbered drills are apt to give more room than you actually need, leading to a loose fit.
Here’s an neat trick for getting the rod down to size: Put the rod in the chuck of a hand-held electric drill. Meanwhile, hold a bit of fine-grit sandpaper or scotchbrite around the rod. Spinning the rod helps remove width fairly evenly.
HOLE DEPTH CONSIDERATIONS
A ball should be drilled at least halfway through. Currently I’m opting to drill exactly halfway through -- but I’m also taking the conical tip of the drill into account.It drives me crazy when I’m cutting rods to size to discover that an armature's limb is too long because I misjudged how deep the ball holes are. I want to know how deep the ball holes are as precisely as possible.
For a while I experimented with using end mills to flatten out the bottoms of holes… But as I started working with smaller and smaller balls, I decided that it wasn’t worth purchasing super small end mills for the task.
So now I calculate how long the tip of a drill is and add that onto the length of my plunge. Standard drill bits have a 118 degree tip. Knowing this I was able to work out that the formula for finding the length of the drill tip is this: (1/2 * drill dia.) * tan31.
You can put down the scientific caluculator… Here’s a convenient table I’ve drawn up for how long the tip is on each size of drill:
- 1/16” = .0190”
- 3/32” = .0280”
- 1/8” = .0375”
- 3/16” = .0560”
- 1/4” = .0750”
TESTING BALL ACCURACY
I’ve come up with three methods for checking if balls have been drilled on center.Method 1
While the ball is still clamped in the jig, put a rod in it standing upright. If the hole has been drilled too wide, the rod can lean to the side… Which will make the ball appear off-center later on, even if the hole is actually centered correctly.Method 2
Put the ball atop a rod, and then put the rod in a hand-held electric drill chuck. When you spin the rod, the ball will look like it’s wobbling back and forth if it’s off-center.Method 3
After you’ve brazed the ball onto a rod, you can put that rod either in the chuck of a mill or a lathe. [I suppose using a collet would be even better.] A lever-style test indicator, attached to a tool holder that’s off to the side, should be able to measure variations as the ball spins quite precisely.posted by sven | permalink | categories: stopmo
August 24, 2009
armatures: limits of miniaturization
by sven at 1:30 pm
small ball and hinge Within the field of armatures, I've decided to specialize in "small and precise." Working on The Whisperer in Darkness (new blog!) has given me a great opportunity to push my previous limits.
In the photo above, the ball is 1/8" in diameter and is brazed to a 1/16" dia. rod. The hinge joint is made from 3/32" dia. rods, and a #0-80 screw. For comparison, the screws in your glasses are likely #0.
These sizes represent certain practical limitations.
Stainless steel balls are made in two sizes smaller than the 1/8" ball I used: 3/32" and 1/16". However, you typically want to use rod that is one-half the diameter of the ball. The usual 1018 steel used for rods in armatures only goes down to 1/8" dia -- so you have to switch over to stainless steel rod, which only goes down to 1/16".
A 1/16" rod could go into a 3/32" ball -- but the range of movement would be rather limited.
Theoretically, you could also use a lathe to thin 1/16" rod down to 1/32", so you could put it into the tiniest 1/16" ball… But at that point, the rod is so fragile, I wouldn't trust it not to bend during use.
Even with the 1/16" rod, bending is an issue. It might be used on the fingers of a hand, or possibly for the outer arms of a very small puppet (~6" in height, or shorter)… But if you fantasize about using it for Jack Skellington style legs, you're bound for heartbreak when you accidentally bend the rods while animating.
So, if you want rods one-half the diameter of balls, and use standard-size rods, then a 1/8" ball and 1/16" rod combo is the limit.
* * * As for hinge joints: the limiting factor is the screw.
I purchase nearly all my raw materials from either McMaster-Carr or Small Parts, Inc. For the hinge, I used a stainless steel 18-8, slotted, binding head machine screw.
Small Parts offers sizes of this type of screw below #0-80: #00-90 and #000-120. However, once you go past #0, prices are ten times as expensive. Whereas a box of a hundred #0 screws costs $7.25, a box of a hundred #00 screws costs $76.95!
[This is according to my invaluable Small Parts catalog from a few years back. Unfortunately, the company has stopped printing catalogs, and now does everything online. On the plus side, though, Small Parts' entire inventory can now be accessed via Amazon.com's "Industrial & Scientific" department… Although, frustratingly, it's turning out that items are out of stock far more often than I'd like.]
Furthermore, in order to drill holes to tap (make threaded), you'll need to go below the standard numbered drills, which run from #1-#60. To make a hole to tap for #00-90 screws, you need a #65 drill. For #000-120 screws, you need a #71 drill.
Personally, I have a set of #61-80 drills on hand… But they look like hairs -- so I haven't dared to try using them yet.
Oh, and in case you're wondering: another set of drills was created not so long ago that goes from #81 to #97. The #97 is .006" thick. For comparison, a piece of notepad paper is .002" thick. So try to imagine a drill that's only as thick as three sheets of paper!
At this point in history, #97 seems to be as small as drills go -- but I wouldn't bet that things stay that way forever.
Anyway, back to topic: making a hinge from 3/32" rod seems to be the practical limit. You could try to make a hinge from 1/16" rod… But the price of the screws skyrockets -- and you move into sizes of drills that are perilously delicate.
posted by sven | permalink | categories: stopmo
August 10, 2009
animation: paint improv
by sven at 7:00 am
click on image to play clip (96sec - 4.4 MB) When I was at ASIFA Portland's summer social on 7/18, I got to play with a sandimation set-up… Down-shooting at a light table with sand on it. It got me jazzed to try some down-shooting at home.
sandimation I used some modular light supports that I built a while back, and simply clamped on a cross-brace. The camera is attached with a 3" long 1/4" dia. threaded rod. Unfortunately my good digital still camera broke in Wisconsin -- so I shot using a video cam, which is more prone to flicker.
down-shooting Altogether, it took about 14 hours… Nearly half of which was sound work. Sound design was very influenced by Joanna Priestley's animations -- which I highly recommend.
posted by sven | permalink | categories: painting, stopmo
July 30, 2009
essay: stopmo webcomics
by sven at 10:40 pm
What if you created stopmo clips as if you were producing content for a webcomic?
Imagine: an ongoing series of 10-20 second clips that get published once a week… Some are stand-alone gags -- but others are part of large, dramatic story arcs broken into bite-sized episodes. Keeping a strict update schedule is critical, and somewhat stressful… Yet, the pay-off is a loyal audience that builds watching your show into their personal weekly rituals.
For about the past month, I've been really excited about this idea. Here I'm going into "deep thought" mode to flesh out the details.
1. ROLE MODELS
Amongst stopmoes, there are several popular role models. The Neo-Harryhausians (as I think of them) idolize "Uncle Ray" and yearn for the return of photorealistic stopmo monsters to feature films. Another group takes their inspiration from Tim Burton's Nightmare Before Christmas and Corpse Bride -- as is often apparent from the Gothic/German Expressionist influences in their character/set designs. Yet another group longs to follow in the footsteps of Will Vinton, fondly recalling the heyday of the California Raisins.Whether the role model is Ray Harryhausen, Tim Burton, or Will Vinton, the career path that most stopmoes fantasize concludes with the publication of a feature-length film. The route to this goal is either a slow accrual of victories in the film festival circuit, ultimately leading to a deal with a big investor -- or the founding of one's own boutique studio, capable of taking on a multi-year project.
Lately, though, I've been looking to a different set of artists for inspiration.
I've become a loyal reader of several webcomics: Jeph Jacques' Questionable Content, Richard Stevens III's Diesel Sweeties, Randall Munroe's XKCD, Rene Ergstrom's Anders Loves Maria, Danielle Corsetto's Girls With Slingshots, to name a few. I've devoured the (live action) webisodes of Felicia Day's The Guild and Joss Whedon's Dr. Horrible's Sing-Along Blog. I've eagerly awaited new webtoon episodes of Amy Winfrey's Making Fiends (and now Squid and Frog) and lost afternoons to Mike Chapman and Craig Zobel's flash cartoon Homestar Runner.
What do these artists' webcomics, webisodes, and webtoons have in common? They're all presenting story worlds in an episodic format, using the internet as their primary distribution media… And what's more, they're all independent artists that publish according to their own time-tables, maintain absolute creative control of their content, and earn a living from their publications.
Sounds appealing! So, while I still admire the works of Ray Harryhausen, Tim Burton, and Will Vinton, I think it is these others that I want to be studying as I devise my potential career path.
2. WEBCOMIC BUSINESS MODEL
Surveying webcomics, webisodes, and webtoons, I think that the clearest business model has emerged among the folks doing comics…Actually, there are really two business models among webcomics: "fee-to-see" or "free-to-see." With fee-to-see, there's either a tip jar (honor system) -- or you get a free sample and then pay a subscription to get into the archives. With free-to-see, the archives are all available -- profits come from selling ads and selling merchandise. Among the folks I've been reading, fee-to-see has been roundly rejected (e.g. How to Make Webcomics by Kurtz, Straub, Kellett, & Guigar; Jeph Jacques' post titled comics comics comics)…
So I'm identifying the webcomic business model with publishing high-quality free-to-see content that attracts an audience, then selling ads and selling merch to make a profit.
Contrast this with how people in film culture (hope to) make their money. Feature films in the cineplex or at art house theaters are fee-to-see. You have to fill seats in order to make your investment back -- which necessitates a big promotional campaign of posters, TV ads, etc. If you're aiming at placing your film on TV, then it's essentially the broadcaster who's paying the fee-to-see -- or more properly in their case, fee-to-play.
And if you're not at a point in your career where you can get mass-market distributors to buy your content? Well, you can try to win award money in the festival circuit -- but you're pretty much back to selling merch -- your DVDs… Either setting up a table at the festivals, or by word-of-mouth / internet publicity.
Some filmmakers are thinking about how they can further monetize their pet projects by selling non-DVD merch… T-shirts, toys, and stickers derived from their films. However, I believe they're unlikely to create significant revenue streams through these efforts.
Why? It works for the webcomics, right?
Well, see the problem is that most filmmakers' shows are one-offs. The films may make a big splash the first time an audience sees them… But then the film is forgotten by the next day. An integral part of what makes webcomics' merch business feasible is that they're releasing new content daily, weekly, or monthly -- not just every few years. The frequency of release is what allows brand loyalty to develop, which is what really drives purchases.
3. RELEASE SCHEDULE, LENGTH, EPISODIC STRUCTURE
Obviously you can't hope to put out feature-length stopmo films on a weekly basis. If you choose to increase the frequency of your releases, then the nature of your creations must also change.I want to discuss how three interrelated issues will shape the form of your art: (a) release schedule, (b) length, (c) episodic structure.
Webcomics tend to update either daily or on something like a M-W-Fr schedule. Webtoons can get away with updating monthly; some flash cartoons manage to update weekly.
The longer the wait between new releases, the longer the clips you can create. However, the longer the wait for new releases, the more you lose your audience's attention. So, while there's an impulse to cram as much story as possible into each installment, personally I want to push myself to think in the opposite direction: What is the shortest video clip I can produce that still conveys a meaningful unit of comedy / drama?
Personally, I think that you could get away with publishing only 10-15 seconds of footage per week. If you have dialogue, that's just enough time to have Character A speak, Character B respond, and Character A react.
As an experiment, try taking a standard newspaper comic strip, 3-4 panels long, and read it aloud… 10-15 seconds is my best estimate. …The 3-4 panel comic strip is also a good comparison because each of those panels is the equivalent of a storyboard panel -- in which case, it seems you're looking to create episodes that are about 4 storyboard panels in length.
[Of course, if you want to publish on a monthly schedule -- 4 weeks worth of work -- you could probably get through 16 storyboard panels, and shoot about 60 seconds worth of footage.]
Won't working in such tiny segments cripple your ability to tell a story? …Not necessarily.
Once you commit to putting on a once-a-week show, you realize that there are two categories of episode: stand-alones, and serials. For stand-alones, think of "Garfield." When you read one episode of Garfield, you generally don't need to know anything about what came before, and aren't left wondering about what will come after. For serials, think of "Dick Tracy" or the old "Buck Rogers" cartoons. There's a storyline that carries on from week to week, which has continuity.
So here's something I'm interested in experimenting with… Take a graphic novel -- like Maus, Watchmen, or Persepolis -- and try to chop it down into smaller segments. Can you take a long-form script and figure out how to present it in three or four lines of dialogue at a time?
It seems likely that through the process of presenting stories in such short segments, the way in which you communicate will change. But this is nothing new… Look at how storytelling for television adapted to fit the needs of the medium: instead of presenting entertainment for a continuous hour, there are several mini-climaxes to help the audience bridge the commercial breaks. In my opinion, storytelling always adapts itself to the medium.
Stopmoes are familiar with feature-length films and short films… What I'm discussing here would perhaps best be termed "micro" length. "Epic" feature-length films are generally felt to be superior to short films, due to scope and grandeur… But I am of the opinion that a long-running serial of micro-length films could equal the emotional weight of a feature -- and even has some advantages over it, production-wise.
First off, when I think about the stories that I personally love most, they're all serials. Star Trek, Battlestar Galactica, Buffy the Vampire Slayer, Angel, Firefly, The X-Files… Frankly, a 13 or 26 hour season of TV shows is able to give me a richer world than a 90-120 minute film -- no matter how big the explosions!
Secondly, from the perspective of being an indie filmmaker, I find the long breaks between having completed films to show extremely demoralizing. The more often I'm able to put out a film, the more legitimate I feel as an artist -- and the less isolated I feel, off in my story universe. The sense of pride in completing small films frequently, and being able to show them to friends, family, and the world -- I find these aspects of micro-length work very attractive.
4. LIVE SHOW ETHOS & PRACTICALITIES OF RUNNING A WEEKLY SHOW
When you spend years working on a single film, the deadline for completion ceases to matter very much. You want to make the film exactly right, because you take pride in your craftsmanship. The final product of your effort is a DVD, an object, a unit of property to sell.When you work on a weekly show, I believe the experience is a lot more like doing live theater. You've told everyone that there will be a show Friday night -- so ready or not, when the curtain rises "the show must go on." If you have to cut corners or improvise, you do what you have to do… The fact that you get up on the stage try to be entertaining is more important than whether or not you feel ready. And if you flop? Well, there's always next week.
It seems to me that if you commit to putting on a weekly stopmo show, the following guidelines will be helpful:
- Use what you've already got. Fabrication is time-expensive, and time is what you don't have!
- If you have a set or a character, re-use it multiple times. There are plenty of story possibilities in those elements -- exhaust them.
- Keep a library of sets and puppets. Once you have an asset, don't throw it away!
- New sets and puppets will be added to the library piecemeal. You'll be very lucky if you are able to add one new puppet or one new set each week. To do so adds at least a full day's labor.
- Plan puppets/sets to be multi-use. Until you have the resources to start off an ongoing show with multiple elements, try to make elements that could be used together in different ways. Scale and aesthetic play into this thought process.
Think about the Muppet Show as an example. Once you have the "Pigs in Space" set and puppets, you can do a skit that uses these assets once every episode. The audience doesn't get bored of such recycling -- rather, it becomes something familiar to look forward to.
I mentioned earlier that there are two types of segment that you can do using the episodic structure: stand-alones and serials. It strikes me that so long as you have a weekly schedule, there's no reason why you have to choose one or the other. You can start off doing stand-alone clips, then sprinkle in installments of larger story arcs as you finish fabricating the necessary sets and puppets. Recycling old puppets and sets in new skits buys you more time to fabricate bigger worlds -- so there's no dead time in the performance schedule while you're preparing something more ambitious.
5. FILM CULTURE VS. COMIC CULTURE
It seems to me that most stopmoes want to be a part of film culture. By "film culture," I mean that the community of filmmakers and film-lovers meet together annually in gatherings across the country known as film festivals. Often there's not as much interaction between the filmmakers and audience members as we might like -- but often enough there are panel discussions, vendor areas, and good conversations in the lobby. Like Brigadoon, the magic city that appears only for a day once each year, the film culture manifests through such events.Webcomic artists, on the other hand, have a separate culture. Webcomic and print-comic artists alike gather at comic conventions… The biggest and most famous of which is the San Diego Comic-Con. I ask myself: could a stopmo doing a weekly micro-length show fit in in the vendor areas of such cons? My answer: heck, yeah!
Things that a weekly stopmo show has in common with your typical webcomic: a cast of fictional characters, a primarily visual medium, episodic story structure, geek appeal… While not without some controversy, notice how the San Diego Comic-Con has grown to encompass films and toys as much (or more than) comics. It seems that the con is really about fictional universes… And the characters leap effortlessly between media -- from novels to comicbooks to films to toys.
The only firm difference I find between webcomics and stopmo webtoons is that you can't read a film -- you have to watch it. Technologically, you need a player of some sort. But even so, you could make an academically sound argument that stopmo is just another form of "sequential art" (to use Scott McCloud's term)… You're just viewing animated comics at 24 panels per second!
So: I think that a stopmoe could embrace the identity of "webcomic" or "webtoonist" and fit in just fine in the comic convention culture… But would film culture have them back again if they did?
Micro-length films might be compiled into a longer film to show at festivals… But I have my doubts about how well the compilation would flow. If the film clips weren't made to be shown as a continuous series, translating them for the big screen is likely to be clumsy.
What's more, many of the prestigious film festivals do not accept submissions that have been shown in public previously -- which would automatically disqualify stopmo webcomics/webtoons. Yet, if you were willing to sacrifice the competitive fests, you could still take your works to other fests… Which would then allow you to sell DVDs in the vendor's area, if nothing else.
PARTING THOUGHTS: A VIABLE ALTERNATIVE
The stopmoe community has wrestled with the question of how much of one's content should go online. One side in the debate has argued forcefully that it's a mistake to just give your work away online, without any hope of making back your investment. Particularly if you think you can get into film fests, then you should keep your work offline and keep it secret.Having explored the webcomic model of publishing a fair bit now, I think that there is a way to make a fair profit from putting your films online -- but the nature of the films has to change considerably for the magic to work. What's important is to post your content with maximum frequency… Which in turn necessitates micro-length, and then propels you toward telling stories using episodic structure.
I'm not personally at a point where I'm ready to commit to doing a weekly show -- but I think it's very exciting to identify a viable alternative to the filmmaking role models and business models we're familiar with.
posted by sven | permalink | categories: stopmo, writing
July 27, 2009
ichbonnsen on muglorp
by sven at 4:30 am
click on image to play clip (16sec - 3.6 MB) Guess who…!
posted by sven | permalink | categories: bestiary, stopmo
July 20, 2009
art buddy invitational
by sven at 7:00 am
click on image to play clip (18sec - 3.5 MB) A while back, our friend Dayna Collins (Alley Art Studio) initiated an "Art Buddy Invitational." She sent out these little artist's manikins to friends, and asked that we do something creative with them.
It only seemed natural that I ought to do some animation with my Art Buddy.
My animation table's been gathering dust far too long. Scripting, machining, sculpting, doing X-sheets… It's too easy to get bogged down. So: What a treat be doing a little improv again!
Thanks for the jump start, Dayna!
posted by sven | permalink | categories: exhibits & events, stopmo
May 11, 2009
behind the scenes: Misha Klein and Stage 13
by sven at 7:00 am
Don't forget the big stopmo event this Wednesday!
An ASIFA Night of Clowns & Owls
With Misha Klein and Dan Ackerman
Wed. May 13th,
7pm-9pm @ Studio 13
13 NW 13th Ave.
Admission is FREE for card-carrying members
$3 for non-membersTo whet your appetite, here's a look behind the scenes…
Stage 13's green screen In February -- on Friday the 13th -- I had the pleasure of attending the launch party for Ackerman Films' "Stage 13" space. Wow! In addition to an editing bay, and several work areas, this magnificent 26'x22'x13' high Corner Green Screen Cyclorama is available for rental. If you're looking for a space in which to work on your film, check out the Ackerman Films website for details.
Misha's workspace Of course, for me the highlight of the party was getting to see Misha's workspace. He was very gracious answering questions for party attendees and showing clips from his film.
the set Misha's project has taken 8 years to complete, putting in about a month per year between paying gigs. Work started in L.A.; when he moved up to Portland, everything had to get packed into boxes for shipping. He says Stage 13 has been a great environment to work in.
For the set, he got friends to pitch-in building props. Music is going to be recorded by a trio in San Francisco. [Never underestimate the value of a good soundtrack!]
the set is bolted to the floor As is typical in stopmo productions, the set is built atop wooden tables that make it comfortable to animate from a standing position. For Misha's project, however, the wooden tables are also firmly attached to a tubular metal cage (which supports the lights) -- and this cage is bolted to the floor.
The camera is attached to the set itself. Consequently, even if you managed to move the cage, the stage and lights and camera are all going to move together -- the shot doesn't get ruined.
Canon EOS Rebel For his camera, Misha's using a Canon EOS Rebel. He shoots using RAW image format. For some shots (e.g. "drunk cam"), having the extra pixels means it's been possible to do virtual camera moves.
In general though, most of the camera moves are done in the real world. At the party, Misha boasted that the last shot he'd filmed used seven axes of motion. Dolly, truck, rack, rotary…
Just below the floor of the set is an XY table. There's another threaded rod to move the camera up and down… And the camera is attached to a 410 Manfrotto geared mount. [I don't understand the set-up well enough to count up all seven axes myself.]
On some shots, the Manfrotto was attached to a heavy base and moved around the set by hand -- creating a looser "hand-held" look.
In my own work, I've tended to lock down the camera. It's been a real revelation to see how much camera movement Misha goes for. In part it means you can keep a tight framing on a character while they act… But Misha also points out that when the camera's locked down, you lose a lot of the 3D nature of the world you've created. Good thought!
Mac PowerBook G4 laptop Attached to the set, there is a Mac PowerBook G4 laptop, and above it a small flat screen monitor. A little black-and-white spy cam is attached to the camera's viewfinder -- this sends a live feed to the monitor. Misha's been using FrameThief for his framegrabbing software.
custom-made control box for toggling frames Beneath the laptop computer, there's a custom-made USB control box for toggling between frames. Credit goes to Kelly Mazurowski for the invention. [Also note the dimmer for adjusting the lights each frame -- to simulate a flashing neon sign.]
Mostly the film has been shot on 1s. But, to my great surprise, Misha said that he'd been getting into shooting at 18FPS recently. Partly this was to make some progress in time for the party… But beyond that, he says it has a really nice feel. He described 12FPS as being too little -- 24FPS as being "unforgiving" of any errors in your arcs -- and 15FPS being pretty nice… 18 is forgiving and more "gestural."
My understanding is that after the footage is shot, he'll let the computer stretch 18FPS out to 24FPS for him.
Fred's head The Fred puppet was constructed using the build-up method on top of a recycled B&S armature. He's meant to look rough-hewn and handmade. The eyes are coated with enamel paint; the pupils are bits of clay attached with sticky wax.
replacement mouths Fred has replacement mouths that click into place with magnets. However, the wide mouths also have wire in them, so they are somewhat posable. Seam lines are hidden by the beard.
…This is the first time I've seen hybrid replacement mouths like this.
upper jaw's inset magnets To maintain the continuity of Fred's teeth between shots, the upper and lower jaws were made using fast-cast plastic. The top jaw has two tiny inset magnets, and a hemispherical bump to key the part into place. There's a square hole so a tongue can plug into the puppet's skull for certain shots.
Misha confirmed something I'd been wondering about… That when you use magnets for registration, it's important to get the magnets lined up so that their polarities don't compete.
Gotta say: I'm hugely impressed by this mouth system!
Misha Klein Big thanks to Misha for sharing details about this project!
The clips I've seen -- both for Misha's film and for Owl Pals -- are simply stunning… If you're anywhere near Portland, I highly recommend turning out for Wednesday's "Clowns & Owls" event!
posted by sven | permalink | categories: exhibits & events, stopmo
May 6, 2009
may 13: clowns & owls - with misha klein & dan ackerman
by sven at 7:00 am
There's going to be an exciting event next week:
An ASIFA Night of Clowns & Owls
With Misha Klein and Dan Ackerman
Wed. May 13th,
7pm-9pm @ Studio 13
13 NW 13th Ave.
Admission is FREE for card-carrying members
$3 for non-members
Owl Pals, directed by Dan Ackerman
"Our evening host, Dan Ackerman, Director of Photography, will present his latest stop-motion project, Owl Pals, a promotional trailer based on the children's book illustrations of Luba Goninda. Dan will be on hand to talk about the rewards and challenges of directing this visually rich combination of original 3D characters, flat puppets and multi-plane camerawork, as well as show off some of the actual puppets and designs.
Fred the Clown, created by Misha Klein (clip)
Coraline animator Misha Klein will also be showing a sneak preview of his brand new animated film, recently competed at Studio 13. A labor of love years in the making, this 7-minute vignette focuses on Fred the Clown's internal struggles and performance anxieties, above all with a palpable dread of his boss. Featuring spontaneous camera work, gorgeous sets and atmospheric lighting, Misha will be on hand to talk about his travels on the road to finishing this amazing film."Monday I'll further whet your appetite for this event by sharing some behind-the-scenes photos & info… Stay tuned!
posted by sven | permalink | categories: exhibits & events, stopmo
May 4, 2009
contest prize from john sumner
by sven at 6:36 pm
resin castings by John Sumner Fellow stopmoe John Sumner issued a challenge in March: identify two obscure books, win a prize. Long-post-short… I won!
Here's the original challenge:
"Cogs, this one's gonna be short and sweet. First off, Don Carlson replied to the Crazy Daisy Ed post and mentioned an older book that might have some cool stop-mo references in it. However, the title and author are unknown. So load up in the Mystery Machine and take a look at his comment on the post about clues to this "gem" of a book. Second on the Unsolved list is a fabulous xeroxed section of a book on the history of puppet animation. The title is Puppet Animation in the Cinema. Being extremely lazy or, too busy, I haven't searched out the author and actual book. That's where you come in. The first cog to correctly find both books and show proof will win a prize... to be determined at a later time. I'm thinking along the lines of an illustration with subject matter of your choosing. But then you'd have to be brave enough to give my your address so I could send it to you. The challenge has been put forth."The book for John is Puppet animation in the cinema: history and technique by L. Bruce Holman (1975). I wasn't sure about Don's book, but suggested Who's Who in Animated Cartoons by Jeff Lenburg (2006) -- which Don says is correct.
So, John emailed to ask what kind of original artwork I might like… I knew just what I wanted. Machine In Use Studios (which John founded) often uses standardized resin heads, which then get Dremeled into final shape for particular puppets. I was hoping that there might be a spare blank lying around somewhere.
Happily, John had one to share! He also sent along a half-head leftover from a previous project…
"A little backstory -- I sculpted the head using chavant sculpture clay (oil base) and then made a two part mold out of RTV silicone. There's a company down here called Silpak where I got my materials, including the 'A'+'B' parts for the eurathane that I poured into the mold. There's still 'some' imperfections, but most of the major stuff I sanded off with a dremel inside a sanding box. The sanding box was great because it contained 99% of the dust + debris. The overall concept for these heads was to be a series for an illustration show (that never happened). I was going to continue modifying each head + paint them. I got a few made, but since the show was cancelled, I lost interest. Funny enough, I found the '7' head, same as your Cog ID#. Destiny?"Needless to say, I'm thrilled. I absolutely love getting to handle another artist's work, getting a sense of the materiality and craftsmanship.
Thanks John!
posted by sven | permalink | categories: miscellany, stopmo
April 4, 2009
1440
by sven at 11:20 am
This is an essay about the poetry of numbers. I'm just playing -- don't let the math scare you.
1440
There are certain numbers that all stopmoes should know. 1440 is one of them.It's a very interesting number. Why? Because it appears in two separate contexts.
1440 is the number of minutes in a day. 60 min/hr x 24 hrs = 1440.
1440 is also the number of frames in a minute of film. 60 sec x 24 fps = 1440.
So think about this: If it took you one minute to shoot one frame of film, then for every 24 hours of work, you'd produce one minute of animation.
That's one day of your life in the real world exchanged for one minute in the dream world of stop-motion fantasy.
When I was growing up, one of my very favorite books was White Monkey King by Sally Hovey Wriggins -- a retelling of the Chinese monkey king myth. In it, when you spend a day visiting the gods in heaven, something like a hundred years passes on earth. Stop-motion's like that. For every minute you spend in Art Heaven, a day passes on Earth.
5 minutes
Of course, you could shoot at 12fps, in which case you'd be getting 2 minutes of film for every day of your life…But frankly, estimating that it only takes 1 minute to shoot 1 frame of film is probably off base.
At Aardman, the studio expects animators to shoot no less than 4 seconds of film per day.
Why 4 seconds? I got to thinking about it… The producers need some sort of benchmark for what to expect from animators. If you assume that the animators work an 8-hour day and shoot at 24fps, then 4 seconds of film is the result of spending 5 minutes on each frame. 5 min/frame is 12 frames/hr… Times 8 hrs/day… Equals 4 seconds.
Ah! There's nothing magical about 4 seconds of film per day -- it's just a benchmark based on a generous estimate for how long an animator has to create a puppet pose.
So, at Aardman then… Animators regularly trade 24 hours of their actual lives for 12 seconds in the filmic fantasy world.
The currency exchange rate is worse for professionals than for amateurs.
1:1
It frightens me to think about the rate at which my real life is escaping me as I breath life into puppets…But here's something that's unusual about time in the Puppet Universe: it repeats. When I make a one-minute long film, I can play that film as many times as I like. A one-minute film that's played ten times takes up ten minutes of real world time.
So I start to wonder… How many times do I need my film to be seen to offset the amount of time I've invested in it?
Let's say that there's a 1:1 ratio when you're having a conversation with a friend. That is, for every minute that I'm talking, my pal spends one minute listening to me. And let's say that the effort of paying attention is of perfectly equal value to the effort of communicating…
Well then, if it takes me 1440 minutes to make a 1-minute film, then I would want my friend to watch this bit of communication 1440 times. Or, more realistically, I'd want an audience of 1440 people to watch it once.
I think it's kind of interesting -- just being playful -- to think that you could calculate what size of audience is required for you to break even for the time you invest in a film… Not in terms of money, but in terms of attention paid.
Time-wise, stopmo is certainly one of the most expensive art forms around… If all you spent was 1 minute per frame, then for a 10-minute film you'd need 14,400 people watching before you made back your investment.
Contrast this with writing. When I'm writing non-fiction at a good clip, I know that I can put out 2.5 pages per hour -- that's 20 pages in an 8-hour work day. I also know that when I'm reading non-fiction by other authors, I can only get through about 20 pages per hour. Assuming other people read as fast as I do, then we've got a 1:8 ratio. That is, it only takes an audience of 8 persons to "break even" for the attention I invested in writing.
Well, of course when I do a moderate editing job, I can only put out about 10 pages per day -- so I'd need 16 readers. And when I do a really meticulous editing job, I only put out 5 pages per day -- so I'd need 32 readers…
But even so! A ratio of 1:32 is not even close to 1:1440… Which, I should point out doesn't even begin to take account of the time spent on scriptwriting, fabrication, lipsync analysis, and post-production for your animation.
Consider for a moment people who do live improv. If you can just walk onto stage and start performing, without any time spent on rehearsals…? Then you've got a winning proposition! If you have 100 persons in the audience watching you, then for every minute of time you invest, you get 100 minutes of their attention in return!
It's rather sobering… Maybe this 100:1 ratio suggests that people who perform for live audiences have a responsibility to invest rehearsal time proportionate to the time that people will spend watching. Thus, if I'm going to be acting in a one-hour-long play for 100 people, then it behooves me to invest 100 hours in preparation.
Interesting.
$12.50
Gretchin teaches a class called "Creative Business Basics." One of the most important parts of the class deals with how to price things that you're selling. The basic idea: fair price = (hours it takes to make a thing x a living wage of $12.50/hr) + (cost of materials) + (50% of all that, for profit - so your business can grow).[Quick example: If I'm selling a painting where materials cost $7.50 and I spent 1 hour working at $12.50 per hour (sub-total $20), then I would need to add $10 for profit… Winding up with a fair price of $30 for the painting.]
One of the crucial numbers in Gretchin's equation is $12.50/hr, which is what's considered a livable wage.
I started wondering… Where did that number of $12.50 come from? Well, if you work 40-hour weeks during a 4-week month, then $12.50 works out to be $2000 per month (before taxes). Ah! …And it also works out to be $100 for an 8-hour work day. I begin to see why $12.50 is such a lovely, useful, round number to keep in mind!
So, going back to my original premise about the magic number of 1440… If it takes 24 human hours to produce 1 puppet minute, then the labor for that minute should be valued at $300.
Or, given our estimate that pro animators spend 5 minutes per frame of film, 1 minute of professional-quality puppet animation would cost $1500.
I'm curious to apply this logic to other aspects of stopmo production… It can take me up to 50 hours to machine a ball&socket armature from scratch. That would be $625 labor, maybe $20 worth of materials… So with a conservative mark-up (50%) to ensure studio growth, I ought to sell the armature for $967.50.
[Actually, pro armature makers are more likely to be paid $15/hr… In which case the armature would be sold for $1155.]
I recall that my Percy 5 puppet took almost exactly 24 hours to fabricate. So, considering only the time spent on him, my simple wire and Sculpey puppet represents an investment of $300.
Now, just because your time is (hypothetically) worth $12.50/hr doesn't mean that you shouldn't work unless you can get your money back! To the contrary, there are plenty of experiences that I would happily pay my own money for… Taking classes for example.
Would I spend $300 to take a class on making Percy 5? Or a $1000 class on making armatures? Or a $1500 class on how to make a one-minute film? Hell yeah! Particularly if the teacher I was paying happened to be myself.
happiness
Happiness? Sorry, can't help you.Sure, it ought to be part of these wacky equations… But how to quantify it? I have no idea.
Being pleasurably absorbed while working with your hands… The tangible connection forged between your dreams and reality when puppets come to life… The pride in having finished a 100-mile marathon… The magic of having created a dream that other dreamers can step into…
You're on your own.
posted by sven | permalink | categories: stopmo
April 3, 2009
the myth of storyboards
by sven at 7:00 am
from the SMA splash page Speaking for myself: making animated films has been agony.
I love the end product. I love the little hit of "progress!" every time I snap another frame. And I love working with my hands to create little worlds.
But when I discover my sequence of shots doesn't work, it's misery. When I realize that good storytelling demands I excise a shot, I feel a day ripped from my life for nothing. And then of course, there's when a film turns into Viet Nam: the quagmire you're too committed to to bail out of, even though there's no end in sight.
I don't think I'm alone. I expect my filmmaker friends (stopmo and otherwise) know exactly what I'm talking about.
There's a problem here that I'm still learning how to solve… But I think I've found the principle that will ultimately save me: WORK FROM ROUGH TO POLISHED.
STOPMOES' GREAT TEMPTATION
Based on my own experience and what I've seen at SMA, I believe that almost all stopmoes are cursed with the temptation to dive into fabrication.We are utterly smitten with the physicality of puppet worlds. We're almost powerless against that lust. What is it that we do? We create actual tangible bodies and then breath our own life into them -- trading the time of our life for time spent in theirs at a frightening exchange rate. We create miniature worlds that we then get to exist in vicariously -- though for us it's far more than six days before we can rest! We can feel as if these people and places are already real -- they're just begging to be born, tugging at our minds…
But I urge myself (and my stopmo brethren) to resist this temptation to start building. We must be storytellers first… Not gods of tiny worlds.
DON'T SKIP STORYBOARDING…
I've found stopmoes surprisingly resistant to the idea of storyboarding. I think it goes back to our great temptation… We want to get straight to fabricating. But also: Storyboarding seems like additional work… And it requires drawing skills… And if you can already see the film perfectly in your head, why bother?Well, just trust me on this: the pain of storyboarding is far less than that of throwing out shots or getting stuck in a years-long quagmire. (No film is ever as as short as you think!)
I think people tend to imagine that storyboards have to be like the ones we see in "making of" featurettes: beautifully rendered, like storybook pages spread out across a wall. No! Stick figures will do… And there's a whole range of storyboard-like development tools to work with:
- thumbnail storyboards
- 3x5 card/post-it note storyboards
- polished storyboards paired with shot descriptions
- slideshow-style storyreels
- 2D animatics (some moving elements)
- 3D CG animatics
- photo storyboards
- photo-based storyreels
- pop-throughs
- live-action video reference
Always start with the fastest, roughest methods… Refine your vision through progressive iterations. Catching a problem now will save you immeasurable grief later on!
…EVEN THOUGH THE STORYBOARD IS WRONG!
So, stopmoes who go through the trouble of storyboarding their film get to feel virtuous. They fought temptation, did the right thing, and now can get on with fabricating puppets and sets. …Right?Wrong!
The great myth of storyboards is that they're the master blueprint for your film… All you have to do is shoot the shots you've drawn, and your project will rise like architecture.
But the reality is that despite all this planning, films are created in the editing room. A film is like an iceberg of deleted scenes… What you see on screen is just the tip of what got shot -- 80% of the project never gets seen.
Here are ways the storyboard is going to be just dead wrong…
(A) You fail to get shots that you need. A reaction shot. A close-up. An establishing shot. The shot sequence looked good on paper, but when it plays on screen, it becomes obvious that something is missing.
(B) You shoot unnecessary shots. You realize that pacing works better if you excise the reaction shot. Or if you cut a line of dialogue. Or if you delete the scene altogether and move on to more important stuff… Ouch.
(C) The shot flow doesn't work. Often this has to do with camera angles… The jump from a far shot to a close-up is jarring. The exciting angle from above or below doesn't mesh with the rest of the scene. Characters move in one direction in shot A, and then there needs to be a shot B that somehow continues the motion… Etc.
The more complicated the visuals you're working with, the more likely it is that a storyboard is going to be wrong. If you have any of the following situations, storyboarding alone probably won't be good enough:
- there's a voice track whose timing you need to obey
- multiple characters are moving around in a scene
- you make use of deep space, rather than having things just move in a shallow picture plane
- quick-paced action sequences
- the camera's position shifts significantly between shots in a scene
- any scenes where the camera moves during a shot
Now, in the world of stopmo, a lot of animators avoid lipsync… The acting space in our sets tends to be pretty shallow… The size of the camera relative to the set often prohibits extreme camera angles and camera movements… Even so -- beware! The storyboard helps preview your film, but still has big limitations.
3D STICKFIGURES SHOT AT 4FPS
My advice: When you get an idea for a film, DON'T start with fabricating puppets and sets! And even if you do have your puppets already made, DON'T start filming shots at 24fps! Both approaches are likely to waste days if not years of your life on dead-ends.Here is the holy grail I'm seeking: a way to preview a 10 minute film -- in motion and start-to-finish -- that can be created in 48 hours.
Part of the solution is pop-throughs. Block your characters. Select your puppets' gestures -- their animation "extremes." Then work pose-to-pose… But don't shoot more than 4fps. You might not even need that, if a character holds poses for a while. Do brainstorming for the pop-through using a hand-held digital still camera, going back and filling in the inbetweens once you've got the keys figured out.
Another part of the solution is to do rough-hewn sets stage-style: either having characters going through their motions in a black-box set, or with cardboard "flats" indicating where 3D set elements and props will go later.
The final part of the solution is to use 3D stick figures.
For a while now, I've been working on the idea of creating a Generic Puppet Actor Ensemble… Six to ten puppets of various sexes, ages, and body-builds -- wearing black rather than special costumes -- which I can draw upon whenever I want to test a scene.
Recently, however, I discovered an even quicker and dirtier approach. Occasionally master animator Anthony Scott updates the splash page of stopmotionanimation.com. This week I noticed that the new intro uses a puppet that's nothing more than a wire armature with a spherical head. Wow! It's the 3D equivalent of a stick figure!
I'm still digesting this revelation… The fabricator in me still wants my rough-hewn yet visually appealing Ensemble… Yet logically, I know the stick-figures are much, much more economical time-wise.
LOW-BUDGET VS. HIGH-BUDGET FILMMAKING
We've all seen enough Hollywood films to know that hiring the prettiest /handsomest / most expensive actor can't save a crap script.I'm desperately trying to take that lesson to heart… Just because I can make a beautiful puppet, or a phenomenal miniature set, that doesn't mean I've got a story that's going to work.
Doesn't it make sense to figure out whether or not your story / editing choices work before you put years of your life into the project? Why wait until the very end to find out if the film is going to gel?
Granted, for some the vision in mind is too powerful to deny. It must be exorcised one way or the other. But for most of us -- I'm certain that we are filled with dozens of potential stories. We needn't worry that we've only got one story to tell!
In the world of stagecraft, before a script ever goes into production, it's going to get "workshopped." You have volunteer actors read your script aloud -- with only the smallest amount of blocking -- not wearing costumes or trying to deliver a performance. One or two rehearsals at most… And then an audience (often not paying admission) gives the author feedback.
Then, when a script has been polished and is truly ready for production, paid actors are going to give it a read-through… Then later a walk-through with basic blocking… Then the acting is developed and refined through rehearsals… It's quite likely that the actors only get to work with costumes and sets in dress rehearsals during the last few nights before the show goes live.
I believe this is how stopmoes should be thinking, too. Don't create expensive costumes and sets before you've at least done a walk-through for the story…! Don't expect your puppet actor to show up on opening night without ever having had the chance to rehearse their lines and blocking…!
It could be argued that stagecraft is the wrong metaphor for stopmo -- that we should be looking to live action films for inspiration… Well, have you watched the special features on any effects films lately? Whereas only CG sequences used to be given the animatic treatment (e.g. X-Men), now it's becoming common practice to do the entire film as a CG animatic (e.g. Hancock, Jumper) -- even before the actors get hired. Previewing is economical.
Mega-budget films might still be the wrong example… Think then about low-budget filmmaking. There are examples of directors who've made a low-budget student film, and then gone back and done a big-budget remake (e.g. Sam Raimi's Evil Dead was remade as Evil Dead II)…
Even if you're making a live action film, I'd recommend getting your friends together for a 48-hour guerilla filmmaking adventure, shooting hand-held video, everything on one take. It's fast, it's cheap, it's easy -- and you get to discover what's horribly wrong with your storyboard before big money and months of work are on the line.
I'm urging my stopmo friends to try this… But more than anyone else, I'm trying to hammer it into my own head…
Make the stick-figure storyboard. Shoot it with 3D stick-figures. And only THEN think about fabricating beautiful puppets and sets.
Storyboards help -- but they're liars. Don't trust them with the next few months or years of your life.
posted by sven | permalink | categories: stopmo
March 26, 2009
writing 10-minute plays for stopmo
by sven at 11:27 am
[An essay I wrote to some friends on 3/11.]
Most people agree that the most important aspect of a film is the story. If the story doesn't work, the film doesn't work. So for the past 15 months I've been studying the construction of story.
Before I go any farther… I'd just like to emphasize that dramatic stories are not the only legitimate type of film. For example, some films provide an experience that is primarily aesthetic… If there are characters at all, they're often anonymous, enigmatic, silent; there may be no discernible conflict or climax; but at the end of the film you wind up feeling like you glimpsed something beautiful, nonetheless. Traditional stories with understandable characters, dramatic conflicts, beginnings, middles, and ends, tend to be most popular -- and not without cause… But even though I neglect to discuss other species of filmic experience here, please don't think I'm putting them down!
Back to topic… My research on story has encompassed three art forms: film, literature, and theater. Research tends to start broad; then, as you clarify exactly what it is that you want to know, your scope narrows. So it has been for me…
1. LONG-FORM VS. SHORT-FORMFilm, literature, and theater each have strong internal divisions between long-form and short-form works. In film, there are "feature length" films and "shorts." In literature there are "novels" and "short stories." In theater there are full-length "plays" and there are "one-acts."
The construction of a long-form work in any medium is significantly different from that of a short-form work. Yet, I find it very interesting that how-to books about how to write short films, short stories, and one acts are quite rare. The vast majority of how-to books deal only with long-form works. Some books -- much to my irritation -- even promise to deal with short-form, but then just rehash long-form principles. [E.g. "Writing The Short Story" by Jack M. Bickham.]
At this point in time, I've narrowed my research to focus only on short-form fiction. For literature, I'm reading the monthly magazine, "Fantasy & Science Fiction." For animation, I've been studying Mike Judge & Don Hertzfeldt's The Animation Show anthologies and Acme Filmworks' "The Animation Show of Shows" series (Animation World Network store ). For plays, I've been reading the annual The Best Ten-Minute Plays series, edited by Lawrence Harbison.
A word of caution, though. It seems that the people who care most about the underlying principles of story are those who work in long-form. My sense is that it's just a lot harder to successfully produce long-form work without a strong understanding of structure -- so long-form folks have been forced to develop better theory.
Top picks for long-form how-to books… Screenplays: Story by Robert McKee. Literature: Techniques of the Selling Writer by Dwight V. Swain -- runner up The Art of Fiction by John Gardner. Playwriting: The Playwright's Process by Buzz McLaughlin -- runner up The Dramatist's Toolkit by Jeffrey Sweet.
Note: In my experience so far, screenwriters have the weakest understanding of story. It feels to me like the field is infected with a number of gimick-based methodologies that may in fact help you to doctor an existing script -- but that are rotten foundations on which to build your basic understanding of story. Beware!
2. WHAT'S MOST USEFUL TO STOPMOES: FILM, LITERATURE, OR PLAYS?I've become convinced that the most useful medium for stopmoes to study is theater. Why?
The biggest reason: limited number of sets. With films, you can easily have the story take place in 80-150 locations. It's no big deal, because typically existing locations can be used. You don't have to build everything from scratch, as with plays and with stopmo. Plays tend to have just 1-3 major sets… Or perhaps merely imply their sets by using "black box" technique. Given the time entailed in building miniature props and sets, stopmoes have to be conservative.
Another reason: only concrete actions are allowed. With literature, you can do amazing things with adjectives and metaphors: e.g. "the wounded leaf somersaulted down to the ground like a football player who's just been shot in the ankle." There's no easy way to translate this poetry to the screen.
Similarly, you can get away with a good deal more inner monologue in literature… Granted, with film and theater you can do voice-overs or break the fourth-wall (having actors talk directly to the audience)… But generally it is ill-advised to do so, because you're violating the principle of "show, don't tell."
Now, theater is not a perfect model for stopmoes. There's a heavy emphasis on dialogue in theater… Remember that most audience members are going to be 50+ feet away from the actors and only get to see the action from one vantage point. Stopmoes would be well-advised to exploit our ability to provide cinematic close-ups and different camera angles. We should also try to convey information through purely visual means wherever possible -- both because we're working in a more visual medium, and because of how laborious it is to do lipsync.
Despite these caveats, it seems to me that the beginning assumptions of a playwright are most like those of someone writing for stopmo: don't use too many sets or characters, and tell the story purely through observable actions and dialogue.
3. 10-MINUTE PLAYS: SCALEThere is a genre in theater called the "10-minute play." It's been around since the early 70s. There are a number of national competitions, which have subsequently resulted in several book anthologies. "One acts" can easily run a half-hour long -- so 10-minute plays are generally an even shorter form. For most purposes, one page of dialogue is equated to one minute of stage time (cold reading format, not the format you see published in books). Thus, ten minutes = ten pages.
It seems to me that 10 minutes is about as much as most independent, amateur stopmo filmmakers should shoot for in their projects. Consider the following estimates…
Aardman films expects 4 seconds of finished animation per day from their animators. If you work backwards, you can see that the way they arrived at this benchmark was by allowing animators 5 minutes per shot, shooting at 24fps, over the course of an 8-hour work day. Now, if you shoot at 12fps and are maybe a little looser with your poses, you might be able to get 10 seconds per day -- presuming you can put in 8 hours. Working full-time, then you could accomplish roughly one minute of film per week. Ten minutes of film = ten weeks. Basically a quarter year (13 weeks)… Though mind you, that's not counting puppet and set fabrication, lip sync analysis, and the actual scriptwriting.
Still, a ten-minute film in a quarter year sounds excellent. Can't work full time? If you can do 10 hours each weekend, you can still get the project done by year end. Thus, 10-minute plays are a pretty good match for stopmo animators in terms of scale.
4. 10-MINUTE PLAYS: AESTHETICRemember Sturgeon's Law: "ninety percent of everything is crap." I've found this to be very much true even in the annual "The Best Ten-Minute Plays" series.
But actually, this is part of what attracted me to the series. I don't want to read an anthology of the best 10-minute plays ever, with all the crap taken out… I want a sense of who the "competition" is right now. I want to know about the overall quality of contemporary playwrights working in this form -- not be bedazzled by the best of the best, whom I have little hope of ever rivaling. I want to learn from failures and triumphs in roughly equal measure.
The "Best Ten-Minute Plays" series I've been reading is also interesting because for each year (since 2004), two books are put out: one for "2 actors," one for "3 or more actors." In my opinion, the plays with 3+ actors tend to be better. Having 3+ characters seems to set up conflict more easily, and prompts more interesting scenarios. Plays with two random strangers who start spouting observations about one another out of the blue -- well, I find them pretty intolerable.
So, suppose you were to take the best of the 10-minute plays and try to do them in stopmo… Would it work?
I've been worrying about this. Part of the unique charm of stopmo is that you can do things that are unrealistic. You can use fantasy monsters, purple characters with ridiculously proportioned anatomy, cartoony physics, etc. I don't want to completely abandon such stuff.
It's not impossible to write some of these things into stage plays, though. As for character design, think about the absurd costumes that Julie Taymor used in "Fool's Fire" -- or the giant puppets she employed in "The Lion King" or "Grendel." Most 10-minute plays are written with black box sets in mind; brevity means that you're probably not going to make a big investment in sets & props. But just because it's uncommon, doesn't mean there's any reason why the 10-minute format inherently prohibits such things.
The thought experiment that finally resolved this question for me: What if I cast one of the 10-minute plays I've written with characters from "Coraline"? I have a play I've written titled "The Buried Piano." Suppose Coraline played "Gina", Coraline's Dad played "Howard", Coraline's mother played "Ellie", and Ms. Forcible played "Ursula"…
Would it work? YES! It's a particular sort of stopmo film -- one that emphasizes character acting -- but that's an aesthetic that's already been established in the world of stop-motion films.
5. WRITING FOR 10-MINUTE PLAYSThis is a topic for a much longer essay -- but I want to at least touch on what I've been learning about playwriting through doing assignments for my "Dramatist's Toolbox" class, taught by Matt Zrebski.
Central Spectacle
Like Jose Rivera, "everything that I write comes from some kind of image." (The Art & Craft of Playwriting, by Jeffrey Hatcher, p.196) I seem to start from "spectacle" -- some image that excites my imagination. Maybe it can be shown on stage, or maybe the actors put it into my head via dialogue… The head of Orpheus kept in a box. A taxidermied whale hanging from the ceiling of a dance club. A buried piano. A nuclear bomb that's been painted with murals.Finding my central spectacle almost needs to be an illogical process. It's a matter of juxtaposing images collage-style until I find something that really leaps out at me with poetic portent. Understanding why the image "sings" comes later.
Character Generation
You need characters for the play. Generating characters has turned out to be much easier than I expected. A very useful exercise: Go to Google Images and surf around collecting head shots of people… Male, female, young, middle-aged, old, various ethnicities. Print the photos out, one per piece of 8.5x11" paper. Pick one out at random and then spend ten minutes on a free write. Focus most on what they value and what they might desire. It took me about 2 hours to gather 40 faces, and about another 2 hours to generate 10 characters.Conect-The-Dots
I'm finding that playwriting is largely a matter of "connect-the-dots." You find a central spectacle that you like… You pick a couple of characters that you're attracted to… Now you play the "what if?" game, brainstorming, trying to find scenarios that bring your elements into play with one another.For me, a really useful tool has been to look for three different interpretations of the central spectacle. For instance: maybe a buried piano is an archeological artifact to put on display; maybe it's a seed that will grow into a piano tree one day; maybe it's the manifestation of a song that's rotting in the ground.
It doesn't matter to me if the interpretations are literally impossible. I find I'm working more or less in the genre of "magic realism". What's most important to me is that my plays convey a sense of poetry and examine how to transform the ugly or banal into the transcendent. [Kinda sounds like an artist's statement, eh?]
Figure out what your climax is before you leave the pre-work phase and start writing the actual play. The climax probably has a strong relationship with your core spectacle. If you don't have a powerful moment to end on, don't even begin!
Refining Characters
Each of the characters in the play must be substantially different from the others. Each should be at least a little eccentric -- including the main character (oddly the person that writers often characterize last).Each character has to have a literal function in the story world… But, for me, the play really gels when I discover how each character maps onto a different aspect of the theme. For instance, one character sees the buried piano as something to put in the museum, another wants to play it… And so on.
You can create backstory for your characters ad nauseam. However, in practice, you draw on most of that material only infrequently. Story people tend to boil down to just a few key traits. As an exercise, pick just three adjectives that best describe each character.
Figure out who your main character is. When you're juggling 3 or 4 characters, it's easy to forget about this. You don't necessarily have to shout at the audience "this is my main character!" -- but you absolutely need to pick one person. Why? Because what their core need is will determine the "story question" -- and you're going to have to check yourself to make sure that the ending of the story actually answers the question raised at the beginning.
Discovering the Conflicts
Know what each character wants. This is how you develop conflict. Look for ways to make each character's desires incompatible. It can be useful to identify your main antagonist -- but there's no reason why they have to be a "villain," and you may well wind up having several characters who are at odds with the main character. Ex: the piano can't be played right now because there's a party going on, and the state governor's present.Conflict need not be about personality. Each of your characters can be a nice person, essentially -- it's just that they have a different vision than the protagonist. Wage conflict over possessions. Who possesses the car? Who's in charge of the party? Who has control of the romantic interest? If your main character starts the play in possession of the thing they want, you've got a problem. Either find a way to put the mcguffin in the possession of another character, or choose someone else from your cast to be the main character.
Summary
Story is really only made out of a few elements: the core poetic image/spectacle/theme, characters, conflicting desires, and a good climax. Make sure you have one main character who wants possession of an object/place/tool/person; find reasons why your other characters have a different vision for this mcguffin. Make sure the resolution of the play answers the same question posed at the beginning of the play.That's about it. Now… Go!
Give me one 10-page script each week for 8-13 weeks. And then pick one of them for your stopmo film. (See where I'm going with all this?)
posted by sven | permalink | categories: stopmo, writing
March 4, 2009
see "gerald's last day"
by sven at 11:59 pm
Gerald's Last Day Our stopmo friends Justin Rasch and Shel Wagner-Rasch have produced a wonderful film titled Gerald's Last Day.
It was a family effort -- their daughter Aedon does the voice of the little girl, Shel did puppet fab, Justin animated… The film's been winning lots of awards on the festival circuit. As they say, "it couldn't happen to nicer people."
Justin's talent really brings Gerald to life. He makes you feel the poor pup's plight…
For a limited time you can see the film online at the Delta Airlines Fly-In Movie Competition. Please go and give it a gander… And if you like it as much as I do, then give it a vote of five stars to help it win. You don't have to sign up for anything.
posted by sven | permalink | categories: exhibits & events, stopmo
February 10, 2009
coraline's technical innovations in historical context
by sven at 7:00 am
In my opinion, three major technical innovations in the art of stopmo have made Coraline possible: digital cameras/framegrabbers, CNC machining, and the 3D printer.
These relatively new tools are being used to try to solve stopmo's biggest challenge: how do we create puppets with expressive faces?
Whoever comes up with the best answer, leads the art form forward. There is no perfect solution yet -- but I think that Coraline presents the most plausible solution to date.
From King Kong to Jack SkellingtonThe influence of King Kong (1933) cannot be overestimated. The work of Willis O'Brien lead to the era of grand master Harryhausen, which led to the "hyper-Harryhausen" innovations of Phil Tippett... Three generations of "Dynamation," using stopmo to put photorealistic monsters onscreen with live action.
That lineage effectively came to an end with the release of Jurassic Park in 1993. Hollywood was overzealous in adopting CG monsters; Dynamation almost died out. Stopmo technology has now advanced to a point where a maverick director could make excellent non-ironic use of puppets in a feature monster film. Yet, there are big advantages to doing effects films in an all-digital environment, and one of stopmo's weaknesses is doing swarms of monsters... So it's implausible that the golden age of stopmo monsters (if one ever existed) will return.
However, 1993 was also the year that The Nightmare Before Christmas came out. Technically, it has roots that go back to folks like George Pal and Rankin & Bass -- yet, it was truly a seminal film. Rather than going for photorealism, TNBC embodies visually stylized storytelling. The aesthetic is one of translating 2D illustrations into 3D media.
Along with this new aesthetic has come new technical challenges to conquer. We know a lot about how greenscreen monsters into a live action context (for example) -- but do we know enough about how to make humanoid puppets that can give a full range of emotional expression?
Technical innovations in stopmo since 1993Corpse Bride and Coraline have both been attempts to build upon and best the innovations of TNBC. Technically, TNBC had puppets with astonishingly tiny joints and it made remarkable use of replacement heads. Corpse Bride was able to take the art further by making use of digital cameras, framegrabbers, and clockwork head technology. Coraline further innovates by using stereoscopic photography, faces produced on a rapid prototyping 3D printer, and armature joints smaller than anything I've ever seen.
What do these innovations mean?
Well, framegrabbers and digital cameras have revolutionized stopmo as a whole. Our ability to create subtle movements, check our work, and delete a frame if a mistake was made... Well, that's huge.
Stereoscopic photography, though? It was beautifully accomplished in Coraline, no question -- but I'm going to feel this technology is a gimmick until there's even the slightest chance that it could become the default for live action filmmakers. I just don't see that ever happening.
Tiny joints are also here to stay, I believe. I can't confirm this, but I think that CNC machining has come a long way since TNBC came out. From photos, it appears to me that armature makers then had to make the majority of their joints one at a time. Now, the standard practice is to outsource making joints to a small parts manufacturing company. Having large supplies of generic joints on hand changes the armaturist's job. It's only on a very special character -- like Oogie Boogie, for instance -- that you're going to see things like universal joints, collet joints, etc. Armaturing now is, for the most part, more about assembly than design.
The big challenge: expressive facesWhere the real "arms race" lies, I believe, is in the technology required to make expressive faces. It's very difficult to do, and I don't think the perfect solution has been found yet.
Corpse Bride's clockwork heads were astonishing... But also profoundly complicated -- far out of the reach of any indy filmmaker. (Though Ron Cole's cable puppets offer a plausible alternative.)
By contrast, creating heads like those in Coraline is not overly complex. There are two main strategies: paddles attached to tiny step-block joints inside the puppet's skull, or resin faces that snap into place with magnets.
Paddles are somewhat prohibitive due to the difficulty of making tiny joints, which are more easily accomplished on a CNC machine. Snap-on faces are most easily created using a 3D printer, but could still be done on a small scale by resculpting a set of identical clay heads and making multiple resin castings. If you had the right tools, neither strategy would be too difficult; yet even without CNC and 3D printing, you can hobble along making things by hand. The only thing that's really out of reach for the solo animator is making thousands of snap-on facial expressions -- and that's really just a function of time/money.
[In an odd way, I find this all very heartening. It was depressing that I couldn't even understand how the Corpse Bride heads worked. As an artist, I felt defeated by the "experts" in my field. With the Coraline puppets, though, I've been excited to realize that I understand what I'm looking at. And I could imagine how one might use this set of strategies to solve specific puppetmaking problems. It's encouraging to think that I could maybe hold my own alongside other puppet fabricators, were I to ever land a job at someplace like Laika.]
Which technology will win out?I think the Corpse Bride clockwork head technology will be abandoned because it's overly complex. There will only ever be a tiny number of people who understand how to make those heads. It won't be passed on to the next generation... And research and development costs at the outset of a film would always remain high.
Snap-on faces and paddles, on the other hand, are not that complicated if you have access to CNC and 3D printers. It seems likely to me that this technology will catch on and become the future of puppet faces in stopmo feature films.
Yet, snap-on faces are not a perfect solution to the problem. In contrast to paddles, you get exquisite control -- freedom to work out the faces in advance, so that "acting on the head" becomes as mechanical for the animator as following an X sheet for lipsync. But what about those seams between the forehead and the lower face? The folks working on Coraline did a great job of digitally erasing them (in 3D no less!) -- but what a hassle! In some shots you can see that they just decided to leave the seams in (notably on Bobinski).
So, there you have it... Coraline represents the state of the art -- but our art form still has a significant technical problem to resolve: how to best make expressive puppet faces?
ADDENDUM:Maybe use of 3D printers isn't beyond solo filmmakers after all! I just remembered a link that Shelley Noble sent a few months back, about an online service that does 3D printing called shapeways.com. You send them the file, they send you a 3D plastic object. Price? $2.89 per cubic centimeter of material.
shapeways.com 3D printing demo posted by sven | permalink | categories: stopmo
February 8, 2009
coraline puppet technology - with photos!
by sven at 4:43 pm
puppet heads Thursday night I went to the world premiere of Coraline. There's lots to say about the film itself... What has my mind buzzing, though, is the party at the Portland Art Museum that came afterwards.
To convey to party attendees how much effort went into fabricating Coraline's world, Laika/Focus set up stations around the room where people from different parts of the art department had their actual workbenches and stuff they'd created: hair, painting, armatures, knitting, sewing. Amazingly, we were allowed to ask whatever questions we liked and take photos. ...So you better believe I did!
As an indie stopmo filmmaker, I have a powerful interest in puppet construction. So I'm going to share what I was able to learn or deduce. Click on the photos for larger images.
cat armature I think that the world of Coraline was produced at 1:8 scale. That means a 6' tall person would be reproduced as a 9" tall puppet. I estimate that Coraline was 7" tall. Stunt puppets at different scales existed for special purposes -- such as the close-up of the sewing needle during the opening credits. I was told that the doll was scaled up more than 2000% for that shot.
other mother - armature map The armatures, were tinier than any I've ever seen. Tie-downs used 4-40 screws -- and that was the largest screw size I saw on any of the armature maps. I recall seeing frequent use of screws labeled 2-56, 1-72 (?) and 0-80. Due to a certain logic inherent in producing step-block joints, it's likely that joints using 4-40 screws also used 1/4" balls. Stainless steel balls are only sold in certain increments: 4/16", 3/16", 2/16", 1/16"... I feel fairly confident that the 0-80 screws were being used in joints that had 1/16" balls and 1/32" rods.
armature detail: hips & legs Merrick Cheney down in San Francisco made many of the lead character's armatures. However, it was not uncommon to discover when they arrived in Portland that they would require some retrofitting to fit inside the molds. Most of the armaturists' labor, it sounds like, was a matter of assembling and modifying generic joints. Joints were not being made on premises; the job was outsourced to companies that specialize in small parts manufacturing. Cheney's company produced most of the joints, but there was also another company involved ("Columbia?"). Use of rototools was specifically mentioned with regards to modifying joints for greater range of motion.
armature detail: knee Almost exclusively, the only types of joints I saw being used were step-blocks and double-ball sandwich joints. I did see hinges being used for elbows and knees on some puppets, as well as hinge and swivel assemblies for shoulders occasionally. Sometimes the toe of the foot had a hinge. I saw a surprising variety of ankle configurations, which I'd have liked to study further. I had the sense that some of the chest blocks, with built-in neck and spine balls and hinge/swivel shoulders had been created prior to work beginning on Coraline -- stuff that Cheney had on hand.
chest block For 1/16" balls, using the usual jeweler's torch would have fried them -- so a butane microtorch was used instead. A special jig was made to hold rod in place, while another tool would hold the ball on top from shooting off. If a ball popped off while brazing, you'd never find it again.
hand Safety Silv soldering wire was used (not Stay-Brite or jeweler's "hard" silver solder); the person I spoke to didn't recall which grade. For shining armatures, pickle was used. Someone from the rigging department said that after pickling he'd use a brass wire brush, which wouldn't scratch the stainless steel balls. I'm not sure if this was also common practice among the armature makers.
feet foot In general, the armature designs I was seeing didn't offer any big surprises. It appears that a standard design has evolved, which is very much like the example that Lionel Ivan Orozco shares in his Armature Anatomy 101 tutorial.
arm mold The really fascinating stuff had to do with how the heads were constructed. I saw two basic types of technology.
One strategy involved creating a hollow resin skull with areas carved away where there would be facial movement (mouth and eyebrows, generally). In these hollow areas, there were little metal paddles attached to tiny step-block joints. There might be one or two paddles for each eyebrow, and then maybe three paddles for the upper lip. The actual face was a silicone sheath that would somehow fit over this skull. The Father and Other Father puppets used this technology.
father's skull - side father's skull - back father's skull - mouth The other strategy was snap-on faces. Faces were divided into two parts: the forehead, and the rest of the face below the corners of the eyes and bridge of the nose. Seams were removed digitally in post-production using Shake (a software similar to AfterEffects). How they managed to do this and maintain the stereoscopic effect, I have no idea.
Coraline - mouth removed I was boggled at how such precision little parts might have been cast from molds... Until I realized (with some certainty) that these pieces all must have been created using rapid prototyping 3D printer technology. The face shapes, then, were surely created using CG modeling software of some sort. ...Whether or not an original physical sculpt was inputted using a 3D scanner is unknown.
Coraline - eye joints There was astonishingly widespread use of magnets for holding different parts of the puppets together. I'd say the magnets were 1/16" diameter neodynium. Each piece of the face might be attached using several magnets. I wondered if the orientation of the magnets mattered, since magnets can repel as well as attract -- but didn't think to ask. Puppets like Coraline and Wybie used the hair and chin lines to their advantage; Bobinski and the cat were different, making use of smile lines to hide seams.
Coraline - skull & wig Coraline's eyes were flattened hemispheres that were attached to the skull behind the two-part snap-on face. I was very surprised to see that they were attached using resin joints rather than metal ones. I'm still having trouble figuring out what I saw, but it seemed that the ball-capture plates were attached to the back of the eye, and a ball was attached to the skull. I think the eyes may have actually used plastic universal joints -- but as I said, I'm still confused. Eyelids could rise and lower and had their own separate joint mechanisms in the skull, squashed in with those for the eyes.
Wybie - painted skull Some characters appeared to have K&S plug-ins for eyes. I didn't see any collections of eyes with square-shaped plugs on their backs, so I'm somewhat confused by this. Eyes in general didn't have holes in the retina (as is common for puppets)... So when the animators used sharp things to move them, the eyes were frequently damaged, irritating the folks in charge of fabrication and repair.
Wybie - skull + wig The heads generally had squat cylinder-shaped cavities at the base where the neck connection could be concealed. The neck-to-skull connection generally involved square telescoping K&S... But rather than being cast or glued into the skull, I saw steel bits at the base of the skull that allowed you to capture the K&S with a screw.
Wybie - head interior 1 With the exception of the Other Mother (a special case), I didn't see any jointed hands. Hands were made from thread-wrapped floral wire. I saw one hand design that had a wrist ball attached to a flat palm, which had four screws for capturing the wire fingers, all made from one piece of wire. A threaded tie-down hole was also placed in the palm.
Wybie - head interior 2 It was impressed upon on me that rigging points in general should never be round -- they should always use telescoping square K&S to prevent the puppet from accidentally rotating around -- as might happen, were you to only use a threaded rod.
Wybie - head interior 3 Wigs were made from synthetic hair and sometimes mohair. Natural fibers were too subject to expanding and contracting with changes in temperature. All the fibers were hand-dyed. They'd be held together using massive amounts of a hair-styling fluid with the consistency of water, painted on with a brush. It sounded like the wires in the hair were usually thread-wrapped floral wire. Lay down the wire, then lay down the hair on top of it. Pony tails and other large hair sometimes had ball joints hidden inside, for the sake of being animatable. Thus, the hair department sometimes had to collaborate with the armature department.
Wybie - head interior 4 For certain puppets, aluminum wire was cast inside the silicone skin. This was the case with the scotty dogs and with the melting Other Father's mouth. With the Other Father, The wires didn't form an "O" as one might expect -- they were perpendicular to that.
Wybie - forehead interior Both silicone and foam latex were used for puppets. (A bit of a surprise: I recall reading an interview back when "Life Aquatic" came out saying that Selick was never going to use foam again.) Coraline's dad had a silicone head. Forcible and Spink had foam latex bodies... Presumably because such bulky puppets would have been too heavy otherwise.
Wybie - mouth interior The folks on this project worked 50 hour weeks during the entire course of the production. One person I spoke to said that this might not be the case if Laika does future feature films. This person thought Laika had learned its lesson: You can work at that pace for a month or two -- but after two years, people were simply too exhausted. It cut down on productivity to the point where 40-hour work weeks may have been just as effective.
Wybie - bottom of head posted by sven | permalink | categories: stopmo
January 19, 2009
a theater-based approach to stopmo
by sven at 5:42 pm
During the past year I've been studying how to write novels and plays, how to direct theatrical productions, and different schools of acting... All with the intent to apply what I learn to stopmo. Here are some guiding principles of the approach I've been working out:
A Theater-Based Approach to Stopmo
The filmmaking process is to "develop material through improvisation." This is different from "planning in advance" in that there is an emphasis on working out a final version through successive iterations -- and on finding solutions to problems through creative play.
Practice animating generic puppet "actors" in "black box theater" sets. Try viewing them as your "acting ensemble."
View specially sculpted and cast puppet heads/bodies as "masks" and "costumes."
Practice animating lipsync, blocking, and gestures by using Shakespeare and other play scripts that have entered the public domain.
With original stories, explore all aspects of the story line before drafting a script. Remember: the script frames only a small part of your story world and its timeline.
Work out the story logic in writing prior to creating visual storyboards. It's easier to discover where things don't make sense when you're forced to actually explain why your characters are doing whatever they're doing.
Work "from rough to polished" in developing your shot list. Suggested stages: (a) thumbnail storyboard, (b) post-it storyboard, (c) polished storyboard, (d) story reel [slideshow], (e) 2D animatic [moving 2D elements], (f) photo animatic, (g) pop-thru.
Proof your story via 2D animatic prior to fabricating non-generic puppets and/or sets. No matter how simple you think your film is, it will take far less time to preview what your story is going to look like by using drawings than to construct and and film it in 3D. (Compare this to how actors do a "read-through" and a "walkthrough" when producing a play.)
Voice track dictates animation; it sets the timing.
Proof your gestures & lipsyncs using pop-thrus and sequenced sets of headshots. (Compare this to doing rehearsals for a play.)
Proof lipsync separately from gestures/blocking. ...And be sure to double-check the viseme analysis when you have the final puppet "mask" with its particular set of mouth shapes.
Strive to create puppet characters that have unique personalities -- not enigmatic anonymity.
To understand a puppet character: Get their voice in your head by writing first-person narratives from their POV. Explore their posture, habitual gestures, style of walk, and way of doing simple activities by acting these things out with your own body.
Do not rely on "costume" as the primary indicator of character.
Make many quick clay "sketches" (maquettes) when developing character "costumes." Ceramic clay is the 3D equivalent of the pencil: it's the fastest and cheapest way to rough out ideas.
Do the final character sculpt prior to making the puppet's armature. Use a throw-away wire armature for building the sculpt.
When animating a performance, work pose-to-pose. Use the pop-thru "rehearsal" as reference.
posted by sven | permalink | categories: stopmo
November 2, 2008
impromptu stopmo film fest
by sven at 1:52 am
Yesterday was my birthday: number 37. Naturally, we threw a party. :)
After folks got tired of playing "Uno," I decided to curate an impromptu stopmo film fest. The intent was to present a survey of different types of puppets, stopmo methods, and aesthetic traditions. Here's what I showed:
1. The Potato Hunter
By Timothy Hittle - 1991. I started out by explaining that there are three main types of puppet construction: clay, foam build-up, and puppets cast from foam latex or silicone. Hittle's "Jay Clay" films ("The Potato Hunter" and "Canhead") nicely demonstrate a clay puppet in action. I drew everyone's attention to the poses: Hittle creates the clearest silhouettes of any stopmoe I've every seen. You can really see his 2D training showing through.2. Balance
By Christoph and Wolfgang Lauenstein - 1989 (7:40). Here's a nice example of puppets created using the foam build-up method. An Academy Award winner. "Very German," folks said. I could have shown the original King Kong as an example of build-up, but monster films have generally used cast foam latex puppets, so I didn't want to confuse matters.3. Madame Tutli-Putli
2007 (17:21). An Academy Award nominee. I think Suzie Templeton's "Peter and the Wolf" won in 2007? An example of a cast silicone puppet -- with innovative use of live-action eyes composited onto the face. Folks were a bit mystified by what the film meant. I gave my best attempt at interpretation... But I don't think I've nailed it yet.4. Creature Comforts
1989 (6 min). Three films without dialogue in a row... So I decided to throw this in next. Creature Comforts won an Oscar, and spawned several TV shows -- both in the UK and in the US (briefly). If I recall my lore correctly, Nick Park was up for an award for Wallace and Gromit the same year, which really catapulted him to the world stage. I talked about how you do lip synch with clay puppets by having an array of replacement mouths on hand. I pointed out that clay puppets are the easiest type of puppet to construct -- but the hardest to animate, because you constantly have to resculpt.5. John Henry and the Inky Poo
One of George Pal's Puppetoons. All the shorts I'd shown so far use displacement animation -- where you pose a bendable/malleable puppet. I wanted to show an example of replacement animation, where you replace the entire puppet for each shot. John Henry wasn't the short I meant to show folks to demonstrate this point -- but interestingly, it generated the most discussion.6. The Philips Broadcast of 1938
Another of George Pal's Puppetoons. This one focuses on dancing puppets, and you can see how they were constructed from wood, often using a lathe. There's a segment in this short of a black Christian revival meeting where a large group of puppets are doing the "wave" in a circle. That bit continues to blow my mind...7. The Hand
By Jiri Trnka (18 min). Riffing on Pal's use of wooden puppets, I went backwards in time to Czechoslovakia's most famous master puppet animator. I felt this was probably his best known film (in the English-speaking world), and talked a little about how Eastern European artists have sometimes slipped anti-authoritarian messages into their art... Trnka in particular payed a price for this, getting banned from the studios for several years.[BREAK]
8. Brother
By Adam Elliot (8 min). Elliot's feature film, "Harvie Krumpet," is another Acadamy Award winner. I thought after our break it would be nice to have something light and humorous to get back into the swing of things... Completely forgetting how grim this film actually is. I explained how Elliot spent a number of years airbrushing T-shirts at an Australian equivalent of Portland's Saturday Market.9. Hamilton Mattress
2001. I wanted to show a good example of high quality foam latex puppets. "Hamilton Mattress," while a bit long, is a heck of a lot of fun and beautifully produced. Barry Purves, author of "Stop Motion: Passion, Process and Performance," directed. Purves also worked on the "Wind in the Willows" TV series, which has similarly excellent puppets -- but is paced much slower.10. The Great Escape
By yours truly - 2006. Some folks had to leave... So before they did, I figured I ought to show them one of my own films. I shudder at some of the technical flaws now -- but people do laugh at it, so it's all good.[BREAK]
11. Street of Crocodiles
By the Brothers Quay - 1986 (21 min). I felt like I was going to be doing stop-motion a disservice if I didn't show at least one short either by Jan Svankmajer or the Quays. I pointed out that where the brothers were animating meat, moving something pointedly dead, they were actually reanimating objects. I also talked a bit about the Quay's philosophy of finding the non-human spirit in their assemblage creatures, rather than anthropomorphizing dolls.12. Aria
By Pjotr Sapegin. This seemed like the perfect short to end on. The music and story are beautiful and haunting... And then the last scene, where the puppet commits suicide by dissembling itself, unscrewing it's own armature... Well, the puppet that's aware of it's own puppet-ness somehow seemed just right.13. the end of the show
By Don Hertzfeldt. Not stopmo. But this little statement about the seriousness of animation as an artform -- interrupted by a ball of fluff shouting "ROBOTS!" and a battle with laser guns... Well, it's just about the best possible way to end ANY animation fest, imho.posted by sven | permalink | categories: stopmo
October 30, 2008
q&a with richard williams and some stopmo pros
by sven at 11:59 pm
Tonight Cascade ACM SIGGRAPH and ASIFA Portland hosted an evening with celebrated animator Richard Willams. Williams is most famous for his work on "Who Framed Roger Rabbit?" and is the author of the essential book, The Animator's Survival Kit.
Williams learned from the likes of Chuck Jones and several of Disney's "Nine Old Men" -- people who literally invented the principles of animation that we use today. Knowledge that would have otherwise been lost has been passed down to the current generation of animators because of his efforts.
Williams showed clips from a new set of instructional DVDs he's peddling and mostly responded to questions. He's charming to listen to -- but I didn't feel like the questions that people asked tonight really tapped into his wisdom very deeply. Still, I was glad to go.
*** For me, the real thrill came afterwards: when my stopmo friend Hazel Malone introduced me to Misha Klein. Having seen clips of Klein's excellent work-in-progress, The Hallway, and various TV shows that he's worked on (Celebrity Death Match, The PJs, Robot Chicken, Moral Orel), I was kinda starstruck.
I also got to meet Anthony Scott a second time, and several other folks from Laika who've just finished working on Coraline. Having just seen Richard Williams speak, it was the perfect moment to ask some technical questions I've been hanging onto about how stopmo professionals work.
Suzanne (who's last name I didn't get!) did most of the answering. Here's my best recollection:
Q: Do you use "breaking of joints" in stopmo?It depends on the armature mostly. But to an extent, yes, pro stopmoes are thinking in terms of breaking of joints. (Example: Bending the elbow of an arm in an unrealistic direction to increase the illusion of fluidness as the arm swings. See p.231 of Survival Kit.)
Q: Do you shoot at 24fps even when working on TV shows?Usually yes -- but it depends on the studio. Most animation studios doing TV shows will shoot 24fps, then use 2:3 pulldown to convert to video's 29.97fps format. A few do shoot at 30fps or 15fps... "But who wants to shoot those extra frames?"
As I knew before, 24fps is standard for film work. The folks I was speaking to weren't sure about what the standard would be now that we're switching to digital TV transmissions -- but I feel confident, based on my research, that we're moving to a 24fps standard for TV too.
So, it sounds like pro stopmoes can do 15fps or 30fps if forced to... But anyone who's learning the art should learn to think in 24fps.
Q: Do you shoot on a combo of 1s and 2s, or usually just on 1s (or just 2s)?In film work, you're generally shooting on 1s -- but yes, sometimes you'll mix in 2s where appropriate (e.g. really slow moves). Stopmo for TV is generally shot on 2s because the schedule and budget are tight.
(I know that stopmo luminary Nick Hilligoss is a big advocate of shooting on 1s... But I was astonished a year or two back when I realized that Justin Rasch shoots a mix of 1s and 2s depending on the action. From what I've seen, it looks like mostly 2s -- but with 1s for fast actions like runs. ...Hey Justin -- did I get that right?)
Q: I know that stopmo is inherently straight-ahead -- but do you use anything like pop-thrus to establish keyframes?Yes. Apparently the folks I spoke to would do a "mock-thru" at 1 pose per 10 frames to get the timing -- and then a "rehearsal" at 1 pose per 4 frames.
Q: Are rehearsals just for the sake of the "suits" -- or are they valuable for you, too?They're valuable for the animator, too. If you're going to spend two weeks on a shot, it's really helpful to get to go through it beforehand and find your marks.
A word about the value of good armatures.I showed off some photos of armatures I've made, and heard some feedback about ball'n'socket armatures in general... The opinion was that they're simply crucial to doing top-notch animation, and that a puppet is basically only as good as its armature.
I pointed out that with framegrabbers nowadays, you can get by with a wire armature if the film is going to be short -- say, 2 minutes or less. Yes, I heard, but if you're going to be doing repeated motions (like mock-thrus & rehearsals) then a B&S armature is really indispensable.
No one likes fighting with wire's spring back... And everyone in the business has had to finish out shots with a broken puppet.
(A few nights ago I rewatched The Sandman on YouTube and was struck by how B&S pups have their own unique quality of movement. Even when framegrabbers are used, the motion just feels different when you've got pivot joints underneath the foam.)
*** I came home totally buzzed. I got some questions answered by the pros I look up to -- and may have a chance to hang out a bit more at some future date. Man, I'd love the chance to get involved in some of these folks' personal side projects!
posted by sven | permalink | categories: stopmo
October 20, 2008
stopmo sketchbook: ball bounce
by sven at 10:39 pm
click on image to play clip (5sec - 736 KB) A little stopmo clip I made over the weekend.
I like the idea of creating clips as if they were drawings in a 4-dimensional sketchbook. This is a first step in that direction.
posted by sven | permalink | categories: stopmo
July 28, 2008
new stopmo demo clip
by sven at 7:00 am
click on image to play clip (14sec - 261 KB) There's a job opening at Laika right now for assistant animators. I'm applying.
Most of my animation so far has been character-driven... So to round things out a bit, I put together some clips of inanimate objects.
The work was done last week over the course of two days. The forest set was recycled, but everything else was made from scratch (including the flower).
I probably could have squeezed out another clip in the time I allotted myself... But at the beginning I got unnecessarily bogged down with hi-def workflow. It was taking 40 sec to capture a frame -- and then, later, 60 sec to translate RAW format to jpg. After the first project was done, I downgraded to a DV video capture workflow -- which made things go much more speedily.
I did my first significant work with rigging and rig-removal. Obviously it was necessary for the leaf. But surprisingly, the red ball needed a rig too. I couldn't find another way to keep it from rolling away from me that didn't also make the ball impossible to animate precisely. The rig wound up acting like an axle.
Lesson learned, though: A white background will show every little mismatch between your clean plate and the frame you're PhotoShopping. Not fun.
I'm excited about the leaf clip. It's the closest I think I've come to translating my 2D aesthetics to 3D. It has my brain burbling with new possibilities.
posted by sven | permalink | categories: stopmo
March 20, 2008
gnome puppet - tease
by sven at 7:00 am
Two weeks ago I was working on a puppet that you saw bits of last year. I had been hoping to hit the March 31 deadline for the StopMoShorts.com stopmo haiku challenge.
What was I thinking?! All my time needs to be going toward getting Let Sleeping Gods Lie done! So, the project's back on hold.
But I figured I give you a little tease. ;-)
The gnome's body is being sculpted in Chavant NSP. The idea is to cast it in foam latex.
The head is a resin casting. It's detachable; there's a K&S plug-in in the neck.
I shaved off the lower jaw with an X-acto blade. I created a new lower jaw using Magic Sculp epoxy clay, which attaches using two 1/8" brass pins. The idea is to sculpt several further lower jaws, so the pup can do lip-sync.
My most ambitious puppet yet. And I'm just aching with frustration, knowing that I mustn't spend time on it until... Well, the H.P. Lovecraft Filmfest submission deadline this year is August 15. Could be as long as that.
Oh -- And the tree... The tree in the background is plaster over insulation foam, with a wash of acrylic paint. Something that I made at a plaster workshop led by Stephanie Lee, which I attended in February.
posted by sven | permalink | categories: stopmo
March 19, 2008
What makes a great stopmo film?
by sven at 7:00 am
[I wrote this on 2/22 in response to this thread at SMA. Seemed worth cross-posting.]
What makes a great stopmo film?I think there are (at least) two competing meanings for the word "great" here. On the one hand, "great" might mean "excellently made" -- good puppets, smooth animation, a delicious color palette and intriguing forms... On the other hand, "great" might mean "serious art" -- the sort of stories that get published in collections of "the world's greatest animation," etc.
I want to try to say something about stopmo that aspires to being "serious art."
STOPMO STORIES' MOST COMMON ELEMENTSI did a quick survey of my stopmo DVD shelf, asking "what elements do these films have in common?" What I found was that the vast majority use stopmo to accomplish a fairly limited number of effects. These include:
- dinosaurs - Lost World; Beast from 20,000 Fathoms; Planet of the Dinosaurs
- dragons / mythological monsters - Jack the Giant Killer; Clash of the Titans; Dragonslayer
- modern horror monsters - The Thing; 7 faces of Dr. Lao; Nightmare Before Christmas (not necessarily scary monsters)
- space aliens - Star Wars holo-chess; Jason of Star Command; First Men In The Moon
- robots - Robo-Jox; RoboCop; AT-AT Walkers; Star Crash
- skeletons - Jason and the Argonauts; Corpse Bride
- insects - The Cameraman's Revenge; James and the Giant Peach; MTV's Monster Island
- talking animals - Wind in the Willows; Creature Comforts
- living toys - Starewicz's 'The Mascot'; Robot Chicken; Domokun
- inanimate objects moving - Street of Crocodiles; the works of PEZ
- morphing - The Adventures of Mark Twain
- rubbery cartoon-style people - George Pal's Puppetoons
- stringless marionettes / puppets - Trnka's 'The Hand'
When I go down this list, what I see is that most of these elements force a story into a genre: science fiction / fantasy, children's, or comedy.
What is a "genre" film? One that has certain guaranteed elements that the target market expects when they purchase your product. A western, for instance, has to have cowboys, horses, six-shooters, and hats. A murder mystery has to have a murder that gets solved. A romantic comedy winds up with the protagonists essentially getting married.
Frustratingly, genre stories are almost never considered serious art. There are a few interesting exceptions, where genre stories transcend -- but more about that later.
ELEMENTS OF THE "SERIOUS ART" GENREI recently watched the new "Animation Show of Shows" DVD sets. The DVDs have some pure comedy pieces mixed in -- but there's also a high proportion of "serious art" shorts. When I consider them as a group, what I see is that "serious art" is essentially a genre itself -- you just have to recognize what the "marketable" elements are in this case:
- the familial life cycle - children losing their parents and becoming parents themselves
- the sexual life cycle - being born, falling in love, having sex, procreating
- aging - how approaching death shifts perspective
- loss / grieving for the departed
- embracing / avoiding one's own death
- questioning the nature of death / afterlife
- creation myth re-tellings
- coming of age - taking charge of one's destiny
- being a part of war-making
- technology vs. nature
- Freudian / Jungian divisions of the psyche
If your animation project deals with one of these themes, you're pretty much automatically in the realm of "serious art." It almost seems unfair, realizing that there's a formula...
TRANSCENDING GENRESNow, returning to films that transcend genre... I think King Kong (1933), Star Wars, and Suzie Templeton's Peter & the Wolf are more than just a Giant Monster movie, a Space Opera, and a Children's Fable.
Why? Well, the original Kong is a psyche story, where Kong is the stand-in for masculine libido. (Peter Jackson, really screwed up this aspect of the story, which imho is part of why his film didn't work nearly as well as the original.) Star Wars has amazing spectacle -- but it's really the spiritual element of Zen vs. Technology that gives us a compelling world view. Suzie Templeton -- well, everything that she's done is just dripping with Freudian psychology.
...
So, what makes a great stopmo film? Here's my answer: Yes, pay attention to the technical and artistic details of good filmmaking... But if you want a shot at being considered "serious art," then take care when choosing your theme. Pick one that makes a broad statement about human nature / the human condition.That is, if the "serious art" market is who you're really moved to speak to.
posted by sven | permalink | categories: stopmo
March 18, 2008
halfway between puppetry and puppetfilms: pop-thru animation
by sven at 7:00 am
Wrote this last week Sunday (3/09) when the idea was burning a hole in my brain. Probably not as cool as I thought in the heat of the moment -- but still worth sharing. Sorry there's no accompanying video clip yet.
Mr. Grumpypants Sometimes I wish I could use stopmo as if it were a 4th-dimensional sketchbook... Quickly and loosely "sketching" sculptures into existence that could then move on their own...
I'm thinking that maybe pop-thrus could help accomplish this wish.
What if a pop-thru were then presented as if it's a complete film? Based on a few related films that I've seen, and on how people relate to live puppetry, I suspect the audience would look past the flaws and accept it.
But would other stopmoes accept rough and stuttery pop-thrus as "real" stop-motion animation? Case in point, would StopMoShorts.com accept a film that looks like this?
I think I could make a strong case that pop-thru animation should be considered a legitimate form of puppetfilm -- that it just uses a very stylized form of motion.
When I look at the broader context, it seems to me that pop-through animation could do something interesting. Puppetfilms exist on a continuum halfway between live puppetry and traditional hand-drawn animation... Exploring pop-thru animation could push stopmoes more toward thinking of themselves as puppeteers, rather than animators.
Exploring unfamiliar territory like that has just got to produce some interesting results...
1. THE PROBLEM: STOPMO TAKES A LOT OF TIMEPuppet animation takes a lot of time. Building the Professor Ichbonnsen puppet for my last film took 24 hours. When you add in building the set, recording the script, animating, and doing post-production, then I'm sure it took 3-4 times that long to produce the final 30 second clip.
I'm OK with that. I like pouring focused attention energy into art. But there are also times when I wish I could produce my visual ideas more quickly. I fantasize about stopmo being more like my sketchbooks... More like throwing ideas out fast and furious with a pencil and paper.
It's hard to take risks and grow as an artist if every experiment is so expensive.
True, I can explore ideas pretty quickly by drawing storyboards... But it's not really satisfying. It's not three-dimensional; the sense of forms, volumes, and space that I see in my head don't translate.
So I'm on a quest. I want to find ways to make stopmo feel more like sketchbooking. ...Not as the only thing I do -- but as one available option.
2. FINDING A NEW FAST AND EXPRESSIVE STYLESo, quest in mind, I set myself a goal: Find a way to build a puppet in one hour. It's OK if it's rough around the edges -- but it has to be actually functional for animation.
Mr. Grumpypants again Here's the result. It took two hours to build -- but still, that's pretty good. And what's more, I genuinely like the look. The deliberately rough-hewn edges feel like they've got life in them.
With some initial success, now I'm thinking: How can I animate my puppet in a way that's equally fast... But which still captures the essential ideas of my vision?
There's an obvious answer: Do a pop-thru.
A pop-thru is an exercise pro-animators sometimes do, where they photograph their key poses but leave out all the inbetweens. It's usually only done during feature productions, when demanded by the director -- it's not something anyone usually keeps around for it's own sake.
But what if you did? What if you treated a pop-thru as your final product? I've experimented with films told through a series of still photographs, and they seem to work OK. And I've seen a few short segments on TV that do the same thing. If there's a worthwhile story, the audience seems to be pretty darned forgiving about how it's presented.
I think to myself: YES -- this is what a "stopmo sketch" must look like. It's not just "test" -- you can do a whole story in this style. And it's not necessarily sloppy -- you can put focus into choosing strong poses. I think artistically, this could really work!
3. IS IT ANIMATION?Using pop-thru animation would make it much more feasible to get a short done in time for the March 31 StopMoShorts.com "stopmo haiku" challenge. And when I think about submitting pop-thru animation, it excites me... Because it feels like it could expand people's horizons about what can be done with stopmo. But I also anticipate a backlash: people feeling that what I've done isn't actually "real" animation.
Not real animation? When I look at the tools that I'm using, the pop-thru is almost identical to any other stopmo film. I'm using gestures, key frames, X-sheets, puppets that have no visible connection to a puppeteer... Really the only difference here is that I've eliminated the inbetweens.
Perhaps someone will suggest that it's not really animation -- it's pixilation.
I think I'd disagree with this. The quintessential pixilated film has to be Norman McLaren's classic, "Neighbors." How is pixilation used in this film? Live actors are shot in static poses which then get strung together into a film. They pop around as if being filmed by time-lapse photography -- although the critical difference there, I believe, is that the camera's shutter is not being triggered on an automatic time-schedule -- the director has as much time as they need to pose each shot.
A pop-thru isn't made using live actors who can pose themselves -- there has to be an animator involved, putting the puppets into their positions. So, I'm inclined to think that a pop-thru isn't "true" pixilation; a pop-thru is simply a pop-thru.
It is its own unique thing -- and it is animation. It requires an animator and an animator's tools. What else could it be?
4. BUT CAN WE ACCEPT IT AS LEGITIMATE STOPMO?Even if people are willing to accept that the pop-thru is really a form of animation, I expect there may still be some resistance to accepting it as legitimate stopmo.
Why? Because the inbetweens are missing? I think there are some relevant precedents worth looking at...
In the realm of traditional hand-drawn animation, there's what's called "limited animation." Hanna-Barbera is a good example of this style. Constrained by budgets, animation houses were forced to stop drawing every frame of a cartoon, and instead used a lot of "talking head" shots and recycled walk sequences.
I've noticed that animation festivals sometimes accept shorts from 2D animators where it's just their pencilling -- no inking or coloring has been done. These shorts don't look "finished" -- but they're entertaining and worth watching as-is, nonetheless.
I think about the Academy Award-winning "Harvie Krumpet" and Adam Elliot's other stopmo works -- which for the most part are shots of the main character standing still.
Limited animation, unpolished animation, and animation that has a lot of still shots -- these all, nonetheless, generally aspire toward a sense of realism. Pop-thrus break with realism more noticeably, due to their stuttery rhythm.
But there are different aesthetics for motion. Ray Harryhausen aimed at a photo-realistic smoothness... Robot Chicken aims for exaggerated "pop"... And what about the Brothers Quay? They have a uniquely non-realistic approach to motion (e.g. the blurry skeletons in "Frida") -- yet no one would suggest that what they do is not proper stopmo.
My conclusion is that though pop-thru animation may look relatively "unfinished" and stuttery, it properly belongs to the family of stop-motion puppet animation. It simply has its own unique aesthetic for motion.
5. THE AUDIENCE PARTICIPATES IN BRINGING PUPPETS TO LIFELet me take an unexpected turn now, for the sake of explaining why I think pop-thrus' motion aesthetic can work with an audience.
Puppet animation requires skills from many different art forms: sculpting, puppet-making, model-making, photography, acting, animation...
I think puppetfilms' closest relatives, though, are hand-drawn animation and puppetry. I think you could say that there's a continuum between these two extremes, and puppet animations sits right there in the middle.
I find this interesting: Stopmoes, we call ourselves "animators" -- not "puppeteers." But we could just as well call ourselves puppeteers, since our acting has to be transfered through our puppets... For that matter (to a lesser extent) puppeteers could call themselves animators -- since they invest life into inanimate puppet beings.
So, how are live puppetry and puppet animation really different?
Well, the most obvious difference is that that stopmoes manipulate their puppets during the invisible space between frames of film. From the audience's point of view, we are physically divorced from our puppets in a way that live puppeteers never can be.
But I think there's something more than this. When I think about all the different types of puppetry... Marionettes, Muppets, sock puppets, ventriloquist dummies, giant Bread and Puppets figures, Indian shadow puppets, and so on... What I notice is that the illusion of reality requires a greater suspension of disbelief.
Puppeteers may mask their presence by dressing in black, or hiding below the proscenium of the puppet stage -- but to forget that they are there, the audience must willingly play along. Skilled puppeteers can create stunning subtlety in their performances -- and yet, few puppets can actually capture a full range of human emotions on their faces. The audience participates in bringing the characters to life, using their imaginations to help isolate and animate the story.
This is what I'm asking the audience of pop-thru animation to do. Here's the deal: I'll give you the key poses -- you use your imagination to fill in the inbetweens for me.
I think this can work... Puppet shows don't seem to suffer from presenting imperfect illusions of reality -- if the story's interesting, the show's a hit. The same should be true for pop-thrus.
6. EXPLORING THE BORDERLANDS BETWEEN PUPPETRY AND PUPPETFILMSIf there is a continuum between live puppetry and hand-drawn animation, then stopmo puppetfilms sit squarely between the two. If we try to place pop-thru films on the same continuum, then I think they fall halfway between live puppetry and puppetfilms.
An illustration might help here. Imagine a continuum that runs from 1 to 9. Here's where I'm suggesting these art forms would fall on it:
- hand-drawn animation
- stopmo puppetfilms
- pop-thru animation
- live puppetry
There's plenty enough to learn if you just want to become good at stopmo. But I think it's well worthwhile for the serious stopmoe to also make forays into the the realms of hand-drawn animation and live puppetry.
Back during the 1930s, the animators at Disney discovered and articulated core principles of animation: squash and stretch, secondary motion, follow-through, etc. In the world of of animation -- hand-drawn, flash, CG, stopmo -- no one surpasses the understanding of motion mechanics that the pencil-pushers have attained. We would be wise to learn from them.
Puppetry, on the other hand, has life and vitality to it that is difficult to feel in oneself one frame at a time. Live puppeteers strive to be actors -- but unlike live action actors, the performance has to be channeled through an inert figure made of wood, foam, wire, and cloth. Because puppeteers don't have to also simultaneously struggle with animating, they've made strides in the art of expressiveness that stopmoes generally take longer to discover. Once again, we would be wise to learn from this other realm.
There are arenas where setting hard lines between art forms is necessary. For instance, the question of whether or not motion-capture constitutes animation has bearing on who's allowed to compete for a "best animation" Oscar this year...
But in the realm of creativity, exploring the borderlands between neighboring artistic nations should be encouraged. Digging around in the gray areas between black and white will surely lead to unusual discoveries -- which have the potential to re-enrich our native traditions.
On the grandest scale, this is part of what I think pop-thru animation has the potential to do.
... I want to take what has been a mere exercise, and expand it to become a full-fledged style of animation...
Pop-thru animation may look rough, it may look stuttery -- but I think it can open up a freedom for me to explore sculptural forms and story ideas that I would not otherwise risk investing in.
I'm thinking this out loud, because I want to open this exploration up as a possibility for other animators as well. What I see in pop-thrus that could benefit me -- maybe it could be useful to you too.
Let's call it legit and find out.
Huh? posted by sven | permalink | categories: stopmo
February 13, 2008
new technologies' effects on stop-motion animation
by sven at 7:00 am
(Another essay-like post that I've written for the pose-to-pose stopmo thread at StopMotionAnimation.com.)
I want to try to sum up a bunch of thinking I've been doing about how new technologies are affecting stop-motion animation.
THE TECHNOLOGY OF FILMING STOPMO ANIMATIONIt seems to me that three technologies have really revolutionized how we work:
- the framegrabber
- the ability to capture digital frames
- the personal computer
I want to emphasize that early framegrabbers, such as the Lunchbox, were built to work with analog frame capture -- film-based movie cameras and tape-based videocams. Now that we're capturing frames with Digital Still Cameras and DV cams, most folks have software-based framegrabbers operating on their computers... But framegrabber tech is not inherently dependent on personal computers.
The personal computer, I'd say, has optimized the use of framegrabbers and digital image capture. Ideally, a computer will fulfill four functions:
- previewing what a DSC/DV cam sees before you snap a frame
- triggering the DSC/DV cam, so we don't have to risk touching it
- storing the images captured
- compiling many frames into a single file that can be played as a movie
There are ways to accomplish all four of these functions without involving a computer -- but it tends to be a much more difficult route. Newer framegrabber programs, such as Dragon, are attempting to integrate the four functions in a very stream-lined way... I think there's good reason to hope that Dragon is establishing a standard that future softwares will emulate.
THE ANIMATOR'S WORK-FLOWHere are the major ways that I see new technologies affecting how animators do their work:
1. With framegrabbers, less mental focus is required.
Before framegrabbers existed, animators had to essentially become "human framegrabbers"... Going into an intense state of "animation hypnosis," where the world slows down to "puppet time," and one almost sees the arcs traced by a puppet's limbs as tracer-lines floating in mid-air. With the aide of framegrabbers, you don't necessarily have to go into such a deep state of concentration. This is both a good and a bad thing. On the one hand, it greatly relieves stress on the animator -- you're more able to take bathroom breaks and recover from lapses of attention while shooting. On the other hand, profound concentration was a crucible that forged the greatest masters of our art. Without the constraint of having to "do it all in your head," it's easier to produce lazy-but-tolerable performances.2. With digital image capture, you get unlimited takes.
Film stock and developing is expensive. Digital frames, on the other hand, cost essentially nothing. Don't feel that your last shot was up-to-snuff? No problem! Shoot again -- the only cost is time.3. We can rehearse with the puppet's body, not just our own.
When you only had one chance to shoot an animation sequence, rehearsing had to be done either by drawing thumbnail poses or by acting out the sequence with your own body. These are still extremely valuable tools. But now we have an additional tool: shooting test frames using the puppet itself -- with the very camera that we'll use for the final shoot, locked-off at the same angle. This is very handy... Often times a puppet's body has limitations that our own bodies don't. Being able to rehearse using the puppet itself gives us the most accurate information possible when we want to test our acting ideas.4. Different acting ideas can be tested quickly using pop-throughs.
Back when animation could only be accomplished using film cameras, pop-throughs were a luxury that only film studios could conceivably afford. That's changed. Now, essentially anyone who's using a digital/computer workflow can do a pop-through -- for no added financial cost, and using far less time than a full-blown take. Better yet, pop-throughs can be created non-linearly, being assembled out of photos that were taken in no particular sequence during a visual brainstorming session. Presumably, having more options to choose from will give us a better end product.
THE CULMINATIVE EFFECTWorking at home, the solo animator is always both an actor and a director.
As an actor, the animator has to try to get inside the mind of their character and deliver a performance. The puppet is just a very small costume. Like a stage actor, the animator tries to embody certain emotions and tries to hit a few planned gestures at certain points in time... And similarly, there will always be an element of improvisation in the actual moment-to-moment doing of the performance.
As a director, the animator is concerned with planning blocking, gestures, and expressions. As Marshall Mason wrote in Creating Life on Stage, "A director is a sculptor of motion..." At a certain level, improvisation never goes away -- but it can be vastly limited.
So, we are always both actor and director -- but the more exploit these new digital/computer tools, the more the balance shifts toward us being directors.
Ultimately, stopmo is always a "straight-ahead" process... But the technology now allows us to emphasize choreography more than ever before. Stop-motion can actually become quite like 2D animation: using pop-throughs as reference (possibly even rotoscoping them), we can just about establish keyframes -- and then plan our inbetweens with pre-determined spacing charts.
Think about it: Where do you fall on the continuum right now? Are you more an actor-animator -- or a director-animator?
Perhaps even more importantly: Where do you personally find fun in the animation process? Is your joy more in living inside the puppet, moment-to-moment? Or is joy for you in the development process that happens before the camera starts shooting?
posted by sven | permalink | categories: stopmo
February 12, 2008
the director-animator
by sven at 7:00 am
(A note-worthy comment that I made on this thread at StopMotionAnimation.com.)
"If for example your puppet is to laugh in reaction to something, you conjure that feeling inside yourself in order to portray it through the puppet.It's that same sort of thing in animation, only slower."Ah! This comment helped me a lot, Ron. Yes: that sense of finding a feeling in yourself and using it to express something through the puppet is a core part of the performance. No matter what else I'm doing when I'm animating, there's still always going to be some part of me that is engaged in this very intuitive, organic, improvisational approach.
BUT, let me now propose a distinction. If there can be an Animator-Actor, then there can also be an Animator-Director.
ACTORS VS. DIRECTORSThink about the division of labor between actors and directors in theater. (Acting and directing for film is pretty different in a number of ways, so set that aside for the moment.) Her are some observations in broad strokes...
An actor's concern is revealing character. A director's concern is telling story.
An actor creates their performance out of a script, blocking, gestures, and expressions. On top of these observable things, though, they also add emotion, motivation, meaning, and an energetic awareness of the other actors whom they're interacting with.
A director creates their version of a story by suggesting blocking, gestures, motivations... If the actors are good, then the director doesn't have to micromanage. On the other hand, if they're working with beginning actors, the director might have to get very specific about things such as cheating poses to the audience, explaining to actors what motivates their character to "pick up this ball, which reminds you of your childhood" -- and so on.
DIRECTOR-ANIMATOR METHODSWhen we're solo animators, not working in a studio, then we get to be both actors and directors at the same time. And yet, there is still a fundamental difference in approach. It seems to me that an actor works from the inside-out -- whereas a director works from the outside-in. (E.g. finding poses that will communicate an emotion, rather than emotions which will communicate no matter what action you do.)
I strongly suspect that I am a Director-Animator more than I'm an Actor-Animator. Sort of like how I know that I'm more of a Fabricator-Animator than a Motion-Animator. (Or a Set Builder-Animator, as castlegardener has identified himself.)
When you're directing live human beings on a stage, you can make suggestions -- but the performances are ultimately up to them. Directing puppets, I have a profound level of control... It can almost be like being a dance choreographer! You can choreograph blocking, gestures, expressions to a phenomenal extent with puppets... My sense is that you could assemble pretty great performances out of these elements, without having to experientially go very deep into the puppet's head.
DIFFERENT TYPES OF DIRECTORSI'm going to go a step farther, and suggest that there are different types of theater directors too, depending upon what kind of play is being staged. For instance, if you stage something like Oscar Wilde's "The Importance of Being Earnest," you're probably going to use a fairly melodramatic style. Something more modern, like Edward Albee's "Who's Afraid of Virginia Woolf?" is going to be more naturalistic.
Myself, well, given what I've done so far, it looks to me like my innate directing style may be musical theater. In my Professor Ichbonnsen clip, I'm pairing up gestures with words and phrases -- which is what you do when you have actors who are singing. (It's kind of like what the 2D animators call "Mickey Mousing," where you have the characters bouncing in time with the beat of the music.)
If I know that this is my directorial style, it allows me to consciously alter it for good effect. For instance, rather than hitting all my cues with full energy, I can pull the punches for a more subtle performance. Or, I can intentionally choose physical actions that contradict what the character is saying with their dialogue, to create a more sophisticated meaning.
DEVELOPING THE PERFORMANCEIt's all very nice, of course, that I'm getting a grip on what my own preferences are... Where this might be useful for other folks, though, is in looking at how we develop our performances.
What I think I'm hearing from most folk is that they imagine what they want their character to do, they act it out a few times, and then they animate.
The types of theater directors that I find exciting (from reading and hearing speakers) seem to be the ones who put their actors through exercises to discover more information that can be channeled into the actual play.
Here's an example from the book "Julie Taymor: Playing With Fire":
"She devoted the early rehearsals to finding ideographs -- essential, emblematic gestures. Her Prospero, Robert Stattel, looked for the movement that captured despair at the loss of one's library, one's source of knowledge, pleasure, and power. His ideograph -- holding his hands together like a book, which then opened like a door, leaving him outside -- used literal images to heighten the sense of his loss when those pictures dissolved. Ferdinand and Miranda searched for expressions of the discovery of physical desire. Ferdinand's gesture -- running his right hand down his left arm, finally grasping the wrist -- mixed sensuality, urgency, and awareness." (p.34)When I read this, what immediately comes to my mind is how Harryhausen characterized Mighty Joe Young. He decided that whenever Joe gets frustrated, he bangs his fist on the ground several times. It's a simple concept -- ("ideograph" is a fancy word) -- but it's a powerful one, and one that comes from the world of directing more than acting.
I find myself asking: What else is there in the world of directing, besides ideographs, which I don't know about yet? ...Which could maybe contribute to creating great performances?
I absolutely want to study books about acting (which I've heard recommended to animators several times)... But hypothetically, how far could I go towards creating great performances if I read nothing but books about directing?
(Anyone want to recommend any good books about directing?)
;-)
posted by sven | permalink | categories: stopmo
February 8, 2008
my stopmo camera set-up
by sven at 7:00 am
"A Word From Professor Ichbonnsen" was a big leap forward for me in several ways. I did lipsync for the first time... I explored a pose-to-pose approach to stopmo... And I shot using a digital still camera.
my stopmo camera set-up click on image to enlarge I recently wrote a post titled "how to connect your digital still camera to a computer - explained"... So I'm not going to go into every detail about my set-up today. However, what that post was really missing was a good diagram. ...So here ya go, I've created one.
Note: In this configuration, the DV cam is being used as an analog-to-digital converter.
Canon ZR45 and Canon PowerShot G5 On my first stopmo film, The Great Escape, I used the DV cam for image capture. The picture quality was nowhere near as good as what I can get with the still cam -- but one nice thing was that I only needed one cord (the FireWire) going between it and the computer.
Oh, and I guess another nice thing was that I only needed one piece of software running: FrameThief. Using a DSC, I need 3 softwares running simultaneously: FrameThief, RemoteCapture, and Proxi.
Proxi -- since you probably haven't heard of it -- manages applescripts, so I can trigger FrameThief and RemoteCapture with a single keystroke. I am much indebted to Evan DeRushie for sharing the relevant script with me, and pointing me in Proxi's direction.
demonstration of flicker click on image to play clip (38 KB) There is a perennial problem with using a DSC to shoot stopmo: flicker. Stopmoes complain about flicker furiously... But you don't often see an actual example. I thought it would be illustrative to show an abandoned shot here.
Watch the clip. See how some frames are randomly lighter than others? That's flicker. I made the still shot above out of a flicker frame and a non-flicker frame to highlight the contrast.
There are several possible causes of flicker:
- A camera's internal programming automatically adjusts the images it takes, before you ever see them. This can lead to inconsistencies. The way around this problem is to shoot in RAW format. When you look at a RAW file, you're seeing what the capture chip actually saw. The files are huge, but you also (I'm told) have a lot more ability to adjust the images.
- With most DSCs, the camera's aperture re-adjusts itself with each shot taken. For consumer-grade cameras, there's just nothing to do about this. For the high-end DSLR cams, though, you can get lenses that don't auto-adjust. It's a very pricey solution.
- Fluctuations in electrical current can effect both the camera and your lighting set-up. In a residential home, a refrigerator turning on or off can have a significant impact on your images. The solution: to get a voltometer which can smooth out the spikes and dips in your current.
Thanks to some early-morning advice from my photo-wiz friend Michael Hall, I was able to figure out how to use RAW files. And happily, that solved most of my flicker problems.
(By the way: most image editing software can't deal with RAW files. Luckily, by digging around in my applications folder I was was able to find a program -- which came with the camera originally -- that can translate RAW files into jpgs.)
final film click on image to play clip (2.1 MB) So, most of my flicker woes were solved... But not all of them. If you watch the final film carefully, there's a hint of flicker in that first shot of Ichbonnsen.
It's a curious flicker, though... It seems to move from the top of the screen to the bottom... It doesn't seem even. Could it be the result of a reflection, or some other practical lighting condition?
Right now, I think looking into voltometers is my next least-radical step.
posted by sven | permalink | categories: stopmo
February 5, 2008
the making of "a word from professor ichbonnsen"
by sven at 9:15 pm
behind the camera I've been flummoxed for a month about how to structure a post describing the making of "A Word From Professor Ichbonnsen." I think now what I'll do is use this post to illustrate the "pose-to-pose" (or "keyframing") method of doing stopmo, which I've been writing about...incessantly...for the past day or so.
recording the voicetrack click on image to play clip (1.9 MB) "The sound leads." Here's an amusingly embarrassing clip of me recording the voicetrack. (Thanks to Gretchin for thinking to tape this!)
I did the recording in a walk-in closet, thinking that the clothes would help prevent echoes. I used the built-in microphone in my laptop and GarageBand for capture. I did some clean-up of the sound afterwards using Sound Soap.
Papagayo interface After finishing the voicetrack, I imported the sound file into the free lipsync analysis program, Papagayo. Doing the analysis is actually very intuitive and simple to do -- but the mouth shapes that come with the program (to demo your lipsync) are pretty useless.
I decided that after doing my analysis and transferring it to X-sheets, I should proof the lipsync to make sure it looked right. A fairly easy task -- and not having to worry about whether the mouths are right during actual filming... Well, that more than makes up for the time spent on proofing.
mouth stickers The mouth shapes that I used on this project are straight out of Preston Blair's book "Cartoon Animation." I've looked through quite a few books, and so far nothing comes close to the clarity of Blair's mouth shape illustrations. Good way to learn on my first serious lipsync'd film, I figure.
The mouths are photocopied onto sticker paper, hand-colored, and cut out. I've got a reference key attached to a clipboard. I tried covering the reference sheet with acetate -- but to my surprise, the stickers adhere to it strongly. I tried using wax paper instead and found that it both easily releases the stickers, and I can see the reference chart through it with no problem.
viseme chart Phonemes are the audible sounds that make up words. Visemes are the visual mouth shapes of a language. You can figure out lipsync analysis by looking in a mirror... But I decided that while it may not be 100% accurate, I'm quite content to at least rough out an analysis by having a cheat-chart of which visemes go with which phonemes.
While Blair's book was an invaluable starting point, I did need to make judgement calls about which visemes I was going to include, and exactly how I wanted to map them to phonemes.
I found it very useful to re-name the phonemes... Linguistic marks are troublesome to create on a computer -- transliterations work better here.
mouth shapes in AfterEffects I locked down my camera and photographed the puppet's head wearing each of my 15 mouth shapes. I imported these 15 photos into AfterEffects. Reading through my X-sheet notes, I dragged instances of the photos into a new timeline, creating a lipsync proof film, one frame at a time.
lipsync proof click on image to play clip (885 KB) While still in AfterEffects, I added on a time code -- so if I found a frame that looked wrong, it would be a simple matter to locate and correct it. I was really astonished when I was doing lipsync tests a month or two back to discover just how much a single bad frame can stand out. I got lucky this time, and felt satisfied with my lipsync on the first try.
X-sheets To finish up pre-production work on the lipsync, I went through my X-sheets and made sure that every frame was marked for which mouth would be required. As an example, "Sven" might get written out as: 1-X ... 2-FV ... 3-Eh ... 4-Eh ... 5-X.
non-linear pose development With the voicetrack all pre-planned, I moved on to developing poses. To do this, I started by just brainstorming all sorts of poses that might fit with the energy of the scene. This is a short clip, and Ichbonnsen doesn't walk anywhere, so nine photographs of pose options seemed plenty.
pop-thru click on image to play clip (352 KB) Selecting five photographs from the visual brainstorm, I assembled them into an order that seemed to make sense. Using the script and the X-sheets to choose logical moments for pose changes, I created a new "pop-thru" clip in AfterEffects. This clip would be my visual reference while filming.
stopwatch & metronome I made notes on my X-sheets about how long each pose should last. One last thing to do: figure out how long each transition between poses should take.
I've tried using a stopwatch while acting out the poses to try to figure out timing. I don't like it. It's hard to stop and start the stopwatch with precision... And time is measured in 1/100th of a second -- rather than 1/24th, which is what I need for animating.
So, I switched over to using an electric metronome. Mind you, I don't care about "beat mapping" the entire film -- all I want is to figure out how long each transition should last. Setting the metronome to 60 beats per minute (bpm) gives me a "click" each second -- that is, every 24 frames. 120bpm is a click every 12 frames... 180bpm is a click every 8 frames... And so on.
Listening to an audible beat while acting out the transitions made it very easy to get a sense of how long a particular transition should last. I'm excited: it feels like if I continue using this method, I'll very quickly be able to get a sense for how to estimate how long any particular action will take on screen. (Well, so long as it's a very short action!)
tripod's kick-guard On to filming. ...D'oh! Ten frames in, I kicked the tripod and ruined my shot!
Well... I had a little insight about the tripod while working on this film. When I kick the legs of my tripod, it's usually not at the very bottom -- it's halfway up. So, this time around, I used a piece of foamcore sandwiched between bricks to create a wall -- which keeps me from coming anywhere near the damned thing.
And the wall worked like a charm!
the finished film click on image to play clip (2.1 MB) Here's your reward for wading through this long post: The finished film!
the giant lightning sloth But wait... One last extra treat: A peek at the film that didn't get made.
Everything I've described in this post happened in one long marathon, during the Saturday, Sunday, and Monday leading up to midnight of New Year's Eve. As late as Friday, I was planning on going with a different script, one which had the Professor getting swallowed by the "giant lightning sloth" pictured on Monster Month's cover.
Ultimately I could see that I just wasn't going to have time to get an adequate monster puppet built. As you can see above, though, I bought faux fur and was roughing out the thing over a cardboard frame.
Heh... And besides not having time for fabrication, I realized too late that set wasn't big enough to get something as big as the lightning sloth in frame. Y'know, I originally wanted to shoot with a 16:9 aspect ratio... If that's going to be the case, gotta have a wider set next time!
posted by sven | permalink | categories: stopmo
February 4, 2008
principles of pose-to-pose stopmo
by sven at 6:07 pm
I thought of a different way to summarize the animation approach I'm exploring. Here are six key aspects:
1) The Sound Leads
When you don't have a voice track, you have a lot more freedom. As soon as you have talking, you're committed to a more structured approach. Lipsync more or less demands using an X-sheet. Yet, there's still room for improvisation with the body.Personally, I'm finding that I prefer animating when there's a voicetrack. When I know what the character is thinking, I have more fixed points in time to which I can attach interesting gestures. I'm tempted, the next time I animate a non-speaking sequence, to record a dummy voicetrack of the character's thoughts -- just to help guide my performance.
(I know that Nick's animations more often than not don't have a voicetrack -- so this is probably one of the most fundamental points at which our methods begin to diverge.)
2) Use Your X-Sheets
Lots of animation gets done without X-sheets. For me, X-sheets are vital for lipsync... I want to have done my voicetrack analysis and checked it for accuracy before I start the real animation, so I can just focus on the rest of the performance. Further, I figure the more information I'm able to capture on the x-sheets in advance, the more additional details I'll ultimately be able to layer in.
3) Hold-Transition-Hold
The rhythm of the animation that I'm doing is "hold-transition-hold." I make sure a pose "reads" by holding it still -- until it's time to transition to the next pose. Hypothetically, a pose could be held for as little as two or three frames... It needn't necessarily feel like the motion is "stop-and-start." Hold-transition-hold doesn't preclude overlapping action, either; secondary motions can be hold-transition-hold on their own time-line.
4) Non-Linear Pose Development
By using a digital camera locked down in the same position that I'm going to use for the final shot, I can take a whole bunch of shots of different pose options, brainstorming... Instead of treating a pop-through as a sort of dress rehearsal for the final performance, I assemble a pop-through from photographs taken in no particular order. A virtue of this method is that it allows you to select your best options from a large pool. A limitation is that you can only really swap between photos taken when the puppet was standing on the same spot (i.e. walks may be more problematic).
5) Animating To A Beat
How do you decide how much time a transition should take? Rather than acting out each action and timing it with a stopwatch, I'm trying to use a metronome to learn what 4 frames, 8 frames, 12 frames (etc.) feel like in my body. Rather than assign a unique time-period to each transition, I'm trying to learn how to estimate how many frames different actions will take, based upon their musicality -- which is interpreted in terms of "beats per minute."(Note: I recognize that this is an atypical use of the phrase "animating to a beat," which usually refers to animating a character moving in time with music.)
6) Pop-Thru Rotoscoping
Stopmo animation is inherently a "straight-forward" process; you can't work non-linearly, tweaking different frames into perfection. The closest we can come to a "pose-to-pose" process, I believe, is establishing keyframes -- and then figuring out how to get from one to the next.In order to simulate keyframes, I am using photographs of the puppet that I am animating, taken from the same camera angle as the final shot. These "keys" are assembled into a pop-through film which can then either be used as a reference clip, or for actual rotoscoping.
posted by sven | permalink | categories: stopmo
pose-to-pose stopmo
by sven at 1:42 am
[Note: I've also posted this entry at StopMotionAnimation.com, where it is being discussed here: http://www.stopmotionanimation.com/dc/dcboard.php?az=showtopic&forum=9&topicid=4968&mesg_id=4968&page=]
Stopmo as we've always known it is "straight ahead." Click a frame... Move the puppet... Repeat.
Cel animation can be "straight ahead," but most of the time it's "pose-to-pose." You draw the extreme poses in a sequence, and then fill in the "inbetweens."
While working on the "A word from Professor Ichbonnsen" short, I decided that I really wanted to find a way to make stopmo as pose-to-pose as possible.
See, there's a lot that you can do to plan your stopmo... But it seems to me that there's a prevailing notion in the stopmo community that you should just start shooting and improvise your way forward.
As I'm working my way through Barry Purves' new book, I've been struck by the feeling that although he plans his animation in detail, there's still a strong physical memory of improvising your way forward...
And this makes me feel that the full extent of the framegrabber revolution has not been fully appreciated yet... That there is a technological generation gap between Barry and I -- and that because of the ways that I am learning to make stopmo now, I will never feel the animating process in my body the way that he does.
* * * Here is the process that I came up with for making stopmo essentially "pose-to-pose."
First I recorded my soundtrack, broke down all the phonemes using the freeware "Papagayo", and then transferred the timing for mouth shapes to an X-sheet (AKA "exposure sheet" or "dope sheet").
I didn't want to have to think about whether or not the lipsync was right while I was animating, so I decided to test it to make sure it was solid. I took 15 photos of stationary heads wearing my collection of mouth stickers. I brought those photos into AfterEffects, and then threw instances of them into the sequence indicated by my X-sheet. I exported the sequence as a QuickTime, and confirmed that the lipsync would be good.
Next, I needed to develop the body's poses. To do this, I locked my camera in place, and simply took a bunch of shots of different poses -- brainstorming them, in no particular order.
I took these possibilities into AfterEffects, and found an order where my favorite poses flowed together in a way that seemed to make sense with the audio track. I marked on my X-sheet how long each pose was supposed to be held.
That dealt with poses... Finally I had to figure out my transitions. Rather than use the stopwatch, as is traditional, I used a metronome. 60bpm (beats per minute) = 1 beat per 24 frames. 120bpm = 1 beat per 12 frames. 180bpm = 1 beat per 8 frames. (I got this idea from LIO's site, but also saw the idea of using musical beats per minute in the book "Timing for Animation.")
For me, it was profoundly useful to be able to act out my transition to an ongoing beat, rather than trying to start and stop a watch. I decided "OK, this transition is fast -- it gets six frames... This transition is slow -- it gets 12 frames..." And so on.
When I went to animate, I kept my QuickTime of the poses open in a side window for reference... But animating was basically just a matter of transferring my X-sheet notes into the puppet's body: Pose... Transition... Pose... Transition...
* * * I really, really liked doing almost all of the planning work before I got to the animator's table. And yet, I'm having some cognitive dissonance.
Barry talks elegantly about a puppet being like a tiny costume that the animator projects themselves into... A concept I mentioned myself, previously, in the essay on stopmo aesthetics....
But when you do the planning in advance, it doesn't quite feel like that. At least, not how I think the experience is supposed to feel.
I'm focussed, and I'm putting out animation that I like... But am I truly animating? In the sense of putting a bit of my own life into the puppet?
Granted, this was a very simple clip I did -- the Prof's feet never move... Maybe I'll discover when I have to do a shot with walks and such, that there are motions that simply cannot be planned... But honestly, I suspect that with being able to take test shots with a DSC, there are few "extremes" that you can't plan out in advance.
How big of a revolution is this? How much has the experience of stopmo animating changed -- perhaps forever?
posted by sven | permalink | categories: stopmo
February 3, 2008
how to connect your digital still camera to a computer - explained
by sven at 11:59 pm
I just wrote a long email to a friend explaining how a Digital Still Camera might be connected to a computer. It seemed to me that this information might be useful to others, so I decided to repost it here.
If you haven't visited the Scarlet Letters blog before, please note that this is specifically intended for people who do stop-motion animation.
==============================
So, let's say you have a digital still camera and a computer. How do pictures get from your camera to the computer?
PATH #1: USB CORD
I'm going to answer the question "How do pictures get from your camera to your computer?" with another question: "How do you usually download your photos?" Usually when you take photos and then download them, they go through a USB cord.But, how does the computer know to download them? Software. If you're using a Mac, you open up iPhoto and it recognizes that a camera is attached to the computer, and it downloads them for you. OR, you might have software that came with the camera that allows you to download the photos you took.
Now, certain software allows you to do something more than just download photos... It actually allows you to activate the camera's shutter by pushing a key on the computer. For Canon brand cameras (at least when I bought mine), this software is called RemoteCapture. The ability to snap off photos without touching the camera is something that we as stopmoes very much want -- because if we touch the camera to take a shot, we're going to very slightly move it -- and that messes up our shots.
A program like RemoteCapture can be used as a basic framegrabber. Whatever you can see in the LCD screen on the back of your camera, RemoteCapture can show you on your computer screen. This is a sort of "live out." You don't have niceties like onion skinning and toggling... But it can work OK.
Wouldn't it be nice if you could just use a USB cord to hook up your camera to the computer, and then turn on a framegrabber like FrameThief or Dragon? Well, too bad! It doesn't work, and here's why... Every brand of camera uses a different language to talk with the computer. Each kind of camera will only interface with the computer using a proprietary software. If you attach your camera to the computer with a USB cord, FrameThief won't know that there's a camera attached at all -- it has no way of talking to the alien device.
However, this may not be the case if you're using Dragon with a Canon or Nikon camera. Part of what's so exciting about Dragon is that the Caliris (as I understand it) have bothered to look into what language these cameras use, so Dragon can itself function as a RemoteCapture program.
PATH #2: AV OUT
(Just to remind you, the question is: "How do pictures get from your camera to the computer?")Many digital still cameras have the ability to capture short videos. If you look at the side of your camera, there's probably a 1/8" wide hole somewhere marked AV. (It may be color-coded yellow.) What comes out of this hole?
Video can come out of this hole. And that's what a framegrabber wants to see. A framegrabber to be able to show you what the camera is looking at, and change the image in real time as you move the camera around.
But here's the problem. The signal that is coming out of that hole is analog, not digital. It's intended to be connected to a VCR -- not a computer. However, fortunately, there are ways to convert that analog signal to digital.
Let's take another look at that hole. Like I said, it's 1/8" in diameter. The cord that you're supposed to attach there is called an AV cord, and the other end of it should split into 3 connectors: red, white, and yellow. The red-white-yellow end is called "RCA." If you have a stereo, the red and white connectors may look very familiar -- they're the ones that carry the right and left signals for stereo sound. The yellow one carries video -- which is why the 1/8" hole may be marked with yellow.
OK, so let's say that you have yourself an AV cord (1/8" connector on one end, RCA on the other end). What can we connect the red-white-yellow end to? Like I said, you could connect it to a VCR -- but that does us no good. You could also connect it to an analog-digital converter, and from there send a digital signal into the computer.
You could buy a stand-alone analog-digital converter. The last time I checked (which was a while ago), they cost about $250. OR, you might be able to use a digital video camera. That's what I do. I have a Canon ZR45 DV cam, which does the job. Unfortunately, a DV cam that's being used as an analog-digital converter may not work for all digital still cams -- so you have to check.
Here's how I get my DV cam to work with the digital still cam and the computer... The DV cam can't accept the RCA cable directly; but it does accept an S-video cable in. So I went to Radio Shack and bought an RCA-to-S-video adaptor for about $30. It's about the size of an A battery. So, I've got an ugly chain of cables -- but it works to get the analog signal from my DSC into my DV cam: Digtital Still Camera -> AV cord -> RCA to S-video adaptor -> S-video cord -> DV cam.
From the DV cam to the computer is much easier -- I just need a FireWire cable. Make sure the settings on the DV cam are correct, and your framegrabber can now see what whatever would normally be showing on your DSC's LCD display. (It's worth noting that if I want to capture images using my DV cam, the FireWire is all I'll ever need.)
Are we ready to shoot films with the DSC? Not quite. There's one more important thing to deal with. See, the image that is being sent from the DSC to the computer is whatever you would normally see on the camera's LCD screen. That means the resolution is probably 640x480 pixels -- which is far less than what you were probably hoping for.
Understand that what you're seeing in the framegrabber is not what you're going to use for your final film -- it's just a preview that helps you take the "beauty shots." How do you capture the beauty shots? There are two solutions.
Solution #1: You can use a remote control to trigger the DSC's shutter, and capture all the images on the camera's memory card. Later on, you download the photos and assemble them into a film. There are two problems with this solution... You can only take as many photos as your camera's memory can hold... And, more significantly, it's a pain in the ass to delete a photo if you decide you made a mistake. Part of the whole point of having a framegrabber is being able to realize when you made a mistake, and backtrack by deleting some photos.... But if the beauty shots are all on the camera's memory card, you can't delete mistakes immediately -- you need to make a note for later, to delete the problem images after they've been downloaded.
Solution #2: You can run two programs at once: The framegrabber, and your camera's proprietary Remote Capture software. The framegrabber will save its files in one folder, and the Remote Capture software will save its (considerably larger) files in another. Each time you want to take a photo, you need to hit two buttons -- one in the framegrabber, one in the Remote Capture program. There are ways to make this somewhat simpler... You can create a script that will allow you to trigger both softwares simultaneously... But, as you can see, this actually requires a third piece of software to be running at the same time.
And, yes, this is what I actually bothered with when I shot my "A Word From Professor Ichbonnsen" short.
PATH #3: SPYCAM
(Again, the question is: "How do pictures get from your camera to the computer?")There is a more low-tech strategy for getting pictures into the framegrabber, a strategy which has worked for folks like Nick Hilligoss for years. That is: Attach a tiny spycam to the optical viewfinder of the camera.
As I mentioned in the previous section, the wiring for connecting a DV cam (or a digital spycam, or a webcam) to the computer is easy: all you need is a FireWire cable.
The image that your framegrabber uses will likely be a bit dark... And due to parallax, it won't be exactly what the DSC sees when it takes a shot -- but it's pretty close, and good enough to let you know that everything is in frame.
posted by sven | permalink | categories: stopmo
January 19, 2008
fish puppet for shelley
by sven at 8:00 am
fish puppet At Thursday's "virtual open studio," I built a fish puppet for stopmo co-conspirator Shelley Noble.
At the outset, I had more "Halfland"-ish ideas: where the scales would have letters on them, or be made from materials from our collage bins... But the scale of the puppet (uh, size) -- and how lovely it was turning out -- made me ditch those concepts. No big deal. It looks like a puppet version of the fishes I've been painting for years. It's neat just getting to see a 3D version of these.
And regardless of how the project ultimately turned out, it's actually done. Can't knock that, either.
A bit about the construction. The body was made from a bit of scrap wood. I cut off the corners, filed it into shape, and sanded it down.
The side fins and tail are detachable. I drilled holes into the body and hot-glued telescoping K&S in. The larger piece is 7/32", the smaller is 3/16". The purpose of this: the plug-ins serve as rigging points if you want to have the fish suspended in mid-air.
The struts of the fins are made from 1/16" aluminum armature wire. The fin webbing is athletic underwrap -- two layers, which sandwich the wires. The wires are attached to the underwrap with Fabri-Tac glue. So... All the fins and the tail are fully posable for animation.
The whole thing is painted with acrylics. The scales were made with a hole-punch and cardstock that I painted on both sides. I wrapped a little extra underwrap around the places where the K&S plug-ins are, just to disguise them a bit better.
Incidentally, I'm really happy with how the photo turned out. The backdrop is made from two sheets of scrapbooker paper. It's sitting on top of a light table, and I'm pointing a desk lamp at it, which has been covered with a sheet of typing paper. Essentially I'm flooding the scene with diffuse light from all directions.
posted by sven | permalink | categories: stopmo
January 12, 2008
the advantages and drawbacks of cg
by sven at 12:01 am
During the past decade, we've seen an enormous amount of computer animation in feature films.
Among the stopmoes at StopMotionAnimation.com, I hear a lot of frustration about this. We've lost ground. Seeing stopmo in feature films is rare now. Many of the artisans who used to have the skills for doing feature-worthy effects haven't been able to find enough work, and have had to move on. Hard-won craft knowledge is dying off. There are regular rants about the "suits" in Hollywood not understanding what can be accomplished with stopmo, and not putting money behind it.
My strongest love and loyalty is to stopmo. Yet, part of my mind wants to get beyond the rants and understand in depth what's behind the rise of CG. Call it playing the "devil's advocate" -- or just really wanting to know "why?"
INTRO: CG HAS DISPLACED MONSTERS AND CARTOONSWhere in feature films do we see computer animation?
It seems to me that there are two areas where CG has come to dominate: monster films, and "cartoon" animation.
For three generations, if you wanted to have full-body monsters on screen, you needed to use stopmo. Willis O'Brien was the progenitor of this heritage, animating the 1933 King Kong. He was followed by his protege Ray Harryhausen, who single-handedly produced the effects for such classics as "The Beast From 20,000 Fathoms," "Jason And The Argonauts," and "Clash of the Titans." Ray's mantle as master of the art form was passed on to Phil Tippett, working within the company Industrial Light and Magic. His style came to be known as "Hyper-Harryhausen" -- more photo-realistic monsters, but with the addition of motorized "go-motion" to create blurs (e.g. for the taun-taun in "The Empire Strikes Back," and the dragon in "Dragon Slayer").
"Jurassic Park," (1993) effectively ended the tradition. A few more films used stopmo for monster effects after it came out... But Jurassic Park's success began the swift transition over to CG.
The other area where we see CG films dominating now is in what I'll call -- for lack of a better word -- "cartoon films." Films like "Ice Age," "Finding Nemo," "Over the Hedge," and "Monster House" previously would have been done using hand-drawn cel animation. The landmark film that began the shift to CG was "Toy Story"... The death-knell signaling that cel animation had seriously lost ground: when Disney dissolved its cel animation division.
I hasten to point out that "cartoon" feature films are a genre that stopmo has NEVER dominated in the USA. Stopmo feature films have always been rarities. If I'm not mistaken, the first feature-length clay-animation stopmo film was Will Vinton's "The Adventures of Mark Twain" in 1984. The first feature-length puppetfilm in the USA followed in 1993: "The Nightmare Before Christmas."
Since then, we've seen further feature-length puppetfilms and claymation -- but coming from an astonishingly limited number of artists/producers. "James and the Giant Peach" and "Coraline" come from Henry Selick, and "Corpse Bride" comes from Tim Burton -- the same two individuals who produced "The Nightmare Before Christmas." Will Vinton studios has dissolved and reemerged as Laika, which is employing Selick to produce "Coraline." Meanwhile, it seems to me that the spiritual successor to the Vinton Claymation tradition has manifested in the UK in the form of Aardman studios -- whom we have to thank for "Wallace and Gromit."
Thus, when we look at "cartoonish" CG films and wish that Hollywood producers were making them in stopmo instead, we would do well to recall that this is not a genre that we have lost ground -- rather, we are only beginning to make our first inroads.
PART I: USING CG FOR MONSTER FILMS THE MERITS OF USING CG FOR MONSTERS
What are the advantages of using computer animation to create monsters and other similar effects? Here's the list I come up with:
1) Editable.
Whereas a stopmo creature delivers a performance which you cannot go back and tweak, computer animation can be tweaked and edited endlessly. Given the financial risk associated with producing a feature film, this is a huge plus.2) Crowd shots.
Ray Harryhausen pushed the limits of what can be done with stopmo by having Jason fight seven skeletons simultaneously. Stopmo is best suited to dealing with just a few puppets at one time. With CG, on the other hand, you can produce whole armies of creatures.3) Less dependence on master animators.
When you have to get a shot right on the first try, you hire a master animator to accomplish it. When you have the freedom to edit, you have a much broader pool of talent to hire from.4) You only need to build one model of a character.
When "The Nightmare Before Christmas" was being filmed, there had to be a dozen or so copies of Jack Skellington, so different animators could be working at the same time on different sets. When your "puppet" is a data file, you can give duplicate copies to many animators, with no further expenditure of time or money.5) Simplification of materials.
When you do computer animation, everything is made out of pixels. When you're building stopmo puppets, there are many materials to procure: foam latex, silicone rubber, paints, steel and silver solder... And each of these different materials requires specialized tools: brushes, ovens, spray booths, lathes... This is not to say that CG doesn't require specialized softwares and specialized skillsets (modeling, rigging, animating) -- but things are simplified nonetheless.6) Less physical storage space needed for props.
After you've made a film, what do you do with all the puppets and sets you constructed? Some might be auctioned off -- but a lot will go into cold storage, which consumes space (which also costs money). Keeping data over the long term is highly problematic -- but in the short-term, it's a huge space-saver.7) Models don't degrade over time.
Puppets get dirty or break and need to be cleaned or replaced. After a few years, foam latex starts to rot. CG models remain immaculate during the course of filming. (In the long run, "bit rot" is a problem, though.)8) Lighting.
One of the more tricky parts of compositing a stopmo monster puppet with live action footage is getting the lighting to match -- it's a delicate art. With CG, you can use virtual lights on your subject... Another instance where being able to edit CG sequences inside the computer makes the filmmaker's life easier.9) Shadows can be accomplished without miniature sets.
In stopmo, if you want a puppet's shadow to fall on something, you can't do that with a green screen -- you have to build a miniature set. With CG, you can create transparent shadows that get composited in over live action footage. You may need to model planes that the shadows fall on, but this is usually a fairly simple matter.10) Dark shots.
When you shoot against a blue screen or green screen, you need a fairly high level of illumination in order to make sure that the backdrop is a uniform color. You probably can't shoot a monster that's supposed to be in a darkened room and just green screen it into your shot -- you'll probably have to build a miniature version of the set. With CG, shadowed creatures are easy to composit.11) Key-framing.
Both cel animation and computer animation allow you to pose key-frames and then make "inbetweens" to connect them. This isn't an option in stopmo -- which is one of its special challenges. You can plan an animated sequence in stopmo by shooting a "pop-through" -- but you don't ever get to use those actual photos in the final.12) Complicated sequences can be animated piecemeal.
In CG, you can animate in passes... First just animating the monster's spine, then going back and doing its limbs, then finessing its claws, and finally working on the facial expressions. In stopmo, you have to pay attention to all of these things all at once.13) Reusable sequences.
After you've animated a monster in CG, you can re-use that performance many times, looking at it from different camera angles. (For instance, if you have an army of monsters fighting.) With stopmo, because you only get one camera angle, you are almost never able to reuse a performance.14) Algorithm-based motion.
With CG creatures, certain motions can be accomplished through programming rather than key-framing. A millipede's legs or a robot's walk, for instance, are good candidates for this technique. Obviously, it's not an option for stopmo.15) Easily combined with other effects.
Because CG already exists in the computer environment, it's relatively easy to combine it with other special effects -- e.g. fire, smoke, water, explosions. Fire and water are notoriously difficult to accomplish with stopmo... It's often easier to use other means to create such illusions -- but then you're left with the difficulty of how to fuse them with the original stopmo performance. (Imagine getting a dragon to realistically breathe fire, for instance.)
THE DRAWBACKS OF USING CG FOR MONSTERSWhat about the inherent drawbacks of using CG? My list is much shorter:
1) Less textural.
Most of the textures we see on CG monsters are simulated. The scales on a dragon generally aren't modeled in virtual 3D space -- they're painted onto flat polygons. See, the more polygons you have, the longer it takes to render out frames. To an extent these painted-on scales can be programmed to catch light and shadow -- but this strategy produces less convincing results than when you do actual 3D modeling. Stopmo, on the other hand, uses real textures -- which have an inherently "real" look to to them.2) Unrealistic lighting.
CG lighting often has a flatness to it. In real life, shadows are often stark and whites are blown out -- but you hardly ever see this in computer animation. To an extent, it's the result of aesthetic choices. In a "good" image, you don't choose to have blown out whites -- but that's not necessarily the most realistic choice. Rendering lighting conditions such as "radiosity" (ambient, reflected light) and sub-dermal glow (flesh's subtle translucency) require a lot of computation... In terms of the time it takes to create these effects, they're very expensive. Stopmo, on the other hand, by using real light, bypasses many of these problems.3) "Floaty" animation.
From its earliest days, computer animation has fought against its tendency to look "floaty" -- as if things are moving around without being impacted by gravity or friction. Much has been done to improve this tendency -- and yet, its roots are inherent in allowing the computer to create inbetweens for you. Stopmo is often accused of being "herky-jerky"... But in reality, living animals move with some jerkiness. To an extent, what has been perceived as a flaw of stopmo adds to its feeling of "life."4) Not hands-on.
There's a computer screen between you and the thing that you're trying to animate. To me at least, it's easier to relate to how a thing is supposed to move when I can actually touch it.
WEIGHING THE ADVANTAGES VERSUS DRAWBACKSWhen I spell out all the advantages of using CG for monsters, it seems like a really staggering list to me. I don't find it surprising at all that CG would become the first tool of choice for a filmmaker when confronted with a special effects challenge... And I can understand why, over time, there would be an impulse to just do all of your effects work with CG and forget about the other options.
On the labor-supply end of things, I can also see why CG has become so successful. There's a uniformity of software -- which makes it easier to train potential employees. Learning the art of stopmo has largely remained a master-apprentice process (or perhaps even more often, a matter of being self-taught)... Learning how to use a piece of software like Maya, on the other hand, is easily accomplished in a classroom context. Hollywood needs an army of interchangeable CG modelers, riggers, and animators -- so the institutional schooling system responds by offering relevant majors to students.
PART II: USING CG FOR CARTOON FILMS Stopmoes should remember that computer animation is not just displacing our own work -- artists who make hand-drawn cel animation are also in jeopardy.
It seems that computer-created cartoons are evolving in two main directions: ones created using 3D modeling software such as Lightwave and Maya -- and ones created using 2D vector-based software, such as Flash. The 3D cartoon look is exemplified by films such as "Cars," "Ratatouille," "Happy Feet," "Veggie Tales," and "Barnyard." The Flash cartoon look is exemplified by TV shows like "Powerpuff Girls" and "Samarai Jack." For this essay, I'll limit discussion to 3D productions.
THE MERITS OF USING CG FOR CARTOONSSo: What are the advantages of making something like "Mickey Mouse" or "The Secret of NIMH" using computers rather than pencils and paint?
1) Characters are guaranteed to stay "on model."
When you're hand-drawing characters, it takes a lot of skill to keep mass and shape looking correct. With CG, this is a non-issue.2) Elimination of the inbetweener's job.
Instead of having to pay people to draw the inbetween pictures, all you need is someone who'll do the key poses (in theory).3) Ease of editing.
When you want to make a minor edit to a sequence, instead of having to re-draw it you can simply push your digital puppet a bit more this way or that -- and the computer will take care of the rest of the fixes for you.4) Easier to rotate geometrical shapes.
In hand-drawn animation, it's much easier to rotate objects that are round and squishy... Hard-edged rectangular objects are difficult to rotate accurately. Not so for a computer.5) Lighting effects are easier.
Want a shadow? Want to change the color palette of a scene from high noon to midnight? No problem.6) Savings on film stock, cels, paint.
Computers aren't cheap -- but (theoretically) they represent a one-time expense. In place of materials costs you have... Electricity bills.
THE DRAWBACKS OF USING CG FOR CARTOONSWhat about the disadvantages of using CG for cartoon films?
1) Fewer cheats.
You can't just imply a location impressionistically with a few lines and swaths of color -- everything you want on screen has to be modeled.2) Less life in the inbetweens.
A lot of the exciting character of animation happens in the inbetween poses. If you leave that work to the computer, the product is going to be more boring at a very fundamental level.3) Less squash and stretch.
Yes, to an extent you can squash and stretch computer models... But if you go too far, the rigging (digital armature) will break. You can rig special models for special effects -- but it takes a conscious effort to create the extremes that a pencil can draw with complete ease.4) Fewer lively "off model" poses.
There's a school of thought (championed most loudly by John Kricfalusi) that focuses on creating truly unique poses and expressions for animated characters. These are, almost by definition, "off model." It's an approach that is contrary to what computer animation does best: uniformity.5) Absence of line quality.
A huge amount of expressiveness is conveyed through the hand-drawn lines that an animator makes. These don't exist for CG characters.
AGAIN, WEIGHING THE ADVANTAGES VERSUS DRAWBACKSWhen the problem is how to create a monster that interacts with live-action actors, CG and stopmo offer two different solutions -- but there is a common criteria for judgement: do the results look photo-realistic? All other considerations aside, CG will usually win out because it is able to provide images that are on the whole more complicated and better integrated into live-action sequences.
When we compare CG and hand-drawn cartoons, however, the products don't look remotely the same. The shared goal? To tell a story that can't be told with live-action. [I'm tempted to say "a story with talking animals," since that is a frequent commonality -- but it wouldn't include a film like "The Incredibles."]
CG cartoons and hand-drawn cartoons ought to be able to co-exist as two separate and unique forms of animation... And yet, how can we ignore Disney dissolving its cel animation branch?
It seems to me that while CG has not delivered the deathblow to hand-drawn cartoons that it's dealt to stopmo monsters, displacement and domination are apparent. Personally, I would say it's largely due to the entertainment industry's aspirations to be... Well, industrial.
The same art school students who are being trained to do modeling, rigging, and animating using Lightwave and Maya for special effects -- they're easily repurposed for CG cartoon films. Companies like Disney were essentially factories to begin with -- but with the standardization that computers (and computer training) provides, the working parts of the entertainment machine (i.e. animators) become even more interchangable.
For an entertainment corporation, the only purpose that "artistry" has is to win Oscars, which act as a form of advertising for the product. So long as the product is "good enough," selling enough units to turn a profit, artistry is expendable...
At least so long as brand recognition doesn't suffer. If different companies' products don't look different from each other -- then there's a reason to start bringing artistry back into the mix!
OUTRO: NEW NICHES FOR STOPMO TO SCRATCHThe phenomenal success of CG as an animation technique is also its Achilles' Heel. Because all of the big entertainment companies have rushed to embrace it, the old techniques have essentially become new again.
There is room for stopmo to be revived for monster films -- and not just as retro pastiche. However, it can never again be the default. From now on, it has to be used as a conscious choice. A name-recognition director very much has it in their power to go this route.
An example: Wes Anderson. Anderson is known for his unique vision; people go to see his films in part if not largely because he's the author. In "The Life Aquatic with Steve Zissou," he bucked the trend and used stopmo instead of CG for all his underwater creatures. The most important of them all -- the Jaguar Shark -- is essentially a monster. This isn't your typical (read "cliched") monster film -- but it's an example of stopmo being used for realistic monster effects, nonetheless.
With regards to cartoon films, again, because the big studios have all rushed to embrace CG (for fear of being left behind?) there's now a void ripe for a daring entertainment company to exploit.
Enter Laika. See, Pixar's doing CG, Disney's doing CG... If Laika starts pumping out stopmo features like "Coraline," it doesn't have any competition! If it does well with this film, it has a chance to quickly establish market dominance.
So how will the other big players in the USA respond? Well, rumor has it that Disney's agreed to do a stopmo remake of Tim Burton's "Frankenweenie." [There's Tim Burton again, one of three-or-so individuals who's currently getting free reign to make stopmo films when he wants.] It seems to me that Disney has seen their blunder... And rather than letting Laika get the upper hand, it's going to counter with its own stopmo product.
Laika and Disney both putting out stopmo products? Remember, there's only been a handful of feature-length stopmo films made in the USA -- EVER. This is an unprecedented scenario... Which, optimistically, could lead to a new boom for stopmo.
A SURPRISE ENDING: "IT'S THE DIRECTORS, DUMMY"I think the year that "Wallace and Gromit" and "Corpse Bride" were both up for Oscars represents a turning point. "Coraline" will build upon that momentum... And if we're very lucky, we might be looking forward to a decade or more of a stopmo film coming out ever year or two.
This would be an excellent thing because -- (and this is a surprise ending to the essay that I didn't see coming) -- what I think we desperately need is more big name directors who have an affinity for the stopmo artform... Because right now, all we've got is Tim Burton, Henry Selick, Nick Park, and Wes Anderson.
If the big studios commit to producing stopmo product, then some new blood might have a chance to rise to the top ranks... And once the directors have had a chance to taste the process of making stopmo films, how can they not wind up pushing to do even more of them?
posted by sven | permalink | categories: stopmo, writing
January 4, 2008
A Word From Professor Ichbonnsen
by sven at 2:52 pm
click on image to play clip (2.1 MB) I just finished a short-short new film: "A Word From Professor Ichbonnsen."
This was a submission for the StopMoShorts.com quarterly Stopmo Haiku Challenge. The challenge is that SMS provides four keywords -- in this case realm, swap, alley, and rose -- and you have to make a short film that works in one or more of them. I chose to go with the word "realm."
The deadline was Dec. 31... And I managed to get my project uploaded a good 40 minutes before midnight. ;-) At SMS, "A Word From Professor Ichbonnsen" (AKA the Monster Month TV Ad) can be viewed here.
I feel I should explain that this project didn't start out as a commercial. Toward the end of December I had already fabricated the set and the puppet version of Ichbonnsen (no, that's not the man himself!)... I wanted to shoot a quick gag about the Professor encountering the creature from the book cover -- but ran out of time for constructing a decent monster puppet.
I was contemplating giving up on doing a short -- when it occurred to me that it would be funny to see Ichbonnsen holding a miniature copy of the book, waving it around. The book prop was much easier to make... So I went with it.
To me, the film stands on its own. The fact that there actually IS a Monster Month book for sale simply deepens the pleasure of the fantasy world.
posted by sven | permalink | categories: bestiary, stopmo
December 28, 2007
stopmo aesthetics
by sven at 12:35 am
On 12.22.07 Neil Gaiman released a sneak peek at the upcoming Coraline film that Henry Selick and Laika are producing. The clip is astonishing. For a particular style of stopmo, it's establishing a new standard for perfection.
[Coraline] However, the animation is so good it's rather disconcerting. At first, a lot of people aren't sure if they're looking at stopmo or CG. Both among friends and at SMA, there's a discussion going on about the "hand-made look" versus the "CG look" and which one each of us prefers.
I'm troubled, because there are tangled undertones in these conversations: Resentment that Laika is setting a standard that no hobbyist will ever be able to match. A reactionary sense of superiority, that stopmo which bears the marks of human imperfection has more soul. A sense of betrayal, because Coraline's aesthetic is reminiscent of CG... Because among stopmoes, CG is the bad guy: it literally killed the use of stopmo for photo-realistic monster effects (e.g. Jurassic Park, King Kong) -- and seems to have a strangle-hold on mainstream cinema that keeps stopmo in general marginalized.
Me, I'm very interested in the visual style that's being established for Coraline. I'm excited to discuss it with other people... But I want a more expansive conversation than "hand-made" vs. "CG." The way that I see it, the spectrum of stopmo aesthetics is much broader than that.
So this is how I'm choosing to respond to the discussion -- with an essay that considers eight or more distinct stopmo aesthetics.
I. MOTHER ART FORMSWhile there may be earlier precursors, stopmo is an art form that was essentially developed during the 20th century. It's new. So naturally, visual styles have been borrowed from other art forms. That's my thesis: stopmo has borrowed its various "looks" from other arts.
I feel this is a pretty easy idea to demonstrate... Off the top of my head I can think of quite a few films whose influences are blatant. But, of course, there are going to be plenty of films that are more difficult to categorize. Artists, being who we are, like to mix and match.
Also, besides "mix and match," I think that stopmo styles evolve through a sort of "imitative drift." Certain artists establish a style which is much imitated -- but with each iteration, the concept becomes mutated (sometimes for better, sometimes for worse). The Rankin & Bass look is a good example. It established a recognizable style... Which people are still copying today -- sometimes embellishing upon it, sometimes just making shoddy rip-offs.
OK, so let's consider the spectrum of aesthetics. Here are the the mother art forms that I've been able to identify:
- Puppetry
- Cartoons
- Miniatures / Models / Dolls
- Assemblage / Found Objects
- Photo Realism
- Living Toys
- CG / Vinyl
- 2D Illustration
1. Puppetry
Eastern Europe, particularly Czechoslovakia, has a strong tradition of puppetry. Stopmo films coming from the Czechs (particularly older films) have the flavor of marionette shows without the strings. The puppet heads are made from carved wood, the story-telling feels like it's based on the traditions of live performances of puppetry, rather than cinematic conventions...
Example: Jiri Trnka
[Trnka's "The Hand"] 2. Cartoons
Some stopmo films attempt to be a traditional cartoon film -- but in 3D. What is the "cartoon look"? Probably the most distinguishing "cartoony" quality is that the film's world seems to be made entirely out of squishy-springy rubber. This look usually has an emphasis on squash-and-stretch. Sometimes you can see puppet designs even imitating the "ball and rubber-hose" construction of early black and white cartoons (e.g. Steamboat Willie).
Example: Will Vinton's "Noid" (for Dominos Pizza)
[Will Vinton's "Noid"] 3. Miniatures / Models / Dolls
There's a tradition of trying to make exact replicas of real world objects -- only in miniature. Think of dioramas that you see in museums, model ships, and fancy doll houses. Some stopmo tries to accomplish just this. There might be slight stylizations -- but these are incidental. The artist has tried to copy the look of the real world in miniature to the best of their ability.
Example: Nick Hilligoss' "Good Riddance" series
[Nick Hilligoss' "Good Riddance"] [Nick Hilligoss' "Good Riddance"] 4. Assemblage / Found Objects
There is a sculptural tradition of making "assemblages" out of found objects. Some stopmo films derive from this aesthetic. The worlds we peek into look as if they are built of dust, old wood, broken bits of machinery... If there are "puppets" at all, they aren't intended to fool us into believing they're creatures with souls. Even when human-shaped puppets are moving, the footage looks like "object animation." The puppet animation seems to be an extension of the original impulse to make recognizably inanimate objects move, rather than an attempt to make miniature actors give a performance.
Examples: Svankmajer, The Brothers Quay
[Jan Svankmajer's "Alice"] [The Brothers Quay's "Street of Crocodiles"] 5. Photo-Realism
Photo-realistic stopmo descends from trick photography, like the old supposed photographs of fairies. The point is to make stopmo footage which will blend seamlessly with live actors. Unlike most stopmo, which gives us whole worlds, stopmo done with this aesthetic is usually interjected into live-action sequences. Its greatest success is when we can't tell where the live action ends and the stopmo begins.
Examples: Willis O'Brien, Ray Harryhausen, Phil Tippet
[Willis O'Brien's "King Kong"] [Ray Harryhausen's Talos from "Jason and the Argonauts"] [Phil Tippet's At-At Walkers from "The Empire Strikes Back"] 6. Living Toys
Who hasn't wished that their toys could come to life? Stopmo gives us the ability to make that happen. The puppets are appealing because they look like things that we own. (Which is different than film productions where toy tie-ins are made after the fact.) Maybe they're "girl toys" (stuffed animals, perhaps); maybe they're "boy toys" (e.g. collectible action figures). Both come from the same impulse.
Examples: Domokun, Robot Chicken
[Domokun] [Adult Swim's "Robot Chicken"] 7. CG / Vinyl
Computer Generated animation has a recognizable look to it, which is the result of the tools used in its creation. Both the motions of the characters and the textures of their world are noticeably smooth. The CG look has a strong relationship with the use of vector graphics in the world of design and with the urban vinyl / designer toys movement (which sometimes uses 3D printers). In all three cases, these are images and objects that have been created using mathematical forms.
It's a fairly new phenomenon, but some stopmo seems to be trying to imitate the look of CG.
Examples: The Corpse Bride, Otafuku Rex
["The Corpse Bride"] [Otafuku Rex] 8. 2D Illustration
The world of illustration has countless visual styles (or at least, more than I've been able to wrap my mind around). Illustrations for comic books, children's books, magazines... Some stopmo attempts to capture the style of a 2D illustrator and translate it into a 3D living world. Rankin & Bass' "Mad Monster Party," for example, was an attempt to translate the works of artists who produced Mad Magazine. Or, consider "The Nightmare Before Christmas": it's based on a storybook written by Tim Burton... No animator would ever have initiated a character design as problematic as Jack Skellington's!
Examples: Rankin & Bass' Mad Monster Party, The Nightmare Before Christmas
[Rankin & Bass' Mad Monster Party] [The Nightmare Before Christmas]
II. MATERIALITYIt seems to me that the various stopmo aesthetics are clearly descended from other art forms: puppetry, cartoons, model-building, assemblage, photography, children's toys, computer animation, and 2D illustration. However, I would be remiss if I didn't also discuss the ways in which the materiality of stopmo also plays into its aesthetics.
Wood
Puppets with wooden heads are generally somewhat inscrutable. If they seem to have an internal emotional life, then this has to be conveyed with pantomime. Because wood puppets make for...wooden actors...there is an inherent distance between the "actors" and the audience. Rather than focussing on the puppets' internal worlds, the artist is compelled to tell broader stories where the characters are more archetypal -- fables and myths being apt material.
Clay
Squash and stretch is difficult to do with most puppet-making materials -- but it's very well suited to clay animation. Hence, there is a natural affinity between clay and the cartoon style. Similarly, cel-animation tends to use flat colors -- which again, is easily reproduced with clay.
Foam Latex
Foam latex is based on an organic material: latex sap is harvested from trees... Both liquid latex and foam latex do a good job of simulating flesh... Hence, they're well suited for the needs of Photo-Realistic animation, where the puppets are supposed to impersonate animals.
Resin
Casting resins are, in some ways, an evolutionary leap up from using wood for puppets. By doing detailed sculpts in clay, taking molds, and then making castings, much more complex shapes can be created. This process is well-suited to the needs of an artist who is trying to translate 2D illustrations into 3D puppets.
Silicone
Silicone, vinyl, and CG lend themselves to the needs of industrial production and mass-marketing. With these materials, you can design a character using vector mathematics, which can then be reproduced with absolute accuracy for either either film media, print media, or consumer-oriented toys. When you're mass-producing dreams, uniformity is is the goal...
III. PUPPET PHILOSOPHY: FROM THE LIVING DEAD TO THE ILLUSION OF LIFEVisual aesthetics aren't merely surface styles -- they're also motivated by philosophies about what it is that we're trying to do with stopmo as an Art. (Yes, that's Art with a capital "A".)
Here are some questions to ponder: What is the purpose of the puppet? How emotionally close to or distant from the puppets should the audience feel? To what extent are animators breathing a soul into their characters -- versus eerily pushing around objects which were never alive and never will be?
It seems to me that there are a limited number of possible philosophies underlying the aesthetics of stopmo. Really I only see four.
1. Puppets Are The Living Dead
The Brothers Quay don't try to invest soul into their puppets. The dolls and assemblages of found objects which they move about in their films remain essentially inanimate. If they have a life, it is a life which we cannot understand -- if they have dreams, they are the dreams of scissors and broken dolls.
Animatronic dummies often are close to looking like humans -- and yet, narrowly fail in their impersonation in a way that creeps us out. This phenomenon is sometimes referred to as the "uncanny valley," a place which lies between laughable failure and success. At times, this is precisely where the Quays want to put the audience... The epitome of this thought is to animate meat: the object is not simply being animated -- it's being eerily reanimated.
2. Puppets Are Stand-Ins For Archetypes
With the wooden-headed czech puppets, there's no way to mistake the puppets for actual living things... And yet, we are intended to use our imaginations to project thoughts and feelings into the puppets. This is exactly the same experience that we have when watching a traditional puppet show. Having stopmo puppets move without strings merely removes some of the technicalities of puppetry (e.g. strings) which might otherwise distract us from the story's telling. Yet, even so, the burden of putting life into the puppets falls on the audience.
3. Puppets Are Trick Photography
When we watch photo-realistic foam latex monsters interacting with live action actors, the audience is meant to believe that the puppets are real living things. The audience shouldn't have to do any work investing life into the Kraken in Clash of the Titans -- Uncle Ray has managed to accomplish that illusion for us.
But what is Harryhausen's own relationship with the puppet? He's often talked about how the animator is like a magician, who shouldn't reveal how he accomplishes his tricks. The puppet is a prop, a special effect. Even when Ray makes one of his creatures give a convincing performance, at the end of the day his puppets are only meant to be a foil for the film's live-action protagonists.
4. Puppets Are Miniature Costumes
Henry Selick is known for treating his animators like actors, whose job is to deliver a performance. When you watch documentaries about the making of "Curse of the Were-Rabbit," you can see Nick Park acting out the mannerisms of different characters with his animators. The puppet is essentially a tiny costume which the animator puts on.
In this approach to stopmo, the whole point is for the artist to put themselves inside of the puppet's body. You're supposed to be able to physically feel in your own body the way that the puppet moves. It's an existentially unnerving experience: trading hours of time in your life to create seconds in the life of the puppet. You are very literally sacrificing some of your life, putting it into this inanimate object, in order to temporarily give it a soul.
IV. AN OBLIGATORY CLOSING STATEMENTAfter this encyclopedic survey, I feel obliged to confess my own preferences.
Puppetry, cartoons, miniatures, assemblage, photo-realism, living toys, CG, 2D illustration... When I consider the stopmo films derived from each of these "mother art forms," I can usually find examples that are truly great. If there is no truly great film in a category yet, then I hold onto the hope that it simply hasn't been made yet. Thus I refuse to weigh in on the polarized "hand-made" versus "CG" debate.
As a multi-media artist-animator, I think my favorite visual aesthetic is Illustration. To me, beginning with drawings, and then creating a stylized, immersive fantasy world is the ultimate in creativity. That's what I want to do.
Consequently, I'm drawn to resin and foam latex as my primary fabrication materials. I want puppets that have been cast, because it gives me excellent control of visual details. Where possible, I'll use hard parts (resin), because it maintains its carefully sculpted form even better than a soft material. I am strongly attracted to the longevity of silicone for flexible areas of the puppet -- but the difficulties of giving its surface a painterly look are a significant hurdle.
In terms of puppet philosophy, I'm most drawn to dealing with puppets as if they are costumes and I am the actor. This shouldn't be too surprising -- in general most people are attracted to narrative stories with strong protagonists and linear, comprehensible plots. I do have an irrational fondness for monsters... But for me, wanting to connect with the emotions and inner worlds of characters is even more important.
* * * In conclusion: My hope is that having read this far, fellow animators will get some sparks of inspiration that help them to better triangulate their own aspirations for art-making... And in the process also find greater tolerance/empathy for folks who are pursuing aesthetics different from their own.
posted by sven | permalink | categories: stopmo
December 23, 2007
stopmo set-building: hills
by sven at 3:30 am
small hills I've done very little set-building. So I'm trying some things out. Tonight's experiment: rather than have Ichbonnsen standing on a perfectly flat stage, I thought I'd throw in some little hills.
What kind of look am I going for? Something with clean lines and colors that you'd see on children's TV... Sorta like Domokun or Colargol (AKA Jeremy the Bear).
insulation foam - rough forms The stage is 1/4" thick MDF (Medium Density Fiberboard) from Home Depot. On top of this, I hot-glued a few pieces of insulation foam. This is a concept I picked up from a book on building terrain for miniature war games.
carved foam I carved the foam into shape using a carving knife, a craft knife, and a flexible blade that's sold for use with polymer clays.
gluing down fleece I picked up some luscious green fleece last month (?) thinking it would make awesome grass for a set at some point. I painted the foam and MDF with a layer of Elmer's glue, and then simply draped the cloth over the whole thing. I cut away the excess, leaving a little extra for safety.
Next: I'm thinking about some trees...
posted by sven | permalink | categories: stopmo
December 10, 2007
the business of stopmo: a primer and a manifesto
by sven at 11:59 pm
[Reprinted from a thread I started at StopMotionAnimation.com... This is an essay I wrote in response to the "How about it - can we make a little scratch in today's digital media environment?" thread, here.]
PART I - Making Something to Sell OK, let's get down to basics... Givens: (1) You're a person who loves filmmaking. (2) You want to make money while doing it. ...What we're talking about here is running a business.
1. PRODUCT & INVENTORYSo, let's think like we're running a business. First off, you need a product to sell. Your product is your film. But filmmaking isn't like painting, where you would ever sell the original... We're in the business of selling copies. I'm going to assume that means making DVDs.
If you were a world-renowned painter who could sell a single painting for $20,000, maybe you could earn a year's worth of living expenses with one sale. No one's going to buy a DVD for $20,000 though...
So, it looks like you're going to need to sell many DVDs in order to make this endeavor profitable. That means keeping inventory on hand. Suppose for the moment that you want a hundred copies available for sale. Right now I can see three options:
(1) buy a stack of blank DVDs, cases, and labels for about $100 total and deal with production and order-fulfillment yourself;
(2) have a professional service burn the discs and print the labels for you, at a cost of ~$7.50 each, therefore $750 total (different deals will vary);
(3) use a print-on-demand service like lulu.com, which allows you to produce each DVD when it is ordered -- and which will take care of fulfilling orders for you, too -- thus, an out-of-pocket cost of $0.
[Personally, I know which means of production I want to pursue. ;-) ]
Let me point out that most of the folks on SMA don't even get this far in terms of creating their stopmo business model... Which drives me nuts! Here we have a message board full of stopmo enthusiasts -- the people most likely in all the world to buy a stopmo film -- and we don't even make it possible to buy films from each other! I'd love to buy DVDs from Nick, Lio, Strider, Paul, Mysterious Ron, Jriggity, Toggo... I'll stop there -- but you get my drift.
Folks, I WANT to buy your films -- but I can't, because there's no physical product there to buy! PLEASE, pick a means for producing some inventory, even if it's just home-burned DVDs, and make them available to me!
2. BUDGET & INITIAL INVESTMENTOK, so let's assume that you want to be in the business of creating DVDs to sell. You first got into this art because you love it, not in order to make money -- so to make the transition, you're going to have to change your perspective and start thinking about the budget.
Here's the challenge that every maker of art must face: in order to make a profit, you have to bring in more money than you spent on creating your product. Easy enough -- except for one horrifying glitch: stopmo is astronomically expensive to produce!
How expensive? Let's look at a hypothetical 5-minute film and talk about what your initial investment is.
Tools of the trade, a computer and camera, you probably owned anyway -- so I'm willing to ignore those. Sculpey, aluminum armature wire, plaster, wood... I'll bet you could make a fine looking 5-minute film for under $100 in material costs. Even if you move up to foam latex and silicone, the material costs probably won't kill you...
It's TIME that's the killer. How many hours does it take to make a stopmo film, when you consider both fabrication and animating? Let's say you work at 12fps, and can pose a frame every 2.5 minutes. That's 2 seconds of film produced per hour. A five minute film, then, takes 150 hours to shoot. Fabrication usually takes longer than shooting the film itself -- I usually estimate 3 times as long -- so, we'll say that this 5 minute film takes 600 hours total to make.
If you were paying yourself a bit better than minimum wage, say $10 per hour, that means this hypothetical 5 minute film is going to cost you $6100 to create. That's how much money you're going to have to make back, just to break even!
Oh, I could talk about cutting corners at this point -- using cheaper materials, stories with fewer characters, filming at a lower fps... But who am I kidding? If you don't love the film, you're not going to go through the hell of creating it. Just accept that, yes, stopmo is painfully expensive to create.
3. PRICING, PRICE POINT, & VOLUMEPricing is not guess work. It's math. Deal with it. Embrace it. It's not that damned hard.
If you were making one-of-a-kind paintings, this is the formula you would use to price your products: cost of materials + cost of labor + mark-up to whatever the market is willing to pay.
The accepted price point (what people are willing to pay) for feature-length DVDs is $10-$25. People might be willing to pay less than that, but they're not going to pay more. Your film is only 5 minutes long, so you're going to be doing pretty well if you can get people to spend $10...
But, if you sell just one copy of your film for $10, you've just made negative $6090. ...Which is why you're in the business of selling DVD copies, not the original. (Duh.)
OK, let's set our sights on just breaking even. Let's say that you use an online print-on-demand service, where it costs $7.50 to produce a DVD -- but whatever you charge on top of that is money that goes to you. If you can sell your DVDs for $10 each, that means you're raking in $2.50 each...
Which means it's an easy calculation to figure out how much volume we need to move. To make back your initial investment of $6100, you're going to have to sell 2440 copies.
Ouch.
And to make a modest living of $20,000 per year? That's another 8000 copies that you're going to want to move.
Double-ouch.
4. SELLING OUTI assume that the people I'm writing this for are artists. We have visions that we want to share on film. However, we also have craft skills that we can sell... Which, sadly, is a much more profitable route to go.
As far as I can see, there are four ways to try to make money while doing stopmo:
(1) make your own film and sell DVD copies;
(2) work as an animator/fabricator at a studio that does stopmo;
(3) start your own stopmo studio, which produces and sells TV commercials and music videos to companies with deep pockets (deep because they're moving huge volumes of their own products);
(4) create a film and sell it to a media company that makes its profits either by distributing a catalog of films, or which broadcasts content and makes its real money off ad revenue.
I've done a little bit of freelance work for a local stopmo studio... If I recall, I was making $15/hour before taxes. Freelance work, kinda by definition, isn't steady... But suppose I wanted to make $20,000 a year doing that. If we assume that taxes are going to take about a third of my pay before it even reaches me, then it's easy to figure out that I'm going to need to work for 2000 hours each year. ...Which translates into fifty weeks of 40 hours each.
Nice work if you can get it... But of course, that's not going to leave a lot of time in your life to make that hypothetical 5-minute film I mentioned earlier, which would take 600 hours to produce (fifteen 40-hour weeks).
Running your own stopmo studio, you can get big money coming in, which hypothetically you can channel into a side project -- possibly making a film even with the help of other animators... But the level of complexity grows too, in terms of getting people their paychecks, dealing with insurance, etc... Well, I don't know enough to go that route.
Plus, if your own studio could make a film, you'd still have to find a media company that will buy it for distribution. At that level, you're not going to risk making a film before finding a buyer -- you're going to court potential buyers with a pitch, and try to sell them on investing in you up front.
Are there media companies interested in buying short films from people who've already created a product? Probably. But I don't personally know anything about them. All I can do is ask: How much is any particular company -- who is primarily interested in their own profit -- likely to pay for 5 minutes worth of content? ...$50? $500? $2000?
Maybe broadcast media are different -- but if the company in question sells DVDs, then they'd be subject to the same math that we talked about earlier: To earn $20,000, they'd have to move 10,440 copies.
Granted, they can probably get volume discounts during production -- but that's still a truly phenomenal number of units to sell when your product only lasts 5 minutes. ...And did I mention that your royalties are going to be skimmed off the top? Probably something like 25 or 50 cents per unit?
PART II - Who's going to buy what you make? OK, now that we've taken a fairly in-depth look at the options for making things to sell, I want to turn attention to consumers -- the people you're going to try to sell your products to.
5. MARKETS ARE EITHER GROWING OR SHRINKINGLet's start with the big picture.
Markets don't simply exist -- they grow or they shrink. ...And, in my opinion, we have it in our power to help make the size of the stopmo audience go in either direction.
I believe that at the heart of every consumer movement there is a core of die-hard enthusiasts. Be their passion for stamp-collecting or for Harley-Davidson motorcycles, wherever there's a shared passion, you've got the seed for a money tree. For stopmo, that essential core of enthusiasts is us -- the 6000-odd lurkers and contributors at SMA.
Look at science fiction. Back in the 30s it was viewed as badly-written kid stuff, not to be taken seriously. It was printed on pulp paper, the cheapest material available, because both the paper and the content was so disposable. Sci fi films have followed a similar path -- look back at attitudes in the 60s -- before 2001 and Star Wars -- when it was all B-movie stuff, not taken seriously by the general public. Where is sci fi now? It's a huge force in the book publishing industry, and it's raking in billions of dollars world-wide in the sale of films. Why? The enthusiasts were determined and won out.
More recently, look at how anime has taken root in the US. It wasn't very long ago that it was just a handful of enthusiasts who even knew what anime is... Now, go into Best Buy, and there are shelves of the stuff for sale.
Why can't the same thing happen with stopmo? In Eastern Europe, the puppet film tradition (I'm told) has a long heritage and continues to thrive. It's a different culture, with stronger ties to traditional puppetry... But even so, why couldn't it happen here too?
6. HOW TO SELL SHORT FILMSStopmo certainly can sell. Wallace and Gromit, the Nightmare Before Christmas, Robot Chicken... People are hungry for this stuff.
It seems to me that the real problem that we have in terms of marketing our own home-brewed stopmo films is length. In my opinion, a DVD is generally supposed to provide between 45-minutes and 2-hours worth of entertainment. If I buy a 5-minute stopmo film on DVD for $10, I definitely feel like I'm doing the author a bit of a favor. Mind you, it's a favor that I'm eager to do, because I love the art form.
I want to point out that stopmo is not the only art form that suffers from issues of scale. How about short stories? You can sell a short story in the form of a chapbook -- but generally you're going to have a challenging time selling to anyone besides other short-story enthusiasts.
Even more generally, I'd like to point out that MOST artists are starving artists. Poets, novelists, painters, sculptors, makers of short live-action films... We all have to struggle with the time-invested vs. income-generated equation.
Short stories, though, I think are a particularly good analogy for stopmoes to look at. How do you sell a short story? Put it in an anthology.
A DVD anthology of good looking films, in attractive packaging? That could sell.
Enough units to make back what you spent on making your film? Um, honestly probably not. But I'm willing to bet that a 30 minute DVD that contains six five-minute shorts can at least sell more volume than those six films could if they were packaged independently.
7. THE MARKET BEGINS WITH MEStopmoes... We love this art form with a crazy intensity. We'll eat up whatever gets produced. And yet we aren't even making our films into physical products and selling them to each other!
The way I see it, we need to stop imagining cinderella stories: starving artist gets swept away by producer prince and lives happily ever after in the castle of film distribution. Instead, we need to take power into our own hands. With home DVD-burners and online print-on-demand services, we now have the means of inexpensively producing the very products that we ourselves want to buy.
Imagine if you will a DVD compilation title "the best of StopMotionAnimation.com"... Pretty sweet, huh?
Then, if we as a community were to continue developing in this direction -- insisting that our projects become actual products, and pressing to make the best single-short DVDs and anthology DVDs we can -- well, then how can we fail to begin attracting a broader audience?
8. A MANIFESTO FOR STOPMO FILMMAKERSTime to wrap this up. And here's where I step up onto my wooden crate marked "manifesto-brand soaps"...
We who love stop-motion animation and who want to see its influence in the world grow, we must:
(1) Take responsibility for turning our filmmaking projects into more than a just hobby, but rather a business. (Even if it loses money.)
(2) Produce DVD versions of our films, and at the very least make them available for sale to other stopmo enthusiasts.
(3) Gather our short films together into anthologies, which make film-viewers feel like they are getting full-value for their entertainment dollar.
(4) Begin expanding the market for stop-motion animation, first by making our products available to other stopmo enthusiasts, and then by drawing others into the passion.
(5) Keep making films. Because if we don't give the audience products to buy frequently enough, their shopping attention won't stay engaged, and they'll just wander away.
And in my best inspirational seminar voice:
We're all in this together folks, so let's "get down to business" -- and really get to work.
[End of speech. You'll find copies of my book in the lobby. I'll be available for signing after a brief intermission... :-P ]posted by sven | permalink | categories: stopmo, writing
November 16, 2007
lip-sync test 2
by sven at 1:30 am
I went back and edited my first lip-sync to create a new version. I wound up changing 4 frames (out of 41) for this new clip... "Professor Ichbonnsen lives!"
click on image to play new clip (77 KB) Justin's comment about doubling Fs, Ms, & Bs rang a bell... He was repeating something I'd read in The Animator's Survival Kit:
"The important consonants are the closed ones -- B, M, P, F, T, V. In order to read these positions we need at least two frames. One isn't enough. (If we don't make these positions the vowel that follows will be vitiated.)" (p.306)So, I elongated the "b" in "Ichbonnsen" to two frames, and it helped a lot.
The vowels still looked a bit long -- so I also shortened the "o" in "Ichbonnsen" by having "nn" hit sooner, and the "i" in "lives" by having the "v" hit sooner.
I know that the "b" in "Ichbonnsen" is a small explosion of air, and that I'm supposed to pop from a closed mouth to a wide open mouth... But it the leap felt too big. Perhaps because the Prof is talking fast, and shouldn't be articulating his speech too much? So I opted to change one of my "b" frames into an inbetween (the mouth shape for "r" seemed to fit).
I'm still a bit fuzzy about phrasing. I know that a lot of speech gets slurred together -- but how to intelligently condense the mouth forms?
posted by sven | permalink | categories: stopmo
November 15, 2007
first lip-sync test
by sven at 2:28 pm
click on image to play clip (75 KB) Here's my first true lip-sync test. Notes:
- I shot 15fps. The "o" in "Ichbonnsen" is jarring to my eye... Does it come in too soon? Did I need another inbetween in order to get to that shape? Is it just holding still for too long? (The "i" in "lives" is also a bit off -- but not as badly.)
- The stickers' corners want to pop up, and they cast shadows. Grrrr.
- It's hard to keep the head perfectly in place when you're trying to press stickers onto it.
- I thought I'd be clever and put the stickers on a piece of clear acetate, sitting on top of a photocopy of the mouth forms -- making it easy to select what I want to use. It turns out, though, that the stickers adhere rather well to acetate. I'll have to try semi-translucent wax paper next.
- I bumped one of the clip lamps. The placement of the one on the right, at least, is going to have to be re-thunk.
- the camera was very slowly leaning forward during the shoot. I must not have locked off the head tightly enough.
posted by sven | permalink | categories: stopmo
November 14, 2007
new puppet: professor ichbonnsen
by sven at 11:00 pm
Professor Ichbonnsen I've just finished up a new puppet: Professor Ichbonnsen!
I wanted to try some new puppet-making techniques, baby-step improvements on the basic Dad and Jimmy designs... A new puppet to play with on my new stage.
This pup didn't start off as Professor Ichbonnsen... But I think it's probably close enough. (Looks a bit more like Johnny Depp than I'd like... But oh well.) I have some ideas for the December SMS stopmo haiku challenge that involve the Prof. Wink.
Here are the gory details about how I built the guy.
THE HEAD
The head is detachable. At the base of the skull, there's a 1/2" long 7/32" piece of K&S. A 3/16" (6/32") piece of K&S at the end of the neck fits into the slot.
I've standardized the size of K&S that I use for this kind of plug-in. My choices are based on using 1/4" dia. balls as the default in ball&socket armatures. For a 1/4" ball, you're going to use a 1/8" rod. If you want to attach that rod into squarestock, it can't be any smaller than 3/16" wide -- that leaves 1/32" on either side of the hole (precise drilling work, but you don't have to break out a micrometer). The walls of K&S are 1/64" thick -- so to have the square stock plug in, you need a piece that's 7/32" wide.
A diagram would help... But it'll have to wait til another day.
neck hole The head is made out of Super Sculpey that has been sculpted around a core of tin foil. Using tin foil means that the Sculpey isn't as thick, doesn't need to be baked as long, and is less likely to crack. Tin foil also keeps the head light enough so that it won't tip the puppet over.
eyes drying On my Percy 5 puppet, I used wooden eyeballs painted with acrylics. They tended to stick in their sockets more than I'd like. This time, I tried using acetal plastic balls for eyes. You can get them via Marc Spess at animateclay.com ("delrin" is the brand name); I got mine directly from smallparts.com.
I drilled holes in the balls, put them on toothpicks, put the toothpicks into a drill, and spun them while I painted the pupils, so the pupils would be nice and round. Acrylic paints don't adhere to acetal well, so I used enamel paints (Testor brand, the stuff you use for model kits). The balls turn in the sockets quite well. I added a dab of vaseline in the sockets, though, to help keep the eyes from falling out.
For this particular puppet, I was going for a look similar to the Rankin & Bass puppets in Mad Monster Party... Since I made the head (back on Sept 20), I've realized that I broke the formula somewhat. Almost universally, puppets that have hard heads will have eyes that are built into the sculpt. Freely rotating eyeballs are only used when the head is made out of a soft material: clay, liquid latex, foam latex, silicone.
paint + hair added The head was painted with acrylics: "bambi brown" + white. I applied the paint with a cosmetic sponge, which gave the head a really nice texture.
The hair is actually yak fur, which I found at Sportsman's Warehouse in the aisle of materials for making fishing lures. I glued down small tufts of hair using Fabri-Tac, working from the center of the scalp outward. I used hair gel to make sure the hair will all stay in place. I cleaned up the hair line a little with dabs of black paint.
ready to lip-sync My intent is to do lip-sync using mouths that have been photocopied onto sticker paper. The mouth the Prof is wearing right now is photocopied out of Preston Blair's classic book, Cartoon Animation. After reviewing four books (Blair, Williams, Shaw, Priebe) and two lip-sync softwares (Magpie, Papagayo), I decided that Blair's breakdown of the visemes makes the most sense, and is the best place for a beginner to start.
THE FEET
For the feet, I used knurled brass thumbnuts for the tie-downs. I attached the thumbnuts to the wire armature using 20 minute plumber's epoxy putty. Then, I sculpted shoes over the tie-downs using Magic Sculp (an epoxy clay designed for scupltors).
On the Dad puppet I used Sculpey for the feet -- and it wound up shattering. Since hands and feet are subject to a lot of stress, I decided to go with epoxy clays this time -- which are much sturdier.
knurled brass thumbnut One mistake I made on the Dad and Jimmy puppets was having the ankle wire coming out the backside of the foot. This time I was careful to have the leg wire coming up out of the top of the foot.
soles of feet One side of the knurled nut is shaped like a funnel, while the other side's flat. Pointing the funnel toward the floor makes it easier to get your tie-down screw screwed in.
finished shoes Magic Sculp has a 3-4 hour working time. To speed up curing, I put it in the oven at 175 degrees for 30 minutes. [The studio oven isn't used for food.]
I'm really pleased with how the shoes came out... I sculpted the line where the shoe's sole attaches, and the rim of the shoe (where you can just see a little bit of sock). The shoes did stick to the wooden base -- but I was able to cut them off using a blade.
THE BODY
Not much different in terms of how I did the body this time... I'm finding that I'm frustrated with foam build-up, though. I want more definition of the body -- even if it's going to be hidden under clothes. The Prof is essentially symmetrical on the dorsal/ventral plane... He needs a butt. And curvature to the spine.
I realize that I could get a little more definition if I used snip foam... But using spray glue is a sticky pain. My "mummy wrap" method is certainly good for "quick and dirty"... If I'm going to put more effort into shaping the body, though, I think I'm going to be happiest with a casting process.
twisting wire All parts of the armature use three strands of 1/16" aluminum armature wire twisted together. I twisted them together using a method Marc Spess recently demonstrated on a youtube video... You put one end of the wires into a vise, and the other end into a drill chuck. (I found the drill had an easier time holding the wire if I taped the ends together.)
I used the drill method for twisting the wire for Moon Baby... Whose arm broke. That put me off the drill method for a while; but now I'm pretty sure that I over-twisted the wire -- shortening its life. So, I'm back to the drill method now.
One of the things that I'm liking about it is how it gives you a long straight rod. Whatever I don't use is easily kept for later.
joining arms, spine, and neck Previously I've made my armatures with three lengths of twisted wire: the legs, the arms, and the spine/neck. The problem with this method was that looping the spine around the arm length innevitably made my puppet shorter than I intended.
Marc Spess does the spine and neck as separate bits... So I decided to try that out this time. Untwist the end of your twisted wire, and then wrap the ends around the arms (or legs). This wad of wire gets covered up with epoxy putty, so it doesn't matter how ugly it gets.
basic armature The armature was closer in scale to my sketch than usual, so I think doing the neck and spine as separate pieces is a keeper.
epoxy putty added I added limb "bones" to the basic armature, as usual. It's quick, and works well.
Even so, I'm looking forward to trying something different on my next armature. I want to try using sections of K&S for the bones, like Susannah Shaw demonstrates. Now that I have a mini cut-off saw, cutting K&S is a breeze...
And this go around, epoxy glue suddenly started making sense to me. The difference this time is that I've got a supply of toothpicks and craft sticks within arm's reach; the one little plastic stirring rod they give you with the kit was confounding me previously.
Assembling an armature out of K&S, armature wire, and epoxy glue may take a bit longer -- but the precision is appealing, and I'm looking forward to not having putty gunk building up on my gloves while I work.
foam I wrapped the armature with 1/4" thick cushion foam, which I cut into strips that are about 1" wide. I'm still using a supply that I got for cheap at Scrap... When it runs out, though, I've located Fabric Depot as a reliable supplier.
athletic underwrap The foam gets covered with athletic underwrap. Love this stuff!
THE CLOTHES
The head took 5.25 hours to make. The body took 6.5 hours. The clothes took 9... And I'm still thinking that I want an overcoat for the Professor.
Significance: It looks like making puppet clothes may wind up taking just as long as it did to make the rest of the puppet! So, I've got myself a book on making clothing for dolls, and am putting some energy into figuring out how to better manage this part of the fabrication process...
mini iron The Prof's clothes are nearly identical to the ones I made for Dad. The one main difference is that I decided to hem everything this time. Dad looked good at the beginning of filming... But by the end, his edges were beginning to fray.
Very useful: A miniature iron produced by Clover Needlecraft, Inc. I found mine at Collage on Alberta street. Folks who are into encaustics tend to use this tool.
sleeve Apparently there are two main approaches to creating patterns: either you start by working on paper, and then modify your plans with successive drafts -- or you start by draping cloth over your subject/victim, and begin pinning/sewing from there. I'm mostly using the "draping" approach.
The sleeves are the easiest part: they're basically just cloth tubes. To hem my cloth I iron a fold and then seal it in place with a line of Fabri-Tac glue.
cuff Wherever an edge of cloth is going to get covered up by another piece, I leave the edge ragged. The cuff, for example, is a separate piece of fabric that's hemmed on three edges which covers up the ragged end of the sleeve.
shirt back For the sleeves, the front and back of the shirt, and the pant legs, I found that you can start with a rectangle of cloth and then modify it until it's about right. The fit isn't exactly what you'd get if you had a more sculpted pattern -- but it's adequate for now... Knowing that I can begin with a rectangle makes things relatively easy.
Check out how gnarly the shirt back was... All the edges get covered by other pieces of cloth -- so it doesn't matter!
shirt front The shirt front needed to be much more precise. It started as a rectangle, then I folded the arm holes, ironed them, glued the hems down... You get the picture.
shirt collar The shirt collar is a separate piece of cloth. So is the strip down the front where buttons go.
gluing on a pant leg Getting the pant legs right is awkward. I do each leg with one piece of fabric, and have the seam fall on the inside of the leg.
I put a piece of tape around the belly to help me keep track of where the waist line is supposed to be. I glue the waist in place first. Then I glue the butt in place. Then the bottom cuff. Then I glue the inseam down. That order seems to make things work out fairly OK.
clothes details I'm really pleased with a few details...
The buttons are 1/8" dia. pieces of black cardstock that I made with a hole-punch. Then: I used a needle to give them button holes.
The belt is real leather. It goes through a rectangular belt buckle that I made out of cardstock. The belt loops were cut from a thin, hemmed strip of cloth. I put the strip over a cardboard form and used my mini iron to sculpt it into shape. The iron liquifies the Fabri-Tac, essentially plasticizing the cloth. [I wear a respirator and have the windows wide open while I do this.]
working on a coat pattern It feels like the Prof ought to have a big overcoat. And maybe a fedora. He's looking a little more Goth than Monster Hunter right now. Giving him eyebrows and maybe some oil clay eyelids might also help.
For the coat I've got some black velvet that Shelley gave me. I could use felt -- but for the scale, velvet seems to look better. I'm nervous about cutting this fabric, so I'm putting more work into creating a paper pattern... Which is challenging. As is, the Prof has some decent body definition; I don't want it to be completely obliterated by a floppy, formless coat.
Next on the list: Lip-sync tests... Painting a backdrop and building some trees... A Scarlet puppet?
posted by sven | permalink | categories: stopmo
September 18, 2007
trying out the new stage
by sven at 10:35 pm
Sunday night I did a little throw-away animation to give the new stage a try. This is also the first time I've actually worked with the Drifter armature. Man... I haven't pushed a puppet since March. (And it shows.)
click on image to play clip (161 KB) Some notes...
The Animation
Pretty simple: I just did a few poses with pauses inbetween. After moving the arms around a little, I realized that the armature looked dead from the chest down, so I decided to do something where there's shifting of weight. I was sort of going for that thing that Neo does in The Matrix, where he gestures to "bring it on" with his hand. Doesn't really work though when the armature's arms end at the wrist!
The Armature
Initially I had the joints tensioned really tight -- but given the joint problems in this armature, that made it almost un-animatable. So I loosened them all up... But a little too much. Toward the end of the clip the armature collapsed at the hip. Trying to recreate a pose is never fun.
The shoulders have worse range of motion than I'd thought. I knew when I built The Drifter that they were double-jointed -- that's an intentional mistake, because I wanted to feel how this design plays. The unforseen problem comes when you raise the arms up from the sides and then try to swing them to the front (as if to make the thumbs touch). When I do that, the outer shoulder joint binds, and the swinging motion is happening purely in the joints that come directly off the shoulder blocks. Pretty unrealistic.
Given the difficulties of range of motion and loss of tension, I'm beginning to favor wire armatures again. The problems of wire breakage and spring-back are perhaps preferable... Not to mention how much quicker fabrication goes!
The Stage
The stage, being steel, doesn't have the same give as MDF. When I tighten the thumb nuts on my tie-downs, it can be hard to get them tight enough... And then when I try to take them off, they can get stuck. Irritating -- but workable.
I found that I wanted the computer as close to where I was filming as possible -- so I put it up on a box, right next to the stage. I find that I'm paying more attention to the screen than to the puppet, though. I have a pair of surface gauges coming in the mail from MicroMark; hopefully they'll help break me of this bad habit.
It may be that I'm relying too much on the framegrabber also because the camera is in the way of my really getting in close to the puppet. I'm using a digital video camera which has pretty good zoom; I ought to try moving the cam back a few more feet from the table to open up some work space.
I clamped my power squid to the table... A small detail, but it sure is nice not having to crawl around on the floor! There's always going to be a minumum of three cords: for the computer, the camera, and at least one light. I think clamping my main power cord to the table's going to become standard practice.
Frame Rate
I shot at 15fps, which has generally been my default, since my intended medium is always television.
However, did you know that the U.S. Congress has mandated that on February 17, 2009 all analog broadcasts will cease? After that point, all transmissions must be digital. Meaning: if at that point you haven't bought either a digital TV or a digital-to-analog converter box, your television will be useless.
I'm doing research right now on digital television specifications, trying to figure out what stopmoes' new default should be for frame rate, resolution, and aspect ratio.
Seriously folks, killing analog TV is going to be big deal -- and a lot of people are going to be really pissed off when their expensive tube suddenly quits working. Best to start thinking about it now.
posted by sven | permalink | categories: stopmo
September 16, 2007
new stopmo stage
by sven at 5:50 pm
This week I built a new stage for doing stopmo animation.
new stopmo stage Previously when I wanted to practice animating, I'd put a piece of pegboard on top of cinderblocks. That worked really well for a while -- it was a cheap and simple set up. However, while the pegboard works fine with 10-32 tie-down screws, it doesn't do so well with 4-40s (which are my new standard). Also, the cinderblocks were so heavy... It was becoming a burden to have to keep dissembling and reassembling the stage.
I wanted to come up with a new design. One that's lightweight, quick to assemble, and works with 4-40 tie-downs. See, I want to get all the little impediments out of my way -- so when I get into a mood to animate, I can just get right to it.
stage only Here's the basic stage without add-ons. It's 2'x2' and about 9" tall. The wooden frame is made of struts that are .75"x1.5".
perforated steel sheet The stage surface is a piece of 16 gauge (1/16") mild steel perforated sheet with 1/8" holes. Susannah Shaw mentions these specifications as industry standard in England on p.88 of Stop Motion: Craft Skills for Model Animation. The reason for 1/8" holes? Because that size provides just the right amount of clearance for 4-40 tie-downs.
Perforated steel stages are more common in England than in the U.S. because animators there use magnets for tie-downs more often. Because the steel is perforated, I'll have the option of using either magnets or screws. (I haven't ever tried magnets, yet.)
I purchased the steel from this page at OnlineMetals.com, and had a really good experience. The metal cost $32.66, shipping options started at $9. I picked 2-day shipping and received the materials almost exactly 24 hours after I'd placed my order -- for just a hair under $50. Normally I'd go to my local branch of Metal Supermarkets to buy in person... However, when I called they didn't have any in stock -- and they didn't even get back to me with a quote ($72) until the next day... Half an hour before OnlineMetals actually delivered to my door!
When I received the metal, it was covered with a thin layer of oil, which was used as lubricant when the holes were being cut. I degreased the sheet using Citri-Solve, rinsed it with a hose, and toweled off the remaining water. The edges are sharp, so I covered them with black electrical tape. I've never seen 4-40 screws longer than about an inch; so in order to attach the metal to the wooden frame, I used 3" threaded rods and 4-40 thumb nuts, which I purchased locally at W.C. Winks Hardware.
clamping stage to table A stopmo stage usually has to be heavy, in order to keep it from moving during the shoot. I'm using 2" C-clamps to clamp the stage to a folding table, thus depending on the weight of the table for my stability.
I designed the stage for animating while seated. Professionally, it seems that animation is nearly always done while standing up. Space-wise, however, that's not an option for most hobbyists (until they wind up converting their garage). The opening beneath the front of the stage is 6.5" tall, which gives comfortable clearance for my hands when I need to get at a puppet's tie-downs.
clamping on walls I built wooden lips on three sides of the stage to support set walls. The lips make it very easy to place a wall where you want it and then fix it in place with a single 2" C-clamp. This is a trick that I learned from Marc Spess' book Secrets of Clay Animation Revealed! -- which I highly recommend. (It's also available as an E-Book.)
The set walls I have pictured here are 2'x2' sheets of MDF (medium density fiberboard), 1/4" and 1/8" thicknesses. To keep the walls together where they meet at the top of the set, I'm using a 90-degree angle clamp (the sort which is used for making picture frames).
clamping on a light So, the set clamps onto a table... The walls clamp onto the base... You can also clamp on a post for lights, if you want.
I'm not sure yet how this is going to work out. When the light is so close to the puppets, I get a really bright hot spot. In most of the lighting set-ups that I've done so far, I wanted much more diffuse lighting.
An Early Design
Originally, I'd thought that the floor of the stage was going to be made from 1/4" MDF. I spent a good seven hours working on drilling holes before I realized just how insane this was.
drilling holes in MDF I was inspired by Justin Rasch's dog pound set, which has hundreds of pre-drilled holes in the floor. From what I've seen on Justin's site, it seems like having pre-drilled holes -- instead of drilling during animation -- really allows you to just focus on performance.
Being me, though, I wanted things laid out in a neat grid. Having a 1/8" hole every quarter inch seemed about right -- like it would give me all the freedom I want.
how far I got I knew as I was going into this that I was taking on a task that would require outrageous patience... But I didn't do the math to realize that I was actually setting out to make about 7500 holes. (That's a 22"x22" area minus the corners where the frame prevents me from using tie-downs.)
Faced with another 7+ hours of drilling holes, spending $50 for a pre-drilled sheet of metal seemed like a real bargain!
my hole-starter invention One neat byproduct of the insanity, however, is that I invented this little device for starting holes. It's just a little piece of acrylic with a screw through it... But it's easier to hold and gives better visibility than when you use a screw and hammer alone -- and there's less strain on your joints than when you use a spring-loaded punch.
(You can see in the photos that I drilled 10-15% of the holes needed for the stage floor. What you probably can't see is that I'd already used my little tool to make hole-starting divots for 80-85% of the grid.)
Uses Of The New Stage
A stage that is 2'x2' is a bit small. You can't have a really panoramic wide shot. And you can't really have long tracking shot where a puppet walks very far. That's a limitation of this stage -- but I think the tradeoff of getting something that's easy to set up and which encourages me to practice animating makes up for it.
As I was putting this stage together, what I really had in mind was making a "black box theater." I'm interested in trying some animations where there isn't much of a set -- where you're just focussing on the performance of the "actors." I have a related idea (which I may or may not wind up pursuing) to create some generic, black-wrapped puppet bodies which can carry detachable heads... Sort of like actors wearing comedia dell'arte masks. (Which, now that I think about it, has a neat historical connection to Punch and Judy puppet shows.)
I'm not sure at this point to what extent using perforated steel for the stage floor is going to impede creating more elaborate sets. Can I only do hills, grass, etc. if I'm starting from scratch on a base of MDF? Maybe not. I might be able to cover the steel with cardstock and then build upward from there.
And as for wide shots: I have a suspicion that most scenes don't have characters walking too far...
I could see potentially building larger, more elaborate sets using a modular construction strategy. I could build more 2'x2' platforms that connect to and expand outward from my one perforated steel platform. So long as the characters don't have to walk past the edge of the steel plate (where the wooden frame prevents use of tie-downs), I'd be OK. ...And even then, maybe if I wanted characters to cross that boundary, I could just use a flying rig to support them.
posted by sven | permalink | categories: stopmo
June 27, 2007
see my films at PLATFORM on Friday
by sven at 3:38 pm
See my film work on the big screen this Friday -- FREE!
This week I'm attending the first PLATFORM International Film Festival, here in sunny (!) Portland. My short "The Great Escape" and the teaser-trailer for "Let Sleeping Gods Lie" will be shown during Friday night's open screening.
The show is at the Portland Center for the Performing Arts (1111 SW Broadway) -- on the fourth floor, in Brunish Hall. The open screening begins at 7:30pm, and is free and open to the public. I was the very first person to sign up -- so be here at 7:30 sharp or you'll miss it!
...
Oh, almost forgot! ...Tonight (Wednesday) there'll be a screening called "Portland Animation Showcase" at 9:00pm in the Whitsell Auditorium in the NW Film Center (1219 SW Park). A music video that I worked on is going to be shown: "Moodbot," directed by Rob Shaw. I made the armature that went inside the little girl puppet. You can get tickets at the door for $10.
posted by sven | permalink | categories: exhibits & events, let sleeping gods lie, stopmo
May 2, 2007
hand-drawn walk cycles
by sven at 11:50 pm
I sooo ought to be working on Let Sleeping Gods Lie... But when you're learning something new, it's so seductive...
click on image to play clip (45 KB) Both of these clips could really use some in-betweens. I have to run them at 6fps to make them bearable. A better strategy for registration is also a must.
click on image to play clip (45 KB) Used a light table for drawing this second clip. Did a master layout, then pencil drawings, then inked them on fresh 3x5" cards. (Which are more difficult to flip through than you'd think.)
The up position looks a little high, and the legs feel stiff -- probably because I'm not adding any twist to the feet. Feels like I'm not thinking right about how to construct animated characters yet. I know that I should be working with simple volumes...
Not sure if I want to pull out a ruler at this early stage. It feels like I'm being overly loose with joint placement. (It's been a long time since I did any drawing that wasn't just about capturing expressiveness and gesture.)
posted by sven | permalink | categories: stopmo
April 30, 2007
side project: hand-drawn animation
by sven at 5:13 pm
I've started reading The Animator's Survival Kit again, after having put it down for about a year.
click to enlarge image My jaw's been hanging floppy watching Justin Rasch learn how to animate puppets. Damn he's good! My suspicion is that he's going so fast and doing so well because he's done 2D animation in the past. Viewed frame-by-frame, I've noticed a few timing tricks in his clips that I know come out of the 2D tradition.
click to enlarge image This observation clicked in my head with a little article over at AnimateClay.com, a simple way to get better sculpts.
"It’s very simple. If you draw something before you sculpt it, you have a better feel for it when you sit down to sculpt. It gives you a much better understanding of the shape, and feel of what you’re about to sculpt."Since puppet animation is really just sculpting -- with the added dimension of time -- it seems like a "duh" that if I want to get better at stopmo, hand-drawn animation is actually the place to start.
Cross-fertilization, yo! ...'Cuz purists can only copy. If you want to learn how to make something new, then multi-disciplinary / mixed-media / synthesis / response is the only way to go!
posted by sven | permalink | categories: stopmo
April 12, 2007
casting in urethane foam
by sven at 8:00 am
urethane foam On Monday and Tuesday I did my first casting using foam latex. That makes this an opportune moment to mention that last month (3/17) I also finally got around to trying out flexible expanding urethane foam.
I got this particular urethane from MonsterMakers.com. It's the self-skinning variety. Like with the foam latex experiments, I decided to use the two-part mold that I made for the flightless bird sculpt last year. Since my interest right now is in the material itself, I didn't bother to make a puppet armature.
I was hoping to be happily proven wrong... But as expected, the casting turns out to be too tough for animation purposes. It's like a Nerf football -- but with skin that's almost as tough as a basketball in places.
mixing chemicals on the front porch Urethane foam (I believe) has some of the same constituent chemicals as super glue. It'll stick to just about anything. So, before putting it into my mold, I painted the mold walls with liquid latex.
[That's a trick I read about in the StopMotionAnimation.com handbook... Although, re-reading the article now, I see that the latex trick is actually intended for non-skinning urethane. Oops.]
For the first pour, I mixed up 100 grams of component A and 50 grams of component B.
foaming up -- and sinking back down At first, it looked like I'd done a good job of estimating how much foam to mix. The material foamed up and came out of the feet... But then, to my surprise, it sank back down a ways.
second pour I mixed up a second batch to fill in the soles of the feet: 20 grams of component A, 10 grams of component B. I figured that ought to be more than enough.
foam sinks down again When I filled the feet, the foam rose up -- and then sank down again. Hm. The foam self-skins when it's against a mold wall... But I guess its surface tension breaks when in the open air. Curious.
demolding It took some work to get the casting out of the mold. Definitely an effort -- but not terrible.
the seam in the latex The latex skin didn't hold up very well. Particularly at the seam between the mold halves.
peeling off the latex I just went ahead and peeled off all the latex. It came off easily. Unfortunately, the brush marks (from when I'd brushed the latex into the mold) all transfered to the urethane.
That being the case, I'm thinking that if I ever do flexible expanding urethane foam again, then I'll probably just use vaseline as my mold release -- and skip the latex.
finished product The final product isn't bad -- if it were intended to be a static sculpture. The main flaw is a small bubble that got trapped at the end of the beak. [I probably ought to have rotated the mold.] The seam line is minimal.
Conclusion: This particular brand of urethane is useless for puppets -- unless, perhaps, they're very thin puppets. The material is just too tough.
posted by sven | permalink | categories: stopmo
April 11, 2007
foam latex - first attempt
by sven at 10:25 pm
struggling to cast foam latex Monday (4/09) I did my first run of foam latex. It was a complete failure. Not unexpected, but demoralizing nonetheless.
Yesterday I did my second foam run. The results (pictured above) are unusable -- but still an improvement.
the original sculpt Here's the original sculpt, which I did back in May 2006. Sort of a wingless bird creature.
the two-part ultracal 30 mold And here's the mold that I'm working with, which I made last June. It's just been sitting around, waiting for me to get back to my line of research on casting materials.
getting ready to do a foam run Why am I getting back to this project now? Because I wasn't happy with the tentacles on my first elder thing puppet. I want to test some different materials -- and rather than go through the whole process of making a new mold, I figured I'd get through my first mistakes more quickly by just using the mold I already have.
For the same reason, I decided not to bother with making an armature right now. This is purely about figuring out how to get the foam latex to do what I want it to.
KitchenAid mixer I bought a new mixing bowl and whisk attachment for my kitchen mixer that will be dedicated to foam latex. I covered the mixer's head with a plastic bag to help protect it from splashes. A plastic bag underneath the bowl would be a smart addition, too, next time.
thermometer / hygrometer I looked around several stores for a a cheap, digital combo-thermometer/hygrometer (humidity detector). I finally found this one at Walmart, which just what I was looking for. It cost about $8. (Radio Shack was a real disappointment -- they only carried a $40 model.)
mold release First thing to do: dust the inside of the mold with mold release. I need to remember to pick up a big batch of cheap acid brushes at Harbor Freight... You go through a lot of them in most casting processes.
mold release drying After the mold release dried, I took it out on the front porch and dusted out the extra with a chip brush. You know it's dry when it's turned from clear to white.
FIRST RUN
For my first foam run I decided to do a standard batch -- 150 grams of latex base -- so I could get a feel for how much that makes. The room temperature was 69 degrees, and humidity was 40% (it rained earlier in the day). I decided to go with the "normal room schedule" (68-72 degrees F).
latex base, foaming agent and curing agent The bad smell of foam latex is legendary. I wasn't all that impressed, though.
When you open up the canister, you get a strong smell of ammonia. If you've worked with liquid latex before, it's about the same.
When you bake the foam you get more of a sulphur smell, like eggs. It lingers in the room... But after airing out the studio and lighting up some vanilla candles, I think we'll be OK.
whipping the latex into a foam When I poured the first three ingredients into the mixing bowl, their level was about an inch below the bottom of the bowl's handle. When the foam reached peak volume, it had risen about halfway up the bowl's handle.
foam gelled too quickly The foam gelled before I could get it into the mold. This was probably within a minute of turning off the mixer. I was trying to quickly brush some foam in with an acid brush, and then...
collapsed foam in bowl As I tried to see if I could quickly get at least some of the foam into the mold, it collapsed into a gummy wad, about the consistency of bread dough.
I noticed that the room temperature shot up to 72 degrees just during the last minute or two of the run (the thermostat turned on). That was probably a contributing factor.
SECOND RUN
Before I could do the second run, I had to clean out the mixing bowl, the whisk attachment, and the mold. I reapplied mold release.
The temperature was 68 degrees; humidity was 40%. I decided to decrease the refining period from 3 to 2 minutes, and the ultra-refining period from 3 to 2 minutes. I decreased the amount of gelling agent from 14 to 11 grams.
strapping the mold shut This go around I had enough working time. I quickly brushed foam onto the mold walls, then poured more in until each side was full. The foam had the consistency of whipped egg whites.
I strapped the mold shut... My straps are 13 feet long -- which is way too long. I used twist ties to try to keep the spare length out of the way.
leftover foam in the bowl The flightless bird is fairly bulky puppet; even so, I only used up between half and 2/3 of the material that I made. I estimate that there are between five and six 150 gram batches in my kit... So I've already used up a fair amount.
There was an area of foam at the very bottom of the bowl that never gelled. This suggests to me that there's an area there that the whisk doesn't reach... Good to know!
I baked the mold for four hours. I was aiming for 190 degrees. My oven thermometer revealed that it was difficult to get this temperature. The oven tended to hover at 180 degrees... And then if I turned it up to 200, it would sometimes go up to 210.
demolding The initial demolding looked promising. The rear of the bird had a big air bubble -- but was otherwise pleasantly springy to the touch.
cured foam - side The nose, however, was another matter. Not only did it have a huge air bubble in it -- when I demolded it, it collapsed like a bad soufflé.
I should have let this mold bake for at least 6 hours... And maybe more. Not only is this a rather puffy character -- the mold is also ridiculously huge. I think the stone must have been doing a lot to insulate the nose from the oven's heat.
cured foam - back The entire thing has shrunk a little bit... But the rear end has maintained a consistency that I believe is what cured foam latex should feel like. So: progress.
washing the foam This morning I washed the foam in soapy water, as you're supposed to do. It was pretty neat to watch the foam suck up water.
wrinkles in the foam After squeezing out the water, there are wrinkles in the foam that I don't think are going to come out. I know that it's the nature of foam to wrinkle... Still, this doesn't make me love the material more!
I'm slowly getting the feel for this stuff... But I'd rather be using a material that involves less guesswork and witchcraft in its preparation.
I'm reminded of the silicone vs. foam latex comparison I did last May. Back then I concluded that I'd probably wind up using silicone as my primary casting medium. Now that I've had a little experience foam, silicone is seeming pretty appealing once again.
posted by sven | permalink | categories: stopmo
April 10, 2007
guest animator: hazel malone
by sven at 8:00 am
Hazel Malone is an aspiring animator here in Portland. To help her pursue the art, we've been scheduling time and setting her up with my animation equipment in the studio. Here are the test clips that she's made so far...
click on image to play movie #1 (31 KB) This quickie was what she did on the first day she came over (Feb 8). That's the Diplomat armature she used.
click on image to play movie #2 (609 KB) This second clip was done on Feb 12, again with the Diplomat. Personally, I see the influence of the Brothers Quay in the vibrating, flapping arms.
click on image to play movie #3 (136 KB) The third clip was done on Mar 29, this time with the Man of Steel armature. She described its action as "cowering in fear."
This clip also includes footage of Hazel's first puppet...
Hazel's first puppet (in progress) I'm very pleased that she found the demo wire armature tutorial I wrote helpful in constructing this. We've had a number of long phone calls, talking about the minutia of puppet fab and where to purchase materials locally.
click on image to play movie #4 (196 KB) The fourth clip was done on Apr 6, entirely with Hazel's puppet. I'm really charmed by the pup walking off the edge of the animation table.
We're going to have to see about getting these uploaded to the new Puppet Training gallery over at StopMoShorts. (nudge!)
posted by sven | permalink | categories: stopmo
April 9, 2007
improving the next armature
by sven at 8:00 am
goodbye (for now) to the Drifter Here is the master list of things to improve on my next armature project.
A. GENERAL
- The biggest problem with the Drifter is that all of the joints have drift. Solving this problem has to be top priority.
- Avoid the lathe, drill press, and grinder. Try doing all their operations on the mill. My current belief is that the mill will be able to give better results on all accounts.
B. DESIGN
1. Joints
- drift must be eliminated
- there should be more space between sandwich plates than just the diameter of the rod
- leave more of a lip between a socket and the edge of the plate
2. Shoulders
- Double-jointed shoulders kink up. Step-block joints are the minimum requirement for adequate shoulders. Hinge and swivel joints would be even better.
3. Feet
- a foot bends at the toe, not in the middle
- the toe needs enough surface area beneath it to be able to grip the table when it’s tied down
- the sole should not be so long as to scrape the floor when the foot bends
- soles should be at least as wide as the ankle joint
- soles should be 1/16” thick, not 1/8”
4. Things To Add
- hands
- rigging point for jumps
- ”rectal tie-down” for sitting
C. PROCESS
1. Set-Ups
- make T-spacer that’s narrower than the sandwich plates
2. Ball Holes
- make attachable milling vise jaws to correct for loose jaw tilt error when locating ball center
- use “drill chuck tool holder” attachments to allow precise, uniform depth of holes
- only use center drill to “center punch” a mark -- not to drill any deeper
- use end mill to get a flat bottom inside the hole
- countersink the top rim of the hole
3. Sockets For Balls
- find way to eliminate plunge chatter
- drill holes at bottom of sockets to eliminate drift?
4. Radiusing
- use corner-radiusing end mill (to avoid grinder dust and plier marks)
5. Through-Holes
- make a slotted riser to hold work pieces up while being drilled
6. Threaded Holes
- try using the drill chuck method for tapping
- countersink rim of hole
7. Brazing
- use hard silver solder instead of SafetySilv 56
- leave parts in pickle longer
8. Maybe...?
- does the stock need to be squared?
- counterbore holes for screw heads?
- use a vibro-tumbler to remove firescale?
- do joint trimming with an end mill and an angle table?
posted by sven | permalink | categories: stopmo
April 8, 2007
brazing and shining "the drifter"
by sven at 8:00 am
making the hips and chest My brazing and shining skills have improved a great deal. The finished Drifter armature has really solid joins, and is really reflective when you throw a light on it. In this post I'll walk through the techniques I used on this latest project.
labeled bowls of rods Here are all the segments of rod that I used for this project, in ten labeled bowls. They're actually bowls for dipping sauce, which I picked up at Pittman Restaurant Supply. ...A lot of time was saved, being able to confidently reach for whichever piece of metal I needed next.
sanding end of rod I prep the ends of all the rod segments by sanding them with a bit of fine-grit sandpaper. The purpose of this is to make sure that the rod is clean before brazing -- and to help make sure that the rod will fit inside of the ball hole.
marking off 1/16" segments I'm using SafteySilv 56 to do my silver soldering. I use a fine-tip Sharpie marker to mark off 1/16" increments on the wire. I find it works best for me to have bits of soldering wire that are all about the same size. Instead of just eyeballing how much wire I need, I can keep notes and figure out how many bits particular joins require.
cutting SafetySilv 56 wire When I cut these little bits of SafteySilv, they want to go flying through the air. To avoid this, I keep my pliers flat against the table as I'm cutting. The little bits are trapped neatly underneath.
supply of silver solder bits Once I've got a nice supply of silver solder bits, I put them into a plastic cup with a lid.
The lid's important. It's likely that there will be left-overs after I'm done brazing. I'll want to keep them for later... And at some point, it's innevitable that the cup is going to get tipped over. If there's no lid, the solder bits will definitely get lost.
flux, water, and toothpick I'm using Stay-Silv flux. It tends to dry out. I've got a new trick to deal with that.
I use my pliers to cut a toothpick in half. I dip the broken end of the toothpick in water, and spread it over the surface that I'm going to braze. Then, I use the toothpick to pick up some flux, and I mix it into the moisture. This works particularly well when you're trying to get flux into tiny ball holes.
ball atop rod For brazing 1/4" dia. balls onto 1/8" dia. rod, I've found that one 1/16" piece of silver solder is the right amount. It creates an unbreakable bond, and almost no solder comes out the seam.
[Note: For joins where the rod is connecting a flat area (e.g. the chest block) you want the solder to flow out of the hole. With the ball, overflow would impede motion; but that's not the case in flat areas. For these, I use 4-5 pieces of solder to get a visibly trustworthy bond.]
Tom Brierton, in Stop-Motion Armature Machining, demonstrates brazing with the rod on top of the ball. Lionel Ivan Orozco, in his brazing balls to rod tutorial, demonstrates brazing with the ball on top of the rod. Which is the better method?
I believe it's better to braze with the ball on top of the rod. This way if molten solder and flux come out of the ball hole, they'll mostly run down the rod -- rather than damaging the ball itself. Also, by using this position you can usually grip the rod in a vise -- which holds it in place much more reliably than a pair of pliers. (If you opt for this method, refer to LIO's tutorial for some important details.)
wiping off excess flux Before I light up my torch, I use a bit of toilet paper to wipe off the ball -- hopefully removing any stray drops of flux. Stray flux discolors the metal when heated... And you can't always see the clear fluid on the ball's surface.
I used a "little torch" to do the brazing. I used an oxygen-propane mix and a #7 tip.
Halfway through the job, I ran out of oxygen. Lesson learned: keep spare canisters of oxygen and propane on hand. I've been surprised at the variance in price. Oxygen costs (if I remember correctly) about $16.50 at Simon Golub & Sons -- But less than $9 at Ace hardware. I'll be keeping my eyes out now, looking for the best price.
cleaning with ScotchBrite pad Using a big flame on the balls, they heat up quickly and don't develop much firescale (blackening). To clean them up, I use a bit of medium-grade ScotchBrite pad.
Initially when I heard about ScotchBrite pads, I thought it was the same stuff that you use to wash dishes. Well, it's the same makers -- but a completely different product. This stuff you find at a good hardware store. In Portland, I get it at W.C. Winks. It doesn't seem to be available at Ace (which is located much closer to me).
putting ball and rod into drill chuck Here's a handy trick I came up with... You can put a ball-rod assembly into the chuck of a hand-held power drill to speed up the cleaning process.
chest and hips with bad firescale When I braze the armature's chest and pelvis, the firescale problem is much worse. Because there's more metal to heat up, I have to hold the flame on it much longer. If there's a way to avoid blackening my parts like this, I'd be very grateful to learn it!
pickle I now look at pickling as being mostly about dissolving leftover flux... But it does help loosen and get rid of some of the firescale too. It may be that if I left the parts in the pickle for a longer period, I'd get better results. I'm unclear at this point how long parts ought to sit in the liquid.
I'm using Sparex #1, which is specifically for steel. There's a note on the label that it doesn't work on stainless steel unless you run an electrical current through the mix... Something that I don't see myself attempting anytime soon!
after pickling Here are the parts after being pickled. Better -- but not great. The rest of the shining I did with ScotchBrite. (I also used fine-grit sandpaper on the large flat areas.)
difficult bits: the chest, pelvis, and feet
Constructing the chest and pelvis blocks is rather challenging. Figuring out how best to hold the parts, and in what order parts should get brazed together -- it takes some thought. The following photos show a series of set-ups that worked out pretty well for me.
constructing the chest - 1 constructing the chest - 2 constructing the chest - 3 constructing the chest - 4 constructing the pelvis For me, the feet are usually the most challenging part of the armature to construct. I'm not entirely happy with this armature's feet, but let's take a closer look at them.
the foot Problems with the feet:
- I made the sole of the foot too long -- it actually cuts into the ground when the armature goes up on its toes
- the joint in the foot should be closer to the toe, not right in the middle
- the sole of the foot isn't wide enough to feel really stable
- the sole of the foot is overly thick
- the toe barely has enough surface area to grab onto the floor when its tie-down is tightened
using roll pins for a mechanical join For the feet, I had to braze flat surfaces to flat surfaces. I find this more difficult that brazing balls onto rods -- where the silver solder is neatly tucked inside of the hole, and the rod holds it in place.
I used roll pins (AKA "tension pins") to create a mechanical bond between the parts that I wanted to braze. This makes the join stronger -- and holds things in place while you're applying the flame.
These are 1/4" long, 1/16" dia. roll pins that I got at Ace hardware. In order to make an appropriately sized hole for them, you need a #52 jobber. (Figuring out what size drill bit I needed, and then going out to buy it -- that ate up a work day.)
brazing the toe When you're brazing, the solder wants to travel toward the source of heat. That means that you can't just shoot fire at it -- you have to figure out where to place the flame so that the solder will flow where you want it to go.
For brazing the toe -- which you see above -- I laid wire on the side of the toe (which was pointed upward) and applied heat to the front. This worked adequately well, but not great.
sole of foot before brazing For the sole of the foot, I milled away a little metal on both ends so the balls of the joint couldn't accidentally rub. (I could also have just used a file -- but I was feeling fussy.)
I really needed the roll pins to hold the parts together for this set-up. In the photo above, the smaller holes are for the pins.
Heating up the ankle joint created firescale in the sockets, which is difficult to ScotchBrite out. One more reason why I'd like to learn how to better avoid firescale in the first place!
posted by sven | permalink | categories: stopmo
April 7, 2007
stopmo and storytelling skills
by sven at 11:59 pm
Last night I was thinking about making a new animatic for Let Sleeping Gods Lie. I sat down at the keyboard to capture some of that inspiration -- and the following "essay" (?) tumbled out.
(The tone of it sort of makes me feel like I'm standing on a stage, delivering a commencement speech to myself.)
...
STOPMO & STORYTELLING
A puppet is just a special effect.
Its sole purpose is to look good in front of a camera. It doesn't matter how well or poorly constructed it is. Anything that looks good, is good.
The goal is to make stories come to life on screen. Or if not "stories," then at least moving art that can be projected in a movie theater or on a TV.
There is a strong temptation to simply make exquisite dolls -- and dollhouse worlds for them to live in.
There's a strong desire to build perfect miniature versions of your characters, which you'll then -- someday -- breath life into.
It's not an entirely bad impulse... In order to make it through the telling of your story, you want puppets that are sturdy, and puppets that don't fight back when you try to pose them.
But let your imagination and excitement be for the storytelling.
If you work at the craft of making well-built puppets, then that is what you will become good at.
If you work at the craft of telling stories, then you will produce animations that look god-awful -- but you will produce a lot of them.
When your excitement is for making up stories, making up scenes, imagining powerful images -- then you can take that energy and do something that people will find worth watching -- in just an afternoon. It'll lack production values... But that's not the point.
My point is that creating stories is a skill. It is a skill that you can practice and develop.
It's not the same thing as just writing a script. (That's a skill, too.) What I'm thinking of is coming up with a story of some sort, and then getting it on screen -- no matter how rough the production values are.
If that's your passion... Then other skills will still develop (perhaps not as quickly as if they're your focus) -- and they will be appropriately subordinate to the greater cause.
Imagine that you have a collection of sketchbooks. One sketchbook contains the series of armatures that you've made while developing your skills as an armature-maker. One sketchbook contains the series of maquettes that you've made while developing your skills (and style) as a sculptor. And in another sketchbook, are the stories that you've made films of.
You can't learn how to be a painter very well if you spend the first four years of your career making just one painting. You need to make as many paintings as possible -- knowing that your early works won't satisfy you -- but that they are the first links in a long chain that eventually leads to what you want.
So imagine a story, and then get it onto the screen as quickly as possible. In a day. Half a week at most. Use still photographs, or hand puppets, or cut-outs -- whatever you know how to use well enough so that you can get the idea out.
Because in the end, every aspect of film production is about IDEAS.
The story is an idea. Making a better armature -- it's about your ideas surrounding armature-making. Sculpting: if that's what you find yourself working on, then there are ideas there that you're pursuing, too... Or rather, ideas that are pulling you on.
Let go of what your hands are drawn to do... Just long enough to look at all the different kinds of things that you could make. That you could study... Story. Sculpting. Lighting. Armatures. Mold-making and casting. Puppet fab (build-up, painting, costumes). Script-writing.
[Again, making stories and writing out scripts -- they're two different things.]
Be "meta" enough to switch between areas of study. Try to consciously choose what it is that you're going to study next.
posted by sven | permalink | categories: let sleeping gods lie, stopmo, writing
sandwich plates for "the drifter"
by sven at 8:00 am
the "Drifter" armature The sandwich plate joints on the Drifter don't work nearly as well as I'd like. I want to write out some notes about how I made them, while the process is still fresh in my mind...
Hopefully the notes will be of some use when I get around to making my next armature project.
A. CUT-OFF SAW
The first job was to rough cut my stock. I used 1/8"x1/4" 1018 steel bar for the sandwich plates.
cut-off saw Now that I've got an abrasive wheel on the mini cut-off saw, it works great! For estimation purposes, it's good to assume that a cut is 1/16" wide... So, when I'm doing a bunch of cuts off of one strip, I tend to allow for 1/8" between the pieces I want -- which should leave a safe margin of 1/32" extra on either side of the cut.
B. MILLING
Next stop: the milling machine.
"facing" one end of a sandwich plate My general approach to making the sandwich plates this time around: use a T-spacer as often as possible. The job of the T-spacer is to give me identical registration each time I put a workpiece into the milling vise. All in all, the approach seemed sound.
After I've rough-cut a piece of steel, I need to face one side of it on the mill. One side has to be perfectly square -- or else the T-spacer won't do me any good.
(Note that the T-spacer in the photo above isn't being used for registration, but rather to balance out pressure on both sides of the vise.)
all the plates have been faced After I facing a plate, I'd mark the square side with a fine-point Sharpie -- just so I'd be clear which side was which.
using a T-spacer for registration The more I think about it, I think I could have done a better job constructing the T-spacer. I measured and cut the two pieces of metal, and then screwed them together. I probably should have gone through those steps -- but left the nose long. Then, I could have milled it and been certain that the end was exactly the right length and perfectly square.
knocking the T-spacer out The other error I made with the T-spacer is that I made it .25" wide. I'm now thinking that I should have made it slightly narrower. After I got my plates registered, I had to gently tap on the T-spacer to get it out of the vise, and out of my way. Knocking the T-spacer out of the vise surely couldn't have helped my accuracy!
ready for milling sockets It doesn't matter exactly where in the vise the T-spacer puts the plate -- what's important is just that all the plates go into the vise in the same place.
After I've got my first plate locked in the vise, I use the wiggler to figure out where to drill the first socket. When I get the spindle over that spot, I get to leave it there for quite a while.
The way that I designed these plates, the center of the .25" dia. socket was .125" from the edge of the plate. In retrospect, i think I'd like to have planned for there to be a little bit more lip at the end of the plate. [Although, to an extent there was some lip, since the socket is shallow enough that it doesn't wind up having a full .25" diameter.]
milling all the right-most sockets I had serious trouble doing plunge cuts with the ball-nosed end mill.
I got terrible vibrations ("chatter?") which left striations in the socket. I think that problem was due to me trying to make the plunge too quickly. I had assumed that I needed to make the plunge quickly in order to avoid work hardening -- like I did with the drill in the lathe method of drilling balls.
Making a shallow cut -- then backing off and starting again -- seemed to help. I tried making the cut much more slowly, and that also generally seemed to help. Sometimes it felt like the cutter was pulling itself down into the steel without my help -- but I'm really not sure if I was just imagining that.
I'm confused about what the rpm should be for this cut. I chose my rpm based on the shaft of the cutter being .25" dia. -- about 500 rpm, if I recall correctly. But the tip of the cutter isn't that wide... How do you choose an appropriate speed when the cutter isn't just cylindrical?
Drilling sockets is a pretty crucial skill. Based on some trial attempts a few months ago, I didn't think I was going to have any problems. Now I see that I ought to do some more practice cuts to figure this out, before I get into my next serious project.
milling the other sockets Here's another principle that was guiding my process on this project: move the spindle as infrequently as possible.
I milled all the right-most sockets in all of the plates. Then I moved the spindle over and did all the cups in its next position. [I'm speaking inaccurately; the spindle doesn't actually move -- only the XY table moves.]
starting holes with the center drill Operations on the drill press are almost always more "quick and dirty" than operations on the mill. I decided that because the holes for screws are designed to have some play in them, I ought to try making those holes on the drill press instead of on the mill.
In preparation, though, I used the #2 center drill to mark where the holes would go.
plates ready for drilling C. DRILL PRESS
That concludes the work on the mill. On to the drill press.
the drill press I have a small MicroLux drill press that I got from Micro-Mark a while back. I've been so enamored with the precision of my mill, I've hardly used it...
Still, I figure I ought to be learning to use "the best tool for the job" -- and oftentimes speed is more a more important factor than accuracy. I keep trying to remind myself: Be accurate -- but don't use more accuracy than the task requires.
risers For this job, I made two risers -- so I could drill a hole in a work piece and not be cutting into the riser that's holding it up.
The more I think about it, I think it would probably be better to just make a single riser with a slot in the middle. Having two risers actually wound up being kind of fiddly.
ready for drilling Drilling the holes using the drill press went just fine. I used a #43 jobber for the threaded holes, and a 1/8" drill bit for the through-holes.
Technically, you ought to clamp down the vise, and not hold it with your hand. At one point I got a lesson in why this is the case: My hand slipped, and the drill press picked up the vise and threw it off the table. ...Thank goodness I've chosen to work with small machines!
I gotta say, though, this experience does tempt me to shelve the drill press and just work on the mill. If I stop drilling balls on the lathe, then I could wind up doing pretty much everything on the mill -- which feels sort of elegant... I could clear some table space...
I've been thinking about using the method of tapping holes where you put the tap loosely into the chuck that just drilled the starter hole. ...That would potentially be another reason to not stick with the drill press -- it's easier to get the drill chuck exactly where I want it when I use the mill.
D. BENCH VISE WORK
The next job is to "tap" (put threads into) the screw holes.
switching over to the bench vise It usually makes sense to do all the operations of one kind on your work pieces, and then move on to the next step. ...Technically, I could have tapped each plate immediately after after drilling it -- while it was still in the milling vise. But I found it easier to just get all the drilling done, and then move over to the bench vise.
tweezers come in handy I love it when I've got just the right tool for the right job... Tweezers really came in handy when I needed to put sandwich plates into the bench vise. It's a little thing -- but so much easier than when I was trying to get the pieces placed using a flat needle file or a set of pliers.
using a home-made tapping block Sometimes my tap hasn't been completely perpendicular to the work piece. I recently read about making a "tapping block" to help guide the tap -- so I decided to try making a quick and dirty one for myself.
It's just a 1/8" hole drilled through a scrap of aluminum. It did seem to help a little when I was getting the tap started. Still, I know I can get my tapping technique better. This is an area for improvement.
[Note: I'm interested in trying out using a countersink for the edges of the threaded hole. Also for the rim of the ball holes.]
E. GRINDER
For the Drifter armature, I decided that I wanted to radius the ends of sandwich plates using the grinder. From what I've read, this is the quickest way to create rounded corners -- and it's usually plenty good enough.
moving to the grinder This is a 6" grinder. The wheels that it takes have to be 3/4" (or narrower) in width. I think if I were doing it again, I might buy an 8" wheel so I could use 1" wide wheels -- which seem to be the most common kind.
I've got the course grinding stone that came with the machine on the right, and a ScotchBrite wheel that I special-ordered from Palm Abrasive on the left.
radiusing the ends of the plates I roughed out a radius using the course grinding wheel, and then gave it a few smoothing passes on the ScotchBrite wheel. The ScotchBrite wheel developed a deep groove, which I'm not too happy about. The groove made work more difficult later on, when I needed to trim the joints.
hellacious steel dust The grinder makes a hellacious amount of steel dust! I'm not sure how far the dust spreads; I'm worried about it getting into electronics that I've got in the same room. I've just purchased a good shop vac, which I hope to jury-rig into a dust collection system. I'm also considering replacing the coarse stone with an extra-aggressive ScotchBrite wheel to cut down on sparks.
I don't like the grinder much. Even with hearing protection on, I noticed my ears ringing a little afterwards. The dust is bad. Using pliers to hold the pieces I was grinding would leave marks on the metal. And occasionally a sandwich plate would skitter across the grinder, scraping up the part's edge.
It may take longer, but I'm eager to try using a corner radiusing end mill on the next project. I may even try using a tilting table and an end mill to trim the joints, rather than the ScotchBrite wheel. Slower, less "artful" -- but hopefully more uniform, functional and professional-looking.
F. FINISHING TOUCHES
After all the machining is done, I give each of the sandwich plates some individual attention.
giving each plate special attention For plates with threaded holes, here's the order of tasks I used:
- diamond file the edges of the threaded hole
- use fine sand paper to shine up all sides (except the one with the sockets)
- use a ScotchBrite pad on the socket side of the plate
- use a tap to clear any residual grime out of the threaded hole
- clean dust out of the sockets with a Q-tip
(Several of those steps aren't necessary for the through-hole plates.)
...
Done!
Well, except for trimming. And it's best to do that after you've done a test assembly of the armature -- after brazing. You want to see how all the joints are working out before you start making special modifications.
posted by sven | permalink | categories: stopmo
April 6, 2007
drilling balls: two methods (part 2 of 2)
by sven at 8:00 am
ball in milling vise I'm walking through two methods for drilling balls. In yesterday's installment I discussed the lathe. Today I'll be discussing the mill.
METHOD #2: THE MILL
Drilling balls using the milling machine method requires some preparation and more set up time than the lathe method. However, it has several distinct advantages:
- If you have the right attachments, you can determine hole depth precisely.
- Because the ball sits on a hard surface, the drill cannot push it backwards.
- A milling vise is unlikely to mark the ball.
- The hole that you make holds cutting lubricant just where you need it -- which lessens concerns about work-hardening.
- Once a hole has been drilled in the ball, it may be possible to mill the bottom of that hole flat. (I haven't tried this idea out yet.)
- After you're set up for this job, it's faster to drill balls on the mill than on the lathe. (Approx 4 min. per ball versus 6.)
The main disadvantage is that it's more difficult to get the ball perfectly centered beneath your drill. If you're not very careful, it's easy to put a hole into the ball off-center.
A. PREPARATION
Before you can go through the process of drilling a ball on the mill, you need to first do two things:
- create a riser that will hold a ball at the right height in the milling vise
- get the mill's spindle dead center over the ball you want to drill
making a riser The milling vise has a groove vertical groove in the center of its fixed jaw that is intended to hold round stock in place. This groove is perfectly suited to holding a ball -- except that you also need to hold the ball up at the top of the vise jaws, so the drill bits can reach it.
I made this riser out of a bit of aluminum. Since the balls I'm drilling are .25" wide, I made it slightly narrower -- so it won't interfere with the vise jaws. (I've forgotten exactly how tall I needed to make it so that the ball is right at the top of the vise. Sorry.)
the wiggler As for getting the mill's spindle dead center over the ball, we're going to need to use a simple (but astonishing) device called the "wiggler."
What is it? It's a needle that has a ball on one end; the ball is held loosely inside of a collet. At the other end of the needle, there's a small cylinder on its tip.
Using a wiggler is not at all difficult... But it's hard to understand how one of these things works if you've never seen it in action. I couldn't figure out the nature of the beast until I watched the SwarfRat video, Mini Machines 101 Volume 2 (Mill Series): Edgefinding & Location. ...Hopefully the photos here will help explain.
attach wiggler to mill's spindle The plan is that we're going to figure out exactly where the edges of the milling vise are, and measure to the center of the ball from there.
Let's start with the X-axis. Attach the wiggler to the mill's spindle. Have the cylinder-tipped needle hanging down more or less vertically.
turn on the mill Turn on the mill to a high speed; say, 1000-2000 rpm. As the wiggler spins, you'll see that it's not hanging down perfectly vertical. That's OK...
bring the wiggler into contact with the vise Move the XY table along the X-axis until it just starts to come into contact with the tip of the wiggler. (Don't worry, the wiggler won't hurt the vise!)
slowly keep moving the XY table Slowly, keep moving the vise toward the wiggler. As you do so, it will push the wiggler increasingly into alignment, until it's spinning almost perfectly vertically.
continue until the wiggler spins off When the wiggler's needle seems vertical, start paying close attention to your digital read out (or handwheel markings, if you don't have a DRO). Move the XY table .0005" at a time...
Suddenly the needle will spin off, and spin wildly around! ...That's what it's supposed to do!
turn off the mill's motor Turn off the mill's motor. You now know that .0005" ago you had the needle spinning "true". Back the XY table up a ways (to compensate for backlash), and then bring it forward again to where it was just before the needle spun off.
move the XY table over .05" more That little cylinder at the tip of the wiggler is .1" wide. In order to get the mill's spindle directly over the edge of the vise, therefore, we need to move it over .05" more -- to where the center of the wiggler would be.
Zero out your digital read out. You now know precisely where the edge of your vise is -- you can make all your future measurements from that point.
use the same process on the Y-axis Next, we need to find an edge to measure from on the Y-axis. Which jaw should we use?
Well, the fixed jaw has the groove in it. The ball sits slightly inside of the groove, which means you won't be able to measure from there without doing some fairly complicated math.
The loose jaw is flat. If you find that edge, all you'll have to do is measure over one-half the diameter of the ball, and you'll be centered on the Y-axis. This is what I wound up doing, and I got very usable balls.
However, I did make an error here.
The loose jaw is nearly, but not perfectly vertical. Unlike a normal vise, which simply squeezes its jaws together, a milling vise pulls its loose jaw down at a 45 degree angle. It applies the greatest pressure at the center of the top lip of the loose jaw... What this means is that the loose jaw is going to be very slightly (almost unnoticably) tilted.
I got "good enough" results even so... But to get this method perfected, I'm going to need to machine some "soft jaws" which screw onto the milling vise's regular jaws. What we need is for the groove to be in the loose jaw, and for the fixed jaw to be perfectly flat and perfectly vertical.
putting the spindle into position Once you've found the edges of the milling vise and zeroed out the DRO, putting the spindle into position is a simple matter.
The Sherline milling vise is 1.95" wide. The groove in the milling vise that holds the ball -- it's exactly halfway across the vise's fixed jaw. So, on the X-axis, we want to move halfway across the jaw -- to .975".
The ball we're drilling is .25" in diameter; so half of that is .125". That's where we want to be on the Y-axis.
Lock your X and Y axes in place. Your spindle is going to stay in this position for the entire process of drilling balls.
B. DRILLING A BALL
OK, on to the drilling itself...
step 1: put center drill in drill chuck Step 1: Put center drill in drill chuck. I'm using a #2 center drill. The drill chuck pictured here is actually the same chuck that I used with the lathe method -- but I've unscrewed the morse arbor, and have attached a drill chuck tool holder in its place.
The drill chuck tool holder is a wonderful little attachment. Normally you'd use a drawbolt to pull the drill chuck's arbor into the mill's spindle. With this attachment, you can just screw it on like a end mill holder, using tommy bars. Much faster and easier! (And with all the repetitive steps in this process, you want all the "fast and easy" you can muster.)
I'm looking forward to getting set up with two drill chucks, both in tool holders, so I don't have to switch the center drill and 1/8" drill bit in and out. I want all my tool changes to be done with just a pair of tommy bars.
step 2: touch the center drill to the ball Step 2: Touch the center drill to the ball. Zero out the digital read out on the Z-axis. Raise the spindle back up and away from the ball.
It's important to find the top edge of the ball now. In a moment we're going to file it away; after doing so, it's no longer possible to figure out the precise position of our drill bit's tip.
step 3: file the ball Step 3: File the ball. Use a bastard saw to make a small flat area on its top. Approx. 1/16" dia. should suffice.
step 4: add a drop of oil Step 4: Add a drop of oil. Just on top of the ball, to help keep the metal from getting hot and work-hardening as we cut.
step 5: make a divot with the center drill Step 5: Make a divot with the center drill. Put the center drill on a very high speed, say about 2000 rpm, and bring it down so it just kisses the ball. Don't go for any depth. Now, pull the drill back.
The next two steps are probably an error. As I now understand it, you shouldn't use the center drill to cut all the way down to its countersinking edge. Skip to step 8.
step 7: center drill deeper Step 6: Add more oil. The little divot you just made will hold it very nicely.
Step 7: Center drill deeper. Drill far enough down so that you get a hole with a beveled rim. This will help guide your 1/8" drill bit. It doesn't matter exactly how deep you make this cut, so long as you go to the same depth on all of the balls that you drill.
step 8: put 1/8" drill bit in chuck Step 8: Put 1/8" drill bit in chuck.
Step 9: Lower drill bit down to where it touches the ball. Zero out the digital read out. You're going to have to do some estimation to figure out how to compensate for the depth that you've already drilled using the center drill -- but so long as you've been consistent with that step, you should be able to drill holes with the 1/8" drill bit that are all nearly equal in depth.
However: If the center drill and the 1/8" drill bit were each in their own separate drill chuck and drill chuck tool holder, then there would be no variation of tool length -- and you could figure out precisely how deep you're drilling. That's what we really want.
step 10: add more oil Step 10: Add more oil. The hole that you've made so far will hold quite a lot, and make work-hardening almost a non-issue.
step 11: drill the ball Step 11: Drill the ball. I used the same speed that I did with the lathe method: 1800 rpm. This seemed to work just fine -- but it's a decision that deserves review.
step 12: check that the hole is centered Step 12: Check that the hole is centered. Slip the ball onto the end of a piece of 1/8" dia rod, and spin the rod in your fingers. If it's not visibly off center, then you've produced a "good enough" ball. If two balls in a row check out OK, then you can eliminate this step -- your set-up is good, and will continue to produce good balls.
Congratulations! The ball is drilled. Now... Repeat.
plunge cutting with an end mill? At one point I wondered if I could skip a few steps and just do a plunge cut into the ball with a 1/8" dia. end mill... No good! The end mill put too much stress on the ball, and the side of the ball broke.
Well, it was worth a try!
CLEANING THE BALLS
Before the balls are ready to be brazed onto rods, there's one more process we need to go through: cleaning.
degrease the balls There's residual oil on the balls that needs to be removed. For a degreaser, I'm using Citrisolve. It's a household cleaner; the active ingredient is dilimonene. Dilimonene (as I understand it) comes from orange peel -- and you can smell it.
Citrisolv Dilimonene is one of the least toxic solvents you can use... But still, beware!
Even a "natural" solvent can harm you. I recommend wearing a respirator and working next to an open window.
rinse After the solvent has broken up the leftover oil from machining, rinse off the balls with water a couple of times.
let the balls dry Lay out the balls to dry. As soon as the water has evaporated, they're ready for use.
...
Now you're done with the easy stuff, you can move on to making joints for the balls to sit in!
posted by sven | permalink | categories: stopmo
April 5, 2007
drilling balls: two methods (part 1 of 2)
by sven at 8:00 am
fresh batch of drilled balls I'm going to walk through two methods for drilling balls. In this installment I'll discuss the lathe. In the next, I'll discuss the mill.
I took the photos in this tutorial while I was constructing my last armature (the "Drifter"). I made errors -- and I'll share those with you too, so you can learn with me. I don't claim that the methods I describe are "right" from a technical standpoint -- but they're what I know so far.
helpful trick: picking up balls with a magnet A helpful trick for working with balls, whether you're drilling them on the lathe or on the mill: use the magnet end of a metal scribe for picking them up and putting them where you want. I found this particularly helpful while trying to get balls into the lathe chuck.
METHOD #1: THE LATHE
Drilling balls on the lathe has one major advantage: the lathe will automatically center the hole for you.
However, drilling holes on the lathe also has several disadvantages.
- There's no way (that I know of) to drill a hole to a precise depth.
- Sometimes the drill seems to be pushing the ball deeper into the lathe chuck.
- I've had problems with the ball twisting in the chuck while I'm trying to drill it.
- Sometimes the lathe chuck marks the ball.
- Because the drill is sideways, oil tends to drip off of it.
I used the lathe method for drilling the balls of another armature (the "Man of Steel") six months ago. At the time, I felt that (with much experimentation) I had figured out how to get consistent results. On this most recent armature, I followed my notes from that previous project...
However, my results still weren't consistent. After an hour and a half of using this method, I had 9 successful balls and 6 failures -- a success rate that really seemed unacceptable. And then I broke my center drill. So I decided to try out an idea for drilling balls on the mill that I'd been considering.
The mill method took a fair while to set up... But I was able to drill balls faster and more consistently -- so I'm sold on the mill method now.
Still, I think I've figured out now what the main thing is that I was doing wrong on the lathe -- so I'm not going to say that the lathe method isn't worth pursuing.
step 1: put ball in lathe OK, so here we go!
Step 1: Put a ball into the lathe chuck. As I said before, using the magnetic end of a metal scribe makes this much easier. If you're using your fingers or tweezers, the ball tends to roll back into the lathe chuck -- and it's very difficult to get out.
Step 2: tighten the lathe chuck Step 2: Tighten the lathe chuck... I'm working on a Sherline lathe. I was having a hard time remembering which way tightened the chuck for a while. It turns out that the old mneumonic "righty tighty, lefty loosy" applies.
The lathe chuck is tightened using two rotating disks. Put a tommy bar in the disk that's closer to the motor and hold it still. Now put a second tommy bar in the disk that's facing you and turn it to the right (clockwise) to tighten.
step 3: file the ball Step 3: File the ball. Before you do any drilling on the ball, you need to file a little flat spot on it. About 1/16" wide will suffice.
To do this, I use a fairly large bastard file. Tom Brierton recommends doing the filing with the motor turned on and the lathe spinning. I haven't had good luck with that. Instead, I rub the file back and forth, and give the lathe chuck a few spins by hand -- just to make sure the flat spot I'm making isn't at too much of an angle.
step 4: put center drill in drill chuck Step 4: Put center drill in drill chuck. When a normal drill bit first touches the thing that it's going to cut, it has a tendency to wander off center -- which can cause the bit to break. A "center drill" has an extra-thick shank that prevents this from happening. You use it to just start a hole -- which you then expand with a normal drill bit.
I'm using a #2 center drill in a 1/4" drill chuck that fits into the lathe's ram using a #0 morse arbor.
step 5: put drill chuck in lathe's ram Step 5: Put drill chuck in lathe's ram. The "morse arbor" is a tapered bit of rod that you simply press into the lathe's ram; it doesn't need to be screwed in, or locked in some other fashion.
step 6: touch the center drill to the ball Step 6: Touch the center drill to the ball. At this point, the ram should be sliding freely along the lathe bed. Slide the ram up close to the ball, until the center drill is just touching the ball.
step 7: lock the ram in place Step 7: Lock the ram in place. Now that you have the ram where you want it, use a hex key to fix it there.
step 8: back up the center drill Step 8: Back up the center drill. Rotate the ram's handwheel one rotation in order to back the center drill away from the ball.
step 9: oil the center drill Step 9: Oil the center drill. Just drip a drop or so on the center drill's tip.
cutting tool lubricant Here's a photo of the kind of oil that I'm using.
step 10: center drill the ball Step 10: Center drill the ball. I've found that to cut a type 302 stainless steel ball on my lathe, I should have it spinning at 1800 rpm. I arrived at that number by experimentation -- I haven't been able research my way to a "correct" answer yet.
It's incredibly important that you don't press the drill into the ball slowly. If you do so, then something called "work hardening" occurs (due to heat, I believe). The metal effectively becomes harder, and it becomes quite difficult to drill a hole at all. So when you press the drill into the ball, you need to do so quite quickly.
Here's where I think I made my main mistake:
As I now understand it, the center drill is really just that little tip. There's also a tapered cutting surface up at the shank. That bit, I believe, is for doing "counter-sinking": tapering the edge of a hole that you've already cut. See, the center drill that I'm using is actually dual-purpose.
I would press the center drill into the ball all the way up to the counter-sinking edge. I now believe that I should have only been making a little divot -- just enough to center the drill bit in the next stage of this process. I think that part of why the ball would sometimes twist on me is because as I tried to press a drill bit into the hole that I made, it would catch on the rim -- and the ball would deflect. A mere divot shouldn't cause deflection.
step 11: replace the center drill with a drill bit Step 11: Replace the center drill with a drill bit. Use the hex key to unlock the ram. Slide the ram back on the lathe bed, and then turn the handwheel backwards until the drill chuck pops out.
Since I'm working with a 1/4" dia. ball, I've chosen to use 1/8" dia. rod -- so I put a 1/8" drill bit in the chuck now. Put the chuck back into the ram.
step 12: touch the drill bit to the ball's hole Step 12: Touch the drill bit to the ball's hole. Slide the ram down the lathe bed until the drill bit just touches the starter hole (or divot) that the center drill made.
step 13: lock the ram in place Step 13: Lock the ram in place. Now that we have the ram where we want it, once again use your hex key to fix it there.
step 14: back up the drill bit Step 14: Back up the drill bit. Turn the ram's handwheel one rotation backwards so that the bit isn't touching the ball.
step 15: oil the drill bit Step 15: Oil the drill bit.
step 16: drill the ball Step 16: Drill the ball. Again, turn the lathe on to 1800 rpm. To avoid work-hardening, press the drill into the ball quickly. (It's counter-intuitive, but the drill cuts much easier when you go fast than if you try to carefully go slow!)
One rotation of the handwheel is .05". The ball is .25" in diameter. I want to drill a hole halfway through the ball: .125". So, that's two and a half rotations of the handwheel. But: don't forget that since we backed off the drill one handwheel rotation from the ball, we actually need to go three and a half rotations forward now.
I strongly recommend counting out loud. Once you've gone through this process ten times, it's easy to get hypnotized and lose track of how many times you've spun the handwheel.
And here's where I made another mistake:
Because I filed a flat spot on the ball, and then used the center drill to make a divot, it's impossible for me to know at this point exactly how far away from the center of the ball my drill bit is. I have to make a guess in order to compensate. If I'm careful about center drilling to an equal depth each time, I can at least ensure that the depth I drill to is fairly equal each time...
However, I've repeatedly forgotten to take into account that the tip of the drill is conical. Even if I can somehow drill to the exact center of the ball, we're measuring from the tip of the drill -- a rod which has been cut off straight cannot reach that point.
It's not a big error when you're only looking at one ball... But if you ignore that error, you can wind up with an armature that's a full half inch taller than your blueprint.
I did!
...
So, there you have it: sixteen steps. It seems kind of foolish to list all of them out like this. After all, if you have your own lathe, then you surely understand how to work it.... However, I want to give the uninitiated a taste of how one actually works this device.
Also, at least for myself, spelling out the steps in excruciating detail helps me get faster at doing them. The "Drifter" armature required 20 drilled balls -- and I made six extra, in case of accidents. I believe at my fastest I could get through those 16 steps in 6 minutes. That's more that two and a half hours just drilling balls -- if I'm at my peak.
With the mill method, I could get a ball done in just 4 minutes. ...More about that tomorrow!
posted by sven | permalink | categories: stopmo
April 4, 2007
new armature: the drifter
by sven at 9:00 pm
beauty shot The "Drifter" is the fourth jointed armature that I've made in my own shop. Making it took 45 hours, over the course of 11 days.
It's made entirely of steel: 1018 for plates and rods, 302 for balls. The joints are all sandwich plate ball-and-socket. It stands 8 and 1/16" tall.
full body Why do I call it the "Drifter?" Well, because... Due to a mistake in how I engineered the ball sockets, every joint has a bad case of drift. Drat!
["Drift" is when a the ball is biased to follow a certain arc of motion, rather than moving smoothly in all directions.]
demonstrating a lean One of the first tests you do on an armature is putting it into an extreme lean. If your puppet can't lean forward without falling over, it can't walk or run. This armature passes the test. (The ankles have to be pretty tight, though.)
jointed feet A notable feature of this armature is that it has jointed feet. Fussy to make -- but having a toe as well as an ankle allows you to animate walks much more realistically.
action pose #1: run I'm not intending to put the Drifter inside a puppet. He's part of a series that I'm doing in order to teach myself the art of armature-making. I've already made a display stand for him. And I have plans outlined for my next two learning projects.
action pose #2: sumo My past three armatures were meant to have human proportions. For this one, I had more of a "gnome" body in mind -- wider in the torso, and with long feet.
I had intended to give this design step-block hands... But when I discovered the drift problem, I decided to leave that for the next project. (Which I'm thinking will be constructed entirely from step-block joints -- no sandwich plates.)
comparison with "Man of Steel" Here's a comparison of the Drifter with my last home project, the Man of Steel...
- The Man of Steel used open-hole sandwich plates, rather than a true ball-and-socket design.
- The Man of Steel used 5/8" dia. balls, whereas the Drifter uses 1/4" dia. balls.
- Rods are perpendicular to the chest and pelvis blocks on the Drifter -- rather than being laid parallel on pieces of flat stock, as I did with the Man of Steel.
- The Drifter has double-jointed shoulders in order to allow greater range of motion.
- The Drifter is the first home project I've done with jointed feet.
close-up I have qualms about the Drifter's performance. However, my design and machining skills have come a long way during the past six months. My accuracy and efficiency in constructing this armature were far superior to the last attempt. The brazing job is much more reliable, and I was able to get a much better shine on the metal...
All in all, excellent progress.
posted by sven | permalink | categories: stopmo
March 26, 2007
armature teaser
by sven at 11:59 pm
new armature - in progress I just wanted to tease y'all a little... Saturday (3/25) I started work on a new armature.
The big picture:
- steel again
- actual ball-and-socket joints (rather than open-hole)
Design improvements:
- square stock at neck for better attachment of head
- body blocks perpendicular to incoming rods
- different shoulder design, to increase range of motion
- step-block wrist joints
- wire fingers
- ankles closer to soles of feet
- hinged toes
Changes in the construction process:
- drilling balls using mill (instead of lathe)
- brazing using oxy-propane "little torch"
- cleaning balls using Scotch-Brite pads
- doing rough-cuts using mini cut-off wheel
- on the mill, I've learned how to use a "wiggler" for locating edges
- using drill press for through-holes
- sandwich plates radiused using grinder (rather than a jig and rotary table)
- trimming the joints using Scotch-Brite wheel on grinder
- handy metal bowls to keep groups of parts together
More soon!
posted by sven | permalink | categories: stopmo
March 12, 2007
speaking @ the "world puppet animation" show
by sven at 3:30 pm
Yesterday I had my speaking engagement at the "World Puppet Animation" show. Thanks gl. for taking photos!
talking about puppet animation I felt it went pretty well. When I spoke, I felt like I knew just what I wanted to say -- and I didn't "um" much. After the films were over, the audience wanted to hear about my reactions to what we'd seen... I wasn't as sure-footed for that part, but see now how I could be better prepared to respond in the future.
There were 9 or 10 of us at the show. I suspect it being a Sunday -- and the Daylight Savings change -- probably kept numbers low.
There was a version of Puss and Boots by the Diehl brothers from Nazi-era Germany that was astonishing; the puppets and sets all looked like they were made by master doll-makers.
We saw a George Pal short -- featuring his unique replacement animation technique -- which I'd seen previously in The Puppetoon Movie. [If you're into stopmo, you must see this film!]
There was a Rankin & Bass-style film from Czechoslovakia titled "The Problem" which I absolutely adored -- and which I will probably never have the opportunity to see again. I'm very glad I went to this show -- even if I hadn't been speaking!
my box of tricks, packed to go I didn't have any written notes for the speaking... But I did have a mental outline. Here's what I said, as best as I can reconstruct it.
[I. INTRODUCE MYSELF]
My name is Sven Bonnichsen. I'm a mixed media animator. That means I do two-dimensional drawn animation, computer animation, and stop-motion puppet animation. My focus is on puppet animation, and I specialize in making metal armatures -- the skeletons that go inside of puppets so they can hold a pose.
[II. DIFFERENCES BETWEEN TYPES OF ANIMATION]
I want to start by saying a little about the differences between puppet animation, drawn animation, and computer animation.
When you're doing drawn animation, you start by making your "keyframes" -- the most important poses in a sequence. Then, you draw the "in-betweens" that get you from point A to point B. This is all on paper -- so as you work, you can flip through the pages to check that your animation is going how you want it to.
Not so with puppet animation. With puppet animation, you start with frame one, and just have to keep going forward. Once you start work on a sequence, you have to keep direction of momentum and arcs of motion all in your head -- so it's very important that you do NOT stop in the middle!
Computer animation, like drawn animation, makes use of in-betweens. You define point A and point B, and then let the computer figure out how to move your model from one point to the other.
Computer animation is very popular with big movie studios because you can have a whole team of animators working on one sequence. One person can be working on the motion of the arm, while another is working on the eyes -- and you can go back and edit what you've programmed endlessly.
Not so with puppet animation. With puppet animation, it's much more like a performance -- and the animator is like an actor. It's just one person going "mano a mano" with the puppet, getting into the puppet's head, breathing life into it.
One thing that I really appreciate about puppet animation, personally, is this tactile experience of being able to manipulate the puppet with your own hands.
Right now I'm working on a film titled "Let Sleeping Gods Lie" -- which, if all goes well, will appear in the H.P. Lovecraft Filmfest this October. In it, I've got these creatures with five legs. I'm trying to figure out how on earth a thing with five legs is supposed to walk...
In the film I've got both a CG model of the critter and a puppet version. When I'm working with the CG version, with the computer screen between me and it, I can't figure out for the life of me how it's supposed to move. But when I work with the puppet model, holding it in my hands I can begin to get a sense of things. "OK, as it leans this way, the weight of the thing has to transfer from this tentacle to this one..."
using puppets to illustrate my points [III. PUPPET ANATOMY]
OK, so that's a little about the differences between different types of animation. Now I'd like to tell you a bit about the anatomy of a puppet, so you can better appreciate what you're going to be seeing tonight.
[III-A. TIE-DOWNS]
The most important thing to know about a puppet is that it has to be able to remain absolutely still between frames. When you're animating, you create the illusion of life by very carefully moving the puppet a little bit at a time. If the puppet twitches uncontrollably each time you snap a frame, then the illusion is destroyed.
So, one of the first things I always check on a puppet is if it can do an extreme lean. [I demonstrate Percy leaning forward.] Think about it: If you're taking a step, there's that moment before your foot touches down when you're leaning far forward... Can the puppet hold that pose without tipping over?
In order to keep the feet planted where they belong, you use "tie-downs." You drill holes in the floor of your set, and then these screws [I demonstrate] come up from underneath, and screw into little nuts in the feet of the puppet.
[III-B. ARMATURES]
In order to hold poses, the puppet needs to have a good armature inside of it.
There are three main types of armatures: ones that are made out of wood, or wire, or metal ball-and-socket joints.
Wood armatures were used a lot in early Eastern European puppetfilms -- but they're not used very much anymore, because the joints tend to wear down and lose their tension.
Wire armatures are the easiest type to make -- and are still used quite a bit in professional productions.
Metal ball-and-socket armatures are in many ways the best sort of armature, and get used extensively in feature-length projects.
Differences between wire armatures and ball-and-socket ones:
With wire armatures, you always have to be aware that the wire is ultimately going to break.
There are things that you can do make it less of a catastrophe when the armature does break. You can make your puppet with a detachable head and hands. That way when the wire breaks, the parts that you put the most work into -- which get the focus on screen -- can still be salvaged. [I demonstrate detaching Percy's hand.]
On a person, the elbow bends at one point. With a ball-and-socket armature, you can also have the elbow bend on a point -- which is nice. On a wire armature, though, if you bend the wire repeatedly on one point, it's going to break a lot quicker. So what you want to do is have slack at the elbow, so the wire bows gently, and the stress on the wire gets distributed.
Generally speaking, a ball-and-socket armature isn't going to break. But sometimes the joints do get loose -- and you're going to have to get inside the puppet to tighten them.
A ball-and-socket armature is sturdier and more precise than a wire armature. (With a wire armature, the wire springs back a little when you pose it.) But ball-and-socket armatures are also generally bigger -- and they're more expensive and labor-intensive to create.
So there are pros and cons to both.
[III-C. PUPPET COVERINGS]
Now, once you have your puppet armature, what are you going to cover it with?
There are three main options...
You could cover the armature with Plasticine and do claymation with it.
(A lot of people use the word "claymation" to mean anything that's stop-motion. "Claymation" is actually a trademarked term, coined by Will Vinton -- most famous for the California Raisins -- whose studio used to be right here in Portland. However, the word has gone into common usage... Sort of like how "Kleenex," which is a specific brand, has become synonymous with "facial tissue.")
For a very detailed puppet, you could cast the armature inside of a flexible material, such as foam latex -- which you might find in the soles of your shoes -- or silicone. The puppets in "The Corpse Bride" were made from silicone, which was a tremendous technical breakthrough.
Or, a third option, you could wrap the armature in strips of cushion foam [I demonstrate] -- like the foam you'd find in your couch -- and make the head and hands out of something hard, like Super Sculpey or Epoxy clay. Then, the body, you'd probably cover in fabric to make clothes -- or perhaps in fur, if it's an animal. This is more or less the process that was used to make the original King Kong puppet in 1933.
So: That's generally how to build a puppet for puppet animation.
puppets lined up on the stage [IV. THE STOPMO COMMUNITY TODAY]
I want to wrap-up by saying that we are living in very exciting times, in terms of stop-motion animation.
When you're learning how to do puppet animation, there's an incredible learning curve. You need to figure out how to make armatures, and do puppet fabrication, and make clothes, and build sets and props, and rig lights, and work the camera...
Up until about ten years ago, you really had to hunt and search to find information about how to do this stuff. But now, an amazing online community of animators has been forming, sharing knowledge -- making it easier to learn the art than it ever has been before.
(And, with digital cameras and laptop computers now -- just about anybody who wants to could get into this art!)
The main hub for information -- globally -- is StopMotionAnimation.com. It has a sister website, StopMoShorts.com, which has a quarterly challenge, to encourage people to make puppetfilms.
[V. CLOSING - FREEBIES]
I just want to show you now my puppets "Dad" and "Jimmy," who starred in a film that I made this last year for StopMoShorts.com. Dad is a sort of gruff, authoritarian father; and Jimmy is his mischievous son, who doesn't want to do his chores.
I've brought along copies of the film, "The Great Escape," as freebies. Who here would like one? (Pass them back, please...)
OK, that's it. Thank you very much to Dennis Nyman. Are there any questions that anyone would like to ask at this point?
...
show's over - goodnight! posted by sven | permalink | categories: exhibits & events, stopmo
March 11, 2007
demo wire armature
by sven at 3:10 pm
REMINDER: Tonight I'll be speaking at the "World Puppet Animation" show at Disjecta (230 E. Burnside) at 7:30pm. ...Don't forget that Daylight Savings Time ends today -- make sure that your watch has "sprung forward!"
demo wire armature For public speaking, it seemed like it would be a good idea to have a demo wire armature that hasn't been covered up with foam, Sculpey, and the like.
I've talked about how to do all this before, but this'll be a nice review.
twisting strands of wire together When you make a wire armature, it is imperative that you not scratch or nick the wire. If the wire is scratched, it's guaranteed to break. So: avoid using pliers!
My method is to slip two pieces of scrap dowel through the loops at the ends of my wire and twist by hand. [Another method is to put one end into the chuck of a power drill. I've tried this; it tends to twist the wires too tightly.]
Using multiple strands of wire gives you a stronger armature. If one strand breaks, the others can still go on working. It's generally a bad idea to use just one strand of wire for any part of the armature.
Twisting wire is the simplest way to make an armature -- and it works quite well. However, it should be noted that twisting immediately introduces stress into the wires. There is another method where you don't twist the strands of wire together, but instead wrap them together loosely with thread and then use Barge rubber cement (found at hardware stores) to bind everything together. I have not tried this approach myself yet, but understand that it is a somewhat more professional method.
3 lengths of twisted wire I'm using 1/16" aluminum armature wire for all parts of this armature. Aluminum armature wire can be found at art and craft supply stores. Unlike the aluminum wire you find at hardware stores, it is annealed -- which means that it is softer and more pliable.
There are, of course, other kinds of wire that you can use. The two main contenders are steel and lead. Lead has no "spring back" when you pose it -- but it is very breakable (and toxic). Steel is very strong -- but consequently also has a lot of spring back. Annealed aluminum is a nice compromise between these two: it's durable, and has minimal spring back.
After annealed aluminum, steel florist's wire (often thread-wrapped) is probably the most common wire used among amateur animators. Soldering wire has reasonably good animating qualities -- but also contains lead. Copper tends to break fairly quickly, and is generally avoided.
I strongly recommend putting in the effort to find aluminum armature wire. However, if you are set on using a different type of metal, do a bend test. Flex a piece of your wire at a single point repeatedly. How many bends did it take for it to break? ...The answer should give you some sense of how the wire will hold up while you're animating.
adding epoxy putty My armature is made out of three segments: the legs, the arms, and the spine/head. For each of these segments, I twisted together three strands of the 1/16" wire. The segments are held together with plumber's epoxy putty.
Look for epoxy putty in a hardware store, either in the adhesives aisle or with the plumbing supplies. Epoxy putty is about the size and shape of a roll of 50 pennies. It is made of two chemicals which, when kneaded together, react with one another and become very hard. "As hard as steel," the advertising says... Which is a bit of an overstatement -- but not by much.
Epoxy putty typically either has a 5-minute or 20-minute cure time. I recommend going with the 20-minute variety. The reality is that it will be too hard to work with by the end of 5 minutes (though it's not yet cured). You need that time to knead and apply the material.
For safety's sake, one should wear gloves while mixing epoxy putty. Simple latex gloves help, but the epoxy actually passes through a latex barrier quite quickly. Nitrile gloves give you much better protection; they can be purchased online via Amazon.com or locally at a medical supplies shop (the sort that specializes in serving the needs of people with disabilities and the elderly).
Epoxy is a sensitizer. Given large enough eposures over time, you will (guaranteed) develop a chronic allergic reaction to the material. How long it takes to develop a sensitivity varies from person to person. There is also anecdotal (but not scientific) evidence that prolonged, unprotected use of epoxy putty can cause "nerve death in the fingers."
Bottom line: epoxy putty is a nearly irreplacable media in the animator's tool box -- but do use it as safely as possible!
using knurled nuts for feet For a humanoid armature, you're going to want tie-downs in the feet.
The easiest way to make feet tie-downs is by epoxy-puttying in nuts. You'll drill holes in the floor of your set; then you'll reach under the set and insert screws through those holes into the soles of your puppet's feet. Another option is to drill wood screws through the feet from above -- but doing so will require puppet feet that can be peeled back to reveal the armature. [For how to hide holes in the set, see Mike Brent's helpful tutorial.]
Pretty much any kind of nut will work. I've chosen to use knurled nuts -- which are handy, because they have a groove around the middle that gives the wire a place to sit while you work.
You're going to want feet with flat soles. So, it's useful to epoxy the nuts in place while they're already screwed onto a piece of wood. Here I'm using a piece of scrap wood that's hanging off the edge of my table. I've also fabricated a piece of wood that sits up on risers before, to have an easier way to tie down puppets while I'm working on them.
done Add in epoxy putty "bones" as necessary.
Leave as much room between bones as possible. On people the elbow may bend on a single point -- but if you do this with wire, it won't last very long. Allowing the wire to bow at joints will prolong its life.
In my experience, the part of a wire armature that gets the most stress is the shoulder. Often it's a good idea to have the shoulder wires come up out of the shoulders and then bow downward -- just so you have some extra slack. I neglected to include shoulder slack while making this demo.
This demo armature is suitable for many types of puppet. You could cover it in oil-based clay to do "claymation." You could cast foam latex or silicone around it...
Most likely, though, you'll use a build-up process. The hands, feet, and head will be solid pieces made from Super Sculpey or an epoxy clay (such as Magic Sculp or Apoxie). The body will be built up with strips of cushion foam and then covered with fabric clothing.
...
And there you have it! It's pretty easy to build one of these armatures -- the real trick is just figuring out what materials you need, where to get them, and then actually collecting them all. ...Good luck!
posted by sven | permalink | categories: stopmo
March 9, 2007
elder thing puppet test
by sven at 4:40 pm
Yesterday I was a busy boy. I built a new puppet and tried out animating it.
new elder thing puppet While I was driving to Tucson, I thought through some changes in the script for Let Sleeping Gods Lie. I've been really unhappy for some time with the "joke ending" I'd originally planned. I've come up with a story now that is much more dramatic -- while still using my basic elements.
But changes? Oh dear...
I'm loath to ask my actors to come back for yet another shooting session. I still might be able to avoid it... I've decided that my storytelling style has generally been too linear; I want to switch my approach to "hitting the high points." By using a style that's similar in pacing to a movie trailer, I may be able to get away with using only what I've already got in the can. ...And then if there are a few vital pick-up shots, I may try using myself as a stunt-double.
starting the armature An important development: I'm adding a whole new section to the film. I'm calling it the "deep history segment." Because it's a sort of flashback, I think it's appropriate for this segment to have a different visual style. I'd been contemplating animating something viscous -- like black molasses, or a mixture of ink + hair gel on glass. But then yesterday it struck me: why would I not use puppets?!?
So I set out to build a "quick and dirty" elder thing puppet -- just for proof of concept.
armature progresses The limbs are made from 1/16" aluminum armature wire: two strands for the arms and eyestalks, three for the legs. The arm and leg wires are 6" long.
The spine is a piece of wooden dowel, and the limbs are attached with plumber's epoxy putty. After fixing the limbs onto the dowel, I added an additional layer of epoxy -- just to make absolutely sure everything holds together.
beginning foam wrapping I've got 1/4" and 3/8"-thick sheets of cushion foam on hand, which I cut into long strips and wrapped around the armature to bulk it out. Most of the time I chose the 1/4" foam. It allows greater control -- but does take quite a while to layer.
The foam strips are held onto the armature with athletic tape.
adding a rigging point It's a little hard to see in this photo, but I remembered to add a rigging point for this puppet. In one of its "armpits" I epoxy-puttied a 1/2"-long piece of 7/32" K&S.
[Notice that underneath the puppet you can see the rough blueprint that I drew for scale before starting construction.]
foam wrapping done There, the foam-wrapping stage looks about complete!
refining form with underwrap Next, I refined the form of the Elder with althletic underwrap. This is an extremely thin non-adhesive foam tape.
testing cloth tape on leg I had the thought that maybe I ought to use the athletic tape -- which is flexible -- as the final form-shaping layer. I tried this idea out on a leg tentacle... And found that I didn't like the way it crumples when the tentacle bends.
However, for the torso -- which is not meant to bend -- the tape worked out very nicely. It's sort of like applying papier mache -- but with cloth Band-Aids. The tape did a nice job of refining the form; it also accepts paint better than the porous foam does.
ready for painting Here's the pup, all ready to be painted.
painted with latex and acrylics mix I mixed mold-building latex with black acrylic paint for the paint job.
My latex has the consistency of thick mayonnaise. I would rather have used a more liquid variety -- but didn't have any on hand.
Why use latex? I was hoping to smooth over the texture. And I wanted something that would help hold the underwrap all together. And I've read about this technique -- but hadn't tried it yet -- so I wanted to try something new.
Nick Hilligoss describes puppets that have been painted with liquid latex as bending "like a rubber boot." Yep -- that's what it's like!
I don't really like how the latex turned out... How it crumples when you bend it. How it wants to stick to itself. [I know I could apply talc -- but it's important that this pup be as black as possible.] ...Still, it's good enough for a test puppet.
Almost forgot: I also added a little bit more epoxy to the eyeballs, just to make them bigger.
whipping leg test: click on image to play movie (33 KB) On to animating! The first test was a very simple "whipping" motion with one of the legs.
I've got some new photo lights. This was their first outing. Turns out their light is extremely blue. Not too happy about it.
walking test: click on image to play movie (76 KB) One of the big mysteries with the Elders is: How the heck do they walk?
I haven't really figured it out yet, but I've begun to get a better sense for how weight shifts from one leg to the next.
...This is one of the HUGE benefits of making an elder thing puppet: I don't know how I'd ever be able to figure out how they move if I was just positioning pixels with a CG version. I need to hold the creature in my hands and be able to push it around, trying out different possibilities in a concrete way.
black line test: click on image to play movie (99 KB) I've been trying on a new hat lately. I'm playing with calling myself a "mixed media animator." (I also heard the phrase "animation artist" recently, which I kinda like too.)
I love stopmo. But "mixed media animation" is probably a better label for the style that I'm ultimately going for. Not just using CG effects to enhance stopmo -- with digital water, skies, and fire. No, what I want to do is mix CG, cel animation, motion graphics, and puppetfilm in innovative ways that blur the lines.
The clip above is a good example. I've taken the puppet animation and used AfterEffects to turn it into what look likes a digital line drawing. ...I like!
standing up test: click on image to play movie (109 KB) Another thing I've been aching to see is how the elder things stand up.
Looking at the prior "walk test," it seemed to me that the Elder was almost comical -- waving its arms around hysterically. These creatures are millions of years old, frighteningly intelligent and dignified. Maybe they don't move their arms much at all? Maybe they don't writhe -- which has always been the assumption -- maybe every motion is very purposeful.
Important puppet construction note: This puppet sorely needs tie-downs at the ends of each of the legs and at the base of the spine. Animating a two-legged puppet without tie-downs is painful, but can be done in a pinch. Having five legs all subtly shifting as you animate, when you really want them to stay fixed to the ground? ...Intolerable.
white line test: click on image to play movie (197 KB) It's going to take more playing around, but I'm beginning to have insight into the Elders.
(Huh. Does puppet pushing constitute method acting?)
Their limbs are fast and lithe. But lifting up their torso -- that's heavy, so the rise has to be more deliberate and burdened.
As I'm animating, there's a tendency for me to choose one of their five faces and think of it as the front. When I do so, I see a pair of arms and a pair of legs -- which looks almost human, if I don't focus on the other spare limbs.
I think I can use this impression of humanity to good effect at key moments in the film -- but I must beware. What are the other faces doing and thinking while I'm looking at this particular side? Maybe it's better to conceptualize the Elder as five separate people, all standing back to back. Kind of like certain photos of multi-faced (Indian?) gods that I've seen.
The eyestalks... If they function like human eyes, then they ought to dart around from focal point to focal point. But there's a danger of making the critters too human. In the "standing up" test, I tried having all the eyes swing around in unison -- which produced a sort of sea anemone effect. Plausible, but very appropriately alien.
For this last clip, I tried using AfterEffects to multiply the critter, and tried out using white lines on a black background. This is very close to what I think I'm going to ultimately use. I thought I'd like to use a "lens flare" effect to create green, star-like eyes... But it turns out that I'd probably need to use LightWave to get what I want -- which may not wind up being worth it.
...
Holy cow! All that in one day??
posted by sven | permalink | categories: let sleeping gods lie, movies, stopmo
March 4, 2007
speaking about stopmo on march 11
by sven at 5:13 pm
On Sunday, March 11, I'll be present at the Dennis Nyback Cartoon Extravaganza to speak about puppet animation. I'll be bringing along puppets and armatures for show and tell.
The Extravaganza is a 21-day-long film series being presented at Disjecta, located at 230 E. Burnside. The series runs from Feb. 23 through March 15; all shows at start at 7:30pm and cost $6. The theme of the March 11 show is "World Puppet Animation."
Independent film archivist Dennis Nyback has organized this film series as a special fundraiser to support the Oregon Cartoon Institute, which is beginning work on a documentary about historic Oregon animators.
I met Nyback and documentarian Anne Richardson at the Feb 28th showing of Ladislav Starevitch films, at which point they invited me to speak. I am honored to be able to contribute in this small way to their efforts.
Here is what the Oregon Cartoon Institute Newsletter had to say:
On Wednesday February 28th the best crowd so far, on the fifth day of the Dennis Nyback Cartoon Extravaganza, showed up to see Ladislaw Starevitch animation at Disjecta (230 E Burnside). Among the crowd was Sven Bonnichsen, animator http:///www.scarletstarstudios.com/ . Mr. Bonnichsen generously explained to the crowd basic puppet design for animation using the armature method. Mr. Bonnichsen has graciously agreed to bring armatures and puppets to World Puppet Animation Night on March 11.I hope that my local readers will strongly consider coming out for the "World Puppet Animation" show on the 11th. ...But even if that doesn't strike your fancy, do take a look at the calendar of shows -- there's something for everyone in this amazing, one-time-only festival.
posted by sven | permalink | categories: exhibits & events, stopmo
March 1, 2007
24 hours in halfland
by sven at 9:00 pm
Hello from sunny Halfland! On my way back from Tucson, I made a detour through LA... And suddenly found myself in Halfland!
Shelley and Sven Check it out! Shelley and I co-exist!
Halfland - back I got to see with mine own eyes the Halfland set being made...
Halfland - front It's big, yo! And it's going to be even bigger! Very impressed.
Shelley animates! Well, you get two animators together, whatcha gonna do? Um... Animate?
click on image to play movie (48 KB) Shelley wanted to see the difference between using a webcam and using a digital still camera. We threw a sheet of pegboard on top of some cinderblocks. I opened up the laptop and connected my Canon Powershot G5. I did capture using Canon's proprietary software, RemoteCapture. (DSCs are notoriously difficult to get running happily with a framegrabber.)
I had the Diplomat with me, and threw this sloppy clip together in a minute or two. "Proof of concept."
click on image to play movie (175 KB) We detached the still cam and replaced it with the "Honorary Strider Stop Motion Patrol Unibrain Webcam of Joy" -- which works seamlessly with FrameThief.
Shells really liked animating Dad... I suggested hot-gluing lengths of armature wire onto the back of Webster the elf -- and then he got in on the action.
click on image to play movie (104 KB) Next, I gave Shells a quick tutorial on how to capture sound, analyze it in Papagayo, and do lipsync in FrameThief. ...What a trip to see someone else breathing life into my pups!
an impromptu workshop I had the opportunity to look at Shelley's scrapbooks from her time working with Julie Taymor. I love all the textures -- which is something Shells is really good at. So, the next morning Shelley gave me an impromptu workshop on textures and improvisational puppet construction.
click on image to play movie (114 KB) Here's what we came up with: a puppet with tree branches for legs, a paper and burlap torso, and an earthen clay head. We tried standing him up with bits of plasticene... But it wasn't very stable. So instead, each of us held one leg, and I told Shelley how much to move for each frame.
The end result seemed too fast, so we slowed it down. Shelley hadn't seen this function of QuickTime Pro before -- so I was glad to be able to do another micro-tut.
my wonderful hosts I can hardly begin to describe what lovely hosts Shelley and Paul are.
Waiting on my pillow I found a little bowl of chocolates and a baby rose. Before I went to bed, Shelley snuck a hot water bottle into the bed, so I could warm my feet. When I woke in the morning, a terry-cloth robe and slippers were waiting for me.
And -- OH! -- the meals! I was particularly taken with the mascarpone/lemon curd/peaches concoction that Shells improvised. Gonna have to try making that one myself!
loving attention to details The thing about Shelley that I'm most left with is her loving attention to details. I mean, look at that vise! Who glues a little wooden heart onto their vise?!? Things like this were gently tucked into nooks all around Paul and Shelley's home.
On one of the walls there were two photos next to each other. One of a catepillar. One of a moth. Shelley hand-fed THAT catepillar -- and it became THAT moth.
Imagine it: patiently feeding a catepillar and then getting to see it transform.
There. Now you understand Shelley.
Jimmy and the writing mouse I had a tremendous time in Halfland -- it was sad to have to leave. And there was so much more to the visit than what I've been able to write...
Let's just end with the symbolic photo: a meeting of worlds.
posted by sven | permalink | categories: stopmo
February 15, 2007
display stand for puppets
by sven at 8:00 am
display stand Last night I did a quick little project: a display stand for puppets or armatures.
I'd been gathering materials for a while -- at last I had everything needed:
- a 4" x 4" x 1/2" piece of MDF, sold at Craft Warehouse for making coasters ($2)
- 1/2" x 1/2" x 3' strips of wood sold at Home Depot in the molding aisle (~$1.50 ea.)
- 3/4" long 10-24 socket cap machine screws from Ace Hardware (50¢ ea.)
I cut two 4" lengths off one of the wood strips using my mini cut-off saw, then hot glued them to the bottom of the MDF. I drilled two 3/16" holes for the tie-downs to come up through. And finally, I painted the whole thing with a coat of black acrylic.
See? Isn't that a professional-looking way to show off your pups?
posted by sven | permalink | categories: stopmo
February 10, 2007
this week's metalworking progress
by sven at 5:10 pm
metalworking table Things are really beginning to come together in my revamped studio room. The space has such a gravitational pull, I keep wanting to wander back over and play more.
I got an 8-foot table at Office Depot for my machine tools. I cut the piece of masonite I'd previously been using as a floor mat to size, and am now using it as a protective surface for the table. The masonite is held in place with a bunch of 1" C-clamps that I got at The Tool Peddler.
The rolly chair is new. I've taken all the other chairs out of the room, and am having a blast scooting from one station to the next.
I got several abrasive grinding wheels for the mini cut-off saw via McMaster-Carr -- before discovering that Tool Peddler (which is local) sells one that's just as good. I also got a metric stainless steel replacement screw for the cut-off (thanks Winks!) after promptly stripping the crappy screw that came with the machine.
(Um, that's not this week's progress -- just an update on things that have been in motion for a while.)
T-spacer (left), trial step-block joint (right) Here's the big progress for this week: I made a trial step-block joint.
I'm getting better at machining... I now understand how to use a "wiggler" to precisely locate the edges of a workpiece in relation to the mill's spindle (X and Y axis). And I know how to use a piece of paper to figure out how far my cutting tool is from the surface of the workpiece (Z axis). (The Swarfrat Mini Machines 101 DVD series was really helpful.) ...A precision part like the stepblock joint wouldn't be possible without these skills.
I'm getting better at figuring out set-ups on the mill. Using the "sushi roll method" to make the Man of Steel was madness. I've made a T-spacer (pictured above) that will make mass producing joints far easier. Clamping technique: I've got homemade risers and store-bought parallels to raise the workpiece up to where I need it -- and I'm being more careful about having a spacer on the left side of the vise if my work is hanging off the right side. Still need to make some machinist's jacks... But they're not necessary for making stepblocks.
The killer step in making the joint was milling out the hollow area between the plates. That space is 7/16" long (.4375"). It took 175 passes with a 1/4" two-flute endmill to carve it out, .0025" at a time. I timed it: 33 mind-numbing minutes. I was pretty demoralized. I may be an absurdly patient person -- but even I can't see spending 10 hours like that (and just on that one step!), to make the 20 joints you need for a standard stepblock armature.
Happily, I just got my copy of Machine Shop Essentials by Frank Marlow in the mail -- and it suggested a solution. [It's an excellent book! I highly recommend it!] The trick to getting rid of a lot of material quickly is to make plunge cuts with the largest, most fluted end mill you have. I tried it out -- and while it still took 19 minutes (on the first try) -- this is definitely the way to go. Much less mind-numbing; and I think I can ultimately get things set up so I can process through a batch of joints with relative ease. ...Yay!
soldering table The soldering table is also coming along nicely...
box for bottles of propane & oxygen Yesterday I built this box to keep my propane and oxygen bottles standing safely upright. You can't see it in this photo, but there's a C-clamp behind them that holds the box firmly to the table.
the "little torch" I've been meaning to share a picture of this since... October? This is the "little torch", a tool that comes from the jewelry-making field. They say that its flame is so precise, you can have have it lit inside of a cigarette paper and not light the paper on fire. Impressive claim...
ceramic tile You don't use an oxy-propane torch just on a cinder block, as I was doing with my butane micro torch. You need a special ceramic tile that is designed to deal with super high temperatures. ...And here it is.
developing blueprints All this metal working... It has me hungry to make a new armature. Can't let myself get into that now -- but let me take this opportunity to talk about where I'm going with all the metalworking development.
My stopmo focus is wholistic -- I want to learn everything that there is to know about puppet fab. Armatures are a good place to put attention early on; they're the foundation of a puppet.
My goal -- (well, one of my goals) -- is to be able to make pro-level steel armatures with stepblock, hinge, and swivel joints by the end of this year. I want to be able to replicate what I saw at Bent and what I see in photos from The Nightmare Before Christmas at home. Overkill? Yeah, probably. But it's a skill that I want nonetheless.
My strategy is to take baby steps, making a series of armatures, each of which builds upon the previous... Conscientiously evolving them. From brass to steel; from hand-held tools, to the drill press, to the mill and lathe; from open-hole sandwich plates, to ball-and-socket joints, to step-blocks, to hinges.
Anyway. I'd been thinking that the follow up to the Man of Steel would be a stepblock armature. Now I'm thinking that that skips a step -- that I ought first to do sandwich plates with sockets instead of holes. Given where I'm at now, that feels easy-peasy, and I'm eager to get started.
(A road trip to Tucson next week stands in the way, though.)
...
On a related note: I just watched Rankin & Bass' Mad Monster Party last night. I'm considering doing a film with their style of pups, next time I do a StopMoShorts haiku challenge. Foam latex body, hollow resin head, limited facial movement -- but with steel jointed armatures instead of wire.
I was paying special attention to the faces. I saw four strategies being used: (1) the upper lip is hard-sculpted, but there's a flat space underneath it where paper mouths can be adhered with sticky wax; (2) same thing, but using a clay lower lip (particularly for female characters); (3) a hinged marionette-style jaw; (4) replacement heads for extreme poses (like a sneeze or a shout). I'm not sure how I ultimately want to deal with facial expressions... But giving the Rankin & Bass approach a try seems like a really worthwhile experiment.
posted by sven | permalink | categories: stopmo
February 8, 2007
stopmo play date
by sven at 11:59 pm
Hazel (whom I met at Bent Image Lab) and Eric (who was there, but I didn't knowingly meet) are starting up a new animation club here in Portland. Doesn't have to be stopmo. Next meeting is Feb 27. If you wanna come, talk to me.
Hazel is the first local person I've met who suffers as I do from "the sickness" -- stopmo fever. Getting together to geek out over stopmo tech details? Predestined.
So today she came over; an afternoon of frenetic conversation ensued. She ogled and was boggled by the stacks of stopmo DVDs. I demonstrated the use of the "wiggler" attachment on the mill. And -- praised be the lord (Harryhausen) -- we got FrameThief fired up and did a little animating with The Diplomat.
Here's a person who's got the passion to do great things, given the resources... So I sent her home with a spare roll of aluminum wire, a tube of epoxy putty, some 3" 4-40 threaded rods and knurled nuts. We've scheduled a day for next week when she can come over again, abscond with my laptop, and have the day to herself in the studio practicing the art of breathing graceful life into inanimate pups.
Just lock the door behind yourself when you go. 'K?
posted by sven | permalink | categories: stopmo
January 16, 2007
product review: mini cut-off saws
by sven at 8:00 am
For making armatures, a mini cut-off saw is just about indispensable. It cuts through small brass or steel rod (or bars) quickly and cleanly. It's much, much faster than using a hacksaw. And the cuts are so clean, you don't even need to sand the rods' ends.
I've seen the following two models in use at two different animation studios, and have now had a chance to try out both.
miter / cut-off machine from Micro-Mark The Micro-Mark model costs $139.95, and can only be purchased online. The Harbor Freight model costs $23.99 -- and if there's a Harbor Freight store near you, you just can walk in and buy it in person.
I'm certain that I need one of these for my metalworking. Given cost and convenience difference between the two, I decided that I could risk buying the Harbor Freight model. If it didn't work out, it's not too big of a loss -- and if it did work out, the savings would be significant.
mini cut-off saw from Harbor Freight The Micro-Mark costs almost six times more than the Harbor Freight -- YOUCH! -- but it is also hands-down the better machine. I'll be ordering one soon.
What's the big difference? With the Harbor Freight cut-off saw, you can only get radial saws with teeth. When I was testing it, the the saw repeatedly got stuck on what it was cutting. Binding up is unacceptable (and rather frightening) behavior.
The Micro-Mark, by contrast, uses abrasive wheels. Instead of using teeth to make its cut, an abrasive wheel grinds material away. So there's basically no way for it to get stuck.
The Harbor Freight model -- while being a hideous color -- has a slightly better form factor. It has a convenient handle. And the safety latch is released with the press of a button, rather than that peculiar little lever.
...If only Harbor Freight made abrasive wheels for their tool, it'd easily be the better machine.
posted by sven | permalink | categories: stopmo
January 15, 2007
casting a resin head
by sven at 8:00 am
Friday was a "stopmo play day"... I put the newly renovated studio to good use, exploring mold-making and casting.
clay sculpt Back in early December, I had a spare hour or two after helping Gretchin with prep for one of her holiday sales. So I pulled out some "Chavant NSP - Medium, Brown" and sculpted this head.
I cleaned it up just a little bit on Friday, smoothing the surface with Brylcreem and a paint brush.
Here's some of what was going through my mind:
Just before Thanksgiving I had a little breakthrough, some insights about character design. Working in my sketchbook, I made rows of circles -- each one a blank face -- and then tried varying the facial features systematically.
Do I like big, medium, or small eyes the best? Do I like the eyes to be close to the nose, centered, or out toward the ears? Do I like the eyes to be high on the head, in the middle, or down around the jaw? ...Pages of variations like this gave me a much better sense of what sorts of characters I want to be creating.
This head was attempt to take some of those sketches into the third dimension.
Also, during the past month or so, I've been putting some energy into studying anatomy. I learned a good deal when I was taking that sculpture class with Kim Graham last summer. I've now picked up some anatomy books, and have been making practice sketches of skulls and skeletons. I figure, the more anatomy you can put into a sculpt, the more realistic/plausible-looking your result will be.
building a mold box The head was sculpted without an armature. For the sake of making a mold, I put it on a piece of 3/16" brass rod, and fixed that into a piece of wood.
To make a mold box, I cut out pieces of foamcore and used hot glue to seal the edges together.
putting clay in the mold box to take up space. For this one-day project, I wanted to get my hands dirty -- and not get stuck over-thinking it. I knew at the outset that this might mean some significant screw-ups. But oftentimes getting a feel for mistakes gives you an even better grasp of how to do things right later on. So, I was prepared to see how things would go wrong.
Case in point: When I opened up my container of silicone base, I didn't have as much left as I'd remembered. I hastily put some wedges of clay into the mold box to take up space -- just hoping that I'd have enough silicone for the mold then.
mold box filled with silicone I'm using silicone from TAP Plastics. Why TAP? Because they have a storefront in town where I can browse, instead of having to buy online.
It took two batches of silicone to fill the box. The first was just silicone base plus the quick cure catalyst (6-8 hour demold time). I thought I'd try the trick where you make a hole in a paper cup and drizzle the silicone into your mold -- the idea being that the string of silicone will break up bubbles. The silicone was so viscous, though, it didn't really want to cooperate. It didn't really even want to fall out of the hole.
So, for my second batch, I mixed in 10% silicone thinner (which also functions as a filler). This poured a good deal more easily -- but at this point I forgot to try the hole-in-the-cup trick.
The silicone just barely managed to cover the head.
silicone after baking Silicone cures via a chemical reaction between the base and the catalyst. As such, it can be speeded up by adding heat. I've tried this with good results using DragonSkin. I decided to try it with the TAP silicone.
This one of those mistakes I alluded to earlier...
I put the mold in the oven on an old pizza pan. [We've dedicated the oven in the studio kitchen to chemical play.] The oven only goes as down to 170 degrees, so I had to prop open the door to take it lower. You can cure DragonSkin in 30 minutes at 150 degrees. I was indecisive and varied the temperature between 130 and 150 degrees during the baking period.
I left the mold in the oven for 2 hrs 15min -- and probably could have taken it out sooner. When I retrieved it, I discovered that the hot glue had melted and the mold walls had popped open. The clay space-fillers looked nearly liquified. ...And yet, the silicone mold itself seemed pretty OK.
[The top has a slight tackiness to it -- which I attribute to the silicone thinner. The sides are properly dry.]
opening up the mold When you make a puppet body out of DragonSkin silicone, you're baking the silicone inside of a plaster mold. Nothing's going to melt. ...So, while I proved to myself that I could successfully speed up the curing time of a silicone mold by adding heat, I also discovered that this is inappropriate when your original is made out of oil-based clay and your mold box is made of materials that melt at low temperatures.
Surprisingly, the silicone took a pretty good impression -- even with the clay liquifying. However, because the clay head got melty, it left a lot of residue on the interior of the mold. I cleaned it out with an old paint brush and isopropyl alcohol -- but I still couldn't get every fleck.
clay head after being removed from the mold The original clay head was demolished because I put it into the oven. Next time, I think I'll put it in the refrigerator or freezer before pouring the silicone, and then just let the silicone cure at room temperature overnight.
silicone mold filled with resin OK, now that the mold is made, it's time to make a casting.
I used TAP Quik-Cast Polyurethane Casting Resin, and mixed in microspheres to make the casting more lightweight. The pour hole is where the brass rod used to be; I enlarged it into a funnel with an X-Acto blade.
In terms of gooeyness, silicone is like slightly liquified peanut butter. Simply dreadful. Resin, on the other hand, pours very easily. It went through the pour hole without incident.
However, I didn't bother to drill a hole in the mold for air to vent out of -- so I did have to awkardly tip the mold around a lot, trying to get bubbles to come out.
resin casting Despite all the mistakes I made, I got a surprisingly good casting out of this mold.
Because the silicone wasn't properly degassed, there were a lot of bubbles in the mold. The resin faithfully reproduced these bubbles in the casting.
When I cut open the cured silicone, I tried to use a jeweler's cut -- making a zig-zag cut with an X-Acto blade. I was a little disappointed with the results. I got quite a bit of flashing along the split-line -- particularly at the top, where the silicone was too thin.
silicone mold after the casting The resin seems to have cleaned out the remnants of clay left inside the mold. So, I've got a half-decent mold to play around with some more now.
I'm thinking that I want to try a hollow casting. I've seen this done in puppet animation to get a very lightweight head.
the head after being cleaned up I'm also considering adding a venting hole in the chin. When I'm pouring resin, the chin is the highest point inside of the mold, and a big air bubble gets trapped there.
I didn't realize it immediately, but the casting actually came out with a hollow chin. As everything cooled off, the chin kinda shrivelled up. Now it looks like the head doesn't have a jaw at all.
Oh well. Plenty learned.
posted by sven | permalink | categories: sculpture, stopmo
January 8, 2007
star wars @ omsi: phil tippett - stopmo god
by sven at 8:42 pm
the OMSI Star Wars exhibit OMSI -- the Oregon Museum of Science and Industry -- just ended an exhibit of props from Star Wars. I managed to squeeze in a visit at the last minute, on Dec. 29.
Thanks to Linda Womack, encaustic artist extraordinaire, for reminding me about this! I'd been meaning to go for months -- but the xmas crunch had completely wiped my memory banks...
Phil Tippett A huge thrill for me was getting to see some of the puppets that Phil Tippett animated. Among stopmoes, Tippett is widely viewed as the heir apparent for Ray Harryhausen's crown as greatest living puppet animator. ...Well, at least that was the case until Jurassic Park decapitated the tradition of photo-realistic stopmo monsters interacting with live actors.
Tippett's style has sometimes been referred to as "hyper-Harryhausen." He helped pioneer innovations such as go-motion, where tiny stepper motors move the puppet a little while the camera takes a shot, adding a more realistic motion-blur to the photo. He has his own company now, and remains one of the kingpins of the special effects industry.
[Incidentally: Marc Spess has a photo gallery with shots of Tippett and his works that I recommend. Also, Mike Brent has a collection of video clips to go see.]
the taun-taun puppet Phil was the animator who put life into the taun-taun in The Empire Strikes Back. My understanding is that he also did of much of the work constructing the puppet, too.
Luke Skywalker puppet The taun-taun puppet can't be more than 18" tall -- but the detail is phenomenal. Everything about the Luke puppet looks properly in scale, including the texture of the fabric. ...I've no idea what they used to make that fake snow.
Luke's legs Look carefully at the edge of the saddle. You can see a little bit of 1/16" aluminum wire poking out. That gave me a thrill: to see a material that stopmoes use now, there in the taun-taun.
taun-taun face The taun-taun's face has amazing texture. The skin is pockmarked and pitted. I have to guess that we're looking at cast foam latex there.
under the taun-taun's head Underneath the taun-taun's head, you can see some decay in the puppet. It looks to me like rotting latex... But I'm not familiar enough with foam latex to say whether it was originally foam, or if it was liquid latex there.
taun-taun's legs Here you can see that there was a little taxidermy going on. The animal pelt's seams are hidden on the insides of the legs.
taun-taun foot The feet look eerily real. Like they were cut off a real animal, dried, and sutured on. I'm sure that's not actually the case...
AT-AT walker Phil also animated the AT-AT ("All Terrain Armored Transport") walkers in The Empire Strikes Back.
AT-AT walker's head For me, part of the excitement with the AT-AT walker was trying to figure out how its armature was constructed. Tom St. Armand -- another god of stopmo -- built the armatures here.
AT-AT walker legs On the insides of the ankles, there were little... handles? I've never noticed these in photographs before. My best guess is that they helped give the animator a good place to grab the puppet. However, they might also be spring-loaded -- releasing tension on the feet joints so they can be re-positioned.
AT-AT walker knee Ah-ha! As I looked closely at the AT-AT walker, I began to notice hexagonal holes here and there. That's where you insert a hex key to tighten a joint. Screws with hexagonal sockets are generally preferred to slotted or philips head screws -- no risk of stripping the screw.
AT-AT walker foot I was absolutely fascinated by the AT-AT's feet. See that half-circle of metal that forms the walker's ankle? I'm certain that's a piece of milled aluminum. You can see a slot in its center that allows it to rotate, and then be fixed in place with the tightening of a screw. In some of the other pictures you can see that there's a slit in the side, too, also for tensioning purposes.
[to be continued]
posted by sven | permalink | categories: exhibits & events, stopmo
January 7, 2007
2006: my first year in stopmo
by sven at 11:50 pm
December 7, 2005 I mark my entry into stopmo puppet animation from December 7, 2005.
I was taking a class in Super8 filmmaking. I'd worked in digital animation before, but really wanted to get the experience of cutting actual celluloid. The class' final project was my opportunity to live out a childhood fantasy: using a remote shutter release cord to snap off shots of KONG, one frame at a time...
On Dec. 7 I threw together the wholly unsatisfactory armature you see above. And I thought to myself: "Huh. I wonder if there's maybe anything on the internet that could help?"
That night I discovered StopMotionAnimation.com -- and everything changed. I've been possessed by a blinding fever to learn this artform, puppet animation. Now, here we are, exactly 13 months later. Time for a progress check.
[Yeah, I would like to have written this post a month ago... But -- oy! -- December!?]
1. armatures
Of all the skills involved in making an animated film, this has really been the year of learning how to make armatures. Prior to February, I'd never cut metal before! Now I'm working with a mill and lathe, and using a torch to solder ("braze") things together at temperatures up to 5300 degrees Fahrenheit.
I've made six ball-jointed armatures. Three at home using brass and steel, three at Bent Image Lab using stainless steel.
the Ambassador, aka the Ambassature For my first armature, I made a big batch of generic joints, which allowed me to get a feel for proportions. "The Ambassature" made a trip down to California, so Shelley Noble could try giving a ball-jointed armature a test drive.
[Note: The elbows and knees aren't double-jointed. For each of those joints, I used solder to freeze one ball in place.]
the Ambassador II, aka the Diplomat For the second armature, I used lead-free solder and made long sandwich plates with individualized proportions. The revised design feels more streamlined and intuitive in an animator's hands.
I wrote up a massive step-by-step tutorial on how to build one of these. Anthony Scott accepted it for inclusion in the StopMotionAnimation.com handbook -- but then he got hired to work on Coraline, and hasn't had time to get it up online.
the man of steel The man of steel duplicates the physical dimensions of the Ambassador II -- but working with steel is nothing like working with brass, and it required a completely different approach. This was my first big project using a mill and lathe.
Irritatingly, after finishing this project, I discovered a design flaw: the arms can't raise up from neutral to a "zombie sleepwalker" position without the shoulder joints getting in the way. An easy fix is to make a bend in the upper arm rod.
Regis Philbin On the merit of the previous three armatures, I got a job at Bent Image Lab doing armatures for a music video where Regis Philbin sings "Rudolph the Red-Nosed Reindeer." I'd studied armature design enough so that I was pretty well prepared... But I did have some trouble with soldering flat surfaces to flat surfaces that took me a while to figure out.
Gelman As I understand it, Gelman is Regis Philbin's producer. My fifth ball-jointed armature was for a puppet of him. [And just to be clear: I only made the armatures inside these puppets -- not their exteriors.]
The Regis and Rudolph clip showed on national TV on Nov. 16, on the Live with Regis and Kelley show.
little girl I made my sixth and final armature of the year as part of the same contract at Bent, for the little girl character in a music video of the song "Dirty Laundry" by Bitter:Sweet. This was the most sophisticated of all: with jointed feet, and a mere 6 5/8" tall. Additionally, time constraints meant that the sculpt and the armature had to be being made concurrently -- so I was responsible for drawing up a master blueprint that would be adhered to by everyone involved.
2. puppets
With my focus on learning armature building, there were surprisingly few puppets that I took to actual completion.
Moon Baby Poor Moon Baby -- my first attempt at a wire armature puppet -- broke before he was even completed. The first mistake was using foam insulation tape for musculature. The wire wasn't strong enough to force the bulk into a pose; it would all immediately spring back into neutral. I tried to cut seams into the foam... Mistake number two. That's probably when I nicked the wire, spelling doom for the poor babe.
Percy 5 Percy 5 was begun February 5th and finished March 5th. This time I used spray adhesive and sandwiched the wire armature between thick blocks of cushion foam, which I then whittled into shape with cuticle scizzors. Paranoid about the armature's ability to hold a pose, I left big gaps between the blocks of foam... Consequently, when Percy bends over, his shirt lifts up and you can see his metal spine.
I did a few animation tests with this puppet -- but I was really frustrated by how difficult he was to work with. This is what spurred me to dive into making ball-jointed armatures.
Jimmy and Dad Almost seven months later, after having done the six ball-jointed armatures, I returned to wire armature puppets. For Jimmy and Dad, I cut long strips of 1/2" thick foam and wrapped them mummy-style. Then, I covered the foam with a layer of athletic underwrap. Much to my relief, this strategy for musculature -- at last -- worked very well.
3. films
I got three short films done this year -- only one of which is true puppet animation.
click on image to play movie (4.0 MB) I put Do You Like Me? online a year ago today. The characters were just blocks with faces -- but it has a story and runs 1min 20sec. I'm still fond of this one...
click on image to play movie (10.9 MB) Explorations in Super8 was the final project for my class in Super8 Filmmaking at Radius Studio. I spent countless hours trying to come up with a story idea that would utilize Moon Baby and/or similar puppets. Ultimately though, I decided to give up on that and instead do a storyless sampler of different animation techniques: sand on glass, paint on glass, shadow puppets, digital animation transfered to analog...
click on image to play movie (6.8 MB) I finished The Great Escape on Dec. 31, just in time for the "stopmo haiku challenge" deadline at StopMoShorts.com. For this project I intentionally worked "quick and dirty" -- taking the story all the way from concept to completion, rather than getting hung up on getting any one part of the process "perfect."
When I watch this one, I see room for improvement in just about every area... But I'm very proud of it, and see a lot of life shining through the rough-hewn pups and their animation.
4. work
This year I did paid work in animation for the first time.
click on image to play video Back in July, the amazing photographer Grace Weston (a friend of Gretchin's via Job Club for Creatives) recommended me to Bent Image Lab. Thank you Grace! Because of her, I got a job casting cobblestone tiles out of hydrocal for the Lux soap commercial. And thus I was "in the door."
click on image to play video When that first job was done, I made sure to give photos to my producer to distribute -- so all of the producers at Bent would know the breadth of what I can do. At the end of September I got a call about maybe doing some armature work. I brought Percy and my three ball-jointed armatures to the interview, displayed in a "The Evolution of Man" tableau. And I got the job!
The first task they gave me was to build an armature for... (gulp!) ...a Regis Philbin puppet. Then they had me do a Gelman armature. They hired a second person to do the Trump and Kelley armatures. Luckily for me, I'd had a chance to study armature maps from previous puppets built at Bent -- because there was no one on site who could train me. Trial by fire!
click on image to play video As part of that same contract, I got the job of making the armature for the little girl puppet in the "Dirty Laundry" music video. Very proud of the work I did on her. The director was really pleased with my work, too; it sounds like he wants me onboard for the next project he gets. Yay!
Henry Selick's parking space Another fantastic photographer friend of Gretchin's, Serena Davidson, got hired to take portraits at Laika on the Coraline shoot. Knowing my interest in Coraline, she invited me to be her assistant. Thank you Serena! On Dec. 13 and 14 I got to play sherpa, carrying around Serena's equipment... And boring into every detail of the Coraline shoot with my hungry eyes. I got to meet Henry Selick and Neil Gaiman (with whom I discussed my niece -- he's very fond of her). I got to see sculpts and puppets and costumes and sets.
It was a wish come true, just to get a glimpse inside of Coraline as it's being made.
5. thanks...
To quote Julia Cameron, "Creativity flourishes in a place of safety and acceptance. ... Creativity grows among friends, withers among enemies." And so, I'd just like to say:
Thank you to Anthony Scott, Marc Spess, Lionel Orozco, Nick Hilligoss, Eric Scott, Jason Gottlieb, and Mike Brent for your roles in creating and leading the online stopmo community!
Thank you to Grace Weston for getting me into Bent!
Thank you to Serena Davidson for giving me the chance to peek into Laika!
Thank you to stopmo buddies Alejo Accini, Mike Brent, Mark Fullerton, Grant Goans, Michael Granberry, Shelley Noble, and Jeffrey Roche for the constant support and encouragement!
And most of all, thank you Gretchin -- for connecting me with Grace and Serena, for being a fantastic artistic advocate and studio partner, for supporting me in my every ambition (and every obsession). "The greatest recognition I could ever receive is your love."
posted by sven | permalink | categories: stopmo
January 3, 2007
making of "the great escape"
by sven at 10:25 pm
Sven animating I want to fill in some details about the process of making The Great Escape...
1. the computer
I was using my PowerBook G4 to capture frames... Boy, was I glad to have a laptop in this instance! It was really helpful being able to easily move the computer around, depending upon where the camera and set needed to be.
2. the framegrabber
I used FrameThief as my framegrabber. Just prior to this project I spent a bunch of time play-testing the main framegrabber options for the Mac: FrameThief, AnimAideXT, and iStopMotion. I'd like to write a more in-depth review, but here's the short version...
There are two functions that are absolutely critical for a framegrabber: (1) it has to let you do onion-skinning, and (2) it has to let you check your work against a sound clip. FrameThief is getting a little antiquated, but it's the only one that can do both of these things adequately. AnimAideXT has exciting potential, but was buggy for me when it came to onion-skinning. Boinx's iStopMotion has a great interface and support -- but you have to pay $400 for the pro version if you want to work with sound.
FrameThief did crash on me a few times. However, I remain impressed with this workhorse software: I never lost any data -- all I had to do was re-start the program, and I was back in the game.
capturing frames with the ZR45 3. the camera
I used a Canon ZR45 DV cam to capture frames. This cam has given me so much grief...
When I was shooting footage for Let Sleeping Gods Lie, it would turn itself off (to conserve power) whenever I kept it on pause for 5 minutes. Since most of the shots took longer than 5min to set up, this was really irritating...
On this project, the horrible realization was that even though I manually set the exposure to 1/60, everytime Jimmy's white shirt came on screen, the picture would darken to compensate -- resulting in awful flicker.
Sin #3: Even though I had a brilliantly colorful set and excellent lighting, the camera sucked a huge amount of color and luminescence out of my shots. In post I did some brute-force color correction by adding saturation and brightness universally -- but I still couldn't get the quality that I had when shooting the photo animatic with my still cam.
Potential solutions: Get a 3CCD DV cam. (Pretty expensive.) Or use the still cam... Which will require an analog-to-digital converter in order to interact with the framegrabber -- and has an expected life-span of 50 to 70 minutes of animation before conking out from over-use.
weighing down the tripod with sand 4. the tripod
I've been told by several sources that sand is the professional choice for how to weigh down your tripod... Yet, I wasn't sure how to do it in practice. I tried putting the feet of the tripod into yogurt tubs filled with sand. Useless. Filling plastic bottles (with handles) up with sand, and then making wire loops so they could hang from the tripod's hook -- that worked pretty well.
Technically water in those jugs would have worked just as well. But I'm glad that I went to the hardware store and bought some sandbox sand, nonetheless. The thought of those jugs, if filled with water, dropping and cracking open -- well, let's just say that I think sand would do less overall damage.
Even with the sand, though, the head of the camera could still be moved some with a good bump. There's play in the gear that raises and lowers the camera that I don't know how to fix.
the set seen from above 5. the set
The set was constructed from a cardboard box, which I then staple-gunned to a piece of plywood. The plywood sat atop two cinderblocks so I could get at the tie-down screws. The ceiling was a piece of white foamcore that wasn't actually attached -- just weighted down. The wallpaper was gift-wrapping paper, and the carpet was felt.
The cardboard walls worked satisfactorily through most of the film. The only problem came at the end when Jimmy pokes out from behind the painting. At that point, he's actually pushing against the walls and they flex. Next time: Rigid walls made out of hardboard or MDF.
The plywood base is adequately rigid, but splinters when I drill holes for the tie-down screws. MDF -- medium density fiberboard -- would be better. It's made out of glue and fine sawdust, which shouldn't be able to splinter at all.
On a couple of occasions I managed to bump the set and shift it on the cinderblocks. Next go around, I plan to build a proper animating table, like the one Justin Rasch has just made, and which Marc Spess shows you how to build in his eBook Secrets of Clay Animation Revealed.
6. props
I'm fairly happy with the look of the comfy chair, which is just fabric glued over insulation foam, with foamcore feet. However, I made two fundamental mistakes here.
One: The foamcore legs were too squishy, and led to the chair moving around while I was animating. I tried using hot glue and pinning it to the floor -- but to little avail. Next time, furniture needs to use MDF for its frame, and there need to be threaded holes for tie-down screws.
Two: Scale! The room was one scale, the pups were another, and the furniture was a third. This was particularly a problem with the comfy chair, which was supposed to be huge -- but was barely big enough to seat Jimmy. Next time, pick a scale and stick to it!
light umbrellas 7. lights
I used two 500 watt lamps that I got at a photography supply store, along with umbrellas to diffuse the light. I ran into terrible problems with the lights burning out. I suspect that this had to do with the lights being so hot and the garage being so cold.
The lights get freakishly hot! When one of them burned out, the broken filiment actually burned a pin-sized hole through the glass. With another, the glass of the bulb melted into a bulge!
For the living room set I wanted lots and lots of light -- a bright, saturated, jubilant environent. So the lamps were really necessary. On future projects, though, I'm thinking I'll probably use more colored lights and gobos -- which may mean I need to get some more fresnells and stands.
In the cave set, I'd intended to use xmas lights hidden behind the arches. It proved to be too much trouble. I just went with shining a single light down the tunnel. Less magical -- but oh well.
Dad's shattered foot 8. puppets
I used Super Sculpey for the heads, hands, and shoes of the puppet. I ran into problems with it cracking. Jimmy's head had a big crack in it from the get-go, and it wasn't firmly attached to the epoxy putty skull. At the very end of the film, Dad's shoe shattered. Little bits of Super Sculpey would flake off around the wrists. Next time, I think I'll be using Magic Sculpt (a fine-grained epoxy putty for artists) for hands and feet; possibly resin for heads.
The most glaring flaw in the puppets' design was in the necks and wrists. Or rather, the lack thereof. One solution would be to wrap these bits in string and then paint them with liquid latex. I've also heard of latex rubber tubing being used for necks -- partly because you can make a hole in the base of the skull that conceals the join.
(Btw: I'd like to tip my hat to Grant Goans -- the idea for Dad's flapping jaw comes directly from his Vitruvius project.)
9. armatures
The sculptor's armature wire (annealed aluminum) didn't break. Huzzah!
Dad was pretty fun to animate; Jimmy was much harder, due to the smaller armature. Note to self: larger wire armatures are easier to articulate.
I keep on making my pups' necks too short. Dad was pretty much neckless; Jimmy was better, but still couldn't lean his head back far enough at one point.
Dad really didn't want to twist in the middle. More wires in his spine would have helped; but given the amount of foam that had to be moved, I'm not really sure how much more a build-up puppet could be improved.
10. costumes
Instead of sewing the costumes, I used Fabri-Tac glue to attach cloth directly to the foam body mass. This seems to have worked out OK on the pants -- but the arms of the shirts tore out of the shoulders.
I'd really like to know a better solution for the shoulders of shirts. I'll probably try hand-sewing the costumes next time. But even then, I know there's a problem with the sleeves and shirt bottom riding up when a pup lifts their arms. Anyone have any ideas here?
I also didn't bother to fold the fabric over when I attached it. It looked fine at first -- but I was getting some fairly serious fraying toward the end of the film, and had to keep cuticle scizzors on set.
11. lipsync
I used Papagayo to do lipsync. Magpie's the industry standard and costs a pretty penny -- whereas Papagayo is free... So I was a bit dubious when I started out. However, while there are some niceties missing, I found Papagayo was very easy to use, and quite satisfactory for my purposes. I strongly recommend giving it try.
A big discovery: It was much easier for me to animate puppets when I was matching movement to dialogue. It made the entire animation process much more managable when knew exactly how many frames I needed for any one shot. But beyond that, I found that my characters' movements were much more motivated when there was speaking. For each word, I thought about what gesture ought to accompany it. I avoided having the words and gestures match up perfectly -- but just working through how the pups' thoughts should be pantomimed really made them more alive.
the tunnel set 12. trick shots
There were a few useful tricks I utilized to get the shots I wanted.
In order to get a point-of-view shot for Jimmy running through the cave tunnel, I made a little wooden sled for the camera... Well, actually, I just picked up a piece of scrap wood and wrapped masking tape around it and the cam. When it got far enough into the cave set, I used a stick to keep pushing it farther in, an inch at a time.
a wooden sled for the camera I put screws into Jimmy's feet for tie-downs... But as it turns out, he never stands up in the story! In order to have him not jitter around too much while he was sitting, I stuck pins right through him and into the chair.
(Thanks to Shelley Noble for the pins that I was using!)
holding things down with pins When Jimmy had to get out of the chair, I didn't have any easy way to secure him... So I wound up just holding him in my hand. The same was true for when he pokes out from behind the painting at the end: no way to secure him, so I was holding him in my right hand from behind the set, and setting off the shutter release with my left.
Consequently, when I concluded the shot, the poor boy fell out. Right on his nose.
that's a wrap 13. post-production
I started working on this film back in October. But when December rolled around, xmas preparations kept me from getting down to business until the 26th -- at which point I pushed everything else aside in order to get this done. On the 30th/31st I worked for 30 contiguous hours without stop... Possibly the longest single stretch of my life (so far).
Post-production took a surprising 18 hours to complete. What really saved me was that at the outset I made up a master list of fixes, and then worked that list. Keeping copious notes on my thought process as I went, problem-solving one thing at a time. Here's the outline:
- assemble the clips so they sync to the audio track
- fix problem clips
- add/cut shots
- add titles/credits
- edit timing - must be absolutely finalized
- record additional sound, edit the mix
- color correction (if there's time)
- compress
Since I'd assembled the photo animatic in iMovie, I thought it would be easy enough to just replace the still images with my new animation clips. Not so! Because I filmed at 15fps -- but the animatic was 30fps -- iMovie simply wouldn't let me edit my clips to single-frame accuracy. That threw the whole audio sync off, which would have ruined the film. [Yes, even though the dialogue is in mumblephonics.] I tried out a whole bunch of potential work-arounds, but nothing did the job. So I switched to AfterEffects for final assembly -- which treated me much better.
I discovered that I had the heads of pins showing in several shots. I went through and fixed each frame by hand in PhotoShop. ...Actually, this wasn't a bad experience at all. I think I may use this process more in future projects -- particularly for flying and jumping effects.
At 320x240 pixels, the final render of the film was 752.9MB. It took a lot of fooling around, but I finally got it compressed down to a more manageable 6.8MB. The magic was to use the Sorenson3 codec at medium quality, with all options set on auto...
And then for sound, it turned out that the QDesign Music 2 codec was working out better than QualComm PureVoice. My settings were: best / 44.1 / best / 48 kbit. Bad sound just kills me... The sound quality I wound up with is not everything I could wish for, but it's at least tolerable.
Jason Gottlieb's tutorial, How to compress a movie for the web using QuickTime Pro, was once again very helpful. If you haven't seen it already, I strongly recommend it.
[Reminder to self: Rendering the image and the sound out from AfterEffects in two separate passes has consistently worked best. Make it standard practice.]
...
And there you have it! More than you ever wanted to know about the making of my little 2 minute film!
posted by sven | permalink | categories: movies, stopmo
January 1, 2007
the great escape
by sven at 11:59 pm
click on image to see my film at StopMoShorts.com Happy New Year!
I'm happy... I managed to complete my film on time for the quarterly "stopmo haiku" challenge at StopMoShorts.com! Click on the image above to see it in the context it was intended for...
Or (in case that link stops working at some point in the future) you can watch the film by clicking here. (6.8MB)
My joke du jour: Can we call this an eleventh hour victory if it was only 10:30pm when I got the film done and submitted?
Very proud.
Here's what I wrote about the film for StopMoShorts:
Armature building's been taking all my attention... So I wanted take a step back and do something more holistic. The idea was to embrace "quick and dirty": go all the way through the film-making process and not get hung up on things being perfect.
When brainstorming story ideas, I latched onto "cave" as a tunnel -- maybe a magical tunnel between places. In terms of animation style, I was inspired by Robot Chicken -- intentionally going for "pop" over "smooth."
The pups are standard aluminum wire armatures, wrapped in thin strips of cushion foam, with heads and hands made from Super Sculpey. The eyes are Van Aken plastilina... One of my weirding-outest moments was when an eye fell off and rolled right down into Dad's mouth.
I shot frames with a Canon ZR45 DV cam... Which (curse its metallic soul) insists on auto-adjusting exposure even when I tell it not to. I used FrameThief for my grabber, 15fps. Sound done in GarageBand, final assembly in AfterEffects.
I actually wrote a script, and then translated it into mumblephonics... Perhaps when I get around to releasing the "director's cut" DVD I'll put together a subtitled version.posted by sven | permalink | categories: exhibits & events, movies, stopmo
December 19, 2006
stopmo teaser: dad gesticulating
by sven at 12:26 pm
click on image to play clip (2.4 MB) Here's a little taste of the animation I've been doing.
The eyeballs are solid; the pupils are made from black Van Aken plastilina. After enough handling, the plastilina eventually stops sticking... One of the most peculiar moments while filming so far was when a pupil fell off and lodged itself in Dad's mouth.
Just prior to this project, I watched Robot Chicken season 1 in order to get inspiration for how to move the pups. I think you can tell... I'm having a lot of fun with the wild and exaggerated gesticulating.
As I've said many times now, I'm working "quick and dirty"... Resolving certain problems as I go, not backtracking to fix anything.
I've found a way to weigh down the camera tripod so it's less vulnerable to bumps. I've filled plastic jugs with sand, and made little wire loops for hanging them from the tripod. (I have photos I want to get around to posting.)
I just noticed last night that I'm getting a lot of flicker. I'm hoping that it's just due to me forgetting to put the camera's exposure on manual.
I've shot about a fourth of the film at this point -- even though I've had little time to work during the past few weeks. Feeling optimistic about getting this done in time for the Dec. 31 deadline.
posted by sven | permalink | categories: stopmo
November 26, 2006
Q&D - photo animatic
by sven at 6:00 pm
(Q&D = "quick and dirty" - an ongoing animation project)
click on image to play animatic (3.51 MB) I've taken the photo storyboard and paired it with my scratch track to create a new photo animatic. I used iMovie to do the editing.
ROLE OF AN ANIMATIC IN THE FILMMAKING PROCESS
When you do animation, you can film first and then add incidental sound effects. It's a fine approach.
However, 70% of a film is the soundtrack. [A movie with good visuals but muffled dialogue is far worse than one with muddy images but crisp sound!] It makes a lot of sense to make sound your first consideration, and then have the visuals follow its lead.
If you're starting with a soundtrack, then there's a powerful reason to make an animatic. ...Yes, it gives you a feel for what the finished product will look like. But there's a much more important reason in that: Creating an animatic allows you to chop the soundtrack into discrete sound clips for each shot.
Having created an animatic (soundtrack + storyboard), I can now know exactly how many frames I need to shoot for each shot. If I use lipsync software, I can go even further -- figuring out what my keyframes are within a shot: where a mouth has to be open, or where a fist slams down on a table.
This is really exciting to me. Knowing how many frames I have to shoot -- and what beats I have to hit within each shot -- I think animating will become more like composition, rather than performance. I've yet to really try this out, but I'm imagining using the draw function in my framegrabber to sketch out incremented arcs of motion, and then checking my work with the audio playing back. ...It feels like this approach could really take a lot of the guesswork out of animating.
More generally, I'm also really excited about an approach to animation that puts the soundtrack first. Music comes very intuitively to me; I like the idea of my films being motivated by rhythm and tempo. If the sound comes first, I can preview the entire 4th dimension of the film early on -- instead of having to compile small visual chunks one at a time, praying that they'll ultimately add up to the pacing I'd imagined.
posted by sven | permalink | categories: stopmo
November 15, 2006
sven's work on television!
by sven at 1:48 am
Today and tomorrow you should be able to see some of my work on national TV!
I recently worked at an animation studio (Bent Image Lab) making armatures for puppets -- specifically puppets of Regis Philbin and his producer (?) Gelman. As I understand it, examples of the puppets will be on TV today (Wednesday), and then the actual music video will show on Thursday.
Here's the message I just received. Check it out!
Subject: PREMIERE! Rudolph Music Video
Hey Team Rudolph!
The Regis music video “Rudolph the Red-Nosed Reindeer” is finished and it looks great! Rankin/Bass would be proud. Thank you for helping to make this video a success!
Here’s a list of upcoming air dates:
Puppet Premiere
Wed, Nov. 15th 11:00 am PST (TOMORROW):
Regis and Kelly present their puppets on Live With Regis & Kelly
Music Video Premiere
Thurs, Nov. 16th 11:00 am PST:
Music video airs on Live With Regis & Kelly
You can see the show on channel 8 (KGW) – the local NBC affiliate.posted by sven | permalink | categories: exhibits & events, stopmo
November 14, 2006
superNOVember - 11
by sven at 11:59 pm
Today's stopmo progress:
- I put examples of Papagayo and Magpie outputs online
Due to a bizarre hiccup in my sleep pattern, I was good for nothing today. Stopmo-wise, all I did was put together examples of Papagayo and Magpie in response to comments re yesterday's post. To make things easy, I'll repeat the info here...
Here is the Papagayo list of keyframes. You do lipsync analysis for each character separately -- so what I've done is cut and paste Dad's dialogue over into Jimmy's document. (His line is "Grrrrr.") Also, Papagayo doesn't write out what the actual words are -- only phonemes -- so I've added the text of the dialogue in, too. And I've put some spaces in, to make it easier to see where phrases begin and end.
Here's Magpie's X sheet output. The demo version of Magpie only allows you to print 16 frames, so there's not a lot there... But you can see that the waveform is included; there are columns for each actor and the physical parts of the actor that I'm analyzing; and the dialogue (which I included in a comment field) is transfered over.posted by sven | permalink | categories: stopmo
November 13, 2006
superNOVember - 10
by sven at 10:55 pm
click on image to play clip (216 KB) Today's stopmo progress:
- used Papagayo to analyze the first 14sec of sound
- printed out a list of keyframes for lipsynch
- created X sheets for the first 14sec of the film
- reformatted the photo storyboard so it'll be easy to refer to while filming
- discovered I need to get my copy of FrameThief registered
- shot my first test clip (using AnimAide XT)
Papagayo is pretty darned quick and easy to use. But it doesn't output X sheets -- only a list of keyframes. Transferring that info to X sheets is annoying. (If someone's really interested in what Papagayo's output looks like, speak up and I'll post an example.)
There's a lot more sound analysis to do... But I figured I should try animating using my new X sheets before spending huge amounts of time to analyze the whole soundtrack.
By the time I got set up in the garage to film, it wasn't going to be long until quitting time -- so I only got out one quick test clip. I'm not happy with the animation. But this marks a turning point: filming has officially begun!
I was thinking that I'd want to do some random test clips with the pups, to get a feel for how they move. Now I realize that I'll probably want to do more than one take for every shot -- so I can work at learning how to make the pups ACT. Thus, I should be shooting every test clip as if I intend to use it in the final cut.
In life news: I wrote a letter to a lawyer regarding my dead dad's probate case (not fun). I got the DMV info I need in order to get the Svan retitled as "reconstructed" (also not fun). I got the estimate on how much it'll cost to tear the closet out in my studio room. I need to follow up with a few questions, then we can schedule.
Oh -- and I watched the first disc of Robot Chicken Season 1. (Ah: FUN.)
Last week I started a push to get some big, difficult, important tasks out of the way. Made good progress. This week I'm basically picking up where I left off.
...I think I'm going to put off the computer upgrade until I'm done shooting this film. I'd like to get the "Quick & Dirty" project done before Thanksgiving -- or at latest, by the end of November.
posted by sven | permalink | categories: stopmo
November 12, 2006
superNOVember - 9
by sven at 10:19 pm
Today's stopmo progress:
- decided to put off buying Magpie, instead work with Papagayo for now
- researched SoundSoap 2
- used the photo storyboard to create a script that I can actually read from
- recorded and edited my scratch track in GarageBand
- used iTunes and QuickTime Pro to convert the sound into a .wav file
- began analyzing the scratch track in Papagayo
One of the benefits of recording your sound first is that it allows you to know in advance just how long your film's going to be. Looks like the Q&D project is going to be about 2min 15sec long. At 15fps, that means I'll need to shoot 2025 still photographs. Heh: Let the countdown begin!
In terms of working "quick and dirty," the soundtrack is probably the part where "dirty" will be most obvious. I've got a lot of hiss in the background... I could probably get it out of the mix if I used the SoundSoap software. I've meant to buy it for quite some time, and will be purchasing soon -- but it goes against the spirit of this project to stop and wait for it now.
Papagayo is pretty intuitive software. But it's also unforgiving. You work on a sound file hierarchically: First you set the frame rate, then you type in the script, then you sync up the sentences with the waveforms, then you sync up specific words, then you sync up syllables. If at any point you take a step backwards in the process, all of the work that falls beneath that level of the hierarchy disappears instantly. No undo. YOUCH!
Trying to minimize risk (and optimize software performance), it looks like I'll be cutting up my soundtrack into short segments: ~15sec each. For my die-hard readers, you can listen to the scratch soundtrack (minus a brief epilogue) by clicking here.
posted by sven | permalink | categories: stopmo
November 11, 2006
superNOVember - 8
by sven at 11:59 pm
Today's stopmo progress:
- downloaded and playtested AnimAide XT (a framegrabber for Macs)
- researched lipsync software options
- downloaded and playtested Papagayo (lipsync)
- did more playtesting of Magpie (lipsync)
- took notes comparing Magpie and Papagayo point-for-point
I think the next step for the Q&D project is going to be recording a scratch track. I'm feeling ready to choose my lipsync software.
AnimAide XT (1.0.3) has some clever and unique features as a framegrabber. In terms of doing any kind of serious lipsync work, however, I think I'd find it pretty useless. (Thanks for the tip, though, Mike!)
I tried this software earlier this year, when it was just "AnimAide". It's pretty good, and I recommend that Mac users give it a whirl. For me, though, it has a few quirks that I find irritating -- I'll probably stick with FrameThief for the time being. Considered doing a formal review of the product; but that'd take me a little too far afield from the projects that I'm really pursuing right now.
I recalled that LIO has a page about stopmo software, and found it again. LIO references three lipsync aps for Macs: Magpie, Papagayo, and JLipSync. Judging from the website, JLipSync doesn't look like reliable programming, so I haven't bothered to download it and give it a real test. Magpie and Papagayo are the serious contenders, and I'm leaning toward Magpie.
Papagayo is FREE, and very good. Jeffrey, if you're listening: Take a look -- I think you could do great things with this software!!
(Incidentally, Chris Boyers just put up another vlog "making of" entry today where he talks about using Papagayo. I found it useful to see how it fits into his workflow. Worth watching.)
Magpie is not necessarily all that different from Papagayo, but it costs $250. (Youch.) The extra bells and whistles may be worth it to me, though. I'm still sorting out exactly what Magpie has that Papagayo doesn't... Here's a partial list:
- ability to scrub back and forth on a selection of the sound clip, instead of having to play through the entire thing every time
- ability to slow the clip's playback, to help you find the beginnings of words
- ability to print out complete X sheets; Papagayo only outputs a list of keyframes
- ability to create different "actors" in PhotoShop, so you'd be doing lipsync with images of the actual puppet you're using
- ability to animate LightWave characters from within Magpie, using sliders (I use LightWave, but I'm not sure if/when I'll need this capability)
The job can get done with Papagayo -- but I think I'd have a smoother, more enjoyable experience with Magpie... This may be how I use birthday money I received this year.
Another factor weighing on my mind: Magpie is what they use at a particular animation company where I'd like to work. There's a test that they give you: A puppet, an X sheet -- go! No particular timeline on this ambition... But I do have a reason to be interested in what software gets used at the professional level.
In life news: This evening Gretchin and I finally had a chance to go have a social night with friends. We've been trying to get around to this for weeks... We watched the Classic Trek episode "Space Seed" followed immediately by "The Wrath of Khan."
Y'all already knew that we're geeks, right?
posted by sven | permalink | categories: stopmo
November 10, 2006
superNOVember - 7
by sven at 11:59 pm
"And on the seventh day he rested..."
Today's stopmo progress:
- NONE
Was in a difficult-to-explain funk in the morning. Afternoon and evening were spent with my oldest and dearest friend, in celebration of our 11 shared years.
posted by sven | permalink | categories: stopmo
November 9, 2006
superNOVember - 6
by sven at 10:15 pm
SuperNOVember is a month-long event initiated by Shelley Noble. The challenge: take action on your art each day, blog about it daily.
I really appreciate all the comments folks have been leaving. Give me a day or so -- I can't respond to them all tonight. Gretchin did me the favor of adjusting how many posts display on the main page, so things won't disappear before they've gotten response.
Today's stopmo progress:
- I cleared the closet and surrounding area in my studio room
- a contractor came over, so we could talk about tearing the closet out
I'm pleased with the contractor so far. "Straight-shooting" is a good word. I'm hopeful that we may be able to rely upon him for future jobs -- presuming this one goes well. I begin to see what the renovated room is actually going to look like...
Last night I downloaded the demo for Magpie and started exploring. Very, very excited! I'm picturing recording a soundtrack in GarageBand, analyzing it in Magpie, and then animating using the X sheets. ...Mike's alerted me that the new AnimAideXT framegrabber has lipsync capabilities built in. Gonna have to look at that too, before I buy anything.
In life news: Got a birthday present for my niece wrapped up and mailed out -- but it looks like it won't arrive in time, which is disappointing. Got the Svan back from the auto shop, transmission repaired. (Still more jobs left to do on it... Next week.) Worked with Gretchin cleaning out the studio gutter. Tomorrow we'll be back to daily rain -- the sound of water constantly spilling out was driving her nuts.
posted by sven | permalink | categories: stopmo
November 8, 2006
superNOVember - 5
by sven at 8:53 pm
SuperNOVember is a month-long event initiated by Shelley Noble. The challenge: take action on your art each day, blog about it daily.
Today's stopmo progress:
- I cleaned off my computer's desktop, which much improved the slowness problem
- downloaded last night's photo shoot and selected pics for the new storyboard
- created a "photo storyboard" for the Q&D project
It looks like I'm really close to doing some actual filming! It might be a good idea at this point to record a scratch track, and then let sound dictate pacing. If I do that, I may just use the mac's internal microphone, to keep the project moving along... But I am considering downloading the demo of Magpie, to help me match up beats and frames.
In life news: It looks like we managed to defeat the evil ballot measures and evil candidates in yesterday's election! Huzzah! Cause for celebration. :-D
Gretchin helped me take the Svan in to the auto shop for some transmission repairs (which won't cost an arm and a leg, happily)... After which, we ran some errands at Art Media and Office Max -- and then had a celebratory meal at McMenamin's.
Tomorrow the contractor comes over to give me an estimate for tearing out the closet in the studio. Yowza... A lot of significant "getting-business-done" stuff this week.
posted by sven | permalink | categories: stopmo
Q&D - photo storyboard
by sven at 8:10 pm
(Q&D = "quick and dirty" - an ongoing animation project)
Last night I took 90 test photos of the new pups in their sets. The puppets and props, as material objects, don't cooperate entirely with my imagination... But that's OK. This is an experimental project -- and I wound up finding all kinds of interesting solutions that I never would have thought of if I weren't working with my hands.
As I took photos, I began to re-write the "script" in my mind. Today I worked on assembling a new storyboard -- a "photo storyboard" -- which you'll see below.
It's funny: I have a hard time reminding myself that I haven't actually shot the film yet. These photos totally look like still shots excerpted from a film that's already been made... But no! Filming is yet to come -- and the final product will still probably wind up looking very different from what I've got here.
'Nuf said. On to the storyboard!
(1) Jimmy's standing on his head in the comfy chair.
(2) Close-up on his face as he flops down playfully.
(Shot should probably be even more of a close-up, to avoid the awkardness of animating him getting down. Let it be implied.)
(3) Jimmy: Ah, the joy that is Saturday.
(Characters won't actually speak -- at least not in English. I'm writing out their thoughts to help motivate pantomime acting. When dialogue is in quotation marks, the puppets' voices will be a squeaky sound for Jimmy, and growly nonsense words for Dad.)
(4) Jimmy: What could possibly go wrong?
Dad walks into the foreground.
(5) Dad stands with his hands on hips, growling in irritation.
(6) Jimmy: "Uh, hi dad!" He waves hello.
(7) Dad: "What are you doing just sitting here?"
(8) Dad: "Didn't you promise to do a really boring chore?"
(9) Dad: "And yet, here we are, several seconds into this film, and you still haven't done the work!" He indicates offscreen. Maybe there are leaves to be raked outside.
(10) Jimmy changes position in the chair.
(I'm worried about how I'm going to pull off a transitional shot like this without a solid rig for Jimmy...)
(11) Jimmy: "Aw, Dad... I don't wanna. Prettyprettypretty please?"
(12) Jimmy: "Have you ever considered that assigning me this chore might just be a manifestation of your bitterness about the soul-sapping, nose-to-the-grindstone life that you find yourself in now? ...That maybe deep down, part of you is jealous of my ability to still be playful and relax -- and is trying to punish me for it?"
(13) They stare each other down in silence. Is Dad going to fall for that excuse? I mean, it sounded pretty good, right?
(14) Dad: "OH GIVE ME A BREAK!"
Jimmy topples backwards in the chair.
(15) Dad: "That is the most irritating, lazy-bones, psycho-babble excuse I've ever heard, young man!"
(16) Dad: "You promise me that you're going to do something..."
(17) Dad: "And then I go to the kitchen and eat a little strawberry pie..."
(18) Dad: "And do you do the chore? ...No!"
(19) Jimmy: While Dad's talking to himself, I think I'll just slip away.
Jimmy crawls around toward the back of the chair. Dad continues ranting in the background.
(20) Jimmy: Good thing Dad doesn't know about my secret escape route!
(21) Jimmy crawls into the cave set through a little crack in the wall.
(22) He crawls through this secret, magical cave tunnel.
(23) He looks over his shoulder. Perhaps we can still hear Dad off in the distance...
(24) (Meanwhile:)
Dad: "And what's more, the strawberries were rather tart and unsatisfying..."
(25) Dad: "Which brings me to my point: which is that..."
(26) Dad does a big startle response, realizing that Jimmy's chair is now empty.
(27) Dad: I'm confused and unsettled!
(28) Dad: Oh! I'm going to go get that boy!!
He growls through gritted teeth and storms off.
(29) (Meanwhile:)
Jimmy is crawling through the cave tunnel. It's silent, like a natural cathedral. Perhaps a good moment for a music cue?
(30) We have a POV shot, the camera shuffling through the tunnel...
(31) Still in the POV shot, we come to a door in the wall marked "Exit."
End of photo storyboard.
I'd like to add a further sequence at the end: We see a shot of a painting hanging on the wall back in the house. The painting opens up like a door, and Jimmy jumps down to the floor, having escaped Dad and the dreaded chores.
The problem with this epilogue, though, is that at this point I haven't made a dining room set for Jimmy to emerge into. It requires more fabrication.
In the last version of the storyboard I had a whole 'nother sequence again, where Dad finds Jimmy and then Jimmy escapes into a second secret tunnel. I think at this point I'm just going to jettison that part of the story. But I believe I still need a scene in the dining room -- otherwise the nature of the secret tunnel is too unclear. It's not just a mysterious cave; it's a tunnel to another part of the house.
posted by sven | permalink | categories: stopmo
November 7, 2006
superNOVember - 4
by sven at 11:59 pm
SuperNOVember is a month-long event initiated by Shelley Noble. The challenge: take action on your art each day, blog about it daily.
Today's stopmo progress:
- I set up the pups, props, & sets in the garage
- tried out using butcher paper to diffuse my ultra-bright lights
- took lots of test photos, trying out camera angles and pup poses
- began thinking about a new version of the "script"
The puppets and props refuse to do what I tell them to. The big comfy chair is too small, and there's no way for "son" to look under the cushion. Dropping into the cave from a hole up in the wall is madness; but I could probably have "son" poke in at the very bottom of the cave wall.
(My experience tonight has me worrying for Shelley. In her imagination, she's developed a perfect vision of what she wants to see when she films Halfland. And we all want to see it just that way, too! But what if even when everything is built, the material objects refuse to perform as expected? ...Meh!)
On the positive side, I really got into finding cool silhouettes for the pups. I know that puppet animation needs to be exagerated and stylized to look right... But I discovered viscerally tonight that pushing extreme poses even farther often makes them even better. At one point I tried having "dad" lean forward at a 45-degree angle while yelling at "son" -- and it looked great!
I'm hoping tomorrow I'll be able to cull the photos and assemble a sort of photo storyboard. Not necessarily one that I'll stick with -- but something that shows what kind of story I can tell -- given the physical limitations of the pups, props, and sets that I've got.
In life news, today was election day. Gretchin and I spend most of the afternoon filling out our ballots (Oregon has vote-by-mail). Then, just before dinner, I went out and dropped them off at the Midland public library (a ballot collection site). What a relief to have that done with!
Here's hoping that none of the painfully evil ballot measures pass -- and that all the candidates we elect are merely the lesser of evils!!
posted by sven | permalink | categories: stopmo
November 6, 2006
Q&D - 2nd pup done
by sven at 11:59 pm
(Q&D = "quick and dirty")
Tonight I finished the second puppet for my "quick and dirty" animation project: "dad." The construction process was nearly identical to what I did for "son."
armature I made the armature out of annealed aluminum wire and plumber's epoxy putty. There are nuts in the feet for tie-downs. There's an extra loop of wire and epoxy that comes off of the "skull" so I can have a movable jaw.
foam I used 1" wide strips of 3/8" thick cushion foam to bulk out the armature. I fixed everything in place using athletic tape.
underwrap To help smooth out the shape and hold everything together, I used athletic underwrap (a thin foam bandage).
painted I used multiple coats of cheap acrylic paint to give "dad" a ghastly appearance. I sprayed him with a coat of gloss varnish, then two coats of matte varnish. The spray varnish seems to have eaten away the acrylics in places. Next time I'll only use matte varnish -- and thinner coats.
clothed The clothing was improvised as I made it, using Fabri-Tac to glue fabric directly onto the foam. It's pretty rough looking, but I'm pleased with some of my detailing. I gave the shirt a pair of cuffs, a collar, and a strip of fabric where the buttons go. The buttons are made from blue paper that I punched using an extra-small hole punch. The belt is made from black card stock, and I glued little cloth belt loops over it. The belt buckle is a piece of scrap brass from when I was making brass armatures.
The son and dad look great standing next to each other... But they also look like two separate species. I think I should do more character sketches, to find a more consistent look.
The foam wrapping worked out better than what I did for Percy... But it'd sure be nice to have a puppet body that's been cast from foam latex or silicone, so the contours aren't so lumpy and lop-sided. (Of course, a lot of that is probably attributable to this being "Q&D.")
The clothes aren't bad, for having been glued together... But I find myself thinking about trying a needle and thread or a sewing machine on the next iteration. My main problem area right now is where the sleeves attach to the body of the shirt. The sleeves look OK in one position -- but when I move them around, the fabric pulls in unnatural ways. ...I'm also looking at where the shirt tucks into the pants, thinking that it doesn't look quite right.
I can tell now that I'm going to be pretty frustrated with how the wire armatures behave.
Criticisms aside... Yay! Another puppet done! Now I actually have TWO characters -- who can interact with one another!
posted by sven | permalink | categories: stopmo
superNOVember - 3
by sven at 11:58 pm
SuperNOVember is a month-long event initiated by Shelley Noble. The challenge: take action on your art each day, blog about it daily.
Today's stopmo progress:
- re-posted the "four types of storyboards" essay to SMA
- found a potential contractor for tearing out the closet in my studio room
- scheduled him to come make an estimate on Thursday
- clothed the "dad" puppet
- finished the "dad" pup and did a photo shoot
In life news, my Dad (no relationship to the pup) died almost two years ago -- and yet the probate process drags on. Had a long chat with a lawyer in Texas.
It also looks like renewing the tags on my car (the Svan) is going to be more of an ordeal than expected. ...At least the process is begun. It's been a day of difficult but important phone calls.
posted by sven | permalink | categories: stopmo
November 5, 2006
four types of storyboard
by sven at 11:59 pm
In all the books I've perused about filmmaking, I think I've only ever seen one kind of storyboard described: the Professional Hollywood Storyboard.
Well, here in indy micro stopmo land, we have different needs. And so, I'd like to suggest that there are at least four types of storyboard that might be of use.
1. the thumbnail storyboard
Draw your storyboard all on one or two pieces of paper. For each shot in your proposed film, draw a little sketch, about the size of a postage stamp. It's OK if the sketches are barely legible -- the point is to be able to get your cinematography ideas down on paper as quickly as possible. If you're working alone, you could even start shooting based on this. Most likely, however, you'll want to do a second, more legible draft.
benefit: very fast
2. the floating storyboard
When you see photos of storyboards, the sketches of scenes are always drawn inside rectangles that match the aspect-ratio that the film is being shot in. But it doesn't have to be that way. You can draw sketches of your scenes in a sketchbook without rectangles around them -- just floating on the page. When you're in the early stages of developing your images, this is a nicely free-form way to work.
benefit: allows drawings to expand, unrestricted
3. the framed storyboard
A framed storyboard is one where you draw your images inside of fixed-aspect-ratio rectangles. The point here is to force yourself to think carefully about how you want to compose things within the shape of the screen that your film will be displayed on.
There are number of ways to do framed storyboards:
- You can just draw a rough rectangle on the page (for each shot). That's often good enough.
- You can cut index cards to the correct size and draw your shots on them. Advantage: this allows you to shuffle and reorder the shots as needed.
- You can use computer software to make multiple perfect rectangles on a page, and then print them out on a printer. In my experience, it can be nice to have a tidy storyboard that lives in a binder when you're in production -- but it's not the easiest way to work when you're still developing ideas.
benefit: forces you to compose images within fixed aspect-ratio
4. the photo storyboard
If you have your puppets and sets done, you can make your storyboard images using a digital camera. With the camera, you don't have to worry about aspect ratio -- the device imposes a frame around the image. Working with the camera also helps you generate camera angles that you might not have thought of when relying only on your imagination. If your puppets and sets aren't done, you can still work with this technique somewhat if you can make stand-ins and mock-ups of some sort.
benefit: fixed aspect-ratio; reveals new camera angles
storyboards and words
With stopmo puppets, we're often making pantomime films without dialogue. Even so, I've found that it can be extremely useful to put words with the storyboard.
Particularly with a floating storyboard, it's easy to write a sentence or two describing what's happening in the image -- sort of like in a storybook. Being forced to switch modes from visual to verbal can help reveal aspects of the story that aren't clear, or suggest new meanings that you want to work into the story.
I haven't gone very far yet with pairing words and pictures in my storyboards. My sense is that there'd be benefits even if you just wrote one or two words beside each image... And if you wrote a whole paragraph for each shot, the discoveries would be even greater.
the purpose of storyboards?
The way that I've typically seen storyboards written about goes something like this:
Write a script.
Stop.
Draw your storyboard.
Stop.
Shoot your film.I want to explore and promote the notion that storyboards are a way of developing your story.
Storyboards can be part of how you generate your script. When your story concept is still rudimentary, drawing images helps it become clearer in your mind.
Then, later on, when you're writing paragraphs that describe what's in each storyboard panel, the images will help prompt you to think about emotional beats, blocking, and performance. Storyboards can help you figure out how you want your puppet to act.
A storyboard could be compared to having a blueprint when you build a house: it's the plan you keep referring back to as you assemble your film. But maybe this metaphor is all wrong...
Maybe films aren't actually (or don't have to be) built from a perfect preconceived plan. Maybe the filmmaking process is more like watching a blurry and indistinct image come into focus... And each time you draw a new storyboard, it's like seeing that red blur in your mind further resolve into a crisp-edged rose.
posted by sven | permalink | categories: movies, stopmo
superNOVember - 2
by sven at 10:21 pm
SuperNOVember is a month-long event initiated by Shelley Noble. The challenge: take action on your art each day, blog about it daily.
Today's progress:
- worked on processing through yesterday's question list
- did a bunch of research on general contractors
- wrote some notes on insights about storyboards
Tuesday was my birthday. Now I'm old enough to run for president. ;-)
So, I'm calling this a special birthday gift to myself: I'm renovating my studio room. I'm going to tear out the closet to make more floor space. And I'm going to replace the carpet with... Probably Pergo. (Because paint spills and metal chips just do not go well with shag.)
Hence the research into general contractors. My hope is to be making calls about the closet job tomorrow. Stopmo connection: getting this work done will give me space for another table, where metal-working machines will be able to live more comfortably -- and I'll be able to set up a soldering station right in front of the window, where (for the sake of ventilation) it ought be.
...
As part of the birthday-palooza, Gretchin took me out to dinner at Assaggio tonight. Awkwardly, just as my Spaghetti al Limone was arriving, I had an inspiration for a book I could write... So I hurriedly took notes, while Gretchin patiently indulged my muse.
Possible title: "People As Property: The story of how children, women, and [word?] have been (and continue to be) treated as if they are owned." Um, that subtitle needs a lot of work -- but the basic idea's sound.
(I choose not to talk about it much in my artistic contexts, but I'm a fairly prolific writer of unpublished political essays.)
Anyway, this line of thought lead to a clarification of personal goals. In addition to living with Gretchin, here are the main Things I'm Interested In Doing With The Second Half Of My Life:
- write a book, and perhaps a few follow-up books
- make stopmo shorts worthy of inclusion in compilation DVDs
- watch sci fi
- keep playing piano
(...As I jotted darkly in my notepad, "I can still play piano if I have Alzheimer's." Gotta plan ahead, right?)
There's a concept from the Artist's Way that Gretchin talks about sometimes; it's called "your true North." The question is, what does success look like for you? Like, if you're an actor, maybe what's really going to feel like "success" to you is getting a Tony. But for another actor, "success" is maybe getting on the cover of People magazine. Whatever it is that defines success for you -- that's your "true North."
I think for me true North is doing something that contributes to the dialectic of history in a noteworthy way. I'd like to write a book that influences people's discussions for 50 or 20 or 10 years -- that is, however long it is before libraries of worth remove the book from their collections. I don't need my work to touch all people -- but some small niche of intellectuals, activists, or artists -- I'd like to have made a landmark contribution within the annals of their subculture.
I'm more advanced in my political/intellectual pursuits that in my artwork -- but the same true North applies for stopmo. I'd be happy if I did something that was worthy of being collected on a DVD. I don't know if I have it in me to do something that impacts the artform as a whole -- but I'm meticulous and creative enough that I'll bet I could make something adequately beautiful for compilation. That'd be good enough for me. I don't think I need to shoot my own feature-length film.
It's good to assess from time to time, as honestly as possible, what it is that you really want. Birthday-paloozas are an apt time for that.
posted by sven | permalink | categories: stopmo
November 4, 2006
superNOVember - 1
by sven at 11:55 pm
SuperNOVember is a month-long event initiated by Shelley Noble. The challenge: take action on your art each day, blog about it daily.
My usual "voice" when writing is documentarian. For SuperNOVember posts I'm going to try to write in a more casual "checking-in" voice.
Today's progress: I was inspired... I wrote a few pages of notes about how I want to develop animated films. The basic idea: I want to infuse playful improvisation into every stage of the filmmaking process -- otherwise, I feel like I'm yoked to the visions of a former self, and the project becomes dead to me.
I also experimented with new idea for personal organization. Here's the germ of the idea:
Try writing down a list of questions instead of a to-do list. Items on a to-do list are just answers that have forgotten the questions they belonged to. To-do lists have a tendency to get overwhelming: a stack of contextless labor we'll never be able to surmount.Following up on this bright idea, I made a list of 226 questions about how to organize my various projects... Many of them relating to stopmo, but also many of them are just things that need to get done so I can get back to art. For kicks, you can read the whole list here.
...
I've got a lot of thoughts about why this is a powerful writing exercise.
When you articulate a question, just writing it down usually gives you at least half the answer. By writing down every question you can think of, many problems resolve themselves before your eyes.
A question invites you to think about answers. A to-do list seems like a list of answers when I first write it -- but after a day or so, it starts to seem like a pile of roadblocks, all standing between me and where I want to be. I think by focusing on the questions, my projects will seem more alive, and I'll be more likely to stay engaged with a constructive process over time.
A question like "what do I need to do to renovate the studio?" leads to asking "do I really want to do this?" and "do I need to do this now?" ...But a to-do item like "call contractor" doesn't inspire me to think about the big picture. To-do items tend to cause me to get lost in details and forget my emotional motivations for pursuing projects.
A question is a leaping off point. An answer is an end point, a stopping place. A to-do item is the answer to an often unarticulated question. If I want to be in motion, then it's helpful to be explicit about my questions, and to stick with the questioning process as much as possible.
...
Tired. Stayed up late helping Gretchin prepare for today's Holiday Bazaar. I think the event went really well for us. There's more planning work to do tomorrow in order to get things done efficiently next week... But I'm also thinking that the next step for stopmo is to clothe the "dad" puppet, and that I can squeeze that in sometime tomorrow.
posted by sven | permalink | categories: stopmo
superNOVember is go
by sven at 6:00 pm
Like a solar explosion of art, it's SuperNOVember!
Shelley (-bo-belly) Noble, a stopmo blog buddy over at Notes from Halfland, has initiated a November-long Daily Progress Push-a-thon. ...And as of today, I am officially joining the game!
The intent of the event is to help artists -- particularly our online circle of stopmoes -- make consistent forward progress on their respective projects. As Shelley says, "A little something done on the project, doesn't much matter what, is to be done each day, along with the rest of life, or I'll know the reason why!"
Here are the rules:
#1. Take action on your chosen project each day. (If action can't be taken on any one particular day, the explanation must be brazen and unquestionably reasonable.) Small actions are completely acceptable as the idea of the SuperNOVember Thon is to make daily progress.
#2. Post about said action. (A photo is preferred but optional.) Posts may be brief, outlining what action was done, what if anything was learned, what was cool, surprising, or satisfying, or where it went pear shaped and has gotten confusing.
#3. If anyone has an idea for another's dilemma they share it in the comments. Yay.
#4. You can have more than one chosen project! (The idea still is DAILY progress on something!! Howz that?)
#5. We go until Thursday, November 30. At that time we see whether we choose to go on for more or break, etc.posted by sven | permalink | categories: stopmo
Q&D - the story
by sven at 5:00 pm
I've been working on "quick and dirty" (Q&D) puppets and sets for the past few weeks... My story idea for them was inspired by this quarter's StopMoShorts challenge: to make an animated short using the words sword, cave, and fear.
My current goal is to pull back from focusing entirely on armatures, to begin working more holistically. I'm not committed to submitting to the StopMoShorts challenge -- but since I had an idea that could work for it, I figured I might as well start there.
STEP ONE: brainstorming story ideas
To come up with my story, I brainstormed a list of 40 ideas and then chose my favorite. You can read the entire list here. (written 10.11.06)
STEP TWO: thumbnail storyboard
The story idea really isn't much more than a paragraph or two long... A few days later (10.17.06) I drew a really quick thumbnail storyboard. Moving from words to images was helpful -- it made me realize that I needed a couple of segues that that I hadn't envisioned before...
thumbnail storyboard (click to enlarge) Based just on the thumbnails, I started work on the sets and pups.
STEP THREE: storybook format
Thursday (11.02.06) I decided to do a clearer storyboard. It's still rough. And I'm not bothering to draw my images on index cards, or in little pre-printed boxes, as some authors would recommend at this point. I drew multiple pictures per page in my sketchbook, only cleaning them up a little for presentation on the blog.
Pairing words with pictures further helps clarify the story. See, the whole point here is to keep developing the story by switching to different formats: a paragraph (words)... thumbnail sketches (pictures)... a storybook presentation (words + pictures)... Whatever my first vision of the story is, it's not going to be nearly rich enough. I believe it's important to go through a bunch of exercises, which progressively evolve the skeletal idea into a fully fleshed out concept.
At this point in time, I don't really have my process of exercises down. Figuring out what the meta-process is here, is almost as important to me actually producing footage right now. ...Other potential exercises: refining sketches of the characters; making 3D maquettes of the characters and sets; trying out different color palletes; a "pop-through" video to demo the blocking...
OK, that's enough theory for now. On to the storyboard!
1. Jimmy was sooooo... Bored! 2. His father was lecturing him. 3. He tries to get comfortable. 4. Dad goes on and on... 5. What's this? A crack between the cushions? 6. There's another world! 7. 7. Ah-ha! A way to escape! 8. Does dad even notice? 9. Jimmy drops into a cave. 10. He runs through the tunnel... To an exit! 11. He comes out from behind a painting on the wall. 12. Jimmy leaps down and the painting-door snaps shut. 13. Is he safe? 14. Oh no! Dad's found him! 15. Quick! Under the table! 16. Jimmy runs through another tunnel... Straight into dad! 17. Caught! 18. Dad's eyes roll back in his head and he flops over. 19. A worm-monster comes out of dad's back! 20. The worm rises up... 21. Terror! The End.
Yep -- it ends abruptly. A traditional resolution would be to have Jimmy snap to attention; we realize this was all just a fantasy, and that he's actually still being lectured by his dad. But I don't want to undermine the reality of these shaman-esque tunnels between places. And what I'm going for here is an interesting sketch, rather than a full story arc... So I think ending on the climax of fear is a legitimate choice. (Hard to tell if it really works until it's actually on film.)
posted by sven | permalink | categories: stopmo
October 30, 2006
Q&D - 1st pup done
by sven at 11:59 am
(Q&D = "quick and dirty")
wire and epoxy putty Yesterday I finished making making the first of two pups for my current "quick and dirty" animation project.
foam Around the armature, I wrapped strips from a sheet of cushion foam that I found for cheap at SCRAP! -- "The School and Community Reuse Action Project." I think the foam was 3/8" thick. My strips were about 1" wide, and I held them together with athletic tape.
underwrap Around the cushion foam, I wrapped McDavid brand underwrap, which I found at G.I. Joe's (a local sports / automotive store). "Professional quality, pre-taping polyurethane foam underwrap. Used to protect the skin prior to taping."
This stuff does a great job of smoothing out the cushion foam... It would have worked even better if I'd taken a little time to first trim the foam more into shape, using cuticle scizzors.
painted I used cheap acrylic paints to do up the Sculpey bits. For the flesh tone, I used "bambi brown" (a tan), and then painted over it with a thin layer of white. (In general, I've found that tan + white does a remarkably good job of simulating "caucasian" flesh tones.)
I wanted to try a trick I heard about: spraying on a layer of clear gloss varnish, then a second coat of matte varnish. I thought it might give me a stronger surface...
I'm not entirely happy with the results. The finish is still a little glossier than I'd like, after applying that second coat. And worse, a faint orange color has appeared in places. Why? Possible explanations:
(a) I used Kryolan gloss, and Citadel matte -- maybe they interact badly?
(b) Maybe Citadel varnish is faintly orange naturally, and it became visible because I put on too thick a coat?
(c) Maybe the varnishes began to dissolve the cheap acrylics, leaching out some of the pigments?
clothed I clothed the pup without making patterns first. I just cut out pieces of fabric, glued them on, and then cut off excess. As with Percy's costume, I used Fabri-tac glue to good effect.
Overall, I'm pretty happy with this puppet. It's pretty seriously lopsided -- but hey, that's part of working "quick and dirty." As a final touch, I added little dots of black Sculpey to the eyes. That'll probably work fine, but today I picked up a small pack of black Van Aken plastilina, which I think will work even better.
The one problem with this pup that I want to be sure to remedy in all future pups is how I've dealt with tie-downs and rigging.
The tie-downs are 10-24, which I'm now realizing will create huge holes in the set floor. I want to move to using 4-40 threaded rod and knurled thumb screws for tie-downs, and make that my standard practice. (Marc Spess shows this approach in the excellent Secrets of Clay Animation Revealed! eBook -- and I've seen it used elsewhere, too.)
As for rigging: I forgot to build any rigging points into the armature, and am not sure as of yet how I might rectify the oversight. The character is supposed to spend some time crawling around on a big comfy chair... Which is essentially the same as having him walk on any non-tie-downable surface: you have to use a walking/flying rig to hold the rest of him in place, as just one part of him moves.
The "dad" pup is almost done -- just needs to get clothed now. More about him soon.
posted by sven | permalink | categories: stopmo
October 23, 2006
quck 'n' dirty pups
by sven at 11:16 pm
Continuing on with the "quick and dirty" animation project I started Friday, tonight I began constructing some new pups.
armatures The armatures are 1/16" sculptor's armature wire (annealed aluminum), held together with plumber's 20-minute epoxy putty. The "son" character is small enough that I didn't think I should put in limb bones. On the "dad" character, I'm trying a mix of boned and non-boned limbs. There are 10-24 nuts embedded in the feet.
Sculpey added I started adding heads, hands, and feet using Super Sculpey. "Dad" has a lower jaw that moves -- a trick I picked up from Grant Goans.
lip crack The "son" pup cracked almost immediately. There's a break in the lip that I could live with...
neck crack ...Unfortunately, there's also a more serious crack at the base of the neck. I should have textured the epoxy putty skull, so the Super Sculpey would have something to grab onto. Because I didn't, the Sculpey has come loose and wiggles on the neck -- and the neck wire has chipped out an area.
Oh well. These pups are going to be crappy -- but I'll get a better idea of what I want to do on the next iteration. I'm thinking that I might do hollow resin heads on a second draft...
posted by sven | permalink | categories: stopmo
October 21, 2006
working quick and dirty
by sven at 9:00 am
I've been focused on armatures for a few months. I want to start moving in a more holistic direction. The idea is to jump in and start doing quick and dirty animation... Stuff that's not up to my standards, but that gets me in motion and gives me something to improve on.
Here's what I did yesterday.
paper chairs I have an idea for the StopMoShorts challenge, so I'm going to be applying myself to that. The first scene is in a room with two chairs, so I did a quick mock-up using card stock.
chair carved from insulation foam One of the chairs is a big comfy thing. I carved it out of blue insulation foam using "Hot Wire Foam Factory" tools, then some small rasps, then sandpaper. The fumes and dust this foam creates are awful -- but I love how easy it is to work with.
"first draft" chairs The comfy chair got covered with fabric, using hot glue. The comfy chair's legs -- and the entire other chair -- are made from black foamcore. These props turned out smaller than I'd intended, and they're going to be difficult to affix to the floor of the set. They might not work out for actual animation... But that's OK. Remember: "quick and dirty."
the living room set The living room set was constructed out of a cardboard box. The carpet is made from pieces of felt glued down with Elmer's glue. The wallpaper is gift-wrapping paper. The cardboard warped pretty badly... If I wind up actually using this first draft for animation, I may need to staple-gun it to a piece of wood.
paper mock-up of the tunnel set The keywords for the StopMoShort challenge this quarter are cave, sword, and fear. I've got a cave tunnel in my story... And this is the paper mock-up I did for it.
building the tunnel arches The tunnel is built out of cardboard again... More trouble with warping.
wrapping the tunnel in crumpled paper To simulate rocky walls, I painted butcher paper with cheap acrylics, let the paint dry, then crumpled it up. I'm pretty pleased with the look. (Note that the outside of the tunnel is not painted.)
inside the tunnel I tried a couple of test photos inside of the tunnel. The idea is that the camera will scoot along toward the end, simulating the main character's point of view.
exit Lighting the tunnel's going to be more difficult than I thought. I initially intended to attach a flashlight to the camera itself -- but it turns out that I'm going to need much more ambient light than that. For these test shots, what I did was sneak a flashlight in behind one of the arches, and then set the camera for a very long exposure.
If I wind up doing a second draft of this set, I think xmas lights (or something that size) hidden behind arches would probably give me the quality of light that I'm looking for.
posted by sven | permalink | categories: stopmo
September 6, 2006
new armature: the man of steel
by sven at 10:56 pm
beauty shot Done at last! All told, after R&D was done, it took about 60 hours to complete this one. Now being able to avoid certain errors, I might be able to trim that down -- but 50 hours is probably a good estimate for the minimum amount of time that any milled armature is going to take.
full body What should I call the man of steel? I've considered calling this design "the Clark Kent." I've also considered calling it "the Christopher Reeve," as an homage -- but I have trouble shaking my discomfort with appropriating an actual person's name.
demonstrating a lean Oooh... The stainless steel balls move so smoothly... But the armature also holds a pose really firmly; no worries about this boy falling over. ...And this armature feels a lot sturdier, more unbreakable than the previous brass design.
Oh, yeah, steel is schweeeet!
action pose #1: quarterback With a fine armature in hand, you really want to get imaginative in thinking up poses. There's so much control over articulation -- you're compelled to make good use of the power.
action pose #2: catching a ball Here's another shot that demonstrates the armature's ability to stand on one foot and lean -- without falling over. That's absolutely crucial in an armature; otherwise you can't even animate a walk. ...Which is why I always make a point of demonstrating a big lean when I debut a new 'ture.
(This shot's just a bit more graceful than the other.)
action pose #3: creepy crawly This armature's built to human proportions. But -- I don't know why -- I keep imagining it doing a creepy crawl, like a person that's turned into an animal.
family portrait The blueprint for the "man of steel" is almost identical to the one that I used for my previous brass armature. However, steel is a whole 'nother world: the process for making this 'ture had next-to-nothing in common with the previous one. In fact, almost nothing that I described in my "how to make a brass ball-jointed armature" tutorial turns out to be applicable here.
Even so, this project was far easier for my having worked in brass first.
Hm. Seeing these two side-by-side sort of reminds me of the gold and silver C3PO units that you see at the beginning of "Star Wars: A New Hope" in the blockade runner...
robot smack-down! (Sorry. I couldn't resist.)
posted by sven | permalink | categories: stopmo
September 4, 2006
steel armature home stretch
by sven at 9:16 pm
the first complete joint Since I got back from Canada, I've put in 51 hours on the steel armature. It's all done, except for the feet -- which I'm estimating will take another 6 hours.
radiused sandwich plates The biggest accomplishment on this project has been getting the sandwich plates radiused (rounded off). Each radius required 18 passes with the milling cutter, shaving off .005" at a time.
In the course of making all those tiny cuts, I managed to reinvent steel wool. As the milling cutter spins, it accumulates a blob of spinning, magnetic, metal-splinter-and-oil paste. This paste -- along with chips and spirals from other cutting operations -- gets all over the worktable. ...Every night I come home with irritating microscopic metal slivers in my fingers, wrists, and elbows. I've started wearing my nitrile gloves while machining. That helps protect my fingers -- but what I really need is to find a sturdy long-sleeved shirt that I'm willing to sacrifice to the metalworking gods.
Even more alarming: A friend in the medical system has forewarned me that I'll now be disqualified from ever getting an MRI scan. Apparently, once upon a time, a fellow came in for a scan who didn't know that he had a tiny metal splinter in his eye. The powerful magnets of the MRI pulled the chip through an artery, and caused a stroke. Thusly, so I'm told, MRI technicians are now supposed to ask if you've ever worked in a machine shop before they let you get scanned.
Yeeeeeeesh...
JIG DESIGN #4
jig design #4 In the course of radiusing the sandwich plates, I discovered that jig design #3 was flawed. I had to spend a day modifying the jig, but it seems to work without fail now.
The trouble was that I was clamping the jig to the rotary table using a lathe chuck. That works very well for a while... But while the chuck is sturdy enough to hold something that's rotating on a lathe, it's not designed to withstand the stresses created by a milling cutter. Eventually its grip loosens.
centering pin My solution (jig design #4), was to create a centering pin that could plug into the hole in the center of the lathe chuck on one side, and connect into a hole in the bottom of the jig on the other. To make the centering pin, I lathed a round piece of aluminum down to 7/16". I made the hole in the bottom of the jig by using the lathe and a boring tool. These tasks represent my first real work on the lathe, other than drilling balls.
modifying the jig The centering pin does a very good job of locating the jig where I want it on the rotary table. But I still needed a means to firmly hold it down. So, what I did was create a groove in the side of the jig, so I could use regular hold-downs.
modifying the jig - closeup This is a particularly interesting set-up, seen in the two photos above. On the mill's XY table, I've attached a tilting angle table, and set it to 90 degrees. Screwed into the tilting angle table is the rotary table, and screwed into that is the lathe chuck. This arrangement allows me to cut a groove all around the jig.
DRILLING BALLS
drilling balls on the lathe Making the sandwich plates is the most time-consuming and challenging part of making the armature. This go-around, I decided to get that ordeal out of the way first, and then move on to easier things: drilling balls, and brazing them onto rods.
filing a small flat area I've been trying to fine-tune my process for drilling balls. The balls pictured are all 5/16" diameter type 302 stainless steel balls purchased from smallparts.com. [They're almost exactly the same size as the 8mm beads that I've used on previous armatures.]
Step 1: Put a ball in the lathe chuck and file a small flat area (~1/16" wide) using a bastard file. Tom Brierton recommends doing this with the lathe turned on. I found that for me it works better to just spin the wheel by hand while the lathe is turned off, filing with not much pressure.
starting a hole with the center drill Step 2: Put a #2 center drill in a small drill chuck in the tail stock. Bring it to the point where it's touching the ball. Put a drop or two of oil on the center drill. Turn the lathe on, and bring the motor up to 1800 RPM. [I haven't been able to determine what the technically correct turning speed should be, but this seems to work based on trial and error.] Feed the drill into the ball fairly quickly, three and a half turns (.175"). This creates a small hole with just a little bit of lip. Don't use the handle on the hand wheel -- keep your hand on the edges of the wheel, or you won't be able to control its speed of entry adequately.
drilling a hole Step 3: Remove the drill chuck, take out the center drill, replace it with a 1/8" drill, and reassemble. I want to make a hole that goes halfway through the ball. If the ball is 5/16" (.3125"), halfway through is .15625"... But for my purposes, .15" is close enough. Each turn of the handwheel is .05", so it'll take three turns of the handwheel to get the drill in. Oil the drill and back it up one turn. Turn the lathe on, and move the drill forward four turns. Use a fiarly fast feed.
completed balls Step 4: Repeat, repeat, repeat. Don't forget to drill extra balls, to accommodate for mistakes later on in the process.
BRAZING BALLS ONTO RODS
ready to braze LIO recommends brazing with the ball on top of the rod. Tom Brierton recommends brazing with the rod on top of the ball, held in a "helping hands" tool. In Laika's "The Making of Believe" video, I can see that they use LIO's method. [Not surprising, given that LIO used to work there.] ...However, because I'm familiar with the helping hands tool, I opt for Tom's method.
using a hammer to press down When I braze, I'm using .030" diameter J.W. Harris brand Safety-Silv 56 cadmium-free silver solder (that's 56% silver), and J.W. Harris brand Stay-Silv white brazing flux. I find that two small clippings of soldering wire is adequate, each between 1/32" and 1/16" in length.
For a heat source, I'm using a butane microtorch that came with a creme brulee set. [You can also buy microtorches at a hardware store.] If I recall correctly, Safety-Silv 56 melts at about 900 degrees. According to the Welder's Handbook, propane burns at 3800 degrees Fahrenheit, and butane burns at 3900 degrees -- so butane should work just as well as the standard propane torch.
microtorch and ball-rod assemblies I find it takes about 15 seconds of heat to get the Safety-Silv to melt. LIO says that you should be able to feel the ball sink onto the rod... I experienced that only once; I think it has to do with the shape of the solder snippings you use. [Tom uses shavings off of a larger diameter wire, which is likely to be another experience still.]
Unfortunately, the Safety-Silv melting seems to coincide with the ball discoloring. It turns a sort of iridescent black, like an (artificial) black pearl. Then, as it cools, it turns a brassier color. I'm unhappy about the discoloration... I think I need to look into purchasing "granular oxide remover" or pickling solution to clean the balls. I tried using a steel brush, as LIO suggests, but it seemed to scratch the balls, which is unacceptable.
The worst of the discoloration results from the flux boiling over the sides of the hole. To avoid this, a trick I came up with was to apply flux into the hole using a toothpick. I attempted to use as little flux as possible, while still coating all of the insides of the hole. When I was careful, it seemed that I was able to avoid flux boiling over almost entirely.
BRAZING THE TORSO AND PELVIS
brazing the pelvis On my previous armature, I was using a solder that was 98% tin, 2% silver -- as opposed to the current stuff, which is 56% silver (and six times more expensive). This solder is much more difficult to use on the torso and pelvis blocks.
I lay down a half-inch long piece of soldering wire on some flux, just to the side of one of the rods that I'm trying to attach. Because the plate is so big, there's a lot of dissipation of heat, making it very difficult to get the wire up to 900 degrees. In the process of getting the metal that hot, the body blocks turn black -- and even rust! -- which I then have to sand off using fine-grit sand paper.
[P.S. I made the grooves for the rods this time using a 1/8" ball-ended milling cutter. I just got it in the mail on Friday. It's going to be necessary pretty soon now, when I get around to making my first step-block joints...]
Looking at LIO's Armature Anatomy 101, I begin to understand why he has the shoulder rods attach into holes, rather than lie lengthwise: a smaller point of contact means less heat dissipation to fight.
I also think I begin to understand why he avoids using "helping hands." The helping hands alligator clips have little springs inside of them that make them close. What happens when you super-heat a spring? It dies! At least one of my clips won't close anymore... It's probably done for. These things are really made for soldering circuitry boards and fusing wires -- they're not meant for such extreme heat.
...
OK, there's plenty more to say -- but I'll leave off there for now.
posted by sven | permalink | categories: stopmo
August 28, 2006
steel armature progress
by sven at 9:49 pm
sandwich plates so far I'm about halfway through making my first all-steel armature. The design is nearly identical to the one I used for my last brass armature. The exceptions:
- sandwich plates are 1/8" thick
- holes for the balls are 3/16" wide
- I'm using solid 5/16" type 302 stainless steel balls instead of 8mm beads
- the legs are slightly shorter, as is the neck
trick for starting a hacksaw I've come up with a handy trick for getting the hacksaw started. I use a pair of pliers as a straight edge. Before I tried this, I was having trouble with the saw skipping.
drilling I'm using my "sushi roll" method again: drilling all the holes in two long strips, then chopping the strips into individual joints. Now that I'm working with a mill, I very much like the precision of using its XY table.
tapping Steel is more difficult to tap than brass. I broke two taps while threading holes... It's just the price of learning. I think I've got the hang of it now. Use lots of lubricant, only turn a little ways, then turn the tap back far enough so that you're definitely breaking off the metal chips. Squeaking is a bad sign.
the "sushi roll" strips Here are the two strips before they get chopped up. In theory, what you're looking at is all of the sandwich plates, laid out in two straight lines...
close-up of the strips Unfortunately, I discovered too late that my milling vise got out of alignment while I was working. You can see that some of the holes aren't perfectly centered. I had to go back and re-make the effected joints.
Incidentally, the cutting speeds I listed in my last steel armature update were incorrect. Since then, I've figured out how to do the calculations that determine RPM for a specific diameter (and shape) of cutter based on the properties of whatever metal you're choosing to work with. There isn't just one RPM for each kind of metal; it depends upon a number of factors.
posted by sven | permalink | categories: stopmo
August 26, 2006
hamilton mattress
by sven at 10:03 pm
We just watched "Hamilton Mattress," a half-hour stopmo film about an aardvark who wants to be beautiful. FANTASTIC!! Better than the first Wallace & Gromit shorts, in my opinion. I was charmed, delighted, enthralled.
Great characters. Lively, fun acting. Tight, elegant, lovely story. Excellent use of color. Beautifully crafted sets. Not high art, but an appealing-to-all-ages fable. A paragon of what stopmo can be.
The "making of" featurette has some interview material with Barry Purves, who's mentioned in a number of stopmo books as a great in the medium. Puppets by MacKinnon & Saunders (foam latex, I'm pretty sure) -- whom you know as the fabricators for Corpse Bride.
The copy I have was gifted to me by our friends Kristen and Todd. I see that it can be had via Amazon.com. It's probably available via NetFlix, too.
Add it to your "must see" list.
posted by sven | permalink | categories: stopmo
August 20, 2006
a new jig for radiusing
by sven at 8:36 pm
Before our vacation to Canada, I had started working out how to make my first steel armature. During the past few days I've made some new progress.
radiused sandwich plate Above you see a "sandwich plate." A pair of these would sandwich two steel balls, making an "open hole double ball" joint. Rounding off the ends of the plate is called "radiusing." Figuring out how to do that rounding took a lot of effort. It's my big success for the day.
[The simple solution would be to hand-file the curve. However, I'm making this armature for show, and want it to look fancy. Figuring out how to do radiusing is also a good learning project, to help me get used to my new milling machine.]
vise spacers If you're going to drill holes through plates, then you need to put spacers underneath, so the drill bit doesn't cut into your milling vise. What I've done is cut a little .03" shelf into two pieces of aluminum. This is just enough room for supporting the 1/4" wide bar, while letting the 3/32" dia. drill bit pass through unhindered.
jig design #1 To hold the sandwich plate in place for radiusing, I needed a jig. My first attempt was successful -- but it was miserable trying to get the rotary table centered under the spindle, squaring the jig to the milling table, and clamping the jig down with step block hold-downs... Too fiddly, and the jig was liable to come loose whenever I unclamped a sandwich plate in order to put another in.
jig design #2 I modified the jig design, drilling holes in one side so I could use socket cap screws and T-nuts to clamp the jig directly to the rotary table. I also added two 4-40 screws on top of the jig, so a little bar could be screwed down to hold the sandwich plate in place. These changes made clamping much easier and more reliable...
...However, I didn't have the holes in the jig perfectly centered. Consequently, the jig was imperceptably angled on the rotary table. Turning the table amplified a small error; so rather than rounding off the plate's end, I got a wonky arc.
jig design #3 Friday night I finally had my "ah-ha!" moment. Most of the misery here has to do with getting the jig perfectly centered... Well, a lathe chuck is designed to get things perfectly centered -- and the rotary table came with an adaptor so you can attach a lathe chuck. A round jig should do the trick!
Saturday I went out to Metal Supermarkets and picked up a 1" length of 1.5" dia. aluminum rod. A little more than six hours later, I finished making the jig you see above.
jig in lathe chuck on rotary table A couple of things I've learned in the course of this project...
RPM for milling aluminum: usually 2500. RPM for milling 1018 steel with a 1/8" end mill: 1000. RPM for milling 1018 steel with a 1/4" end mill: 500.
Everyone says to take shallow cuts -- and they're right. When roughing out the radius, .03" cuts are appropriate. For the final passes, .0010" and .0005" passes are appropriate. Try to take too deep a cut and the jig might buck, the cutter could get stuck, and the accuracy will be bad. In fact, it's best to do your first passes with the cutter not even touching the work, just to make sure that you're not going to suddenly dig into an unexpectedly thick surface.
Working with backlash... If you're moving the XY table to the right and then reverse directions, there's a moment when you're turning the handwheel but the table isn't moving -- because the leadscrew has some play and hasn't grabbed hold yet. This is called "backlash."
Your measurements are only good when you're moving the table in one direction -- if you back up, backlash will introduce uncertainty. So, if you overshoot your mark, you have to back up past the backlash, and then go forward again.
I've got a digital read out (DRO) which can be set to accommodate for backlash -- but I've seen at least one online warning that adding and subtracting backlash to your measurements is an inaccurate method.
My current method for locating the spindle in relationship to something in the vise: I put a piece of 1/8" rod into the drill chuck and move it forward until I hit the edge of the vise... When I hit the edge of the vise, I zero-out the DRO. I back the spindle up a good ways and then, going forward, use the DRO to help me move the spindle to where I need it.
Oh! And I used a fly cutter for the first time. That's a rotating blade that can "quickly" flatten out wide surfaces (up to 2" wide).
I think -- knock on wood -- that I'm just about ready now to start working on the armature proper.
posted by sven | permalink | categories: stopmo
August 13, 2006
30fps - basic principles
by sven at 7:46 am
We're only just back from Canada... And immediately I get one of my signature bouts of inspired insomnia.
click on image to play clip (2.74 MB) Last night I started typing out a list titled "exploring the formal qualities of stopmo animation." Why? Form precedes content, I think I've decided. I'm just not gushing forth ideas for stories that I want to tell -- but if I spend a while dissecting the empty cinematic container that's meant to transmit stories, I suspect some part of me will start stepping forward to fill the void.
After I went to bed, one of the items on my list developed itself into a full-fledged short film concept -- so I was compelled to get up and execute the idea. Click on the image above to see the film; it runs 1 min 16 sec.
For your additional amusement, here's the passage I wrote that inspired the film:
5. As animation is actually a series of still images displayed rapidly, one might have more than one series of images interspersed with each other, perhaps at varying rates. At a one-to-one ratio, the two story streams would appear superimposed. At a ten-to-one ratio, the minor story stream would become subliminal. There could be not just two, but three or four or more story streams being interspersed at the frame-level of time, each at varying rates. The rate at which a story thread is visible could be constant, or it could change during the course of a film -- e.g. increasing in frequency until it’s visible at a conscious level -- and then receding back to a subliminal rate.
5A. Do the interspersing of frames using nothing but still frames of color. (This isn’t stopmo proper, and there are no evolving story threads -- but it would be a much simplified version of the basic idea, useful for testing how it works in practice.) Each of these colors might be paired with a musical tone, which would both help alert the viewer to new themes, and create an organic soundtrack. ...Backtracking, this raises the question of how a soundtrack would be handled if one were working with actual story threads.
5B. The principle of intermixing different story threads at the single-frame level could be explored even more simply using black and white screens. At its most basic, there are four concepts to demonstrate: unbroken, superimposed, subliminal, and transition. Have the name for each concept in white letters at the top of a black screen, and in black letters at the bottom of a white screen. After demonstrating the four basic concepts, one could move on to demonstrate ratios, e.g. 1:14, 2:13, 3:12, 4:11, 5:10, 6:9, 7:8. (Working in 15fps would probably be most practical.) Having the words for the black screen and the white screen spaced so that they wouldn’t overlap would make it easier to see the principles; for the ratios, it might be more interesting to have the black and white text fall on the same spot on the screen. For sound, perhaps just white screens would have sound (a simple sawtooth tone?) -- black would have silence. If there were a title at the beginning and credits at the end, perhaps it would be appropriate to the medium that they each only be one frame long; using a QuickTime viewer, they would stay visible until the film was set into motion. It might also be appropriate to have the title cards written on gray screens. Possible titles: ratios, intercut, 15fps, stacking frames, impersistent vision... This experiment would do a very good job of laying the groundwork for the color, multi-thread experiment. The title card might also be an explanation, rather than a title -- the title and credit could come at the end. Looking at this project from a practical point of view, it could probably be assembled in AfterEffects by dropping single-frame compositions into a master composition (nesting them), and then using the keyframe assistant command to sequence them.(Oh so witty... Now may I please go to sleep, please?)
posted by sven | permalink | categories: movies, stopmo
July 29, 2006
making cobblestones at bent
by sven at 11:59 pm
Wednesday (7/26) I finished my first job at Bent: casting plaster tiles that will represent cobblestones in a small town.
[Being conscientious about confidentiality, I only took these 4 photos -- ones that show my little project, and nothing else.]
the empty mold Here's an empty mold that I made. The cobblestone pattern is vacuformed. Clay walls helped give the tiles a more "jig-saw"-like edge. The mold sits in a wooden box, but the box is protected by a sheet of plastic.
the mold filled with plaster I'd fill the mold up with plaster (hydrostone), layering in a piece of burlap. Then I'd "scree" the excess off the top.
running four molds at once When I finally got the workflow down, I had four molds running at once, popping out four tiles per hour. To control the spread of particulates, mixing plaster and de-molding tiles needed to be done in the spray booth.
stacking up finished tiles In order to help me keep track -- and make it easy for supervisors to see how far along I was -- I numbered the backs of the tiles. After de-molding, I stacked the tiles in piles. By the end of the job, I'd made 55 cobblestone tiles.
Working at Bent was wonderful! I was thrilled to discover that I was familiar with almost every material I came in contact with -- due to the intensive research of the past eight months. And yet, seeing these materials actually in use -- it gave me a much more visceral understanding of how they all come together to make an animation. It was a good low-stakes project for me to start out with, getting me oriented in the world of professional stopmo.
Bent hires folks on a per-job basis... And it sounds like they've got a lot of projects coming up. I'm really hoping to work with them again soon.
posted by sven | permalink | categories: stopmo
July 20, 2006
I've got a contract!
by sven at 10:00 pm
I'm so excited! Today I got a contract with Bent Image Lab, a local animation studio that seems to focus on producing TV ads on the national and international levels. I got the call asking me if I wanted a job at 10:35am... I went in to sign paperwork at 1:00pm... And by 2:00pm I was actually working!
A million thanks to Grace Weston, who recommended me to studio and gave them my contact info. Go look at Grace's website; she's an amazing photographer. Gretchin met Grace at Job Club for Creatives and showed off my work to her -- so thank you Gretchin as well!
I signed a (sigh) confidentiality form, so I'm not going to be able to say much about the job... But here are a few innocuous details I think are safe to share:
I'm going to be making cobblestones for a street scene. The first task they set me to was vacuforming. You use a special machine to melt a piece of plastic, and then very quickly pivot it over and onto a table that has a vacuum under it. You place a 3D form on top of the vaccuum table called a "buck" (in this case cobblestones); the vacuum forces the melty plastic to take the shape of the buck. ...Cool!
My job will last maybe one week or ten days, so it will be done before Gretchin and I head off to a family reunion in Canada. It's the first paid animation-related work that I'll be able to put on my resume. It may not be the most glamorous part of the production -- but I'm in, which is the important thing. And really, given my voracious interest in animation, I'd kinda sorta like to take a stint doing every job in the building.
Ah, the adrenalin still hasn't worn off...
:-D
posted by sven | permalink | categories: miscellany, stopmo
July 17, 2006
steel armature progress
by sven at 11:59 pm
I've been doing tests and experiments in preparation for making my first steel armature. Here's a quick progress report...
drilled bearing soldered to rod I think I've figured out the magic combination of factors needed to successfully drill balls on the lathe. Step 1: file a small flat surface on the bearing while it's in the lathe. Step 2: While the ball rotates at 1800 rpm, use a #2 centering drill fitted into my smaller drill chuck to start a hole. Step 3: Three turns of the handwheel will put a 1/8" dia. drill just about halfway through a 1/4" ball. (Actually, the balls that I'm going to use will be 5/16" dia. -- they're very nearly identical in size to the 8mm beads I used on my last armature.)
Above you see a ball that I've soldered onto a rod using 1/32" dia. Safety-Silv 56. I used three tiny snippings of solder; I think 3 or 2 would have been adequate. The silver solder was a pleasure to work with -- I didn't have any problems getting the parts to join.
On this test, I used 1/8" music wire for the rod. One of our Scarlet Letters readers warned me that this stuff would be hell on a hacksaw. I forget now who said this -- but thank you! Sure enough, I took the teeth right off my hacksaw's blade. If you hadn't given me the heads-up, I would have been baffled. ...I've bought some type 304 stainless steel rod as a replacement now.
radiused sandwich plate Today's project was to "radius" (round off) a sandwich plate. The big problem was how to clamp the plate down for cutting -- while not cutting the rotary table.
Upon consultation, stopmoe/machinist Mark Fullerton suggested that what I require is a jig. He even went so far as to create a 15-photo tutorial for me! Holy cow, that's above and beyond, Mark! BIG THANKS!!
jig for radiusing The jig design that I came up with has little in common with what Mark showed me -- but the tutorial was very helpful nonetheless, and I'm going to be chewing on it for quite some time.
For my own jig, I milled a 1/4" wide x 1/16" deep slot in a 3/4" wide bar of 6061 aluminum. A 1/4" wide 1018 steel sandwich plate sits snugly in that slot. The plate is kept registered with a piece of 3/16" dia. x 1/2" long brass rod.
milling One of the trickiest parts of this operation is getting the rotary table perfectly centered underneath the mill's headstock. What I did was attach a lathe chuck to the rotary table, and a drill chuck to the headstock. I put a piece of 3/16" brass rod loosely in the drill chuck, and then maneuvered the X-Y table until the rod fell down into the lathe chuck. From that point on in the process, I made sure to never move the X-Y table.
I put the rod back in the drill chuck and used it to center the jig. I used a precision machinist's square to square the jig with the milling column. The slots in the rotary table had to be at 45 degree angles to the jig so there'd be room for hold-downs. I used two step-block hold-downs to keep the aluminum jig and steel plate in place while I was milling.
Making the jig and this first test plate took almost five hours. It's time well spent: at this point, I just need to get familiar with using my machines. I tried filing the opposite end of the sandwich plate by hand to make it into a curve. It was quick and easy... But nowhere near as pretty as the radiused end! ;-)
posted by sven | permalink | categories: stopmo
July 12, 2006
gifting
by gl. at 2:58 pm
the studio loves gifts! so i'd like to acknowledge & thank three recent ones:
first, ubatuber sent a copy of his "jenny greenteeth" woodprint, which is even more impressive in person than it is here:
then one of my artist's way independent support students brought perfectly sweet chilcotin raspberries fresh from the farmer's market. yum!
and finally today, laura gave us both evil-eye bracelets she picked up in instanbul!
of course, the collage fairies always bless us by refreshing our pool of interesting and unusual collage materials: thanks colleen, vicki, jen, chip & kathy, grace & alesia!
posted by gl. | permalink | categories: artist's way, miscellany, stopmo
July 10, 2006
a stopmo play day
by sven at 8:00 am
I've been long overdue to do some actual animating. So yesterday I declared a "stopmo play day," and did some serious fooling around...
click on image to play clip (356 KB) I'm out of practice. So, rather than leap into something really complicated, I decided to start simple and add levels of sophistication with each successive clip. For the first one, I clamped a piece of masonite to the livingroom coffee table, taped on a piece of butcher paper, and started animating a piece of clay. I used my digital still camera and its remote capture software -- no framegrabber.
Previously I've shot 24 fps on ones. Today I was shooting 15 fps, which is the same as shooting 30 fps (NTSC) on twos. It was interesting to discover that my clips weren't overly fast today, as they tended to be when I shot 24 fps. Fewer frames per seond means you don't accidentally squeeze too much into a second.
click on image to play clip (506 KB) For the second clip, I switched to using my digital video camera in combination with FrameThief (a framegrabber). I've resisted using the DV cam because the picture quality isn't quite as good as what a still cam can produce... But I have to remind myself that a TV screen is going to trash the picture quality anyway. The benefits of using a framegrabber outweigh the loss of quality. [Still cams are notoriously difficult to get working with a framegrabber.]
The motion is much improved by the use of the framegrabber... One problem that came up on both of the clay clips, though, is that I didn't have the horizontal piece of paper adequately locked down. In the first clip it slid sideways. In the second clip, the stickiness and tipping weight of the clay would lift the paper up off of the table.
click on image to play clip (424 KB) My first try animating the new brass armature! For the most part, it performed excellently. It did tip over once, though, when I had Percy doing an extreme lean. It's forgivable: he has a very heavy head. Still, for an armature to tip over -- that's a significant failure.
For this clip, I moved into the garage, where I can completely control the light. It was so hot, though -- I had to set up a fan to keep the laptop computer from overheating. My shadow shows up a couple of times in frame. Since Percy is way over on the right side of the screen, and the computer was to the left, I got sloppy about standing far enough away when I'd hit the shutter release key.
In terms of the motion itself, I'm fairly pleased. Percy is supposed to be looking up at a bird or a plane (or..?) -- and he loses his balance. Then he looks over his shoulder to see if anyone saw him. I see a number of moments that could be improved -- but this was pretty much improvised, so I'm not going to hold the clip to a high standard.
click on image to play clip (230 KB) For the final clip I did, I set up a theatrical light with a gel, and put in the "cave wall" backdrop I did a while back. Percy's supposed to be looking back at someone behind him, and then waving as if to say "follow me." I don't think I got the angle of the hand right... But I did animate the shadow following Percy off screen, which I think looks cool.
The DV cam automatically adjusted for brightness, which messed up the shot. I've had more troubles with this camera's automatic settings... >:-( ...There's also some blur that's a result of the compression process. These issues aside, I feel pretty good about the clip. Everything is slowly coming together -- you could almost begin to imagine me (gasp) shooting a short story.
posted by sven | permalink | categories: stopmo
July 9, 2006
stainless steel balls
by sven at 2:00 pm
type 302 stainless steel balls Having done a pretty successful brass armature, the next step up is to try making a steel armature. Following the advice of Lionel Orozco and Tom Brierton, I'm going to use type 302 stainless steel balls for the joints. I ordered a selection of ball sizes from smallparts.com.
steel beads scratched by 1018 steel plates On my brass armature, I had a nifty trick: I used hollow beads instead of solid balls -- which really cut down on drilling time. Before moving on to the professional standard (type 302 balls) I had to see if my bead trick could also be used with steel. The answer: no.
Stainless steel beads, it turns out, are harder to acquire than brass beads. I had to get my supplier, "A Bead Source," to make a special order for me. The steel beads soldered onto my 1/8" dia. K&S music wire with no problems. However, when I put the beads between my 1018 cold finish steel plates from Metal Supermarkets, the beads got all scratched up. I shouldn't be surprised -- the beads must be made of a far softer metal.
I've looked in the K&S stainless steel center for something analagous to the 12" x 1/4" x .093" brass strips I used on the brass armature -- but found nothing. Conclusion: I could make an armature that uses steel beads and brass sandwich plates, but there's not going to be an all-steel armature that uses beads for balls.
Sherline 4400 Lathe My Sherline 4400 lathe and 5400 mill arrived June 20... I was so busy writing the brass armature tutorial, however, it took me a while to get around to setting them up. Much of this past week was spent assembling the machines, attaching them to wooden bases, and getting acquainted with their basic operations.
ball in lathe Friday night (7/7) I successfully drilled my first ball using the lathe method. Basic idea: the chuck of the lathe spins the ball while the drill stays still, which allows you to make a perfectly centered hole.
I've read quite a bit by this point -- in Stop-Motion Armature Machining, Tabletop Machining, and The Home Machinist's Handbook -- and yet, the tactile quality of machining steel was not at all what I expected. I knew that you need to be patient; but I couldn't imagine the extent to which progress is measured in fractions of a millimeter. I knew that you use a lot of oil; but I didn't comprehend that the tiny metal chips would form a sort of oily paste.
...Metal-working at this level is going to be challenging. But I still think I have what it takes.
bead (left) and ball (right) Here's a photo of my first drilled stainless steel ball. For comparison's sake, I simply fit it onto the other end of a rod that was already soldered to a bead. I have the Safety-Silv 56 solder I need in order to attach it permanently, but that's the next step...
Celebrate one small victory at a time. This stuff ain't easy.
posted by sven | permalink | categories: stopmo
June 23, 2006
how to make a brass ball-jointed armature (part 5 of 5)
by sven at 9:05 pm
PART 5: PUTTING IT ALL TOGETHER You've attached balls to rods, and you've made sandwich plates. So, all the parts for joints are ready. What's left is to create the chest, pelvis, and feet of the armature.
MAKING THE CHEST AND PELVIS
For this design, the chest and pelvis will each be made from segments of a 3/4" wide K&S strip. We'll solder onto these plates several of the ball-and-rod assemblies that we made earlier.
chest and pelvis before soldering Step 1: Cut off two lengths of brass. I'm using 3/4" wide, .064" thick brass strip segments for the chest and pelvis of this armature. Depending on your design, a 1/2" or 1" wide strip could work just as well. I cut off 1.5" lengths from the original 12" long strip using the Dremel rotary tool.
Step 2: Round off the corners. Use the Dremel to round the corners of the rectangles you've cut. It's a kindness to your own hands, to not leave pointy scratchy parts. Also, it should help protect the puppet that you build on top of the armature from being torn.
Step 3: Make grooves. You're going to solder rods onto these strips. That task will be much easier if you first make grooves for the rods to sit in. After measuring and scribing guide lines, start the grooves by notching the edges of the strip with a triangle-shaped needle file. The edge notches make it easier to begin filing in a straight line. After you have a significant groove in place, round it out with the round needle file.
clamping the chest for soldering Step 4: Position your work piece in the "helping hands". Place one of your torso plates into the "helping hands" tool. One clamp should hold the plate up, while the other clamp holds a ball-and-rod in its groove.
completed chest and pelvis Step 5: Solder. The trick to soldering is that you apply flame to the metal that you are going to solder, never to the soldering wire itself. Let the heat of the brass do the work of melting your soldering wire. Apply flame to one side of a rod while holding a length of wire against the other side.
Step 6: Quench. Cool the work piece off before moving on to the next join. Squirt it with water from an eyedropper, and then use needle-nosed pliers to dunk it in a jar of water.
During the soldering process you may wind up accidentally frying one of the ball-to-rod joins. If this happens, refer back to the section on attaching balls to rods and fix the break.
MAKING FEET
It's crucial to make tie-downs in the feet of your puppet so that you can attach it firmly to the floor of your set. You have the option of drilling a hole in the foot of the armature and using a tap to thread it. That's a fairly elegant solution. Personally, I prefer to solder a hex nut onto the foot -- it just feels sturdier to me (particularly for larger armatures).
a simple foot design A very simple way to make a foot is to drill a hole in a foot plate, solder on a hex nut over the hole, and then solder on a rod-and-ball. If you go this route, it's useful to file a groove into the foot for the rod to sit in while you do your soldering.
Notice that with this design the ankle joint will actually rest on the ground. You'll want to "freeze" one of the balls in this joint with solder, so that the ankle has only one point of rotation.
a more complicated foot design. On the armature design that I'm demonstrating, I wanted to avoid having to freeze a ball in place. What I came up with is a sort of simple "step-block" joint. The basic idea is that a sandwich plate joint will rise vertically from the flat of the foot. One sandwich plate will be soldered in place, the other will move freely.
pieces for a "step-block" foot For the flat part of the foot, I used brass strip that was 1/2" wide and .064" thick (1/16"). This particular foot is one inch long. The hole for the tie-down screw is 7/32" wide. The nut that will go on top of it is size 10-24. The sandwich plates each have little notches at their bottom that will fit into notches in the flat of the foot. The space between the sandwich plates is 7mm wide.
Use the Dremel rotary tool to rough-out the notches. Use a triangle needle file to make the notches as accurate as you possibly can.
soldering on the hex nut When you solder the brass nut onto the flat of the foot, be sure to first give both parts a light sanding with fine-grit sandpaper. This will help remove oils from the surface of the brass and help the solder adhere better.
Hold the nut in place by screwing the tie-down screw up and through it from beneath the foot plate. Hold the work piece in position for soldering using the "helping hands".
Solder on three sides of the nut. Remember that the trick to soldering is to apply flame to the metal that you're going to solder, never to the soldering wire itself. Each time you solder a face of the hex nut, apply your flame to a part of the foot plate that is on the opposite side of the nut.
attaching the sandwich plates The best way to hold the sandwich plates in place when you attach them to the flat of the foot is to simply put a spare ball in and tighten the joint onto the foot's sole. Use the "helping hands" to hold the foot in place while you solder. Solder only one plate in place: the one with the threaded hole. Heat the ankle area from the outside of the joint as you apply solder to the inside.
the completed "step-block" foot Here's the completed foot. Notice how one plate is fixed in place, while the other is able to move freely.
This is a very workable foot design... It's worth noting that on a more professional armature there would typically be a hinge in the middle of the foot. This is so a puppet could stand on its toes -- or walk heel-toe-heel-toe, rather than just landing flat on the foot each time it takes a step.
FINAL ASSEMBLY
You've built everything that you need for your brass ball-jointed armature: "open hole double ball" joints, torso plates, and feet. Place the sandwich plates around the appropriate balls, and tighten the 4-40 screws.
The project looks complete -- but you're not done quite yet.
Now that the armature is all together, spend some time playing with it. (...As if you could keep your hands off of it!) As you're twisting the limbs, it's quite likely that at least one of the balls will come loose from its rod. That's OK -- sometimes joins are weak. Better to discover it now, instead of later when you're actually animating. Review the section on attaching balls to rods and fix the break.
Test the armature again. If nothing breaks this time... Then you're DONE! Congratulations!!
OTHER RESOURCES
This essay is intended to fill a gap in the array of online armature tutorials that are currently available. On the one hand, you have very simple designs that use aluminum armature wire with epoxy putty for bones: e.g. by Mike Brent and by Nick Hilligoss. On the other hand, you have designs with “open hole double ball” joints that are made on a drill press: e.g. by Lionel Ivan Orozco, by Charles Hamper, and by limanima.com. This brass ball-jointed armature falls in-between those two kinds of designs. It is meant for animators who want to move up to making metal-jointed armatures, but who aren't yet ready to purchase big machines that need to be bolted onto a workbench.
For myself, this project is partly a way of taking baby-steps toward making truly professional armature designs. If that is your goal as well, I believe making steel armatures on a drill press (or mill and lathe) will come more after having done this project.
Even if it's not your ambition to build more sophisticated armatures, this tutorial may still be of some use. My hope is that by illustrating nearly every step of the construction process, you will be left with a very physical sense that you could make one of these things with your own hands. You may choose not to go to the effort -- but at least the process won't seem mysterious and beyond the realm of possibility.
Whichever way you go -- good luck!
Leap from here to...
- PART 1: THE DESIGN
- PART 2: SUPPLIES YOU'LL NEED
- PART 3: PUTTING BALLS ON RODS - THE HOLLOW BEAD METHOD
- PART 4: MAKING SANDWICH PLATES - THE "SUSHI ROLL" METHOD
- PART 5: PUTTING IT ALL TOGETHER
posted by sven | permalink | categories: stopmo
how to make a brass ball-jointed armature (part 4 of 5)
by sven at 9:04 pm
PART 4: MAKING SANDWICH PLATES - THE "SUSHI ROLL" METHOD Making sandwich plates is the most time-consuming aspect of building the armature.
Most tutorials have you making sandwich plates one pair at a time. I'm going to show you a more efficient method. We're going to bind two long strips of K&S together, and drill all our holes at once. Then, we'll chop the length into individual joints, and give them some minor finishing touches. I call this the "sushi roll" method.
Using the "sushi roll" method, we'll create our sandwich plates in four stages: (a) registration, (b) drilling, (c) cutting, (d) finishing.
A. REGISTRATION
There are two big advantages in binding your long strips of K&S together. One: You won't have to waste so much time getting work pieces into and out of the vise, each time making sure that everything is properly aligned. Two: Registering the long strips with one another will give you more accurate alignment than if you try to mate short plates together.
Now, let's get to it...
measuring and marking a brass strip Step 1: Marking where the strips will be attached. Take one piece of 12" x 1/4" x .093" K&S and tape it down onto your work table. At each end, find the center (1/8" from either side). Scribe a line between those two points, all the way across the strip. Now, from each end, measure 3mm in and use the spring-loaded center punch to start a hole. Measure 3mm farther in and scribe a line perpendicular to your first. These 6mm of material on either side of the strip will be where you attach the top and bottom strips together. These bits will be waste material at the end of the process.
Step 2: Marking the lengths of individual plates. Based on your particular puppet design, use the scribe to mark in the ends of each individual joint. Leave at least 2mm between each joint.
Step 3: Marking where holes will be drilled. Use the spring-loaded center punch to mark where the joints' holes will be drilled. As a reminder to yourself, you may want to use a fine-tipped Sharpie marker to circle all of the points that will be screw holes -- just so you don't accidentally forget and drill them too large.
drilling the end holes Step 4: Clamping the strips. Now that you've marked your measurements on the top strip, put a second (unmarked) brass strip underneath it. Place these two pieces into the vise together with about 1" hanging outside of the jaws. The vise assures that the strips will stay perfectly aligned with one another horizontally. We also want to make sure that the strips are held together vertically while being drilled -- so use an additional 2" C-clamp to bind the top and bottom plates together. Make sure that the C-clamp is at least 1/2" away from your end hole. If the drill chuck bumps that clamp, it will put sideways stress on your drill bit and cause it to break off in the hole.
move the top plate aside if the drill meets resistance For steps 5 - 8, we're going to focus on just one end of the strips.
Step 5: Drilling an end hole. Use a 1/16" bit to drill an end hole. Pay close attention: this is the step in building the armature where you are most likely to break a drill bit! Sometimes the drill will go through both strips with no problem... However, sometimes the bit will go through the top plate, and then have trouble digging into the second. If you feel any resistance at all, STOP and remove the upper plate. There should be at least a small mark on the bottom plate; start drilling again from there.
I strongly recommend having three or more extra 1/16" drill bits on hand. Given my own experience, it is likely that you will break at least one or two while getting a feel for how to do this right.
expand the end hole to 3/32" Step 6: Expand the end hole. If you've separated the top and bottom plates, put them back together now, taking extreme care to line the holes up perfectly. Re-clamp the plates with the C-clamp -- again, at least 1/2" away from the hole. The 1/16" hole that you've just made is a pilot hole. Use another drill bit to expand it to 3/32".
tapping the end hole Step 7: Tap the end hole. You're done drilling your end hole. Move your C-clamp as close to it as possible. Use a 4-40 tap to thread the hole. When the tap gets through the top plate and begins to go into the bottom plate, the wedge-action of the threads will try to pry the two plates apart from each other. This is why you need the clamp as close to the hole as possible -- to prevent the plates from being pried apart.
put a screw through the hole Step 8: Screw the two plates together. Now that you have a threaded hole passing through the end of your two strips, bind them tightly together using a 4-40 socket cap machine screw. You'll need the 3/32 hex key in order to do this.
Repeat steps 4 - 8 on the opposite end of the strip. ...You now have your basic "sushi roll", which we will proceed to drill, and then cut into segments.
B. DRILLING
Next, we're going to drill all the holes that we need in our sandwich plates.
Note: It's generally faster to change a drill bit than to unclamp and reclamp your work piece. In the following process of drilling, you'll actually probably want to complete steps 1 - 3 on a section of the "sushi roll", then slide the whole thing over in the vise and do another section (repeat).
...Nonetheless, for clarity of explanation I'll be speaking as if step 1 must be fully completed before moving on to step 2, and step 2 must be fully completed before moving on to step 3. If you do choose to fully complete each step before proceeding on to the next, work will go a bit slower -- but it will also help you keep track of where you are in the process.
drilling pilot holes Step 1: Drill pilot holes. Use a 1/16" bit to drill all of the points you marked with the center punch. Having screwed the top and bottom strips together is going to save you a lot of grief in terms of keeping the two strips registered... However, you're still going to want to use C-clamps to keep the strips pressed tightly together vertically. I recommend using one clamp at either side of the vise. If you don't, the bottom strip may bow outward slightly when the drill bit reaches it. A bowed strip can potentially break the bit when it passes through.
Brass is soft enough that I find I can get away with using almost no lubrication. When making these pilot holes, however, I do find it useful to apply some. I use an eyedropper to put a few drops of water on the spot where I'm drilling the hole. This makes the plunge noticeably easier.
expanding holes to 3/32" Step 2: Expand holes to 3/32". Use a 3/32" bit to expand all your holes. No lubrication is necessary. The drill should pass through the strips very smoothly at this point.
expanding just the holes for balls Step 3: Expand just the holes for balls. Now we're going to expand all the holes where balls will sit to 11/64", while leaving the holes for screws as-is. The 11/64" bit has some tendency to walk and to chatter while making this plunge -- so be careful. Your joints will still function if the holes are not perfectly centered between the edges of the plate -- but you want to get them as close to center as possible.
separate and label the strips Step 4: Separate the strips. Remove the "sushi roll" from the vise and clamps, unscrew the strips, and put them on the work table. As you are doing this, be careful not to flip either over or turn them around -- keep their orientation. Use a fine-point Sharpie marker to label one "top" and the other "bottom". (It doesn't matter at this point which is which.)
the top strip Step 5: Complete the top strip. Put just the top strip in the vise (no C-clamps necessary). Expand all of the remaining 3/32" holes to 1/8". This is the hole on a joint where the socket cap screw will slide through freely. Remove the top strip from the vise.
the bottom strip Step 6: Complete the bottom strip. Put the bottom strip in the vise (no C-clamps necessary). Use a 4-40 tap to thread all of the remaining 3/32" holes. This is the hole on a joint where the socket cap screw's threaded tip will attach. Remove the bottom strip from the vise.
filing the strips Step 7: File the strips. Use a flat needle file to de-burr the top and bottom strips. For each strip, file both sides.
completed "sushi roll" Step 8: Screw the strips together. Put the top and bottom strips back together. With the exception of the end holes, put a 4-40 screw in every threaded hole. Tighten them with your hex key. There -- you've completed the "sushi roll", and are ready to chop it into individual joints!
C. CUTTING
We're entering the stage of this process where you're going to be creating large amounts of brass dust -- which will shoot up at your face. Make absolutely sure that you're wearing wrap-around goggles and a tightly fitting dust mask!!! You really, really don't want metal slivers in your eye or brass dust permanently lodged in your lungs. Any additional precautions that you want to take in terms of limiting the spray of dust should be put in place at this point.
"helping hands" hold the piece you'll cut off Step 1: Position the "helping hands" and cut. Clamp your "sushi roll" in the vise with at least 1" hanging out over the edge. You're going to cut off the end hole where we originally registered the top and bottom strips. Clamp the bit that you're going to cut off in the "helping hands". Use the Dremel rotary tool's reinforced cut-off wheel to make the cut. At this stage, you can simply eyeball your cuts.
rounding the end Step 2: Round the end. The hole that's now at the end of the strip will be seating a ball. Use the Dremel to round off the area around it. This is a matter of sculpting; it is not extremely precise. Try to have that outside rim be about 1mm wide. (You'll be surprised how narrow you can make the rim of the joint and still have it be functional.)
moving on to the next cut Step 3: Move on to the next cut. Scoot the "sushi roll" forward in the vise so you can cut this joint off from the whole. Be careful -- the metal where you were grinding will be hot. After you've made the cut, round off the outside edge of the next joint.
grind the reverse ends Step 4: Rounding off the opposite ends. After you've cut all of the joints off from the "sushi roll", put them back in the vise one at a time and round off their opposite ends.
a new cut-off wheel and one that has been worn down A word of caution: You're going to be giving the Dremel's cut-off wheel a lot of wear. Take a moment to notice how big it is. A new cut-off wheel is about the size of a quarter. You can easily wear that down to the size of a dime if you're not paying attention. As the wheel becomes smaller, it will become increasingly difficult to chop off sections of the "sushi roll". Also, be aware that the wear you put on the face of the cut-off wheel can ultimately lead it to crack and fly off the tool toward your face. ...So, be sure to replace your cut-off wheel before it gets too worn out!
D. FINISHING
an array of freshly cut sandwich plates You're almost done making the sandwich plates! Now it's time to give each one a little individualized attention.
filing the outside of the joint Step 1: File the outside of the joint. Use the flat needle file to remove any burrs left over from the grinding process.
label your sandwich plates Step 2: Label the plates. Unscrew the joint. Carefully separate the plates, maintaining their orientation, and place them both face-up next to each other. Label each plate of the joint. Using a metal scribe for labeling works fine. Personally, I prefer to use metal letter stamps, for a more easy-to-read and elegant look. If you choose to use metal stamps, be sure that you don't make your marks too close to any of the holes, or else the holes will be deformed.
Each pair of plates will only work with one another, and can only be used in one orientation. Carefully labeling your mated pairs (in a way that also indicates orientation) will save you a lot of grief later on, if the plates should accidentally get separated.
Step 3: File the inside of the joint. Use the flat needle file to remove any remaining burrs on the insides of the joint. Be careful not to introduce any nicks on the rims of holes that seat balls, as these may later cause scratching.
...Congratulations! You're done making your sandwich plates!
Leap from here to...
- PART 1: THE DESIGN
- PART 2: SUPPLIES YOU'LL NEED
- PART 3: PUTTING BALLS ON RODS - THE HOLLOW BEAD METHOD
- PART 4: MAKING SANDWICH PLATES - THE "SUSHI ROLL" METHOD
- PART 5: PUTTING IT ALL TOGETHER
posted by sven | permalink | categories: stopmo
how to make a brass ball-jointed armature (part 3 of 5)
by sven at 9:03 pm
PART 3: PUTTING BALLS ON RODS - THE HOLLOW BEAD METHOD OK, it's time to get to work! We're going to assemble the balls and rods in three stages: (a) cutting rod, (b) drilling balls, (c) soldering balls onto rods.
A. CUTTING ROD
measuring Step 1: Measure. It's a bit awkward to measure a rod with a ruler. A useful trick is to make your measurements on a piece of graph paper, and then hold the rod against that measurement. Mark the rod with a fine-tipped sharpie.
cut rods Step 2: Cut. Put your rod in the vise and cut. Since the blade of your cutting device has width, you're going to have to go through a process of cutting one segment, removing the rod from the vise, and then making a new measurement for the next segment (repeat). For just cutting rod, a hacksaw works fine. A jeweler's saw (in my experience) doesn't last very long before breaking. My preference is to use the Dremel rotary tool, which can make cuts very quickly.
filing Step 3: File. Use your flat files to de-burr the rods. And while you've at it... You're going to want a symmetrical armature: arms equally long, legs equally long, etc. Take a moment to compare the matching limbs. File until they're equal.
B. DRILLING BALLS
normal beads (left) and modified beads (right) One of the big advantages of using hollow beads for balls is that you don't have to go to pains to get the hole centered when you drill. The bead's pre-made holes act as a pilot hole, which guides your drill straight through the center! All we need to do is enlarge the existing hole to 1/8".
positioning Step 1: Position the bead in the vise. Place a bead in the vise and orient it so that the hole is turned upward. This is where those rubber vise grips come in handy: they hold the bead firmly in place without scratching it. I find it very helpful to use the round needle file for positioning.
enlarging the hole Step 2: Enlarge hole with drill. Use the 1/8" drill bit to enlarge the bead's hole. It's so quick and easy -- this is probably my favorite step in the whole armature building process.
Repeat the process, drilling the rest of your beads.
C. SOLDERING BALLS ONTO RODS
finished rod-and-ball assemblies Here's the product that we'll have after completing this next stage. The idea is to put little pieces of soldering wire inside of a hollow bead, put rod through the hole, and then heat the bead with a butane micro-torch until the solder inside melts.
working on top of a cinder block Before we begin, I want to show you an image of the general setup. For fire safety, we're going to do this job on top of a cinder block. The "helping hands" tool is going to hold the work piece. Although we're using lead-free solder, it should be noted that rosin can release irritating fumes. For this reason, I have a small exhaust fan set up just inches behind where I'm doing the soldering. You can read my previous tutorial on how to assemble a desktop exhaust system like this one here.
sand the rods Step 1: Sand the rods. Metals tend to be coated with an invisible layer of oil -- which can prevent solder from adhering. Rubbing the rod with some fine-grit sandpaper removes the oil and creates a better surface for joining.
cut soldering wire into bits Step 2: Prepare bits of soldering wire. Cut a few inches of your soldering wire into tiny little bits, no longer than 1mm each. The smaller, the better: they'll melt more quickly and easily when they're small.
loading bead with solder Step 3: Put solder bits inside bead. Keeping a finger over one of the holes, use your needle-nosed pliers to put approx. 5 - 8 bits of solder inside of the bead.
clamping your work Step 4: Put ball and rod in "helping hands". Gently twist the rod into the bead, being careful not to push out the bits of solder. Set the bead and rod upright on the cinderblock, held in place by the "helping hands".
Step 5: Heat bead with butane micro-torch. This is kind of tricky... Light up your butane torch and heat the ball for 5 - 10 seconds. If you don't heat it long enough, the solder won't melt; if you heat it too long, the solder will fry into smoky oblivion. It takes some practice to get a sense for how long to keep the heat on the bead. One trick I've come up with is to use an eye dropper to set a droplet of water on the top of the rod. Watching to see when it starts to boil gives me some sense of how hot the work piece is.
...Timing and temperature is particularly important when you do a rod that has balls on both ends. If you heat the second ball too long, the solder job on the first will fry, and you'll lose that join. Sometimes you find yourself repeatedly fixing one side of a ball-and-rod assembly, only to discover that you've broken the opposite side.
quenching Step 6: Quench the work piece. Use your needle-nosed pliers to dunk the soldered ball and rod in water. This is not technically correct; for the strongest join, one should wait for the piece to air cool. I'm not that patient. My joins have seemed to survive pretty well, nonetheless. The "helping hands" may be hot when you finish soldering. I find it useful to squirt the clamp with water from an eyedropper; this cools it down quickly.
Step 7: Test the join. Give the ball that you've just soldered a good push and pull to see if it comes loose from the rod. If it does, re-sand the rod and try again. Even if it seems sturdy at this point, however, realize that you may still wind up having to fix it later. The pressure that the join undergoes when it's turning between tightened sandwich plates is more than you can easily exert with just your hands.
Leap from here to...
- PART 1: THE DESIGN
- PART 2: SUPPLIES YOU'LL NEED
- PART 3: PUTTING BALLS ON RODS - THE HOLLOW BEAD METHOD
- PART 4: MAKING SANDWICH PLATES - THE "SUSHI ROLL" METHOD
- PART 5: PUTTING IT ALL TOGETHER
posted by sven | permalink | categories: stopmo
how to make a brass ball-jointed armature (part 2 of 5)
by sven at 9:02 pm
PART 2: SUPPLIES YOU'LL NEED Let's take a look at what supplies you're going to need.
raw materials RAW MATERIALS:
Soldering wire: 1/16" diameter lead-free rosin core. Lead-free solder should have silver content. For a professional armature, you might use solder that's 56% silver -- and costs $25 per ounce. On this project I used Alpha Fry solder that's 96% tin 4% silver, bought for under $4 at Ace Hardware. It's important that you find solder with a rosin core. Otherwise you'd need to apply flux paste separately, which would be very awkward in this case. (In addition to lead, check labels to make sure that your solder is also free of Cadmium and Antimony.)
Brass beads: 8mm hollow brass beads. Most bead shops seem to carry these. The specific number you need will depend on your design; my example armature uses 24. I've purchased bags of 25 for about $3.50; they're more expensive when sold individually. Make certain that the beads you get are hollow spheres, not solid balls that have been drilled with a hole. The hollow space inside of the bead is where the solder is going to sit. According to the people I've purchased from, these beads are "base metal" that's merely been plated. They seem to work very well, nonetheless. The beads need to be equally hard or harder than the plates that they sit in, or else they'll scratch.
Screws for joints: 1/2" long 4-40 stainless steel socket cap machine screws. In addition to stainless steel, you can also buy these screws made from black "coarse" metal. It doesn't matter which sort you use. The example armature uses 14 screws. They're small and easy to lose track of, so I recommend keeping extras on hand. (Note that you'll need a 3/32 hex key to tighten these screws.)
Screws for tie-downs: two 2.5" long 10-24 machine screws with wing nuts. The length and diameter of screws that you use for tie-downs is largely a matter of preference. This size simply feels sturdy to me. If you go for a different size, make sure that the tie-down nuts are of a matching size.
Nuts for tie-downs: 10-24 brass hex nuts. While your tie-down screws might be made of zinc or stainless steel, it is important that the nuts be made of brass. Otherwise it will be difficult or impossible to solder them onto the armature's feet.
Brass rod: 1/8" diameter brass rod. K&S sells this material in 12" lengths. If you look in the metal supply section of your local hardware store, you can probably find 36" lengths. These are preferable. You'll be cutting the rod up into segments; you'll have fewer unusable leftovers from the tail-ends of rods if you're cutting from a 36" length.
Brass strips for sandwich plates: K&S brand brass strips, four pieces, each .093" (3/32") thick x 1/4" wide x 12" long. It is very important that you find .093" thick strips. Thinner material will bend when you tighten your joints' screws. K&S has eight different metal displays that they ship to hobby shops and hardware stores; only the "jumbo metal center" carries .093" thick strips. K&S displays are pretty common, so with some looking around you're likely to be able to find a local store that carries what you want. If you're unable to find anyone that has the "jumbo metal center", any store that has a K&S display ought to be able to special-order a box of eight .093" thick strips for under $20.
Brass strip for feet: one K&S brand brass strip, .064" (1/16") thick x 1/2" wide x 12" long. This stock is sold in both the "metal center" and the "jumbo metal center." It should be fairly easy to find. Ask at hardware stores or hobby shops that deal with model railroads, remote control cars/airplanes, dollhouses, scale model building, or wargaming miniatures.
Brass strip for chest & pelvis: one K&S brand brass strip, .064" (1/16") thick x 3/4" wide x 12" long. This stock is also sold in both the "metal center" and the "jumbo metal center."
power tools and clamping devices POWER TOOLS AND CLAMPING DEVICES:
Dremel rotary tool: Fit the Dremel with a reinforced cut-off wheel, and have spares on hand. Don't be tempted to just use regular cut-off wheels; they won't hold up for long. You're going to be doing a lot of cutting and grinding with this tool. You could do the same jobs with a hacksaw and a file -- but it would be much more labor intensive.
Power drill: This project requires a plug-in power drill. I've tried using a battery powered drill -- it doesn't have adequate force to get the job done.
Butane micro-torch: A butane micro-torch costs about $25, and can be found in a hardware store among the soldering irons, propane torches, and welding supplies. The torch in the picture actually came with a set for making creme brulee -- so you can also look for these in kitchen stores. All models have a safety switch that must be clicked before you can ignite the flame. Some models place this button immediately underneath the flame, others place it on the back of the tool where your thumb will rest. I strongly recommend purchasing the latter type! The soldering wire that I use melts at 430 degrees Fahrenheit. A propane torch should also do the job -- but it's a bulkier tool, and this is small work. A soldering iron will not be adequate. There is too much metal involved in the joins we'll be making; heat dissipates quickly, and the soldering iron just can't get the join area hot enough.
"Helping Hands" clamping system: These are invaluable for holding small things while you solder. You can find them for less than $15 at stores that sell parts for making circuit boards, such as Radio Shack.
Two small C-clamps: The two C-clamps pictured above each have 2" capacity.
Small vise: A small vise is essential. You can get one that clamps onto the edge of your work table for under $20. The vise pictured above has jaws that are 3" wide.
Rubber jaw attachments: Rubber jaw attachments will hold the brass beads in place while you drill them. They connect to the vise with inset magnets.
NOT PICTURED HERE:
Cinder block: You're going to need a cinder block as a work surface, for when you're soldering with the butane micro-torch.
small tools SMALL TOOLS:
A ruler that measures in both inches and metric.
A large file.
Metal scribe: Used for marking measurements on the brass strips. You could use the center punch to mark lines, but it has a wider tip and doesn't work quite as well. An X-Acto knife can also do the same job, although it will dull the blade. Lines made by the fine-tipped Sharpie are not very accurate, and will quickly rub off.
Spring-loaded center punch: A center punch starts the holes that you're going to drill. The spring-loaded variety is nice because you can use it one-handed. There are also non-spring-loaded center punches that you use with a hammer. You can get away with just using a hammer and a brass screw to start your hole... You'd lose a good deal of accuracy, though -- and this is a small project where accuracy matters.
Fine-tipped Sharpie marker: Useful for marking the brass rod, and for temporarily labeling the brass strips.
Small needle-nosed pliers.
Needle files: round, flat, and triangular.
HSS drill bits: 1/16", 3/32", 1/8", 11/64", and 7/32". HSS stands for High Speed Steel, which is adequate for cutting soft metals. Look on the side of your drill bits, they're probably labeled "HSS". The 1/16" bits are prone to breakage -- I recommend having at least three or four extras on hand.
Tap: Tapping handle and size 4-40 tap. This is how you thread holes that you've drilled. It's really very easy: just remember to rotate the tap half a turn backwards every few turns, to help remove the metal chips.
Hex key: A 3/32 hex key. This is what you need to tighten the 4-40 socket cap machine screws. You can see in the photo that I use a "Swiss Army Knife"-style hex key set, with a variety of key sizes on it.
ALSO USEFUL:
Sandpaper: Fine-grit sandpaper is useful for preparing brass parts to be soldered.
Eyedropper: While soldering, sometimes it's helpful to be able to quickly cool off a work piece by squirting water on it. While drilling, a few drops of water can also serve as lubricant. An eyedropper is a very helpful tool for delivery.
Metal letter stamps and hammer: Each set of sandwich plates is a mated pair. It's important to mark them, in case they become separated. You can do this with a metal scribe. However, it's more elegant to use metal letter stamps for labeling. I found a nice set of small letter stamps at Harbor Freight for under $10.
safety gear SAFETY GEAR:
Safety goggles: During this project, brass dust will be flying up at your face. Wear goggles! Cautionary tale: At one point while I was working, a cut-off wheel broke -- and I definitely would have lost an eye if I hadn't been wearing my goggles. Make sure that your goggles wrap around all sides and seal to your face. Also check where the air holes are -- since dust is going to be shooting upward, you want to make sure that the holes are located on the sides, not at the bottom.
Dust mask: You don't want brass dust permanently lodged inside your lungs. The cartridge respirator that I'm wearing here is overkill, but it has a tight seal to my face, which is important.
Ear plugs: Some of the drilling is very loud. Ear protection is optional, but recommended. Ear plugs work fine, and are cheap. I invested in the ear-muffs because they are easier to find after you've set them down, and because they stay clean better.
Hat: The hat's not just for style -- I didn't like getting brass dust in my hair.
...When you're using the Dremel cut-off wheel to grind away brass, a lot of dust is created. Plan ahead to limit the mess. I recommend taping down butcher paper on your work table. I improvised a dust guard over the vise by clamping a sheet of acrylic "glass" onto a spare tool stand. I also clamped the hose of a household vacuum cleaner just underneath my vise in an attempt to suck up some of the dust as it was actually being made. Even with these measures, you're probably going to want to keep a hand-held vacuum nearby, and will have to do some serious wipe-up after the project's done.
Leap from here to...
- PART 1: THE DESIGN
- PART 2: SUPPLIES YOU'LL NEED
- PART 3: PUTTING BALLS ON RODS - THE HOLLOW BEAD METHOD
- PART 4: MAKING SANDWICH PLATES - THE "SUSHI ROLL" METHOD
- PART 5: PUTTING IT ALL TOGETHER
posted by sven | permalink | categories: stopmo
how to make a brass ball-jointed armature (part 1 of 5)
by sven at 9:01 pm
PART 1: THE DESIGN You want to make a ball-jointed metal armature. But you're not ready to buy big machines that need to be bolted to a workbench. And you're uncomfortable purchasing raw materials online, sight-unseen. ...I'm going to teach you how to make a brass ball-jointed armature using only hand-held power tools and materials that are easy to find locally.
The design I'll describe requires only a plug-in power drill and a Dremel rotary tool. It uses K&S brand brass strips which are available at most hobby stores, and brass beads that are common at bead shops. This is not a professional-level armature -- but it's a step up from the beginner's aluminum wire and epoxy putty design. It is intended to be of intermediate difficulty, and produce fairly high-quality results.
this is what we're going to make! This armature is made entirely of "open hole double ball" joints. It stands 10 inches tall. I think the same materials could be used to make an armature anywhere between 6 and 14 inches tall. Be aware that brass, due to copper content, rots latex. If your puppet body is going to incorporate latex, be sure to wrap the armature beforehand. Cling-wrap or plumber's Teflon tape are decent wrapping options.
Raw materials should cost under $20. The real cost of this project is time. Two similar armatures are pictured in this tutorial. One took 19 hours to make, the other took 23 hours. ...Think of this as a two-weekend project.
Process-wise, I offer two innovations that I haven't seen elsewhere. One is the use of hollow beads for the joints' balls (rather than bearings or ornamental lamp balls). The second is what I call the "sushi roll" method of making sandwich plates. Rather than create one joint at a time, you'll do all your drilling and tapping on a long strip, which will then be chopped into individual joints.
UNDERSTAND THE BASIC JOINT
the "open hole double ball" joint Let's examine the joint we'll be making.
Two balls sit between two "sandwich plates". The balls are seated in holes (not concave "sockets") that go all the way through each plate. The plates are pulled together by a screw. Turning the screw adjusts how tight or loose the joint is.
The screw hole of the bottom plate is threaded; the screw hole of the top plate is larger and unthreaded, letting the screw move through freely. Rather than tapping the bottom hole, one could just use a nut and a longer screw. The downside of using a nut is that more moving parts means more things that can come loose. A nut would also make the joint wider.
The screw that I'm using is a socket cap machine screw, which you turn using a hex key. There are two benefits to using this kind of screw: it's less likely to be stripped by a screwdriver, and it's easier to find by feel when you need to do surgery on a puppet for tightening.
blueprint of the basic joint [click to enlarge] When you examine the blueprint above, you'll notice that the measurements are in both inches and millimeters. Beads, it seems, are sold in metric units. K&S brand brass strips are measured in inches. It's an unfortunate disparity... But so long as you have a ruler with inches on one side and centimeters on the other, it shouldn't pose a problem.
The shortest joint that I've been able to make using these materials is 18mm in length. It has the most "basic" design. Making longer joints introduces complications -- which I'll talk about in just a moment.
WAYS TO USE THE JOINTS
There are two strategies for how to make an armature using "open hole double ball" joints. One is to mass-produce generic joints, all 18mm long. The other is to make joints of different lengths, each specific to the part of the body that they'll represent.
mass-producing generic joints Mass-producing joints has some benefits... It requires less advance planning. It allows you to get a sense of how big the joints really are before committing to limb lengths. Conceivably, batches of these joints could be kept on hand, so you could assemble armatures more quickly when the mood strikes.
freezing one ball in place Using generic joints also has significant drawbacks. The biggest problem is that you wind up with double-jointed elbows and knees. There's a solution for this. Solder fits in one of those plate holes very nicely. At the elbow or knee joint, freeze one of the balls in place with solder -- leaving just a single point of rotation.
Unfortunately, this solution creates additional problems. The balls in the "open hole double ball" joint have already been soldered onto rods. Soldering a second time risks undoing the ball's join to the rod. Furthermore, soldering points are weak spots on the armature; the more places where you have solder, the more places where the armature can break. Generally, it's best to use solid pieces of metal wherever possible, rather than soldering bits together.
Also worth noting: When you're freezing joints in place, it can be difficult to get your limbs perfectly straight. With the limbs being made out of so many bits, all going at slightly different angles, it's sometimes difficult for your hands to make sense of the armature's shape as you pose it. As a rule, intuitive is better.
using long sandwich plates The alternative to using mass-produced generic joints is to custom-make long sandwich plates for specific parts of the body. This is less likely to break, gives straight limbs. and feels more intuitive to the animator's hands. The main downside is that the limbs are now somewhat wider.
how to construct different lengths of joints If a joint is too long and only has one screw in the middle, then it will be loose. If you try to tighten it, the plates may begin to buckle. The solution is to put two screws in the joint, each as close as possible to one of the balls.
If you do only this, though, then tightening the joint becomes difficult. The tightness of each screw will impact the other. Thus, it's a good idea to put a spacer in-between the two screws, so that they can be tightened independently of one another. I find it convenient to use spare balls as spacers.
The longest single-screw joint on my example armature is about 34mm long. This is pretty much the maximum that the joint can tolerate. At 36mm and longer, switch to using two screws with one ball spacer in the middle. For even longer joints -- such as the 66mm legs -- use two ball spacers.
It's best to keep the distance between balls (or balls and spacers) short. It keeps the joints tight, which gives you more control while animating. You don't want your armature falling over mid-shot, right?
Leap from here to...
- PART 1: THE DESIGN
- PART 2: SUPPLIES YOU'LL NEED
- PART 3: PUTTING BALLS ON RODS - THE HOLLOW BEAD METHOD
- PART 4: MAKING SANDWICH PLATES - THE "SUSHI ROLL" METHOD
- PART 5: PUTTING IT ALL TOGETHER
posted by sven | permalink | categories: stopmo
June 19, 2006
new brass puppet armature
by sven at 11:50 pm
the new armature I've just completed a brass puppet armature that improves upon the design of my first, "the Ambassador". No name for this one yet... The Ambassador 2?
Main improvements: Long sandwich plates for the forearms and upper legs, silver solder, rounded corners on the chest and pelvis, longer neck, new foot design.
demonstrating a lean Here's the mandatory photo showing that the armature can stand on one foot while leaning forward. An armature that can't... Well, what good is it?
(I'm particularly proud of the feet. I came up with a way to do a simple "step-block" joint for the ankles.)
sneaky pose And here's a pose to show off the armature's ability to communicate character.
It took just over 23 hours to complete this project. I think it's a worthwhile investment. If I'm going to bother with the painstaking art of animation, then I want to have serious control over the puppets that I'm photographing. ...And it just feels good when you pose a well-made armature!
peek-a-boo! Guest appearance by Percy! ...I made Percy with detachable hands and head -- so he volunteered to add some personality to the new armature during its photo op.
be patient No specific plans for filming this armature just yet. I'm learning the craft of armature building, and this project was simply the next step for me. ...Doesn't hurt to have a spare armature around, though, now does it?
posted by sven | permalink | categories: stopmo
June 14, 2006
setting up a small machines shop
by sven at 1:00 am
Sherline mill and lathe I'm actually doing it: I'm setting up a small machines shop!
I've just ordered three vital tools: a mill, a lathe, and a drill press.
In my initial research on milling machines it looked like I was going to go with a MicroLux. However, that machine's 110 pounds... I just can't accommodate it in my work space. And certainly not if I'm going to have other machines, too. What I need is a group of small machines.
For a long time I kept trying to find a way to avoid purchasing multiple machines. I've finally accepted that the mill, lathe, and drill press all have their own specialized functions. It's like a kitchen: an oven, a stove, and a kitchen mixer all serve different functions... You can get by without them -- but, oh!, the things you can cook up when you are fully equipped with proper tools!
MicroLux drill press What do these machines do?
A drill press drills perfectly vertical holes; it's quick and easy to plunge the drill bit into your work piece.
A mill allows you to shave metal off of a work piece that is held still. Although it looks a lot like a drill press, the mill is designed to take sideways stress that would break a drill press (and take out your eye in the process!). A mill is designed to do very, very precise work; it's not the best tool for just drilling a quick hole.
A lathe is like the opposite of a mill: instead of holding the work piece still and cutting it with a spinning tool, the work piece is what spins while the cutting device remains still.
...With luck, the machines that I've just purchased will be the only big purchases that I ever need to make for metalworking. And, if I understand the relative sizes of these machines, they should all fit on one table.
There's a lot of learning still to do, about how to properly use these devices -- but it seems to me that 90% of making metalworking projects is just having the appropriate tools available. And now, I'm going to have those tools.
Exciting! Intimidating! Liberating!
posted by sven | permalink | categories: sculpture, stopmo, studio space
June 13, 2006
the ambassature returns
by sven at 3:28 pm
back from Los Angeles Shelley Noble has sent me back the "ambassature", as he's now come to be known... And he came with a present and a poem!
u know
u know how grateful I am for what u've done
u know how your kindness sheds light in the world
u know so much more than u may know
u knowEee! Thank you, Shelley! ...The package arrived Friday (6/09), just after lunch. We were having hot port-soaked pears over ice cream -- which seemed like a very fitting feast for His Eminence to walk in on. ;-D
Here's the recipe (via WineSkinny.com):
Port-poached Pears
4 firm Bosc pears, washed, peeled (reserve peels), stems intact
½ cup sugar
3 cups good quality port
2 cinnamon sticks
Large strips of orange zest
In a covered saucepan large enough to hold the pears in a single layer, place the pear peels, sugar, port, cinnamon, and orange zest. Bring to a boil. Reduce heat and simmer 5 to 10 minutes. Remove pear peels and discard.
With a slotted spoon, gently add the pears to the poaching liquid. If necessary, add up to 1 cup of water to completely cover the pears. A small plate, set over the pears, will help keep them submerged. Leave the cover ajar and simmer gently 15 to 20 minutes or until a skewer poked into a pear center meets little resistance.
Using the slotted spoon, remove the pears from their liquid and stand upright in a serving dish deep enough for the reduced liquid to be poured over. Remove zest and cinnamon stick (or strain liquid) and continue simmering to reduce the liquid to a syrupy consistency.
Pour syrup over the pears.posted by sven | permalink | categories: miscellany, stopmo
June 5, 2006
making my first two-part mold
by sven at 7:54 pm
Thursday (June 2) I got back into the studio and made my first two-part mold.
The mold itself is made from ultracal 30 that I bought at Stephenson Pattern Supply. Ultracal is a gypsum product that's about halfway between plaster and concrete; it's designed to capture a lot of detail.
1. propping up my sculpt with clay The red clay is "cherry creek red (no grog)" that I bought at Georgies. I needed a soft clay that wouldn't damage my sculpt; an employee recommended that I select any "low fire" clay without grog. I picked a red clay so there'd be good visual contrast with my sculpt while I was working.
2. making a clay bed for the sculpt This sculpt has a long nose and long feet. It really ought to get a three- or four-part mold. However, I opted to go for a two-part mold.
Why? I decided that I just couldn't leap from only ever having done one-piece molds to doing a complicated four-piece mold. The material I'm going to use for casting is flexible; I'm hoping that with a little effort I'll still be able to get it out of the two-piece. ...I decided that while this is most likely a mistake, it's a mistake that I need to make in order to understand the mold-making process better. I also decided that I've been being too precious with my sculpt; there will be more sculpts -- it's OK to screw this one up.
I think occasionally it's worthwhile to go ahead with a project even when you know at the outset that it's flawed. Mistakes are an important part of how we learn.
3. building a cardboard wall I made a cardboard wall to hold the liquid ultracal in place... I've watched Kathi Zung's video, and she doesn't do this. She slathers the material on by hand, then shapes it with a kidney-shaped pottery tool (sort of like frosting a cake).
It may well be that I wasn't mixing my ultracal thickly enough -- or maybe I should have waited for it to get stiffer before pouring... Nonetheless, the technique I used seems to have worked out alright.
4. making "keys" so the two halves of the mold can fit together snugly For making "keys" for the mold, I tried two different styles. On one side there's a sort of clay trapezoid with tapered edges. On the other side there are two marbles that I pressed into the clay. Initially, the marbles didn't want to separate from the ultracal 30. A gentle knock with a hammer did the trick, though. ...The two sides of the finished mold seem to fit together very well.
5. oops! this wall needs to be taller I extended the top of the mold using what was at hand: cardstock. It worked OK when the paper didn't have to hold back too much ultracal.
I figured out when I made my second wall that you really do need the cardboard for strength -- but if you line it with cardstock, then the resulting mold has smoother and nicer sides.
6. finishing the first pour of ultracal 30 When I mixed the ultracal 30 with water, I did so in these big paper buckets that I found at Ace Hardware. They seem to be meant for house-painters... However, they very quickly became soggy. Near the end of the day, I was carrying one of these paper buckets, full with water, away from the sink -- and it started gushing water out the bottom onto the carpet!
Grrr.... No real harm done -- but on my next plaster-making run, I'll definitely be using plastic buckets instead.
7. I tear off the wall and flip everything over When the ultracal for the first side of the mold was hard, I removed the cardboard walls. Then, I flipped the whole thing over and stripped away the red clay. I had been worried that the clay would damage my sculpt... I was very pleased to discover that it really left no damage at all.
8. removing the clay bed When I was flipping everything over so I could do the other side, I had an absentminded moment where I tried to pick up the work-piece by its wooden base. Oops! While it looks like everything is firmly attached to that piece of wood, really it's just the sculpt that's held in place with tie-downs. My flub created some tiny spaces beneath the feet of the sculpt that I had to fix -- otherwise, ultracal would have flowed into the feet-holes of the mold.
9. there's a little bit of clean-up to do There were some minor smudges of red clay left on the sculpt. It was very easy to clean these off, just using a brush and water.
10. after washing off the sculpt, vaseline is applied After I cleaned off all the red clay residue, I used a brush to apply vaseline to the ultracal. In retrospect, I think I probably should have applied vaseline to the sculpt as well. It was a nightmare picking plasticene out of the mold later.
11. building another wall with cardstock, sealing the edges with clay Doing the second pour of ultracal is pretty similar, so I'm just going to let the pictures tell the story here...
12. the cardstock needed to be reinforced with cardboard
13. the second pour of ultracal 30 has been made, and I've torn off the cardboard wall
14. opening up the mold: the sculpt has been destroyed After giving the second side of the mold time to harden, I opened it up... The sculpt didn't survive at all. I had thought that plasticene -- an oil-based clay -- wouldn't stick to the ultracal. I was wrong.
Maybe I opened up the mold too soon. I know that you're supposed to let ultracal set for at least two hours -- and I only gave it one. When I opened it up, it was pretty warm inside... The plasticene had the consistency of peanut butter. Maybe if I hadn't been in such a hurry -- if I had let everything cool down -- maybe then the plasticene would have come out more easily.
Or maybe I just needed to apply a release to the sculpt itself. Vaseline would probably work. I've also heard that a clear acrylic spray can do the trick.
15. all the plasticene that i had to pick out of the mold (Here you see those terrible buckets that I mentioned earlier.)
16. the finished mold, after I've cleaned it out with turpenoid Even after I'd scraped all the plasticene out of the mold using my trusty loop tool, there was still an oily residue. To get this out, I needed a solvent. What I had at hand was turpenoid. Scrubbing turpenoid around with a brush, the residue came out quite easily (although scrubbing ultimately ruined the brush).
...I'm a bit worried, though. Turpenoid is a petroleum distillate. Will it leave any sort of oily residue? When you cast liquid latex in a plaster mold, it cures because the ammonia content is absorbed into the gypsum. Will a petroleum residue prevent the ultracal from absorbing the ammonia? Or will the turpenoid, since it's a solvent, evaporate from the mold -- leaving it OK for use with latex?
17. the finished mold... is huge And here's the finished mold! I took me a bit over eight hours to make -- kinda a long time, but not over my patience threshold.
Boy is this thing massive, though! Lesson learned: Another advantage of doing a three- or four-part mold would be that you wouldn't need nearly as much ultracal.
THE SURPRISING EPILOGUE
The mold is done; I'm ready to make castings. However, just this morning I had surgery on my back to remove a lipoma (a large, non-cancerous fatty deposit). Consequently, I'm not supposed to lift anything as heavy as a gallon of milk for 4-6 weeks. How am I going to work with my monster-sized mold?
Gretchin has generously offered to help... Still, I'm having a moment of discouragement.
posted by sven | permalink | categories: sculpture, stopmo
May 31, 2006
planning a steel armature
by sven at 8:00 am
I'm in the process of collecting the materials necessary to build a steel armature. There are so many things to consider... Ack! Gotta write some of this down, just to clear my head.
OK, so take a look at this brass armature that I made:
close-up of torso My new armature is going to be very similar -- only made out of steel. There are six elements in this armature design that need consideration:
- balls
- sandwich plates
- screws
- rod
- solder
- bar for torso and pelvis
1. BALLS
A) Type 302 stainless steel balls
Within the amateur stopmo community, most of us have learned how to make steel armatures from Lionel Ivan Orozco ("LIO"). He has three key tutorials on his site: making an open hole double ball joint, drilling metal balls, and brazing balls to rod. LIO also authored a section of Marc Spess' e-book, Secrets of Clay Animation Revealed!, which covers the same material.
LIO recommends type 302 stainless steel balls from smallparts.com. I can get a 100 count box of 1/4" balls from smallparts.com for $10.75. Their flat rate for ground mail is $8.95. That's $19.70 total. [Note: shipping goes up if the order weighs more than 10 lbs.]
I could also just buy a box of 25 balls for $3.25. My brass armature used 28 balls... I suspect the steel armature will only use 20 -- but there need to spares in case I make mistakes. Particularly given that these balls need to be drilled, which is an error-prone part of the construction process.
I wanted to know if I could get steel balls for less by buying locally. After checking the yellow pages listing for "bearings", I called Applied Industrial Technologies, Kaman Industrial Technologies Corporation, McGuire Bearing Co, and Motion Industries Inc. Only McGuire was able to help. They have seven type 302 stainless steel balls at their Salem store -- but not in the 1/4" size. If I wanted 100 of the 1/4" type 302 stainless steel balls, they could have some shipped from Illinois. The price would be 35¢ each -- thus $35 for 100 -- plus shipping, which would be $6 - $10.
Lesson learned: type 302 stainless steel balls are a fairly exotic item. Even when shipping costs are included, smallparts.com is the best place to purchase; it's $19.70 versus $40+ -- so ordering through a local store costs more than twice as much!
[Another interesting thing I learned in the process: bearings are rated for "grade". The smaller the number, the more perfectly smooth the balls. Grade 100 is typical. Grade 10 and grade 1 are also available -- though not through smallparts.com. I was advised that the difference between these grades is not visible to the naked eye, and that grade 100 should work perfectly well for my applications.]
B) An alternative method: using beads instead of bearings
On my brass armature, I used hollow brass beads for balls in the "open hole double ball" joints. To the best of my knowledge, I'm the only person who's come up with this solution.
...It worked remarkably well, and has two big advantages. First, because the beads have holes in them, drilling is much simplified -- you've already got pilot holes, and just need to enlarge the openings. Second, because the beads are hollow, there's space on the inside where you can put little snippets of solder -- all you have to do is heat the exterior of the bead with a micro-torch. The thing that you'd expect to be a problem -- the end of the rod extending through the opposite side of the ball -- turns out to not be a problem at all. The lip of the sandwich plates prevents the ball-rod piece from rotating to a point where the rod would begin to impede rotation.
I purchased my 8mm brass beads from A Bead Source (15831 SE Division St.). The largest hollow stainless steel beads that they sell are only 6mm. I've asked for the 8mm size to be ordered; an employee wrote a note for the owner -- but I'll have to call back periodically to see if the beads are actually in stock yet. This makes me want to see if I can't find an online bead seller, so I can just order the item myself...
I've also looked in Beads Forever (3522 SE Hawthorne) and Beads at Dusti Creek (4848 SE Division); A Bead Source is the best stocked of the three. Checking the yellow pages, I see that there are a few other bead stores that might be worth calling. Dava Bead And Trade (1815 NE Broadway) looks like a decent possibility.
A Bead Source carried what appeared to be 8mm carbon steel beads; however these were simply drilled -- not hollow. Drilled beads would not work. When you drill bearings yourself, you essentially create a little cup for the liquid solder to sit in. When you use a hollow bead, there's a space inside the bead where the solder can rest. If there's a hole that's drilled all the way through the sphere, then there's nowhere for the solder to rest.
A Bead Source also carried 8mm hollow silver-plated beads. Given that some solders contain silver, it seemed likely that these could work as an alternative to stainless steel. I picked up a bag of 25 for $2.95 for testing.
2. SANDWICH PLATES
For sandwich plates, LIO recommends "cold roll steel flats" that are 1/8" thick and 1/4" wide, which can be purchased online from either smallparts.com or onlinemetals.com. I believe the proper material from smallparts.com is "STEEL, COLD ROLLED - Rectangular Bar Type C1018", which costs $2.60 for a 36" length (longest available). I believe at onlinemetals.com "Mild Steel Rectangle 1018 CF" is the same thing; a 36" length only costs $1, and lengths up to 8' are available. Both companies charge a basic fee of $8.95 for shipping. Note that while onlinemetals.com is cheaper, it does not seem to carry bearings of any sort -- so it probably makes more sense to purchase both balls and sandwich plates from smallparts.com, at the same time.
A little galled at how much shipping costs, I decided to research local metal suppliers. It seems the best place to start for this research is in the yellow pages, looking under "Steel Distributors & Warehouses". In Portland, the four suppliers that look to be worth visiting are: Eastside Steel, Metal Supermarkets, The Steel Yard, and Pacific Machinery & Tool Steel.
some stock at Metal Supermarkets Eastide Steel and The Steel Yard keep their materials outdoors, and deal only in steel stock. They seem adequately friendly towards artist-types, but the premises felt "rough" in a way that made me a little uncomfortable nonetheless. ... Metal Supermarkets was excellent. They carry aluminum, brass, and steel; their stock is all indoors; and the staff were remarkably courteous and helpful. This is a national chain, and from what I've seen at this one branch, I recommend it highly. ... Pacific is on the other side of town from me; I haven't had a chance to visit it yet. I get the impression that it is another indoors multi-metal supplier.
I purchased a 6' length of 1/8" x 1/4" "cold-finished" 1018 carbon steel at Metal Supermarkets for $8.42. Compare that with $1.62 for a 6' strip from onlinemetals.com, or $5.20 for two 36" strips from smallparts.com... I'm really surprised to find it's costing less to buy metals online than in-person. Of course, and there's also shipping costs to consider -- and it's quicker to buy stuff in person.
Something interesting that I learned about buying metals: when you're buying in-person locally, the prices change daily. The price of metals at any point in time is linked to the stock market. With Metal Supermarkets, what you can do is check their website (which is organized very nicely) for what item you want, and then call the store to ask for a quote. Pretty easy. [I don't know why online metal suppliers are able to sell their products at fixed-prices.]
3. SCREWS
Screws are easy: I've got an Ace Hardware less than a mile from me -- just buy 4-40 socket cap set screws from their little bins, however many you need for the project. One interesting discovery... They offer both black "course" 4-40 screws, and stainless steel. I don't understand what "course" refers to... Generally a "course" screw has fewer threads per inch -- but both of these have 40 threads per inch. I know that I like the stainless steel, though -- so it's a moot issue.
4. ROD
LIO recommends "type 01 carbon steel rod, or cold roll steel rod". There are a great many types of steel, and I haven't figured out what "type 01" is yet. I found and purchased something a while back that I think I'm going to try to use... It's 5/32" music wire from the K&S Tube & Wire center at Bridgetown Hobbies & Games (3350 NE Sandy Blvd).
What is music wire? It's not what you think of as "wire" -- it looks like rod. I checked smallparts.com and found "Straightened Spring Steel Music Wire", which appears to be the same thing. When I search Wikipedia for "music wire", I get the entry on "piano wire", which says:
Piano wire is a specialized type of wire made for use in piano and other musical instrument strings, as well as many other purposes. It is made from tempered high-carbon steel, also known as "spring steel". Music wire is another name for piano wire: it is used for the cores of strings, which may be wound with other materials....Since this passage says "high-carbon steel", I'm going to guess that it's roughly equivalent to what LIO describes.
5. SOLDER
On my brass armature, I used standard 60%-tin / 40%-lead wire with a rosin core. I want to get lead out of the equation. Solders also sometimes contain Cadmium or Antimony -- I want to avoid these as well.
LIO recommends 1/32" diameter Safety-Silv 56 from Harris. I found and purchased a kit of 1/16" Safety-Silv 45 at Irontech (6417 SE Powell) that contains 1 oz of silver brazing alloy and 2 oz of Stay-Silv white flux. I'm very pleased with the MSDS, which clearly states what metals and chemicals are contained in the package. However, the price is steep: $24. Youch! ...I guess you're paying for the silver: the "45" in the name refers to 45% silver content.
About a week later I found some 1/32" Safety-Silv 56 at what looks like a mom-and-pop shop, Jones Welding Supply (11230 NE Sandy Blvd). It cost $12.50 for 1 troy ounce, but didn't include the flux (which I already have). Having looked around a little in welding supply stores now, my sense is that Harris brand Safety-Silv is very common. The particular store you visit may not have the exact silver-percentage or diameter you're looking for, but they should be able to order it pretty easily. The Harris website shows that they have an enormous selection of products -- but they don't sell to individual consumers online.
Looking closely at Ace Hardware, I found some more options for lead- and cadmium-free silver solder. Ace carries Alpha Fry brand soldering wire. Product #53982 is 1/16" wire that's 98%-tin / 2 %-silver and comes with a separate tube of flux. Product #62963 is 1/32" wire that's 96%-tin / 4%-silver and has a rosin flux core. Product #62964 is 1/16" wire that's 96%-tin / 4%-silver and has a rosin flux core. These last two products cost $3.49 and $3.79 (I forget which is which).
The Harris brand soldering wires cost about six times what the Alpha Fry stuff costs. Harris has a much higher silver content -- which makes for a stronger bond. An advantage of the Alpha Fry wire, though, is that it has a rosin core -- making it easier to work with, especially when using the "hollow bead" technique I described earlier. One more significant difference: the melting point for Alpha Fry is 430 degrees Fahrenheit; Harris has a melting range between 1250 and 1370 degrees Fahrenheit. The Welder's Handbook by Richard Finch says that butane burns at 3900 degrees, so my micro-torch ought to be fine. (Still, a note of concern is raised in my mind.)
In addition to welding supply stores, one can find silver solder at jewelry supply stores. A quick trip to Ed's House of Gems (7712 NE Sandy Blvd) confirmed what I've read online: jeweler's have a different language for soldering. They sell silver solder in three categories -- "soft", "medium", and "hard" -- and they don't seem to include MSDS info. I decided that I'm just going to avoid buying soldering materials from the jewelry-making world.
6. BAR FOR TORSO AND PELVIS
I had hoped that I could just purchase some 1" wide cold-finish 1018 carbon steel at Ace Hardware. What they stock, though, is "weld steel" and "plated steel" (which looks galvanized to me) from Steel Works. Neither of these looks right -- so I expect I'll wind up making a quick trip back to Metal Supermarkets.
I'm also curious to take another look at the K&S Stainless Steel Center at Ace Pearl Hardware (1621 NW Glisan St). ...I don't know how well this shiny stainless steel stock would mesh with the carbon steels I've purchased; I'd like to purchase a snippet for testing.
posted by sven | permalink | categories: stopmo
May 30, 2006
choice of metal for armatures
by sven at 8:00 am
It appears that there are mainly just four metals used in creating metal-jointed armatures:
- Brass: Easy to find, easy to cut, easy to braze. Seems only to be used in amateurs' armatures. Reacts badly with foam latex, due to there being copper in the alloy. The armature can be wrapped or sprayed to protect the latex, but it's still a risk.
- Steel: A strong material, but rather heavy. More difficult to find -- need to go to professional metal suppliers, rather than hobby stores. Brazes easily. Can be used safely with foam latex. Sparks when cut.
- Aluminum: Lightweight. More difficult to find -- need to go to professional metal suppliers, rather than hobby stores. "Cannot" be brazed; pieces are generally secured using very small screws (4-40 or smaller). Typically requires a milling machine -- not just drilling and cutting. Aluminum balls not recommended for ball joints: too soft. Can be used safely with foam latex.
- Phosphor bronze: Noted as having a particularly "smooth" feel. Material is difficult to find -- needs to be special-ordered, even from a pro metal supplier. Reacts badly with foam latex, due to there being copper in alloy. Even among professional armaturists, it seems esoteric; its use may (?) have come from the Trnka studio.
If you want to make armatures at the pro-level, steel seems to be the standard. I suspect that this is primarily due to it being safe for use with latex. Aluminum has the advantage of being lighter -- but this is counterbalanced by the fact that it's difficult/impossible to braze.
I'm in the process of collecting the materials that I'll need for making a steel armature. Even if I'm just a hobbyist, I'd like to do pro-quality work. And I'm interested in steel just for the sake of experiencing different materials hands-on.
However, I've begun to question the assumption that steel is necessarily superior to brass. If I understand correctly, brass works fine with silicone. Brass is easier to find than steel, and doesn't spark when you cut it. So, if you're making silicone puppets, shouldn't brass be the preferred material?
I have a suspicion... For a very long time, foam latex was the pinnacle of pro puppet-making. Foam latex puppets require steel armatures. Silicone is relatively new on the scene. I suspect that people still feel that steel is the "professional" and "superior" material -- but only because they haven't disentangled the actual needs of the casting materials from what kind of armature is required.
I was very interested to read this on an SMA thread:
[Henry] Selick recently mentioned, in an interview relating to his work on "Life Aquatic", that he's basically abandoned foam latex in favor of Dragon Skin, which is silicone based, I believe.It looks like silicone may be the future. ...Perhaps brass is the future, too?
posted by sven | permalink | categories: stopmo
May 29, 2006
if I went with foam latex...
by sven at 8:00 am
At this point, I'm thinking I'll probably go with making a silicone puppet next -- not foam latex. But I've done a bunch of research... And if I don't write down what I've learned, it'll go to waste. This post can be where I pick up again, if I come back to doing foam latex later.
THE FOAM LATEX ITSELF
I took at look at three brands of foam latex: Burman, GM, and Monster Makers.
All three brands cost roughly $30 for the basic 1 quart kit (shipping not included)... Burman costs $29; GM costs $32.50 (from Tim Vittetoe Originals, the most convenient distributor relative to my location); Monster Makers costs $30.
GM Foam I think the deciding factor for me is quality of instructions -- and on this criteria, GM excels. The GM Foam website has run schedules that are specific to three common types of kitchen mixers: Mixmaster, KitchenAid, and Hobart. The instructions that I've hunted down for Monster Makers aren't so specific -- although they do give more information about using different recipes for different purposes. Burman does not provide online instructions that I've been able to find.
In general, GM foam feels the most user-friendly to me. The Burman website seems geared for professionals in the special effects industry; you have to really know what you're looking for in order to find it on their website. As for Monster Makers, I'm a little soured on them after having ordered my "self-skinning flexible expanding urethane foam". When I made my purchase, I also ordered two books -- but I got two copies of the same book, rather than the two different books I asked for. Furthermore, I asked repeatedly for instructions and an MSDS for the urethane foam, but never received these things.
GM foam is recommended by Kathi Zung. Her Do It Yourself! Foam Latex Puppetmaking 101 DVD is invaluable for getting a sense of how foam latex works -- so her advice also weighs in heavily.
Yep, my mind's made up -- I'll go with GM.
...There's something more worth saying about Monster Makers foam, though. Apparently Monster Makers actually carries McLaughlin Foam -- just under their own name. I found this very interesting story from Tom McLaughlin about how he pioneered the use of theatrical foam latex in the 1970s -- but then his recipe was stolen!
Apparently Tom is the guy that produced the foam that was used to make Miss Piggy, the critters from The Dark Crystal, Yoda, and Jabba the Hutt. Yowza! GM foam was used for Amadeus and the aliens on Star Trek: Next Generation / Voyager / Deep Space 9. Also impressive... But having made Yoda? That pretty much makes you my God.
[Tom also authored "Silicone Art" -- a difficult-to-find book that I'm trying to hunt down.]
...If I wind up spending any significant amount of time working with foam latex, then my second order of materials might have to be McLaughlin foam.
AN OVEN FOR CURING
I was hoping to find a large convection toaster-oven for curing foam. Something small enough to fit on a counter, but big enough to handle fairly beefy puppets. I found a pretty decent selection at Target. What we really need to know is the interior dimensions -- so I grabbed a ruler from the store's school supply section, and measured all the in-stock models.
Oster toaster oven My top pick was the "Oster 6-Slice Toaster Oven - Red" for $60 (apparently on sale for $50 right now). The interior dimensions: 4.75" tall, 11.5" wide, 10" deep. This was pretty much the roomiest toaster oven that I could find for $50 or under. And yes, I confess, the sexy red exterior also helped sway me. ...Still, I'm left with the uncomfortable feeling that the first mold I make will wind up being too big for this thing.
So I looked for used ovens.
I looked in the used appliances room at Standard Appliances (5240 SE 82nd Ave). The cheapest oven they had was $200 -- still too much. ...I kept my eyes out while driving around town and finally found a "store" called Associated Bargain Barn on NE Martin Luther King. The employees are amazingly rude; there's just a narrow path through the single room of junked-out machines back to their office; and the business cards don't even have a street address on them. BUT, they said that they'd sell an oven with a non-functioning stovetop for $30. And that's all I really need. They'd had "seven" for sale the week before, but were sold out when I visited. Doesn't matter -- I feel like I've found the place where I can get my cheap oven.
Where to put it? I think the only workable solution is to store it in the garage. When I do an actual foam run, then I can wheel it out into the driveway, plugged in with an extension cord. And if I find that I don't like foam latex? It ought to be pretty easy to take the junker back to the folks who sold it to me -- just to get rid of it.
A KITCHEN MIXER
GM Foam has schedules for doing foam runs on the Mixmaster (Sunbeam), the Hobart "KitchenAid" mixer, and the Hobart (which has a 20 quart bowl). I shopped around online, looking at Walmart, Sears, Target, and Amazon.com. The best price I found was $98.72 for the Sunbeam Heritage Mixmaster at Walmart.
Sunbeam Heritage mixer However, when I was shopping in-person at Target, I noticed that they sell spare bowls for the KitchenAid... Ah-ha!
KitchenAid Artisan mixer See, I already have a "KitchenAid Artisan 5-qt. Stand Mixer - Red" -- but I was looking for a new machine, because once foam latex goes in the bowl, you never eat out of it again. What I could do is just buy a second KitchenAide bowl and whisk-attachment -- or better yet, just a whisk and then an old aluminum bowl of some sort from Good Will. I'm sure that with a garbage bag and some cardboard for a splash guard, I could construct a protective covering for my "kitchen motorcycle". Checking Amazon.com, I see that a new whisk attachment might cost me around $31.
GRAND TOTAL
Let's see here...
- $32.50 ... GM Foam 1-Quart Starter Kit, from Tim Vittetoe Originals
- $30.00 ... oven without functioning stovetop, from Associated Bargain Barns Inc.
- $31.00 ... whisk attachment for KitchenAid mixer, from amazon.com
...That's $93.50. Figure in something for shipping and a cheap bowl from Good Will, and the grand total probably comes out to just about $100. Not bad at all!
posted by sven | permalink | categories: stopmo
May 28, 2006
silicone or foam latex next?
by sven at 8:00 am
I've got a puppet in progress right now that will be cast in flexible expanding urethane foam ("cold foam"). It will have an outermost skin of latex, which will be painted directly into the ultracal 30 mold. The armature will be made of aluminum armature wire.
I'm committed to seeing the puppet through -- but already I'm pretty sure that I won't be using this techinique again.
After this puppet, I want to make either a foam latex puppet or a silicone puppet. I suspect that one of these two materials will become my default for casting puppets here-on-out. Pros and cons for each...
Foam latex:
- Pro: It's light and fluffy.
- Pro: It's reasonably easy to repair if you need to tear it open for surgery -- which is particularly important if you're going to have a metal-jointed armature that needs tightening from time-to-time.
- Pro: Painting "only" requires PAX paint and talc.
- Con: It rots over time -- in perhaps as little as 6 months to 3 years.
- Con: It's difficult to mix right; there are four components that need to be frothed, and timing matters.
- Con: It's tricky getting the foam to cure; it's sensitive to temperature, humidity, and barometric pressure.
- Con: You need a dedicated oven and kitchen mixer -- which take up space, and are an additional cost.
- Con: It's vulnerable to brass (due to copper content) and to oils... Like the natural oils on your hands.
Silicone:
- Pro: It doesn't rot. It should last at least 30 years.
- Pro: There are only two components (well, three with slacker/deadener) -- and you don't have to froth them in a mixer.
- Pro: The curing doesn't require baking. It should work so long as you get the measurements right and stir well.
- Pro: You don't need to make space for a stove and kitchen mixer.
- Pro: Brass armatures shouldn't pose a problem.
- Con: It's rather heavy.
- Con: It's difficult to paint; the only thing that sticks to silicone is silicone.
- Con: Repairing tears is difficult or impossible; this makes it hard to tighten a metal-jointed armature.
- Con: It's vulnerable to sulfur, which is found in many brands of plasticene.
- Con: Silicone is somewhat more expensive than foam latex.
The notion that foam latex is going to rot so quickly is really appalling. ...But then, it's what Ray Harryhausen used. I wonder if part of me would always feel incomplete, if I didn't try making a foam latex puppet at least once? A thought experiment: If there was a class in Portland on making foam latex puppets, and the tuition was $250 -- and I got to keep all the tools and materials -- would I take that class? I think the answer is YES! -- in a heartbeat!
I've been pricing it out, and I think that I could actually get a foam latex set-up for only $90 - $100. ...But then, suppose that after I try it I find that don't want to keep working with latex? (Did I mention that it rots?) I'd be stuck with a big clunky oven eating up my precious space. If I got a used oven for cheap, I could probably just sell/give it back to the store where I got it. Even so, it feels weird to go through all that trouble and expense if I don't know that I'm going to stick with this material.
In the long run, I suspect that I'll wind up working with silicone. I just can't stand the idea of my puppets rotting away before my eyes. The main worry with silicone is that I'll need to get into the puppet to tighten joints -- but won't be able to. ...From what I've read so far, I think that I can cobble together a solution for painting the stuff. And all the other "cons" seem pretty surmountable.
I guess, then, that I ought to try silicone next. It's more likely to be the material that I want to stick with. If it's not, then I can try foam latex with a clear conscience. Or hey -- even if I love silicone, there's nothing preventing me from trying foam latex later on -- just for the sake of having the experience.
posted by sven | permalink | categories: stopmo
May 24, 2006
if i buy a milling machine...
by sven at 8:00 am
I very much want to build metal-jointed armatures for my puppets. I've come up with a relatively simple brass design that can be made with handheld power tools. However, I'm interested in graduating up to making steel and/or aluminum armatures. Ones with joints that make sense for the anatomy: e.g. knees that only bend on one axis of rotation.
That probably means: buying a milling machine.
Micro-Mark's MicroLux mini milling machine I've been doing a lot of research. At this point in time, I think that I would choose to buy a MicroLux Mini Milling Machine from Micro-Mark for $590 (that's including shipping). However, I haven't fully committed to buying any machine -- not just yet.
For my own sake, I need to summarize what I've learned so far...
1. CROSS SLIDING VISE?
A while back, I bought a drill press at Home Depot -- which I returned a few days later. ...Immediately after leaving that Home Depot, I stopped at a hardware store that I'd never been in before: The Tool Peddler (9907 SE 82nd Ave). Inside, I discovered this tool I'd never seen before: a cross sliding vise. The cross sliding vise looked very much like the X/Y table on a milling machine. It made me wonder: can you use a cross sliding vise to turn a drill press into a milling machine?
cross sliding vise I posted my question on SMA. The answer I got back was that a drill press isn't really built to deal with the sideways stress. Mike said that the machine will vibrate and give you sloppy cuts. Nick said that he's tried using a drill press to mill aluminum (which is soft) and failed. Jon Frier warned me that he had tried milling with a drill press -- and has scars from the attempt!
I went back into the store to have a second look at the vise, and was told similar things by an employee: the cross sliding vise is really just for precision-positioning. You might be able to use it for milling wood -- but trying it on metal would be a Bad Idea.
2. PRICES
For making armatures, you don't need a full-sized milling machine. There are "micro" mills and "mini" mills -- and either of these sizes will suffice. In general, it seems that micros cost more than minis -- you're paying for miniaturization.
From what I've read, it looks like a good mini is going to cost at least $500, and a good micro is going to cost at least $650. The price range for minis I've looked at runs from $399 to $525. The micros fall into two groups: $240 to $260, and $650 to $995. All of these prices are without shipping. Also, these are prices for the machines only -- milling bits, clamps, or other accessories all have to be purchased separately.
Micro mills I've looked at:
- Procon = $240 ($375 with milling table?)
- Harbor Freight = $259.99
- Sherline = $650 / $775 / $995
- Taig = $680
Mini mills I've looked at:
- Cummins = $399
- Procon = $405
- Harbor Freight = $459.99
- Micro-Mark MicroLux = $524.95
- Grizzly = $525
Harbor Freight's micro milling machine The Harbor Freight micro milling machine seems to be the cheapest milling option available. Unlike the Procon (whose price is unclear), I can buy it locally and avoid shipping costs. However, it's remarkably heavy for a micro; its X/Y table is quite small; and it only has two speeds. The cheapest option is worth mentioning -- but I think I would have more confidence purchasing one of the fancier machines. We're going for precision metalworking here. (And "you get what you pay for.")
3. WEIGHT AND SIZE
For me, weight and size have probably been the most significant consideration after cost. My studio space is a spare bedroom. I don't have a proper metalworking shop -- and I don't have a lot of free space. This would seem to indicate that I should get a micro mill.
Comparing height, width, and depth is cumbersome (even for me!); a comparison of weight should give an adequate sense of how big these things are...
Micro mills I've looked at:
- Procon = 15Kg without table (33 lbs.)
- Harbor Freight = 103 lbs.
- Sherline = 33 lbs. / 36 lbs. / 38 lbs.
- Taig = 65 lbs.
Mini mills I've looked at:
- Cummins = over 150 lbs.
- Procon = 40Kg (88 lbs.)
- Harbor Freight = 150 lbs.
- Micro-Mark MicroLux = 110 lbs.
- Grizzly = 153 lbs.
If weight and size are the primary considerations, then Sherline is the clear winner. Reading through the setup instructions, I see that you do need to attach the Sherline mill to a board, to create stability -- but you don't need to (and shouldn't) secure it to a workbench. It appears that all other mills (including the Taig) need to be bolted to a heavy table.
4. STRENGTH
The strength (or "beefiness") of a mill seems to be a matter of two factors: (1) what kind of metals it's able to cut, and (2) how rigid the milling column is.
On two threads over at SMA, professional armature fabricator Lionel Ivan Orozco ("LIO") advises that the extra mass and power of a mini mill (vs. a micro) can be advantageous.
LIO uses a Grizzly mini mill (as well as a 400+ Lb. Enco!) -- however, he's quick to point out that with intelligent design, there's still a lot that one can do with a micro.
Tom Brierton, another professional armature fabricator, gets good results with a Sherline. In his book Stop-Motion Armature Machining: A Construction Manual, Tom says
"Sherline miniature mills and lathes can cut the following metals quite easily: all grades of aircraft aluminum, brass, and mild to semi-hardened steel, such as the 303 and 404 series steels. Anything beyond the hardness of 440 will require very specialized cutting tools and jobber drill bits, which are very expensive. It has been the experience of the author that rarely is there a need to go beyond the 440 hardness when building stop-motion puppet armatures, as these metals are quite sufficient for armature purposes." (p.21)...So, it appears that the Sherline is limited in terms of what materials it can deal with -- although it's unlikely that you'll need metals that it can't cut -- not within the realm of stopmo. Still, it's worthwhile to realize that size does limit the versatility of the Sherline.
[As I'm reviewing this portion of Tom's book, I now see that he says "Sherline machines must be securely mounted on a table, preferably with screws and bolts." This seems to contradict what Sherline says on its website.]
With regards to rigidity, the difference between a Sherline and a Taig is visible in their photographs.
Sherline Model 5400 micro mill Look at the milling column of the Sherline...
Taig micro mill Now look at the milling column of the Taig. You can see that it's much more solid. ...The Taig website boasts about their micro mill's strength:
"This is the machine you don't have to baby. The Micro Mill is a rugged precision instrument that has plenty of rigidity. Its machined, ground and stabilized steel bed has a life-time ball bearing spindle, coupled with a six speed positive vee belt drive. Spindle speeds in geometric progression from 525-5200 RPM (CR version 1000 - 10000 rpm) provide the power to "HOG" 1/8 inch cuts in mild steel or the speed and precision to "dust" a few tenths (compare that to other mills of similar size on the market, you can't!)."It appears that if strength is the primary concern in choosing a mill, then the Taig wins out over the Sherline. However, a Taig pretty definitely has to be screwed down onto a workbench -- so at that point, you might as well go for a mini like the MicroLux.
5. MINIS VS. MICROS
There a few differences between the minis and the micros worth mentioning...
(1) The milling heads on the micros can turn 90 degrees in either direction; the milling heads on the minis can't turn -- but their milling columns can turn 45 degrees in either direction. It sounds like this is a point in favor of micros -- however, after asking folks on SMA and looking in Tom's book at how specific armature joints are made, I find that you probably want to avoid tilting the milling column entirely. It's unnecessary -- and "tramming" the column to make sure it's perfectly vertical sounds like a very tedious process.
(2) The minis can double as drill presses -- the micros can't. The minis all have a wheel on the side that allow you to easily plunge a drill bit into a work piece; the micros can only lower their drill bit slowly, using very small increments of movement. Getting two machines for the price of one -- both a milling machine and a drill press -- seems like a significant benefit to me. [Correction: It appears that the Procon and Harbor Freight micro mills can double as small drill presses.]
6. COMPARING THE MINI MILLS
An interesting fact about the minis is that at least five brands are all made at the same Chinese factory: Grizzly, Harbor Freight, Micro-Mark, Homier, and Cummins. LittleMachineShop.com has a very useful comparison chart for these five brands. [I have been unable to find any info for Homier Mobile Merchants' "Speedway" model, and have thus excluded it from consideration.] Procon appears similar to these brands, but seems to be produced in a different factory.
Now, on to comparing the various brands of mini mills with one another...
The Procon website is confusing -- and as I am looking at it today, the link to its page about mills seems to be broken. The Procon also appears to be a metric machine. I'm disqualifying it from my considerations.
The Cummins ($399) and Harbor Freight ($459.99) both seem to be somewhat less expensive because they have only two speeds. From what I read, being able to control the speed at which you mill each particular kind of metal is very important. Having only two speeds is a significant deficit. However: There are at least two Harbor Freight stores here in Multnomah county; all of the other brands seem to only be able via mail order. Thus, Harbor Freight gets some extra points... With their brand, I wouldn't have to pay shipping costs.
The Grizzly ($525) and the Micro-Mark MicroLux ($524.95) are essentially identical in price -- and even when shipping is considered, they only differ by $5. The Grizzly is heavier: 153 lbs. versus 110 lbs. The MicroLux's lighter weight should probably be considered as a point in its favor.
The tipping point in favor of the MicroLux may be that it has "true-inch" feed screws and dials. As the LittleMachineShop.com comparison chart explains,
"The MicroLux mini mill has one unique feature; the table feed dials both advance 0.050 inch per revolution. On all the other mini mills the dials advance 1/16 inch per revolution. The 0.050-inch per turn is easier to use than the 0.0625-inch per turn of the other mini mills. Micro-Mark will have you believe that the other mini mills have metric dials, but they do not."I've looked at the Harbor Freights dials in person and can attest: .0625-inch per turn is really strange-looking and counter-intuitive. It's difficult to explain; suffice it to say that I walked away from the store not understanding how one would actually work that dial.
So, when it comes down to it, it looks like both the Grizzly and the Microlux are very good machines. LIO has a Grizzly. And, I feel it's worth mentioning, Kevin Kelly's "Cool Tools" website advocated for the Grizzly (though not in comparison to anything else). On the other hand, both Yuji and Eric Scott over on SMA have opted for the MicroLux, and seem very happy with the machine. ...For someone who's not a pro like LIO, it sounds like the "true-inch" dials make the MicroLux slightly easier to work with -- giving it a slight edge.
7. PICKING THE MACHINE FOR ME
It seems that my first choice for a milling machine would be the MicroLux ($524.95). It's strong: having both rigidity, and the power to cut different metals with ease. It's versatile: being able to serve both as a milling machine and a drill press. It's somewhat easier to use than other mini mills: having both a variable speed control, and "true-inch" dials. It's less expensive than the micro-mills. And at 110 pounds, it's not light -- but it's also not completely unmanageable.
The "big" problem with the MicroLux is that it commits me to also buying/making a sturdy workbench that it can be screwed onto. So, my second choice for a milling machine would have to be the Sherline Model 5400 Deluxe Mill ($775).
...The basic Sherline mill (Model 5000, $650) is a bit smaller than the Deluxe -- but also lacks the "laser engraved scales on the table and base" -- which seems a little unreasonable. Having an incremented ruler built into the X/Y table feels essential; the Model 5000 seems inadequate. The high-end Model 2000 ($995), on the other hand, seems like over-kill. The "Deluxe" seems to be Goldilock's "just right" compromise.
[Note: As I double-check info now, it appears that the Model 2000 may be the only Sherline with a milling head that can turn 90 degrees -- the others seem to be fixed in place.]
A Sherline is the most lightweight option. There is conflicting info, but it appears that one can merely attach it to a wooden tray -- which then allows one to put it away when it's not being used. It has variable speed -- whereas the Taig has only six speed settings, and the Procon and Harbor Freight micro mills only have two. Sherlines are the best documented of all mills (micros and minis) that I've seen, and there's a vibrant online community of users.
Really, I think the only sticking point that's really preventing me from buying a MicroLux right now is: "Where am I going to put it?" ...I'm having trouble imagining where I want to put a heavy workbench.
That makes me begin to wonder if the Sherline might be the better option after all. BUT... It's more expensive -- by $250 -- and I have to remember that there's bits, clamps, and accessories to buy, as well as the machine itself. And it's also helpful at this point to recall what Yuji said while discussing his purchase:
"I chose the mini mill and lathe because I wanted something beefier than the Sherline. I got to use Sherline equipment with Tom Brierton last year when he gave a workshop here in Los Angeles. I thought they were good little machines but there were too many little things I didn't like about them too. Now that I have been working on my Micro Mark machines for a few months, I am very happy. And the fact they are cheaper, well that's just icing on the cake."Yuji's kind of vague -- but his comment does help me feel more confident about going for the MicroLux.
SO! I guess the question I'm left with is: what am I going to do for a workbench?
8. THE WINNERS
This post is long and rambling, so let me summarize in another way. In the "small affordable milling machines" competition, I'd like to announce awards in three categories:
- cheapest machine: the Harbor Freight micro mill ($259.99, if bought locally)
- strong and versatile: the Micro-Mark MicroLux mini mill ($589.95, shipping included)
- small and portable: Sherline Model 5400 Deluxe micro mill ($775, shipping not included)
...And the winner for best overall value: the Micro-Mark MicroLux mini mill ($589.95, shipping included)
posted by sven | permalink | categories: miscellany, sculpture, stopmo
May 23, 2006
the drill press mistake
by sven at 8:00 am
It seems like there's a progression of complexity for puppet armature designs:
- Mike Brent: aluminum armature wire, epoxy putty bones, nuts for tie-downs
- Nick Hilligoss: aluminum armature wire, wooden body block, T-style tie-downs
- Susannah Shaw: aluminum armature wire, K&S plug-in limbs
- Lionel Ivan Orozco ("LIO"): "open-hole double-ball" joints made from steel strips, bearings, and rods.
- Tom Brierton: multiple types of joints, milled from aircraft aluminum stock
I've gotten to the point where I can make a Susannah Shaw design pretty comfortably. For a while, I thought it was reasonable to just take the next step up -- getting only what I would need in order to make a LIO armature... That meant: a drill press, and some special-order metal stock.
Ryobi 10" drill press About two months ago, I actually went ahead and bought a drill press. I was reading and re-reading LIO's tutorial on how to drill type 302 stainless steel balls. In the photos, he uses a 10" Ryobi drill press. I could see in Nick Hilligoss' tie-down tutorial video that he uses a Ryobi bandsaw. Ryobi seemed like a trustworthy brand. Affordable, too: the 10" drill press only costs $99 at Home Depot. After coveting it for weeks, I finally decided that my ultimate purchase was a foregone conclusion, and that I might as well quit putting it off.
However, I wound up taking the drill press back just a few days later -- never even having taken it out of the back of the Svan.
Reason #1
At the point of purchasing a drill press, you enter into the world of tabletop machines -- which take up quite a bit of space. If a milling machine were able to both mill and drill, then perhaps for the sake of space I ought to just save up and get the more versatile machine.
LIO ranted a little at me that a drill-press is an essential tool in any shop. That helped goad me into purchasing the drill press. He's an authority that I respect... But did I feel like I truly understood why I need both tools? No. So I decided I should take the drill press back. I can always re-purchase it later, if I finally understand why both are necessary.
Reason #2
I realized that I just didn't know enough about machining metal yet. I was depending entirely upon other people's tutorials and advice. When I'd ask a question on SMA, I could see my own ignorance reflected back in what I wrote, and it just seemed ridiculous.
My new resolve: I'm a smart boy -- I can own the knowledge of metalworking for myself -- no more dumb questions -- go forth and read up on the subject! So, I drove to Powell's Technical Books and purchased The Home Machinist's Handbook by Doug Briney and Tabletop Machining by Joe Martin (owner of Sherline).
Research research research....
posted by sven | permalink | categories: sculpture, stopmo
May 22, 2006
learning metalworking
by sven at 8:00 am
[Last week I wrote a comment over at Shelley Noble's "Notes from Halfland" blog that seemed worth re-posting here. I have thoughts about fleshing it out into an illustrated tutorial -- but best to share it as-is for now.]
Prior to February, I had never done any metal working. Period. In fact, I clearly remember the message I wrote to Mike saying how the thought of metalworking scared the bejeezus out of me. His encouraging words got me over the hump, to the point where I decided that I'm probably a smart-enough sort of person to be able to get the job done. [THANK YOU MIKE!!]
There were several distinct steps for me in learning what I know so far.
#1. Cutting a strip of aluminum. I started with a hacksaw and trying to hold the metal down by hand. Couldn't do it. I got a drillpress vise -- wrong kind of vise. I got a small clamp-to-the-table vise and wax for the hacksaw blade. That worked, but my cuts were sort of crooked. I tried using a dremel cut-off wheel, and suddenly cutting metal was like slicing butter.
#2. Drilling and tapping a brass strip. Drilling was pretty easy right off the bat. What I didn't realize at first was that normal drill bits work fine. If they're labeled HSS, that means "High Speed Steel", which can easily cut the softer metals (brass, aluminum, copper). HSS bits are probably what you have by default; you can get carbide bits at a hardware store, which are even more durable. ...Tapping just requires buying a little specialized tool so you can screw threads into a hole. I was so proud when I showed Gretchin a simple hole with a screw in it -- and I had made the threaded hole myself!
#3. Soldering. I needed to learn soldering so I could attach little brass nuts onto square K&S tubing, so I could make plug-in armatures like Susannah Shaw describes. (Neither super glue nor epoxy putty made adequate bonds.) My first frustration was learning that a zinc nut wasn't going to attach to the brass K&S -- it had to be brass-to-brass. I discovered that I had to sand the parts a little to make sure that they were clean. Then it took a little bit of fiddling to figure out where to press the soldering iron and how to hold the soldering wire effectively. ...But then, poof! I knew how to solder!
#4. Safe ventilation. Reading online, I found out that the fumes from soldering -- both from the lead and from the rosin core -- are hazardous. (My other main worry had been the fumes from epoxy glue.) My desk isn't in front of a window, so I needed a way to suck the fumes through dryer ducting that I bought at Home Depot. I tried an air brush spray booth -- it was way too big for my desk! I found some tiny desk fans made specifically for soldering and ordered one from Amazon.com. I figured out a way to modify it so it could vent through the ducting. The write-up on my solution is available over at Scarlet Letters.
#5. Using a torch. When it came time to attach balls onto rods, the soldering iron couldn't get the metals hot enough. I wound up using a butane micro-torch -- actually the kitchen brulee torch that I got two Christmases back! Flame scares me, and it took a little time even when I was in the kitchen to get comfortable with using something that's 1200 degrees hot. Using it for metal working, it wasn't bad at all -- as soon as I figured out that I ought to work on top of a cinder block, and that a small "helping hands" clamping device from Radio Shack was necessary to hold things for me while I heated them.
...And that's actually everything I know!! Each step was a big deal to me -- but once learned, it's just like adding a new media to the art pantry: pastels, acrylics, clay...
Oh -- one other step that was a meaningful hurdle: ordering materials online. It was really weird to be buying something that I'd never touched in person before. Buying "self-skinning flexible expanding urethane foam" from MonsterMakers was where I got over that. I'm going to need to order type 302 stainless steel balls from smallparts.com soon -- I wouldn't be able to if I hadn't already broken the online-buying barrier.
(Not a barrier, but another little bit of learning: Walking around the hardware store looking at nuts and bolts and screws long enough to know the difference between 4-40, 6-32, and 10-24; the difference between a socket cap screw and a machine screw; the difference between brass, zinc, and stainless steel screws... It's been really useful to be able to recognize these things by sight.)
posted by sven | permalink | categories: sculpture, stopmo
May 21, 2006
thinking about set design
by sven at 8:00 am
I've been thinking about set design for stopmo films.
"Theatre de la Mode" dolls Back on Sunday May 7, Gretchin and myself and our friends Todd & Kristen made an excursion to the Maryhill Museum of Art, about 90 minutes east of us. I was really excited to go see their collection of Theatre de la Mode dolls, which I had discovered previously in a book titled Théâtre de la Mode: Fashion Dolls: The Survival of Haute Couture that was being sold at Fabric Depot (700 SE 122nd Ave).
"Doll" is perhaps a misnomer. These are 1:3 scale (27" tall) mannequins with wire mesh bodies and white clay heads reminiscent of Greek sculpture. They were created in post-WWII France, in a (successful) attempt to revive the fashion industry. More than 70 unique dolls were created by leaders of the art/fashion world; they were displayed in sets created by noted theatrical designers (e.g. Jean Cocteau). The dolls are amazing art -- but I think it's probably the sets that are really sparking my imagination.
...Unfortunately, the dolls weren't actually at the Maryhill Art Museum when we visited! They were temporarily on loan to the Washington Museum of History and Industry ("MOHAI") up in Seattle. However, by a strange serendipity, Gretchin and I wound up traveling to Seattle the following weekend (May 12). How could we not go see the dolls? It seemed fated.
So, yes, I finally got to see the dolls. :-)
Seattle Public Library While we were in Seattle, we also made a visit to the Seattle Public Library. Gretchin had been there before, and raved to me about the architecture. Wow! She wasn't exaggerating -- it's a truly fascinating design... And one of the few examples of postmodern architecture that I've really grooved on.
heart of the library The part of the library that I'm most taken with is in the core of the building: it's built to look like the interior of an enormous heart! The walls are red -- like the color of Mickey Mouse's shorts -- and the hallways curve away from you like ventricles... I would love to make a set for a stopmo film that looks like that!
set #1 Now, backtracking to the Monday after we didn't see the Theatre de la Mode dolls...
On May 8th I spent a happy two hours using cardstock to brainstorm 3D spaces for my puppets to inhabit. (I may not have seen the dolls and their sets in person at that point in time -- but I had come home with a fist full of Theatre de la Mode post cards!)
set #2 I bought a whole ream of this white cardstock at Arvey Paper & Office Products (1005 SE Grand Ave) a while back. It's proved really useful on a number of occasions. It doesn't take paint like I'd want, however; acrylics make it warp. ...True, I could use foamcore -- but paper's quicker, more inexpensive, and more recycleable when I'm just brainstorming.
set #3 After a while, I wound up with several bits that I just kept rearranging: a staircase, an arch, a platform, a pillar, some flat walls. I could see making a bunch more of these pieces to experiment with. ...Sort of like playing with wooden blocks!
It's funny: as I fooled around with my little paper props, I found myself thinking increasingly spatially. When I went to bed that night, all sorts of interesting spaces were occuring to me -- as if I'd unlocked a part of my imagination that's always been dormant.
posted by sven | permalink | categories: miscellany, stopmo
May 20, 2006
sculpting: a wingless bird creature
by sven at 12:00 pm
new sculpt in progress Two weeks ago I started doing a sculpt for a humanoid puppet. I was going to use this sculpt to make my first-ever two-piece mold... However, I've put that project on hold. The mold-making experiment could go horribly wrong -- it'd be foolish to put a huge investment of time into a sculpt that might just get wasted.
Instead of the humanoid, I've gone ahead and made a simpler beastie -- a sort of wingless bird-creature. I think I'm going to name it "buttons", after a raven-critter from Amy Winfrey's wonderful online cartoon series, Making Fiends. (A little homage, y'know?) ...Just one problem: I put too much effort into this sculpt to use it as a first test, either!
Oh well. I'm thinking now that I'll do something ridiculously simple for my two-piece mold test. Like, say, a severed arm. If that goes OK, then I'll go forward with casting "Buttons" in flexible expanding urethane foam.
my new puppetmaking table New invention: A puppetmaking table. Puppets have tie-downs -- screws that come up from underneath the table, fitting into nuts in the feet. This little table has holes in it for tie-downs, so I can easily work with the puppet in a standing position -- but still be able to lift it up or rotate it when necessary. I made a whole series of holes, all 1/2" apart, so the table can accommodate puppets with different gaits.
I think I've come up with a pretty useful tool here... My only complaint: the table's just a little too wide. It's 12" across; 8" probably would have been plenty.
armature As I understand it, when you're making a puppet from casting materials, you usually create two armatures. A rough one that just holds the clay up while you sculpt. And the good armature, which goes inside the final puppet. I thought I'd be clever and make just one armature...
The one you see above has three twisted strands of 1/16" aluminum armature wire in each leg. The legs are glued into a block of pine with epoxy glue. The feet are metal nuts attached to the wires with plumber's epoxy putty. The nuts are set on top of thin pieces of wood (with holes, so the screws can pass through) -- just to make the soles a bit flatter.
It's a well-constructed armature. But it's not going to work for the final puppet. I can already tell that the leg wires aren't going to be nearly strong enough to pose the puppet's legs. The sculpt wound up being a lot beefier than I expected.
sculpt in progress - back It took three hours to build the armature and puppetmaking table; it took another four to do the actual sculpt. Before adding plastilene, I covered the armature with plastic wrap so it would be protected.
I had a lot of fun... There's something really appealing about working with actual 3D volumes, rather than just 2D representations. I specifically wanted to share the photo above because I was really pleased with how the backs of the legs turned out. Neat shapes.
the finished sculpt ...And here's the finished sculpt! I used turpenoid with a brush to smooth it out. It's pretty close to what I had in mind. I think I'm beginning to get the knack for this "sculpting" business. ;-)
posted by sven | permalink | categories: sculpture, stopmo
May 13, 2006
the ambassador
by sven at 9:52 pm
the ambassador arrives in Halfland Remember that brass armature I completed back at the end of March? I've sent it (on loan) to Shelley Noble down in California. Shelley's been experimenting with different kinds of armatures for her stopmo production, "Halfland" -- and I wanted her to get to try out a ball-and-socket model.
She's very excited. And I'm just thrilled to add a little bit of my energy to this wonderful project. ...Best wishes, Shelley!
posted by sven | permalink | categories: miscellany, stopmo
May 3, 2006
new project: cold foam puppet
by sven at 10:21 pm
After what seems like forever, I finally got back into the studio tonight. I'm starting a new project: making a stopmo puppet with "flexible expanding urethane foam" (cold foam) and a latex skin.
armature for the sculpt The first step is to make a sculpt out of oil-based clay. Then I'll make a mold out of ultracal 30. Then I'll paint in liquid latex and let it dry. Then I'll put the puppet's armature into the mold, and fill it with the expanding foam.
In making the sculpt, you need an armature to help support the clay. This is NOT the same armature that will be inside the finished puppet. For supporting the sculpt, I used 1/8" thick aluminum armature wire. The base is a piece of wood that I've drilled several holes in, so I can weave the wire through.
first layer of clay I've been experimenting with different types of oil-based clay. From what I've read, the two most popular brands are Roma Plastilina Clay and Chavant Plastiline. Plastilina often has sulfur in it, which interacts badly with latex. Chavant produces an oil-clay called "NSP" (Non Sulphurated Plastine) that's safe; I don't think Roma has a similar product.
According to the Chavant website, there are only two distributors of NSP in Portland: Stephenson Pattern Supply and Lash Quality Molds. These aren't your typical art supply stores; you're only going to know that they exist if you're doing pretty specialized work...
bulking it out Stephenson Pattern Supply is a wholesaler in the industrial district that has a sign saying they don't accept orders for less than $150 of materials... They mean to scare off browsers; I was fortunate, and they deigned to sell me four pounds of NSP and a bag of ultracal 30 -- despite what the sign said. They're the only place in Portland that sells ultracal 30. [Interesting note to those in the know: This must be where Ralph Cordero shops -- there was a Toxic Mom's Studio sculpture in the lobby!]
Lash Quality Molds is a one-woman operation in an unmarked building way out by the airport. You have to call for an appointment. The owner (whose name I forget at the moment) was a neat person; she gave myself and another fellow a tour of the premises. I saw silicone molds being assembled -- and a monumental sculpture in the back room that was being prepped for casting. The owner recommended that I try J-MAC Classic Clay. It's non-sulphur, and she says the "brown firm" outsells everything else she carries by 80%. Well... I had to give it a try!
Comparing the NSP to the J-MAC, the NSP is more oily. The J-MAC feels more like water-based clay. ...I think I like the J-MAC a lot!!
beginning to sculpt volumes In all honesy, I've hardly worked with clay at all previously. This is very new to me -- but it's feeling really right.
I do know that I generally like to work reductively -- so I began the sculpt by building up way more clay than I'm going to need. I don't have a drawing that I'm working from; I'm improvising... Happily shaving the lumpy mass into smooth volumes with my one trusty loop tool. I find myself starting with the ribcage, and then everything else evolves from there. The front of the ribcage arcs around to the small of the back; the spine is S-shaped; there's a line that swoops around from the butt to the knee... And so on.
I'm charmed. It's like learning constellations: From the Big Dipper, you arc to Arcturus -- and from Arcturus, spy Spica. :-)
posted by sven | permalink | categories: sculpture, stopmo
April 19, 2006
against keeping your film production secret
by sven at 8:39 pm
[I just wrote a long post over at StopMotionAnimation.com that's worth repeating here. Leevi Lehtinen is working on an excellent stopmo film, and my blog brother Ale suggested that Leevi shouldn't show us any more clips from the work until it's complete. I've been roughing out an essay about why I'm against keeping film projects secret -- Ale's comment just opened the floodgates.]
Quote
Keep it up and please don't show so much about the film! I love it, but prefer to see it completed!Oh! I must respectfully disagree with Ale! PLEASE, don't hesitate to post work-in-progress shots! If a viewer does not want to see the film until it is completed, then it is their own responsibility to not click on those files.
I am of the opinion that getting to see the film as it's being made only enhances the experience. Rather than spending five minutes of attention on your well-crafted work of art, I get to spend months or years enjoying it bit-by-bit. I'm cheering you on -- and when it is completed, I feel that in some small way I was able to help make it possible -- by being a supportive ear / eye.
Telling artists not to show their work until it's done -- this doesn't help them at all! Isolation is a terrible motivator. Look at SMA itself: when we get to share our energy, we are reinvigorated and inspired to do more! Sharing encourages sharing -- and that's where we get our spark.
"Keeping it secret" is NOT a step towards professionalism. Look at Peter Jackson's online "making-of" video diary for King Kong. Look at how Joss Whedon showed rough cuts of Serenity to eager audiences... Sharing the process of creation -- as you're creating -- is an excellent way to build your audience prior to release.
...And after your film is released, showing the "making-of" doesn't somehow spoil the magic. Pick up almost any DVD, and you'll see "making of" documentaries. The viewing public knows movies aren't magic -- we're curious to see how they're made, and only gain respect by learning how well-crafted the film is. The "making-of" is part of the product, just as marketable as the film itself.
The film-viewing public is literate and should get to make their own choices where "spoilers" are concerned. For example, when the new Star Wars movies came out, myself and lots of my friends knew that there would be spoilers -- and we conscientiously avoided them. In the world of blogging, there's an etiquette whereby you warn people that there may be "spoilers" in your post so they can decide for themselves if they want to read on.
The movie itself is only half the story. I want to know about about the people who made it. There are movies that I go to not because I know anything about the film -- but because the film is a Peter Jackson- or George Lucas- or James Cameron- or Steven Spielberg- or Jim Henson- or Joss Whedon- or Martin Scorsese- or Whoever- film. As filmmakers, we shouldn't try make ourselves invisible. Ultimately what we want is for people to be invested in US. Hopefully I'm not going to make just one film. I'm going to make several or many films -- and I want my audience to follow ME as I grow and create.
I don't know what Nick Hilligoss' next film is going to be about -- but it doesn't matter! I already know that I want to see it! Same goes for the the next film by Mike Brent or Alejo Accini or Jeffrey Roche or Shelley Noble or Dave Hettmer or Lio Ivan Orozco or Marc Spess or (forgive me, folks I'm failing to name)... I want to see WHATEVER these people do next, because I've come care about them and what they're doing.
And I want to know about their work as it's in progress, too. So, please -- everyone -- keep sharing your works-in-progress!
Svenposted by sven | permalink | categories: movies, stopmo, writing
April 18, 2006
buying a lab scale
by sven at 12:00 pm
my new lab scale It's taken me a long time to get to the point where I can begin experimenting with toxics like resin and urethane foam.
Part of what's held me up is that I've lacked a precision lab scale. I did a bunch of shopping around on Amazon.com and finally found one that is both inexpensive and meets an animator's needs. To all you stopmoes out there, I recommend the 1000 x .1g Precision Lab Table Scale from US Balance.
The standard scale that you'd use for weighing chemicals is the Ohaus 750-SO Triple Beam Scale. This is what I remember using in high school, and (I believe) what Kathi Zung uses in her "Do It Yourself! Foam Latex Puppetmaking 101" DVD. Amazon currently sells the triple beam for $99. I've seen it sold for $150 at other places -- Amazon is offering a good deal. ...But I really wanted a digital scale if at all possible.
So: how to decide what scale to buy? I think there are three factors to consider: How accurate is the scale? How much weight can it accommodate? And what is the cost?
Ohaus 750-SO Triple Beam Scale The standard triple beam model is accurate down to .1 grams -- so I decided that whatever digital scale I chose should also be able to measure in .1 gram increments. As for price range, I was hoping to find an option that was no more expensive than the triple beam's normal cost, $150. I decided that if all the digital scales were more expensive than that, then I'd sacrifice convenience and just buy the triple beam.
Fortunately, after a thorough search I found three decent candidates.
Ohaus SP-401 Scout Pro Digital Scale, 400 x .1 g The Ohaus SP-401 Scout Pro Digital Scale costs $114.95 -- but can only accommodate 400 grams. One pound equals 453 grams; so the SP-401 can't even deal with four sticks of butter!
HL2000 HI Digital Scale The HL2000 HI Digital Scale from A&D Engineering costs $130.23, and can accommodate 2000 grams (four pounds). A bit more expensive -- but much more useful, being able to deal with larger batches of chemicals.
1000 x .1g Precision Lab Table Scale The Precision Lab Table Scale from US Balance can deal with 1000 grams -- but only costs $40!! It's a reasonable compromise in terms of how much weight it can measure (2.2 pounds)... And for $40, I decided I could afford to make a mistake, if this turned out to be a bad purchase.
Luckily, it's turned out to be a very good purchase. So far -- (knock on wood) -- no complaints whatsoever!
posted by sven | permalink | categories: sculpture, stopmo
April 17, 2006
toxic cupcakes
by sven at 9:25 pm
During the past two months I've purchased several new-to-me art materials: ultra-cal 30, RTV silicone, polyurethane casting resin, glass microspheres, and "self-skinning flexible expanding urethane foam". On Saturday I finally had the opportunity to play with all this stuff. Doing small experiments in paper drinking cups, I now have a bunch of odd castings that look like... toxic cupcakes.
"toxic cupcakes" What do I plan to do with all these materials? Well, they'll allow me to make molds and castings with a precision that I've never achieved before. So as an artist, I'm interested in them just for the sake of having more techniques at my disposal. However, there are two projects that they may apply to immediately:
Project #1: I want to try making a stopmo puppet with a body cast in foam. Foam latex is the standard for this application. However, foam latex has several problems: it involves 4 chemical components; it requires a dedicated kitchen mixer and oven; it is very vulnerable to temperature/humidity/barometric pressure; and it starts to rot after a few years. ...Contrast this with urethane foam: it only has two components, cures at room temperature, and doesn't rot. --Worth a shot, don'tcha think?
Project #2: I like puppets with heads that are very large in proportion to their bodies. How do I make heads that are light enough so that the puppet won't tip over? Mike Brent suggested that I should try casting my puppet heads in resin. You can get a filler material (such as glass micro-spheres) that will lighten the casting significantly... And as an additional benefit: If you're doing castings, when a puppet breaks you can just cast another!
working on the studio porch These materials give off toxic fumes, so I have to work with them outside. However, this is Oregon... It was rainy and windy on Saturday -- so I wound up working on the front porch, manipulating the chemicals inside of cardboard boxes that served as wind-breaks. It worked adequately; but boy do I wish we had a covered driveway!
material tests Please refer to the photo above...
FRONT LEFT: RESIN
The front two "cupcakes" are polyurethane resin. This resin has you mixing part A and part B in a 1:1 ratio by volume, but allows for 5-10% error. For the cupcake on the left, I measured out part A and part B by weight (oops) on my new lab scale. It cured in roughly 20 minutes... It looked sort of like liquid lard congealing, a white clot appearing in the clear fluid. I was disappointed to see tiny bubbles over much of the casting's surface.FRONT RIGHT: RESIN WITH MICROSPHERES
For the resin cupcake on the right, I tried eyeballing the measurements, and added in the glass microspheres as filler. The bottom-most part of the casting didn't seem as if it was going to cure -- which I attribute to the poor measurements... But the next day, I was surprised to find that the remaining material did finally harden. Conclusion: I prefer not to eyeball measurements. ...The microspheres definitely lightened the material -- and they also smoothed out the surface a great deal. Yay microspheres!Next steps for exploring resin: The bottles "glug" when I pour them -- I need to see if I can find some screw-on spigots for more precise pouring. I tried painting the resin with acrylic -- but even dry, it wiped off easily. I suspect that resin requires enamel based paints. However, I may be able to use an enamel-based spray primer, over which I could paint acrylics. That, I believe, is how wargamers paint their plastic and metal miniatures -- so I'll have to pick some up at Bridgetown Hobby. ...I'm also interested in trying out some black pigment that gets mixed directly into the resin.
BACK FAR-LEFT: URETHANE FOAM
In the back row on the left is my first experiment with the expanding urethane foam. I was really surprised to discover that it cures in only about six minutes. There were gooey uncured areas at the bottom of the cup, however; I don't know what to make of that. The material feels like a Nerf football -- only a bit stiffer.BACK MIDDLE-LEFT: URETHANE FOAM ON ULTRA-CAL
The next cupcake is an experiment I did to see if the urethane would stick to ultra-cal 30. I knew that urethane foam has a reputation for adhering to anything -- but I hoped against hope that the self-skinning variety would be different. No luck. This was my first batch of ultra-cal... I eyeballed how much water to add, and it turned out fine. It took a good deal longer to set-up than I expected, though -- around half an hour.I checked The Prop Builder's Molding & Casting Handbook to see what mold-release it recommended for making urethane foam casts in a plaster mold. It said that PVA (white glue?) could work, but is not recommended. Instead, urethane foam should be cast in silicone molds. This leads us to the pretty blue cupcake...
BACK MIDDLE-RIGHT: SILICONE MOLD, PAINTED FOAM CASTING
The blue cupcake is made of silicone. Silicone is the gooiest stuff I've ever encountered: like wet peanut butter mixed with caulking. I wanted to actually try making a mold with this stuff, so I dangled a wooden sphere from a wire into the paper cup, and then poured in the silicone around it. I was worried that the cold would interfere with curing -- but it seemed to be cured after only six hours, which was listed as the minimum set time. I cut open the silicone with a razor, and bundled it back together with a rubber band. I used the hole where the wire had been as a pour hole, and made an impromptu paper funnel to help channel in the urethane...The casting was OK, but not great. Air got trapped in the mold, so my casting wasn't perfectly spherical. I guess I need a second hole, so air can escape. The expanding foam was under pressure inside the mold, so it wound up being a good deal denser than I'd like. The surface is relatively smooth, but has pitting that looks like the pores in the skin of your nose. That pretty much terminates my fantasy of doing urethane foam puppets without latex skins. Drat.
One nice thing I'll say about the urethane though: It's really easy to paint. The sphere looks like a cherry because I painted it with red acrylic. The paint doesn't rub or peel off; and it's so flexible, I question whether you'd even need PAX paint if you were doing an all-urethane puppet.
BACK FAR-RIGHT: LIQUID LATEX ON UNTRA-CAL
The cupcake on the far right is another ultra-cal test. I did a quick google on the material, and discovered that 38 parts water for every 100 parts ultra-cal is recommended. This batch seemed to have a little water left over; now that I think about it, I wonder if it's because I measured by weight instead of volume? ...Even so, it set up. I tried painting some liquid latex on top; latex (unlike the urethane) comes off easily.Conclusion: It looks like my next puppet will be made from flexible urethane foam with a latex skin, all cast in an ultra-cal 30 mold. The foam seems to be fluffiest when it has ample room to escape -- so I'll need to make vent holes in the puppet's feet. I have some Pro Adhesive (a Prosaide knock-off) for making PAX paint...
So I guess at this point I have everything I need to get started!!
posted by sven | permalink | categories: sculpture, stopmo
April 7, 2006
lighting: par cans
by sven at 12:00 pm
I just got my par cans in the mail.
dramatic blue lighting As I had hoped, these lights allow me to create more dramatic lighting.
American DJ PAR 46 Can with Lamp The PAR 46 is what's lighting all the test photos here.
Odyssey PAR 16 Pro Pin Spot The PAR 16 didn't come with a bulb -- and I'm a little confused about what I need to get for it -- so it hasn't been tested yet. Just to give you a sense of scale: this one's small enough that a 60watt bulb wouldn't fit inside of its housing.
blue gel The blue gel produces the happiest results. As Gretchin pointed out, I could use it to suggest a moonlit night.
red gel The red gel created surprisingly saturated results. If I hadn't taken this shot myself, I would have sworn it was photoshopped... But no -- the pic is unaltered.
green gel The green gel didn't really do much for me one way or the other.
Prior to the arrival of the par cans, I'd been using lights that are made for photographers doing portrait shoots. They are amazingly bright -- the par can can't compete at all. I suspect I'll order another par can or two in the not too distant future... Maybe some PAR 64's? I'd like to be able to do a traditional three-point lighting arrangement.
I'd also really like to get dimmers for the lights -- but I haven't been able to find anything appropriate yet. If I could dim my white lights, then maybe I could use them together with the par cans... which would be nice.
posted by sven | permalink | categories: movies, stopmo
April 6, 2006
building sets with insulation foam
by sven at 6:00 pm
Back on March 15 I made my first foray into set-building. (I've been meaning to write about this for a while!)
giving Percy a world to inhabit From what I've read online, it seems that one of the most versatile materials for making stopmo sets is insulation foam -- so I started there. I used 1" thick pink Dow insulation foam-board to create a 24"x15" stone wall.
I hacked into the foam with a steak knife to create an irregular surface. Then, I painted the entire thing with black (acrylic) gesso. On top of this basecoat I dry-brushed three layers of acrylic: burnt umber, a gray, and finally a very pale gray. I was originally trying to create the look of a cave wall. I don't think I got that. Maybe a cliff face, maybe granite that's been roughly mined...
the wall Even so -- for a first try, I'm very pleased with the results. Here's what I'll need to explore next...
- While the surface texture is good, it's still just a flat wall. I want much more depth in my sets -- hallways and landscapes, etc., where there can be a foreground, midground, and background. ...I always think of Peter Greenaway's cinematographer Sacha Vierny as someone I'd like to emulate in this regard.
- The lighting is flat and lifeless. I've ordered some par cans and gels, so I can start experimenting with more dynamic lighting set-ups. A cave environment, I think, needs some blues and reds.
- I'm increasingly curious to try a hot-wire foam cutter. There's a local hobby store that carries them -- but I'll want to do some further online research before I purchase.
posted by sven | permalink | categories: sculpture, stopmo
March 30, 2006
brass armature complete
by sven at 11:59 pm
Tonight I finished making the brass armature!
the new brass armature There are more pictures of the full armature at the bottom of the post. Let me first talk a little more about its construction...
Sven: Stormtrooper of Art Here's the get-up I've been wearing during the making. The cartridge respirator may be over-kill -- but it has a tighter fit than a paper dust mask, and I really don't want brass dust in my lungs. I've recently purchased a welder's hat; brass filings were actually hitting me in the forehead and getting in my hair while I was grinding. I've replaced the AOSafety brand goggles in this picture... They have their ventilation holes on the bottom rather than on the sides, and occasionally dust was flying up at my eyes through them.
Dust has been getting everywhere... I think my next safety purchase needs to be a shop vac that I can clamp to the table while I'm grinding -- suck the dust away as it is made, rather than having to clean it up later.
deciding on proportions For this project I'm starting with an armature design, rather than a character design. To figure out how the armature should be proportioned, I consulted "Designing the Doll: From Concept to Construction" by Susanna Oroyan. This puppet will be eight head-sized units tall.
The armature is 10 inches tall. That's a little larger than the 9" = 6' scale I've been aiming at -- but I felt it needed to be bigger to accommodate the width of the joints. Oh well; I guess it will wind up being a monster of some sort.
soldering bead onto rod The balls for the joints are hollow brass beads. I widened the holes to 1/8" using a drill. The existing holes acted as pilot holes, which made things very easy.
solder snippings To attach the balls to the rods, I snip several very small pieces of solder and put them inside the hollow bead. Then, I put the rod through the bead. I clip one end of the rod into the "helping hands", and let the ball slide down onto the table. ...Or rather, down onto the cinderblock that I was using as a table while soldering. The cinderblock actually made for a very nice work area -- it raised everything up to a comfortable height.
cinderblock, fume extractor, "helping hands" I used a butane micro-torch to heat the ball, melting the solder inside. A soldering iron would not work for this project -- it has to be a torch. ...After heating the ball (about 6 seconds) I'd use an eyedropper to shoot water at it. Then I'd grip the mostly-cooled workpiece with my needle-nosed pliers and quench it in a jar of water. I realize that this may weaken my joins -- but it seemed that the hollow beads were trapping heat, and for such a time-consuming project I was unwilling to spend additional time waiting for them to cool on their own.
glove discoloration I've read in several places that brass reacts with latex... Check out the discoloration of my glove in the photo! It may be that this wasn't due to the brass, but rather due to the solder flux and solder fumes -- or the invisible layer of oil on the brass -- but I suspect it's the brass. Subsequently I switched to my nitrile gloves. They were also discolored somewhat, which surprises me.
laying out rods on the blueprint I got pretty much everything from the hips down done Sunday night. I meant to finish the project on Monday -- but I caught a cold and couldn't muster the energy to go back to the studio til today (Thursday). ...I gotta say, compared to making the sandwich plates, cutting rod and soldering on beads is pretty fun. It goes quickly, and requires very little measuring.
making the torso To attach rods to the brass strips that would be the torso, pelvis, and feet, I first created little grooves for them to sit in. I started the grooves with a jeweler's saw, then deepened them with a triangular needle file, and then rounded the grooves with a round needle file. Soldering the middle rod in the pelvis and torso was tricky -- the "helping hands" couldn't reach. I wound up using small C-clamp, which the "helping hands" could then prop up.
freezing joints in place I knew that I didn't want to have double-jointed elbows and knees -- so at these points on the armature I "froze" one of the balls in each joint in place with solder. This worked out very well -- better than I expected, actually...
See, as I had been creating the "barbells" for the limbs, I discovered that if I overheated the second bead, the solder job on the first bead might also melt. I was worried that the problem would be even worse when I was freezing beads in place, because I'd have to be directly heating a bead I'd already done solder work on. Wouldn't the previous solder job quickly melt and be ruined? ...Well, apparently not.
finished armature And here we are! The completed armature!
It seems to work very well... But I have had to make some repairs. There's more stress on the joints when you try to spin them in place than when you move them from side to side. In a few places the rod broke loose from the bead when subjected to this stress. It wasn't hard to fix, though -- at least not while I had all my soldering gear already out.
pose: running The armature easily holds its own weight while standing on one foot and leaning. I even posed it at an extreme lean so that the "head" was an only inch from the floor; the ankles still held their pose!
pose: dancing In terms of attaching a head and hands, I think what I'll do is epoxy glue some square K&S tubing onto the wrists and neck. Then I can use the plug-in system that I've explained previously, which I used on the Percy puppet.
close-up of torso Looking back at my records, it appears that it took just a hair over 19 hours to make this armature. That doesn't include the first attempt at mass-producing joints, which I consider a failure. Yowch -- 19 hours is a lot of labor for just one of these...
What's most important here, perhaps, is that I now have a prototype armature that following models can build upon. Mass-producing a generic joint worked OK -- but I think on my next model I would instead use long sandwich plates for the upper legs and the upper arms. Every place there's solder, there's a potential break point; using long sandwich plates would automatically eliminate four solder points on each limb.
I'm proud of this piece... But getting this taste of what a metal-jointed armature can be like -- it makes me want to be able to machine joints that are even more anatomically correct (e.g. knees that can't bend sideways). You realize what that means? ...I'm fantasizing about getting a micro mill!
posted by sven | permalink | categories: stopmo
March 25, 2006
mass producing joints
by sven at 11:59 pm
A week ago I showed off my first successful brass "open hole double ball" joint. Since then I've been working on figuring out how to mass produce these things.
tonight's work The photo above shows where I got to tonight. This is my second attempt... And I expect there'll be a third. When the process is perfected, I want to do a tutorial.
forty sandwich plates With my first attempt, I started by cutting forty 18mm-wide plates. That was a mistake.
the aborted first attempt Problems with attempt #1: It was incredibly fiddly getting the parts in and out of the vise... The plates weren't always perfectly even with one another...
broken drill bits ...And I broke two drill bits -- I believe because the drill would knock against the head of that screw as it punched through the brass strips.
Drat. I had a batch of 20 joints getting close to completion. But then I discovered the design (or rather, the process) was fatally flawed.
making a template I was in the middle of a conversation with Gretchin, and suddenly stared off into space... Ah-ha! A new idea for how to mass produce these joints!
The gist: Rather than do one joint at a time, bind two strips of brass together, drill all the holes, and then cut the strips into pieces.
drilling holes using the template This time I made a template out of a thin piece of metal. It turns out that the template strip was too thin (it curled!) -- and I also drilled more holes than I actually need -- but the concept is sound.
When I got around to using the template to drill holes in the plates, I used lubricant for the first time. Just water -- but the difference was noticable nonetheless.
filing off metal burs The K&S brand brass strips I'm using are .093" thick, 1/4" wide, 12" long. K&S has seven standardized displays that they send out to retail stores. The .093" thick stuff is only sold in their "jumbo" hobby metal display. I can name six stores in Portland that sell K&S -- but only one has the jumbo display.
I bought the last two strips in the store last Sunday. I used these up in the failed first attempt Monday. ...Waiting until Friday for the store to get new stock in was murder.
the two strips screwed together On the first attempt I used a fine-point Sharpie to mark measurements, and a hammer and a brass screw to start holes. For my second attempt, I used a metal scribe and a center-punch to make the template. It's my first time with these tools, and they helped a lot.
In the picture above you see the two strips fully drilled, and I've added 1/2" 4-40 stainless steel socket cap screws. Adding them in after all the holes have been drilled, I didn't have the same problem with breaking bits this time.
cutting and rounding joints For cutting the individual joints off of the strip, I used a Dremel with a reinforced cut-off wheel. I tested normal cut-off wheels, and a jeweler's saw first... The jeweler's saw gave a nice hair-line cut -- but I broke two blades on my first two cuts -- so I'll be reserving that tool for finer work. The regular cut-off wheel made a cut 1/32" wide, whereas the reinforced wheel made a cut 1/16" wide. Given the amount of cutting I'm doing, durability won out.
Even with it being reinforced, I've worn one blade down from the size of a quarter (larger, actually) to the size of a dime -- and another splintered and flew at my face. Thank goodness Safety Boy is fastidious about wearing his safety goggles!!
An unforseen benefit of cutting the joints off of a strip: immediately after making the cut, I can round off the joint on one side. ...You see, this is such a time-consuming process -- every motion that you can eliminate from the workflow makes a difference.
I think I'm going to need 17 joints to make an armature. If they all prove functional, it looks like I got 13 done tonight. I may just try to salvage the remaining four from attempt #1.
--But there will be an attempt #3 -- and soon. The process is so close to being right...
posted by sven | permalink | categories: stopmo
March 22, 2006
tutorial: desktop ventilation
by sven at 4:55 pm
Many of us who are working on stopmo puppets labor in dungeon-like basements. Although we know that we should have "good ventilation" while working with toxics, it just doesn't seem possible -- so we play dumb. This is not OK!
desktop ventilation system In this post I'll show you how to build your own desktop ventilation system. Please -- if you work with materials such as super glue, epoxy glue, epoxy putty, barge cement, turpenoid, acetone, or soldering wire while making your puppets -- strongly consider making a ventilation system siimilar to this one for yourself!
a temporary solution It takes a while to get new a ventilation system set up. In the meantime, at least put a fan in your window.
[Addendum: And be sure that the fan is sucking air out of the room, rather than blowing air in.]
When you're working on something toxic at a desk, you usually have your face right over the nasty stuff. Opening a window will help keep the fumes from building up in the room -- and using a fan to suck the fumes out will help even more. If you're just using a fan, though, you're still breathing in the fumes as they rise up from your work.
What you want is for the fumes to be actively sucked away from you, in a way where they don't go past your face as they escape.
Paasche spray paint booth My first strategy for good ventilation was to purchase a Paasche hobby shop spray paint booth ($269 before shipping). But unfortunately... I HATED it!
The spraybooth takes up my entire desk. And although it's collapsable, it is not nearly as easy to set up as I had initially hoped.
the huge motor Storing this thing is another problem. Look at how huge that motor is! ...Much discouraged, I wound up returning the spray booth to the store where I had purchased it.
venting fumes outside One thing about the spraybooth solution that did work well was the way that I vented it out the window. The insulation foam doesn't have to live there forever; I just pop it out of the window between work sessions. [In this picture it looks like there's a crack of light between the foam and the sliding window -- but I realized later on that the foam could fit even more snugly if I just pushed it into the window frame a little farther.]
...After finally admitting to myself that the spraybooth wasn't going to work out, I resumed research. Luckily, right around this time I was exploring soldering. I stumbled upon this useful quote on the Art Glass Association's website:
"Most fluxes contain zinc chloride that is harmful to the skin and eyes, and toxic if ingested. Read the labels on all chemicals you use for safety precautions. Flux also produces fumes when it is heated (as in soldering) and you need to work in a well-ventilated area.Well-ventilated means MOVE THE AIR - DON'T JUST OPEN A WINDOW. There are small, portable fume removers made specifically for eliminating flux fumes, available through your local stained glass retailer. If you find that you are getting frequent headaches or sinus problems, you may be breathing fumes. One rule of thumb - if you can smell what you're working on, you probably need to move the air a bit more, or invest in a fume remover."
the Edsyn "Fuminator" the Xytronic 426DLX This site on soldering safety recommended the Edsyn Fuminator for soldering fume extraction. That was the most explicit product recommendation I could find. Hunting around on Amazon.com and elsewhere, I found that the Fuminator's main competition seems to be the Xytronic 426DLX fume extractor. ...So the problem became how to choose between the two.
What's important here? First of all, we need something small that won't take up a lot of desk space. Folks doing soldering (unlike folks doing airbrushing) have this same need -- which is why fume extractors are also a good option for puppet-makers. Second, we need something that has powerful sucking capabilities.
Airflow is measured in CFM (Cubic Feet of air per Minute). According to this Fuminator product info sheet, "the maximum air flow with both filters installed is 21 cfm." According to this Xytronic product info sheet, the 426DLX's "max. air volume" is "95/115 CFM". So, although the Fuminator has a sexier design and is more expensive ($79.95 at Amazon.com), it appears that the Xytronic 426DLX is really the better purchase for our purposes.
[This write-up on the Paasch spray booth says that it "provides approximately 80 to 100 LFM air movement." That's Linear Feet of air per Minute... These companies certainly don't make comparison-shopping easy!]
Xytronic 426DLX - front At present, the Xytronic is being sold for $59.95 at Amazon.com. With shipping and handling, it cost about $64, and took about a week to arrive.
One thing that I did not 100% understand when I ordered the Xytronic is that tabletop fume extractors aren't intended to be attached to a hose for venting. The fan sucks air through a carbon filter, and simply vents out the back. This raises a question: Would it make more sense just to buy a simple fan? I don't think so. What we need is a very small, very powerful fan -- which is what the fume extractors have. It's hard to find plain fan with these qualities.
...And, even though the fume extractors weren't built to attach to ducting, I feel it's easier to attach ducting to these than it would be to a fan. So I'm sticking with the Xytronic.
Xytronic 426DLX - back As you can see here, the Xytronic has a plate on its back that directs air upward and out of a slot on top of the device.
removing the back Removing the back plate was a simple matter of taking out a few screws. In order to maximize air flow, I also chose to remove the filter. The filter is supposed to be replaced every month, so the device is built to make removal of this part easy.
cutting the insulation foam What we need now is an adaptor, so we can attach ducting. I started by measuring the back of the Xytronic, and then cutting out a square of insulation foam that matched its dimensions.
inserting duct adaptor If you go to Home Depot and look in the aisle where they carry air ducting supplies, you should be able to find an adaptor that looks like the one above. Trace the adaptor's outline onto the foam, and then cut this circle out with a steak knife. Trim as needed so you can fit the adaptor snugly into the hole.
attaching cardboard This next step is mostly just to disguise the ugly pink foam. I measured the sides of the foam square, and cut out rectangles of cereal box cardboard to cover them. The cardboard is wider than the foam on three of the sides so we can easily fit it around the Xytronic.
assembly Press the pink foam square against the back of the Xytronic. The cardboard lips should wrap around the top and sides of the device. Now attach this adaptor that you've made onto the fan using clear packing tape. Seal up any cracks you notice where fumes might escape.
duct and hose clamp The ducting is the same kind that comes out the back of a clothes dryer. Attach it to the tin ducting adaptor using a hose clamp. The foam that sits in the window frame also has a tin adaptor in it, and the ducting is attached with a hose clamp there, too.
completed ventilation system tucked away Here's the completed desktop ventilation system, tucked away at the side of my desk. The ducting is still a bit awkward -- but it's a far better solution than the spraybooth.
smoke test But wait! There's one more thing that you need to do. You need to understand the range at which the ventilation system is effective.
Turn on the Xytronic. Light a candle, and then blow it out. If everything is working properly, the smoke will be sucked into the ventilation system. OK -- now lay down a ruler. How far away can you pull the candle before the smoke just wafts up into the room?
I found that the suction is only effective when the candle is within 6 inches of the fan. That's not really very far -- but remember, this system is designed to deal with small jobs, like when you're using epoxy glue or soldering. Be mindful of the range when you work -- and even when the Xytronic is turned on, be sure to wear a respirator rated for organic solvents for additional protection.
Good luck, and play safe!
posted by sven | permalink | categories: sculpture, stopmo
March 18, 2006
brass "open hole double ball" joint
by sven at 10:43 pm
Very exciting! I just this afternoon created my first really successful "open hole double ball" joint!
side view This design was inspired by Lionel Ivan Orozco's tutorial on how to make an open hole double ball joint and by a link off LIO's site that describes a similar design made of brass. It's a lot like a "ball and socket" joint -- but the balls just sit on top of the holes, rather than being recessed into sockets.
I'm scheming to make a full puppet armature out of these joints. Expect to be hearing more about them... ;-)
top view If all goes well with these joints, I'll probably do a full write up about how to make them. In the meantime, here are a few details...
The balls are 8mm hollow brass beads that I found at a bead store. The brass rod and the brass bar (for the sandwich plates) are K&S brand materials. The rod is 1/8" diameter. The bar is 1/4" wide and .064" thick; I cut it to be 18mm long using a Dremel cut-off wheel. Beads are measured in millimeters -- which led to this weird combination of metric and English units.
The trick to making the sandwich plates was to screw them together before drilling the holes that seat the beads. The screw is 4-40 and 1/2" long; it has a cap that can be turned with a hex key. I threaded the middle hole myself, using a tap. To allow the plates to move correctly, only one side of the sandwich gets tapped. After all the holes were drilled, I rounded off the bar's corners using the Dremel again.
I used a power drill to enlarge the hole through the bead. Because the bead is hollow, I was able to snip off a little bit of solder and actually put it inside the bead with the rod. I heated the bead with a butane micro torch (actually my brulee torch!) to melt the solder and seal the bead in place. I didn't round the end of the rod that pokes out of the hole -- but the joint seems to work very well, nonetheless.
posted by sven | permalink | categories: stopmo
March 9, 2006
percy wakes up
by sven at 1:14 am
Tonight I got set up and did some motion tests with the new puppet, Percy.
click on image to play clip (150 KB) In my opinion, the first clip was the best. The eyes more than anything else make Percy live.
Problems:
- using just sticky wax, one of the eyelids fell off a few times (a plug-in system might have been wiser)
- the eyeballs catch and don't want to turn smoothly
- it looks like the facial paint smudged an eyeball; do I need varnish?
click on image to play clip (137 KB) In the second clip, I wanted Percy to smack himself on the head -- as if to say, "What was I thinking?!"
Problems:
- jerky, jerky, jerky...
- I only tied down one foot -- and it shows
- the pants hang so low, they almost entirely cover the shoes
- when the head leans back, there's a big gap between the neck and the body
- is there a camera flicker? --or did my shadow effect the lighting?
- the eye movement is unmotivated
click on image to play clip (246 KB) ...And, of course, I had to try a walk cycle. Trying to make things a little more interesting, I dressed up the set a bit with stuff I got from Loose Ends back in January, and had the camera shoot from above.
Problems:
- dang it's hard to keep the head moving in a straight line; guess I need a surface gauge
- when the arm moves forward, the shirt sleeve pulls up and shows a lot of wrist
- the shirt also wanted to ride up and uncover the small of his back
- I tried to make sure I was bending the limbs, but he still looks pretty stiff
After all the effort that went into making this puppet, it's hard not to be a little disappointed as I discover design flaws. Still, the point is to learn -- and I can't complain on that account. I learned a helluva lot making this guy.
posted by sven | permalink | categories: movies, stopmo
March 6, 2006
puppet #2: percy five
by sven at 5:21 am
It took me a full month -- from February 5 to March 5 -- but I've finally completed my new puppet: Percy!
the new puppet: Percy Five My first puppet, Moon Baby, met an untimely demise even before he was complete. So technically this is my first puppet... But we will count Percy as #2, out of respect for M.B. -- he may yet rise again!
"inspired by Mike Brent" When last we saw our hero, I had just opened up his head to hollow it out, because it had been too heavy. Since the head was open, I decided I ought to slip some sort of symbolic soul inside... Since Mike Brent has helped me (and so many others) so much in my quest to learn puppet-making, I decided a dedication was appropriate. Thank you Mike!
back of head I glued the back of the head on with Duco cement. I smeared Super Sculpey into the crack and gave the head a quick bake. After sanding the whole thing down, you can't tell that Percy ever underwent brain surgery. ...In this photo you can see the little hole in the back of his head -- that's where I tighten the screw that attaches head to neck.
before the eyelids have been made I had planned to attach eyelids onto the head using magnets. However, the eyelids for this puppet had to be smaller than the test eyelids I made, so it didn't look like that was going to work out. It might have been possible if I'd had some very tiny magnets on hand... But I didn't -- and I wanted to avoid drilling into the front of the face, now that I had a decent sculpt.
So, instead of using magnets, I decided that I should be able to keep the eyelids in place using museum wax. It's not ideal -- but it does work. It's fussier to take eyelids off and put them back on than it should be; this is going to discourage me from doing much with blinks.
making eyelids on top of aluminum foil To make the eyelids, I put aluminum foil on top of the face, and then pushed the wooden eyeballs into their sockets. When I was done sculpting the eyelids with Super Sculpey, I gently pulled the aluminum out of the eyesockets, and put the eyeballs and lids into a toaster oven. (The eyeballs helped the lids keep their shape.)
On to the hands...
original hand design My original hand design involved wrapping thread around the finger wires, and then painting the thread with liquid latex. The principle is sound -- but it was taking a million years to do the wrapping -- and it was such fine work, it made my hands hurt. So, after getting through just two fingers, I abandoned this plan and decided to come up with a new design.
using drill to wrap thread around wire I experimented with putting short pieces of wire into a drill bit, using the drill to do the winding for me. This worked very well! The plug-in drill, which is stronger than the cordless drill, actually worked best. It got the job done quite quickly -- but I did need to wear a glove on the hand that was guiding the thread, to avoid rope burn. ...I didn't think to take a picture of it, but the spool of thread is actually attached to my sewing machine. Having the spool sit on a dowel that's stuck into a piece of wood would probably do the job just as well.
wire wrapped with thread It was surprising just how noticable the thickness of the thread was. If you try this technique, I definitely recommend using an extremely fine thread. Strength doesn't matter much -- the thread just bulks out the wire -- liquid latex holds the whole thing together. I tried dipping the finger into the liquid latex; that gave me globby results. Painting three coats of latex on with a brush worked much better. I used a hair dryer sitting in my lap, propped against the edge of the desk, to make the latex dry more quickly.
second hand design After making a batch of these odd little latex maggots, I tried binding them together with the tubing that attaches the hand to the wrist. (I had to make a new batch of these joints after deciding to redesign the hands.) The concept looked promising, but tape clearly wasn't going to be enough to hold it all together. I drew some sketches of a more complicated design, where each of the fingers would have some exposed wire that could be epoxy glued into a small piece of aluminum; the brass joint would be silver soldered into a slot in the palm of the hand.
At this point I both ran out of thread, and the head of my dremel broke.
final hand design It was late in the evening, and stores were closed. I couldn't stand spending one more day fussing around with the hands, so I decided to give up on movable fingers and just make the hands out of Super Sculpey. Since the hands are detachable, I can always go back and try a new design if I want. ...It turns out that I'm pretty happy with this sculpt, though, so it's unlikely that I'll get back to the complicated design -- at least on this puppet.
base coat of pink acrylic In the photo of the hands, you see them already painted. Figuring out what I wanted to do with the skin tone took a long time in itself. I know I spent at least two, if not three hours one night experimenting with acrylics in a sketchbook, looking for just the right layering of colors...
sponging on tan acrylic What I finally settled on was three coats of paint: first, brushing on a light magenta base coat; then sponging on a peachy-tan made from white, brown, red, and yellow; and finally, lightly sponging on white with just a tint of the previous peachy-tan. ...I'm not sure how much of this will show up in photos -- but in person, I feel the color has great depth to it. It has a pale, almost newborn quality to it, which I was looking for.
color tests for clothes To figure out what color I wanted for the clothes, I did lots of tests. I laid the naked puppet face down on the photocopier, and made a bunch of copies that I could paint on. This is a puppet being made without a story in mind -- so I wanted a fairly neutral "everyman" costume that could fit in lots of settings. ("Percy" is the actor's name. Hopefully he'll get to star in many roles.)
final color choice I settled on a sort of New England blue, mixed with grays. In the photo above, you can also tell that I've done more sculpting work on the cushion foam body -- Percy's still curvy, but not nearly as zaftig as he was in my initial post.
failed attempt to use gloves for clothes Mike Brent has a neat trick in his "Simple puppet fabrication" tutorial that I wanted to try, where you use a pair of gloves to make a shirt and pants. After some looking around, I found some white cotton gloves at Columbia Art and Drafting Supply. Unfortunately, I realized too late that Mike's puppet is about six inches tall, and mine measures in at nine and a half. Hoping that I could somehow stretch the fabric, I forged ahead with the fabric dyeing process... That was a waste of several hours.
using masking tape to simulate shirt Since using gloves for clothing didn't work out, I was left with having to make the clothes by hand. To do this, I had to come up with a custom-designed pattern. I started by creating a mock shirt on the puppet using masking tape...
cutting off the tape I carefully cut the masking tape shirt off the puppet, and then traced the outlines of these pieces onto graph paper. I tidied up the shapes and added in extra space for seams. When I thought I had a pretty good shape, I'd lay a piece of tissue paper (the kind you wrap presents with) on top of the graph paper, and trace the design. I cut the piece out of the tissue paper, and tested it on the puppet's body.
pattern-making process Here you can see three steps in the process of making a pattern for the arm of the shirt: masking tape, graph paper, and tissue paper. The costume is a simple shirt and pants ensemble; it turns out that this required four patterns: a pant leg, a sleeve, the shirt's front, the shirt's back. When I tested the tissue paper on the puppet, I innevitably discovered tweaks that I wanted to make, and went back to the graph paper for adjustments.
final patterns When the patterns were finalized, I glued the graph paper onto cardboard from cereal boxes; I cut the patterns out to make templates. I went to that delicious monstrosity, Fabric Depot, and chose a fine white cotton knit (with a percentage of lycra) for Percy's costume. I traced the templates onto the fabric, and cut the cloth...
piecing together the clothes with fabri-tac glue In retrospect, I should have dyed the cloth before cutting -- but at first I thought that I was going to test the fabric before committing... And then I liked how it all was working out, and kept the first attempt. Rather than use a sewing machine, I used fabri-tac glue to put the pieces together. The glue was excellent -- it was easy to control, and bonded cloth within seconds. (My one concern is that it seemed to go through Nitrile gloves, making the insides sticky. The label says acetone is one of its ingredients; I'll have to look into what can hold up against that.)
wrist wrapped with string With the end in sight, I didn't take many more photos. I dyed the clothes using acrylic paints. Mixing the right colors took a long time. Any smudges of glue on the cloth acted like resists, which was annoying. The shirt was tricky to assemble, the arms being attached to the body of the shirt last of all.
For the neck, wrists, and ankles, I used a trick I invented with Moon Baby: wrapping dyed string around the joints. It's a stylized look, but I like it. After getting the joints taken care of, I realized that the shirt is short enough that when Percy bends over his back shows. It's not a very good solution, but I wrapped some more string around his midriff to conceal the foam when the clothing gapes. The string acts a lot like a corset, changing the shape of the body, which is not what I want.
Percival standing ...And here he is!
In the book Learning by Heart, by Corita Kent and Jan Steward, there's a passage that says puppetmakers in India always save the eyes for last -- the eyes giving the puppet life. I thought that was a great idea, so I did the eyes last too. I drilled little holes in wooden balls, put short strands of wire in the holes, and then put the wires in a drill bit. The drill spinning the spheres made it relatively easy to paint round irises. (This is a trick I picked up from Susannah Shaw's book, Stop Motion: Craft Skills for Model Animation.)
By the way: The name "Percy" came to me while I was in the shower one day, as a diminutive for "Perseus". When I checked my mythology, it was actually Theseus and the Minotaur I was thinking of -- but the name had stuck. I added the surname "Five" just this morning, thinking about how I began and and finished this puppet on the fifth of the month. I dunno -- the name "Percy Five" just sorta has a pleasant sci fi sound to it that I like.
posted by sven | permalink | categories: stopmo
March 2, 2006
stopmo safety - initial notes
by sven at 8:11 am
[This is another long post that I made to stopmotionanimation.com. The context was a discussion about using lead wire in armatures. The person I was responding to had just written, "I've heard it works very well. I've never used it though. But don't forget, um... lead is poison!"]
Of all the poisons we're working with, lead is probably just the one with the most notorious reputation -- not necessarily the most dangerous.
You can wear gloves to avoid skin contact, and use snips to prevent creating particulates. The wire's going to be buried inside of the puppet, so the period of contact is fairly limited.
...There are many dangerously toxic materials that we're working with in puppet construction. I've been working on a full analysis of safety hazards and how to protect ourselves. I'm not done yet, but here are a few initial notes:
epoxy putty (including Milliput, Apoxie, and Magic Sculpt) - used for the armature, and sometimes for sculpting heads, etc. Epoxy putty is basically epoxy resin mixed with talc. With enough exposure over time, all people develop a sensitivity, which involves (minimally) a nasty rash. Over time, epoxy putties can cause nerve death in the fingers. Neither latex nor vinyl gloves are fully protective; nitrile gloves are recommended.
epoxy glue - used for glueing wires of armature into body parts. Same toxins as epoxy putty, but with powerful vapors. In addition to getting as much forced ventilation as you can muster, it's a good idea to wear an organic vapors respirator -- a face-mask with carbon cartridges. You can find these for about $30 at Home Depot and paint stores. I recommend 3M brand as being probably the most comfortable.
barge cement or spray glue - used for attaching cushion foam (urethane) to armature. Barge contains tuolene; I'm not sure if even an organic vapors respirator can protect you -- but I'd wear one. Most organic solvents attack carbon (hence "organic"); the cartridges basically contain charcoal -- concentrated carbon. Since spray glue also creates a cloud of floating particulates, I only ever use it outdoors.
rubbing alcohol (isopropyl) or turpenoid - used for smoothing polymer clays. These are powerful solvents which are just as happy to dissolve you as whatever you're working on. Gloves and an organic solvents respirator are recommended.
liquid latex - used for puppet skins. Liquid latex cures by releasing ammonia. In the quantities that we work with, the fumes usually aren't concentrated enough to do more than cause irritation. However, it's not a bad idea to wear safety goggles -- ammonia can cause blindness. If you do decide to use a respirator (I don't), you'll need cartridges that are specially made to deal with ammonia -- carbon filters won't help. Fortunately you can generally fit ammonia filters onto the same mask.
brass and aluminum dust - created while grinding K&S tubing or metal strips used in armatures that have removable parts. If metal dust gets into your lungs, it may be with you for life -- wear a dust mask. The ones that have a little plastic box on the front are much more comfortable to use, which will increase the chances that you'll actually wear them. Aluminum has been associated with Alzheimer's disease (technically the studies have only demonstrated this link when the aluminum is carried in water). Brass may have other metals in it that pose special dangers. ...There are concerns about how to clean up dust without putting it back into the air -- but I haven't found safety recommendations yet.
solder - used for making armatures that have removable parts. Typically solder is a combination of lead and tin, used with an acid flux ("rosin"). During soldering, all three release fumes which are toxic. One can buy a desktop fume extractor: a small desktop fan that sucks fumes through a carbon filter. I recently purchased one from xytronics via amazon.com for $64 (including shipping).
A word about ventilation: Particularly given the nasty glues we use, ventilation should a big concern. The ideal is to have air being forcibly sucked away from you, to be vented outdoors. As animators are often working in dungeon-like cellars, the ideal's probably not possible.
...But do as much as you can! With the powerful stuff, do the job outside and wear a mask. Minimally open a window. Put a fan in the window to push the air outside. Try to put your table in front of the window, so fumes don't have to go past you to escape. Personally, I've just put together a system where I've attached dryer ducting to a table-top fume extractor so I can vent fumes out the nearest window.
A few things that are relatively safe:
Polymer clay - used especially for sculpting puppet heads. Polymer clays such as Super Sculpey, Cernit, and Fimo have vinyl in them. However, these materials have recently gone through rigorous testing, and it's been proven that absorbtion through the skin is negligible. The fumes released while baking are judged to be noxious, not toxic; diluted in a normal room full of air, they shouldn't pose any harm. (Avoid taking a deep breath as you open the oven perhaps, though.) If you're sanding baked polymer clays, however, be sure to wear a dust mask.
Acrylic paints - used for painting the puppet. So long as you use good hygiene, you're pretty much OK. Do NOT put brushes in your mouth to point their tips! Avoiding getting paint on your skin is a good practice. Different pigments are based on different chemicals -- each one varies. Be particularly mindful when you're working with Cadmium Red, Cadmium Orange, and Cadmium Yellow.
posted by sven | permalink | categories: stopmo
February 25, 2006
stopmo puppets: twisted vs. untwisted wire?
by sven at 12:41 am
I just wrote a long post over at stopmotionanimation.com that was more or less an essay in itself. It seemed worth re-posting here:
[Mike Brent wrote:] "To twist or not to twist? That is the question. Really it's a matter of personal preference."
I can't tell you how much I've been wanting to hear a vigorous discussion of twisted vs. untwisted wire, and about wire in general! Guess now's the time...
Here's what I understand so far:
(1) single strand vs. multiple strands
First off, there's a question of whether to use a single strand of wire or multiple strands. Most people favor using multiple strands -- the thinking being that if one of the strands breaks, the others will still work. The one exception seems to be among people who are using lead wire. The reason folks using lead wire tend work with single strands, I think, is because it's hard to find lead that's less than 1/4" diameter. (I've only been able to find lead wire in stores that carry fishing supplies, in the area where they sell lead sinkers.)
(2) twisting with a drill vs. twisting by hand
The main reason to twist multiple strands seems to be to hold them all together. At this point, there's a choice about whether to twist by hand, or twist the wire using a drill bit. Folks against using the drill bit seem most worried about accidentally nicking the wire in the process, which almost guarantees that the wire will break. It's also fairly easy to over-twist the wire using a drill, which may put extra strain on the strands. However, using a drill will give you a tight and even twist -- whereas hand-twisting can give you a very funky twist. In Susanna Oroyan's book, "Designing the Doll", it's suggested that uneven twists weaken an armature's strength (p.73).
This is a point where I'm hearing contradictory messages: some folks claim that uneven twisting strengthens, some claim that it weakens.
(3) stress between the strands
Some folks say that twisting strands inherently creates stress points between your wires. As I understand it, this is the main argument for using untwisted wire: no twists equals no stress between wires. Without twisting, though, you need another means to bind the strands together. Barge and silk thread are the only suggested solution I've encountered so far.
(4) when do multiple strands become a single wire?
The main rationale for using multiple strands is to have back-ups when one breaks... But if you twist the wires, do they start to act as a single wire? I've only had one break so far -- in a twisted-wire armature -- and it seemed like the wires all broke as one. I presume a wire armature usually breaks after it's been covered with foam, latex, clay, etc... Has anyone actually seen a puppet performing with just one of the multiple strands in a limb broken?
...Or am I misconceptualizing how this is supposed to work? Is the idea that twisted strands are stronger because they distribute the stress among each other -- so you'll never see just one strand broken; they'll break all together, but not as quickly as a single strand otherwise would?
(5) point of entry into the torso
Having multiple-strand limbs is supposed to distribute stress and protect against breakage. But with puppets that use epoxy putty torsos, the point where the arm enters the putty effectively turns the wire "rope" into just one strand. I think it's really note-worthy, then, what Nick does with some of his puppets: He uses a wood block, threads the wires through holes, and only twists them together afterwards. With the wires entering the torso at multiple points, you preserve the benefit of having multiple strands! (Nick's tutorials: http://www.picturetrail.com/gallery/view?p=999&gid=60051&uid=42706 )
(6) other strategies
I've read about a strategy where you twist together three types of wire: lead (for its lack of memory), steel (for strength), and aluminum (for a combination of these qualities). I've also seen someone mention actually braiding their wires together -- not just twisting them. Both of these strategies have been attributed to pros in the field -- but I haven't seen enough about either to really say anything else about them.
(7) accepting that wire armatures break
I'm probably thinking too hard about this... All wire armatures break. Maybe multi-strand untwisted aluminum that enters the torso at multiple points is the most durable -- and maybe not. When you build the puppet, though, you consider not just durability, but also ease of construction. Maybe you do a quick epoxy putty torso -- you accept some risk for the sake of convenience, having the wire all enter the shoulder at one point.
...Or, you could design your puppet the expectation that it's going to break -- having plug-in limbs that are attached into the torso with little socket set screws, limbs that can be replaced if needed. (See Juergan Kling's armatures for an example: http://www.animateclay.com/index.php?module=PayPalCart&cid=7 )
Hm. I seem to have written an essay...
I guess what I'm really curious to know, personally, is if anyone with an engineering background can actually say anything authoritative about the physics of wire...
Does twisting wires together really create significant stress? How exactly?
Does uneven twisting weaken or strengthen your armature?
Stress-wise, do multiple strands start acting like a single strand when you twist them together?
Has anyone seen a multi-strand limb where one strand has broken, but the others continue to function?
If having multiple strands distributes stress, how does that actually work?
Does the wire stop distributing stress (as I suspect) when the strands all enter the torso via a single point?
Ever curious,
--Svenposted by sven | permalink | categories: stopmo
February 15, 2006
tutorial: how to analyze puppet construction
by sven at 8:40 pm
For a little more than two months now I've been feverishly studying how to make puppets for stop motion animation. In the process, I've developed a useful checklist of 11 things to look at when you're studying a particular puppet's design.
The checklist works for puppets that use a wire armature with latex and foam build-up. [If you need background knowledge on what that means, refer to my post on the basics of stopmo puppet construction.] It is designed with mainly humanoid characters in mind.
A CHECKLIST FOR ANALYZING PUPPET CONSTRUCTION:
When you examine a puppet's design, attempt to describe the eleven following features...
The Basic Wire Armature
- Wire
a. What metal is used?
b. What gauge?
c. How many strands?
d. Twisted, untwisted, braided?Body blocks (torso and pelvis)
Limb bones
Attachment points
Focus Areas
- Head
a. eyes
b. mouth
c. eyebrows & earsHands
Feet & tie-downs
Neck, wrists, ankles
Covering for the Main Body
- Musculature
a. Material?
b. What adhesive?
c. How are joints dealt with?Clothes
Skin
Example: Analyzing Mike Brent's puppets
Right now I'm working on a puppet that's inspired by Mike Brent's designs. But what makes a Mike Brent puppet different from other puppets? I know, it's not an entirely fair question; Mike has written about several designs he's done. For the purpose of this exercise, I'm looking mainly at his "Simple puppet fabrication" tutorial, his improptu tut on making hands, and a post where he talks about using urethane upholstery foam.
1. Wire: aluminum armature wire (lead wire broke); wire is hand-twisted (untwisted wire for the "Buster" puppet)
2. Body blocks: epoxy putty
3. Limb bones: cloth tape ("Buster", however, doesn't have bones)
4. Attachment points: wires are fixed directly into the epoxy putty; the wires of a limb are twisted together into a single strand at the point where they enter the putty
5. Head: no movable features; Super Sculpey, baked directly onto the wire (Mike says he often casts heads in resin, though)
6. Hands: the ends of the three arm wires form the middle three fingers, a loop of wire is attached with epoxy putty to create the remaining two
7. Feet & tie-downs: wood feet with a hex nut set in place with epoxy putty; regular machine screw for tie-down
8. Neck, wrists, ankles: for the neck, the finger of a latex glove is glued to the head with Barge contact cement while being stretched
9. Musculature: cushion foam (Mike's disavowed use of polyfil batting); adhered using Barge cement; where possible, piercing the foam with an Exacto-knife rather than gluing separate blocks together
10. Clothes: cotton or leather gloves are turned into shirts and pants
11. Skin: not applicable
posted by sven | permalink | categories: stopmo
the basics of stopmo puppet construction
by sven at 8:33 pm
There are two main components to a stopmo puppet's construction: (1) its armature, (2) the covering that goes over the armature.
types of armature:
There are three main types of armature: (1) flexible wire, (2) wood, (3) metal ball & socket. Wooden armatures (similar to artist's mannequins) have mostly been abandoned. Wire is inexpensive, light, and easy to make; however, it can't be posed as precisely as a ball and socket armature, and is prone to breaking. Ball and socket armatures rarely break and can be posed quite precisely; but they are heavy, expensive, and rather difficult to create.types of covering:
There are three main types of puppet covering: (1) clay, (2) latex and foam build-up, (3) cast foam latex. Clay is the easiest to sculpt -- but the most difficult to animate; every time you touch it, it changes -- so it needs constant re-sculpting. Puppets built-up from soft urethane foam (cushion foam) and liquid latex don't need constant re-sculpting, and are relatively easy for the amateur animator to learn how to make. Cast foam latex is trickier and more expensive to learn, involving a combination of four chemicals that must be frothed in a kitchen mixer and then baked. The curing of foam latex is influenced by temperature, humidity, and barometric pressure; a good casting is not guaranteed.alternative constructions:
There are many variations on the basic types of armatures and coverings that I've described. For instance, one can make an armature from stiff wire and swivel joints that falls somewhere between flexible wire and ball & socket armatures. Many people have also converted store-bought toys into workable armatures. With regards to coverings, exciting things have been done with cast silicone. There is also a technique for casting a skin using liquid latex, and then filling it with expanding urethane foam (which does not self-skin like foam latex does).[For more info, I recommend Mike Brent's excellent links page, "A Basic Overview of Puppetmaking Techniques."]
posted by sven | permalink | categories: stopmo
February 11, 2006
tutorial: how to make a puppet's limbs removable
by sven at 9:26 pm
If you're making stopmo puppets, then this is just a fact of life that you have to accept: wire armatures break.
the finished joins that I'm going to demonstrate making A lot of work goes into making a good looking head and hands... You want at least to be able to save these parts if an armature breaks. So wouldn't it be a good idea to make an armature with removable parts? I know of two people who have systems for removable parts: Susannah Shaw, and Juergen Kling (follow the "shop" link). Both work on similar principles, but Susannah's is somewhat easier for the amateur to accomplish. Her's is the one that I'll be demonstrating here.
Here's what Susannah says in her book, "Stop Motion: Craft Skills for Model Animators"...
"It's always a good idea to be able to remove head, hands and feet, as they often need extra work -- so glue on a section of square brass sleeving K&S of sizes that will slot into each other for arms and hands, and head and neck. K&S is square brass tubing that you can buy in any model shop. It comes in different sizes allowing a smaller size to fit into a larger, giving a firm, well-located joint. (K&S is only available in imperial sizes.) An M3 nut is soldered onto the larger piece of K&S at the wrist, neck and ankles. This allows the grub screw to be used to hold the smaller size of K&S in place. This in turn holds the wire in place. The strands of wire are then epoxy glued into the relevant pieces of K&S to form the armature." (p.53)Susannah's book is excellent -- probably the best general book on stopmo available at present -- go buy it! ...However, it took some work to figure out exactly how to accomplish what she describes and to find U.S. equivalents for the parts, so I offer this tutorial as a supplement. [Refer to my most recent puppet work to see these joins in action.]
safety: goggles, dust mask, ear plugs Safety first. We're about to create brass dust -- you don't want to breath that stuff. So wear a dust mask. The ones that have a funny little plug in front are more comfortable. Wear goggles that protect your eyes on all sides; tiny bits of brass most definitely do shoot up at your face. Cutting metal is loud... I recommend wearing earplugs, which are cheap. I bought myself some safety ear muffs, which last longer, are more comfortable, and don't get lost. All of these things should be available at your local hardware store. They're also available at Amazon.com.
dremel cut-off wheel "K&S" is a brand name. K&S has a standardized "hobby metal center" display that you can find in many stores; it looks like this. Here in Portland, I know that I can find K&S at Ace Hardware, Columbia Art and Drafting Supply, a model railroad store, and a hobby store that specializes in remote-control cars and airplanes.
The two pieces of square brass tubing that I'm using are 5/32" and 3/16" in diameter. They fit snugly within one another, but are able to slide easily. Each piece is 12" long, and costs roughly $1.50.
I've found that my join only needs to be about 1/2" long. To cut the tubing, I recommend using a dremel tool with a fiberglass cut-off wheel. A hacksaw works OK -- but I felt that I got a sloppier cut. Either way, you're going to need to hold the tubing steady while you saw. If you're using a hacksaw, you might be able to just hold the tube against a table. However, any sort of clamp will make the job easier. Here, I'm using a 3" vise that I bought for $20 at Home Depot. It just clamps to the table -- so you don't have to drill screws into your desk, which is nice. ...This is my first vise, and it has made my work SO much easier. :-)
The two pieces of K&S don't have to be the same length. If you want them equal, though, it works just fine to slip one inside of the other and then make your cut. An "ultra fine point" sharpie marker works well to mark your measurements on the brass. After you've made your cut, there will probably be metal burs; you can use the flat face of the cut-off wheel to grind them down. Watch out: after cutting, the brass is hot!
a small, square file I have a small square-shaped file that's very useful for getting rid of burs on the inside of the tubing. This is necessary, or else you won't be able to fit the smaller tube back inside of the larger. This file is also a very useful tool for picking up small pieces of K&S and putting them in the vise.
use a hammer and nail/screw to make a small dent Next, we're going to drill a hole in just the larger piece of K&S. At this point I lay one of the nuts that's going to be soldered on on top of the K&S to figure out where the hole goes. I mark that spot with the sharpie. When you drill, the drill bit is going to want to slide around on the metal's surface. To fight this, I made a little dent in the K&S using a spare screw I had lying around. This will help get the drill started.
drilling the K&S We're going to drill the hole in the K&S with an electric drill. Look at your drill bits; if they say HSS (High Speed Steel) on the side, then they're adequate for cutting soft metals (brass or aluminum). If you cut thicker material than this tubing, be aware that you'll probably want some sort of lubricant -- even just using a little water will help. I've broken two 1/16" HSS drill bits during the past few weeks, so I've replaced these smallest bits with carbide, which is sturdier.
To get a really exact hole, I started with a smaller bit, and then enlarged it with a bigger one. My first hole was 1/16"; I enlarged it to 7/64". Remember that you want the hole to be a little larger than the diameter of the screws you'll be using.
preparing the brass for soldering OK, we're about to solder the nut onto the tubing. I've tried using super glue and epoxy putty as alternate means for adhering the nut: neither worked. When you tighten the screw, it acts like a tiny, powerful jack and breaks the glue or tears the epoxy putty. The only bond that's going to be sufficient is molten metal. It's got to be soldered on.
The nut has to be made of brass. I'm not sure what normal nuts are made out of, but when I tried to solder them to the brass tubing, I couldn't get a bond to occur. Soldering brass to brass, however, works great.
The brass hex nut is measured as "4-40"; that's one size smaller than 6-32. What Susannah calls a "grub screw" seems to be sold as a "socket set screw" in the U.S. Get yourself socket set screws that measure "4-40 x 1/8". These are the smallest nuts and screws that I could find. Happily, both are available at my local Ace Hardware store. The nuts cost me 11 cents each, and the screws cost 13 cents each. Get yourself a bunch, so you can feel free to make mistakes.
To prepare the surfaces for soldering, go over them with sandpaper. Make sure that you do the sides of the K&S and the nut, as well as the faces that are going to be touching. It's actually the sides where the bond is going to happen. You can't see it, but there's a film of oil on the metal that will prevent the bond; sanding removes it. I wore gloves at this point to avoid adding any fingerprint oil back into the mix.
my new soldering iron I got this soldering iron for about $30 at Radio Shack. You can get soldering irons for as low as about $7, but I wanted the one that had a built-in holder. (I'm paranoid about burning down the house.)
For solder, I chose a wire with a rosin core so I wouldn't have to apply flux in a separate step. The "rosin core" is liquid acid that makes the brass more receptive to bonding. I chose a very fine solder, "diameter .050", made of 60% tin and 40% lead. I don't know if this is the very best solder to use, but it seems to have worked well. I found it at Ace Hardware.
adding solder to the hot metal The trick with soldering is that you don't actually touch the soldering iron to the solder. Instead, you heat up the brass and then touch the soldering wire to it. I found that it worked well to put the socket set screw into the nut, and then put the nut underneath the K&S with the screw nested inside its hole. This allowed me to hold the whole thing down with the soldering iron from the top, giving me space to touch the soldering wire to the sides, where it would run down onto the edges of the nut. [The photo should help make this clearer.]
If you overheat the work piece, it will give off smoke -- and that smoke has lead in it. Very toxic. Have the best ventilation that you can manage for this part of the job . I switched to my "organic solvents" respirator for this part of the work... I don't think that this is quite the right safety measure; I'd appreciate it if anyone who knows better would let me know how best to deal with fumes while soldering.
cooling off the hot metal with water After I finished adding solder to the piece, I picked it up with the little square file and dumped it in a jar of water to cool it off. ...Voila! A join that will allow you to make removable puppet limbs!
posted by sven | permalink | categories: stopmo
February 10, 2006
puppet #2: construction notes
by sven at 11:05 pm
I've been studying, studying, studying the puppet designs of Mike Brent, Nick Hilligoss, and Susannah Shaw. Finally it was time to stop studying and just make something. Because my head is so full of new techniques, though, this puppet has had rather confused beginnings.
the initial puppet blueprint I'm saying that I began this puppet last Sunday (Feb 5); that's the day I assembled the wire for the armature. Simultaneously, I was working on making a set of Nick's T-style tie-downs, learning how to solder the replacable joints that Susannah describes, and developing my own design for hollow heads. Initially, this puppet was pretty much just another experiment: the goal was to construct a wire armature that's 10" tall. [My first puppet was only 5" tall, and I wanted to get a sense of how the bigger scale would feel.]
...Once I had the beginnings of an armature, though, it was clear that I was actually making a puppet. I needed a better plan. I decided that much of my mental chaos was the result of trying to use bits and pieces of three designs (plus my own) all at the same time. New plan: as an exercise, do each design just as the author has described. Do a Mike Brent. Do a Nick Hilligoss. Do a Susannah Shaw.
This puppet is supposed to be a Mike Brent... Except that Moon Baby (puppet #1) was already a Mike Brent. So I've been letting myself experiment a little bit in areas that I covered according-to-blueprint last time. I don't think I've done myself a favor, though.
wires joined with epoxy putty The wire of the armature is composed of three pieces: the legs, the spine, and the arms. The legs and spine are each made of three strands; the arms are made of two strands. I twisted the wires by hand this time, rather than using a drill. Twisting always makes the lengths shorter; I must remember next time to start with longer strands than I actually need. I have the shoulders go up and then down, to help lessen stress on that joint. The wires are joined with 20-minute plumber's epoxy putty that I bought at Ace Hardware in the plumbing section.
[Note: You can see that when I took this picture I was still planning on attaching aluminum feet. Each of the foot wires would have been glued horizontally into separate holes.]
shoes One aspect of Mike's design that I copied faithfully was the feet. On my previous puppet, I used the design for feet described by Kathi Zung in her "DIY - Foam Latex Puppetmaking 101" video: a hex nut epoxied on top of a loop of wire. The problem for me with Kathi's design was that the feet weren't really flat on the bottom. Mike's wooden design should solve this problem nicely.
tie-downs For a while I'd been thinking that the best design for feet must be the aluminum feet and T-style tie-downs that Nick uses. However, last week I discovered that Nick has added a new puppet making tutorial to the StopMoShorts.com tutorial section... In it he uses plain screws and hex nuts! I have a pair of aluminum feet all ready to go on the next puppet -- but seeing that Nick doesn't entirely shun the simpler screw-and-bolt strategy made me feel a lot better about using it here.
"bones" added I added more epoxy putty "bones" to the basic wire armature. I attached the feet using two-part epoxy glue (gel). I tried a quick little test with epoxy glue a few days beforehand -- but this is my first time actually using the stuff on a project. I also used the epoxy glue to add on 1/2" sections of K&S (square brass tubing) at the neck and wrists. The K&S is so I can have detachable hands and a detachable head. [I hope to give a tutorial on K&S pretty soon.]
wires for hands Mike did an improptu tutorial on making hands over at StopMotionAnimation.com. Since I'm trying to do a Mike Brent puppet, I figured I should use his technique. However, since I'd already added the K&S, I sort of botched my attempt.
In his tutorial, Mike uses three wires from the arm to make three fingers, and then uses a loop of wire to add two more. I twisted three new pieces of wire together, added a loop, and then epoxied this big wad to the brass tubing. It's very bulky, and kinda misses the point... But then again, my last puppet didn't have fingers that move -- so I guess I'm still going in the right direction.
hands and skull - epoxy putty stage I'm very excited about Susannah Shaw's system for replacable parts. I'm using the tiniest brass hex nuts I can buy, and socket set screws that are only 1/8" tall -- the screws don't even poke out of the nut when they're in! In the picture above, you can see a spare piece of tubing extending from a ball of epoxy putty that will be the "skull" over which I build a head. Inside that "skull" there's a slightly larger piece of brass tubing, which forms a sheath around the smaller. The nut and screw allow me to clamp the sheath to the tubing. [Look closely at the base of the "skull" -- you can just make out the tiny hole for the hex key.]
plan for adding foam One of the catastrophic failures with the Moon Baby puppet had to do with its foam "musculature". I used foam weather-stripping tape for MB; it hardly allowed the limbs to move at all. For this puppet I'm using blocks of cushion foam, instead. It's not what Mike uses in his tutorial (although he uses it on his later puppet, "Buster") -- but it's standard for most puppet makers, so I feel fine about this choice. I also made sure to draw up a plan in advance showing where I would add the blocks of foam -- I wanted to intentonally leave gaps, so joints could twist without fighting the cushion material.
I bought my cushion foam at Michael's. I've also seen it for sale at JoAnne's Fabric, and at the local store Fabric Depot. It seems to be sold mainly for people who are sewing and doing up cushions for kitchen chairs.
I snipped the foam into blocks and sandwhiched the armature between them. I glued all this together a bit at a time using Elmer's brand spray glue. I've used 3M in the past; this was half the price and available at Ace Hardware, so I figured I'd give it a try. The blocks of foam had to be squeezed together for one or two minutes before they adhered adequately.
the foam body being sculpted I've been sculpting the foam blocks using rounded cuticle scizzors. I'm not done with this step yet. In the photo above, you can see that I've screwed on the "skull" and hands to see how things are coming along.
alternate head sculpts I didn't have a clear idea about what I wanted to do for the head when I began this puppet. I had been working on a scary bird-like head -- but it really looked wrong on this zaftig body. [More about the bird monster to come in a future post!] I decided that what I wanted was a fairly sweet, sympathetic, "everyman" character. This turned out to be more difficult to achieve than I'd expected. My 2D sketches got me nowhere -- so I did a series of rough 3D sculpts, exploring the possibilities.
the head sculpt begins to take shape My "ah-ha!" moment for the head was realizing that the basic form I was looking for was sort of like a mushroom cap. Often in the world of 2D animation you see diagrams where characters are broken down into their basic component shapes... I feel like I'm really just beginning to learn that the same is true for 3D characters, too -- if you look, you can see that complex forms are made up of simple solids. The photo above is where the head first begins to take shape.
head ready to be baked Having the K&S tubing bolted into the "skull" proved very useful when it came time to bake the Super Sculpey. I clamped the tubing with a metal C-clamp that I could use as a stand in the oven. After reading a bunch more online about the chemistry of Super Sculpey, I decided to bake at the prescribed 275 degrees (rather than 200 degrees for a longer period, as smellybug has suggested). I baked the head for 30 minutes. I removed the delicate ears and eyelids -- they'll be done in a second pass. The eyes are wooden balls that sit loosely in their sockets.
hollowing out the head Unfortunately, when I tried the head on the body after baking, it was too heavy. When I tried to lean the character forward on one foot, he'd totally bend in half. Arg! This is exactly why I've been working on a strategy for hollow heads...
I think this can be salvaged, though. I cut the back of the head off with a hobby saw, and have begun hollowing it out. At first I used an electric drill to get things started. Then I started working at it with some woodcarving tools. I tried to be careful, but it was awkward to handle, and not too surprisingly I wound up cutting myself. Not badly, luckily; but it was enough to prompt me to quit for the evening and rethink how I'm going about this.
notice the hole near the eye If you look carefully, you can see the hole above the eye socket where the tool poked through and got me...
What's left at this point? Finish hollowing the head. Add ears and magnetic eyelids. Paint the eyes. Wrap the fingers in thread and tip them in liquid latex (Richard Svensson's technique). Make the clothing out of cotton gloves (this is one of Mike's unique tips that I really want to try). Paint all the exposed skin.
...And animate it!
posted by sven | permalink | categories: stopmo
puppet #2 is underway
by sven at 10:11 pm
Work on my second puppet is finally underway! Here's a picture of what I've got done so far...
the new puppet - in progress I don't have a story that I want to animate right now. For the while, I'm just trying to learn puppetmaking. Once I have puppets, then I think short stories will suggest themselves.
...This might seems backwards -- normally you'd write a script, and then build puppets for it. But in the StopMotionAnimation.com forums I see a lot of newbies planning films that are beyond their abilities, and consequently getting stuck. In my opinion, puppet animation is an advanced form of playing "make believe" with dolls. Thus, you should begin exploring stopmo with learning how to make really beautiful and functional dolls.
I think that only a fairly advanced animator can successfully start off a project with a script. The implication is that you already have the ability to fabricate any actor or set that comes into your mind. A newbie (like me) isn't going to have those skills. In my opinion, treating stopmo as if it were a live-action film really does beginners a disservice. You can't cast your friends as actors; you can't use neighborhood buildings as sets. You have to build all this stuff from scratch. --So begin with learning how to build things.
posted by sven | permalink | categories: stopmo
February 3, 2006
stopmo puppet work: eye, feet, neck
by sven at 1:33 pm
When I was working on CG animation, I found myself getting stuck on the modeling -- not actually getting around to making things move. I worry that I may fall into the same pattern with puppet animation... Constantly striving to make the perfect puppet.
Worrying aside, though, I did some neat experiments yesterday. A few more details to work out, and then I'll begin construction on puppet #2 in earnest.
eye Eyes are one of the most expressive parts of the puppet -- I want them to be posable. The trick for this eye was figuring out how to embed it behind some eyelids. If I were using soft clay for animating, it wouldn't be a problem... But I'm working with baked Super Sculpey here; it requires a paint job.
eye magnets revealed What I did was to make the eyelids as separate pieces. Then, I glued little magnets on with Duco cement. The eyeball just sits in its socket, unglued; the magnetic eyelids hold it in place.
One thing to improve upon: When you stick a magnet to a magnet, the magenetic forces sometimes cause the connection to twist or jump. On the next iteration, I'll have the magnets coupled with snippets of tin instead.
using a toothpick to move the eye The eyeball is a little wooden ball that I found at Craft Warehouse in Gresham -- you can buy bags of them at pretty much any craft store, e.g. Michael's. To make it easier to work with, I drilled a 1/16" hole in the back and stuck the sphere on a piece of wire. To paint the iris, I put the wire in an electric drill bit and had it slowly rotate while I held the paintbrush stationary. That's a trick that I picked up from Susannah Shaw's book, "Stop Motion: Craft Sklls for Model Animation".
After painting, I pressed a very tiny hole into the iris using a needle. This allows me to gently move the eye in its socket using a toothpick. I think that it would rotate even more smoothly if I put a little vaseline in the socket -- need to pick some up at the grocery store.
tie-downs for feet When you have puppets walking, you need a way to "tie down" their feet to the set. An easy way to do this is to have a nut in the foot of the puppet, and then have a screw come up into it from beneath the set. Getting the screw into the hole can be a little fussy, though.
Animator extraordinaire Nick Hilligoss has a tutorial on making "T-style" tie-downs on his site that I've wanted to try. Basically, what you do is take a bolt and file down its head until you have a "T". The "T" then fits through a slot in the puppet's foot, rotates 90 degrees, and comes to rest in a groove. Underneath the animating table you tighten a wing-nut, and -- voila! -- your puppet is tightly bolted to the floor.
I had to learn several new skills to pull this off...
feet "tied down" First off, I had to find a vise that I could clamp to my work table. I thought I could use a drill press vise -- but that was a total failure. I wound up buying a little 3" vise at Home Depot for $20.
The feet are cut from a strip of aluminum. I first tried cutting it with a hacksaw. The saw blade kept binding up -- until I bought some wax for it, which acts as a lubricant. The cut worked then, but was sloppy. Next I tried using a cut-off wheel attachment with my dremel tool. That worked much better! The dremel tool made it easy to cut the feet off the strip, cut the slots, and make the grooves.
To grind down the heads of the bolts, first I tried using a bastard file. That worked well -- but it took about an hour just to do one bolt! Next, I tried using the dremel cut-off wheel to grind it down. Much faster... But also a very different experience. When I use the cut-off wheel, sparks shoot off like a Fourth of July sparkler, and the metal starts to glow orange! (I was careful to be wearing a dust mask, goggles, and apron this whole time.)
I'm feeling rather proud of myself: this is the first time I've ever done any sort of metal working. :-D
neck When you build a puppet with a wire armature, it's just a fact of life that the wire is going to eventually break. So, it can make a lot of sense to create armatures that allow you to replace joints when needed. ...Here I'm working on a system that will allow me to replace a puppet's neck. The head is where you do the most detailed sculpting work -- it could be tragic if there's no way to reattach it to the body after a break.
What you see above is two pieces of square-shaped brass tubing, one fitting inside of the other. The larger piece will eventually be epoxied into the head. The neck wire will be epoxied into the smaller tubing. Then you can slip the head onto and off of the neck at will. Once again, this is a design from Susannah Shaw's book.
neck dissembled To make sure the head won't fall off while you're animating, you need a way to keep the tubes fitted tightly together. A hole is drilled the larger piece of tubing, and a nut is attached over the hole. When the smaller tubing is inside the larger tubing, you tighten a screw into the nut, which should then lock the two pieces together.
I made one mistake here. I thought I could just super-glue the nut to the brass tubing. It didn't work. Rereading the book, I realized that you need to solder the nut in place. Soldering isn't a skill I have yet -- but I've looked into it, and think I can learn it within another week.
...Incidentally, the screw is a "grub screw". Rather than having a head, there's a hole in its middle, and you turn it with a hex key. You can see a hex key in the photo above.
posted by sven | permalink | categories: stopmo
January 30, 2006
sculpting: new test snippets
by sven at 12:30 am
I've done a bunch of little test snippets with different sculpting materials this past week. Lots of things to show you!
papier mache mash The papier mache mash I wrote about on Jan. 23 has finally dried. I think it took about five (maybe six) days. The stuff that I baked turned dark and tough; it reminds me of a chew toy you'd give to a pet dog... I'll never try that again. The unbaked stuff turned a pale gray; it has potential. I'm thinking about how I could use it for stopmo animation sets.
insulation foam; "Sculpt It!"; Foam Putty; Creative Paperclay; clay and wood flour mix Here are several test "fingers" I made using different materials. From left to right:
- insulation foam
This is a bit of carved insulation foam without anything on it. The rest of the tests involve spreading different substances on top of one of these.- "Sculpt It!"
This feels like a high-grade Play-Doh; sort of soapy, very slightly springy. When I try to put it through the pasta machine, it becomes flakey. Loop tools work poorly. It smooths easily with fingers. It starts feeling dry to the touch after 10-15 minutes, but remains workable longer. It shrinks while drying; since it was applied over a foam core, this made it crack.- Foam Putty
I found this at a model train store. It has a very fine powdery grain, like spackle. It has the consistency of very light frosting. It can be spread, but is impossible to sculpt; it's only good for filling in cracks in pieces of foam, I think. It didn't crack while drying.- Creative Paperclay
The fiber content is very fine. Smoothing with fingers works OK; water helps. Loop tools work pretty well, but leave a rough grain that needs smoothing; sometimes using the loop tool leads to crumbling. Doesn't go through the pasta maker well. Doesn't adhere to the foam core easily. Cracked while drying.- air-drying clay mixed with wood flour
Wood flour is sawdust that's been ground into a fine powder. Here I was trying to reproduce the Noah's Doll technique. It was difficult to mix the clay and wood flour -- very crumbly. When I added water, it became very messy. I think perhaps I'm missing an ingredient: maybe wheat paste. Once I got this stuff mixed, it was indistinguishable from regular clay. Cracked while dryingSuper Sculpey on top of epoxy putty (painted) I wasn't very happy with any of the preceding materials. Then I had an epiphany... Try sculpting in three layers: a core of foam, covered with a hard shell of epoxy putty, and a "beauty layer" of Super Sculpey on the outermost surface. I tried it -- and was thrilled! This is technique I've been searching for, like, forever. Now it's just a matter of refining it.
I particularly need this technique for making stopmo puppets... Last weekend I was brainstorming, doing sketches of characters that I could turn into new puppets. In the process, I discovered that most of my characters have over-sized heads. This is a big problem for two reasons. One: the weight of these heads -- if they're solid -- is going to bend my puppets in half; they won't be able to stand up. And two: Super Sculpey doesn't bake well if it's more than about half an inch thick -- solid heads would either crack, or not cure at all. Solution: make hollow heads!
[Added benefit: Super Sculpey for the top layer can be put through the pasta machine. When you lay Sculpey sheets over the epoxy putty shell, you know exactly how thick they are. That means that it should be really easy to guess how long the head needs to bake. ...With the Moon Baby puppet, I had a terrible time trying to figure out what my baking time should be.]
notice the yellowish layer of Sculpey over the hollow gray epoxy shell If I make a hard shell of epoxy over a soft base form, it should be easy to hollow it out to make a hollow puppet head. How should I do this? I've come up with a five possible options so far, and am still exploring...
- Work on a base of foam, dissolve it out using acetone.
- Work on a base of foam, melt it out with a heat gun.
- Work on a base of foam, use a rasp to rake it out of the shell.
- Work on a base of plastilene, use loop tools to dig it out.
- Work on a base of plastilene covered with cling-wrap, dig and pull it out.
On the snippet above, I tried the acetone trick -- using nail polish remover, actually -- but it didn't work for me.
Then I tried a heat gun; that worked very well -- but it releases toxic fumes, so this isn't a very good option.
I have only just purchased a suitable rasp -- I still need to try using it. (It's what's recommended in the Noah's Doll tutorial.)
Plastilene: that's probably the way to go. It's what I try out in this next experiment...
shell of hard epoxy putty over Roma Plastilene I didn't really get the photos I'd like to have for explaining this next thing... What you see above is a piece of Roma Plastilene that I've already covered with plumber's epoxy putty. I only wanted a very crude form; detail work would go on top of this, using Super Sculpey. I roughed out a nose and a chin...
head cut in half with hobby saw I cut the epoxy putty shell in half with a hobby saw. In this picture I've already scooped the plastilene out of half of the shell -- but you can see that the other half is still filled.
scooping out the plastilene This picture maybe gives you a better sense of what it's like to dig out the plastilene. It comes out fairly easily -- but leaves a waxy residue. On my next try, I'm planning on covering the plastilene form with cling-wrap; that ought to make it easier to get out cleanly.
When I dug out the plastilene from the first half, I was dismayed to discover that the shell wasn't entirely solid yet. It was definitely firm -- but bendable. I was worried that the plastilene had reacted with the epoxy chemically, preventing it from curing. Since I'd been working outside on the porch, to give myself good ventilation, I also wondered if cold weather was impeding the cure...
To my great relief, the epoxy was rock hard the next day. Lesson learned: 20-minute epoxy is workable for five minutes, and hard to the touch in twenty -- but it may be a few hours before it's fully cured.
head put back together with metal tape Here I've taped the two halves of the head back together using metal tape. I found it at G.I. Joe's -- a NorthWest automotive and sporting goods store -- in the auto section. I've been told you can also find metal tape in with the plumbing supplies at a hardware store or at Home Depot. My thinking here: since the Super Sculpey layer is going to be baked, I want an adhesive that's going to hold up under heat. Metal tape seemed right for the job.
I haven't gotten around to putting Super Sculpey on this snippet yet -- but I'm very pleased at how firm and lightweight it turned out to be. Yay!!
Oh... I should mention that the previous snippet -- the red tongue-like one -- was painted with acrylics. I tried "tonal underpainting" for the first time. It's a technique that was used by the old masters, where they would do their painting in black and white, and then "colorize" it with glazes. For the "tongue", I sponged on a black undercoat, sponged on a speckling of white, and then used a large soft brush to apply thin coats of red. I'm simply in love with the results. It's got such depth of color... I'm eagerly looking forward to exploring this painting technique further.
posted by sven | permalink | categories: sculpture, stopmo
January 29, 2006
now showing: "Experiments in Super8" and "Two Men, One Pair of Glasses"
by sven at 12:30 am
You can finally see the work I did for my Super 8mm Filmmaking class!
click on image to play movie (10.9 MB) Here's my final project, "Explorations in Super8". It's 3min 14sec in length, so expect a long wait while downloading. Sadly, more image quality was lost when I went from Super8 to DV. Sigh... I knew going into this project that I was working in a lossy medium.
I've previously written in-depth descriptions about how each effect was achieved. You may want to refer back:
Amusing / irritating note: When the film was finally developed, I discovered that in several shots the camera is zooming out. I didn't do that. What happened? There was a knob on the lens that you would rotate to adjust the zoom. While I was shooting, its own weight would cause it to slowly and imperceptibly descend from its initial position -- thus causing the zoom effect!
click on image to play movie (11.5 MB) As a bonus, here's the "Two Men, One Pair of Glasses" film that Andy Weinstein and I made as a quick in-class exercise. No one else wanted it, so I figured I'd use the reel for practice doing video transfer -- before potentially chewing up or melting my own precious celluloid. This is also 3min 14sec in length.
It's out of focus a lot of the time... Let's you and me say that was intentional: the camera man needed glasses too. ;-)
How did I get the Super8 footage digitized? Here's a shot of me setting up the video transfer. Inside that black box is a mirror, so the light from the Super8 projector can shoot directly into the DV cam. Very fussy work, trying to get everything lined up correctly and in focus. ...And then you turn off the lights.
posted by sven | permalink | categories: classes & workshops, movies, stopmo
January 27, 2006
safer - but still not safe enough
by sven at 8:03 am
Epoxy putty is an amazing sculpting material... But it gives me the willies.
So far, I've discovered several types of putty: plumber's epoxy putty, Magic Sculpt, Apoxie Sculpt, milliput, and Green Stuff. All of these brands come in two parts -- a resin, and a hardening agent -- which you knead together to activate. Working time varies from about 5 minutes to 3 hours, depending on which product you use. When the putty dries, it's extremely sturdy -- but can easily be sawed, drilled, or sanded.
However, epoxy resins are extremely toxic. This fact seems to frequently be downplayed or ignored by manufacturers and hobbyists. This fellow, for instance, in demonstrating how to mix resin and hardener, doesn't wear any gloves. Elsewhere on his site, he talks about using his saliva (!!) to smooth the putty. ...That's a great way to ingest toxins -- don't do it!
I've been trying to research how to approach toxins in the art studio intelligently. My best plan at present is to wear vinyl safety gloves, a respirator rated for organic solvents, and set up a desktop airbrush spray paint booth to vent fumes to the outside. At present, I have the respirator, and am using latex gloves. I still need to get a spray booth, and the gloves should be upgraded.
To check if my plan makes sense, I consulted Kim Graham -- a truly amazing sculptor whom I met at the art marketing workshop in November. Kim recently left working in the special effects / fantasy sculpting industry -- largely because she was beginning to develop sensitivities to some of the sculpting media. (She's moving into fine art ceramic figures and Art Nouveau fireplace facades -- please, look at her stunning website!) ...She's known people who've died from misuse of art materials -- so I asked about that, too. Here's what she wrote me:
"You have taken all the necessary safety precautions. The vinyl gloves are your best protection. Magic Sculpt, Apoxie and Plumbers putty are all Epoxy that has been loaded with some powders like talc. The resins can seep into your skin, and over time cause nerve death in your fingertips. If you are only using this stuff once or twice a week you will be fine with just gloves, but if you are using it constantly, all the precautions are a good idea. A good rule of thumb is if you can smell it, you are sucking it into your lungs.It is the liquid form of Epoxy that will give you some real trouble. That and the volatiles used to thin it, like paint thinner, Lacquer thinner and Acetone. These are the most deadly and the ones that lead directly to the deaths of those people. These substances shred cells and do it quickly. All of the precautions should be in place every time you use them! Lacquer Thinner and Acetone are the most dangerous. Their purpose is to breakdown molecular bonds aggressively. The two people that I knew, and I hesitate to call them friends, did some downright stupid things. I watched in horror when one of them used acetone to wash his face and hands like it was water! The other was a professional fiberglasser and refused to wear a respirator, even when I bought him one, because it was uncomfortable. His job was to spray epoxy gel coats onto furniture. In order for epoxy to be put through an air gun it has to be cut 30 to 50% with acetone. Essentially he was atomizing this toxic brew and breathing it wholesale into his lungs. True, you will not be handling epoxy in quantities that will hurt you immediately, just be warned that this stuff resides in fat cells and can stay in the body for years. It is the accumulated damage that can get you."
Sobering words of caution. Stopmo folk using epoxy putty for puppet construction, heed the warning... "nerve death in your fingertips!"
Last night I tried working with plumber's epoxy putty outside while wearing the respirator and latex gloves. It's better than what most people would do -- but I'm still uncomfortable. I have the sense that resin fumes are probably passing through the latex. My hands feel dry, and I'm just really hoping that it's due to the plastiline and other materials I handled during the evening, not the epoxy.
Also, I could occasionally smell the epoxy through the respirator. That's not too surprising -- a respirator cuts down on how much vapor gets through, but it's not 100% effective. Even so, I'm getting increasingly antsy to get that spray booth. It'll make me feel better when I have the means to forcably suck the fumes away from myself and vent them outside.
posted by sven | permalink | categories: sculpture, stopmo
January 22, 2006
comic homage to moon baby
by sven at 10:11 pm
My brother drew a comic using Moon Baby and the Sven blocks!
[click on image to enlarge] Here's what he had to say about it on his art blog:
"This will probably make my brother do a double take. I used two of his characters and two of his themes in this comic. Moon baby and the Sven blocks both come from his recent explorations into stopmo. If you look through Scarlet Star, you'll see Love and The Moon constantly show up in his work (well, at least I think they do). Pardon any off character sheet drawings, I didn't look up what they looked like before I started drawing."...Wow. I wish I'd thought of that story line. (Thanks, Bro!)
posted by sven | permalink | categories: movies, stopmo
January 16, 2006
scenes from "Explorations in Super8"
by sven at 12:00 pm
I turned in my final project for the "Super 8mm Filmmaking" class at on Sunday (Jan 15). I tried to turn it in twice on Friday (the deadline), but no one was at Radius Studios (grrrrr).
I feel like this class is jinxed. I just wouldn't be surprised at all if my film cartridge somehow got lost in the mail. So, I will now spoil all surprise and describe exactly what I did for this project. I'm hoping that when I get the developed film back, I'll be able to do a transfer to digital and put it online. But, like I said, I'm not holding my breath.
I shot one complete film cartridge. A cartridge contains 50 feet of film, which works out to be around 3 minutes 30 seconds of screen time. To keep track of where I was in the roll of film, I used graph paper to make worksheets -- marking off one square for each frame shot.
I took quite a few "making of" shots with the digital camera... Not everything's covered, but you'll get the idea.
title card Opening shot: The words "Explorations in Super8" write themselves on a white backdrop. The camera angle changes, showing that the words were actually written on a surface that was at an angle. The closed spaces of the the letters P, O, R, and A -- and of the number 8 -- sequentially turn black, as I put pieces of black paper over them. These cut-out shapes then all slowly tilt sideways. All the cut-outs on the left slide over to the right and are consumed by the black shapes there (the "O" of exploration and the "8"). The remaining "Explorations in Super8" logo appears again later in the film.
exploration #1 The number "1" seems to write itself on top of the logo...
grease pencil on a sheet of acrylic "glass" ...This effect was achieved by writing the number "1" in grease pencil on a sheet of acrylic "glass". I was very pleased with the strategy I came up with for making the glass stand up. As you can see in the photo, each side of the glass is clamped to a piece of wood. These two pieces of wood are held in corner clamps. The corner clamps are then clamped to the table using two more clamps (a total of six clamps).
the "blockheads" present themselves Eight blocks that I made previously, ones with photocopies of my face on them, present themselves in a half-circle. The middle two swap places. The next two out knock heads and return to their places. As do the next two out. The last blockhead on the left runs over to the one on the far right and tips him over.
blockheads cavorting on the wall and the ground The blockheads start running around the set willy-nilly. Some slide across the floor; others slide up, down, and across the wall. One comes down the wall and gets on top of a block that's on the floor.
everyone's about to be just two blocks tall A little comedy: a totem pole of two blocks, a totem pole of three blocks, and a single block all stand next to each other. The middle one looks at the others and seems pleased that it's the tallest. The one on the left rams it while it's not looking, and then everyone is equally two-blocks-tall.
exploration #2 The first exploration used a predominantly white set, where butcher paper was the backdrop. The second exploration dealt with sets that were predominantly black. Using the same trick that I used for "#1", I animate "#2" appearing by writing with a white grease pencil on the glass sheet. In both cases I also animated the numbers erasing themselves.
ghostly skull My face, floating in blackness, is replaced with a ghostly skull. See my post on "compositing, retro-style" for details.
spaceship A spaceship rockets between the stars. As it zooms past, the stars spin in its wake. The spaceship is a drawing cut out of paper; its exhaust is made out of green tissue paper.
landing The spaceship fires its retro-rockets and gently lands on an alien world. The mountains and hills are made from scraps of blue insulation foam.
panicking robot A panicking robot runs by in the foreground. The focus changes, and we see the landed rocket in the background.
exploration #3 Having done "light" and "dark", I decided to do "wet" and "dry". Exploration #3 is animation done using sand (dry concrete mix, actually). After I draw the "3", I animate it disappearing -- by vacuuming up a little bit of it at a time.
(For how-to details, read "animating: sand, paint, shadow.")
flag made of sand Three O's appear. They turn into two eyes and a mouth. The mouth smiles -- and then frowns, and tears fall. The lines that make up the eyes connect themselves to the mouth, and the resulting snake wriggles its way off screen.
New scene: I cover the entire screen with sand. I wipe some away, so that white shows through, and an American flag appears. I make the stripes seem to flap in the wind. The flag dissolves, and the mushroom cloud from an atomic bomb appears. (Clearly I was free-associating here!) The cloud disappears, and random zig-zag lines mark the sand for a while.
exploration #4 On to "wet" animation! A number four paints itself on the glass, and then erases itself.
paint "weaving" I splatter paint onto the whiteness a little at a time until there's a black puddle. The puddle turns into a checkerboard. The checkerboard becomes a more ornate "weaving" pattern.
paint "whorl" Circles radiate out from the center. A spiral takes its place. The spiral pattern becomes a wild whorl. The whorl resolves into a painting of a human eye, which blinks once. The paint is gradually wiped away, until it looks like a bagel. Bites disappear from the bagel until it's gone. (I must have been hungry!)
exploration #5 I thought it would be interesting to use this retro medium, Super8, to film digital images. I think there's an impulse, if you're using super8, to try to make everything look "old-timey." Why ignore the existence of digital? Maybe hi-resolution digital captured on low-resolution Super8 will create an interesting visual effect... ?
For the transition to this section, I quickly made a three dimensional "5" in LightWave and set up a scene where it would rotate. Rather than rendering out this footage, I simply advanced the frames manually in preview mode, and snapped a shot each time with the super8 cam.
"star" I experimented with reusing animations that I've made previously. The first one, "star", shows a person looking at the sky... They see something and point at it; they reach out a hand, and catch a falling star. This animation exists as a QuickTime movie. I advanced it one frame at a time on an Apple Cinema Display, taking two shots of each frame with the super8 cam.
"Dot" The second animation I recycled is called "dot". It was an improvization where a dot morphs into all kinds of random shapes. Both "star" and "dot" can be seen in their original forms at my old "Sven's Animation" site.
filming a QuickTime movie on the laptop For "dot", I tried filming the movie off of the laptop rather than from the workhorse computer. I shot this using the macro setting -- and have a suspicion it'll probably be all blurry. I tried filming "dot" three times in succession: once at 3 frames for each drawing, once at 2 frames per drawing, and once at 1 frame per drawing.
exploration #6 For the sixth and final exploration, I decided to work with shadow puppets. The shadow of the number six appears, and then disappears.
(For how-to details, read "animating: sand, paint, shadow.")
robot walking away A shadow robot waves, shakes its head, and walks off screen.
Random geometric shapes -- squares, rectangles, triangles, circles -- appear and disappear in interesting patterns. A circle and triangle form themselves into a timer, which goes through two revolutions.
"the end" - part 1 At this point, my best guess was that I had 10 - 20 seconds of film left. I brought Gretchin over to the studio and had her help me with the final shot. I wanted to have this last bit be live-action, and I needed her help to actually run the camera.
Gretchin -- fine calligrapher that she is -- wrote "by sven" for me on my the back of my hand...
"the end" - part 2 I show the camera the back of my hand: it says "by sven". I turn my hand over and "2006" is there, written on my palm. Just as I finished showing my palm to the camera, we think we heard the camera run out of film...
THE END!
posted by sven | permalink | categories: movies, stopmo
January 15, 2006
animating: sand, paint, shadow
by sven at 6:00 pm
For the Super8 final project I tried out several animation techniques that I've read about, but never had enough interest in to actually pursue: sand, paint, and shadow.
camera + tripod mounted on microphone stand Animating sand and animating paint both had a similar setup. You work on a horizontal piece of glass, lit from below. You put your sand or paint on top of this glass, and film with the camera above.
The super8 camera has a minimum focal distance of 4 feet (unless you use macro). My sheet of acrylic "glass" was raised up about 18" off the ground by two recycling bins. This meant I needed to get the camera pretty high up in the air -- and it had to point directly down, which the tripod wasn't built to do.
So, I took the camera and tripod as one piece and put them in a microphone stand! ...A little wobbly, but a very workable solution.
animating sand With sand, I put a piece of white butcher paper on top of the glass -- to prevent scratching, and to diffuse light. I didn't have any proper sandbox sand around, so I used some of Gretchin's dry concrete mix instead. Concrete has lye in it, so I was careful to wear latex gloves while working with the grit.
Sand was kinda fun to work with. ...Dropping pinches of it onto the glass wasn't very precise -- and trying to pick it back up to move it somewhere else was fairly irritating... But pushing around little lines was pleasant. And spreading sand across the whole sheet and then making lines with negative space was also pretty good -- so long as the image didn't need to be very fussy.
animating paint For animating paint, I took the sheet of paper off the top of the glass and instead clamped it onto the underside. I started off by dripping black tempera paint onto the slick surface -- Jackson Pollock style -- and then proceeded to move it around with brushes (occasionally re-wetting the surface).
This I liked a lot. It was very much like finger-painting: the process being more about moving paint around than capturing a single static image. And the light shining up through the glass really illuminated the texture of the brush strokes nicely. Just beautiful.
camera pointed at mirror below glass For filming shadows, I needed to change the camera setup. I put the white butcher paper back on top of the glass, and pointed the lights downward at it. The shadow puppets sit on top, held in place by gravity. The image I wanted to capture was going to be underneath the glass.
If the camera were directly underneath the glass, then the glass would have to be at least four feet up in the air (due to focal distance). That would have been really awkward to work with. So instead, I put a mirror on the floor, and pointed the camera at that. The focal distance was measured not from the camera to the mirror -- but rather from the camera to the mirror and then up to the glass.
shadow puppet hinged with nails Shadow puppets are typically hinged with thread, I believe. But I was feeling lazy. I wanted to use brads (the metal fasteners you find on large manilla envelopes) -- but we didn't have any on hand. So, in a pinch, I used small wire nails for my joints. Pointy -- but effective!
The robot pictured above was cute, but not a very practical puppet. The shoulders would bump into the neck if I moved them too far. If I make shadow puppets again, I must remember to make sure that none of the joints interfere with each other.
animating with shadows Animating the shadow puppet was a real pleasure when I was only moving one limb at a time. The arms moved wonderfully smoothly. But when I had to move the whole body -- that was trouble. All the joints would flail wildly, dragging behind the main torso.
Another problem I ran into was bad lighting. Because it was easiest to just lean the lights inward, I had beams coming from two sides. The puppet didn't always lie totally flat upon the glass, which meant that side-lighting could wash out some of the shadows I was trying to create. If I had had light coming from directly above, it probably wouldn't have mattered so much if the puppet wasn't lying entirely flat; all the shadows would be perpendicular to the glass.
Conclusion: Having known about these animation techniques for years, I'm glad to have actually tried them now. I doubt that I'll return to them any time soon... But if I do, I expect it'll be paint that I pick up again. It has a really lovely improvisational quality about it -- and it would be interesting to see what I could do with it if I were working in color. Any serious work, though, would probably require oil points -- which is an investment I'm not quite ready to spring for yet.
posted by sven | permalink | categories: movies, stopmo
January 14, 2006
compositing, retro-style
by sven at 11:59 pm
I finally finished the Super8 final project Thursday night; it took 19 hours to complete actual shooting. I squeezed in a lot of interesting experiments, so I'm going to break this story up into more than one post.
The trick I'm most proud of was making a ghostly skull appear in place of my face -- without any use of digital compositing!
Note: Super8 is, of course, actual celluloid. What you see here are photos that I took with a digital camera from the same angle as the Super8 cam, so I could document my process.
The "ghost" trick begins with this image of my face. The image is just a photocopy, blown up from a photograph that I had lying around. The photocopier lopped off the edges of my head -- so I cut out some paper to make that fiery "manga" hairstyle.
As you watch, the face is slowly replaced...
...by this skull, which is a paper cut-out.
How did I achieve the effect? Well, it's a little tricky to explain.
The key to the effect is putting a plate of clear acrylic "glass" between the camera and the image of the face. The glass is at a 45 degree angle, so it will reflect whatever is on the wall to the camera's left.
On the wall to the left of the camera, I taped the skull onto a piece of black foamcore. If there's no light on the skull, then there's no reflection on the glass that the camera is looking through. But, throw some light on that skull, and then a reflection appears. If I subsequently turn down the light on the image of the face, then I can almost get it to disappear, so we're left seeing only the skull.
My problem here was in trying to isolate the lighting... If there's any light at all on the skull, then we're going to see some reflection of it in on the glass. The ideal solution would have been to have a spotlight focussed on the skull that was controlled by a dimmer switch. That way I could keep the skull in darkness, and then gradually illuminate it. ...But I didn't have a dimmer switch.
So, what I did instead was have a light pointing away from the skull, but aimed at a mirror. For my purposes, I clamped the mirror to a microphone stand. When the time comes to illuminate the skull, I swivel the mirror on the microphone stand, and the light is bounced onto the skull. Overly complicated -- but pretty effective.
Here's a picture of the whole setup. As you can (hopefully) see, I've got two light sources: one on the left pointed at a mirror, which will illuminate the skull -- and one on the right that's pointed directly at the photo of my face. When it comes time to film the trick, what I do is animate the lights turning. ...For each frame of film, I incrementally turn the one light away from the face -- and the other light so that it's illuminating the skull. Run the film at 18 fps, and the metamorphosis appears!
My understanding is that this is an old theatrical trick... I think it was used around the end of the 1800s to make "ghosts" appear on stage, next to live actors. The trick there, too, was putting a big inclined sheet of glass between the audience and the stage.
More recently, I've seen the trick put to use in science museums, using a two way mirror. At the traveling "Star Trek: Federation Science" exhibit, for instance, I recall there being a station where you could sit in front of this pane of glass, and as you raised the lights on the other side, you could see a Klingon face superimposed over your own. Neat gimick.
Since compositing is so easily done in digital, I don't know when I'll ever need the "ghost" trick again. It's labor intensive, and relies on a complete control of lighting sources, which is difficult to achieve...
Note to self, in case I ever do attempt it again, though: An even more effective means to isolate the light on the skull would be to put a board between the light and the skull, with a "keyhole" in it... Cut out a skull shape in the board, so all extraneous light is truly masked and only a thin beam can shine through.
posted by sven | permalink | categories: movies, stopmo
January 11, 2006
explorations in super8
by sven at 12:05 am
So, Monday I finally began shooting my reel of Super8 film.
Ultimately, I decided that I'd have to be crazy to shoot animation I care about on Super8. As I stood in the kitchen Sunday night, thinking about this project -- which might turn out blurry, will be very difficult to get online, and could take up to 20 hours to shoot -- the exact words that went through my head were: "Do I hate myself?"
...So instead of wasting my "Mud & Metal" script on this project, I decided to film a series of improvised experiments in animation. It'll still take me a hella lot of time -- but at least this way there's no risk of heartbreak.
Title: "Explorations in Super8." ...I'd meant to title it "Experiments in Super8", and when I got to the end of animating the first word, found myself wondering why the letters didn't fit as planned!
posted by sven | permalink | categories: classes & workshops, movies, stopmo
January 8, 2006
script: mud & metal
by sven at 9:55 pm
Yesterday I wrote a new script. I'm very excited about it... When it was done, I read the whole thing through... and cried! (Of course, I have the benefit of perfectly heartbreaking mental visuals to go along with it.) I used the new story generating strategy a third time, brainstorming ideas as a numbered series. Read them as a text file.
This is the story of a young robot losing the human that takes care of him, told in three acts. ...I say "acts" -- but it's really a short piece, probably four minutes long -- reading more like haiku than theatre. Still, there are three distinct movements: the first is a "gotcha" gag; the second is straight comedy; the third: tragedy. ...I like how the the third act hits just that much harder because you were laughing only a moment ago.
Anyway, without further ado, here's the script:
MUD & METAL
January 7, 2006ACT I.
They're a little unnerving
And we're so dependent on them.
What if they rose up against us?
Still...
Some of my best friends are human.ACT II.
Human: After we're gone, you'll still be here
I tried to make you everything I'm not.Robot: Why? Are you ashamed?
Human: We are... hungry, unhappy, smelly, confused.
People are made of clay.
But you -- metal is immortal.Robot: I wish I could fart.
ACT III.
I can't always tell
if you're sleeping.
I wait
and I worry
If you die
who will take care of me?posted by sven | permalink | categories: movies, stopmo, writing
January 7, 2006
Attention Surplus Disorder (ASD)
by sven at 4:17 am
Thursday I had crazy laser focus and wound up creating a complete stopmo short: all the way from getting the idea to having a compressed movie ready to put online. Biggest one yet by far: 1 minute 20 seconds -- that's one thousand nine hundred thirty eight frames that I shot!
click on image to play movie (4.04 MB) I didn't start the day with any particular project in mind. I just wanted to keep experimenting. So, using my new story generating strategy, I brainstormed 18 ideas for films that could use blocks as main characters. Read them as a text file.
After 2 hrs 15 min, this is the idea I decided I wanted to run with:
#013 FIRST PICK
Back to writing words on the backdrop. Maybe as the characters speak, words are added to the backdrop without erasing the previous ones. The dialogue is added increasingly quickly and angrily, until the air is blackened with accusations. If I were easily able to do it with Super8, I'd then have everything go still, and let it all fade away, being replaced by a clear white backdrop again. If I were going for crude, one of the characters would then say: "So, wanna f*ck?" Or, the punch line, after all the furor could be "I love you." Or I could try to steal that beautiful scene between Tara and Willow on "Buffy the Vampire Slayer" where Tara says "I know we have so much to repair... but could we be kissing now?" (paraphrase). ...In this set up, the cubes hardly move, except maybe to twist and turn a bit while talking. All the action is in what's being written up above them. This is probably not more than a minute-long gag: as the air gets increasingly cluttered with words, you either have to focus on the words or the cubes -- you can only really show the whole conversation written above the cubes and have it remain legible early in the game....It's not all hashed out -- but you can see the germ there.
I was working in the livingroom again -- but this time I bothered to set up better lights -- and I put my 2'x2' hardboard "stage" up on the piano bench, so I'd be able to place the camera more easily. I was sloppy with the backdrop, though -- it's a piece of of big newsprint folded over another piece of hardboard, not even taped on. It shifted a little during the shoot -- but I got lucky, and it didn't give me too much trouble.
The real pain this time was when I'd bump the camera. With such small characters, I had to have the camera right at the edge of the set -- forcing me to contort around it to do the animating. Important lesson: I think I'm going to make a point of using larger puppets in the future, so the camera can be farther back, giving me more elbow room. Glad I learned this while working in digital... A Super8 cam is much trickier to focus; bigger puppets will save me a lot of grief.
For folks who are wondering about tech details, here's the scoop. I'm shooting photos with a Canon Powershot G5 digital camera. I'm using the laptop computer to activate the shutter release, using a software application that came with the camera: RemoteCapture. The computer is a Macintosh PowerBook G4. I've been doing research on framegrabber software, but none was used on this project.
...Overall, I'm thrilled with the piece. There are some glaring problems: I bumped the camera several times, there are pauses that last too long, the spinning sequence is too slow, and the blocks' "body language" doesn't always make sense. Even so, it's a complete story -- which counts for a lot. And there are several bits that came out really well -- like when the zig-zags shoot around and you see the action carry over from one shot into another, and when the word "really?" seems to wrap itself around the cube.
It took seven hours, non-stop, to shoot. That's about 11 seconds of footage per hour. My previous experiment with animating blocks averaged out to 10 seconds of footage per hour -- so it looks like I'm pretty consistent (at least with these puppets). I finished the thing at 2:45 in the morning. Exhausted...
But euphoric. :-)
posted by sven | permalink | categories: movies, stopmo, writing
January 6, 2006
while moon baby's in the hospital...
by sven at 11:59 pm
Tuesday and Wednesday I did a few more simple stopmo experiments. Can't let Moon Baby being in the hospital bring everything to a halt!
click on image to play movie (139 KB) Tuesday night I went over to the studio; threw together a bit of 2"x2" pine scrap, masonite, and bronze (?) wire; painted it all white, and taped on a paper face. ...Voila! New puppet.
It only took about an hour to make; I consider it a throw-away. The masonite base is so I don't have to worry about tie-downs and walking for a while; it just slides around. The arms are too stiff to do much with... However, I did try something new: drilling holes in the torso, and weaving the strands of wire through -- a good idea that I'm borrowing from Nick Hilligoss. I also gave this puppet some fingers using very thin aluminum wire, just to get a feeling for what that would be like.
Earlier Tuesday afternoon I was brainstorming story ideas. When I was making this clip, I had this story germ in mind:
"a solitary artist [...] nightly looks at the stars, paints them and paints them, and ultimately releases a star into the sky from his own chest"I liked the look of the puppet interacting with the paintbrush -- but it also turned out to be pretty difficult making it grip the prop. Puppet hands aren't people hands; that's something I'll have to remember. Maybe they'd grip better if I exaggerated the length of the fingers?
click on image to play movie (427 KB) When the painter in the first clip is making his spiral line, that was drawn in with a black crayola marker. ...I wanted something without fumes! The look was so appealing, I decided to try something else with the markers.
The light in this second clip is pretty awful -- I've been doing my work on the livingroom floor again. Gretchin was typing on the couch, so I wanted to hang out with her. ...This experiment was a nice surprise for her when she finally looked up, too. :-)
click on image to play movie (776 KB) I did this third clip the following night, after being out doing Artist's Way postering all day. Again, terrible lighting in the livingroom -- and I forgot to turn off the camera's auto-focus for the first bit. Still, this was my longest stopmo clip to date -- 363 frames @ 24 fps for 15 sec.
Like I said in my last post, I'm thinking now that the final project ought to be done animating objects rather than puppets -- hence the blocks. The blocks were cut off the same 2"x2" piece of pine that the artist puppet came from -- using a miter saw to get straight lines. I taped on photocopies of my face just to make them a bit more interesting. I chose to go with black and white because the Super8 final project will ultimately be shot on b/w filmstock.
My lesson while working on this clip: it's easy to make things zip around on screen way too fast! Move the objects in even tinier increments, and have them pause longer -- 24 frames per second is a lot of space to fill.
posted by sven | permalink | categories: movies, stopmo
January 5, 2006
story writing experiment
by sven at 2:17 pm
For a couple of months I've been going to "Church of Art" meetings. This is a small group of artists (mostly painters) that meets once a month at World Cup Coffee for a show-and-tell session about what they've been working on. One of the members recently wrote:
"One of my favorite artists, Corita Kent would push her students to come up 50 or 100 ideas for a project. She said that when you scrambled through the first easy ones, then worked harder for the next ones and really had to scrape for the last ones, you found out what you were made of."I like this idea very much! It's very much in line with my "quality through quantity" ethic.
...Also on my mind, this post from Pjotr Sapegin that I found on the StopMotionAnimation.com "story" forum. (Pjotr's from Norway -- be nice about his spelling.)
When you write a film-script, the dialog comes last in the prosess. You should write a short Sinopsis first, to have your story strate. Then you write a Treatement, where you brake your story in to the sceens, and there might come a little-bit of the dialog. When you are satisfied with it, you write the actuall script, basycaly, felling up your treatement with the dialog.Storytelling, admittedly, is one of my weak points. I'm a very visual thinker -- more comfortable quickly sketching a storyboard than trying to work out a film idea using just words. This has led to problems with "Let Sleeping Gods Lie": I find myself now trying to rewrite both the beginning and the ending, because what looked good in pictures stopped making sense when I had to actually explain what was going on. I swore that for the Super8 class' final project, I'd try to do better.
So, with the two quotes above in mind, I set out to develop the "moon baby helps a star" story. I set for myself a goal of writing 50 to 100 different concepts, each with a serial number, and only a paragraph long. ...I spent two hours writing and made it only to 25 -- but it was a good experiment, and served its purpose.
I figured out that I could do a pretty good story about a dragon stealing a star, scared away when Moon Baby -- aided by fireflies -- creates a terrible shadow on the wall of the monster's lair. However, this story would take more puppets and more shots than I have time for right now, in the context of the Super8 class. My second-choice story deals with a solitary artist who nightly looks at the stars, paints them and paints them, and ultimately releases a star into the sky from his own chest. This is much more doable...
But at the end of it all, I've been convinced that I should go for something simpler still. I'm holding onto the Moon Baby concept -- possibly for submission to the quarterly StopMoShorts.com competition? In the meantime, I'm looking into what I can do with animating objects, like blocks. "Something is better than nothing" -- being too ambitious could easily prevent me from finishing anything for Super8.
...Want to see those 25 story synopses I wrote? Read the complete text file.
posted by sven | permalink | categories: movies, stopmo, writing
December 29, 2005
little black tears
by sven at 1:05 am
My poor puppet "moon baby" has broken!
I worked all day on finishing my new puppet... And then his left arm snapped off. This setback would be devastating -- but I'm trying not to let the hurt in too deeply; I need to believe that I can still save my baby.
And everything was going so well...
body made of unbaked Sculpey The first thing I did today was paint Moon Baby's eyes black. I'd been intending green, but time's at a premium, and this was simpler. It reminds me of the eyes of your stereotypical "Close Encounters of the Third Kind" alien -- and of a great white shark -- and of the tree spirits from "Princess Mononoke". I like it.
I thought maybe I could cut corners by encasing the armature in unbaked Sculpey. When I did so, it turned out that the puppet became too heavy -- the ankles couldn't support the extra weight. Still, it was a good exercise: it helped me get a better sense of the physical dimensions I was after.
body made of poly foam So, I went back to my original plan: to cover baby's body with poly foam. It's probably for the best; it's better to put in extra time making a good puppet up front, rather than be cursing the puppet later while you try to animate it.
A week or so ago when I went out shopping for foam, I found something wonderful: "Poly Foam Weatherseal Self Stick Tape" from Frost King. I want to strongly recommend this material to stopmo puppetmakers who are using the build-up method. This tape is 3/4" wide, 1/4" thick, and came in a 17' long roll. It's intended for insulating windows, and I found it in the hardware section of Fred Meyers (our local department store). It cost maybe $3.00.
...It's the kind of foam that you would normally use for bulking out a puppet -- but because it comes in tape form, you don't have to deal with messy, toxic sprayment! It's also good for creating a symmetrical body mass; you layer small, precisely measured pieces of foam -- rather than having to whittle down a huge block. Really, it was a joy to work with.
working on the costume For Moon Baby's costume I wanted a sort of black burlap muumuu. I had some tan burlap on hand, so I dyed it black with india ink. It did the job -- but also rubs off on the hands over time, which leads to smudging baby's head. I thought it would be a good idea to paint the back of the fabric with liquid latex. It had a loose weave that I wanted to seal, and I figured a stiffer fabric would move less randomly when I was animating. This was probably a mistake; the stiffness impairs the armature's ability to hold its shape, somewhat.
I created a pattern for the costume by trial and error using pieces of paper and tape. When I thought I had it right, I tried out the pattern using burlap -- but not the burlap I'd treated with latex yet. Looking at the burlap, I made some further changes to the pattern, which I now drew onto graph paper. I cut these templates out, and using a yellow watercolor pencil (because it was at hand), marked out my cut lines on the black stuff, and cut.
At this point I realized that I should deal with the wrists, ankles, and neck before going farther. These bits (I gather) are always difficult to construct. I decided that with the look I'm going for, it would be adequate to just wrap them with string. I thought about painting the string with latex, but then decided it wasn't really necessary. The string for the ankles was dyed black using india ink again. The ends of the string were fixed in place with a dab from the hot glue gun.
Now I started attaching the muumuu. A while back I read that professional costumers in the theater have a trick for quick clothing construction: they use a hot glue gun to make their seams, instead of a sewing machine. Perfect! I hot glued the arms of the costume directly to the body...
...At which point I realized that the arms weren't bending as easily as they should anymore. The poly foam "muscle" combined with the costume was just too springy, and baby couldn't hold a pose without it slowly sliding out of place. So I tore open the sleeves, and tried cutting through the foam -- incising rings down to the "bones", so the joints could move more easily.
amputated! That's when it happened. The arm just snapped off.
At first I thought I must have nicked the wire -- which is death for an armature. But now as I look at it, I see that the wire broke right where it goes into the epoxy putty. Maybe the arm was working as a lever, and all the strain was put on that one point. I've read about people reinforcing the entry point with silk thread... Maybe that's what I should have done.
...I'm hopeful that I can still salvage this puppet. I've already put at least twelve hours into him, and have grown fond of the character. I think maybe I can drill new holes into the epoxy and replace the wire. But it will be difficult.
I'm left with questions about how other puppet makers deal with musculature. Replacing the wire will fix the problem, but what should I have been doing with the foam in the first place? Was incising the foam at the joints the right way to create mobility? What if I tried wrapping string in these areas, too?
My next step is going to have to be writing a sad post to the www.stopmotionanimation.com forum...
posted by sven | permalink | categories: movies, stopmo
December 28, 2005
sets for "moon baby helps a star"
by sven at 11:10 pm
Yesterday I started work in earnest on making a stop-motion animated short -- spurred on by the approaching deadline for the Super8 class' final project. Tentative title: "moon baby helps a star".
basic animating set up I commandeered Scarlet Star Studio's meeting space and began assembling sets. My basic set up involves two tables with pegboard bridging the gap between them. Since pegboard is pretty flexible, I reinforced each of my two big scraps with wooden rails. I've got three spot lamps that I borrowed from Radius Studio; super8 requires a lot of light. I put a little step ladder next to the table so I could easily get up there and take shots looking down at the set.
experimental set I like to brainstorm with my hands, seeing what I can make with what's around me. I like the sense of improvization... And in this case, it helps me avoid fantasizing about things that I don't have time to construct. At this point in the game, I'm still working out what my story is going to be; the impromptu sets I've been trying out are suggesting story ideas as much as anything else.
One interesting thing I discovered while doing this physical brainstorming: it's helpful to have the set about a foot higher than table-level. When I'm sitting in a chair, this puts the floor of the set close to eye level -- so I don't have to crawl under the table to screw in the tie-downs. In the photo above, you can see that I've put one of my pegboard scraps up on bricks, and have a test set thrown together.
cave set I've found it very useful to have a digital camera handy while I'm playing around like this... It allows me to try out different camera angles, and later on I can string the photos together into a sort of storyboard. Since the Super8 film stock I'm working with is black and white (and silent), I took all my test shots in b/w.
the cave entrance The cave walls are made out of butcher paper that was packing material in a box of art supplies that Gretchin ordered. It had such an interesting texture, I knew it would come in handy when I got around to animating! In that same box, there was also this interesting paper mesh... Turns out it's excellent for creating a floor texture that still allows tie-downs to pass through.
nighttime outside Here's an exterior shot. The dark sky is two huge pieces of black foamcore. The mountains and hills are leftover insulation foam from a sculpture project several years ago. The stars were decorations I made for our tent when we went to Burning Man in 2004.
So, the story as I've imagined it so far: Black shadow creatures steal a star from the sky and whisk it down into the depths of a cave. "Moon Baby" -- a name that Gretchin suggested for my new puppet, which I'd been referring to as just "baby" -- also lives in this cave, and discovers the kidnapping. He steals it back from the amorphous nether creatures, and after consulting either a map or some sort of guardian being, journeys to the entrance of the cave. Stepping into the outside world, he throws the star back into the heavens, and all the stars above dance in joy.
posted by sven | permalink | categories: movies, stopmo
December 27, 2005
Nice model... But can you animate it?
by sven at 12:15 am
I've been very focused on learning how to build puppets to animate... Yesterday I suddenly realized that I've neglected learning how to actually put them in motion!
When I think about it, I really haven't done much animating at all. The last time I worked with animating objects was nearly two years ago. You can still see those experiments at my old Sven's Animation site. Since then, I've been working mostly with LightWave 3D for the "Let Sleeping Gods Lie" project -- but that too has been mostly about modeling so far.
So I set to the task of learning and re-learning the basics of stop-motion animation. ...And thanks to Jason Gottlieb's definitive tutorial on compressing stopmo for the web, you get to see all eight tests that I've done so far! Some of these are pretty bad -- but I include them here because the learning process (beginning from zero) may be interesting.
click on image to play movie I'm using a Canon PowerShot G5 camera attached to a Macintosh PowerBook G4. Using the software RemoteCapture (which came with the camera, I think) I can activate the shutter release without touching the camera, and the images go directly to the computer, rather than into the camera's memory card.
In RemoteCapture, these are the steps to get ready for shooting:
- in "preferences", select the folder you want shots to go to
- now in the "shooting remote" window, set size to "small/fine"
- in the same window, hit the button to turn the view finder on and then adjust zoom
- put the puppet in shot and take a test shot
- if it's in focus, then set the autofocus (AF) to "locked"
- delete the test shot
- ...and go!
After all the shots have been captured, I use the software QuickTime Pro to open the shots as an "image sequence". The newly created movie is then saved. It's from this master that I create the compressed versions you see here.
In my first test (above), the camera is just sitting on the floor, and I'm scooting a bottle of embossing powder (a Christmas stocking stuffer) across the floor. The picture vibrates, going in and out of focus... This is because I didn't have the auto-focus locked yet.
click on image to play movie In this next clip, I'm moving the embossing powder again (this time upsidedown) -- but with the auto-focus locked. There's still some variation in light, but this is because I'm using daylight (which changes as clouds pass) and my shadow occasionally falls in the frame.
click on image to play movie Moving a solid object in a straight line? Not very interesting. So I grabbed another stocking stuffer -- a fuzzy sock -- and made it worm its way across the floor. Cute! But now I realized that the foreground is really blurry. That's because the camera's just sitting on the ground; it can't focus both on the foreground and the midground at the same time.
click on image to play movie In the fourth test, I put the camera on top of three DVD cases -- that was enough to get rid of the blurry foreground problem. This time I wanted not just to imply character, but to show a relationship between two beings. The star globe reacting to the orange is fairly compelling, I think.
...This was the last test I did before going to bed on Christmas night.
click on image to play movie This afternoon I dove into some more elaborate tests. I commandeered the livingroom cofffeetable, leaned a big piece of black foamcore against it for a background, and taped down a piece of butcher paper. I pulled out some Sculpey, and after conditioning it by running it through a pasta maker, created some very rough characters.
In my imagination, what's happening here is two tree beings get blown around by the wind; the little one cries out a complaint, and the old one blinks its eyebrows dispassionately; the little guy sneezes, and with a few more blinks, everything goes back to normal. ...But it all goes so fast, I don't think the "story" gets communicated.
At this point I realized that I hadn't really paid any attention to timing. Every frame, I just pushed my puppets forward a little more -- so they were in constant motion. What about pauses? What about figuring out how long you want specific actions to last? For that matter, what about really planning out the story in advance?
click on image to play movie For this sixth test I drew a very quick storyboard. The dinosaur-head creature is supposed to notice the fruits, reach down and gobble up one, then another, and then stretch himself out on the ground in order to reach the third. It occurred to me that as an animator, one needs to develop a good sense of how long a second, half-second, and quarter-second are. So in the storyboard, I made a note for how long I thought each motion should last. I was pretty happy with this approach.
But before I could even get the dino's mouth down to the first fruit, it tipped over! D'oh! Here we have an object lesson in the importance of attaching your puppets securely to the set.
click on image to play movie Seeing that it was time to begin playing with my actual puppet-in-progress ("Baby"), I got out a scrap of pegboard and clamped it to the coffee table, hanging over the edge (see the photo at the top of this post).
The little animation of Baby interacting with this Sculpey ball works pretty well. I guesstimated how long I wanted each action to last, and helped myself keep track by counting each section of shots out loud : "1... 2... 3... 4... 5... 6!"
The foot that's tied down swivels in place when Baby turns. That doesn't look right; the foot should always be firmly planted in one place. There's also a moment when an arm swings wildly, where I either didn't give it enough time, or wasn't thinking about what was motivating the action.
click on image to play movie Finally, my eighth test: a walk cycle. I've been shooting 24 frames for each second -- using the frame rate associated with film cameras rather than DV, in order to get the classic learning experience. Sending baby from one side of the screen to the other required 178 photos, which took me just a hair over an hour to shoot.
Beginner animators obsess over walk cycles. You have to realize, though, that a good deal of action happens when characters are basically standing still. Getting walks right is a technical skill -- but what we ultimately need to focus on is acting. ...I say this in part because I could see myself being one of those people who gets stuck on striving for technical perfection, rather than using the puppets to tell a story. No, Sven!
If you just look at the feet, the walk worked out pretty well. The arms, though, are swinging way too much. With hands that drag on the ground, Baby would probably carry them in front of himself, rather than swinging them at all. The head is also painfully jerky. This is probably exactly the sort of situation where a gauge would be helpful -- perhaps one that tracks the position of the nose. [Oh yeah -- and in one frame you can see my hand in the shot!]
Problems that I knew were inherent in the Baby puppet became much more obvious. He's too small: only 5 inches tall. It was hard to manipulate his legs; and I could tell that the lack of upper arm bones (which I couldn't fit in) made a big difference while animating. He's also top-heavy. He'd jiggle a little when I posed him -- but the ankles did OK holding their shape. Note to self: ALWAYS test whether or not an armature can stand on one foot while leaning forward, before you get too invested in the puppet!
...And there you have it: eight quick tests to help me learn animation. I really recommend this process; if I had dreamed up a fancy story first, I'd have been bogged down with trying to overreach my skill level. But by grabbing whatever what was at hand, I made fast progress learning. Tomorrow I have to turn my attention to the Super8 final project -- but I can tell that if I just allowed myself to continue doing experiments without expectations, it wouldn't be long at all until my growing level of competency would start producing keep-worthy clips -- which might then be woven into an interesting whole.
posted by sven | permalink | categories: movies, stopmo
December 23, 2005
new stopmo puppet - in progress
by sven at 9:29 pm
For several weeks I've been obsessed with learning how to make puppets for stop-motion animation. I studied and studied -- and now I'm making one of my own...
How I came up with the design is interesting... I was experimenting with different ways to generate stories for my Super8 final project. I tried:
- photographing improvised dioramas
- quickly brainstorming story elements, drawing each one on a separate piece paper
- writing ten one-paragraph-long story ideas as quickly as I could
- beginning from the characters: sketching pictures of possible puppets
[So far, working with dioramas has worked the best. I found that when I drew story elements, I tended to only draw solitary characters -- working with "dolls", on the other hand, immediately implied relationships. Writing story ideas, I tended to come up with poetry -- neat, but it felt too abstract.]
...When I tried doing character designs, I managed to spit out 35 sketches in about an hour and a half. I used fat crayola markers on the backs of junk typing paper -- it was nice not to be inhaling toxic fumes! The sketches were rough, but conveyed emotion... From this, I just had to leap into constructing them in 3D!
I'm surprised myself that I chose this picture to start with. But for some reason, the little "baby" on the far left really spoke to me. In my imagination, I see this shy family of what's-its cowering in a cave somewhere, eyes almost blind from disuse, whispering unintelligible things to the moon when they occasionally creep up to the outside world at night.
I started puppet construction by drawing a quick outline of the character on another piece of paper, marking out where I thought the bones should be. I took some sculptor's aluminum armature wire (1/16", I think), folded it in half, and used a hand-held drill to twist the two strands together. Interesting: the wire becomes a straight and stiff rod in the process... It's easily bent -- but this first transformation fascinates me.
I created three lengths of twisted wire: one for the legs, one for the arms, and one for the spine and head. The lengths for the legs and head I folded and twisted a second time, so they'd be four-strands-strong. These bits turned out smaller than I expected -- when you twist the wire, it shortens noticably.
Next I created some "bones" out of plumber's epoxy putty. The armature here is about 5" tall -- which is overly small -- so I couldn't make all the bones I'd imagined. Nothing in the legs, and bones only in the forearms.
This is my first time working with epoxy putty... Overall I liked it. It starts setting up in about 5 minutes, and is steel-hard in 20. Since I wasn't creating any details, that was plenty of time. (Glad I wore latex gloves, though.)
Notice that I epoxied some bolts onto the feet loops. The armature is able to stand up because there's a bolt coming up through a hole in that piece of wood, screwing into the foot.
For my first puppet I figured I'd just have a single-expression face -- expressiveness would have to come from body language. I got out some Super Sculpey and "conditioned" it by putting it through a pasta maker several times. ...I got the stuff to begin working with Sculpey quite a while back (last year?), and I tried a few tests then -- but this is really my first time doing a serious project with the material.
I used Super Sculpey to put on a head, hands, and feet. I smoothed the head by using a loop tool and then brushing with isopropyl alcohol. The rubbing alcohol is supposed to act as a solvent, softening the sculpey; it did somewhat, but I was disappointed. Turpenoid is stronger; I'll be trying that next time. ...Even so, I got a pretty darned smooth head. I wasn't as concerned with the hands and feet this time around, and didn't work them too hard.
You're suppossed to bake Sculpey at 275 degrees for every quarter inch of thickness. I guessed that there were places on the head a full inch thick, so I chose to bake it for an hour. That was a mistake. I got severe cracks in the head, a pinky fell off the hand, and one of the feet broke. Meh.
According to Smellybug's insanely cool tutorial on maquettes, the way to fix cracks is by putting superglue in, smearing on Super Sculpey, smoothing it with turpenoid, and then hitting the spot with a heat gun. I tried this and only wound up adding some scorch marks to the puppet. However, I found that I could just smear Sculpey into the cracks like you'd use wood putty on a nicked chair; it was fine even without baking.
After making repairs, I sanded the head even smoother, and then painted all the Sculpey bits with four coats of white acrylic. I used a bit of kitchen sponge to do the application, which gives the whole piece a really neat stone-like texture. I think I like it better than brush-work -- but in the future I might try using an airbrush to get an even finer surface.
That's where things stand at present!
Notes on what could be improved:
- 5" is too small a scale -- puppets should probably be between 8" and 14" tall
- bake Super Sculpey at a lower temperature for a longer time (200 degrees?)
- a basecoat of black paint, with white sponged on top of that, and then color stains, would probably give me a better look
- try using an airbrush next time?
- I shouldn't have used tin foil to bulk up the head; it's a little loose on the wire
- there should be a more distinct neck; the head almost rests on the shoulders
- the shoulders could have been wider
- truly flat feet would work better; bolts on top of wire loops = uneven footing
- I think Nick Hilligoss' T-style tie-downs would be easier to work with on set
(Still, I'm very enthusiastic about what I've accomplished so far.)
posted by sven | permalink | categories: movies, sculpture, stopmo
December 8, 2005
research: stop-motion puppet construction
by sven at 9:24 pm
I stayed up way later than I should have last night -- researching how to make stop-motion puppets. And I'm very excited about what I've learned. I'm going to break this into sections...
I. RESOURCES
By far, the best general resource I found was at StopMotionAnimation.com: their Stop-Motion Newbie Guide rocked my world.
Really -- I've been fascinated with stop-motion animation for years, and this site taught me things that I'd never seen addressed before. ...It was valuable to the extent that I feel compelled to list what's included in their index:
- Chapter 1: A Basic Overview of Puppetmaking Techniques
- Chapter 2: Building a Wire Armature for Your Puppet
- Chapter 3: Building up a Classic Stop-motion Monster
- Chapter 4: Properties of Different Clays
- Chapter 5: Claymation or Stop-Motion - What's the difference?
- Chapter 6: Choosing a Camera for Stop-motion
- Chapter 7: The Importance of Using Gages
- Chapter 8: Stop Motion Software
Three other sites had outstanding tutorial sections: Stop Motion Works, AnimateClay.com, and www.StopMoShorts.com. Whatever educational gaps StopmotionAnimation.com left, they filled in pretty nicely.
Stop-motion animation is a rarified art -- and I'm pleased to discover what seems to be an enclave of amateurs and professionals dedicated to keeping it alive. StopMotionAnimation.com seems to be the heart of their community -- and StopMoShorts.com seems to be where they're showing finished works amongst each other. Not for prizes -- just for the love of it.
...It's very exciting for me to discover StopMoShorts.com -- they have filmmaking challenges every two or three months and seem easygoing about posting submissions. I'm seriously considering grooming future animation projects for display there...
I'm beginning to recognize the names of individuals who -- by their actions -- lead in the "StopMo" community. Four who have personal sites that have helped me greatly:
One more name I want to squeeze in: Kathi Zung. She has a homemade DVD titled "Do It Yourself! Foam Latex Puppetmaking 101" available on her website. I saw it mentioned on Kevin Kelly's Cool Tools site a while back (via Gretchin), and promptly ordered the thing. It's not where I'm going with puppet construction at the moment -- but it was truly an excellent introduction to the topic.
II. PUPPET CONSTRUCTION OPTIONS
I'm going to condense a bunch of what I learned...
Constructing a puppet for animation can be divided into two phases: (A) the armature, (B) the armature's covering.
Phase A. There are basically two sorts of armatures: (1) ones made out of bent wire, (2) ones with machined joints.
Phase B. There are basically three ways to cover the armature: (1) clay, (2) couch cushion foam, (3) foam latex.
Wire vs. Machined Armatures. When you bend wire, it has a bit of rebound; machined joints can be positioned more precisely. Wire suffers metal fatigue over time; machined joints are more generally more durable. However, it's difficult and expensive to machine your own armature.
Differences in coverings. As Mike Brent says, "clay puppets are the easiest to make and the hardest to animate". When you push clay, it smooshes -- so you have to keep resculpting it as you work. ...Foam latex probably gives you the best ability to sculpt your puppet; however, it is very tricky getting the latex to gel correctly, and it can be a fairly expensive route.
...Which leaves couch foam. With this technique, you build musculature with the couch foam (urethane), and then cover it with liquid latex rubber. According to Richard Svensson, this is what you use for "creating the King Kong-Harryhausen-type monster, dragon, dinosaur, etc". The downside: latex rubber disintegrates after about 5 years -- but then, clay and foam latex aren't particularly permanent media, either.
Considering the options, I think it's clear that any 3D puppets I create will probably have a wire armature, and be covered with urethane and liquid latex rubber.
III. CONSTRUCTION DETAILS
Now that I've decided what kind of puppets I want to make, let's take a closer look at the four main steps in their construction...
Step 1: Armature
From what I've read, it sounds like the best wire to use for armatures is aluminum -- it doesn't fatigue too quickly. Several armatures I've seen show more than one strand of wire wrapped together. My guess is that braided wire is more reliable: if one strand breaks, the others are still functional.You don't want the entire "skeleton" to be bendy -- you want to create some "bones". This can be done by putting segments of the wire through metal tubing, or wrapping them in epoxy putty, or simply by wrapping them thickly with tape. Mike Brent said this about epoxy putty: "It's used to create solid 'grab points' that allow you to feel and easily move the puppet under the padding, and also it helps to lock the twisted wire together permanently".
The following two photos were very helpful to me:
This is a wire armature with epoxy putty "bones". (by Joshua Mosley)
This armature has taped arms, an epoxied torso, and a sculpey head. (by Mike Brent) Step 2: Tie-downs
How do you make sure your puppet doesn't fall over? Bolt it to the table! You have a choice: bolt from above, or bolt from below. If you bolt from above, you can just have a slot in the puppet's foot where the screw goes. If you bolt from below, you might build a nut into the foot, and then have the bolt come up through a hole in the table. Either way, it's probably best to drill the holes before you start animating, so you won't get sawdust all over and accidentally tip over the puppet.These photos were particularly useful to me:
Notice the bolt coming up through the table. (by Joshua Mosley)
Notice the nut that's built into the shoe. (by Mike Brent)
This is a reverse-engineered "California Raisin". (from AnimateClay.com) How do you hide the holes in the table? Filling them with plugs that you can pop out when you need to is probably the best option. At www.StopMoShorts.com the tutorial section contains an excellent animated movie on tie-downs by Nick Hilligoss -- followed up by a great article by Mike Brent about how to hide the holes.
Step 3: Covering with urethane foam
Apply couch foam to the armature using spray glue. Trim it into the shape you want using little scizzors. Nick Hilligoss' site does the best job of explaining this process. Richard Svensson, however, does a somewhat better job of showing how one can shape musculature.Padded grandma. (by Nick Hilligoss)
Coach foam on demon. (by Richard Svensson) Step 4: Latex rubber skin
In his article on "Building up a Classic Stop-Motion Monster", Richard Svensson does a good job of describing how you sculpt a model, create a mold from it, and then cast a thin latex skin -- which one attaches to the bulked out puppet, much as a taxidermist would. When you're closing up seams in the skin, use liquid latex; rather than brush it on, use a sponge to get a smoother surface.Another great trick for liquid latex: fingers can be built up by applying successive layers of latex directly to naked bits of wire.
Applying latex with a sponge. (by Richard Svensson)
The fully-skinned but unpainted demon. (by Richard Svensson)
Hands made with liquid latex painted over wire. (by Nick Hilligoss) Closing Remarks
Phew! A lot of details... I'd just like to restate that I am so grateful to Mike Brent, Nick Hilligoss, Joshua Mosely, and Richard Svensson for the tutorials they've put up online -- it's so much easier to understand this art form when you can look at the pictures. If you're interested in StopMo, then please, go visit their sites!
posted by sven | permalink | categories: links, movies, stopmo
test: stop-motion puppet armature
by sven at 5:50 pm
Last night after I got back from Super8 class, Gretchin unpackaged her new computer, "Celeste". An important event! An addition to our computing family! Gretchin set the machine to upload all the files from her old laptop, "Eliot"... And suddenly we had an hour and a half to kill, waiting.
I thought to myself: "I wonder if I could build a stop-motion monster puppet in 90 minutes?" --And in a flash, off I ran to the studio.
Above, you see the results. I didn't have time to make arms or flesh the thing out -- but with some scrap wood, wire, and nails, I got a decent head, torso, legs, and feet.
How to attach the wire for joints to the wood? At first I tried wrapping the wire around and between little nails. That was a miserable failure, and actually wound up breaking the wood. So I tried drilling holes and threading the wire through. That worked pretty well -- except in the ankle joints, where the wire remained too loose.
The whole thing stands up pretty nicely if you leave it alone... But if you push it, it'll start to lean. Lesson learned: you need to have thicker joints in the legs, and your thickest joints in the ankles. The whole body is a lever, applying force at the point where the feet meet the floor...
There are holes in the feet so I could use screws to quickly fix them to the set's floor as the puppet walks forward. However, I don't think I'll be doing anything more with this armature. It's not bad -- but not good enough for extended use in animation. That's OK; the point was just to try, and to see what would happen.
This test convinced me that I need to do further research on armature construction. More on that to come...
posted by sven | permalink | categories: movies, stopmo
Super8 class takes a long break
by sven at 5:01 pm
Last night the Super 8mm Filmmaking class met for just an hour. We watched the two one-reel films that the class made two weeks ago. [We were supposed to have seen them last week, but the film didn't get sent out for developing on time.] ...The film I helped make looked pretty good: good continuity of action, decent lighting -- a few out-of-focus shots, though; and pixelation with three-shots-per-pose was jerkier than I'd hoped.
Film equipment was distributed. Now folks go off to do their final projects. Having second thoughts, I took a couple of lamps to help with lighting whatever animation I settle on doing.
We decided when we'll meet next. It turns out that we're not going to meet again until January 11, when we'll learn how to do editing. January 18 is tentatively the day when we'll all meet to view our final projects. So, the latest we can turn in our film for developing is December 29.
... I'm kinda appalled that we're going to be meeting in January. When I signed up for this class, I understood it to be a five week class. Originally, we were supposed to be done by Dec. 7! I don't think I have any conflicts, and I consented to the new dates -- but I'm shocked that the class schedule was not actually set in advance.
I suppose I shouldn't be surprised. When I showed up for what was supposed to be the first night of class I discovered that the class had been pushed back a week, and by some snafu I hadn't been notified. I only signed up for the class because I wanted to get a general sense of what it's like to work with real celluloid -- and I've gotten that. But -- and I'm sorry to say it -- I think this is probably the most poorly organized class I've every participated in.
posted by sven | permalink | categories: classes & workshops, movies, stopmo
December 3, 2005
test clip: dancing
by sven at 1:49 am
Yesterday afternoon I did a really neat film experiment in preparation for my final project in the Super8 class.
I set up a digital camera on a tripod and used the remote to take some photos of myself: full -body shots and head shots. I printed them out on an inkjet printer, enlarged them on the photocopier, pasted them to black cardstock, and cut out the bits I wanted to keep. On my desk, using my desklamp for lighting, I set up two pieces of black foamcore -- one for the backdrop, one for the ground. I have a scrap piece of wood with drill holes in it, which I put a dowel in. Then I taped the heads and bodies to the dowel and took more photos. I imported 54 stills into QuickTime as an image sequence at 6 frames-per-second...
And thus made an 8 second movie clip!
If you want, you can download the clip.
[Wow -- I think this is the first actual movie clip I've put on the Scarlet Letters blog!]
- Length: 8 seconds
- Format: QuickTime (.mov)
- Size: 2MB
Notes:
- The shadows are excellent... I could create this same clip (including shadows) entirely in digital space -- but it just wouldn't be as rich.
- There's some fluctuation in the lighting. It seems to be a matter of where the camera is pointing when it takes its light meter reading. The figure changes; the background doesn't. If I make sure the reading's being taken off the background, things seem to be OK. [I could also probably put the light meter on manual.]
- 6fps seems about right. Since Super8 shoots at 18fps (as opposed to normal film's 24fps, and DV's 30fps), I probably want to click three shots of each pose.
- The facial transitions are a bit abrupt. For my brain, my guess is that it takes a minimum of half a second to read an expression. Since the eye really focuses on the face, this is important.
- I could have done with more tweens for the leg movements.
- Cardstock cut-outs bend. This can be an advantage. It allows me to get the foot below the edge of the foamcore that I'm using as the ground. It doesn't look right if the foot is standing right on top of the line.
- The "ground" was at an angle. I like it. It might be useful for some "forced perspective" effects.
posted by sven | permalink | categories: movies, stopmo
December 2, 2005
3D storyboard: "Stole My Heart"
by sven at 11:54 pm
I'm a visual thinker. When I've tried to brainstorm movie scripts with friends, I can't do it. They're imagining a story through words -- I have to draw pictures to show them what I'm thinking.
Last night I wanted to begin creating a story to film for the Super8 class' final project. Where to begin? With collage! I went to my DVD shelves and started blindly picking out titles. I'd try to think of the most memorable scene from the film, and then I'd draw a little illustration of it. After doing this about eight times, my brain was percolating with ideas for my own scenes.
I didn't just want to do a 2D storyboard this time, though. I went to the garage and brought out leftover masonite from the pegboard project. I went to the recycling bins and pulled out printer paper. I started making people by taping sharpie-drawn faces onto toilet paper tubes, and throwing together hills by stacking scraps of polystyrene foam.
Work fast. Instead of drawing ideas for scenes, I cobbled together little dioramas and took snapshots of them with the digital camera. I didn't create them in order -- I pieced them together into a story this afternoon. I'm really excited about the process: it was energizing, and so much richer than working just in 2D. Work from the hands, not the brain.
...Too bad the story's too long to actually use for my Super8 project. D'oh!
Nonetheless, here's the quick'n'dirty story I came up with: "Stole My Heart"
1. Inside of the moon... 2. there lives... 3. a monster... 4. an angry monster. 5. Below, a village dances. 6. But too loudly for the monster. 7. It descends upon the village... 8. and seizes Little Brother! 9. The monster rises up... 10. and the villagers watch, stunned... 11. as it flies away with him. 12. Big Brother to Middle Brother: "We must save him!" 13. They set off through the woods, running... 14. and climb into their boat, at the edge of the sea. 15. Meanwhile, the monster has Little Brother in a cage. 16. Little Brother is scared. 17. The monster eyes him hungrily... 18. lifts him up into the air... 19. and swallows him down! 20. Poor Little Brother, in the monster's belly! 21. His brothers sail in their boat for a long time... 22. until they come to the island... 23. where the ladder to the sky is. 24. They start climbing... 25. and climb, and climb... 26. until they can reach the moon. 27. They confront the monster on his throne... ...Will they be able to save Little Brother? posted by sven | permalink | categories: movies, stopmo
super8 class @ radius studio
by sven at 6:02 pm
So, I'm taking a "Super 8mm Filmmaking" class taught by Mark Brandau at radius studio.
I'm a digital boy; digital is what finally made filmmaking accessable to me. But there's a sense of lacking street cred -- I wanted to take this class so I'd have a more tangible sense of what it means to shoot on real film and to edit celluloid by actually cutting and taping it together.
Plus, the price was right. Only $130 for five 2-hour classes, and the cost of film and developing is covered. That last bit's the knock-out. I've always dreaded not knowing how much the cost of real film would add up to... With Super8, I now know that we're talking about $12 for a roll of film, and about $16 to develop it. That's for just three and a half minutes -- fifty feet of celluloid, yo. Maybe not as bad as I imagined -- but still, it's comforting to have it covered on my first, experimental outing.
I've been to three classes so far. It's very informal. Mark has a collection of maybe ten cameras that he's gotten off of eBay and from thrift stores. The first night, we leapt in, and each got to shoot thirty seconds. It was supposed to be developed by our next meeting, but someone simply forgot to mail out the rolls (they have to go to Seattle). Still, not a bad start to the class. My one complaint is that the seven students weren't given a period for introducing ourselves. Anonymity is an odd dynamic to start off on, even if there's just ten hours of class time.
For the second class we broke up into two groups, each got a roll of film, and we shot a story that night. A few folks didn't show up, so there were just two of us in my group. We came up with a story about two men who share one pair of glasses. Man A wakes up, drives to the meeting point, hands his glasses to Man B, and then Man B drives home and goes to bed. The driving sequences were done with pixelation (my idea, of course) -- and I managed to break a chair while scooting around. Oops.
The third night, I'm sorry to say, was just awful. Mark showed us how to hand-process film. It's like developing photographic film... You put it in a light-fast container, and sequentially add and drain chemicals. It's a neat thing to know how to do -- but 45 minutes of just watching Mark shake a plastic container nearly killed me.
Next Wednesday we meet briefly to view the films we shot during the second class, and most students will pick the camera they want to use for their final project. Me, I knew what I wanted and checked out a camera at the end of this week's class...
I gotta to do something with animation. It's a childhood dream. King Kong, Ray Harryhausen -- if I'm only ever going to do Super8 once, then I have to try walking in the footsteps of the masters.
The cameras are all different models. Me, I'm holding a Canon 310XL. I'll be shooting on Kodak Tri-X Reversal Film. I also borrowed a remote shutter release cord, so I don't have to touch the camera itself and inadvertantly muck up the shot -- which matters, if you're doing animation.
Ee! I'm excited to finally try something I've always wanted to do. Also a little dismayed at the imprecision of it... I'm really worried about getting the shots in focus and adequately lit. It's difficult, but I'm trying to find a good emotional balance between going hog-wild -- and not getting too invested in a product that might come out really crappy.
posted by sven | permalink | categories: classes & workshops, movies, stopmo