you are here [x]: Scarlet Star Studios > the Scarlet Letters > how to make a brass ball-jointed armature (part 1 of 5)
<< before
addict
after >>
how to make a brass ball-jointed armature (part 2 of 5)
June 23, 2006
how to make a brass ball-jointed armature (part 1 of 5)
by sven at 9:01 pm
You want to make a ball-jointed metal armature. But you're not ready to buy big machines that need to be bolted to a workbench. And you're uncomfortable purchasing raw materials online, sight-unseen. ...I'm going to teach you how to make a brass ball-jointed armature using only hand-held power tools and materials that are easy to find locally.
The design I'll describe requires only a plug-in power drill and a Dremel rotary tool. It uses K&S brand brass strips which are available at most hobby stores, and brass beads that are common at bead shops. This is not a professional-level armature -- but it's a step up from the beginner's aluminum wire and epoxy putty design. It is intended to be of intermediate difficulty, and produce fairly high-quality results.
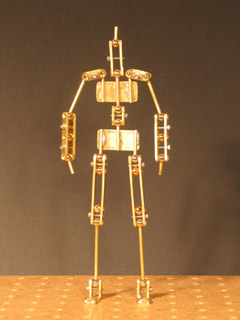
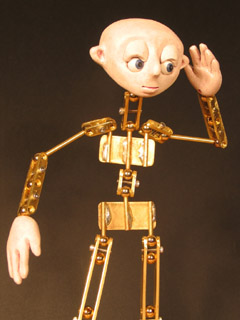
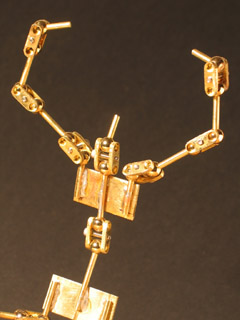
This armature is made entirely of "open hole double ball" joints. It stands 10 inches tall. I think the same materials could be used to make an armature anywhere between 6 and 14 inches tall. Be aware that brass, due to copper content, rots latex. If your puppet body is going to incorporate latex, be sure to wrap the armature beforehand. Cling-wrap or plumber's Teflon tape are decent wrapping options.
Raw materials should cost under $20. The real cost of this project is time. Two similar armatures are pictured in this tutorial. One took 19 hours to make, the other took 23 hours. ...Think of this as a two-weekend project.
Process-wise, I offer two innovations that I haven't seen elsewhere. One is the use of hollow beads for the joints' balls (rather than bearings or ornamental lamp balls). The second is what I call the "sushi roll" method of making sandwich plates. Rather than create one joint at a time, you'll do all your drilling and tapping on a long strip, which will then be chopped into individual joints.
UNDERSTAND THE BASIC JOINT
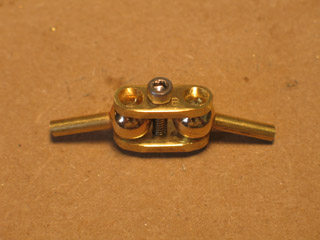
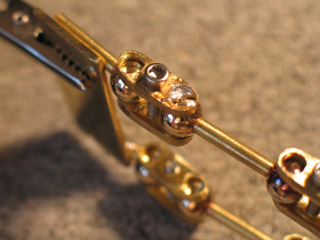
Let's examine the joint we'll be making.
Two balls sit between two "sandwich plates". The balls are seated in holes (not concave "sockets") that go all the way through each plate. The plates are pulled together by a screw. Turning the screw adjusts how tight or loose the joint is.
The screw hole of the bottom plate is threaded; the screw hole of the top plate is larger and unthreaded, letting the screw move through freely. Rather than tapping the bottom hole, one could just use a nut and a longer screw. The downside of using a nut is that more moving parts means more things that can come loose. A nut would also make the joint wider.
The screw that I'm using is a socket cap machine screw, which you turn using a hex key. There are two benefits to using this kind of screw: it's less likely to be stripped by a screwdriver, and it's easier to find by feel when you need to do surgery on a puppet for tightening.
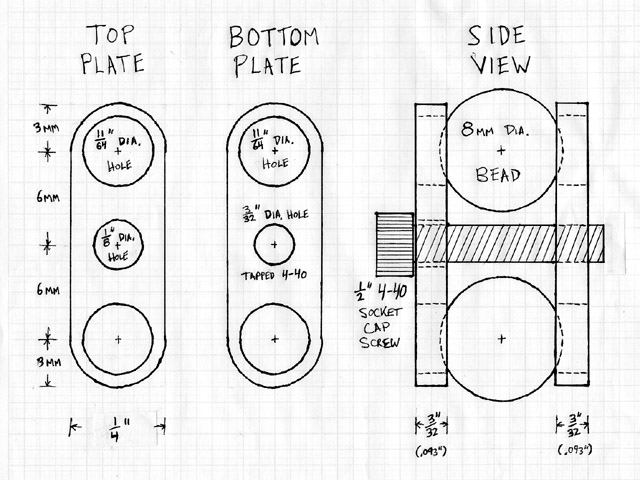
When you examine the blueprint above, you'll notice that the measurements are in both inches and millimeters. Beads, it seems, are sold in metric units. K&S brand brass strips are measured in inches. It's an unfortunate disparity... But so long as you have a ruler with inches on one side and centimeters on the other, it shouldn't pose a problem.
The shortest joint that I've been able to make using these materials is 18mm in length. It has the most "basic" design. Making longer joints introduces complications -- which I'll talk about in just a moment.
WAYS TO USE THE JOINTS
There are two strategies for how to make an armature using "open hole double ball" joints. One is to mass-produce generic joints, all 18mm long. The other is to make joints of different lengths, each specific to the part of the body that they'll represent.
Mass-producing joints has some benefits... It requires less advance planning. It allows you to get a sense of how big the joints really are before committing to limb lengths. Conceivably, batches of these joints could be kept on hand, so you could assemble armatures more quickly when the mood strikes.
Using generic joints also has significant drawbacks. The biggest problem is that you wind up with double-jointed elbows and knees. There's a solution for this. Solder fits in one of those plate holes very nicely. At the elbow or knee joint, freeze one of the balls in place with solder -- leaving just a single point of rotation.
Unfortunately, this solution creates additional problems. The balls in the "open hole double ball" joint have already been soldered onto rods. Soldering a second time risks undoing the ball's join to the rod. Furthermore, soldering points are weak spots on the armature; the more places where you have solder, the more places where the armature can break. Generally, it's best to use solid pieces of metal wherever possible, rather than soldering bits together.
Also worth noting: When you're freezing joints in place, it can be difficult to get your limbs perfectly straight. With the limbs being made out of so many bits, all going at slightly different angles, it's sometimes difficult for your hands to make sense of the armature's shape as you pose it. As a rule, intuitive is better.
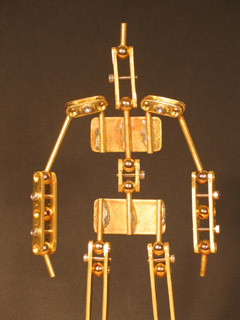
The alternative to using mass-produced generic joints is to custom-make long sandwich plates for specific parts of the body. This is less likely to break, gives straight limbs. and feels more intuitive to the animator's hands. The main downside is that the limbs are now somewhat wider.
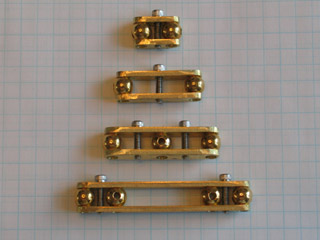
If a joint is too long and only has one screw in the middle, then it will be loose. If you try to tighten it, the plates may begin to buckle. The solution is to put two screws in the joint, each as close as possible to one of the balls.
If you do only this, though, then tightening the joint becomes difficult. The tightness of each screw will impact the other. Thus, it's a good idea to put a spacer in-between the two screws, so that they can be tightened independently of one another. I find it convenient to use spare balls as spacers.
The longest single-screw joint on my example armature is about 34mm long. This is pretty much the maximum that the joint can tolerate. At 36mm and longer, switch to using two screws with one ball spacer in the middle. For even longer joints -- such as the 66mm legs -- use two ball spacers.
It's best to keep the distance between balls (or balls and spacers) short. It keeps the joints tight, which gives you more control while animating. You don't want your armature falling over mid-shot, right?
Leap from here to...