April 11, 2005 archives
you are here [x]: Scarlet Star Studios > the Scarlet Letters > April 11, 2005
<< before
April 7, 2005
after >>
April 12, 2005
April 11, 2005
artist's way: week 12
by gl. at 10:41 pm
today we created image cards and created a collaborative story from them. one of the participants said she was angry at parts of this chapter; thinks julia is stretching her even thinner than she already is.
next week is the last artist's way & the omega project, which panicked one participant tonight because he thought we had two more weeks left. i can't believe it's almost over!
posted by gl. | permalink | categories: artist's way
LSGL work session #11
by sven at 10:29 pm
Time in studio: 4 hrs
Accomplished:
- further streamlined process for framing shots of cave
- created three backdrops for the lavamen
Commentary:
First of all, I want to show folks what the new tunnel set looks like viewed from the outside:
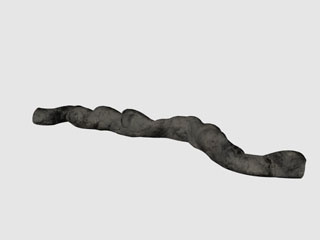
I've been trying to get good use out of the new model -- and got three more shots out of it today... But I'm running up against problems with regards to the texture. I think the texture's sized wrong. Continuity of color is also a problem.
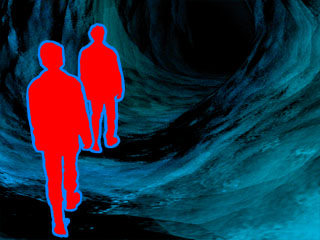
I'm thinking now that I'll have to go back and re-tweak all of the shots in this tunnel sequence. Recall that the shot of the tunnel I produced last Monday was almost purple, and really, really smooth. Part of the problem there was that I colored my shot using PhotoShop -- where I could saturate colors beyond 100%. All coloring should really be being done in AfterEffects. [With the exception of the first entry shot, where I have to merge the "watercolor" world with the cave world.]
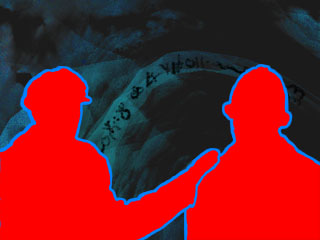
The lettering in the shot above presents another problem. The easiest way to create the carvings is to paint them in PhotoShop using rough brushes. However, if the letters show up in more than one shot, how am I going to re-apply them? And even if I just paint them, rather than modeling them in LightWave, I'm going to need to pay more attention to shadows than I did on this first pass. Letters that sit in shadows are going to be less distinct than ones in the light...
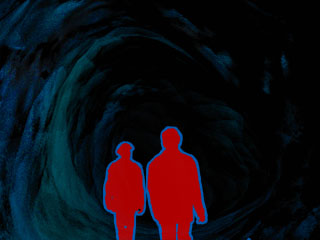
In this third shot that I produced today, the lavamen are supposed to disappear into the dark, swallowed. I can accomplish the effect by both fading the lavamen out and fading the cave itself to black at the same time, I think. The trouble this time is that the "black light" shot from last Monday also has the lavamen walking into darkness. Perhaps I should have them going into a better lit patch first? I came up with a few really cool lighting designs last week that I might be able to put to the purpose.
At this point I've resigned myself to doing a "draft" version of this chapter, then going back to fiddle. I haven't ascertained yet if I'm going to have to model more tunnel sets. ...At least I've got a grip on how to sculpt them now.
Next Steps:
- revisit the texture of the tunnel set
- finalize a color scheme, at least for the entry passage
- experiment with an alternate lighting scheme for the early part of the set
- work out a stretch of the tunnel for an animated camera pass
- reorganize .psd files that are being used for tests, before a mess builds up
- create a better naming scheme for LightWave scenes
posted by sven | permalink | categories: let sleeping gods lie, movies
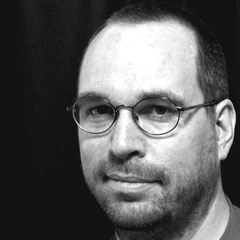
Portrait of Michael Hall
by sven at 12:31 pm
My friend and personal tech guru Michael Hall asked for "something creative" for his birthday. So I decided to paint a portrait of him. Portraits, I figure, are a very appropriate way to celebrate a person's birth.
I started with this photograph, which Michael uses as a by-line for his on-line columns:
Next, I fiddled with the image in PhotoShop -- mainly using "posterize".
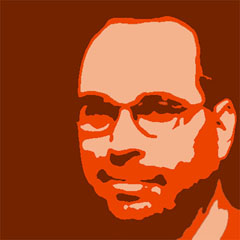
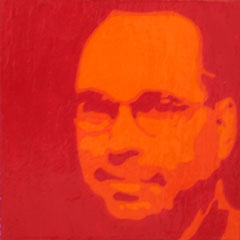
I applied "find edges" to the image, printed it, applied graphite to the back of the paper, and transfered the image to to a 5"x5" piece of hardboard by tracing its lines with a pen. The hardboard was gessoed, and I applied an undercoat of red. The image was painted in acrylic, and I applied two coats of "clear tar gel" to give it a glossy finish. The end product sort of looks like a porcelain tile.
To frame it, I used left-over wood from the flat-files project. The rim is built out of wood from the rails -- and is the first time I've cut a 45 degree angle since I got my new mitre box. I didn't have appropriate nails, so the rim is just hot-glued on. The "tile" sits on a riser made from another piece of hardboard.
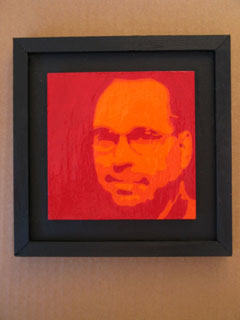
Including photo-manipulation (which I didn't time), the project probably took 6 hours. I'm excited -- it's a relatively simple gift to make, and it has a high "impressive" factor. I've been wanting to get into acrylics more; 5"x5" is an approachable scale. I could see myself making similar paintings as gifts in the near future...
In fact, I've already agreed to do a similar piece for Michael's partner, Alison.