you are here [x]: Scarlet Star Studios > the Scarlet Letters > mass producing joints
<< before
mhcc calligraphy: class 10 (final project)
after >>
process and product
March 25, 2006
mass producing joints
by sven at 11:59 pm
A week ago I showed off my first successful brass "open hole double ball" joint. Since then I've been working on figuring out how to mass produce these things.

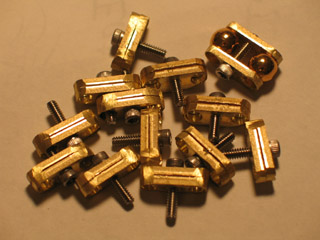
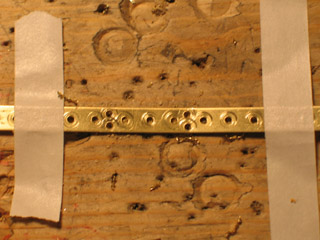
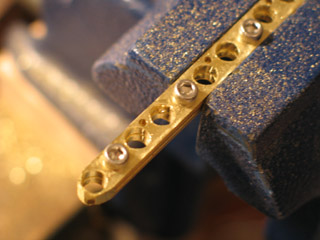
The photo above shows where I got to tonight. This is my second attempt... And I expect there'll be a third. When the process is perfected, I want to do a tutorial.

With my first attempt, I started by cutting forty 18mm-wide plates. That was a mistake.

Problems with attempt #1: It was incredibly fiddly getting the parts in and out of the vise... The plates weren't always perfectly even with one another...

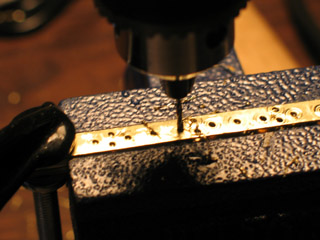
...And I broke two drill bits -- I believe because the drill would knock against the head of that screw as it punched through the brass strips.
Drat. I had a batch of 20 joints getting close to completion. But then I discovered the design (or rather, the process) was fatally flawed.

I was in the middle of a conversation with Gretchin, and suddenly stared off into space... Ah-ha! A new idea for how to mass produce these joints!
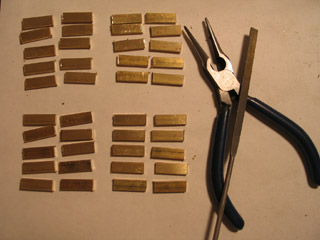
The gist: Rather than do one joint at a time, bind two strips of brass together, drill all the holes, and then cut the strips into pieces.

This time I made a template out of a thin piece of metal. It turns out that the template strip was too thin (it curled!) -- and I also drilled more holes than I actually need -- but the concept is sound.
When I got around to using the template to drill holes in the plates, I used lubricant for the first time. Just water -- but the difference was noticable nonetheless.

The K&S brand brass strips I'm using are .093" thick, 1/4" wide, 12" long. K&S has seven standardized displays that they send out to retail stores. The .093" thick stuff is only sold in their "jumbo" hobby metal display. I can name six stores in Portland that sell K&S -- but only one has the jumbo display.
I bought the last two strips in the store last Sunday. I used these up in the failed first attempt Monday. ...Waiting until Friday for the store to get new stock in was murder.

On the first attempt I used a fine-point Sharpie to mark measurements, and a hammer and a brass screw to start holes. For my second attempt, I used a metal scribe and a center-punch to make the template. It's my first time with these tools, and they helped a lot.
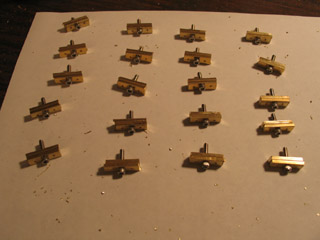
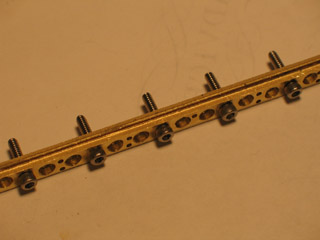
In the picture above you see the two strips fully drilled, and I've added 1/2" 4-40 stainless steel socket cap screws. Adding them in after all the holes have been drilled, I didn't have the same problem with breaking bits this time.

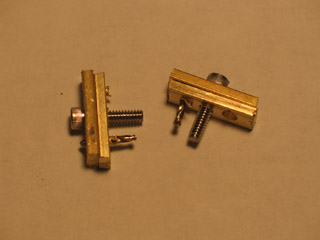
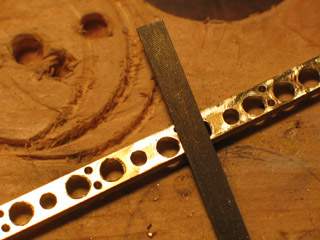
For cutting the individual joints off of the strip, I used a Dremel with a reinforced cut-off wheel. I tested normal cut-off wheels, and a jeweler's saw first... The jeweler's saw gave a nice hair-line cut -- but I broke two blades on my first two cuts -- so I'll be reserving that tool for finer work. The regular cut-off wheel made a cut 1/32" wide, whereas the reinforced wheel made a cut 1/16" wide. Given the amount of cutting I'm doing, durability won out.
Even with it being reinforced, I've worn one blade down from the size of a quarter (larger, actually) to the size of a dime -- and another splintered and flew at my face. Thank goodness Safety Boy is fastidious about wearing his safety goggles!!
An unforseen benefit of cutting the joints off of a strip: immediately after making the cut, I can round off the joint on one side. ...You see, this is such a time-consuming process -- every motion that you can eliminate from the workflow makes a difference.
I think I'm going to need 17 joints to make an armature. If they all prove functional, it looks like I got 13 done tonight. I may just try to salvage the remaining four from attempt #1.
--But there will be an attempt #3 -- and soon. The process is so close to being right...
posted by sven | March 25, 2006 11:59 PM | comments (8) | categories: stopmo
Comments
WOW! Man you're really into this armature investigation... You're taking the whole stopmo thing quite seriously, and I wonder...Are you planning to make this for a living or something like that?
See ya'
Posted by: Ale at March 26, 2006 7:19 AM
I think we'd all like to do this for a living, Ale...I know I would...I eventually want to make a live action film that involves stop-motion, like a stop-mo horror Roger Rabbit! Gimme about a decade :P
Hey Sven, way to crank 'em out! I'm impressed...get that factory going! 13 completed in one day sounds great to me...just think how many you'll be able to do in one sitting by the time you perfect the process...How about posting a sketch of your vision for the finished armature? 17 ball joints sounds like a lot to me, I can't picture it...
Posted by: Ubatuber at March 26, 2006 10:48 AM
Damn it! It ate my comment again :(
'sigh'....Here I go again... Uba: I'm not pretending to do this for a living, it's just a hobby...And many guys arounf SMA forum don't want that either...there was a post about it some time ago. And about the armature, 17 joints is fine, Stikfas have 16 or 18....which makes me wonder...There might be some joint missing over there... Can't wait to see the finished product!
Posted by: Ale at March 26, 2006 1:28 PM
Wow, you've been a busy boy!
Looks like you're getting the whole assembly line process thing well in hand... that's the way to do it! I have some reservations though... looking at your pics, that last one in particular, sohwing the strip with screws in place and the end rounded off.... it looks like the hles might not be completely aligned. The centers of all 3 holes must be in a straight line or it will throw off your joint. Also, careful you don't grind off too much material! It looks like you're getting awfully close to the holes in the finished piece. Especially since you're using brass rather than steel, you want to keep plenty of material for stability and strength.
So, you're making all short joints I see... maybe that's why you need so many? Did you decide against the full-length sandwich joints like I used for Ahab and LIO used for most of his example pics? IMO it's easier with the long joints used for forearms or upper arms, and then a rod for the other part of arm... and same for legs. But it does make for a bulkier puppet (hey, that shouldn['t be a problem with your husky puppets).
Anyway, you're a freakin' factory! I wish I was that productive!
Posted by: Darkstrider at March 27, 2006 3:50 AM
Hey Ale -- Thanks! ...No, I don't have any ambitions of doing this for a living. (Though if LAIKA asked me if I wanted a job, I'd really have to do some hard thinking...)
Stopmo is art. I want to learn the craft side of it fully, so I've got the ability to put anything I imagine onto the screen. I want posing a puppet to be a joy, rather than a struggle. I want pro-level puppets for my amateur-level hobby. :-)
Posted by: sven at March 27, 2006 10:40 PM
Hey Jeffrey -- I don't have a photo / scan of the armature's blueprint handy... Just wait til Wednesday or Thursday -- I should have the armature done by then. I got everything from the waist down pretty much done last night. Thought I'd have it completed today, but I'm plumb tuckered out...
Regarding the number of joints: Turns out I only needed 14 after all. Here's the list: 2 ankles, 2 knees, 2 hips, 2 shoulders, 2 elbows, 2 wrists, 1 spine, 1 neck. I originally thought that I'd have feet that can stand on their toes for this puppet, and a neck with two joints (like the one on LIO's skeleton puppet) -- but scale was prohibitive. The armature's going to be 10" tall.
Posted by: sven at March 27, 2006 10:50 PM
Hey Mike -- I thought that if I could mass produce joints, then it would free me up, so I could maybe just throw together a metal armature on the fly whenever I needed one. I figured if I only needed a single point of rotation, then I could just freeze one of the balls in place with solder.
But already I'm discovering problems with this design:
1: There's a lot of room for rods to pointing at wonky angles when I freeze them in place.2: Every place I solder is a potential break point. So I've got way more potential break points than I'd like.
3: Now that I've had a taste of metal joints, I sorely want anatomically accurate joints -- e.g. knees that can't bend sideways.
It's been a good learning experience, nonetheless. I've worked with the materials... I'm getting a sense of scale... And a sense for how various parts of the anatomy ought to be jointed...
I've seen pictures of the long sandwich joints around -- and I'd probably use them on a mark II design. But for Ahab I've only seen the photo of the shoulder that you've got in your gallery. Do you have others floating around somewhere?
With regards to the alignment of the holes in the photo: I think what you're noticing are the extra holes I made to tell me where to cut off the joints. To differentiate these holes from the ones essential to the joint, I set them off to the side. Turns out that the guide holes are completely unnecessary, though. So long as the essential holes are correctly placed, you can eyeball where to make the cuts -- the ends have to be sculpted into a curve anyway.
With regards to the thickness of the brass: You're right that I'm getting awfully close to the holes... It could be a problem -- but the joints seem to be holding up so far. The brass strips I'm using are .093" thick -- which is sturdier than you'd expect. But then, the real test will be when I get this thing in front of a camera...
Posted by: sven at March 27, 2006 11:25 PM
One more update before I crash for the night: I just purchased a drill press today!
Eeeeeeeee!!!
It's a 10 inch Ryobi. This paves the way for doing a proper LIO-style armature. I just need to order the type 302 steel balls, the cold roll steel strips, the rods... Um, and figure out where I'm getting the proper solder and flux...
This development may derail my plans for doing a third attempt on the brass joints. I may wind up just typing out the instructions, without the whole step-by-step photo tutorial.
(Man, it's 30 steps just for the plates!)
However, before I get around to a LIO armature, I may well go back to wire... I've got this flexible expanding urethane foam to try out. I don't want to put too much of an investment in the armature when I don't know how this covering behaves.
It could be a good opportunity to try out a Nick Hilligoss armature -- I've already got a set of his T-style tie-downs and slotted aluminum feet that I put together a while back.
...Oof. OK -- goodnight y'all!
Posted by: sven at March 27, 2006 11:38 PM