you are here [x]: Scarlet Star Studios > the Scarlet Letters > sculpting: a wingless bird creature
<< before
mhcc visual arts student show reception
after >>
thinking about set design
May 20, 2006
sculpting: a wingless bird creature
by sven at 12:00 pm

Two weeks ago I started doing a sculpt for a humanoid puppet. I was going to use this sculpt to make my first-ever two-piece mold... However, I've put that project on hold. The mold-making experiment could go horribly wrong -- it'd be foolish to put a huge investment of time into a sculpt that might just get wasted.
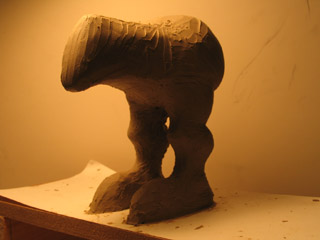
Instead of the humanoid, I've gone ahead and made a simpler beastie -- a sort of wingless bird-creature. I think I'm going to name it "buttons", after a raven-critter from Amy Winfrey's wonderful online cartoon series, Making Fiends. (A little homage, y'know?) ...Just one problem: I put too much effort into this sculpt to use it as a first test, either!
Oh well. I'm thinking now that I'll do something ridiculously simple for my two-piece mold test. Like, say, a severed arm. If that goes OK, then I'll go forward with casting "Buttons" in flexible expanding urethane foam.

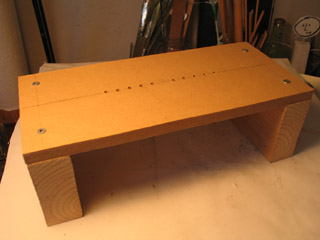
New invention: A puppetmaking table. Puppets have tie-downs -- screws that come up from underneath the table, fitting into nuts in the feet. This little table has holes in it for tie-downs, so I can easily work with the puppet in a standing position -- but still be able to lift it up or rotate it when necessary. I made a whole series of holes, all 1/2" apart, so the table can accommodate puppets with different gaits.
I think I've come up with a pretty useful tool here... My only complaint: the table's just a little too wide. It's 12" across; 8" probably would have been plenty.

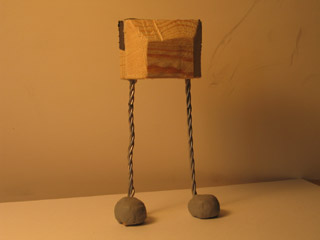
As I understand it, when you're making a puppet from casting materials, you usually create two armatures. A rough one that just holds the clay up while you sculpt. And the good armature, which goes inside the final puppet. I thought I'd be clever and make just one armature...
The one you see above has three twisted strands of 1/16" aluminum armature wire in each leg. The legs are glued into a block of pine with epoxy glue. The feet are metal nuts attached to the wires with plumber's epoxy putty. The nuts are set on top of thin pieces of wood (with holes, so the screws can pass through) -- just to make the soles a bit flatter.
It's a well-constructed armature. But it's not going to work for the final puppet. I can already tell that the leg wires aren't going to be nearly strong enough to pose the puppet's legs. The sculpt wound up being a lot beefier than I expected.

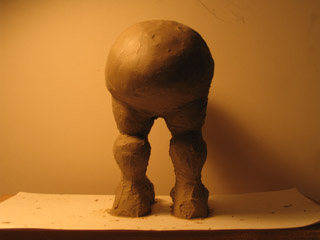
It took three hours to build the armature and puppetmaking table; it took another four to do the actual sculpt. Before adding plastilene, I covered the armature with plastic wrap so it would be protected.
I had a lot of fun... There's something really appealing about working with actual 3D volumes, rather than just 2D representations. I specifically wanted to share the photo above because I was really pleased with how the backs of the legs turned out. Neat shapes.

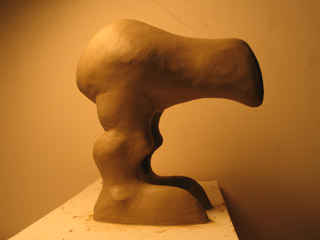
...And here's the finished sculpt! I used turpenoid with a brush to smooth it out. It's pretty close to what I had in mind. I think I'm beginning to get the knack for this "sculpting" business. ;-)
posted by sven | May 20, 2006 12:00 PM | comments (10) | categories: sculpture, stopmo
Comments
that's great, sven! but why can't you use "buttons" as a cast? can something go so horribly wrong that it destroys the original sculpture?
Posted by: gl. at May 20, 2006 5:56 PM
Lookin' good, man...the legs are great, nice shapes indeed (I have a weak spot for knobby little knees)...and yeah, gl, unforunately sometimes the original sculpt is virtually destroyed in the mold-making process, with plaster anyway, especially something with a lot of detail like my Jenny (her face was mangled when I pulled her out of her mold :(...Buttons here may survive alright though, since its parts are fairly large (no small pieces to rip off or get stuck in the mold, etc.)...I say 'Go for it!'...
Posted by: ubatuber at May 20, 2006 6:11 PM
Jeffrey's right -- from what I read, it's very unlikely that the original sculpt will survive the mold-making process.
If I'm unlucky, I'll have to pick the sculpt out of the mold one tiny-little-chunk at a time. If I'm lucky, it'll come out in several large pieces. But getting it out pristine? Not going to happen.
...Actually, the aspect of casting that I'm most concerned about is coating the inside of the mold with liquid latex.
Latex comes in different viscosities. The stuff I have is more like mayonnaise than milk. I can use a paintbrush to put it into each side of the mold... But in order to cover the remaining seam, I'm going to have to dilute it, so I can pour it in. That's a step where things could go horribly wrong.
Gotta coat the inside of the mold with a skin of latex -- expanding urethane foam sticks to everything. If there's no latex, I won't be able to get the cast out of the mold at all!
Posted by: sven at May 20, 2006 7:18 PM
aw, man! no wonder you're feeling so protective! risk-intensive processes drives me nuts. it's sort of like calligraphy: if you make a mistake you have to start all over again.
Posted by: gl. at May 20, 2006 7:28 PM
Yeah, that's giving me some trouble right now too, my latex is mayo-y also...tried a Jenny skin pour and the latex just wasn't thick enough in the face, she came out a little stretched, didnt hold her shape well AT ALL...maybe made the latex too thin...and if I brush it in Ive got the twopiece/seam thing going on, ugh......The good news is that once the original mold is made, you can experiment all you want with pouring/brushing/etc at different consistencies...that mold isn't going anywhere (unless you drop it...I'm quite the butterfingers so I tend to handle my molds with extreme prejudice)...
Posted by: ubatuber at May 20, 2006 9:11 PM
Wow, that thing looks awesome!
A couple of thoughts.... That would be difficult to do a 2-piece mold for. Actually a human figure in the flat position is a lot easier because all the limbs etc are along the same seamline. That piece protruding forward that sells toward the end is going to be a nightmare, unless I'm not seeing how you plan to run your seam line.
Also, for a thinner latex you could get a slip casting latex from burmanfoam.com or monstermakers.com. You stand up your mold when it's all rubber-banded together and seam sealed with klean klay or hotglue or something, and you fill the mold to the brim with the latex, which is pretty thin. You let it sit for an hour or two (don't quote me on the times) and the plaster pulls moisture out of the latex, causing the outermost layer to start to cure. It forms a thin skin. Depending on how long you leave it, the skin gets thicker. When you think it's reached the thickness you want you pour the rest of the latex back into the jar. Of course it requires buying a pretty big jar of latex. I suppose it could be painted in as well, or you could get another thin latex like balloon rubber, sold through the same places I mentioned above.
I made an ultracal mold of a vulture's head and neck for my first and only foam latex attempt, and while the casting didn't turn out good, the original plasticene sculpt (Roma) came out pristine! I was amazed. I still have it.
Posted by: Darkstrider at May 20, 2006 10:55 PM
Oops... I messed up one line above...
" That piece protruding forward that sells toward the end is going to be a nightmare,"
Sells should be swells.
Also, I like the puppet table. and it does look like you could use another strand of wire in the legs. I'm not sure I would trust epoxy in drilled holes entirely for something as major as the legs. I'd probably drill through and run the leg wires all the way through to the top, then make wire loops and secure them to the wood with screws. I like a secure mechanical attachment, and then the epoxy is there to help that, rather than depending entirely on the adhesive for a major stress area like that.
And it is sometimes done all with one armature. In that case you'd want to wrap it with plastic wrap or something before sculpting on it. Make sure none of the oils from the plasticene get on it, they might adversely affect your foam... not sure. They're murder on foam latex though. For a more permanent armature, like a ball and socket job, they'll sometimes wrap with plastic or teflon tape (or condoms) before inserting it in the mold for latex casting too, so it can be easily cleaned later for re-use.
Posted by: Darkstrider at May 20, 2006 11:03 PM
Wow! Mike, thanks for all the advice!
I'm going to have to look at the slipcasting foam. My mayonnaise-latex is probably just the wrong material for the job. ...I guess I'll try it out on the "severed arm" sculpt, though, when I get around to that. Just to know for sure.
Oh... You're probably right about the snout being a problem. I had imagined the seam going up along the sides of the legs -- like you'd do for a humanoid -- and then treating the beak bit like a large nose. But I probably have an undercut there that I didn't account for. Drat!
Good suggestions about the armature. If I wind up making a new 'ture, I'll probably do both of the legs with one piece of wire that loops through two leg holes.
Re wrapping the armature in plastic wrap... D'oh! I actually did that, but forgot to mention it. I even took a photo -- but didn't think it added to the "story" enough to include it.
Posted by: sven at May 20, 2006 11:49 PM
Yeah, I think for the shape you've got sculpted you'd need to go with a 3 piece mold. Basically the front piece (thinking of it as a 2 piece mold divided up the center of the legs) would have to be split in half vertically if that makes sense.
You can use the thick latex you've got... I don't know how much difference a thinner latex would make aside from going on thinner and less lumpy. The stuff you have can be thinned down with a little water mixed with ammonia. Or I've used pure ammonia when I had an old jar that had thickened up. I've heard about the water/ammonia mix but never tried it myself.
Posted by: Darkstrider at May 21, 2006 5:25 AM
Ah, we're on the same wavelength. :-)
I was just coming to the conclusion that I need a 3-part mold for Buttons when you wrote. ...And a week or two back I bought a bottle of ammonia, to maybe help with watering down my mayo-latex.
Thank you for devoting brain-power to this, Mike! I really appreciate your input. :-D
Posted by: sven at May 21, 2006 10:54 PM