you are here [x]: Scarlet Star Studios > the Scarlet Letters > steel armature progress
<< before poem: on being a lonely planet
after >> running as fast as i can

August 28, 2006

steel armature progress

by sven at 9:49 pm

sandwich plates so far

I'm about halfway through making my first all-steel armature. The design is nearly identical to the one I used for my last brass armature. The exceptions:

trick for starting a hacksaw

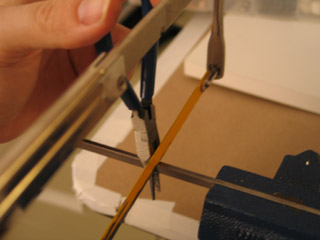
I've come up with a handy trick for getting the hacksaw started. I use a pair of pliers as a straight edge. Before I tried this, I was having trouble with the saw skipping.

drilling

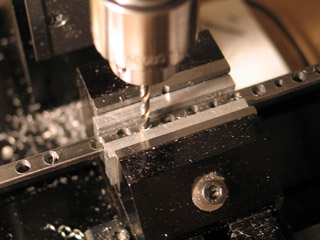
I'm using my "sushi roll" method again: drilling all the holes in two long strips, then chopping the strips into individual joints. Now that I'm working with a mill, I very much like the precision of using its XY table.

tapping

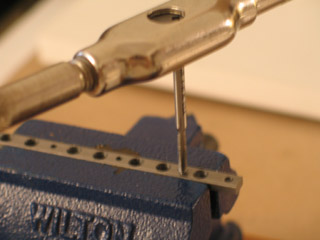
Steel is more difficult to tap than brass. I broke two taps while threading holes... It's just the price of learning. I think I've got the hang of it now. Use lots of lubricant, only turn a little ways, then turn the tap back far enough so that you're definitely breaking off the metal chips. Squeaking is a bad sign.

the "sushi roll" strips

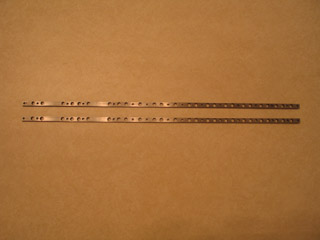
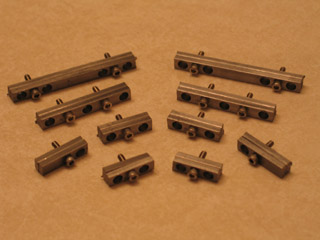
Here are the two strips before they get chopped up. In theory, what you're looking at is all of the sandwich plates, laid out in two straight lines...

close-up of the strips

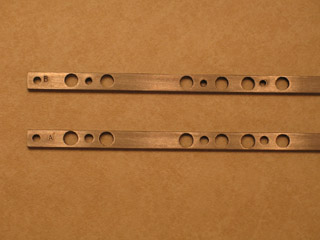
Unfortunately, I discovered too late that my milling vise got out of alignment while I was working. You can see that some of the holes aren't perfectly centered. I had to go back and re-make the effected joints.

Incidentally, the cutting speeds I listed in my last steel armature update were incorrect. Since then, I've figured out how to do the calculations that determine RPM for a specific diameter (and shape) of cutter based on the properties of whatever metal you're choosing to work with. There isn't just one RPM for each kind of metal; it depends upon a number of factors.

posted by sven | August 28, 2006 9:49 PM | comments (9) | categories: stopmo

Comments

Gosh, Sven, this process is even more technical than I imagined! Bravo for all your learning and progress. Very impressive. Save the mistake scraps for me.

Posted by: shelley Noble at August 28, 2006 11:42 PM

if the cutting speeds are different, i think you should go back and revise the previous post, then, assuming that's the one you want people to use as a reference.

Posted by: gl. at August 29, 2006 12:29 AM

Wow Sven, You're really burnin' through the learnin' curve! You'll be making LIO quality armatures in about a week at this rate!

Posted by: Darkstrider at August 29, 2006 2:42 AM

@ Shells: You serious? 'Cause I've got an empty cat food can on the desk where this stuff collects. If you've got a use for it, I'll send it your way. :-)

@Gretchin: You're quite right. Thanks for calling me on the laziness -- I'll go back and add a note.

@Mike: Thanks, man! ...Heh... (evil grin) Actually factually, starting a LIOesque armature later this week is exactly what I've got planned. I've been drawing out the specs for step-block joints on graph paper, and just yesterday afternoon I placed my order to smallparts.com for a heap of stainless steel.

Posted by: sven at August 29, 2006 8:30 AM

oh, it wasn't about being lazy! just a little reminder! tiredness must be affecting my affect. ;)

Posted by: gl. at August 29, 2006 9:39 AM

Making good progress Sven. It's hard to see from the photo, but are you drilling both sandwich plates at the same time? It's important to do that so that the holes line up and you have a matching set of plates. That is if you are using the through hole method. I know you can be much more precise with the x,y table, but the beauty of the through hole method is you drill both plates together and you have an exact match. That is why you would want to mark each one as a matched set - don't interchange them even if they are supposed to be the same size. Chances are they will be off just a little. Brass is much more forgiving since it's so soft. The balls will tend to self-seat after a little use. You will notice with steel that it is not so forgiving with small misalignments. Nice post and thanks for sharing the tips and tricks as you discover them.

Posted by: Mark F. at August 29, 2006 9:40 AM

Thanks, Mark. Happy to share. :-)

Yes, I'm drilling both plates at the same time. In the photo I posted above, I'm drilling the 1/8" hole that goes between the 3/16" ball seats. The 4-40 screw passes through the 1/8" hole freely, and then threads into a hole that I drilled with a #43 jobber and then tapped. The 1/8" hole and the 4-40 hole line up -- but since they're not the same size, it was easier to make these holes when the strips were separated.

With regards to matched pairs... One mistake I made on this project was using letter stamps to mark the plates. I learned on the brass armature that if you're not careful, the stamps can distort the shape of holes as metal is displaced. I was careful to avoid that this time -- but what I didn't realize is that the stamps can actually cause the strips to bend. It's probably not visible when you stamp a single joint... But when you're stamping a long strip, the effect is magnified and you can see by the ends that the strip begins to curve. So, from here on out I'll be identifying pairs either with temporary stickers, or by notching the edges with a needle file.

Posted by: sven at August 29, 2006 10:26 AM

Well, I was just thinking that my standard for parts is a 0 compared to your 10, so your trash might be useful. I could buy the bearings and little screws. I dunno, certainly nothing needed urgently. Keep feeding the kitty?

Posted by: shelley Noble at August 29, 2006 7:19 PM

Great work man, keep it up!!!...pretty soon I'll be sending you monster sketches and commissioning armatures :D

Posted by: ubatuber at August 29, 2006 11:29 PM

Post a comment


Remember Me?


You may use HTML tags or Markdown syntax in your comments:
*emphasized*, **strong**, & [link](http://www.foo.com).

No need for <p> or <br> tags.