you are here [x]: Scarlet Star Studios > the Scarlet Letters > this week's metalworking progress
<< before
more letterpress experiments
after >>
artist's way guided intent (february)
February 10, 2007
this week's metalworking progress
by sven at 5:10 pm

Things are really beginning to come together in my revamped studio room. The space has such a gravitational pull, I keep wanting to wander back over and play more.
I got an 8-foot table at Office Depot for my machine tools. I cut the piece of masonite I'd previously been using as a floor mat to size, and am now using it as a protective surface for the table. The masonite is held in place with a bunch of 1" C-clamps that I got at The Tool Peddler.
The rolly chair is new. I've taken all the other chairs out of the room, and am having a blast scooting from one station to the next.
I got several abrasive grinding wheels for the mini cut-off saw via McMaster-Carr -- before discovering that Tool Peddler (which is local) sells one that's just as good. I also got a metric stainless steel replacement screw for the cut-off (thanks Winks!) after promptly stripping the crappy screw that came with the machine.
(Um, that's not this week's progress -- just an update on things that have been in motion for a while.)
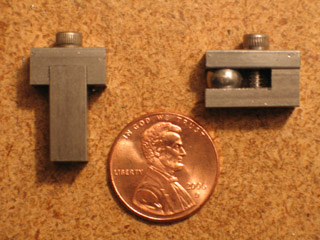
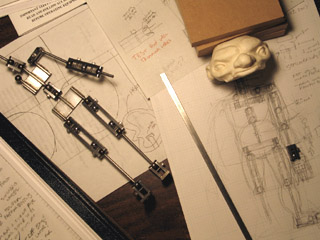
Here's the big progress for this week: I made a trial step-block joint.
I'm getting better at machining... I now understand how to use a "wiggler" to precisely locate the edges of a workpiece in relation to the mill's spindle (X and Y axis). And I know how to use a piece of paper to figure out how far my cutting tool is from the surface of the workpiece (Z axis). (The Swarfrat Mini Machines 101 DVD series was really helpful.) ...A precision part like the stepblock joint wouldn't be possible without these skills.
I'm getting better at figuring out set-ups on the mill. Using the "sushi roll method" to make the Man of Steel was madness. I've made a T-spacer (pictured above) that will make mass producing joints far easier. Clamping technique: I've got homemade risers and store-bought parallels to raise the workpiece up to where I need it -- and I'm being more careful about having a spacer on the left side of the vise if my work is hanging off the right side. Still need to make some machinist's jacks... But they're not necessary for making stepblocks.
The killer step in making the joint was milling out the hollow area between the plates. That space is 7/16" long (.4375"). It took 175 passes with a 1/4" two-flute endmill to carve it out, .0025" at a time. I timed it: 33 mind-numbing minutes. I was pretty demoralized. I may be an absurdly patient person -- but even I can't see spending 10 hours like that (and just on that one step!), to make the 20 joints you need for a standard stepblock armature.
Happily, I just got my copy of Machine Shop Essentials by Frank Marlow in the mail -- and it suggested a solution. [It's an excellent book! I highly recommend it!] The trick to getting rid of a lot of material quickly is to make plunge cuts with the largest, most fluted end mill you have. I tried it out -- and while it still took 19 minutes (on the first try) -- this is definitely the way to go. Much less mind-numbing; and I think I can ultimately get things set up so I can process through a batch of joints with relative ease. ...Yay!

The soldering table is also coming along nicely...
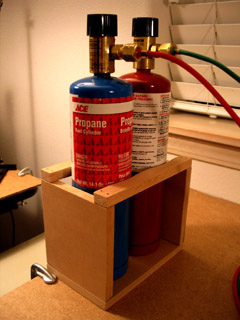
Yesterday I built this box to keep my propane and oxygen bottles standing safely upright. You can't see it in this photo, but there's a C-clamp behind them that holds the box firmly to the table.
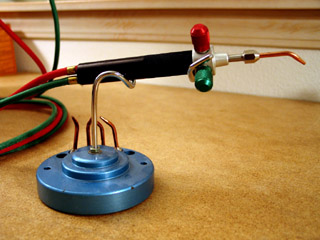
I've been meaning to share a picture of this since... October? This is the "little torch", a tool that comes from the jewelry-making field. They say that its flame is so precise, you can have have it lit inside of a cigarette paper and not light the paper on fire. Impressive claim...
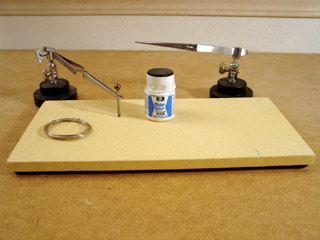
You don't use an oxy-propane torch just on a cinder block, as I was doing with my butane micro torch. You need a special ceramic tile that is designed to deal with super high temperatures. ...And here it is.
All this metal working... It has me hungry to make a new armature. Can't let myself get into that now -- but let me take this opportunity to talk about where I'm going with all the metalworking development.
My stopmo focus is wholistic -- I want to learn everything that there is to know about puppet fab. Armatures are a good place to put attention early on; they're the foundation of a puppet.
My goal -- (well, one of my goals) -- is to be able to make pro-level steel armatures with stepblock, hinge, and swivel joints by the end of this year. I want to be able to replicate what I saw at Bent and what I see in photos from The Nightmare Before Christmas at home. Overkill? Yeah, probably. But it's a skill that I want nonetheless.
My strategy is to take baby steps, making a series of armatures, each of which builds upon the previous... Conscientiously evolving them. From brass to steel; from hand-held tools, to the drill press, to the mill and lathe; from open-hole sandwich plates, to ball-and-socket joints, to step-blocks, to hinges.
Anyway. I'd been thinking that the follow up to the Man of Steel would be a stepblock armature. Now I'm thinking that that skips a step -- that I ought first to do sandwich plates with sockets instead of holes. Given where I'm at now, that feels easy-peasy, and I'm eager to get started.
(A road trip to Tucson next week stands in the way, though.)
...
On a related note: I just watched Rankin & Bass' Mad Monster Party last night. I'm considering doing a film with their style of pups, next time I do a StopMoShorts haiku challenge. Foam latex body, hollow resin head, limited facial movement -- but with steel jointed armatures instead of wire.
I was paying special attention to the faces. I saw four strategies being used: (1) the upper lip is hard-sculpted, but there's a flat space underneath it where paper mouths can be adhered with sticky wax; (2) same thing, but using a clay lower lip (particularly for female characters); (3) a hinged marionette-style jaw; (4) replacement heads for extreme poses (like a sneeze or a shout). I'm not sure how I ultimately want to deal with facial expressions... But giving the Rankin & Bass approach a try seems like a really worthwhile experiment.
posted by sven | February 10, 2007 5:10 PM | categories: stopmo