you are here [x]: Scarlet Star Studios > the Scarlet Letters > improving the next armature
<< before lsgl: new script + animatic
after >> toby's first easter

April 9, 2007

improving the next armature

by sven at 8:00 am

goodbye (for now) to the Drifter

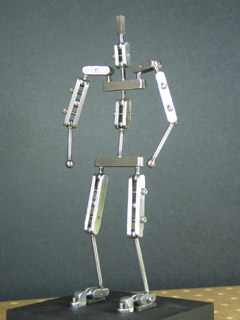
Here is the master list of things to improve on my next armature project.

A. GENERAL

  • The biggest problem with the Drifter is that all of the joints have drift. Solving this problem has to be top priority.
  • Avoid the lathe, drill press, and grinder. Try doing all their operations on the mill. My current belief is that the mill will be able to give better results on all accounts.

B. DESIGN

1. Joints

  • drift must be eliminated
  • there should be more space between sandwich plates than just the diameter of the rod
  • leave more of a lip between a socket and the edge of the plate

2. Shoulders

  • Double-jointed shoulders kink up. Step-block joints are the minimum requirement for adequate shoulders. Hinge and swivel joints would be even better.

3. Feet

  • a foot bends at the toe, not in the middle
  • the toe needs enough surface area beneath it to be able to grip the table when it’s tied down
  • the sole should not be so long as to scrape the floor when the foot bends
  • soles should be at least as wide as the ankle joint
  • soles should be 1/16” thick, not 1/8”

4. Things To Add

  • hands
  • rigging point for jumps
  • ”rectal tie-down” for sitting

C. PROCESS

1. Set-Ups

  • make T-spacer that’s narrower than the sandwich plates

2. Ball Holes

  • make attachable milling vise jaws to correct for loose jaw tilt error when locating ball center
  • use “drill chuck tool holder” attachments to allow precise, uniform depth of holes
  • only use center drill to “center punch” a mark -- not to drill any deeper
  • use end mill to get a flat bottom inside the hole
  • countersink the top rim of the hole

3. Sockets For Balls

  • find way to eliminate plunge chatter
  • drill holes at bottom of sockets to eliminate drift?

4. Radiusing

  • use corner-radiusing end mill (to avoid grinder dust and plier marks)

5. Through-Holes

  • make a slotted riser to hold work pieces up while being drilled

6. Threaded Holes

  • try using the drill chuck method for tapping
  • countersink rim of hole

7. Brazing

  • use hard silver solder instead of SafetySilv 56
  • leave parts in pickle longer

8. Maybe...?

  • does the stock need to be squared?
  • counterbore holes for screw heads?
  • use a vibro-tumbler to remove firescale?
  • do joint trimming with an end mill and an angle table?

posted by sven | April 9, 2007 8:00 AM | comments (6) | categories: stopmo

Comments

knowing what you want to do -next- is actually very helpful in my conceptualization of what you're doing. thanks!

Posted by: gl. at April 9, 2007 12:58 PM

wow man! your really breakin it down....

Ill have to order up a sven armature in a few revs.

jriggity

Posted by: justin rasch at April 9, 2007 2:52 PM

Sven,

Here are some thoughts on your plans.

First off you have Lots of good ideas already to start with. Your process is great it lends itself to learning better methods.

Instead of making feet joints from many parts, why not just mill the toe from a single piece of steel. Same for the heel of the foot. It may be a little more work from the machining point of view, but easier than the pins and brazing. Make each a step block design.

I like the counter bore idea for screw heads. With steel you will still have the strength, with aluminum you have to be careful. I like to leave a little of the screw head sticking up so if you have to slice into your foam puppet to adjust the tension you know where to slice. This is mostly a cosmetic thing but sometimes it is needed for thin puppet arms and legs.

Jumping and sitting tie-downs - a great idea.

The drift, the drift, the drift. Many ways to approach solving it. But find a way to solve it.

You might want to just build and test sandwich plates until you solve it. Don’t bother with an entire armature.

You can try the step block design if the drift is caused from misalignment of pairs of sockets in a sandwich plate. That may solve it.

You can try milling your sockets so you only have a ring of contact – not a cup of contact with the ball. A thru hole is just one way to accomplish that.

Remember a ball end mill will not by any stretch of the imagination create a socket that matches the perfect roundness (spherical nature) of a quality ball.

Try Bluing the socket, putting a ball in, tighten and rotate the ball and rod for a good bit. Then take it apart and look at which areas have the blue removed. You will see where the ball is contacting the socket. It should be enlightening.

Great progress, you are making headway!

Posted by: mark F. at April 9, 2007 11:03 PM

@gl.: Oh, I'm so glad to hear that! As if all the other posts hadn't been enough... I was feeling that the "notes" doc must surely take this "drifter" arc beyond all reasonable bounds. Good to know that it succeeds in serving as some kind of summary. :-)

Posted by: sven at April 12, 2007 12:32 AM

@Justin: I don't think I'm really ever going to take on armature-making as an entrepreneurial pursuit... But I do have it in mind that when I'm good enough, it would be an honor to get to collaborate with a select group of animators. ...And man, you are SO on that list!

Think of me about when you're starting work on your second film, eh? ;-)

Posted by: sven at April 12, 2007 12:36 AM

@Mark: Wow! Thank you SO much for the detailed response!

In particular, that idea about using blue dye in the ball sockets -- gold!

Re milling the feet rather than doing so much brazing: You make a good point. I think with the feet I got fixated on trying to perfect certain skills that are necessary when you're working in a pro setting, where some of the parts are being mass-manufactured for you. For a home project, though, that toe really doesn't make much sense.

I can't begin to express how much I appreciate having someone to dialogue with who's done armature-machining themselves... Again: thank you!

Posted by: sven at April 12, 2007 12:48 AM

Post a comment


Remember Me?


You may use HTML tags or Markdown syntax in your comments:
*emphasized*, **strong**, & [link](http://www.foo.com).

No need for <p> or <br> tags.