you are here [x]: Scarlet Star Studios > the Scarlet Letters > new stopmo stage
<< before
squee!
after >>
trying out the new stage
September 16, 2007
new stopmo stage
by sven at 5:50 pm
This week I built a new stage for doing stopmo animation.
Previously when I wanted to practice animating, I'd put a piece of pegboard on top of cinderblocks. That worked really well for a while -- it was a cheap and simple set up. However, while the pegboard works fine with 10-32 tie-down screws, it doesn't do so well with 4-40s (which are my new standard). Also, the cinderblocks were so heavy... It was becoming a burden to have to keep dissembling and reassembling the stage.
I wanted to come up with a new design. One that's lightweight, quick to assemble, and works with 4-40 tie-downs. See, I want to get all the little impediments out of my way -- so when I get into a mood to animate, I can just get right to it.
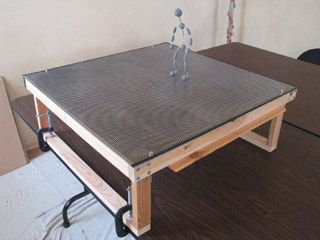
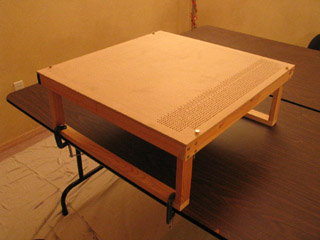
Here's the basic stage without add-ons. It's 2'x2' and about 9" tall. The wooden frame is made of struts that are .75"x1.5".
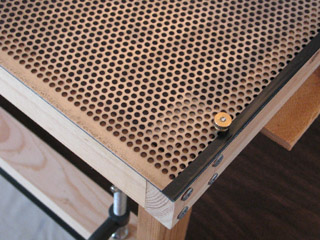
The stage surface is a piece of 16 gauge (1/16") mild steel perforated sheet with 1/8" holes. Susannah Shaw mentions these specifications as industry standard in England on p.88 of Stop Motion: Craft Skills for Model Animation. The reason for 1/8" holes? Because that size provides just the right amount of clearance for 4-40 tie-downs.
Perforated steel stages are more common in England than in the U.S. because animators there use magnets for tie-downs more often. Because the steel is perforated, I'll have the option of using either magnets or screws. (I haven't ever tried magnets, yet.)
I purchased the steel from this page at OnlineMetals.com, and had a really good experience. The metal cost $32.66, shipping options started at $9. I picked 2-day shipping and received the materials almost exactly 24 hours after I'd placed my order -- for just a hair under $50. Normally I'd go to my local branch of Metal Supermarkets to buy in person... However, when I called they didn't have any in stock -- and they didn't even get back to me with a quote ($72) until the next day... Half an hour before OnlineMetals actually delivered to my door!
When I received the metal, it was covered with a thin layer of oil, which was used as lubricant when the holes were being cut. I degreased the sheet using Citri-Solve, rinsed it with a hose, and toweled off the remaining water. The edges are sharp, so I covered them with black electrical tape. I've never seen 4-40 screws longer than about an inch; so in order to attach the metal to the wooden frame, I used 3" threaded rods and 4-40 thumb nuts, which I purchased locally at W.C. Winks Hardware.
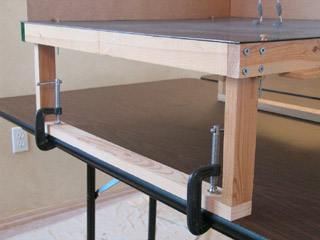
A stopmo stage usually has to be heavy, in order to keep it from moving during the shoot. I'm using 2" C-clamps to clamp the stage to a folding table, thus depending on the weight of the table for my stability.
I designed the stage for animating while seated. Professionally, it seems that animation is nearly always done while standing up. Space-wise, however, that's not an option for most hobbyists (until they wind up converting their garage). The opening beneath the front of the stage is 6.5" tall, which gives comfortable clearance for my hands when I need to get at a puppet's tie-downs.
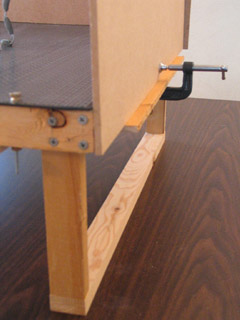
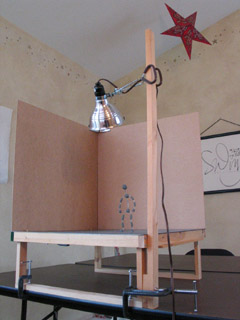
I built wooden lips on three sides of the stage to support set walls. The lips make it very easy to place a wall where you want it and then fix it in place with a single 2" C-clamp. This is a trick that I learned from Marc Spess' book Secrets of Clay Animation Revealed! -- which I highly recommend. (It's also available as an E-Book.)
The set walls I have pictured here are 2'x2' sheets of MDF (medium density fiberboard), 1/4" and 1/8" thicknesses. To keep the walls together where they meet at the top of the set, I'm using a 90-degree angle clamp (the sort which is used for making picture frames).
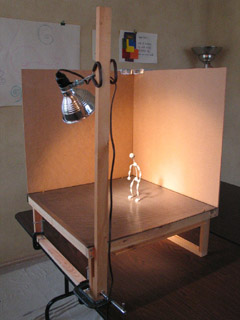
So, the set clamps onto a table... The walls clamp onto the base... You can also clamp on a post for lights, if you want.
I'm not sure yet how this is going to work out. When the light is so close to the puppets, I get a really bright hot spot. In most of the lighting set-ups that I've done so far, I wanted much more diffuse lighting.
An Early Design
Originally, I'd thought that the floor of the stage was going to be made from 1/4" MDF. I spent a good seven hours working on drilling holes before I realized just how insane this was.
I was inspired by Justin Rasch's dog pound set, which has hundreds of pre-drilled holes in the floor. From what I've seen on Justin's site, it seems like having pre-drilled holes -- instead of drilling during animation -- really allows you to just focus on performance.
Being me, though, I wanted things laid out in a neat grid. Having a 1/8" hole every quarter inch seemed about right -- like it would give me all the freedom I want.
I knew as I was going into this that I was taking on a task that would require outrageous patience... But I didn't do the math to realize that I was actually setting out to make about 7500 holes. (That's a 22"x22" area minus the corners where the frame prevents me from using tie-downs.)
Faced with another 7+ hours of drilling holes, spending $50 for a pre-drilled sheet of metal seemed like a real bargain!
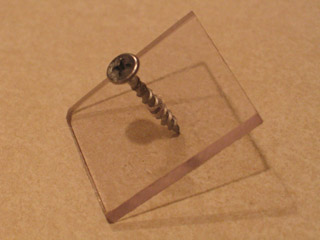
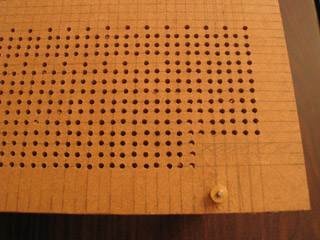
One neat byproduct of the insanity, however, is that I invented this little device for starting holes. It's just a little piece of acrylic with a screw through it... But it's easier to hold and gives better visibility than when you use a screw and hammer alone -- and there's less strain on your joints than when you use a spring-loaded punch.
(You can see in the photos that I drilled 10-15% of the holes needed for the stage floor. What you probably can't see is that I'd already used my little tool to make hole-starting divots for 80-85% of the grid.)
Uses Of The New Stage
A stage that is 2'x2' is a bit small. You can't have a really panoramic wide shot. And you can't really have long tracking shot where a puppet walks very far. That's a limitation of this stage -- but I think the tradeoff of getting something that's easy to set up and which encourages me to practice animating makes up for it.
As I was putting this stage together, what I really had in mind was making a "black box theater." I'm interested in trying some animations where there isn't much of a set -- where you're just focussing on the performance of the "actors." I have a related idea (which I may or may not wind up pursuing) to create some generic, black-wrapped puppet bodies which can carry detachable heads... Sort of like actors wearing comedia dell'arte masks. (Which, now that I think about it, has a neat historical connection to Punch and Judy puppet shows.)
I'm not sure at this point to what extent using perforated steel for the stage floor is going to impede creating more elaborate sets. Can I only do hills, grass, etc. if I'm starting from scratch on a base of MDF? Maybe not. I might be able to cover the steel with cardstock and then build upward from there.
And as for wide shots: I have a suspicion that most scenes don't have characters walking too far...
I could see potentially building larger, more elaborate sets using a modular construction strategy. I could build more 2'x2' platforms that connect to and expand outward from my one perforated steel platform. So long as the characters don't have to walk past the edge of the steel plate (where the wooden frame prevents use of tie-downs), I'd be OK. ...And even then, maybe if I wanted characters to cross that boundary, I could just use a flying rig to support them.
posted by sven | September 16, 2007 5:50 PM | categories: stopmo