you are here [x]: Scarlet Star Studios > the Scarlet Letters > pressing business
<< before
handmade holidays
after >>
artist's way: session 6
November 4, 2007
pressing business
by gl. at 11:59 pm
october was a month o' letterpress! i got the chance to attend three letterpress classes in one week at the iprc:
how type is made
sven and i have had a crazy fantasy that between my love for letters and his developing metalworking skills, we might make our own type someday. after going to this workshop, i think we were cured of that notion. i was hoping for more explanation about what's involved in each of the steps of typemaking, but i now know difference between monotype & linotype, categories which were previously blurred for me. fascinating fact: the development of linotype apparently was what prompted the printer's union to accept women, who were frequently linotype operators.
introduction to letterpress
this is the class i've been trying to get into for months! i took this class a few years ago, before chas gave me his press, but i wanted a refresher because i knew there were things i was unclear on, notably in the lockup process.this class was very helpful in allowing me to solidify some of those concepts. i thought the point of lockup was to pack as much furniture into the chase as possible, so it became tedious and rather tetris-like. but the rule is furniture doesn't touch! you're looking for a pyramid effect, with the largest pieces out on the edges and the smallest pieces against the form. that will immensely simplify my lockup process (and hopefully give me better prints!).

["a sample of a most perfect lockup": click to see it larger]i am totally envious of this furniture storage case, as my furniture & reglets are in a giant jumbled shoebox:

[everything in its place]also, my little 3x5 kelsey doesn't use quoins, it uses metal plates (otherwise known as lockup slugs/lead). i had been using the long one, but not the short one! i hope that using both will immediately give me better prints, too. :)
i finally understood the difference between "packing" vs "make ready" in this class. i had entirely forgotten about the make ready process, in fact. print on a piece of tracing paper: this is your make ready. then puncture three dots through the make ready and the tympan to register it. put a tiny piece of tissue paper over the letters that aren't printing on the make ready, then realign it behind the tympan and print again. the tiny pieces of tissue should provide a tiny bit more pressure on those spots; it doesn't take much. check the results. if letters are still dropping, repeat the process.
miscellaneous: in addition, i was excited to learn about beaver engraving, a portland business who's willing to make magnesium plates from illustrator files for what i consider to be a reasonable fee.
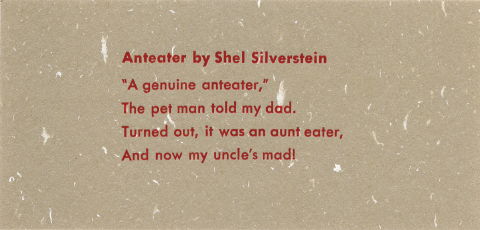
there aren't enough letterpresses for everyone, of course, so we ended up teaming up. because i've taken it before, i let my partner take the lead on most things. so this is her quote:
Anteater by Shel Silverstein
"A genuine anteater,"
The pet man told my dad.
Turned out, it was an aunt eater,
And now my uncle's mad!i "fixed" a grammatical issue (using "my" instead of the original "me") because i didn't know shel actually wrote it like that. oops. that extra comma after "turned out" drives me crazy, too, but that's original, as well.
i believe this is 10-point type but i have forgotten the face (darn!). 6 pt slugs on top & bottom, with at least an em quad on either side of the lines for stability and 4pt leading between lines (two 2pt leads). we used 5-to-the-em spacing because there was more of it in our point size than there were 4-to-the-em spaces.
care & maintenance of your tabletop press
this was a class i was very much looking forward to, and i was thrilled that they encouraged me to bring my own press in so i could work directly on it! i was determined to discover whether my press was defective in some way, so i'd finally know whether my unsuccessful printing attempts have been my fault or or the fault of the press. i don't mind if it's my fault, but i don't want to waste a lot of effort and frustration if it's something that could be easily fixed by noticing the press is missing a whoozits or by adjusting the whatzits.but it turns out my press is fine (yay!). all the pieces are there and are in good shape. i still need to clean it of the grime it accumulated after years of living through colorado seasons in a box under chas' porch. and i replaced the rollers before the workshop (from n.a. graphics in silverton!) just so that wouldn't be an issue. when i spoke with fritz, he said it was likely the pitting i had on the former composition rollers were actually little mice teethmarks! that's what hide glue gets you, i guess. i have rubber rollers now, thank you.
so because i brought my own tabletop press, it meant that everyone got their own press to examine, which i quite liked. i picked up some tips & vocabulary to help me talk about letterpress more clearly, like:
labeling & differentiating rollers, trucks & rails
locating the oil & oil holes in most presses (my tiny kelsey doesn't have any, though i'm welcome to oil the parts where metal meets metal. now i just have to find a tiny oilcan!)
labeling the platen/tympan bar (a "bale")
making sense of grippers (i had them on backwards and not tightened), though nobody has been able to tell me what the gripper bar spring does
discovering a whole pack of what i thought were dark postcards was in fact pressboard, meant to be used as packing
also: craftsman apparently makes good presses. kelseys are bottom of the barrel, but i don't care! also, i discovered that only 1/3 print area on any press is consistently usable, which on a 3x5 press is pretty substantial (gocco is like that, too: you get your clearest image transfer in the center).
finally, we adjusted the platen, a process i had done after consulting the manual, but that never seemed to have any effect. i found that it's probably because it's so sensitive: a quarter-turn of the screw can make a big difference.
i found this to be a fairly time-consuming & tedious process, in part because we had to set up a form to test it, and this made the class run about 1/2 hour longer than expected. but the process make a lot of sense:
set up four corners of a form with the letter "O," preferably in a larger type size. check to make sure all the type you're using isn't worn and is exactly type-high by using a type-high gauge (also handy for checking the depth of wood/linocuts). set the form something like this:
then you print (in this case, a dry print so we didn't have cleanup), see which Os are not printing, and then adjust the screw nearest the O a little bit at a time to see the effects. only adjust one screw at a time. repeat until all four Os are printing clearly. when you adjust the platen pressure, the standard is to set it for heavy stock, which is why you add packing for lighter stock. i wasn't having much luck with this part, and though we were running so far behind, the instructor still spared some time after everyone had left to make sure the platen screws on my press were properly adjusted. good thing you don't have to do that very often (once a year or less).
so i feel much more confident in my letterpress skills now. i really hope it makes a difference when i get a chance to print again!
posted by gl. | November 4, 2007 11:59 PM | categories: classes & workshops, printing