you are here [x]: Scarlet Star Studios > the Scarlet Letters > research: stop-motion puppet construction
<< before
test: stop-motion puppet armature
after >>
scarlet star studies
December 8, 2005
research: stop-motion puppet construction
by sven at 9:24 pm
I stayed up way later than I should have last night -- researching how to make stop-motion puppets. And I'm very excited about what I've learned. I'm going to break this into sections...
I. RESOURCES
By far, the best general resource I found was at StopMotionAnimation.com: their Stop-Motion Newbie Guide rocked my world.
Really -- I've been fascinated with stop-motion animation for years, and this site taught me things that I'd never seen addressed before. ...It was valuable to the extent that I feel compelled to list what's included in their index:
- Chapter 1: A Basic Overview of Puppetmaking Techniques
- Chapter 2: Building a Wire Armature for Your Puppet
- Chapter 3: Building up a Classic Stop-motion Monster
- Chapter 4: Properties of Different Clays
- Chapter 5: Claymation or Stop-Motion - What's the difference?
- Chapter 6: Choosing a Camera for Stop-motion
- Chapter 7: The Importance of Using Gages
- Chapter 8: Stop Motion Software
Three other sites had outstanding tutorial sections: Stop Motion Works, AnimateClay.com, and www.StopMoShorts.com. Whatever educational gaps StopmotionAnimation.com left, they filled in pretty nicely.
Stop-motion animation is a rarified art -- and I'm pleased to discover what seems to be an enclave of amateurs and professionals dedicated to keeping it alive. StopMotionAnimation.com seems to be the heart of their community -- and StopMoShorts.com seems to be where they're showing finished works amongst each other. Not for prizes -- just for the love of it.
...It's very exciting for me to discover StopMoShorts.com -- they have filmmaking challenges every two or three months and seem easygoing about posting submissions. I'm seriously considering grooming future animation projects for display there...
I'm beginning to recognize the names of individuals who -- by their actions -- lead in the "StopMo" community. Four who have personal sites that have helped me greatly:
One more name I want to squeeze in: Kathi Zung. She has a homemade DVD titled "Do It Yourself! Foam Latex Puppetmaking 101" available on her website. I saw it mentioned on Kevin Kelly's Cool Tools site a while back (via Gretchin), and promptly ordered the thing. It's not where I'm going with puppet construction at the moment -- but it was truly an excellent introduction to the topic.
II. PUPPET CONSTRUCTION OPTIONS
I'm going to condense a bunch of what I learned...
Constructing a puppet for animation can be divided into two phases: (A) the armature, (B) the armature's covering.
Phase A. There are basically two sorts of armatures: (1) ones made out of bent wire, (2) ones with machined joints.
Phase B. There are basically three ways to cover the armature: (1) clay, (2) couch cushion foam, (3) foam latex.
Wire vs. Machined Armatures. When you bend wire, it has a bit of rebound; machined joints can be positioned more precisely. Wire suffers metal fatigue over time; machined joints are more generally more durable. However, it's difficult and expensive to machine your own armature.
Differences in coverings. As Mike Brent says, "clay puppets are the easiest to make and the hardest to animate". When you push clay, it smooshes -- so you have to keep resculpting it as you work. ...Foam latex probably gives you the best ability to sculpt your puppet; however, it is very tricky getting the latex to gel correctly, and it can be a fairly expensive route.
...Which leaves couch foam. With this technique, you build musculature with the couch foam (urethane), and then cover it with liquid latex rubber. According to Richard Svensson, this is what you use for "creating the King Kong-Harryhausen-type monster, dragon, dinosaur, etc". The downside: latex rubber disintegrates after about 5 years -- but then, clay and foam latex aren't particularly permanent media, either.
Considering the options, I think it's clear that any 3D puppets I create will probably have a wire armature, and be covered with urethane and liquid latex rubber.
III. CONSTRUCTION DETAILS
Now that I've decided what kind of puppets I want to make, let's take a closer look at the four main steps in their construction...
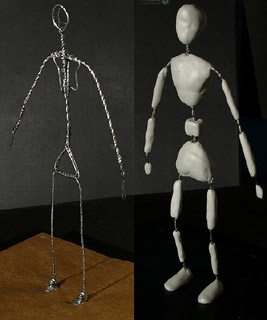
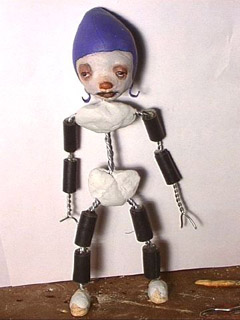
Step 1: Armature
From what I've read, it sounds like the best wire to use for armatures is aluminum -- it doesn't fatigue too quickly. Several armatures I've seen show more than one strand of wire wrapped together. My guess is that braided wire is more reliable: if one strand breaks, the others are still functional.
You don't want the entire "skeleton" to be bendy -- you want to create some "bones". This can be done by putting segments of the wire through metal tubing, or wrapping them in epoxy putty, or simply by wrapping them thickly with tape. Mike Brent said this about epoxy putty: "It's used to create solid 'grab points' that allow you to feel and easily move the puppet under the padding, and also it helps to lock the twisted wire together permanently".
The following two photos were very helpful to me:
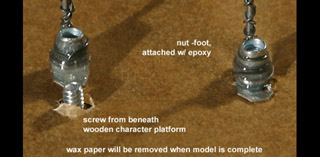
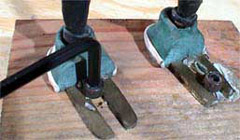
Step 2: Tie-downs
How do you make sure your puppet doesn't fall over? Bolt it to the table! You have a choice: bolt from above, or bolt from below. If you bolt from above, you can just have a slot in the puppet's foot where the screw goes. If you bolt from below, you might build a nut into the foot, and then have the bolt come up through a hole in the table. Either way, it's probably best to drill the holes before you start animating, so you won't get sawdust all over and accidentally tip over the puppet.
These photos were particularly useful to me:

How do you hide the holes in the table? Filling them with plugs that you can pop out when you need to is probably the best option. At www.StopMoShorts.com the tutorial section contains an excellent animated movie on tie-downs by Nick Hilligoss -- followed up by a great article by Mike Brent about how to hide the holes.
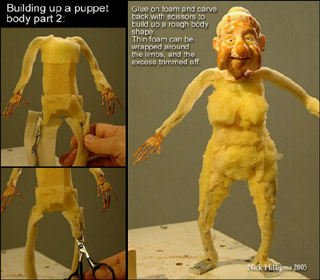
Step 3: Covering with urethane foam
Apply couch foam to the armature using spray glue. Trim it into the shape you want using little scizzors. Nick Hilligoss' site does the best job of explaining this process. Richard Svensson, however, does a somewhat better job of showing how one can shape musculature.
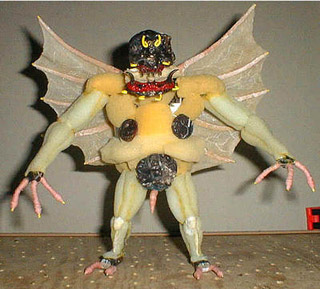
Step 4: Latex rubber skin
In his article on "Building up a Classic Stop-Motion Monster", Richard Svensson does a good job of describing how you sculpt a model, create a mold from it, and then cast a thin latex skin -- which one attaches to the bulked out puppet, much as a taxidermist would. When you're closing up seams in the skin, use liquid latex; rather than brush it on, use a sponge to get a smoother surface.
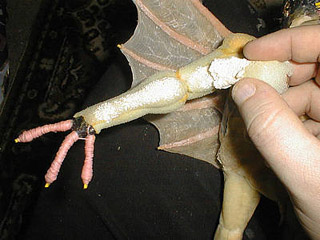
Another great trick for liquid latex: fingers can be built up by applying successive layers of latex directly to naked bits of wire.


Closing Remarks
Phew! A lot of details... I'd just like to restate that I am so grateful to Mike Brent, Nick Hilligoss, Joshua Mosely, and Richard Svensson for the tutorials they've put up online -- it's so much easier to understand this art form when you can look at the pictures. If you're interested in StopMo, then please, go visit their sites!
posted by sven | December 8, 2005 9:24 PM | categories: links, movies, stopmo