you are here [x]: Scarlet Star Studios > the Scarlet Letters > puppet #2: construction notes
<< before
puppet #2 is underway
after >>
tutorial: how to make a puppet's limbs removable
February 10, 2006
puppet #2: construction notes
by sven at 11:05 pm
I've been studying, studying, studying the puppet designs of Mike Brent, Nick Hilligoss, and Susannah Shaw. Finally it was time to stop studying and just make something. Because my head is so full of new techniques, though, this puppet has had rather confused beginnings.
I'm saying that I began this puppet last Sunday (Feb 5); that's the day I assembled the wire for the armature. Simultaneously, I was working on making a set of Nick's T-style tie-downs, learning how to solder the replacable joints that Susannah describes, and developing my own design for hollow heads. Initially, this puppet was pretty much just another experiment: the goal was to construct a wire armature that's 10" tall. [My first puppet was only 5" tall, and I wanted to get a sense of how the bigger scale would feel.]
...Once I had the beginnings of an armature, though, it was clear that I was actually making a puppet. I needed a better plan. I decided that much of my mental chaos was the result of trying to use bits and pieces of three designs (plus my own) all at the same time. New plan: as an exercise, do each design just as the author has described. Do a Mike Brent. Do a Nick Hilligoss. Do a Susannah Shaw.
This puppet is supposed to be a Mike Brent... Except that Moon Baby (puppet #1) was already a Mike Brent. So I've been letting myself experiment a little bit in areas that I covered according-to-blueprint last time. I don't think I've done myself a favor, though.
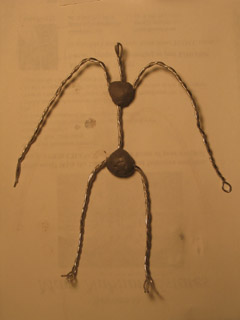
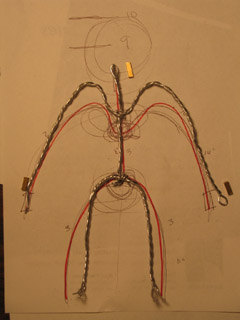
The wire of the armature is composed of three pieces: the legs, the spine, and the arms. The legs and spine are each made of three strands; the arms are made of two strands. I twisted the wires by hand this time, rather than using a drill. Twisting always makes the lengths shorter; I must remember next time to start with longer strands than I actually need. I have the shoulders go up and then down, to help lessen stress on that joint. The wires are joined with 20-minute plumber's epoxy putty that I bought at Ace Hardware in the plumbing section.
[Note: You can see that when I took this picture I was still planning on attaching aluminum feet. Each of the foot wires would have been glued horizontally into separate holes.]
One aspect of Mike's design that I copied faithfully was the feet. On my previous puppet, I used the design for feet described by Kathi Zung in her "DIY - Foam Latex Puppetmaking 101" video: a hex nut epoxied on top of a loop of wire. The problem for me with Kathi's design was that the feet weren't really flat on the bottom. Mike's wooden design should solve this problem nicely.
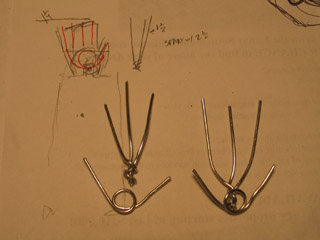
For a while I'd been thinking that the best design for feet must be the aluminum feet and T-style tie-downs that Nick uses. However, last week I discovered that Nick has added a new puppet making tutorial to the StopMoShorts.com tutorial section... In it he uses plain screws and hex nuts! I have a pair of aluminum feet all ready to go on the next puppet -- but seeing that Nick doesn't entirely shun the simpler screw-and-bolt strategy made me feel a lot better about using it here.
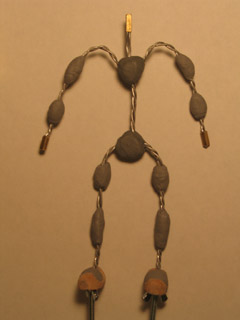
I added more epoxy putty "bones" to the basic wire armature. I attached the feet using two-part epoxy glue (gel). I tried a quick little test with epoxy glue a few days beforehand -- but this is my first time actually using the stuff on a project. I also used the epoxy glue to add on 1/2" sections of K&S (square brass tubing) at the neck and wrists. The K&S is so I can have detachable hands and a detachable head. [I hope to give a tutorial on K&S pretty soon.]
Mike did an improptu tutorial on making hands over at StopMotionAnimation.com. Since I'm trying to do a Mike Brent puppet, I figured I should use his technique. However, since I'd already added the K&S, I sort of botched my attempt.
In his tutorial, Mike uses three wires from the arm to make three fingers, and then uses a loop of wire to add two more. I twisted three new pieces of wire together, added a loop, and then epoxied this big wad to the brass tubing. It's very bulky, and kinda misses the point... But then again, my last puppet didn't have fingers that move -- so I guess I'm still going in the right direction.
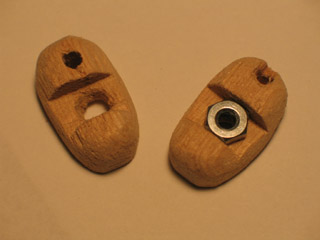
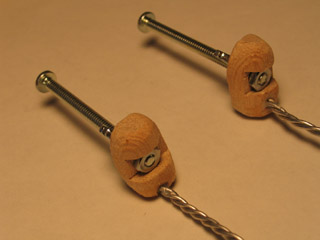
I'm very excited about Susannah Shaw's system for replacable parts. I'm using the tiniest brass hex nuts I can buy, and socket set screws that are only 1/8" tall -- the screws don't even poke out of the nut when they're in! In the picture above, you can see a spare piece of tubing extending from a ball of epoxy putty that will be the "skull" over which I build a head. Inside that "skull" there's a slightly larger piece of brass tubing, which forms a sheath around the smaller. The nut and screw allow me to clamp the sheath to the tubing. [Look closely at the base of the "skull" -- you can just make out the tiny hole for the hex key.]
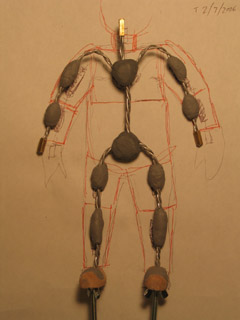
One of the catastrophic failures with the Moon Baby puppet had to do with its foam "musculature". I used foam weather-stripping tape for MB; it hardly allowed the limbs to move at all. For this puppet I'm using blocks of cushion foam, instead. It's not what Mike uses in his tutorial (although he uses it on his later puppet, "Buster") -- but it's standard for most puppet makers, so I feel fine about this choice. I also made sure to draw up a plan in advance showing where I would add the blocks of foam -- I wanted to intentonally leave gaps, so joints could twist without fighting the cushion material.

I bought my cushion foam at Michael's. I've also seen it for sale at JoAnne's Fabric, and at the local store Fabric Depot. It seems to be sold mainly for people who are sewing and doing up cushions for kitchen chairs.
I snipped the foam into blocks and sandwhiched the armature between them. I glued all this together a bit at a time using Elmer's brand spray glue. I've used 3M in the past; this was half the price and available at Ace Hardware, so I figured I'd give it a try. The blocks of foam had to be squeezed together for one or two minutes before they adhered adequately.
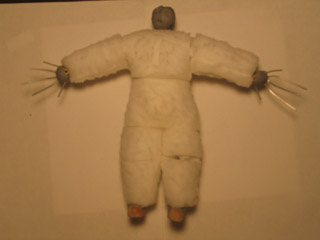
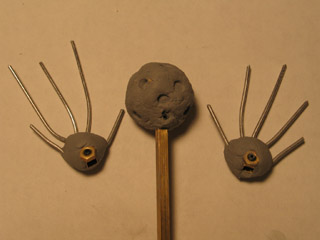
I've been sculpting the foam blocks using rounded cuticle scizzors. I'm not done with this step yet. In the photo above, you can see that I've screwed on the "skull" and hands to see how things are coming along.
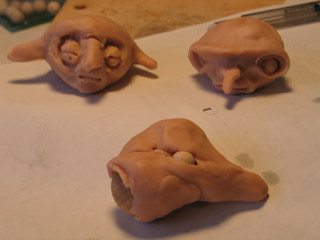
I didn't have a clear idea about what I wanted to do for the head when I began this puppet. I had been working on a scary bird-like head -- but it really looked wrong on this zaftig body. [More about the bird monster to come in a future post!] I decided that what I wanted was a fairly sweet, sympathetic, "everyman" character. This turned out to be more difficult to achieve than I'd expected. My 2D sketches got me nowhere -- so I did a series of rough 3D sculpts, exploring the possibilities.
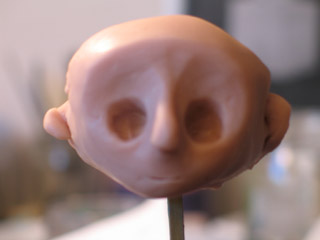
My "ah-ha!" moment for the head was realizing that the basic form I was looking for was sort of like a mushroom cap. Often in the world of 2D animation you see diagrams where characters are broken down into their basic component shapes... I feel like I'm really just beginning to learn that the same is true for 3D characters, too -- if you look, you can see that complex forms are made up of simple solids. The photo above is where the head first begins to take shape.
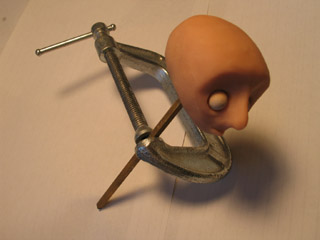
Having the K&S tubing bolted into the "skull" proved very useful when it came time to bake the Super Sculpey. I clamped the tubing with a metal C-clamp that I could use as a stand in the oven. After reading a bunch more online about the chemistry of Super Sculpey, I decided to bake at the prescribed 275 degrees (rather than 200 degrees for a longer period, as smellybug has suggested). I baked the head for 30 minutes. I removed the delicate ears and eyelids -- they'll be done in a second pass. The eyes are wooden balls that sit loosely in their sockets.
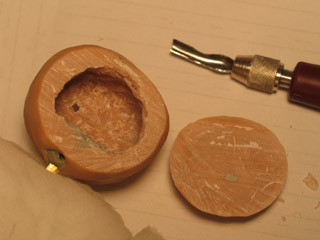
Unfortunately, when I tried the head on the body after baking, it was too heavy. When I tried to lean the character forward on one foot, he'd totally bend in half. Arg! This is exactly why I've been working on a strategy for hollow heads...
I think this can be salvaged, though. I cut the back of the head off with a hobby saw, and have begun hollowing it out. At first I used an electric drill to get things started. Then I started working at it with some woodcarving tools. I tried to be careful, but it was awkward to handle, and not too surprisingly I wound up cutting myself. Not badly, luckily; but it was enough to prompt me to quit for the evening and rethink how I'm going about this.
If you look carefully, you can see the hole above the eye socket where the tool poked through and got me...
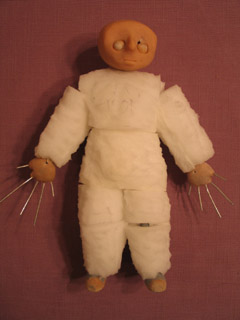
What's left at this point? Finish hollowing the head. Add ears and magnetic eyelids. Paint the eyes. Wrap the fingers in thread and tip them in liquid latex (Richard Svensson's technique). Make the clothing out of cotton gloves (this is one of Mike's unique tips that I really want to try). Paint all the exposed skin.
...And animate it!
posted by sven | February 10, 2006 11:05 PM | categories: stopmo