you are here [x]: Scarlet Star Studios > the Scarlet Letters > stopmo puppet work: eye, feet, neck
<< before
sculpting: new test snippets
after >>
mare nubium estates
February 3, 2006
stopmo puppet work: eye, feet, neck
by sven at 1:33 pm
When I was working on CG animation, I found myself getting stuck on the modeling -- not actually getting around to making things move. I worry that I may fall into the same pattern with puppet animation... Constantly striving to make the perfect puppet.
Worrying aside, though, I did some neat experiments yesterday. A few more details to work out, and then I'll begin construction on puppet #2 in earnest.
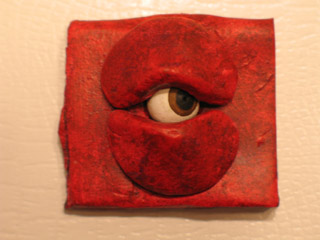
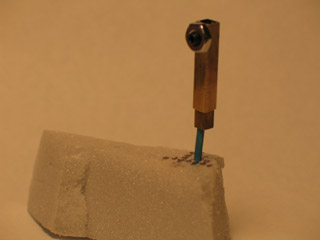
Eyes are one of the most expressive parts of the puppet -- I want them to be posable. The trick for this eye was figuring out how to embed it behind some eyelids. If I were using soft clay for animating, it wouldn't be a problem... But I'm working with baked Super Sculpey here; it requires a paint job.
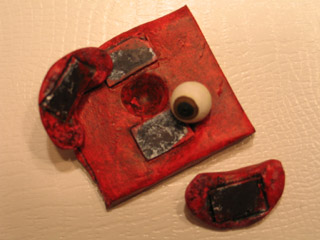
What I did was to make the eyelids as separate pieces. Then, I glued little magnets on with Duco cement. The eyeball just sits in its socket, unglued; the magnetic eyelids hold it in place.
One thing to improve upon: When you stick a magnet to a magnet, the magenetic forces sometimes cause the connection to twist or jump. On the next iteration, I'll have the magnets coupled with snippets of tin instead.
The eyeball is a little wooden ball that I found at Craft Warehouse in Gresham -- you can buy bags of them at pretty much any craft store, e.g. Michael's. To make it easier to work with, I drilled a 1/16" hole in the back and stuck the sphere on a piece of wire. To paint the iris, I put the wire in an electric drill bit and had it slowly rotate while I held the paintbrush stationary. That's a trick that I picked up from Susannah Shaw's book, "Stop Motion: Craft Sklls for Model Animation".
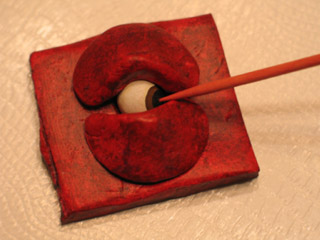
After painting, I pressed a very tiny hole into the iris using a needle. This allows me to gently move the eye in its socket using a toothpick. I think that it would rotate even more smoothly if I put a little vaseline in the socket -- need to pick some up at the grocery store.
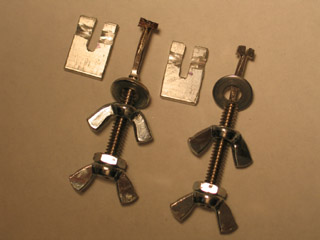
When you have puppets walking, you need a way to "tie down" their feet to the set. An easy way to do this is to have a nut in the foot of the puppet, and then have a screw come up into it from beneath the set. Getting the screw into the hole can be a little fussy, though.
Animator extraordinaire Nick Hilligoss has a tutorial on making "T-style" tie-downs on his site that I've wanted to try. Basically, what you do is take a bolt and file down its head until you have a "T". The "T" then fits through a slot in the puppet's foot, rotates 90 degrees, and comes to rest in a groove. Underneath the animating table you tighten a wing-nut, and -- voila! -- your puppet is tightly bolted to the floor.
I had to learn several new skills to pull this off...
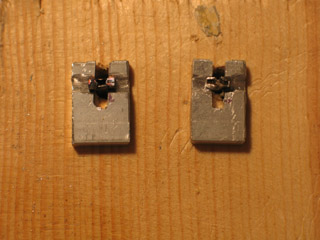
First off, I had to find a vise that I could clamp to my work table. I thought I could use a drill press vise -- but that was a total failure. I wound up buying a little 3" vise at Home Depot for $20.
The feet are cut from a strip of aluminum. I first tried cutting it with a hacksaw. The saw blade kept binding up -- until I bought some wax for it, which acts as a lubricant. The cut worked then, but was sloppy. Next I tried using a cut-off wheel attachment with my dremel tool. That worked much better! The dremel tool made it easy to cut the feet off the strip, cut the slots, and make the grooves.
To grind down the heads of the bolts, first I tried using a bastard file. That worked well -- but it took about an hour just to do one bolt! Next, I tried using the dremel cut-off wheel to grind it down. Much faster... But also a very different experience. When I use the cut-off wheel, sparks shoot off like a Fourth of July sparkler, and the metal starts to glow orange! (I was careful to be wearing a dust mask, goggles, and apron this whole time.)
I'm feeling rather proud of myself: this is the first time I've ever done any sort of metal working. :-D
When you build a puppet with a wire armature, it's just a fact of life that the wire is going to eventually break. So, it can make a lot of sense to create armatures that allow you to replace joints when needed. ...Here I'm working on a system that will allow me to replace a puppet's neck. The head is where you do the most detailed sculpting work -- it could be tragic if there's no way to reattach it to the body after a break.
What you see above is two pieces of square-shaped brass tubing, one fitting inside of the other. The larger piece will eventually be epoxied into the head. The neck wire will be epoxied into the smaller tubing. Then you can slip the head onto and off of the neck at will. Once again, this is a design from Susannah Shaw's book.
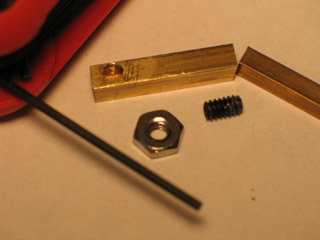
To make sure the head won't fall off while you're animating, you need a way to keep the tubes fitted tightly together. A hole is drilled the larger piece of tubing, and a nut is attached over the hole. When the smaller tubing is inside the larger tubing, you tighten a screw into the nut, which should then lock the two pieces together.
I made one mistake here. I thought I could just super-glue the nut to the brass tubing. It didn't work. Rereading the book, I realized that you need to solder the nut in place. Soldering isn't a skill I have yet -- but I've looked into it, and think I can learn it within another week.
...Incidentally, the screw is a "grub screw". Rather than having a head, there's a hole in its middle, and you turn it with a hex key. You can see a hex key in the photo above.
posted by sven | February 3, 2006 1:33 PM | categories: stopmo