you are here [x]: Scarlet Star Studios > the Scarlet Letters > toxic cupcakes
<< before
happy easter from scarlet star studios!
after >>
buying a lab scale
April 17, 2006
toxic cupcakes
by sven at 9:25 pm
During the past two months I've purchased several new-to-me art materials: ultra-cal 30, RTV silicone, polyurethane casting resin, glass microspheres, and "self-skinning flexible expanding urethane foam". On Saturday I finally had the opportunity to play with all this stuff. Doing small experiments in paper drinking cups, I now have a bunch of odd castings that look like... toxic cupcakes.

What do I plan to do with all these materials? Well, they'll allow me to make molds and castings with a precision that I've never achieved before. So as an artist, I'm interested in them just for the sake of having more techniques at my disposal. However, there are two projects that they may apply to immediately:
Project #1: I want to try making a stopmo puppet with a body cast in foam. Foam latex is the standard for this application. However, foam latex has several problems: it involves 4 chemical components; it requires a dedicated kitchen mixer and oven; it is very vulnerable to temperature/humidity/barometric pressure; and it starts to rot after a few years. ...Contrast this with urethane foam: it only has two components, cures at room temperature, and doesn't rot. --Worth a shot, don'tcha think?
Project #2: I like puppets with heads that are very large in proportion to their bodies. How do I make heads that are light enough so that the puppet won't tip over? Mike Brent suggested that I should try casting my puppet heads in resin. You can get a filler material (such as glass micro-spheres) that will lighten the casting significantly... And as an additional benefit: If you're doing castings, when a puppet breaks you can just cast another!
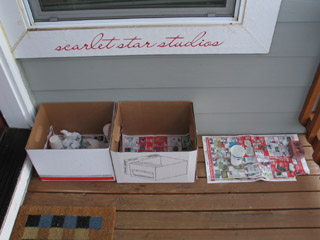
These materials give off toxic fumes, so I have to work with them outside. However, this is Oregon... It was rainy and windy on Saturday -- so I wound up working on the front porch, manipulating the chemicals inside of cardboard boxes that served as wind-breaks. It worked adequately; but boy do I wish we had a covered driveway!
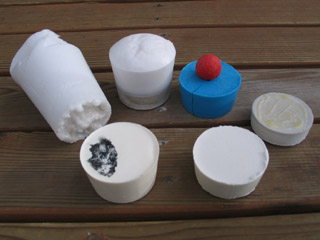
Please refer to the photo above...
FRONT LEFT: RESIN
The front two "cupcakes" are polyurethane resin. This resin has you mixing part A and part B in a 1:1 ratio by volume, but allows for 5-10% error. For the cupcake on the left, I measured out part A and part B by weight (oops) on my new lab scale. It cured in roughly 20 minutes... It looked sort of like liquid lard congealing, a white clot appearing in the clear fluid. I was disappointed to see tiny bubbles over much of the casting's surface.
FRONT RIGHT: RESIN WITH MICROSPHERES
For the resin cupcake on the right, I tried eyeballing the measurements, and added in the glass microspheres as filler. The bottom-most part of the casting didn't seem as if it was going to cure -- which I attribute to the poor measurements... But the next day, I was surprised to find that the remaining material did finally harden. Conclusion: I prefer not to eyeball measurements. ...The microspheres definitely lightened the material -- and they also smoothed out the surface a great deal. Yay microspheres!
Next steps for exploring resin: The bottles "glug" when I pour them -- I need to see if I can find some screw-on spigots for more precise pouring. I tried painting the resin with acrylic -- but even dry, it wiped off easily. I suspect that resin requires enamel based paints. However, I may be able to use an enamel-based spray primer, over which I could paint acrylics. That, I believe, is how wargamers paint their plastic and metal miniatures -- so I'll have to pick some up at Bridgetown Hobby. ...I'm also interested in trying out some black pigment that gets mixed directly into the resin.
BACK FAR-LEFT: URETHANE FOAM
In the back row on the left is my first experiment with the expanding urethane foam. I was really surprised to discover that it cures in only about six minutes. There were gooey uncured areas at the bottom of the cup, however; I don't know what to make of that. The material feels like a Nerf football -- only a bit stiffer.
BACK MIDDLE-LEFT: URETHANE FOAM ON ULTRA-CAL
The next cupcake is an experiment I did to see if the urethane would stick to ultra-cal 30. I knew that urethane foam has a reputation for adhering to anything -- but I hoped against hope that the self-skinning variety would be different. No luck. This was my first batch of ultra-cal... I eyeballed how much water to add, and it turned out fine. It took a good deal longer to set-up than I expected, though -- around half an hour.
I checked The Prop Builder's Molding & Casting Handbook to see what mold-release it recommended for making urethane foam casts in a plaster mold. It said that PVA (white glue?) could work, but is not recommended. Instead, urethane foam should be cast in silicone molds. This leads us to the pretty blue cupcake...
BACK MIDDLE-RIGHT: SILICONE MOLD, PAINTED FOAM CASTING
The blue cupcake is made of silicone. Silicone is the gooiest stuff I've ever encountered: like wet peanut butter mixed with caulking. I wanted to actually try making a mold with this stuff, so I dangled a wooden sphere from a wire into the paper cup, and then poured in the silicone around it. I was worried that the cold would interfere with curing -- but it seemed to be cured after only six hours, which was listed as the minimum set time. I cut open the silicone with a razor, and bundled it back together with a rubber band. I used the hole where the wire had been as a pour hole, and made an impromptu paper funnel to help channel in the urethane...
The casting was OK, but not great. Air got trapped in the mold, so my casting wasn't perfectly spherical. I guess I need a second hole, so air can escape. The expanding foam was under pressure inside the mold, so it wound up being a good deal denser than I'd like. The surface is relatively smooth, but has pitting that looks like the pores in the skin of your nose. That pretty much terminates my fantasy of doing urethane foam puppets without latex skins. Drat.
One nice thing I'll say about the urethane though: It's really easy to paint. The sphere looks like a cherry because I painted it with red acrylic. The paint doesn't rub or peel off; and it's so flexible, I question whether you'd even need PAX paint if you were doing an all-urethane puppet.
BACK FAR-RIGHT: LIQUID LATEX ON UNTRA-CAL
The cupcake on the far right is another ultra-cal test. I did a quick google on the material, and discovered that 38 parts water for every 100 parts ultra-cal is recommended. This batch seemed to have a little water left over; now that I think about it, I wonder if it's because I measured by weight instead of volume? ...Even so, it set up. I tried painting some liquid latex on top; latex (unlike the urethane) comes off easily.
Conclusion: It looks like my next puppet will be made from flexible urethane foam with a latex skin, all cast in an ultra-cal 30 mold. The foam seems to be fluffiest when it has ample room to escape -- so I'll need to make vent holes in the puppet's feet. I have some Pro Adhesive (a Prosaide knock-off) for making PAX paint...
So I guess at this point I have everything I need to get started!!
posted by sven | April 17, 2006 9:25 PM | categories: sculpture, stopmo