you are here [x]: Scarlet Star Studios > the Scarlet Letters > drilling balls: two methods (part 1 of 2)
<< before
artist's way guided intent (april)
after >>
drilling balls: two methods (part 2 of 2)
April 5, 2007
drilling balls: two methods (part 1 of 2)
by sven at 8:00 am
I'm going to walk through two methods for drilling balls. In this installment I'll discuss the lathe. In the next, I'll discuss the mill.
I took the photos in this tutorial while I was constructing my last armature (the "Drifter"). I made errors -- and I'll share those with you too, so you can learn with me. I don't claim that the methods I describe are "right" from a technical standpoint -- but they're what I know so far.
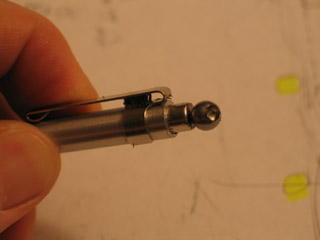
A helpful trick for working with balls, whether you're drilling them on the lathe or on the mill: use the magnet end of a metal scribe for picking them up and putting them where you want. I found this particularly helpful while trying to get balls into the lathe chuck.
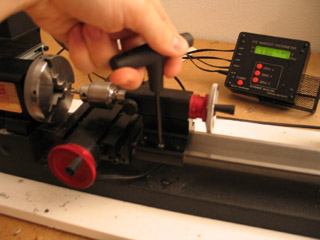
METHOD #1: THE LATHE
Drilling balls on the lathe has one major advantage: the lathe will automatically center the hole for you.
However, drilling holes on the lathe also has several disadvantages.
- There's no way (that I know of) to drill a hole to a precise depth.
- Sometimes the drill seems to be pushing the ball deeper into the lathe chuck.
- I've had problems with the ball twisting in the chuck while I'm trying to drill it.
- Sometimes the lathe chuck marks the ball.
- Because the drill is sideways, oil tends to drip off of it.
I used the lathe method for drilling the balls of another armature (the "Man of Steel") six months ago. At the time, I felt that (with much experimentation) I had figured out how to get consistent results. On this most recent armature, I followed my notes from that previous project...
However, my results still weren't consistent. After an hour and a half of using this method, I had 9 successful balls and 6 failures -- a success rate that really seemed unacceptable. And then I broke my center drill. So I decided to try out an idea for drilling balls on the mill that I'd been considering.
The mill method took a fair while to set up... But I was able to drill balls faster and more consistently -- so I'm sold on the mill method now.
Still, I think I've figured out now what the main thing is that I was doing wrong on the lathe -- so I'm not going to say that the lathe method isn't worth pursuing.
OK, so here we go!
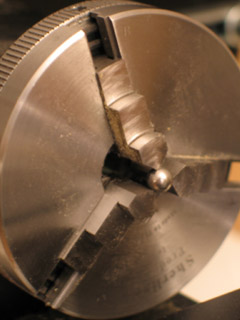
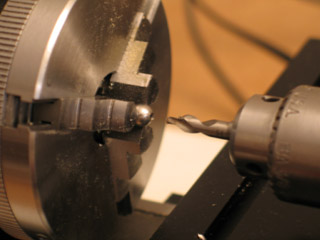
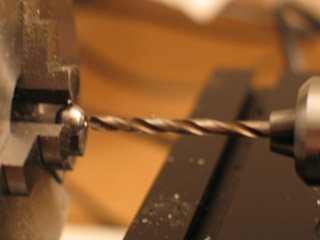
Step 1: Put a ball into the lathe chuck. As I said before, using the magnetic end of a metal scribe makes this much easier. If you're using your fingers or tweezers, the ball tends to roll back into the lathe chuck -- and it's very difficult to get out.
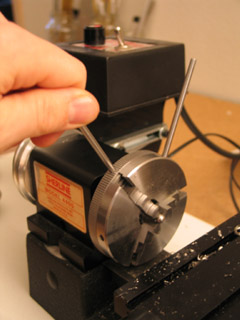
Step 2: Tighten the lathe chuck... I'm working on a Sherline lathe. I was having a hard time remembering which way tightened the chuck for a while. It turns out that the old mneumonic "righty tighty, lefty loosy" applies.
The lathe chuck is tightened using two rotating disks. Put a tommy bar in the disk that's closer to the motor and hold it still. Now put a second tommy bar in the disk that's facing you and turn it to the right (clockwise) to tighten.
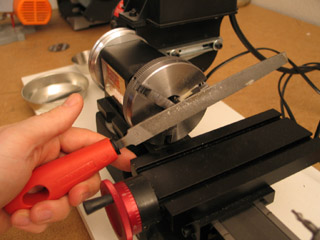
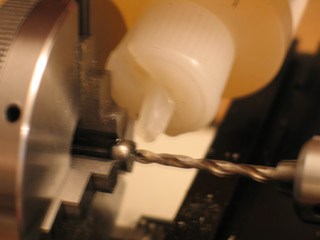
Step 3: File the ball. Before you do any drilling on the ball, you need to file a little flat spot on it. About 1/16" wide will suffice.
To do this, I use a fairly large bastard file. Tom Brierton recommends doing the filing with the motor turned on and the lathe spinning. I haven't had good luck with that. Instead, I rub the file back and forth, and give the lathe chuck a few spins by hand -- just to make sure the flat spot I'm making isn't at too much of an angle.
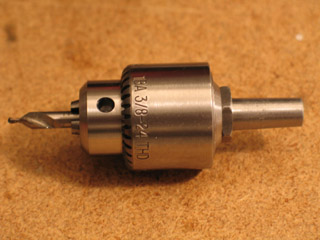
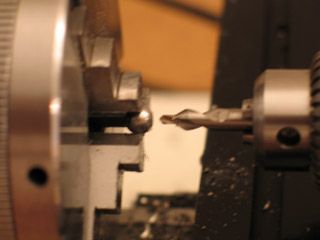
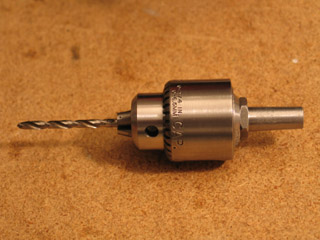
Step 4: Put center drill in drill chuck. When a normal drill bit first touches the thing that it's going to cut, it has a tendency to wander off center -- which can cause the bit to break. A "center drill" has an extra-thick shank that prevents this from happening. You use it to just start a hole -- which you then expand with a normal drill bit.
I'm using a #2 center drill in a 1/4" drill chuck that fits into the lathe's ram using a #0 morse arbor.
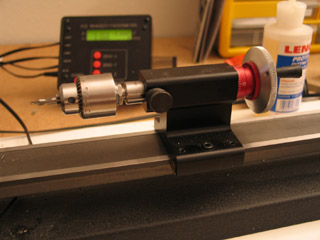
Step 5: Put drill chuck in lathe's ram. The "morse arbor" is a tapered bit of rod that you simply press into the lathe's ram; it doesn't need to be screwed in, or locked in some other fashion.
Step 6: Touch the center drill to the ball. At this point, the ram should be sliding freely along the lathe bed. Slide the ram up close to the ball, until the center drill is just touching the ball.
Step 7: Lock the ram in place. Now that you have the ram where you want it, use a hex key to fix it there.
Step 8: Back up the center drill. Rotate the ram's handwheel one rotation in order to back the center drill away from the ball.
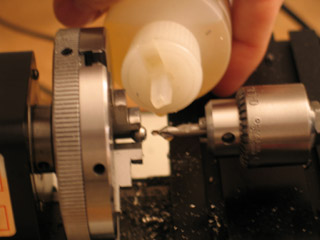
Step 9: Oil the center drill. Just drip a drop or so on the center drill's tip.
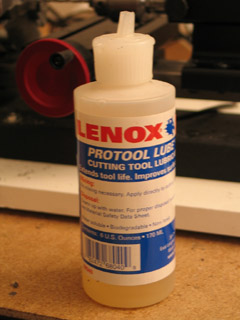
Here's a photo of the kind of oil that I'm using.
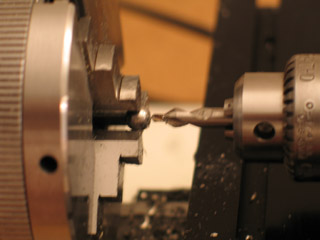
Step 10: Center drill the ball. I've found that to cut a type 302 stainless steel ball on my lathe, I should have it spinning at 1800 rpm. I arrived at that number by experimentation -- I haven't been able research my way to a "correct" answer yet.
It's incredibly important that you don't press the drill into the ball slowly. If you do so, then something called "work hardening" occurs (due to heat, I believe). The metal effectively becomes harder, and it becomes quite difficult to drill a hole at all. So when you press the drill into the ball, you need to do so quite quickly.
Here's where I think I made my main mistake:
As I now understand it, the center drill is really just that little tip. There's also a tapered cutting surface up at the shank. That bit, I believe, is for doing "counter-sinking": tapering the edge of a hole that you've already cut. See, the center drill that I'm using is actually dual-purpose.
I would press the center drill into the ball all the way up to the counter-sinking edge. I now believe that I should have only been making a little divot -- just enough to center the drill bit in the next stage of this process. I think that part of why the ball would sometimes twist on me is because as I tried to press a drill bit into the hole that I made, it would catch on the rim -- and the ball would deflect. A mere divot shouldn't cause deflection.
Step 11: Replace the center drill with a drill bit. Use the hex key to unlock the ram. Slide the ram back on the lathe bed, and then turn the handwheel backwards until the drill chuck pops out.
Since I'm working with a 1/4" dia. ball, I've chosen to use 1/8" dia. rod -- so I put a 1/8" drill bit in the chuck now. Put the chuck back into the ram.
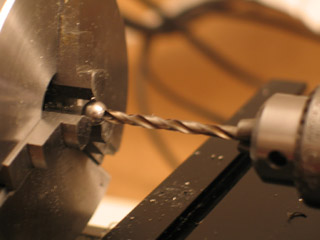
Step 12: Touch the drill bit to the ball's hole. Slide the ram down the lathe bed until the drill bit just touches the starter hole (or divot) that the center drill made.
Step 13: Lock the ram in place. Now that we have the ram where we want it, once again use your hex key to fix it there.
Step 14: Back up the drill bit. Turn the ram's handwheel one rotation backwards so that the bit isn't touching the ball.
Step 15: Oil the drill bit.
Step 16: Drill the ball. Again, turn the lathe on to 1800 rpm. To avoid work-hardening, press the drill into the ball quickly. (It's counter-intuitive, but the drill cuts much easier when you go fast than if you try to carefully go slow!)
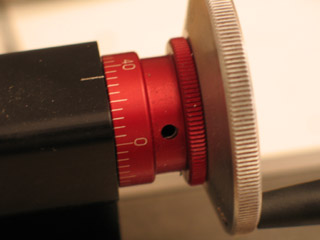
One rotation of the handwheel is .05". The ball is .25" in diameter. I want to drill a hole halfway through the ball: .125". So, that's two and a half rotations of the handwheel. But: don't forget that since we backed off the drill one handwheel rotation from the ball, we actually need to go three and a half rotations forward now.
I strongly recommend counting out loud. Once you've gone through this process ten times, it's easy to get hypnotized and lose track of how many times you've spun the handwheel.
And here's where I made another mistake:
Because I filed a flat spot on the ball, and then used the center drill to make a divot, it's impossible for me to know at this point exactly how far away from the center of the ball my drill bit is. I have to make a guess in order to compensate. If I'm careful about center drilling to an equal depth each time, I can at least ensure that the depth I drill to is fairly equal each time...
However, I've repeatedly forgotten to take into account that the tip of the drill is conical. Even if I can somehow drill to the exact center of the ball, we're measuring from the tip of the drill -- a rod which has been cut off straight cannot reach that point.
It's not a big error when you're only looking at one ball... But if you ignore that error, you can wind up with an armature that's a full half inch taller than your blueprint.
I did!
...
So, there you have it: sixteen steps. It seems kind of foolish to list all of them out like this. After all, if you have your own lathe, then you surely understand how to work it.... However, I want to give the uninitiated a taste of how one actually works this device.
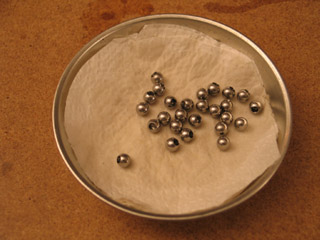
Also, at least for myself, spelling out the steps in excruciating detail helps me get faster at doing them. The "Drifter" armature required 20 drilled balls -- and I made six extra, in case of accidents. I believe at my fastest I could get through those 16 steps in 6 minutes. That's more that two and a half hours just drilling balls -- if I'm at my peak.
With the mill method, I could get a ball done in just 4 minutes. ...More about that tomorrow!