August 2009 archives
you are here [x]: Scarlet Star Studios > the Scarlet Letters > August 2009
<< before
July 2009
after >>
September 2009
August 27, 2009
machine shop improvements
by sven at 7:00 am
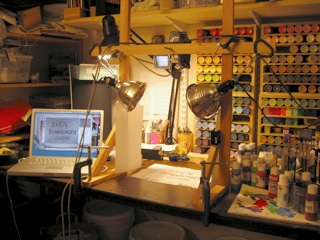
During the past few months I've made some improvements in the machining area of my studio space. Here's a little guided tour.
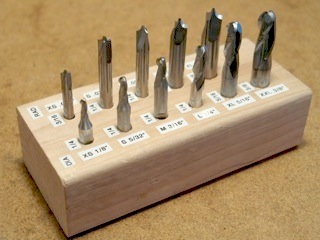
I've made sure that I have a complete set of the ball-nosed and corner-rounding end mills that I need for making armature joints. I've also created a handy wooden holder for them with easy-to-read labels for quick reference.
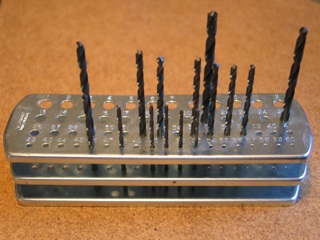
For a long time I only had the numbered drill bits that one needs for making threaded holes…
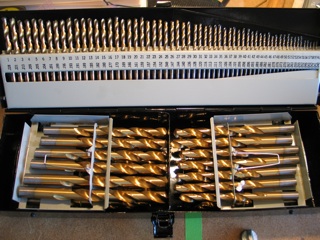
I finally decided that in order to run a serious machine shop, I really needed to have a full library of drills on hand. Thanks to Harbor Freight, I was able to get this 115 Piece Titanium Nitride Coated HSS set for just over $40!
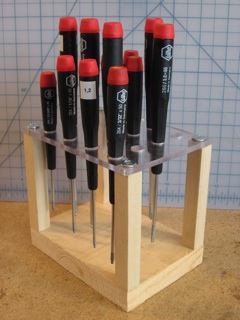
I fell in love with Wiha screwdrivers while working at Bent Image Lab. They feel like velvet… They don't do much good, however, if you can't find what you're looking for when you need it. So I built this pretty organizer for the set.
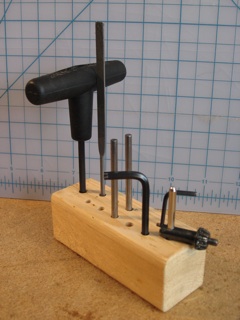
Simple but useful: I built this little organizer to hold the hex keys, chuck keys, and tommy bars needed for tightening and untightening my milling machine.
When you're threading a hole by hand, there's a risk that the tap won't go into the hole straight, and a risk that you'll accidentally break the tap.
Two books -- "Tabletop Machining" by Joe Martin and "Machine Shop Essentials" by Frank Marlowe -- show a tap holder design that solves this problem. The general idea is that you keep the tap vertical by holding it loosely in the drill chuck of a drill press or milling machine. Then, you build a special tap holder that keeps the tap in place with a screw.
Good idea! Except, the design in the books is -- in my opinion -- overly complicated. There's no reason why you need to make the tap holder from a 2" disk and then knurl the sides!
The design you see here is my simplification of Martin and Barlowe's design… And it works like a charm. It's pretty self-explanatory. The one important thing to point out is that I've filed the through-hole into a teardrop shape. That's essential -- it gives a better grip and thus helps keep the tap from shifting in its seat.
This tool has been so useful, in fact, I've built two version: one for size 4 taps and under, and one for size 10 and under.
Highly recommended.
posted by sven | permalink | categories: studio space
August 25, 2009
tutorial: how to drill a 1/8” ball
by sven at 2:22 pm
It can be very tricky to drill tiny 1/8” diameter balls on center using a mill. Here’s the method I’ve developed.
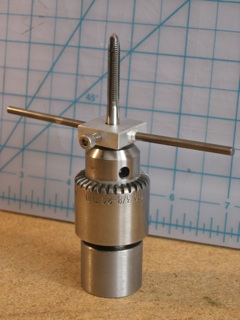
THE BALL-CLAMPING JIG
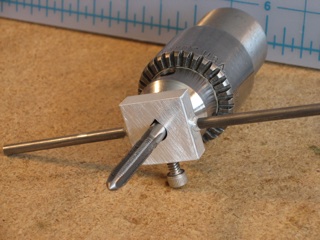
The ball-clamping jig I designed is essentially a step-block joint. It’s made from two pieces of 1018 steel whose dimensions are 1/8” x 1/2” x 1.8”. At the far left there’s a 10-32 allen head set screw that acts as the step. Next to it, there’s a 10-32 socket head cap screw to tighten the two plates. There are three open holes to seat balls, whose diameters are 19/64”, 11/64”, and 7/64”.

For practical reasons, I’ve limited myself to working with a set of six ball sizes: 1/8”, 5/32”, 3/16”, 1/4”, 5/16”, and 3/8”. For simplicity’s sake, I’ve taken to labeling them XS, S, M, L, XL, and XLL, respectively. The jig’s smallest hole accommodates XS & S, the middle hole M & L, and the largest hole XL and XXL.
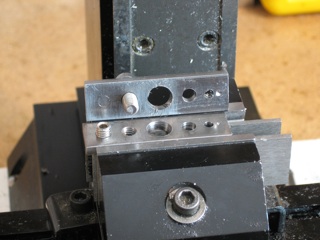
The jig sits atop 3/4” tall parallels in the Sherline milling vise.
CENTERING THE SPINDLE
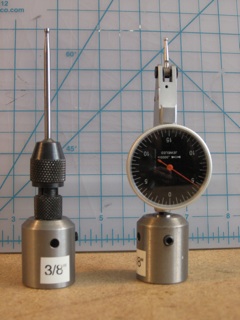
It is absolutely essential that the vise be parallel with the X-Y table. For some time I made the mistake of using nothing but a machinist’s square for this job. I’ve come to realize that while a square is a useful start, a lever-style test indicator is indispensable. I recently purchased a serviceable indicator on Amazon.com for about $30.
After the vise is correctly aligned, I use a wiggler to locate the right-hand edge of the jig and the edge of the vise’s fixed jaw. These are the same edges I used to locate the jig’s holes when I drilled them.
While doing edge location, I spin the top plate of the jig out of the way, so that it won’t interfere with the wiggler.
DRILLING OPERATIONS
Step 1: Locate the top of the ball.
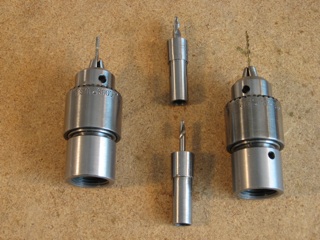
I put the drill I’m going to use in a chuck which then goes onto a drill chuck tool holder, which makes tool changes quick and easy. I screw the tool onto the mill, then lower it down to the point where the tip of the drill just touches the ball. I zero-out the DRO (Digital Read Out).
Because stainless steel is harder than the metal of the drill bit (I believe), the drill is unlikely to dent the ball, and you’re likely to get a pretty good reading. Note that I’m going for accurate depth -- but getting the depth right is less important than getting the hole centered.
I’ve tried to make sure that this process doesn’t depend on the Z-axis for any crucial measurements. In my experience, Z tends to be the sloppiest of the axes.
Step 2: Make a flat spot on top of the ball.
With this jig, it’s impossible to use a file for making a flat spot on top of the ball. The flat spot is quite necessary -- I’ve broken center drills while testing to see if I could get by without one.
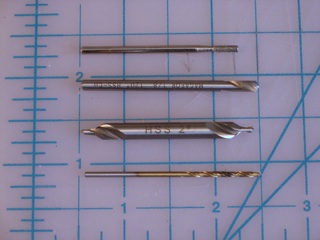
What I’ve come up with is using a diamond bit that has a 3/32” shaft and a cylindrical grinding body that is approximately 1/16” in diameter. A set of 20 various diamond bits cost about $15 at my local jewelry making supply store.
I put the tool in a drill chuck and bring it down into the jig’s open hole. The diamond bit needs to be used with lubricant… One of the things I love about this jig design is that when it’s clamped tight, it creates a perfect cup for holding cutting oil.
[I’ve read about similar abrasive bits that are made from ruby dust. They may be superior -- they have abrasive all the way through rather than just on the surface. The ruby bits haven’t been in stock at my supplier; I may wind up special-ordering some.]
Step 3: Center drill the ball.
Whereas the twist drill and the diamond bit can just go into drill chucks, it is absolutely essential that the center drill goes into a milling collet. If you don’t use a collet, you won’t have a centered hole in the ball -- and if you’re drilling a 1/8” ball, it will probably be unusable.
There are two types of center drills: combination drills and spotting drills. I use them both. For the XS and S balls, I use a #2 combination drill to reach through the jig’s seating holes. For the larger sizes of ball, I use a 1/8” cobalt spotting drill. McMaster-Carr (the machinist’s ultimate mail order catalog) doesn’t sell spotting drills smaller than 1/4” in diameter -- this one is something special I was able to find on Amazon.com.
Step 4: Drill the ball.
The standard drill has a 118 degree tip. The spotting drill makes a conical dimple with a 120 degree angle, which helps guide the twist drill’s tip to true center. With that help, it doesn’t matter that the drill, seated in its chuck, isn’t perfectly centered.
[Note that drilling a hole in metal is different from drilling a hole in wood. With wood, you might want a pilot hole. With metal, the pilot hole would be counterproductive -- the drill would catch on the edges of the hole and go astray.]
Drill the hole down to your chosen depth… And you’re done!
ROD & HOLE WIDTH CONSIDERATIONS
Usually I use rods that are 1/2 the ball diameter. However, this isn’t possible for all balls. The smallest diameters of rod I can buy are 1/16”, 3/32”, and 1/8”. So, for something like a 5/32” ball, I’m likely to lathe the end of a 3/32” rod down to size.
Sometimes rods are slightly too large for their holes. One could use numbered drill bits (AKA “wire gauge” bits) to make larger holes that allow leeway -- but after trying this route, I’ve decided it’s better policy to just sand the rods down slightly. Precise rod diameter is seldom critical… And numbered drills are apt to give more room than you actually need, leading to a loose fit.
Here’s an neat trick for getting the rod down to size: Put the rod in the chuck of a hand-held electric drill. Meanwhile, hold a bit of fine-grit sandpaper or scotchbrite around the rod. Spinning the rod helps remove width fairly evenly.
HOLE DEPTH CONSIDERATIONS
A ball should be drilled at least halfway through. Currently I’m opting to drill exactly halfway through -- but I’m also taking the conical tip of the drill into account.
It drives me crazy when I’m cutting rods to size to discover that an armature's limb is too long because I misjudged how deep the ball holes are. I want to know how deep the ball holes are as precisely as possible.
For a while I experimented with using end mills to flatten out the bottoms of holes… But as I started working with smaller and smaller balls, I decided that it wasn’t worth purchasing super small end mills for the task.
So now I calculate how long the tip of a drill is and add that onto the length of my plunge. Standard drill bits have a 118 degree tip. Knowing this I was able to work out that the formula for finding the length of the drill tip is this: (1/2 * drill dia.) * tan31.
You can put down the scientific caluculator… Here’s a convenient table I’ve drawn up for how long the tip is on each size of drill:
- 1/16” = .0190”
- 3/32” = .0280”
- 1/8” = .0375”
- 3/16” = .0560”
- 1/4” = .0750”
TESTING BALL ACCURACY
I’ve come up with three methods for checking if balls have been drilled on center.
Method 1
While the ball is still clamped in the jig, put a rod in it standing upright. If the hole has been drilled too wide, the rod can lean to the side… Which will make the ball appear off-center later on, even if the hole is actually centered correctly.
Method 2
Put the ball atop a rod, and then put the rod in a hand-held electric drill chuck. When you spin the rod, the ball will look like it’s wobbling back and forth if it’s off-center.
Method 3
After you’ve brazed the ball onto a rod, you can put that rod either in the chuck of a mill or a lathe. [I suppose using a collet would be even better.] A lever-style test indicator, attached to a tool holder that’s off to the side, should be able to measure variations as the ball spins quite precisely.
posted by sven | permalink | categories: stopmo
August 24, 2009
armatures: limits of miniaturization
by sven at 1:30 pm
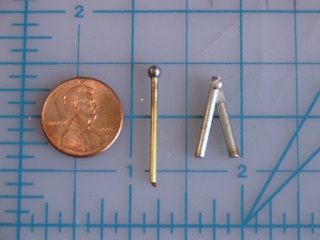
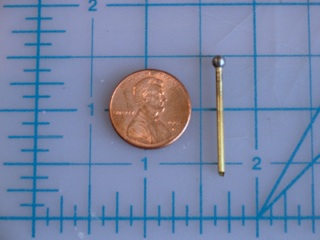
Within the field of armatures, I've decided to specialize in "small and precise." Working on The Whisperer in Darkness (new blog!) has given me a great opportunity to push my previous limits.
In the photo above, the ball is 1/8" in diameter and is brazed to a 1/16" dia. rod. The hinge joint is made from 3/32" dia. rods, and a #0-80 screw. For comparison, the screws in your glasses are likely #0.
These sizes represent certain practical limitations.
Stainless steel balls are made in two sizes smaller than the 1/8" ball I used: 3/32" and 1/16". However, you typically want to use rod that is one-half the diameter of the ball. The usual 1018 steel used for rods in armatures only goes down to 1/8" dia -- so you have to switch over to stainless steel rod, which only goes down to 1/16".
A 1/16" rod could go into a 3/32" ball -- but the range of movement would be rather limited.
Theoretically, you could also use a lathe to thin 1/16" rod down to 1/32", so you could put it into the tiniest 1/16" ball… But at that point, the rod is so fragile, I wouldn't trust it not to bend during use.
Even with the 1/16" rod, bending is an issue. It might be used on the fingers of a hand, or possibly for the outer arms of a very small puppet (~6" in height, or shorter)… But if you fantasize about using it for Jack Skellington style legs, you're bound for heartbreak when you accidentally bend the rods while animating.
So, if you want rods one-half the diameter of balls, and use standard-size rods, then a 1/8" ball and 1/16" rod combo is the limit.
As for hinge joints: the limiting factor is the screw.
I purchase nearly all my raw materials from either McMaster-Carr or Small Parts, Inc. For the hinge, I used a stainless steel 18-8, slotted, binding head machine screw.
Small Parts offers sizes of this type of screw below #0-80: #00-90 and #000-120. However, once you go past #0, prices are ten times as expensive. Whereas a box of a hundred #0 screws costs $7.25, a box of a hundred #00 screws costs $76.95!
[This is according to my invaluable Small Parts catalog from a few years back. Unfortunately, the company has stopped printing catalogs, and now does everything online. On the plus side, though, Small Parts' entire inventory can now be accessed via Amazon.com's "Industrial & Scientific" department… Although, frustratingly, it's turning out that items are out of stock far more often than I'd like.]
Furthermore, in order to drill holes to tap (make threaded), you'll need to go below the standard numbered drills, which run from #1-#60. To make a hole to tap for #00-90 screws, you need a #65 drill. For #000-120 screws, you need a #71 drill.
Personally, I have a set of #61-80 drills on hand… But they look like hairs -- so I haven't dared to try using them yet.
Oh, and in case you're wondering: another set of drills was created not so long ago that goes from #81 to #97. The #97 is .006" thick. For comparison, a piece of notepad paper is .002" thick. So try to imagine a drill that's only as thick as three sheets of paper!
At this point in history, #97 seems to be as small as drills go -- but I wouldn't bet that things stay that way forever.
Anyway, back to topic: making a hinge from 3/32" rod seems to be the practical limit. You could try to make a hinge from 1/16" rod… But the price of the screws skyrockets -- and you move into sizes of drills that are perilously delicate.
posted by sven | permalink | categories: stopmo
August 15, 2009
birthday card: shu-ju wang
by sven at 7:00 am

Today is Shu-Ju's birthday...
From Sven & Gretchin: happy birthday Shu-Ju!
posted by sven | permalink | categories: painting
August 10, 2009
animation: paint improv
by sven at 7:00 am

When I was at ASIFA Portland's summer social on 7/18, I got to play with a sandimation set-up… Down-shooting at a light table with sand on it. It got me jazzed to try some down-shooting at home.

I used some modular light supports that I built a while back, and simply clamped on a cross-brace. The camera is attached with a 3" long 1/4" dia. threaded rod. Unfortunately my good digital still camera broke in Wisconsin -- so I shot using a video cam, which is more prone to flicker.
Altogether, it took about 14 hours… Nearly half of which was sound work. Sound design was very influenced by Joanna Priestley's animations -- which I highly recommend.
posted by sven | permalink | categories: painting, stopmo
August 4, 2009
birthday card: gretchin lair
by sven at 2:22 pm

To my scarlet star:
Happy birthday to you,
Happy birthday to you,
Happy birthday dear Gretchiiiiiiiiin....
Happy birthday to YOU!
....And many mooooooooorrrrreee!!
Love,
Sven