November 2010 archives
you are here [x]: Scarlet Star Studios > the Scarlet Letters > November 2010
<< before
October 2010
after >>
December 2010
November 15, 2010
it gets better
by sven at 7:00 am

Here's a painting I just did for my niece's birthday, titled "it gets better."
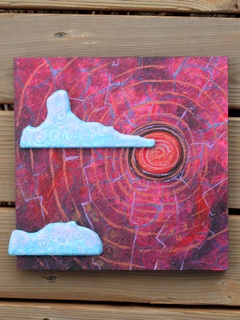
The title was inspired by the It Gets Better Project. The project was founded by Dan Savage in September 2010, in response to a spate of teens being bullied to death (suicide) because they were perceived to be gay. As the site says:
Many LGBT youth can't picture what their lives might be like as openly gay adults. They can't imagine a future for themselves. So let's show them what our lives are like, let's show them what the future may hold in store for them.
Good stuff. Even President Obama has contributed a video in support of the effort.

Anyway, the painting itself isn't intended to be political. I just thought that "it gets better" is a good thing to remember in all our times of darkness. Something worth hanging on the wall.
posted by sven | permalink | categories: painting
November 13, 2010
birthday party: still 30 something
by sven at 7:00 am

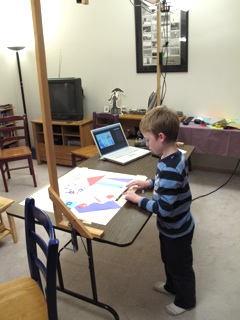
Last year I set up a downshooter animation table at my birthday party -- to introduce my friends to this artform that I love. It went so well, I decided to do the same thing again this year!
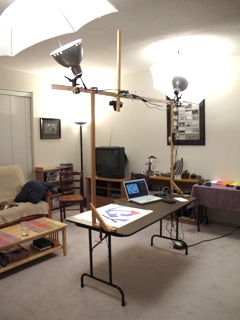
I provided colored paper so people could cut out whatever shapes they wanted. A downshooter is very user friendly: just move the shapes around on the table, and hit the computer's "enter" button to shoot a frame.
(My one mistake was that I should have used the DV cam rather than a digital still camera. Though picture quality is lower, it can capture frames faster, which makes the process more fun for everyone.)
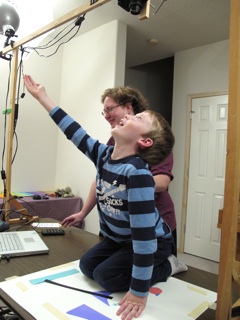
Most of the animation was done by our friend Ben H. From the very start, he saw the exciting possibilities about what you can put beneath the camera...
It was remarkable to watch Ben's approach evolve over the course of the evening. If you pay attention, after the cake portion of the film, the images become less random. ...We're watching a story about a wizard who casts a spell!
posted by sven | permalink | categories: exhibits & events, stopmo
November 11, 2010
thirty-nine dance: behind the scenes
by sven at 5:30 pm
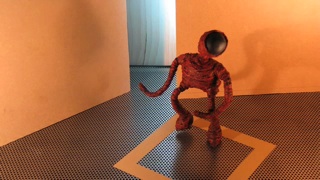
I want to share some "behind the scenes" photos from my most recent stopmo clip, The Thirty-Nine Dance.
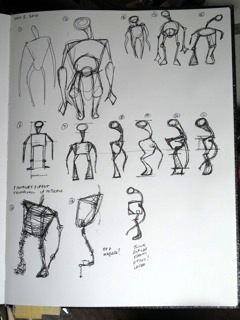
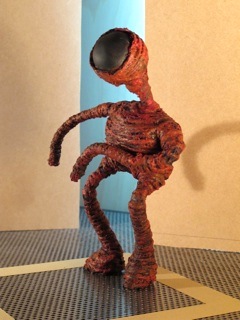
Fig.1: For the puppet design, I didn't just want a generic humanoid. I wanted something stylized.
In 2D hand-drawn animation, there's an emphasis on finding the underlying forms of a character. If you're going to draw Donald Duck or Homer Simpson thousands of times, you need to know that the head is built upon a circle, the belly is constructed from a bean, the character is four head-circles tall... Etc.
Using this sort of thinking, I decided to base the body on a squashed square shape, and made the legs almost twice as long as the torso.
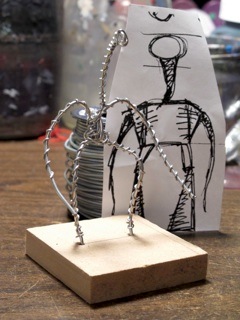
Fig.2: I want puppets that have a highly sculpted look. So, for the first time, I went ahead and tried making a maquette before creating my final puppet. Seeing a rough sketch in 3D allowed me to identify some changes that I wanted to make in the final design.
Some thoughts about the armature you do your sculpt on...
If you're going to cast a puppet in foam latex or silicone, you can either:
- make an animatable armature, do your sculpting on top of it, and then make a mold, or
- do your sculpt on a rough armature, make a mold, and then make an animatable armature to fit inside it.
While I'm not doing cast puppets yet, I do want to work in the direction of option B. It makes the life of the armature builder more difficult -- but prioritizes creating a dynamic sculpt... Which is, after all, what the audience is going to see.
The armature that you build a sculpt on is different from an armature suited for animation. The maquette armature you see above starts with two equal lengths of wire for the left and right sides of the body, which then get bound together at the spine. This construction helps make sure that both sides of the puppet are symmetrical. The entire thing is then wrapped in a smaller gauge wire, which gives your sculpting material something to grip onto.
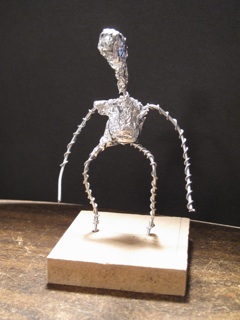
Fig.3: If you look at photos from the making of Return of the Jedi, all the monster maquettes from Jabba's palace appear to be made from water-based clay. If you look at photos from Star Wars Episodes I-III, you can see that maquettes are now made from Super Sculpey brand polymer clay. From what I've read online, Super Sculpey seems to have become Hollywood's default medium for maquettes.
With polymer clay, you want the material be of similar thickness everywhere on the maquette's body so that it will bake evenly. Thick parts of the body (like the torso) get bulked out with aluminum foil. Tip to the thrifty: the Dollar Store is a great place to pick up cheap rolls of foil!
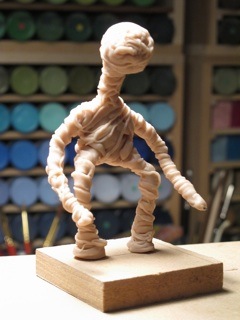
Fig.4: I was imagining that the puppet would be wrapped in sisal twine, burlap, thread, and possibly plant materials. To simulate this texture, I ran the Super Sculpey through a pasta roller, sliced it into fettuccine-like strips, and then wrapped the strips around the armature. For even thinner strands, I used a small clay extruder.
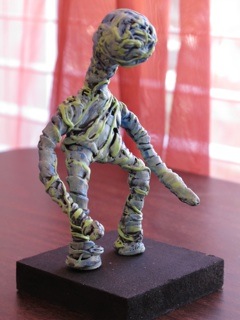
Fig.5: Paint really transforms a maquette and brings it to life. I gave the maquette a base of black acrylic paint, then dry-brushed highlights with pale blues and greens. (Painting the wooden base black goes a long way toward creating a professional presentation.)
Studying this maquette, it seemed as if I'd lost some of the angularity that I liked so much in the original sketch. Also, I felt that there needed to be some area on the puppet that was smooth, to contrast with the chaotic fibrous areas. I changed my mind about colors, and decided to go with a red palette.
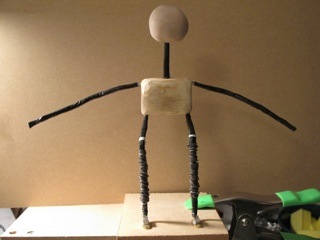
Fig.6: My original thumbnail sketch was about 2" tall. For the maquette, I blew the sketch up 200% on our photocopier, and made the thing 4" tall. For the final puppet, I went up 200% again, and created an 8" tall puppet. I could have just drawn a new reference sketch that was 8" -- but there tends to be a special vitality in thumbnail sketches, which I wanted to preserve as long as possible in the construction process.
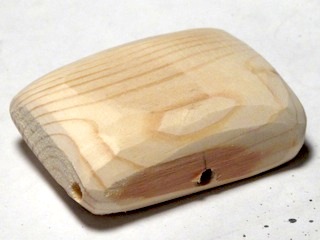
Fig.7: The torso is made from a scrap of pine wood. I drilled 1/8" diameter holes where the arms, legs, and neck would attach. Then I ground off the edges using both a Dremel moto-tool and a belt sander.
My use of wood here is inspired by the puppets of Nick Hilligoss. One difference is that he sometimes has multiple strands of wire glued into multiple holes -- rather than all being glued into a single hole as a bundle. I can see, at least in theory, that this should have benefits for preventing wire breakage. Wires tend to break where they interface with something hard. Multiple attachment points would give you more safeties.
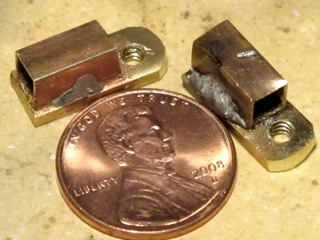
Fig.8: The feet are made from K&S brand brass, which you can find at most hardware and hobby stores. The feet are 1/4" wide and about 5/8" long. I tapped the tie-down holes to receive 4-40 threaded rods. Rather than have the square tubing point upward, I have it come out the back of the foot. I think that this better simulates an ankle joint, putting it close to the ground, rather than a ways up the leg. (Again, this approach to ankles was inspired by Nick Hilligoss.)
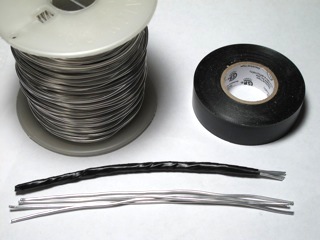
Fig.9: Most amateur stopmo puppet makers twist strands of wire to make a sort of cable. In recent years, the default approach in some Hollywood-based stopmo houses is to leave wires untwisted -- instead binding them together with thread and a coat of Barge brand flexible cement.
An advantage of leaving wires untwisted is that it avoids putting tension into the wires, which could cause breakage. Also, for an area like the puppet's neck, where you rotate left and right, you can feel twisted wire tightening or loosening depending on which way you rotate... That doesn't happen with untwisted wire.
A disadvantage of leaving wires untwisted is that you can sometimes hear the wires sliding past each other, when they bend at the hip or elbow.
Based on personal study, I think that different wire strategies may be better suited to different parts of a puppet body -- depending on whether a bend or a twist motion is most common...
See, there are actually three options for working with strands of wire: (a) untwisted, (b) twisted, and (c) coiled. For coiled wire, you wrap your wires horizontally around a vertical core wire. Think about what happens when you bend a spring or slinky at a 90 degree angle -- very little stress is put on the wire.
In theory, it could be smart to put a coiled strand or two in at the puppet's knees -- as safeties, in case the core untwisted wires break. In practice, however, it seems like a lot of trouble to try to come up with a perfect solution for what is, after all, only a wire puppet.
For the dancer puppet, I decided to go with four untwisted strands of 1/16" dia. annealed aluminum wire for all limbs. Barge is very toxic, and working with thread is awkward... So I bound the strands together using flexible vinyl electrical tape. It seems to have worked quite well for this build-up puppet -- but I recognize that there might be adverse chemical reactions if I were to bake these bundles inside of foam latex.
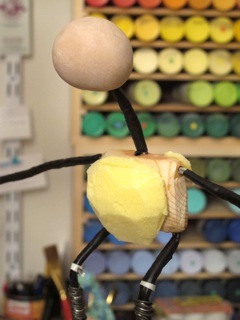
Fig.10: The initial armature looked a bit too much like a bar of soap with legs. So, I bulked out the torso with rigid insulation foam, to give it some additional form. Insulation foam is wonderfully easy to carve, and is easily adhered using hot glue.
I should also mention that I wanted to give the lower legs some "bones"... Rather than use plumber's epoxy putty (as I have in the past), I stiffened the lower legs by wrapping them in a thin gauge steel wire. The difference in flexibility between the top and bottom of the leg was plenty enough to help me animate the illusion of there being stiff bones there.
The head has a wooden core, bulked out with aluminum foil, and a thin Super Sculpey skin, which I sanded down for maximum smoothness.

Fig.11: For skin-level texture, I wrapped the puppet in sisal twine, periodically laying down a dab of hot glue to keep it in place. At the maquette stage, I thought that I'd have organic textures going in all directions... But the look of the methodical wrapping was so striking, I decided to just stick with that.
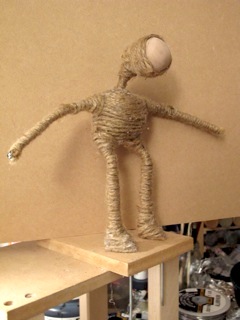
Fig.12: I'm very pleased with the look of the wrapped sisal. However, at this point I discovered a down side. The twine greatly reduced flexibility -- particularly at the shoulders and hips, where the wrapping is thickest.
I also discovered a big flaw in the armature's design. In a human skeleton, the base of the pelvis is significantly lower than the points where the femurs connect. The head of a femur really connects to the side of the pelvis, not the bottom...
In my armature, I have the leg wires shooting straight out the bottom of the torso block. Consequently, it seems like the bend is part way down the leg -- not up at the hip. In future designs, I intend to have the leg wires come out the sides of the pelvis... And I'll look at carving the pelvis to be shaped more like a triangle, rather than a box.
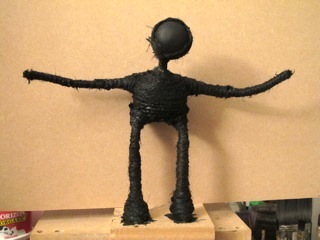
Fig.13: As with the maquette, I started painting the puppet by laying down a base coat of black acrylic paint. Sisal is absorbent, so I watered the paint down a lot, to help it soak in.
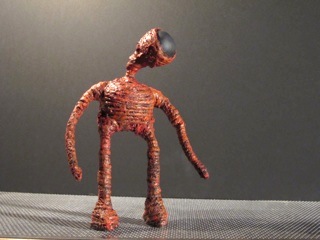
Fig.14: Even after applying the base of black acrylic, the puppet had a lot of loose fibers sticking off of it. I used an electric razor to trim them down some. Then, I coated the puppet in a 50-50 mix of balloon rubber and black acrylic to hold the whole thing together. Painting was finished off with a dry-brushed layer of red acrylic, and another thin layer of orange (no balloon rubber this time).
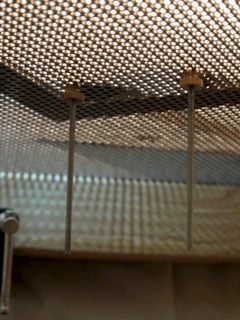
Fig.15: For tie-downs, I used what I always use: 3" long 4-40 threaded rods, purchased at Ace Hardware. The feet are tightened into place using brass thumb screws. Tightening these is actually really hard on my fingers... I'm interested in replacing them with something more friendly, like wing nuts.
The stage for this project is a sheet of perforated steel that I bought a few years ago from onlinemetals.com. The convenience of having all those holes pre-drilled can't be beat. I know a number of stopmoes have imitated Justin Rasch, who drilled hundreds of holes by hand in the floor of the set for his film Gerald's Last Day... I tried that myself once -- but for the size of the stage floor I wanted, the monotony was unbearable. I think I paid about $50 for the perforated steel. It was money well spent.
One down-side of a steel floor, though: Unlike MDF, it has no give to it. To fix a puppet foot in place, you actually have to tighten the tie-down nut really hard. To make it easier on myself, I added rubber washers to the tie-downs, underneath the set. That helped some -- though not as much as I'd like.
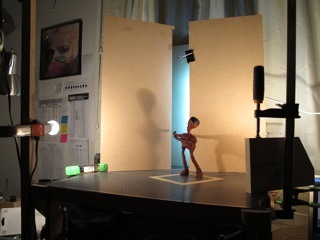
Fig.16: I always forget how painful it is trying to find a lighting set-up that works. For this project, I wanted to imitate lighting at dance performances -- which often comes in from the sides, helping to define the dancers' muscles.

Fig.17: For my stopmo films so far, I've generally flooded the stage with as much diffused light as possible, bouncing beams off of the ceiling and white photographers' umbrellas. I'm trying to get away from that approach; instead, setting up just a few lights that perform precise jobs.
I've discovered that Home Depot sells light sockets for $2 that are just a socket and a plug with no cord. Very useful for trying out different lights! I'm using (if I recall) two little 40 watt bulbs at the front of the stage: one at the puppet's eye level that comes from the front, and one that's more at hip level, that comes strongly from the side (and casts a nice shadow on the wall).
I would have been blinded by the side lamp, so I clamped a piece of wood between me and it to protect my eyes. In the future, I'm interested in seeing if I can modify tin cans to narrow the beams of light.
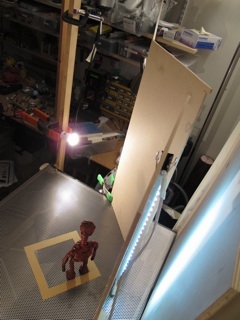
Fig.18: I was very pleased with the idea of having two unconnected flats that let you see another wall beyond them. So much amateur stopmo work just sticks the puppet in the corner of a cubical room -- or worse yet, against a flat wall. I really want to create some sense of depth in my sets.
The rear plane was lit with a strip of LED lights. I'm excited about LEDS -- they don't get hot, they're energy efficient... I've tinkered with wiring LEDs purchased at Radio Shack -- but haven't got the hang of it yet... And I'm uncertain about how to give them a stable power supply.
One happy accident was that the LEDs are more blue than the incandescent lights. The variation in color added interest to the set.
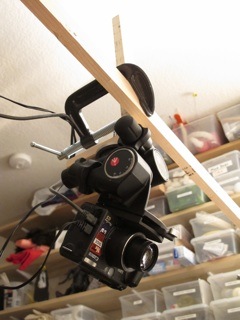
Fig.19: The camera is a PowerShot G5, attached to a manfrotto geared head. Tripods are a nightmare; if you accidentally kick them, your shot is ruined. So I hung the camera upside-down from overhead. My framegrabber software, Dragon Stop Motion, makes it incredibly easy to flip the image right-side-up again.
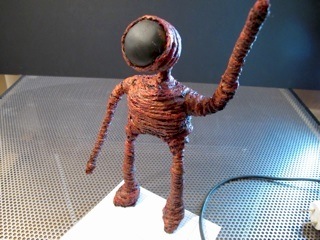
Fig.20: I've spent a lot of time during the past two years trying to better understand how a camera's "angle of view" impacts stopmo work.
When the camera is not zoomed in at all, you have the widest angle of view. You can get the camera close in to the set -- which can be important if you don't have much floor space in your studio for a camera tripods and such.
Having the camera so close to the puppet can also create some "perspective distortion"... Increased foreshortening and some slight fisheye-like curvature around the edges of the frame. This helps create some sense of depth.
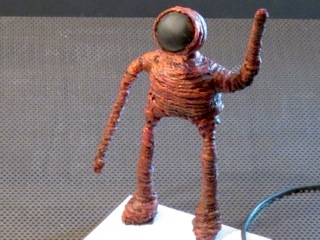
Fig.21: In the previous photo, the camera was about 12" from the puppet. In this photo, the camera is maybe 72" back. The foreshortening is gone, and the image looks fairly flat.
However, I also don't need as much backdrop... When the angle of vision is narrower, the rear wall or sky cyclorama doesn't need to be as wide.
So there's a trade-off to be made:
- When the camera is very close to the puppet, you're going to need a wide backdrop. (big X-axis)
- When the camera is farther back, you can have a narrow backdrop -- but you'll simultaneously need more space for pulling the camera back. (big Z-axis)
My compromise was to put the camera about 24" back from the puppet. I don't get as much foreshortening as I'd like -- but both the width of the backdrop and the placement of the camera were manageable, given the size of my work room.
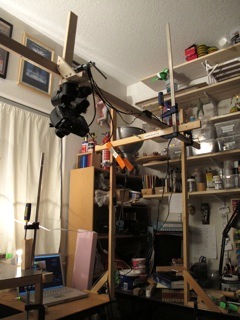
Fig.22: I've built several wooden pylons that I can move around at will, clamping them to the edge of tables. For my film Mutate, the camera was clamped to a cross strut that was attached to the animation table itself. For this project, I created an 8-foot-wide arch that was attached to two separate tables on either side of the room.
I am totally enamored with this modular approach. It's great to be able to quickly set up different arrangements as need arises. Which leads to Sven's rule: YOU CAN NEVER HAVE TOO MANY C-CLAMPS!
One downside of the big arch concept, though, was that if the animation table moved even slightly, it's the same as kicking a tripod. If you watch closely, in the film you can see that the entire set moves about a millimeter backwards.
For my next film, I think I'm going to try creating a stable wooden cage around the set, and then have the camera extend outward on some sort of pole -- so that if the animation table moves, the camera will have to move with it.
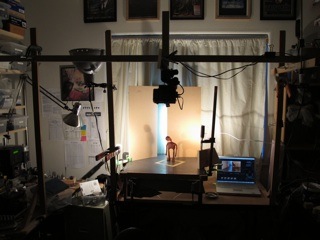
Fig.23: It's a different feeling animating when you're using a few well-positioned point lights, rather than flooding the whole room with diffused light. Most of the room is in darkness. I've seen that professional stopmo sets tend to have black curtains surrounding the animation area... It's a pleasing feeling to begin reproducing that environment at home.
posted by sven | permalink | categories: stopmo
November 7, 2010
thirty-nine dance
by sven at 11:21 am
For my birthday, I took a "staycation" in the studio. For a few days, I got to eat, breath, and sleep stopmo.
I've been wanting to try choreographing a puppet dance. I managed to build a new puppet, compose a song, and work out some steps. Time ran short, though, so I only got five seconds on film.
If you want to hear the complete "thirty-nine" song, you can listen to the mp3 here.
(Note: The song has a very low bass line, which might not be audible on some computer speakers.)