you are here [x]: Scarlet Star Studios > the Scarlet Letters > puppet #2: percy five
<< before
se portland artwalk
after >>
creata: intro to art therapy
March 6, 2006
puppet #2: percy five
by sven at 5:21 am
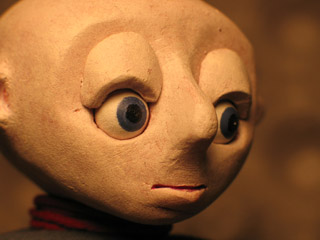
It took me a full month -- from February 5 to March 5 -- but I've finally completed my new puppet: Percy!
My first puppet, Moon Baby, met an untimely demise even before he was complete. So technically this is my first puppet... But we will count Percy as #2, out of respect for M.B. -- he may yet rise again!
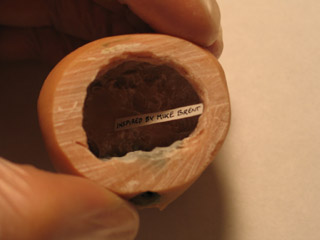
When last we saw our hero, I had just opened up his head to hollow it out, because it had been too heavy. Since the head was open, I decided I ought to slip some sort of symbolic soul inside... Since Mike Brent has helped me (and so many others) so much in my quest to learn puppet-making, I decided a dedication was appropriate. Thank you Mike!

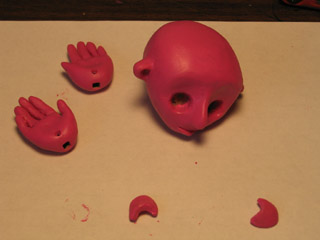
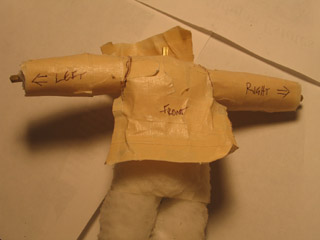
I glued the back of the head on with Duco cement. I smeared Super Sculpey into the crack and gave the head a quick bake. After sanding the whole thing down, you can't tell that Percy ever underwent brain surgery. ...In this photo you can see the little hole in the back of his head -- that's where I tighten the screw that attaches head to neck.
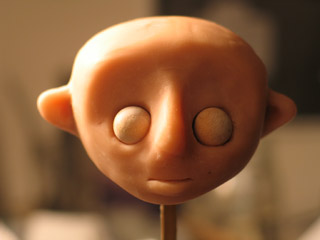
I had planned to attach eyelids onto the head using magnets. However, the eyelids for this puppet had to be smaller than the test eyelids I made, so it didn't look like that was going to work out. It might have been possible if I'd had some very tiny magnets on hand... But I didn't -- and I wanted to avoid drilling into the front of the face, now that I had a decent sculpt.
So, instead of using magnets, I decided that I should be able to keep the eyelids in place using museum wax. It's not ideal -- but it does work. It's fussier to take eyelids off and put them back on than it should be; this is going to discourage me from doing much with blinks.
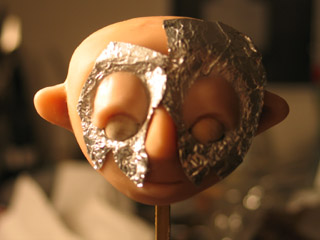
To make the eyelids, I put aluminum foil on top of the face, and then pushed the wooden eyeballs into their sockets. When I was done sculpting the eyelids with Super Sculpey, I gently pulled the aluminum out of the eyesockets, and put the eyeballs and lids into a toaster oven. (The eyeballs helped the lids keep their shape.)
On to the hands...
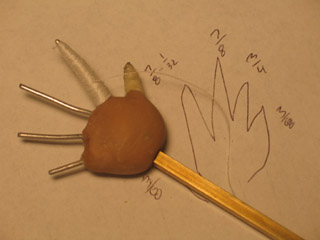
My original hand design involved wrapping thread around the finger wires, and then painting the thread with liquid latex. The principle is sound -- but it was taking a million years to do the wrapping -- and it was such fine work, it made my hands hurt. So, after getting through just two fingers, I abandoned this plan and decided to come up with a new design.
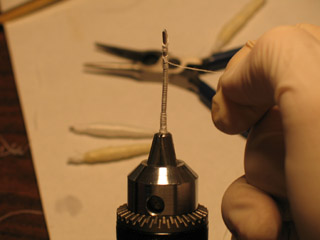
I experimented with putting short pieces of wire into a drill bit, using the drill to do the winding for me. This worked very well! The plug-in drill, which is stronger than the cordless drill, actually worked best. It got the job done quite quickly -- but I did need to wear a glove on the hand that was guiding the thread, to avoid rope burn. ...I didn't think to take a picture of it, but the spool of thread is actually attached to my sewing machine. Having the spool sit on a dowel that's stuck into a piece of wood would probably do the job just as well.
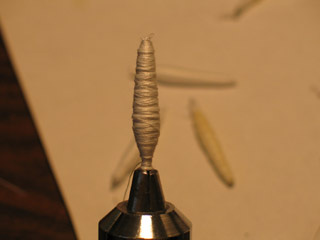
It was surprising just how noticable the thickness of the thread was. If you try this technique, I definitely recommend using an extremely fine thread. Strength doesn't matter much -- the thread just bulks out the wire -- liquid latex holds the whole thing together. I tried dipping the finger into the liquid latex; that gave me globby results. Painting three coats of latex on with a brush worked much better. I used a hair dryer sitting in my lap, propped against the edge of the desk, to make the latex dry more quickly.
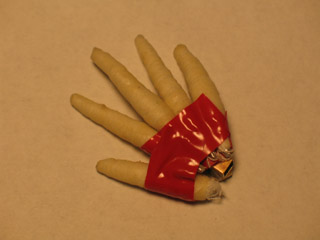
After making a batch of these odd little latex maggots, I tried binding them together with the tubing that attaches the hand to the wrist. (I had to make a new batch of these joints after deciding to redesign the hands.) The concept looked promising, but tape clearly wasn't going to be enough to hold it all together. I drew some sketches of a more complicated design, where each of the fingers would have some exposed wire that could be epoxy glued into a small piece of aluminum; the brass joint would be silver soldered into a slot in the palm of the hand.
At this point I both ran out of thread, and the head of my dremel broke.
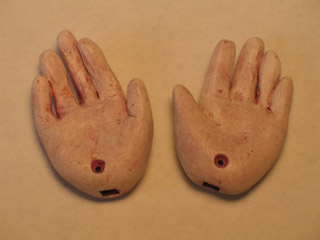
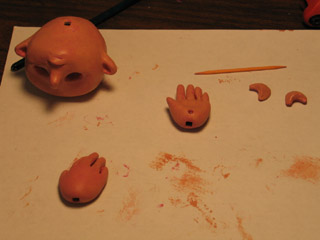
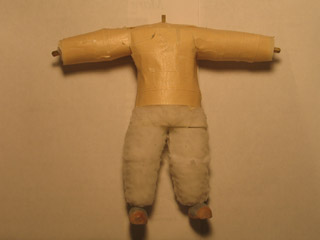
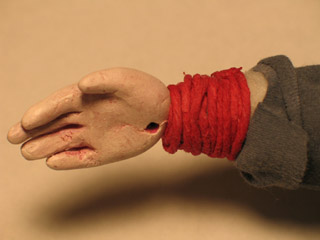
It was late in the evening, and stores were closed. I couldn't stand spending one more day fussing around with the hands, so I decided to give up on movable fingers and just make the hands out of Super Sculpey. Since the hands are detachable, I can always go back and try a new design if I want. ...It turns out that I'm pretty happy with this sculpt, though, so it's unlikely that I'll get back to the complicated design -- at least on this puppet.
In the photo of the hands, you see them already painted. Figuring out what I wanted to do with the skin tone took a long time in itself. I know I spent at least two, if not three hours one night experimenting with acrylics in a sketchbook, looking for just the right layering of colors...
What I finally settled on was three coats of paint: first, brushing on a light magenta base coat; then sponging on a peachy-tan made from white, brown, red, and yellow; and finally, lightly sponging on white with just a tint of the previous peachy-tan. ...I'm not sure how much of this will show up in photos -- but in person, I feel the color has great depth to it. It has a pale, almost newborn quality to it, which I was looking for.
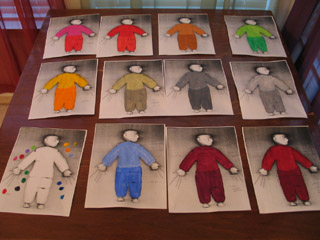
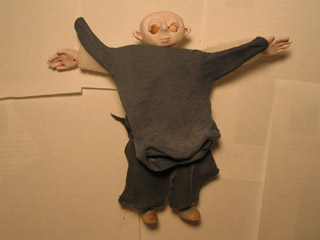
To figure out what color I wanted for the clothes, I did lots of tests. I laid the naked puppet face down on the photocopier, and made a bunch of copies that I could paint on. This is a puppet being made without a story in mind -- so I wanted a fairly neutral "everyman" costume that could fit in lots of settings. ("Percy" is the actor's name. Hopefully he'll get to star in many roles.)
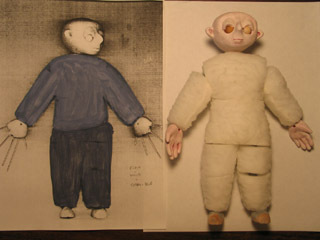
I settled on a sort of New England blue, mixed with grays. In the photo above, you can also tell that I've done more sculpting work on the cushion foam body -- Percy's still curvy, but not nearly as zaftig as he was in my initial post.
Mike Brent has a neat trick in his "Simple puppet fabrication" tutorial that I wanted to try, where you use a pair of gloves to make a shirt and pants. After some looking around, I found some white cotton gloves at Columbia Art and Drafting Supply. Unfortunately, I realized too late that Mike's puppet is about six inches tall, and mine measures in at nine and a half. Hoping that I could somehow stretch the fabric, I forged ahead with the fabric dyeing process... That was a waste of several hours.
Since using gloves for clothing didn't work out, I was left with having to make the clothes by hand. To do this, I had to come up with a custom-designed pattern. I started by creating a mock shirt on the puppet using masking tape...
I carefully cut the masking tape shirt off the puppet, and then traced the outlines of these pieces onto graph paper. I tidied up the shapes and added in extra space for seams. When I thought I had a pretty good shape, I'd lay a piece of tissue paper (the kind you wrap presents with) on top of the graph paper, and trace the design. I cut the piece out of the tissue paper, and tested it on the puppet's body.
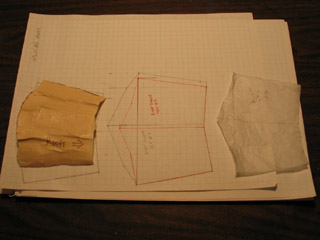
Here you can see three steps in the process of making a pattern for the arm of the shirt: masking tape, graph paper, and tissue paper. The costume is a simple shirt and pants ensemble; it turns out that this required four patterns: a pant leg, a sleeve, the shirt's front, the shirt's back. When I tested the tissue paper on the puppet, I innevitably discovered tweaks that I wanted to make, and went back to the graph paper for adjustments.
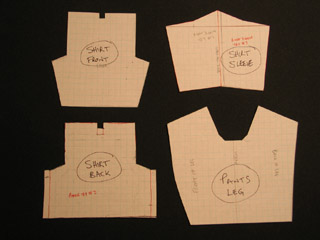
When the patterns were finalized, I glued the graph paper onto cardboard from cereal boxes; I cut the patterns out to make templates. I went to that delicious monstrosity, Fabric Depot, and chose a fine white cotton knit (with a percentage of lycra) for Percy's costume. I traced the templates onto the fabric, and cut the cloth...
In retrospect, I should have dyed the cloth before cutting -- but at first I thought that I was going to test the fabric before committing... And then I liked how it all was working out, and kept the first attempt. Rather than use a sewing machine, I used fabri-tac glue to put the pieces together. The glue was excellent -- it was easy to control, and bonded cloth within seconds. (My one concern is that it seemed to go through Nitrile gloves, making the insides sticky. The label says acetone is one of its ingredients; I'll have to look into what can hold up against that.)
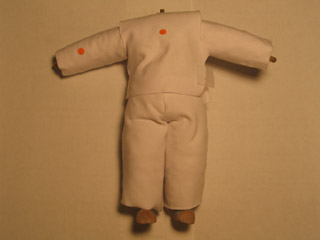
With the end in sight, I didn't take many more photos. I dyed the clothes using acrylic paints. Mixing the right colors took a long time. Any smudges of glue on the cloth acted like resists, which was annoying. The shirt was tricky to assemble, the arms being attached to the body of the shirt last of all.
For the neck, wrists, and ankles, I used a trick I invented with Moon Baby: wrapping dyed string around the joints. It's a stylized look, but I like it. After getting the joints taken care of, I realized that the shirt is short enough that when Percy bends over his back shows. It's not a very good solution, but I wrapped some more string around his midriff to conceal the foam when the clothing gapes. The string acts a lot like a corset, changing the shape of the body, which is not what I want.
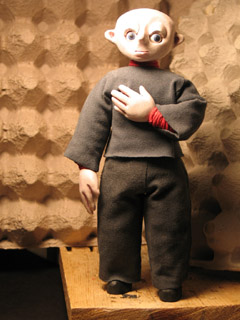
...And here he is!
In the book Learning by Heart, by Corita Kent and Jan Steward, there's a passage that says puppetmakers in India always save the eyes for last -- the eyes giving the puppet life. I thought that was a great idea, so I did the eyes last too. I drilled little holes in wooden balls, put short strands of wire in the holes, and then put the wires in a drill bit. The drill spinning the spheres made it relatively easy to paint round irises. (This is a trick I picked up from Susannah Shaw's book, Stop Motion: Craft Skills for Model Animation.)
By the way: The name "Percy" came to me while I was in the shower one day, as a diminutive for "Perseus". When I checked my mythology, it was actually Theseus and the Minotaur I was thinking of -- but the name had stuck. I added the surname "Five" just this morning, thinking about how I began and and finished this puppet on the fifth of the month. I dunno -- the name "Percy Five" just sorta has a pleasant sci fi sound to it that I like.