you are here [x]: Scarlet Star Studios > the Scarlet Letters > foam latex - first attempt
<< before
guest animator: hazel malone
after >>
casting in urethane foam
April 11, 2007
foam latex - first attempt
by sven at 10:25 pm
Monday (4/09) I did my first run of foam latex. It was a complete failure. Not unexpected, but demoralizing nonetheless.
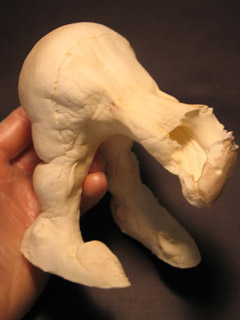
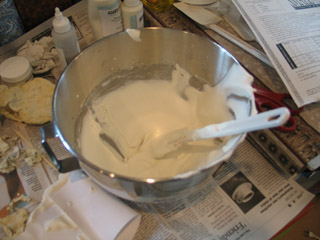
Yesterday I did my second foam run. The results (pictured above) are unusable -- but still an improvement.
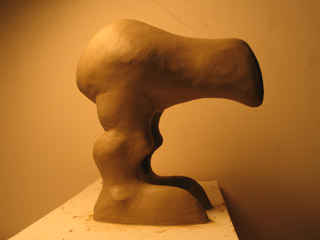
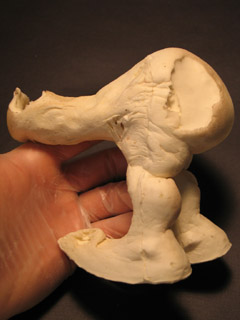
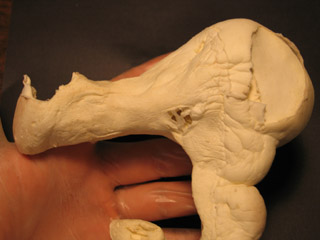
Here's the original sculpt, which I did back in May 2006. Sort of a wingless bird creature.
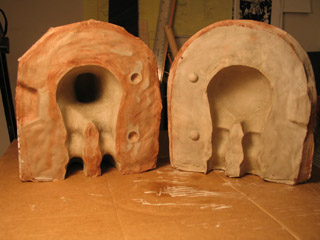
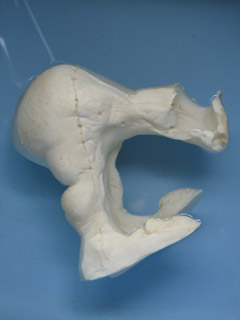
And here's the mold that I'm working with, which I made last June. It's just been sitting around, waiting for me to get back to my line of research on casting materials.
Why am I getting back to this project now? Because I wasn't happy with the tentacles on my first elder thing puppet. I want to test some different materials -- and rather than go through the whole process of making a new mold, I figured I'd get through my first mistakes more quickly by just using the mold I already have.
For the same reason, I decided not to bother with making an armature right now. This is purely about figuring out how to get the foam latex to do what I want it to.
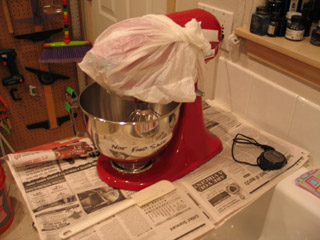
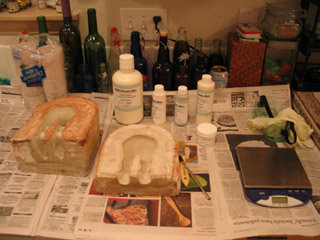
I bought a new mixing bowl and whisk attachment for my kitchen mixer that will be dedicated to foam latex. I covered the mixer's head with a plastic bag to help protect it from splashes. A plastic bag underneath the bowl would be a smart addition, too, next time.
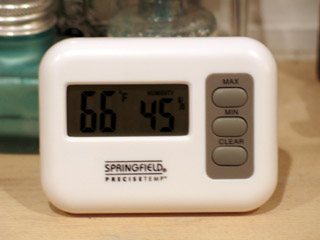
I looked around several stores for a a cheap, digital combo-thermometer/hygrometer (humidity detector). I finally found this one at Walmart, which just what I was looking for. It cost about $8. (Radio Shack was a real disappointment -- they only carried a $40 model.)
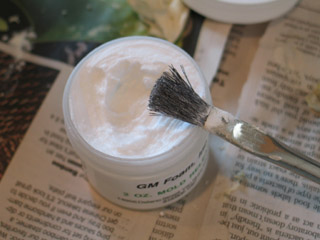
First thing to do: dust the inside of the mold with mold release. I need to remember to pick up a big batch of cheap acid brushes at Harbor Freight... You go through a lot of them in most casting processes.
After the mold release dried, I took it out on the front porch and dusted out the extra with a chip brush. You know it's dry when it's turned from clear to white.
FIRST RUN
For my first foam run I decided to do a standard batch -- 150 grams of latex base -- so I could get a feel for how much that makes. The room temperature was 69 degrees, and humidity was 40% (it rained earlier in the day). I decided to go with the "normal room schedule" (68-72 degrees F).

The bad smell of foam latex is legendary. I wasn't all that impressed, though.
When you open up the canister, you get a strong smell of ammonia. If you've worked with liquid latex before, it's about the same.
When you bake the foam you get more of a sulphur smell, like eggs. It lingers in the room... But after airing out the studio and lighting up some vanilla candles, I think we'll be OK.
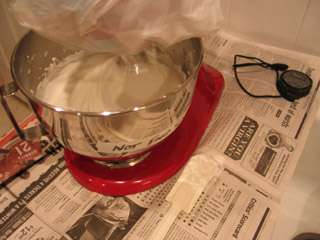
When I poured the first three ingredients into the mixing bowl, their level was about an inch below the bottom of the bowl's handle. When the foam reached peak volume, it had risen about halfway up the bowl's handle.
The foam gelled before I could get it into the mold. This was probably within a minute of turning off the mixer. I was trying to quickly brush some foam in with an acid brush, and then...
As I tried to see if I could quickly get at least some of the foam into the mold, it collapsed into a gummy wad, about the consistency of bread dough.
I noticed that the room temperature shot up to 72 degrees just during the last minute or two of the run (the thermostat turned on). That was probably a contributing factor.
SECOND RUN
Before I could do the second run, I had to clean out the mixing bowl, the whisk attachment, and the mold. I reapplied mold release.
The temperature was 68 degrees; humidity was 40%. I decided to decrease the refining period from 3 to 2 minutes, and the ultra-refining period from 3 to 2 minutes. I decreased the amount of gelling agent from 14 to 11 grams.
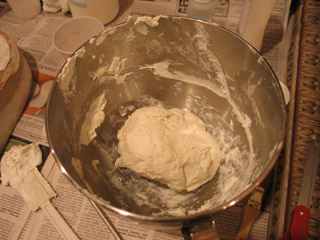
This go around I had enough working time. I quickly brushed foam onto the mold walls, then poured more in until each side was full. The foam had the consistency of whipped egg whites.
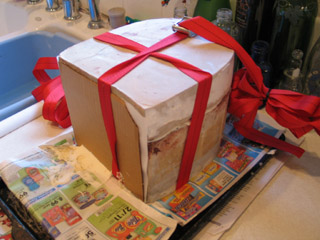
I strapped the mold shut... My straps are 13 feet long -- which is way too long. I used twist ties to try to keep the spare length out of the way.
The flightless bird is fairly bulky puppet; even so, I only used up between half and 2/3 of the material that I made. I estimate that there are between five and six 150 gram batches in my kit... So I've already used up a fair amount.
There was an area of foam at the very bottom of the bowl that never gelled. This suggests to me that there's an area there that the whisk doesn't reach... Good to know!
I baked the mold for four hours. I was aiming for 190 degrees. My oven thermometer revealed that it was difficult to get this temperature. The oven tended to hover at 180 degrees... And then if I turned it up to 200, it would sometimes go up to 210.
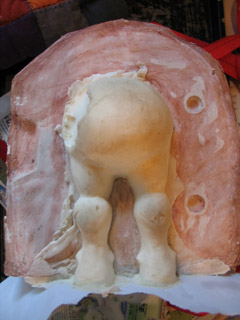
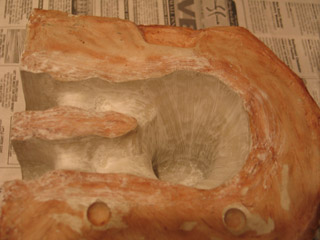
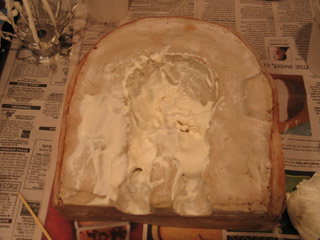
The initial demolding looked promising. The rear of the bird had a big air bubble -- but was otherwise pleasantly springy to the touch.
The nose, however, was another matter. Not only did it have a huge air bubble in it -- when I demolded it, it collapsed like a bad soufflé.
I should have let this mold bake for at least 6 hours... And maybe more. Not only is this a rather puffy character -- the mold is also ridiculously huge. I think the stone must have been doing a lot to insulate the nose from the oven's heat.
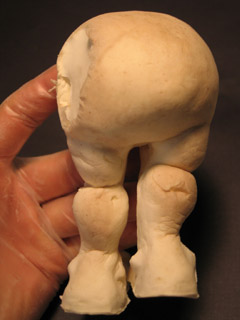
The entire thing has shrunk a little bit... But the rear end has maintained a consistency that I believe is what cured foam latex should feel like. So: progress.
This morning I washed the foam in soapy water, as you're supposed to do. It was pretty neat to watch the foam suck up water.
After squeezing out the water, there are wrinkles in the foam that I don't think are going to come out. I know that it's the nature of foam to wrinkle... Still, this doesn't make me love the material more!
I'm slowly getting the feel for this stuff... But I'd rather be using a material that involves less guesswork and witchcraft in its preparation.
I'm reminded of the silicone vs. foam latex comparison I did last May. Back then I concluded that I'd probably wind up using silicone as my primary casting medium. Now that I've had a little experience foam, silicone is seeming pretty appealing once again.
posted by sven | April 11, 2007 10:25 PM | categories: stopmo