March 2010 archives
you are here [x]: Scarlet Star Studios > the Scarlet Letters > March 2010
<< before
February 2010
after >>
April 2010
March 27, 2010
morocco 2009 pix
by gl. at 8:01 pm
last year my long-time friend and poet-photographer leeann took me on a 3-week photography trip to morocco. it was a great experience, filled with ups and downs, like any epic trip. i am really grateful and amazed i got the opportunity to go. i love trips that are magic and awkward and illuminating and difficult, trips that fill you to the brim with things your eyes have never seen before and trips that make you glad to be home with plenty of hot water.
(p.s.: my recommendation, if you ever go to morocco yourself, is to skip Casablanca and go straight to Chefchouen or Fes. and make time to go to Essaouira, which is a strangely Portland-like city.)
after my mind and body returned to the pacific time zone i arranged for a photo review & presentation at 23 Sandy Gallery. there were photos & poetry as well as candy and ephemera from morocco for attendees to take home. that went really well -- but then the holidays came and i forgot to post anything about it to the blog!
so here are a handful of the >1300 pix i took. i rented a camera and learned a bit about balancing iso, aperture and shutter speed -- which is vastly more than i knew going in. of course there were lots of things i couldn't take pictures of (like my wedding dance in Midelt, or the cutest baby in Imlil) but i hope you enjoy them!

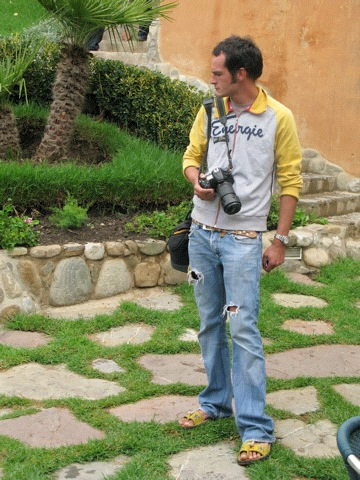
[one of our travel mates in my favorite city, Chefchouen]
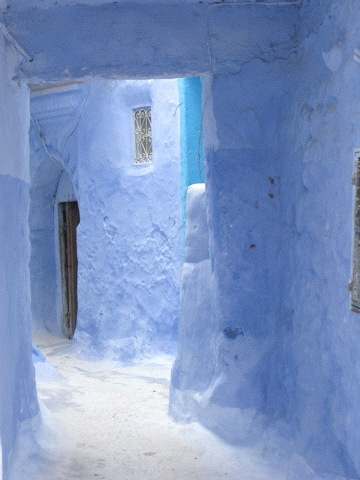
[the beautiful blue walls of Chefchouen]

[the Sahara desert]
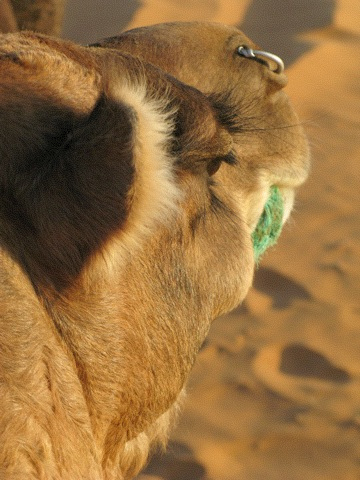
[the camel i camped with in the Sahara]

[nomads taking pictures of our caravan on their cell phones]
[our guide at Dar Chefchouen]

[a bridal mannequin in the Fes souk]
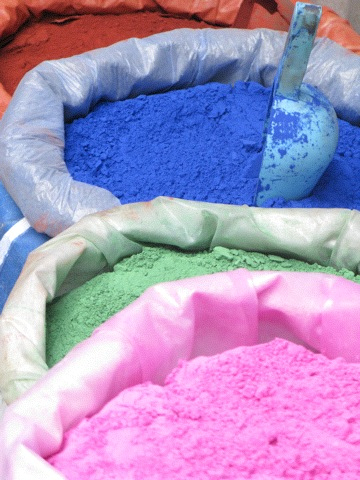
[dyes in the streets of Chefchouen]
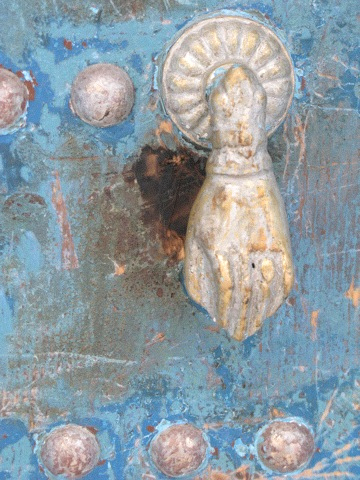
[hand of fatima door knocker in the salty city of Essaouira]
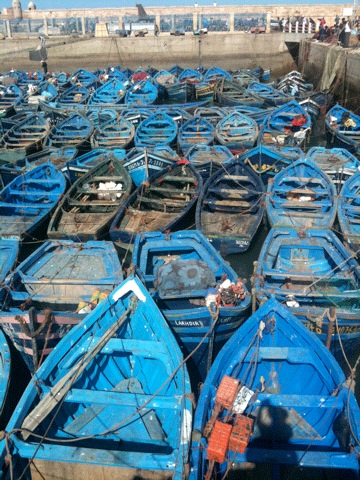
[boats in Essaouira]
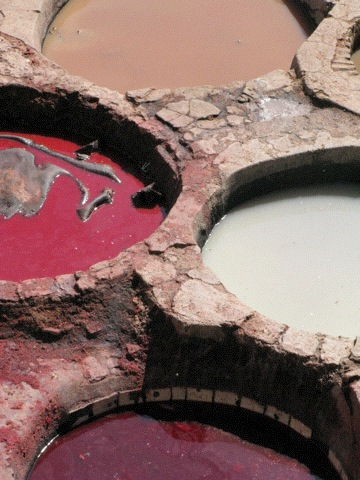
[leather dying pits in Fes]
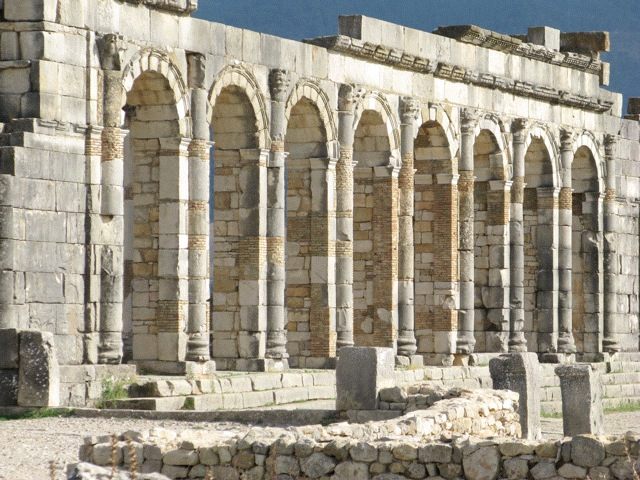
[the Roman ruins of Volubilis]
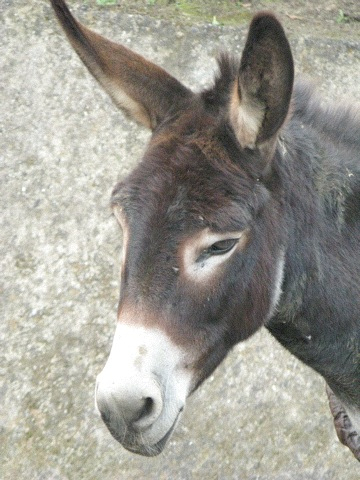
[a patient donkey in Chefchouen]

[Barbary Apes in the Middle Atlas Mountains]
posted by gl. | permalink | categories: exhibits & events, miscellany
March 26, 2010
poem: in the caves below
by sven at 7:00 am
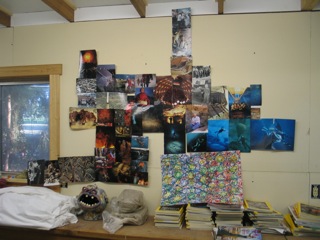
A prose poem inspired by the collage I made at Sara Swink's Two-Day Creative Process Workshop last year.
in the caves below
We can no longer distinguish ourselves from the moving parts of the machines we've constructed, inside of which we work.
We have built boxes and cubes for ourselves to live in; and in due course our beings have taken on the shape of the spaces we inhabit.
Even our dreams are dull and predictable. For entertainment we watch images streamed though boxes; so when we sleep, often we find ourselves acting out re-runs from TV.
But beneath all this there still lie ancient caves. There are subterranean spaces blocked off by accumulated junk and barricades and cave-ins... But they can yet be reached.
The shaman who crawls in the dark, whose magic wand is a pen, casting premonitory lines in black blood ink... If he is willing to go far enough into the mines, will find his way down to the womb-shaped rooms where the handprints of ancestors are still marked on the wall in red and white paint.
And deeper still, submerging in the wellsprings of consciousness, he might swim down into the earth cracked river from which life proceeds, seeking the skeletons of...
Of who? His dreams? Ancestors? Former selves? To whom do these bones belong, sunk to the very bottom of it all?
While far above, the machines ache with routine, the orbits of decay maintained -- there is a mystery here, at the source of all things.
He holds his breath again and again, diving down to those remains, trying to identify who they were. Where they came from. How did they come to rest here?
January 22, 2009
posted by sven | permalink | categories: poetry
March 19, 2010
poem: falling
by sven at 7:00 am
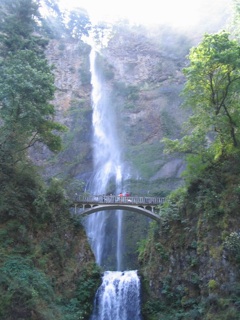
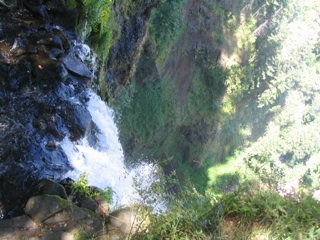
One of my favorite recurring images dates back to 2003, when Gretchin and I were standing at the top of Multnomah Falls. I wondered aloud what a droplet of water must feel just at that moment when it leaps out into space…
falling
(the water’s song)
I'm falling
we're falling
all falling
toward the inevitable
conclusion
and as
I'm falling
we're falling
all falling
I wave my hands
we wave our hands
all wave our hands
wildly
a frantic semaphore
like flapping wings
as we pass through storm
and tossed by wind
like flapping wings
frantic semaphore
to the ones below
ones yet above
grandfather
who began before me
niece
who tumbles after
tether to my mother cut
I quickly follow
my father's path
our family's path
our only path
falling
I'm falling
we're falling
all falling
together
toward the inevitable
conclusion
September 2, 2009
posted by sven | permalink | categories: poetry
March 12, 2010
poem: old man brontosaurus
by sven at 7:00 am
Here are the origins of that brontosaurus the walrus was chatting with…
old man brontosaurus
old man brontosaurus
i have never seen
an elephant
not in this neighborhood
you've stayed with me
all these years like
death, a roommate
surly, whom i live with
begrudgingly
but old brontosaurus
my footsteps in yours
following on hot summer
sidewalk, you're
a kind companion
to sit in upholstered chairs
with, slowly chinwagging
about yesterday's newspaper
over drinks
all the children wish
they were Rex the king
but i, as i melt in the sun
i would be a brontosaurus
too
December 31, 2008
posted by sven | permalink | categories: poetry
March 10, 2010
stopmo experiment: replacement faces
by sven at 7:00 am
Lena Podesta has started up an animation study group for members of ASIFA Portland. A few weeks back I had a cold and was too fuzzy-headed to machine armatures… So I started work on something for the study group: a set of replacement faces.
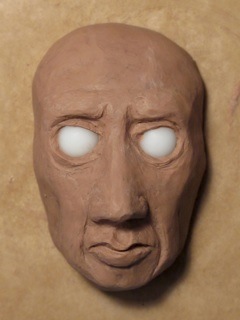
Fig.1: The sculpt was done using Chavant medium plastilene on top of a piece of wood wrapped in wax paper. The eyes are acetal plastic balls, which can be purchased either through animateclay.com or smallparts.com (which now offers its catalog via amazon.com). I studied sculptures of Roman emperors as reference while doing the sculpt, which helped me bring in a few nice details.
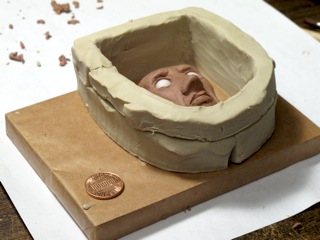
Fig.2: The mold wall is made from Klean Klay, which Ron Cole recommends in his fantastic mold-making tutorial.
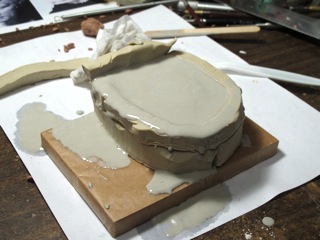
Fig.3: I used Ultracal 30 to make the mold. There is only one place in Portland that carries it… Stephenson Pattern Supply.
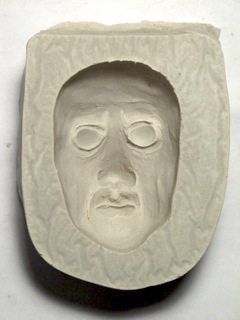
Fig.4: The negative image inside the mold is always creepy and fascinating to see. A number of tricks in the DisneyLand haunted house ride are based on this optical illusion…
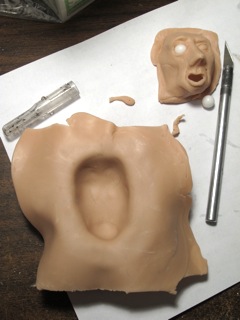
Fig.5: I put some Super Sculpey through a pasta roller. (The pasta roller is dedicated to polymer clay only.) This is intended to be a press mold, so I simply laid the sheet of Sculpey in and firmly pressed it into the details.
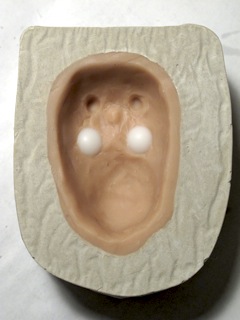
Fig.6: I trimmed the edges of the Sculpey sheet, pressed two more acetal balls into the eyes, and then laid in another sheet of Sculpey.
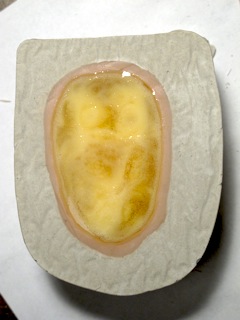
Fig.7: To create a "skull" that this "mask" can rest on, I poured resin into the negative space.
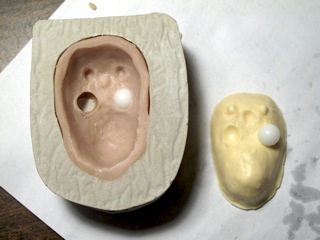
Fig.8: Here's the skull. Notice that I've given it two bumps on the forehead as keys for registration.
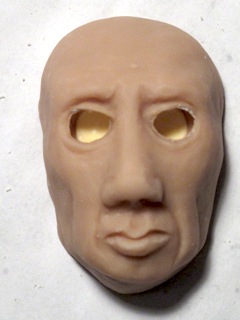
Fig.9: When I pull out the Sculpey, it's pretty easy to distort the edges. The skull helps put the face back in shape — but it's not going to be perfect. A little bit of detail's been lost, but overall I'm pretty pleased with how the pull turned out.
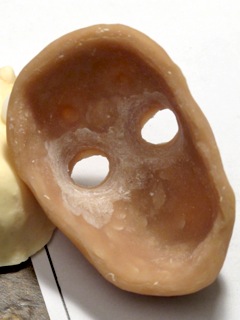
Fig.10: One problem I quickly discovered was that I wasn't doing enough to dig out the eye sockets. On this mask, I wound up Dremeling the interior. There are still problems… On some pulls, the eyeballs are right up against the eyelids — on others, the eyes are a little recessed.
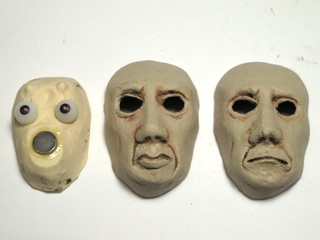
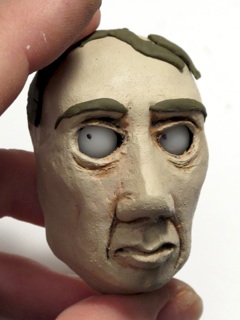
Fig.11: The first pull was a "neutral" face. For the second pull, I re-sculpted the mouth shape to represent the letter "M." I intend to do twelve faces in all, so I can have a full set of mouth shapes for lip sync.
The paint is several layers of Delta Ceramcoat acrylics. These are cheap crafter's paints — but it's invaluable to be able to use paint colors straight out of the bottle, rather than trying to re-mix the right tint every time. The top color here is called "bamboo."
One obvious problem I'm going to run into is eyebrows. How am I going to keep them in the same place each time I change masks? I'm really seeing the wisdom of having the forehead and lower face be separate pieces, which was a big innovation for the movie "Coraline."
Still, even if this experiment is flawed from the start, I think it's worth seeing through — just to find out how these replacement faces work in practice.
posted by sven | permalink | categories: stopmo
March 8, 2010
armatures: making a hinge joint's tongue
by sven at 8:54 pm
I've been making hinges out of 1/16" stainless steel rod… I want to document the gist of the process while it's still fresh in my mind.
A hinge joint consists of a tongue that fits into a groove. Today I'm just going over how to make the tongue.
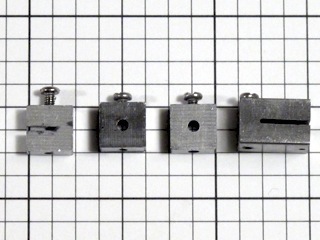
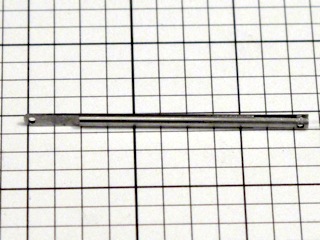
Fig.1: These are the jigs needed to make the part, each made from .25x.25" 1018 steel. You need two rod-holding jigs and a tongue-holding jig. The long jig on the right will be used later, for making the groove end of the joint.
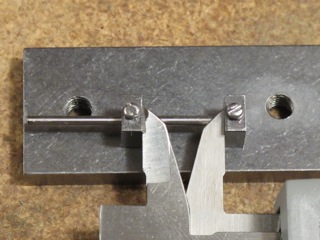
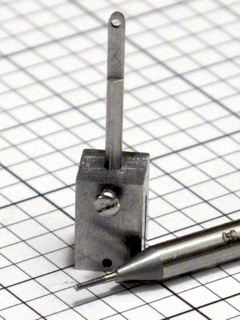
Fig.2: Put your piece of rod through the two rod-holding jigs. One end must be flush with the outside face of one of the jigs. Use calipers to make a space .5" wide between the jigs.
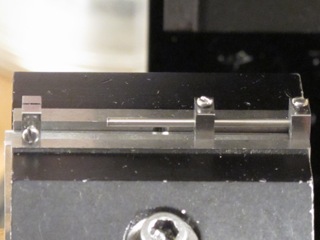
Fig.3: Put the rod, clamped in the jigs, into the vise. Make sure that one end is flush with the fixed jaw of the vise. Don't forget to put a spacer in the left-hand side of the vise, or it will be damaged.
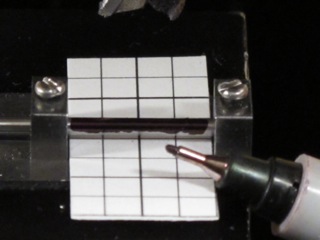
Fig.4: Use a fine-point sharpie marker to blacken the top of the rod.
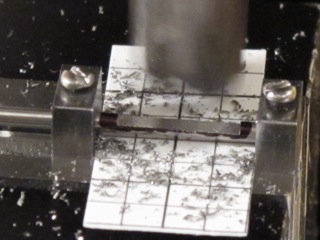
Fig. 5: Using a 3/8" dia. end mill, mill downward in .0005" passes just until the sharpie ink is marked. Set the DRO (digital read out) to zero. Proceed to mill downward to Z=.215 at 400rpm using .0025" passes.
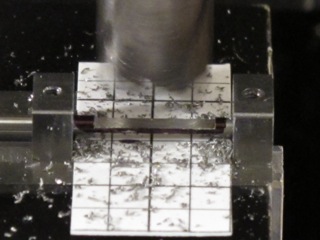
Fig.6: Flip the part over, still keeping it clamped in the jigs. Repeat the process to mill the bottom face.
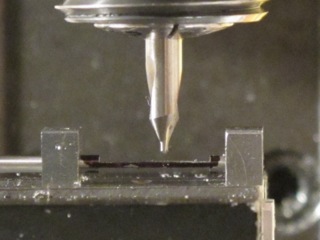
Fig.7: Put a #00 center drill, held in a collet, into the mill's spindle. Start a hole at X=.3735, Y=.124, rpm=3500. (My .25" stock measured .248" in actuality, so Y=.124 is the center.)
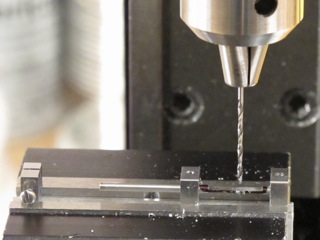
Fig.8: Keeping the spindle in the same position, replace the center drill with a #64 drill bit. The bit should be held in a drill chuck, which is attached using an arbor. Enlarge the hole, spinning the drill at 2550rpm.
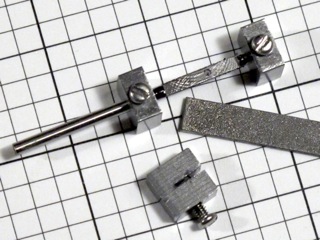
Fig.9: Remove the part from the vise. Use a diamond file to de-burr the edges and the hole. Make sure the the part can pass through the tongue-holding jig at this point. If not, file it to size.
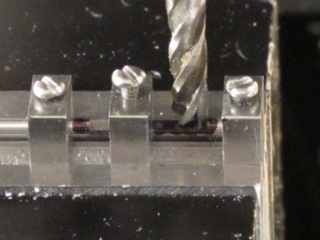
Fig.10: The part should still be clamped into the rod-holding jigs. Now put the tongue-holding jig on, loosely, just behind the hole. Put this assembly into the vise and tighten it. Now tighten the tongue-holding jig.
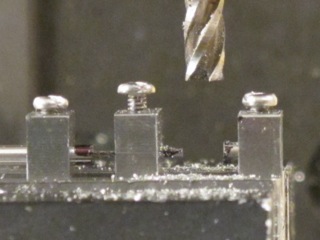
Fig.11: Using a .125" dia. end mill at 1200rpm, we're going to part the waste material at the end. Move the end mill to X=.3435. Any slop in the set-up should favor protecting the hole we've drilled, so move the end mill to the right until it physically bumps the ledge that's been milled. Mill through the flattened area of the part using .0025" passes.
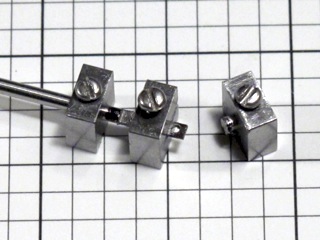
Fig.12: In preparation for rounding the corners of the tongue, blacken it with a sharpie.
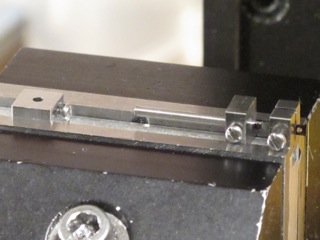
Fig.13: Put the part into the vise, still clamped in the tongue-holding jig and one rod-holding jig. Put a 1/32" radius corner-rounding end mill into a collet in the spindle.
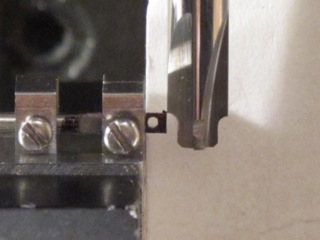
Fig.14: I've found it works best to align the corner-rounding end mill by eye. Spinning the cutter at 1200rpm, move it to the left .0005" at a time until it just marks the end of the part. Be sure not to use climb-cutting, or the part will be damaged (though it can likely be bent back into shape, if necessary).
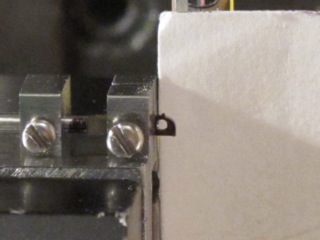
Fig.15: Once you've got the cutter in place on the X-axis, bring it downward in .0025" passes, until the corner looks about right. Perfect roundness is not crucial here.
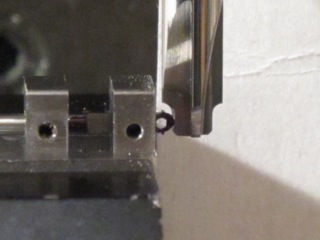
Fig.16: Flip the part in the vise and repeat the previous two steps.
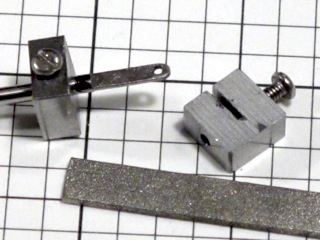
Fig.17: Remove the part from the vise and from the jigs. Use the diamond file to remove burrs. To check that the part is good, make sure that the tongue can pass smoothly through the slit in the tongue-holding jig.
(Yep, all the XY coordinates and rpms are memorized at this point…)
posted by sven | permalink | categories: stopmo
March 5, 2010
poem: oh, honey
by sven at 7:00 am
This was for a friend who apologized after writing a "long" email…
Oh, honey
"Oh, honey"
says the voice in my head—
a voice,
I hasten to add,
that silently chats with both
adult men, children,
and cats, too—
don't feel embarrassed
about being too long-winded.
There's plenty of air in the world
to go around.
All the better that you should get to
exhale completely.
It makes me happy:
then you get to inhale
to full lung capacity.
Everyone should get to breathe.
January 19, 2009
posted by sven | permalink | categories: poetry
March 3, 2010
the tiniest epic fail
by sven at 10:58 pm
You use a tap to thread holes. A tiny-tiny 000-120 tap costs $50…
Today, while making the groove end of a hinge, my one and only 000-120 tap broke…
Locking the part I was working on in my homemade jig…
Thus also ruining both the hinge and the jig.
Ouch.