November 2007 archives
you are here [x]: Scarlet Star Studios > the Scarlet Letters > November 2007
<< before
October 2007
after >>
December 2007
November 29, 2007
artist's way: session 10
by gl. at 1:41 pm
this group tends to be in sync: many of the issues that come up in a week are shared among the particpants. this time it was a desire for physical exercise or motion, which doesn't surprise me. as we near the end of the artist's way, physical motion mirrors creative motion; momentum in one sphere often means momentum in the other. also, since we only have one (!) more session left, there are worries about how to maintain these practices, protect the time they've managed to carve out in the week -- and continue to make art!
ordinarily i might do a blind painting exercise at this point, but i kept hearing the group mention music, so i held my breath and opted to try something new. that failed miserably the first time i tried it, and so it took a significant amount of courage to try it again. since then i have attended a music session at creata, which gave me a better baseline for how to facilitate a music event, but i was still nervous, in part because it's an area i still feel pretty uncertain in as an artist. fortunately, it went really well this time!
this activity was possible in large part because one of the participants has a large drum collection she was kind enough to share with us. if i do this again, i need more drums. and a place to keep them. :) i actually ordered some handbells & "boomwhackers," but alas, they haven't gotten here yet. however, i was thrilled to get a chance to use the scarlet star-shaped tambourine sven got me a couple of years ago in anticipation of such an event.
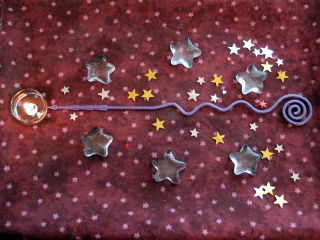
center (autonomy): finding your own way amongst all the other pretty stars.
music: bobby mcferrin's "beyond words."
posted by gl. | permalink | categories: artist's way
November 25, 2007
neighborhood poetry program
by gl. at 11:38 pm
last week trixie hosted an impromptu poetry workshop for some neighborhood boys:

[youthful poets]
they played with trixie a long time, considering how cold it was that day. let's see what they came up with:

[tell us where you want it you naked man]

[i make love wildly]

[all we need is weed]

[symphony & love]

[swift work makes only more]
i totally loved that last one. they were so pleased they didn't even balk when i asked for their picture:

[say cheese!]
posted by gl. | permalink | categories: trixie
November 24, 2007
artist's way: session 9
by gl. at 7:43 pm
a smaller group this time: two people couldn't make it. i myself barely made it: there were two people waiting outside as i flew down the sidewalk, and they helped me set up. everyone in this group, especially, feels different when they have people missing but it means they get twice as long to check in. the "touchstones" exercise in this chapter seemed pretty popular. one woman came up with a great mantra for her to move beyond her usually introspective nature: "connect, create & commit." i love that! that's very much what artist's way is all about.
one of our members will be in the "thirty" show in december and she said, "people i don't even know might buy something!" so we had a good discussion about why people who don't know you seem more valid than people who do, and talked about the ways in which people are more likely to buy art (or buy anything, really), from people they know (or think they know). so if people you know are buying your art, great! those are the people who really appreciate you and want you to succeed! i went through this when colleen bought the 4x4 version of "you don't own her" and between her, sven & the job club, i've really come to appreciate & better understand the patronage process. :)
this group has asked me to checkin more than once, but they'll get plenty of me when they transition to the "sacred circle" email list, a place for former artist's way participants to maintain their progress with a supportive group who's been through the same thing. a few of us still check in every week, while others go in waves depending on what's going on in their lives. the great thing about it is that whenever you want to get creative again, you'll always have a group to cheer you on!
this week the art activity was "authentic dance." anything with the word "dance" in it is still scary to many participants, which is why we save it till the end. even people who have adapted well to exploring visual creativity exercises find creating art with something as intimate as one's own body is a challenging experience. but i feel quite strongly about exposing people to a wide range of art in order to develop a larger creative vocabulary. and i am always gratified when i know participants would never do something like this except in a creative cluster, because it means they trust the process, they trust the space, they trust the group, they trust me.
authentic dance isn't really necessarily "dance" in the traditional sense. there's no choreography or specific movements you need to accomplish. it's not a "performance." you simply allow your body to move in the way it wants to move next. it's sort of like morning pages that way. if this means you're petrified and you can only wiggle your toes, that's fine. each person had 5 minutes to do this (though usually they have 10). you work in pairs: one of you is a dancer, the other is a witness. the witness' job is to anchor you, to beam good will at you, to watch you as if to look away would cause you to disappear. watching a dance in this way becomes active rather than passive, and allows the dancer to know that only one person is ever really watching them (in a pretty intense way, but it means all your self-consciousness can be narrowed to one person instead of diffused among four and keeps competitiveness at bay).
i know when i first tried this myself i was terrified. i almost refused to do it. understanding i had the option to not move at all gave me a way to try it without feeling (too) foolish. it was horrifying and liberating at the same time, and i never forgot it. this group, though, handled it with much more grace than i did my first time. :)
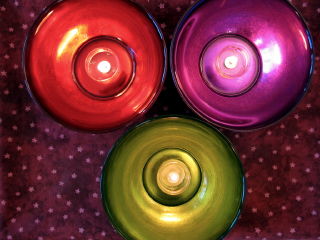
center (self-protection): each candle safe & beautiful in its own bowl of color. i usually have four bowls, but one of them is still at trillium after the holiday sale. :)
music: a selection of songs from peter gabriel's passion. i especially like "a different drum," "the feeling begins" and "with this love (choir)" for this exercise.
posted by gl. | permalink | categories: artist's way
November 23, 2007
elements of food styling
by gl. at 11:59 pm
on saturday i also attended the iprc text ball. it was my first time, and so i decided rather than spending my energy creating a costume (which, alas, isn't one of my strengths, anyway), i'd bring a text-themed food product for the snack table.
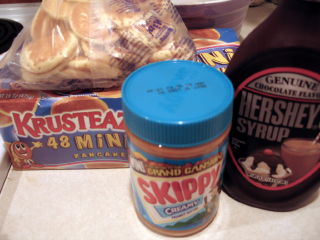
["print" ingredients]
i still had half a bag of tiny pancakes leftover from shu-ju's "printing with food" class, and i did so want to print something on them. i thought i would print punctuation because they would be small & cute on the little pancakes and i thought other people would be bringing words. but then i read what shu-ju was making: punctuation! curses! but thank goodness she posted about it so i had time to think of something else. :)
inspired by the the "blog" of "unnecessary" quotation marks, i decided a bowl of unnecessary quote marks would be adorable, and on a pancake i would only have to print one quote mark to get both beginning & end quote marks, because you can just rotate it around to the appropriate type! though i ordinarily love palatino as a base font, i really wanted the quote marks to have those big bubbles on the end, so i used times new roman instead.

[quote "marks"]
i took the opportunity to practice "teaching" myself gocco for the gocco workshop i'm teaching next month at the iprc (thanks, gillian!), so i was in the kitchen talking to myself up until i started to mix the "ink." :)
the good news is that they came out pretty well in the end. the bad news is that it's still a hugely messy process and i had to totally clean the screen every eighth print or so, or i'd start to have gaps even when i had plenty of ink. i used the chocolate/peanut butter base i was so impressed with for sven's 62 breakfast, but shuju says she used chocolate & sour cream which may not dry as quickly on the screen. i gotta say that chocolate sauce/peanut butter mix makes a fabulous dipping sauce, though.
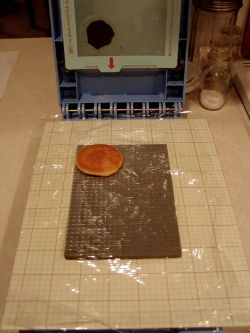
["ideal" gocco quote setup: which lasted maybe 30 seconds]

[waiting to "dry"]

["bowl" of quotes]
i thought i wasn't going to know anyone at the text ball except shu-ju. but i also got to talk to jenny (who was a "relative claus" w/ "presents") & her husband (dressed all in white with two large letters hanging around his neck: E and B), gabe (who was "just tex" with books strung together as chaps!) & his daughter anais (who was a "red letter"). i was hoping to see alesia, but i don't think she was there this year.
unfortunately, it doesn't look like the food gets much love at these events. it was tucked way in the back in a dark spot, and other than shu-ju's puff pastry, there wasn't much presentation or punning. for instance, i saw a can of cheez-whiz and thought they totally missed an opportunity to provide something to write on with it -- or at least provide an encouraging sign or funny "directions for use." maybe it's different if you get there earlier, but i'm not sure how many people really saw the bowl of quote marks, even though they were all eaten by the time i left.
i stayed long enough for the costume catwalk, but didn't see who won. i had circled the event for over 20 minutes before i finally found a spot, so it was a long walk back to the car. but it looped me past ground kontrol, so i stopped in and played a few rounds of tempest & joust before coming home. :)
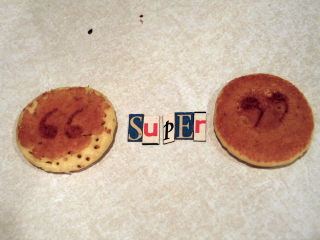
["super"]
posted by gl. | permalink | categories: exhibits & events
November 20, 2007
one event may hide another
by gl. at 11:59 pm
on saturday i took a "found poetry" class at the 100th monkey, the title of which is based on the beautiful poem "one train may hide another", inspired by a sign the author saw in kenya.
our first exercise was in the format of a "lost" ad:
lost: free time. last seen summer of 2004. may be in the company of homemade meals and long walks on the springwater corridor trail. if found, please contact gretchin@scarletstarstudios... and i will try to arrange a pickup time in the next few weeks.
afterwards, i thought i might write a companion piece called "free to good home: to-do list." :)
the next exercise was finding a sign at the studio to write about: i'm always intrigued by the "we reserve the right to refuse service to anyone" signs, but we didn't really write a poem based on it.
then we did an exercise where the facilitator asked us to listen and write down what we heard as he slowly moved his way up the AM dial: we could use those words, and those words only, for the next poem we wrote:
an open field
how long ago was that?
no return
solid state now
we were told
we could only go
forward
he also briefly covered a technique called "widows & orphans," which is similar to the above technique. widows and orphans are typesetting terms for the dangling words left morosely at the bottom and top of book pages: you gather a bunch of those and use only those words to make a poem (but again, we didn't write anything based on that technique).
finally we created "blackout poems" like those found on humument. this could have been a workshop all to itself! we found a page in a book or a magazine, highlighted words that together suggested a poem, blacked out everything else with a marker or sharpie, then created art atop it. i copied a page from a book about constellations and found this poem in it:
the goddess screamed.
vengeance gives names
to dark shapes.
but abandon pain
believe in lilies:
gifts of immortality,
the pathway of souls.
amusingly, one of the women i met at this workshop i saw later that night at the iprc text ball, a story about an event that has yet to be told.
posted by gl. | permalink | categories: classes & workshops, writing
November 18, 2007
artist's way open studio (november)
by gl. at 10:10 pm
on thursday we hosted our monthly collage night. novembers have previously been dubiously attended, but this month was packed w/ a long waiting list! jill finally got to come and i am pleased when people who have been on the list for a while make it out to an event for the first time, because it feels like the studio is so much cooler than i can convey through email alone!
i wasn't intending on making something thematic, but the catalog candles immediately leapt onto the page and everything else fell into place from there. i've been wanting to use these leaves for a few months now. the flames in the upper half called for shiny bits elsewhere, so i punched some dots from a scrap of gold wrapping paper.
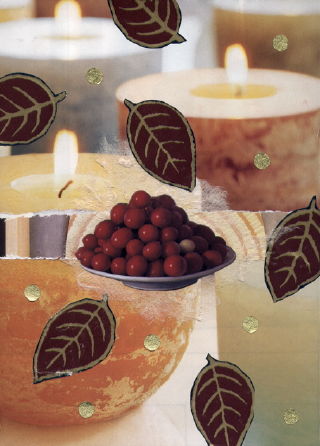
["bountiful": click the image to see the other collages]
also, in the rush of october, i completely (!) forgot to write about the last open studio, where i made this collage:

["eating poetry": click the image to see the other collages]
one of the things i like about collage night is that i see stuff pop back up and i can use it in a different context. the "eating poetry" scraps are from the edible book tea back in march!
posted by gl. | permalink | categories: artist's way
November 17, 2007
out and about
by gl. at 11:59 pm
wednesday was a big day-o'-art all across portland! first i met w/ the kind and lovely bren, an art therapist from owl's nest north. then i met with the talented and supportive serena barton over pie at the bipartisan cafe, where we discussed a february workshop. then i dropped off a thank-you note for a woman who was kind enough to drop off my moo cards after they had sent them to the wrong address (twice!). then i crashed the local book arts guild meeting at reed college's special collections room, where we got to share dozens of beautiful artist's books. finally, i stopped at the grand reopening of diy lounge, where i got to see the generous and connected diane -- and bridget's creative and vivacious surprise appearance in her bee costume! i didn't intend to stay long, but there was cake and bridgetbee got her disco on. :) plus, collage carries the tiny hammers i need for the wordwear workshop coming up next month...
posted by gl. | permalink | categories: exhibits & events
November 16, 2007
artist's way: session 8
by gl. at 11:45 pm
this was a week of "uturns," for the participants, points where they wanted to slide back into old habits and despair. "what's the point?" their inner voices sneered. "why are you bothering to do that?" where "that" could be any number of artistic or expressive things. i'm happy to say that they are doing things despite that voice, relying on their inner muses and "constellation of support," but the antidote came loudly to one participant: "why not?" she told herself. why not, indeed? it doesn't have to mean anything to be fun for you. self expression is a natural human desire, and thinking it has to be profound or appreciated by anyone other than you is a surefire way to keep yourself from doing it. as long as you get something out of it, where's the harm? why not?
this week we did an activity based on "playback theatre," which is always looked upon dubiously at first, but by the end everyone is laughing and energetic and joyful. it is the gateway drug to some of the other performing arts we will be exploring in the next two weeks before the end of artist's way.
after a warmup called "find your mother like a baby penguin," we began with an exercise called "yes and/yes but," where we take turns elaborating on a simple story by saying either "yes, and!" or "yes, but..." between each segment. each phrase produces a different type of story, and you can keep the "yes, and!" stories going longer than the "yes, but..." stories.
playback theatre asks each person to tell a dream, present story or future story to the rest of the group, who re-enacts it for the storyteller as a spontaneous ensemble creation. watching a story in this way offers insight, perspective and catharis for the storyteller, as well as invoking compassion and consideration in the players. since everyone gets to be both storyteller and player, they often have very different feelings about telling the story vs. reacting to someone else's story.
because the weather was so nice, we ended with a game of "red rover" out in the driveway. because we encouraged "cheating," it became more like calvinball, until we weren't really sure who had won, and didn't care! :)
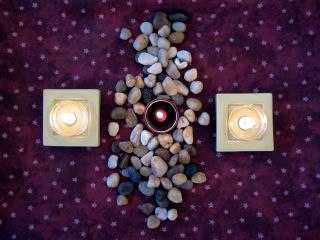
center (compassion): a river of compassion running between two bright candles. a little silver heart is nestled amongst the stones.
music: pink martini's hang on little tomato. a classic! i actually referenced this song in the weekly email i send out to creative cluster participants, and the whole album has a very theatrical feel to it.
posted by gl. | permalink | categories: artist's way
lip-sync test 2
by sven at 1:30 am
I went back and edited my first lip-sync to create a new version. I wound up changing 4 frames (out of 41) for this new clip... "Professor Ichbonnsen lives!"

Justin's comment about doubling Fs, Ms, & Bs rang a bell... He was repeating something I'd read in The Animator's Survival Kit:
"The important consonants are the closed ones -- B, M, P, F, T, V. In order to read these positions we need at least two frames. One isn't enough. (If we don't make these positions the vowel that follows will be vitiated.)" (p.306)
So, I elongated the "b" in "Ichbonnsen" to two frames, and it helped a lot.
The vowels still looked a bit long -- so I also shortened the "o" in "Ichbonnsen" by having "nn" hit sooner, and the "i" in "lives" by having the "v" hit sooner.
I know that the "b" in "Ichbonnsen" is a small explosion of air, and that I'm supposed to pop from a closed mouth to a wide open mouth... But it the leap felt too big. Perhaps because the Prof is talking fast, and shouldn't be articulating his speech too much? So I opted to change one of my "b" frames into an inbetween (the mouth shape for "r" seemed to fit).
I'm still a bit fuzzy about phrasing. I know that a lot of speech gets slurred together -- but how to intelligently condense the mouth forms?
posted by sven | permalink | categories: stopmo
November 15, 2007
first lip-sync test
by sven at 2:28 pm
Here's my first true lip-sync test. Notes:
- I shot 15fps. The "o" in "Ichbonnsen" is jarring to my eye... Does it come in too soon? Did I need another inbetween in order to get to that shape? Is it just holding still for too long? (The "i" in "lives" is also a bit off -- but not as badly.)
- The stickers' corners want to pop up, and they cast shadows. Grrrr.
- It's hard to keep the head perfectly in place when you're trying to press stickers onto it.
- I thought I'd be clever and put the stickers on a piece of clear acetate, sitting on top of a photocopy of the mouth forms -- making it easy to select what I want to use. It turns out, though, that the stickers adhere rather well to acetate. I'll have to try semi-translucent wax paper next.
- I bumped one of the clip lamps. The placement of the one on the right, at least, is going to have to be re-thunk.
- the camera was very slowly leaning forward during the shoot. I must not have locked off the head tightly enough.
posted by sven | permalink | categories: stopmo
November 14, 2007
new puppet: professor ichbonnsen
by sven at 11:00 pm
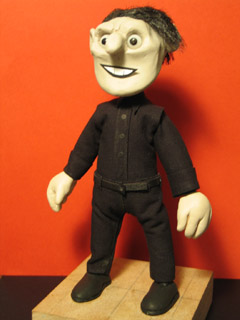
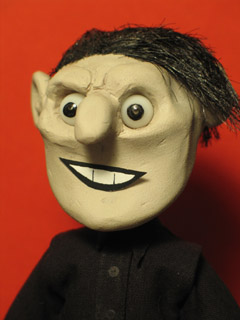
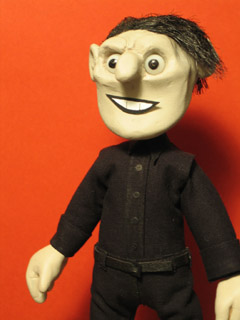
I've just finished up a new puppet: Professor Ichbonnsen!
I wanted to try some new puppet-making techniques, baby-step improvements on the basic Dad and Jimmy designs... A new puppet to play with on my new stage.
This pup didn't start off as Professor Ichbonnsen... But I think it's probably close enough. (Looks a bit more like Johnny Depp than I'd like... But oh well.) I have some ideas for the December SMS stopmo haiku challenge that involve the Prof. Wink.
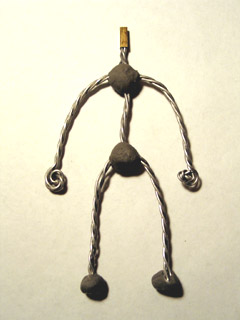
Here are the gory details about how I built the guy.
THE HEAD
The head is detachable. At the base of the skull, there's a 1/2" long 7/32" piece of K&S. A 3/16" (6/32") piece of K&S at the end of the neck fits into the slot.
I've standardized the size of K&S that I use for this kind of plug-in. My choices are based on using 1/4" dia. balls as the default in ball&socket armatures. For a 1/4" ball, you're going to use a 1/8" rod. If you want to attach that rod into squarestock, it can't be any smaller than 3/16" wide -- that leaves 1/32" on either side of the hole (precise drilling work, but you don't have to break out a micrometer). The walls of K&S are 1/64" thick -- so to have the square stock plug in, you need a piece that's 7/32" wide.
A diagram would help... But it'll have to wait til another day.
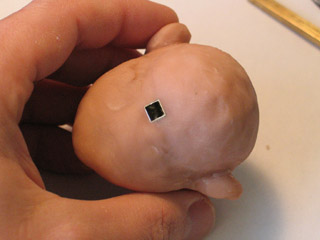
The head is made out of Super Sculpey that has been sculpted around a core of tin foil. Using tin foil means that the Sculpey isn't as thick, doesn't need to be baked as long, and is less likely to crack. Tin foil also keeps the head light enough so that it won't tip the puppet over.
On my Percy 5 puppet, I used wooden eyeballs painted with acrylics. They tended to stick in their sockets more than I'd like. This time, I tried using acetal plastic balls for eyes. You can get them via Marc Spess at animateclay.com ("delrin" is the brand name); I got mine directly from smallparts.com.
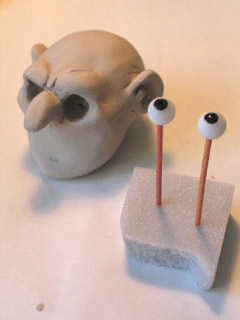
I drilled holes in the balls, put them on toothpicks, put the toothpicks into a drill, and spun them while I painted the pupils, so the pupils would be nice and round. Acrylic paints don't adhere to acetal well, so I used enamel paints (Testor brand, the stuff you use for model kits). The balls turn in the sockets quite well. I added a dab of vaseline in the sockets, though, to help keep the eyes from falling out.
For this particular puppet, I was going for a look similar to the Rankin & Bass puppets in Mad Monster Party... Since I made the head (back on Sept 20), I've realized that I broke the formula somewhat. Almost universally, puppets that have hard heads will have eyes that are built into the sculpt. Freely rotating eyeballs are only used when the head is made out of a soft material: clay, liquid latex, foam latex, silicone.
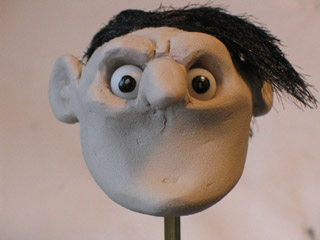
The head was painted with acrylics: "bambi brown" + white. I applied the paint with a cosmetic sponge, which gave the head a really nice texture.
The hair is actually yak fur, which I found at Sportsman's Warehouse in the aisle of materials for making fishing lures. I glued down small tufts of hair using Fabri-Tac, working from the center of the scalp outward. I used hair gel to make sure the hair will all stay in place. I cleaned up the hair line a little with dabs of black paint.
My intent is to do lip-sync using mouths that have been photocopied onto sticker paper. The mouth the Prof is wearing right now is photocopied out of Preston Blair's classic book, Cartoon Animation. After reviewing four books (Blair, Williams, Shaw, Priebe) and two lip-sync softwares (Magpie, Papagayo), I decided that Blair's breakdown of the visemes makes the most sense, and is the best place for a beginner to start.
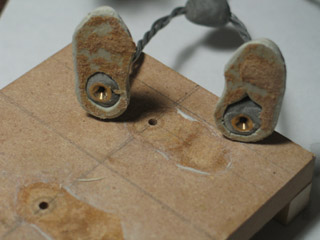
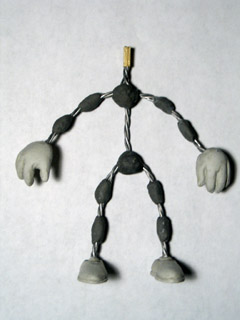
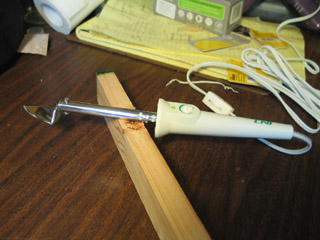
THE FEET
For the feet, I used knurled brass thumbnuts for the tie-downs. I attached the thumbnuts to the wire armature using 20 minute plumber's epoxy putty. Then, I sculpted shoes over the tie-downs using Magic Sculp (an epoxy clay designed for scupltors).
On the Dad puppet I used Sculpey for the feet -- and it wound up shattering. Since hands and feet are subject to a lot of stress, I decided to go with epoxy clays this time -- which are much sturdier.
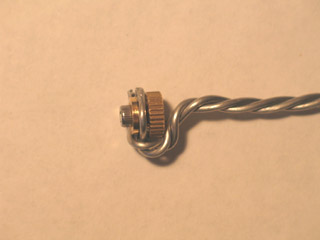
One mistake I made on the Dad and Jimmy puppets was having the ankle wire coming out the backside of the foot. This time I was careful to have the leg wire coming up out of the top of the foot.
One side of the knurled nut is shaped like a funnel, while the other side's flat. Pointing the funnel toward the floor makes it easier to get your tie-down screw screwed in.

Magic Sculp has a 3-4 hour working time. To speed up curing, I put it in the oven at 175 degrees for 30 minutes. [The studio oven isn't used for food.]
I'm really pleased with how the shoes came out... I sculpted the line where the shoe's sole attaches, and the rim of the shoe (where you can just see a little bit of sock). The shoes did stick to the wooden base -- but I was able to cut them off using a blade.
THE BODY
Not much different in terms of how I did the body this time... I'm finding that I'm frustrated with foam build-up, though. I want more definition of the body -- even if it's going to be hidden under clothes. The Prof is essentially symmetrical on the dorsal/ventral plane... He needs a butt. And curvature to the spine.
I realize that I could get a little more definition if I used snip foam... But using spray glue is a sticky pain. My "mummy wrap" method is certainly good for "quick and dirty"... If I'm going to put more effort into shaping the body, though, I think I'm going to be happiest with a casting process.
All parts of the armature use three strands of 1/16" aluminum armature wire twisted together. I twisted them together using a method Marc Spess recently demonstrated on a youtube video... You put one end of the wires into a vise, and the other end into a drill chuck. (I found the drill had an easier time holding the wire if I taped the ends together.)
I used the drill method for twisting the wire for Moon Baby... Whose arm broke. That put me off the drill method for a while; but now I'm pretty sure that I over-twisted the wire -- shortening its life. So, I'm back to the drill method now.
One of the things that I'm liking about it is how it gives you a long straight rod. Whatever I don't use is easily kept for later.
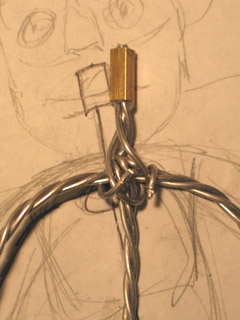
Previously I've made my armatures with three lengths of twisted wire: the legs, the arms, and the spine/neck. The problem with this method was that looping the spine around the arm length innevitably made my puppet shorter than I intended.
Marc Spess does the spine and neck as separate bits... So I decided to try that out this time. Untwist the end of your twisted wire, and then wrap the ends around the arms (or legs). This wad of wire gets covered up with epoxy putty, so it doesn't matter how ugly it gets.
The armature was closer in scale to my sketch than usual, so I think doing the neck and spine as separate pieces is a keeper.
I added limb "bones" to the basic armature, as usual. It's quick, and works well.
Even so, I'm looking forward to trying something different on my next armature. I want to try using sections of K&S for the bones, like Susannah Shaw demonstrates. Now that I have a mini cut-off saw, cutting K&S is a breeze...
And this go around, epoxy glue suddenly started making sense to me. The difference this time is that I've got a supply of toothpicks and craft sticks within arm's reach; the one little plastic stirring rod they give you with the kit was confounding me previously.
Assembling an armature out of K&S, armature wire, and epoxy glue may take a bit longer -- but the precision is appealing, and I'm looking forward to not having putty gunk building up on my gloves while I work.
I wrapped the armature with 1/4" thick cushion foam, which I cut into strips that are about 1" wide. I'm still using a supply that I got for cheap at Scrap... When it runs out, though, I've located Fabric Depot as a reliable supplier.
The foam gets covered with athletic underwrap. Love this stuff!
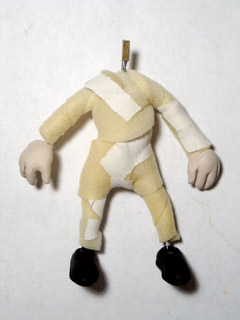
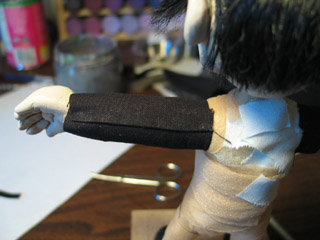
THE CLOTHES
The head took 5.25 hours to make. The body took 6.5 hours. The clothes took 9... And I'm still thinking that I want an overcoat for the Professor.
Significance: It looks like making puppet clothes may wind up taking just as long as it did to make the rest of the puppet! So, I've got myself a book on making clothing for dolls, and am putting some energy into figuring out how to better manage this part of the fabrication process...
The Prof's clothes are nearly identical to the ones I made for Dad. The one main difference is that I decided to hem everything this time. Dad looked good at the beginning of filming... But by the end, his edges were beginning to fray.
Very useful: A miniature iron produced by Clover Needlecraft, Inc. I found mine at Collage on Alberta street. Folks who are into encaustics tend to use this tool.
Apparently there are two main approaches to creating patterns: either you start by working on paper, and then modify your plans with successive drafts -- or you start by draping cloth over your subject/victim, and begin pinning/sewing from there. I'm mostly using the "draping" approach.
The sleeves are the easiest part: they're basically just cloth tubes. To hem my cloth I iron a fold and then seal it in place with a line of Fabri-Tac glue.
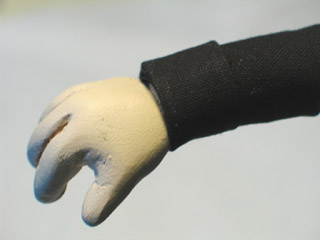
Wherever an edge of cloth is going to get covered up by another piece, I leave the edge ragged. The cuff, for example, is a separate piece of fabric that's hemmed on three edges which covers up the ragged end of the sleeve.
For the sleeves, the front and back of the shirt, and the pant legs, I found that you can start with a rectangle of cloth and then modify it until it's about right. The fit isn't exactly what you'd get if you had a more sculpted pattern -- but it's adequate for now... Knowing that I can begin with a rectangle makes things relatively easy.
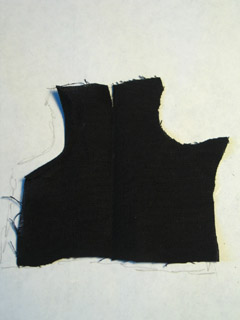
Check out how gnarly the shirt back was... All the edges get covered by other pieces of cloth -- so it doesn't matter!

The shirt front needed to be much more precise. It started as a rectangle, then I folded the arm holes, ironed them, glued the hems down... You get the picture.
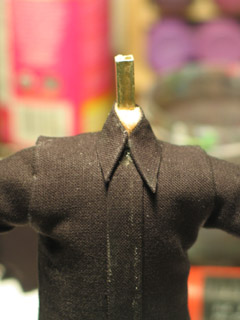
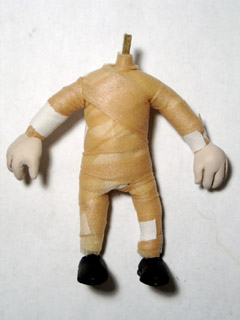
The shirt collar is a separate piece of cloth. So is the strip down the front where buttons go.

Getting the pant legs right is awkward. I do each leg with one piece of fabric, and have the seam fall on the inside of the leg.
I put a piece of tape around the belly to help me keep track of where the waist line is supposed to be. I glue the waist in place first. Then I glue the butt in place. Then the bottom cuff. Then I glue the inseam down. That order seems to make things work out fairly OK.
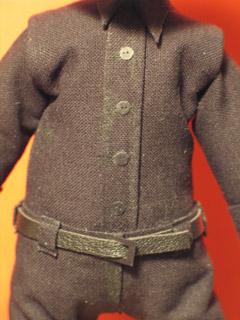
I'm really pleased with a few details...
The buttons are 1/8" dia. pieces of black cardstock that I made with a hole-punch. Then: I used a needle to give them button holes.
The belt is real leather. It goes through a rectangular belt buckle that I made out of cardstock. The belt loops were cut from a thin, hemmed strip of cloth. I put the strip over a cardboard form and used my mini iron to sculpt it into shape. The iron liquifies the Fabri-Tac, essentially plasticizing the cloth. [I wear a respirator and have the windows wide open while I do this.]
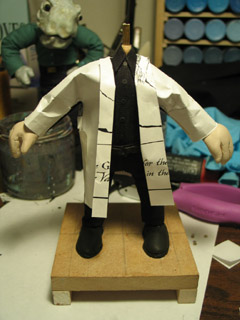
It feels like the Prof ought to have a big overcoat. And maybe a fedora. He's looking a little more Goth than Monster Hunter right now. Giving him eyebrows and maybe some oil clay eyelids might also help.
For the coat I've got some black velvet that Shelley gave me. I could use felt -- but for the scale, velvet seems to look better. I'm nervous about cutting this fabric, so I'm putting more work into creating a paper pattern... Which is challenging. As is, the Prof has some decent body definition; I don't want it to be completely obliterated by a floppy, formless coat.
Next on the list: Lip-sync tests... Painting a backdrop and building some trees... A Scarlet puppet?
posted by sven | permalink | categories: stopmo
November 13, 2007
sale of the century
by gl. at 11:59 pm
on saturday i dropped off a plate of apples, cheese, crackers & nuts for the trillium holiday sale, and then i got to shop! i'm not actually a big shopper, but it feels different when you're involved in the organization and supporting real people, you know? :)
i went home with 2 pairs of stubborn earrings, a pair of earrings from carolyn quinn designs, bookmarks from becky bilyeu, a slug family for some very lucky cats for christmas, and one pound of fabric i really don't need but couldn't resist such beautiful scraps for a measly $1.
oh, aaaaaannnnnddd.... a chicken hat from liv and lotus!
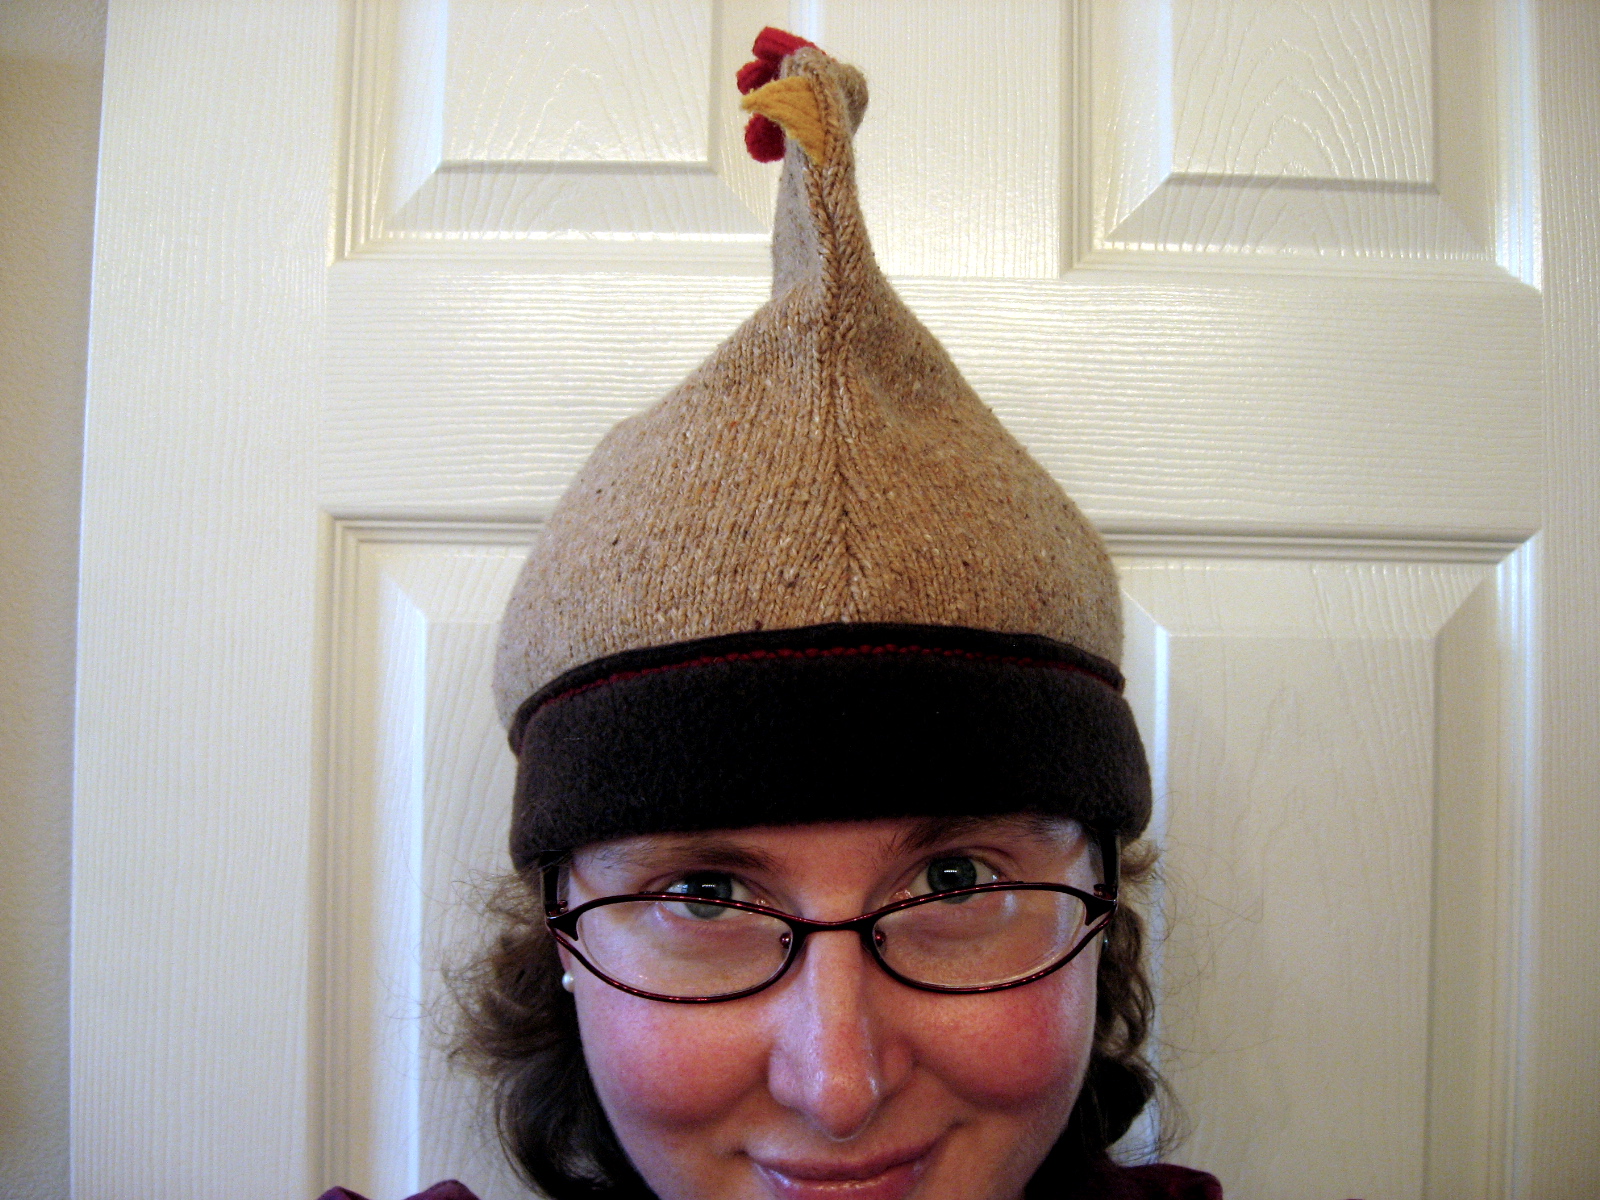
[bawk! rawk!]
but best of all, i got to meet the family of one of my artist's way clients. her daughter met trixie and made several poetry fragments, one of which was this one:

[she has enormously sad hair]
posted by gl. | permalink | categories: exhibits & events, trixie
November 12, 2007
it's hip to be squared
by gl. at 2:11 pm
two weeks ago i attended shu-ju's "print with your food gocco class" at the iprc. some of you may remember what a fine time i had making poetry crepes at the edible book tea in march, so i'm always up to try more food printing! there was just one other person but i'm glad the iprc chose to run it anyway. the people who weren't in the class were simply astounded at what were were doing and kept taking pictures. :)
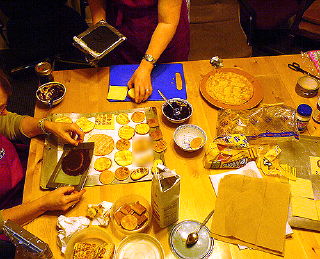
[trying lots of different printing surfaces (photo via shuju)]
we printed on fig newtons, mini pancakes, puff pastry, cookies, apple slices, and lunchmeat. i also brought homemade dessert crepes to print onto for sven's 36th birthday breakfast later in the week. crepes are a great printing surface, but i was really impressed with the clarity of printing on puff pasty! mini pancakes print well, too, and are very visually appealing objects (someday maybe i'll do one letter on each pancake. so cute!). shu-ju offered us a few different printing "inks": i was so happy with the peanut butter/chocolate syrup combination that i didn't try "shu-ju's secret sauce," a blend of nutella & balsamic vinegar (sweet & tangy!). the chocolate/peanut butter ink is easier to make and a better consistency than the one i created for the edible book tea, which was just chocolate syrup & powdered sugar.
this was my first time using our new laser printer to create a gocco screen! despite not blow-drying the print and forgetting to use the blue filter, the screen came out beautifully. that thrills me. however, i need to learn to put cardstock on the print bed when i'm flashing a screen, or the print bed pattern shows (fortunately, when printed, it's light enough that the ink spread just squooshes over it). to make the screens more durable and washable, we ripped the screens apart & taped them together. i wish i had thought about putting plastic wrap over the print bed for the edible book tea; it would have saved me a lot of cleanup!
btw, shu-ju wrote about the print with your food class a while back. :)
so i surprised sven with a "branded" birthday: i printed the 62 logo on breakfast, his present, the card & cake!

[crepes & puf pastry squared]

[reverse: crepes & puf pastry squared]

[apple squared]

[birthday breakfast squared]

[cake squared: no gocco, just icing]
posted by gl. | permalink | categories: classes & workshops, printing
November 11, 2007
paint storage boxes
by sven at 3:15 pm
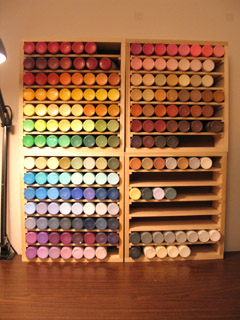
While you're painting, it makes an incredible difference to be able to easily see all your available colors at once. Alesia Zorn gifted Scarlet Star Studios with a paint storage box that really transformed the experience of painting for me... But now I have more paints than it can hold, so I set out to make some customized storage boxes.
I'm using 2oz bottles of Delta Ceramcoat acrylic paints which I get at Craft Warehouse for $1.29 each. This isn't an "artist's quality" brand... But for most of my purposes, having an abundance of colors to choose from -- and feeling like I don't have to worry about wasting expensive materials -- outweighs any quality concerns.
The paint bottles' diameter is approx. 1.5", and they're 4" tall.
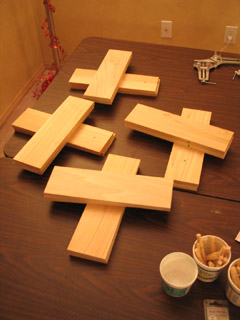
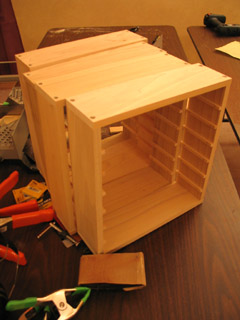
Each paint storage box holds 56 bottles of paint. I could have made a single 2'x2' box that accommodates more than 200 bottles at once... But paint is heavy. It would have been a bear to move; shelves bowing would have been a concern; and it would have been more difficult to organize the rows by color.
The silhouette of each box is 12" wide by 13" tall. That means the interior space is 11" wide by 12" tall. This very neatly makes room for 7 shelf spaces, each exactly 1.5" tall.
The boxes are made from poplar that I bought at Home Depot. The sides of a box are 1/2" thick. The shelves are 1/4" thick. The backing for a box is 1/8" thick hardboard.
The boxes are 3.5" deep. The wood I purchased was listed as 4" wide -- but the reality is that 1/4" gets planed off either side of that at the factory.
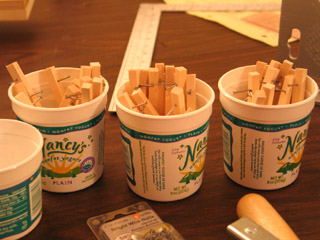
The shelves sit on 1/4"x1/4" rails, and are removable. The rails are each attached using two 5/8" long #16 wire nails.
Home Depot sells 2' lengths of Poplar that were very convenient, in terms of not having to make many cuts.
The stuff that's 1/2" thick cost $2.48 and each box requires 2 pieces. The stuff that's 1/4" thick cost $2.09 and each box requires 3 pieces. Rails that are 3' long cost $.69 each. A 2'x4' piece of hardboard costs $2.48. Thus, materials for each box cost approximately $13.
My prototype took 3 hours to build. I did a batch of 4 more all at once, which took 9 hours -- thus only 2:15 hours each. (One box is going to be a gift. Who for? My lips are sealed.)
Process-wise, there were a few things that really helped make this project turn out nicely... I used a miter saw to cut the wood, giving me really clean and straight cuts. I used corner clamps to hold the box sides at 90 degree angles while putting them together -- and 2' long clamps to hold the pieces tightly together during drilling. I inset the screws so they wouldn't scratch anything... I drilled pilot holes for the screws, then drilled into the same hole again with a larger bit -- but only went about 1/8" deep the second time.
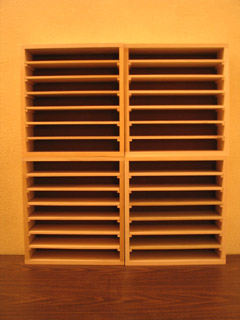
Oooh... It is such a thrill to sit in front of my "wall of paint" now! Looking at all those colors just makes me lust to create something!
posted by sven | permalink | categories: painting, studio space
November 10, 2007
aocc 2007: the 4x4 exhibit
by gl. at 11:24 pm
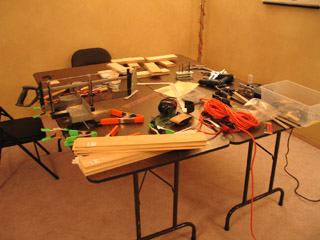
sven wrote about the portable art gallery he made for the 4x4 exhibit i was curating for the all oregon calligraphers conference this year. here's what it became!
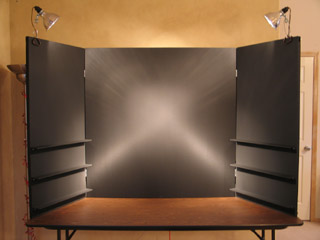
[before]

[after]
two major goals i had for this exhibit were:
find a non-destructive way to attach the art to the board: last time some of them were stapled, which made me wince. so i was planning to use photocorners, but sven had an even better idea: photocorners on squares of card stock, so that i could move them around more easily, especially when i put them in blocks of 4.
include a statement: last time the display didn't have a sign or any context/mission about the exhibit, and i definitely felt its absence.

[4x4 exhibit: a call for unintimidating art]
The full text of the statement (or view the PDF layout):
As calligraphers, we toil over grand works. In pursuit of perfection, our labour is often pleasurable: delicately handling calf skin, breathing gently on gold leaf, sometimes even grinding our own pigments to achieve something truly magnificent and fine.
Frankly, it’s a little overwhelming. Even the most spontaneous works happen after immense preparation. There’s no “undo” for calligraphers: the pressure to get it “right” leaves less room for error and risk, essential components for making progress and exploring our own styles. And our time is so precious we hate to waste it on creative experiments.
But limitations often inspire creativity, and working in a small 4"x4" square is a prime example. We all have some small scraps of paper to use up, some leftover inks from previous projects, or some technique we’ve always wanted to try. With this exhibit, we’re encouraging play, risk and reward. The format is meant to be unintimidating and approachable — both for artists to create and viewers to appreciate. At heart, art is meant to be fun!
With special thanks to Sven Bonnichsen for making the display panel, Susan Cole for coordinating the previous exhibit, and everyone who makes AOCC happen!
i don't know if anyone read it, but i was glad to have it there. :)
besides creating this elegant place for art, sven also came w/ me to aocc to help set it up. we were up so early, we saw venus blaze in in the heart of leo. i was heartbroken to discover this fabulous display doesn't fit in trixie, so we had tro use the svan instead (thank god it fit in there!). sven's help turned out to be not just a kindness, but a huge blessing: we had 33 small pieces, many of which i got the day of the exhibit. which was a shame in part because the exhibit seemed to be a pretty popular destination, & i needed to keep popping in to add another piece of art or rearrange the art in front of them. depending on the configuration, this exhibit could have held over 100 pieces.

[look at all the pretty pieces]
the shelves came in extremely handy for items too thick to use photocorners, but someone brought in a framed piece and it fit perfectly when we removed a shelf. it's lovely to have that flexibility. it might make sense to make another row of shelves, but it was immensely gratifying for them to work out so well.
one of my favorite pieces from the exhibit wasn't on the display, but lying in front of it: this "gravel alphabet" by marilyn new has gorgeous letters sandblasted onto tiny pieces of gravel she gathered at the beach.

[ittybittyalphabeta]
the whole alphabet would fit in half the size of your palm, but she has an even tinier set which was also on display. amazing craftsmanship and a very unique piece. so imagine my dismay when i came back to the exhibit after the afternoon classes to find the gravel alphabet missing! when marilyn came to pick up her other pieces, i apologized profusely -- and fortunately, it turned out she had sold them. what a huge relief! everyone wins! well, except for me: i really wanted those stones for myself! :D
so overall, i was quite pleased with this year's exhibit; it met the major goals i wanted to accomplish this year. too bad aocc will travel to salem next year! sven built the exhibit with love and it belongs to us, not The Society. (but having said that, if you need to borrow/rent a portable art gallery, the terms are very reasonable. ;)
posted by gl. | permalink | categories: calligraphy
November 9, 2007
artist's way guided intent (november)
by gl. at 10:29 pm
on wednesday night we gathered four strands of possibility in our fingers and wove them together to create poetry. using divination tricks like coins, cards, cookies and cups of darjeeling tea, we poured our hopes and hearts onto the page. this month charles won a new journal to continue writing (and everyone went home with an exotic coin or fortune in their pocket!).
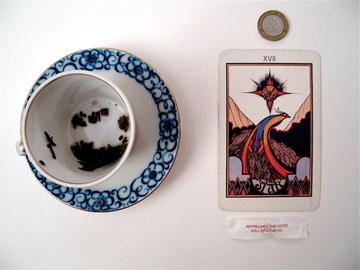
["appreciate the good will of others;" click to see the other prompts]
essentially, we spent the evening writing based on these tangible prompts. at the end, we wrote a poem based on one of the writings we did. we only shared the final poem, not any of the writings.
the first type of possibility is binary: yes or no, heads or tails. so i passed around a little bowl of various foreign coins and we asked a question with a yes or no answer. mine was "will i live to be 100?" and the answer was tails: no. so i wrote about asking the wrong question, because maybe i'll live to be 101, or 1001. 100 is like 2 more lifetimes from now for me, and it's hard to imagine even 10 years in the future. i should have asked "will i have a long, happy life?" -- but what if the answer to -that- was no?
then we picked a tarot card, and i was amazed that i picked "the star," the card i coveted so dearly when sven picked it last time. i love the star! unexpectedly, i started writing about harvesting stars like a fisherman, casting my net into the roaring dark. (i had a physics professor tell me once that if space wasn't a vaccum, we'd hear the roar of the sun all day and the chatter of stars at night). the sound of atoms in the dark, chattering waves of ions & photons riding gravity through space, creating tides & eddies. galaxies like mammoth whales slowly floating across the universe, eating starlight & breathing stardust. i hit a little bump when i wrote: "but where do the stars go after that? we harvest to eat, we harvest to consume, we harvest them for dresses that sparkle, coats so soft and flowing they make people cry as you walk by." the vision of a stardust coat was appealing, but harvesting & killing stars to do it makes me shudder. i don't know if star farms would be a very valid option, either, though stars glowing in barns would be sort of sweet.
this year i actually bought fortune cookies to use instead of using the little bag of fortunes i'm saving for an undetermined art project. cracking open a fortune cookie in an irreplacable kinesthetic experience. my fortune read "appreciate the good will of others." and i do! while writing, as i so often do, i compared it to a scientific principle, in this case e=mc2: an equal exchange of matter & energy. the more goodwill i have for others, the more i will receive in return.
finally, everyone picked a tea cup from the center of the table and i passed around a bowl of loose darjeeling tea. we poured ourselves just enough tea to dip the fortune cookie into and slowly sipped until the pattern was revealed. mine looked like land & sky, with stars or birds hovering in the air. i couldn't decide which they were, which lent itself well to the final part of the night, picking one of the writings to use as the basis of a poem:
the quantum mechanic takes tea
wet and moist with possibility
the tea leaves swell & swarm
leaving land on one side
sky on the other.
there is no tempest in this teapot
only monet or van gogh
each leaf a dab of paint
from an impressionist's paintbrush.up close, the story is unclear:
swifts chasing a hawk
or stars gently glowing
above a fragrant field?
like a double exposure
each is true but when i choose one
the other will cease to exist.
stars
or
birds?
--*--
the next event is collage night, which is already full, but the next guided intent is one of my favorites: blind painting! and then i'll team up with bridget to teach a wordwear workshop: the strong silent type. whee!
posted by gl. | permalink | categories: artist's way, writing
November 7, 2007
artist's way: session 7
by gl. at 2:46 pm
yesterday was a very emotional creative cluster, as members created day of the dead altars for people they had lost. i asked each participant to bring in a photo or object of someone they had lost, which they could interpret as broadly as they felt comfortable with: the person could be lost through death, distance, misunderstanding, or time.
using anything they could find in the studio, they each built small altars who or what they had lost. these weren't shrines: there was no gluing and nobody took anything home, though i did take pictures i'll develop for them. there's an element of discovery and play to this activity, since they can wander around the studio looking in places they don't usually get a chance to see and using our huge range of materials and objects. (one woman got a bottle of lotion from the bathroom!). after they were ready, i turned down the lights while they wrote a prayer for the person and shared it with the rest of the group. many of them chose their grandmothers & mothers, but one person chose "san francisco" as something she'd lost.
this cluster is really doing well: i found out at checkin that the group had a whole conversation w/o me over email this week! this pleases me in part because the after-artist's-way transition will be smoother for them since they're already in contact with each other. one of the participants was on her way to stay in a fire lookout station, but instead of skipping today entirely she came long enough for the checkin process: "no, i have to hear everyone's checkin!," she said. we all stood on the porch and waved goodbye to her as she left at the break.
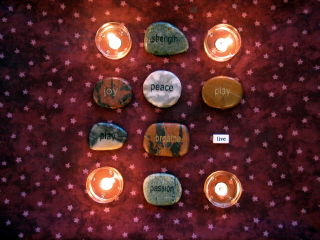
center (connection & strength): i believe words have power: each of these stones is etched with a strong word: strength, joy, peace, play, breathe, passion. one small poetry bead, chosen for this activity, simply says "live."
music: cowboy junkies' the trinity session because boy, is it sad.
posted by gl. | permalink | categories: artist's way
November 5, 2007
artist's way: session 6
by gl. at 11:59 pm
"abundance" is one of my favorite chapters in the artist's way, and i always enjoy it when it coincides with halloween so that we can make masks. it makes the studio into a glorious chaos! after several weeks of tidy & contained activities i get to drag out the bins of 3d objects and everyone gets to find ways to use old umbrellas and discarded light bulbs and even prozac pills i got from who-knows-where! now at the halfway point, participants are moving towards activities that require more involvement, stimulus and an awareness of space.
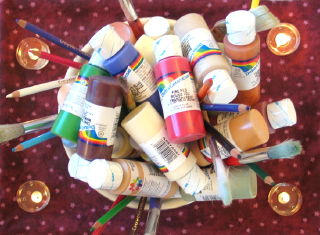
center (abundance): this chapter is usually one of my favorite centerpieces: a large bowl overflowing with apples, which the participants get to take home with them at the end of the evening. i even insert candles into some of the apples. but this year i didn't manage to get apples in time for the session, so i scrambled madly in the morning to find something we had an abundance of and finally remember all our huge stash of acrylics, many of which sven was using for monster month. so they formed the base of the center this week, which then was filled out with a bristling array of brushes, pens & pencils.
music: delerium's karma and poem.
posted by gl. | permalink | categories: artist's way
November 4, 2007
pressing business
by gl. at 11:59 pm
october was a month o' letterpress! i got the chance to attend three letterpress classes in one week at the iprc:
how type is made
sven and i have had a crazy fantasy that between my love for letters and his developing metalworking skills, we might make our own type someday. after going to this workshop, i think we were cured of that notion. i was hoping for more explanation about what's involved in each of the steps of typemaking, but i now know difference between monotype & linotype, categories which were previously blurred for me. fascinating fact: the development of linotype apparently was what prompted the printer's union to accept women, who were frequently linotype operators.
introduction to letterpress
this is the class i've been trying to get into for months! i took this class a few years ago, before chas gave me his press, but i wanted a refresher because i knew there were things i was unclear on, notably in the lockup process.this class was very helpful in allowing me to solidify some of those concepts. i thought the point of lockup was to pack as much furniture into the chase as possible, so it became tedious and rather tetris-like. but the rule is furniture doesn't touch! you're looking for a pyramid effect, with the largest pieces out on the edges and the smallest pieces against the form. that will immensely simplify my lockup process (and hopefully give me better prints!).

["a sample of a most perfect lockup": click to see it larger]i am totally envious of this furniture storage case, as my furniture & reglets are in a giant jumbled shoebox:

[everything in its place]also, my little 3x5 kelsey doesn't use quoins, it uses metal plates (otherwise known as lockup slugs/lead). i had been using the long one, but not the short one! i hope that using both will immediately give me better prints, too. :)
i finally understood the difference between "packing" vs "make ready" in this class. i had entirely forgotten about the make ready process, in fact. print on a piece of tracing paper: this is your make ready. then puncture three dots through the make ready and the tympan to register it. put a tiny piece of tissue paper over the letters that aren't printing on the make ready, then realign it behind the tympan and print again. the tiny pieces of tissue should provide a tiny bit more pressure on those spots; it doesn't take much. check the results. if letters are still dropping, repeat the process.
miscellaneous: in addition, i was excited to learn about beaver engraving, a portland business who's willing to make magnesium plates from illustrator files for what i consider to be a reasonable fee.
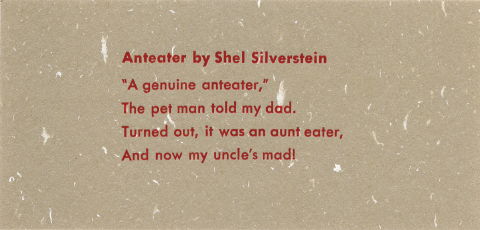
there aren't enough letterpresses for everyone, of course, so we ended up teaming up. because i've taken it before, i let my partner take the lead on most things. so this is her quote:
Anteater by Shel Silverstein
"A genuine anteater,"
The pet man told my dad.
Turned out, it was an aunt eater,
And now my uncle's mad!i "fixed" a grammatical issue (using "my" instead of the original "me") because i didn't know shel actually wrote it like that. oops. that extra comma after "turned out" drives me crazy, too, but that's original, as well.
i believe this is 10-point type but i have forgotten the face (darn!). 6 pt slugs on top & bottom, with at least an em quad on either side of the lines for stability and 4pt leading between lines (two 2pt leads). we used 5-to-the-em spacing because there was more of it in our point size than there were 4-to-the-em spaces.
care & maintenance of your tabletop press
this was a class i was very much looking forward to, and i was thrilled that they encouraged me to bring my own press in so i could work directly on it! i was determined to discover whether my press was defective in some way, so i'd finally know whether my unsuccessful printing attempts have been my fault or or the fault of the press. i don't mind if it's my fault, but i don't want to waste a lot of effort and frustration if it's something that could be easily fixed by noticing the press is missing a whoozits or by adjusting the whatzits.but it turns out my press is fine (yay!). all the pieces are there and are in good shape. i still need to clean it of the grime it accumulated after years of living through colorado seasons in a box under chas' porch. and i replaced the rollers before the workshop (from n.a. graphics in silverton!) just so that wouldn't be an issue. when i spoke with fritz, he said it was likely the pitting i had on the former composition rollers were actually little mice teethmarks! that's what hide glue gets you, i guess. i have rubber rollers now, thank you.
so because i brought my own tabletop press, it meant that everyone got their own press to examine, which i quite liked. i picked up some tips & vocabulary to help me talk about letterpress more clearly, like:
labeling & differentiating rollers, trucks & rails
locating the oil & oil holes in most presses (my tiny kelsey doesn't have any, though i'm welcome to oil the parts where metal meets metal. now i just have to find a tiny oilcan!)
labeling the platen/tympan bar (a "bale")
making sense of grippers (i had them on backwards and not tightened), though nobody has been able to tell me what the gripper bar spring does
discovering a whole pack of what i thought were dark postcards was in fact pressboard, meant to be used as packing
also: craftsman apparently makes good presses. kelseys are bottom of the barrel, but i don't care! also, i discovered that only 1/3 print area on any press is consistently usable, which on a 3x5 press is pretty substantial (gocco is like that, too: you get your clearest image transfer in the center).
finally, we adjusted the platen, a process i had done after consulting the manual, but that never seemed to have any effect. i found that it's probably because it's so sensitive: a quarter-turn of the screw can make a big difference.
i found this to be a fairly time-consuming & tedious process, in part because we had to set up a form to test it, and this made the class run about 1/2 hour longer than expected. but the process make a lot of sense:
set up four corners of a form with the letter "O," preferably in a larger type size. check to make sure all the type you're using isn't worn and is exactly type-high by using a type-high gauge (also handy for checking the depth of wood/linocuts). set the form something like this:
then you print (in this case, a dry print so we didn't have cleanup), see which Os are not printing, and then adjust the screw nearest the O a little bit at a time to see the effects. only adjust one screw at a time. repeat until all four Os are printing clearly. when you adjust the platen pressure, the standard is to set it for heavy stock, which is why you add packing for lighter stock. i wasn't having much luck with this part, and though we were running so far behind, the instructor still spared some time after everyone had left to make sure the platen screws on my press were properly adjusted. good thing you don't have to do that very often (once a year or less).
so i feel much more confident in my letterpress skills now. i really hope it makes a difference when i get a chance to print again!
posted by gl. | permalink | categories: classes & workshops, printing
November 2, 2007
handmade holidays
by gl. at 11:42 am
update nov03: i've added the dinnergrrls holiday sale to this list.
'tis the season of holiday sales! this year i've decided not to participate in any (unlike last year, when i successfully launched wordwear), but i have definite plans to support at least three that i am emotionally invested in:
the trillium holiday sale & membership drive supports microenterprising low-income artisans who use upcycled materials. it will be saturday, november 10, from 1 - 6 pm at trillium artisans. as an extra bonus, all items will be 10% off! i'm on the board of trillium because i strongly believe in the educational component of their program: they have a product review board, offer business counseling, and teach artisans to price their work at a livable wage (which in turn educates us to pay a livable wage for artisan goods).
last year, the first dinnergrrls holiday bazaar was my first introduction to tabling at a craft fair and was primarily responsible for the success of wordwear, which i made for this event almost on a lark. i got a lot of support from friends & patrons (and it helped to be set up next to the chocolate fountain, i think ;). i've chosen not to be a vendor at any craft fairs this season, but i'm definitely going to support the other grrls this year! this time it will be at cubespace from noon-4 p.m. on december 2.
the rebel rabbit is back! the rebel rabbit holiday sale has been extended to two dates this time: december 9 and 16 from noon-5 p.m. at hipbone studio. one of my former artist's way clients, anna, created this juried craft fair earlier this year and it was so successful she did it again! check out what i brought back last time! i'm a little excited that the person who makes jewelry from typewriter keys will be there again, though the thought of all those old typewriters being "disassembled" gives me hives.
i really enjoy buying things from local artists, knowing the money i give them goes to support a real person. of course, if your time & money are unlimited, there are plenty of other holiday sales to discover (check out diyalert to stay on top of them!). may this be a profitable and enjoyable sales season for everyone!
posted by gl. | permalink | categories: exhibits & events
November 1, 2007
Ichbonnsen Reborn!
by sven at 2:00 pm

Wow! The good Professor has pulled a Mark Twain! ...As in: "The rumors of my death have been greatly exaggerated."
Go check it out: there's one last post on the Monster Month blog.
I am so relieved. Ichbonnsen and Scarlet have really grown on me. Maybe next year they'll even see fit to share some more stories. Whether or not I'm up to doing paintings for them... Well, we'll see.
I'm just glad that people like this still exist in the world. ;-)
posted by sven | permalink | categories: bestiary
month of 1000 monsters!
by sven at 8:00 am
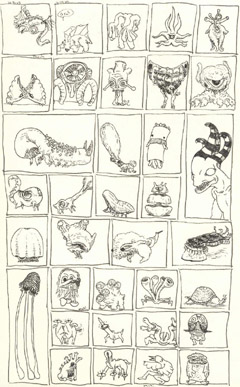
From my bro's art blog:
Monster month has ENDED! Unlike my brother who posted an illustration every day with description (and a plot!), I decided to post a page of monsters each day so the month total would be 1000. MISSION ACHIEVED!!! Enjoy!
I've been aching to post about this all month! (Boy has time been in short supply, though.) Shield really took the Monster Month concept to a new extreme...
Blows. My. Mind.
Be forewarned, Shield does his html coding by hand -- so I don't know how long the links to his monster pages will stay sitting at the top of his blog. If you want to see them all at once, he's put together a free-standing page that gathers them all together, which ought to be a bit more permanent.
He called yesterday and we congratulated each other on meeting our respective goals. Even so, I think this definitely bears repeating:
posted by sven | permalink | categories: bestiary, links
portland open studios tour: westside
by gl. at 2:55 am
this year the portland open studios tour eastside conflicted with a letterpress class and the opening of the portland society for calligraphy show opening, so we made up for lost time on the westside the next weekend. i'm getting better at poking around those areas, which can be pretty confusing and lost-inducing.
we bought the calendar at linda's pre-party for the eastside open studios. i picked potentials from it and plotted their locations on a google map the night before. still, with just one day, we got to relatively few artists:
shu-ju wang: first stop! shu-ju promised me a copy of the print she made for trixie as part of her "portland suite." we even got to see the eponymous "the last bedroom," where shuju has created drying racks out of track shelving: when not in use, the track stay on the walls, but the brackets & foam core "boards" get put away. clever! i also met jeremy from rake gallery, who was a total sweetheart and grand assistant. he & shu-ju play well together.
if you want to buy your own portland suite print, this is what the copy will say: "Ever notice the little toy horses hitched up to the metal rings embedded in the sidewalks? Or Trixie the Poetry Car, a light blue car covered in poetry magnets, zooming around town? These are the things that make Portland wonderful and make me happy to live here. There is at least one more print coming, inspired by the world's smallest public park here in Portland."theresa andreas o'leary: theresa was immedately warm & welcoming to all who walked in the door, and wanted to show everyone what she did in each painting to communicate what she sees in the world around her.
one of the other things i find inspiring on the tour is seeing what artists surround themselves with to inspire and motivate them. in theresa's studio we found large, striking landscapes with striated color, as well as this artist checklist posted to a magnetic board:
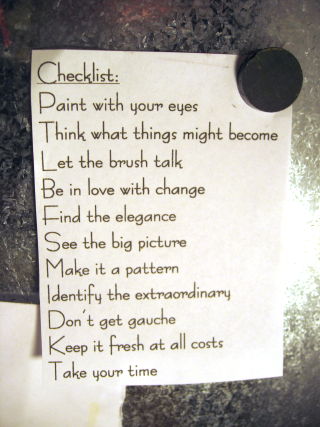
- paint with your eyes
- think what things might become
- let the brush talk
- be in love with change
- find the elegance
- see the big picture
- make it a pattern
- identify the extraordinary
- don't get gauche
- keep it fresh at all costs
- take your time
blake van roekel: i saw the website for magma and was entranced. i had no idea what the studio space was like and i was really looking forward to seeing a demonstration. it's in a tiny activspace storefront (i love activespace!), but the woman at the counter was busy with another couple and so we didn't get to see a demo.
nicky falkenhayn: several metal sculpures on display in an intriguing half-finished house addition. but again, not very interactive. where does it all happen? what goes into making a large tangled metal sculpture? she was busy talking to friends, so we never found out.
jane levy campbell: jane extended us an invitation to come visit this year, after discovering our last review of her studio in 2005: "last stop! a watercolorist with a simply phenomenal house who did a hoyt arboredum series i found quite pleasing." this is all still true -- and this time her husband printed maps of their space so you knew where you were and what series of pictures you were looking at. in addition, they've since acquired a sweet blue heeler (?) puppy, who would repeatedly run around in a loop through the back yard stalking & herding you. alas, we didn't get to talk to jane nearly as long as we would have liked, which was a shame because she has such a vibrant personality and though she is blessed with plenty of it, she believes that talent isn't the most important thing in art.
posted by gl. | permalink | categories: exhibits & events